User Guide
for Macintosh
®and
Trademarks
Program copyright 1991-99 Ghost Effects, Inc. All rights reserved. Interface copyright 1994-99 MetaCreations Corporation. All rights reserved. MetaCreations Poser is a trademark of
MetaCreations Corporation. All other trademarks or registered trademarks are the property of their respective owners.
“Macintosh” is a registered trademark of Apple Computer, Incorporated. “Windows” is a registered trademark of Microsoft Corporation. “Pentium” is a registered trademark and “i486” is a trademark of Intel Corporation.
ImageStream is a trademark and ImageStream Graphics Filters is a registered trademark of INSO Corporation. All other product names mentioned in the manual and other documentation are used for identification purposes only and may be trademarks or registered trademarks of their respective companies. Registered and unregistered trademarks used herein are the exclusive property of their respective owners. MetaCreations Corp. makes no claim to any such marks, nor willingly or knowingly misused or misapplied such marks.
Copyright
This manual, as well as the software described in it is furnished under license and may only be used or copied in accordance with the terms of such license. Program ©1999 MetaCreations Corporation, including the look and feel of the product. MetaCreations Poser User Guide ©1999 MetaCreations Corporation. No part of this guide may be reproduced in any form or by any means without the prior written permission of MetaCreations Corporation.
Notice
Before using this software or reading this user guide, make sure you have read, understood and agreed to the license contained in the back of the Poser User Guide.
Credits
Poser was originally created by Larry Weinberg. MetaCreations Poser was created by
Larry Weinberg, Seath Ahrens, Jianhua Shen, Sree Kotay.
Original interface design by Phil Clevenger. New interface design by Kyle Maxwell. Quality Assurance testing by Dan Huver, Lorna Brown, Brian Romero, Steve Yatson, and Jim Brown. Quality Assurance Management by Michael Cinque
Thanks to Technical Support lead Todd Burlingame.
Product management by Steve Cooper. The User Guide was written by Carol Franger and Linda Stevens; Tutorial by Ian Grey and Erick Vera; edited by Laura Turnidge and Valarie Sanford; managed by Erick Vera; production by Landis Gwynn. Art direction by Brian Moose; cover illustration by
Heather Dunnigan; manual and comic book illustrated by Nathan Harris; illustration assistance by Melinda Kniffen; layout design by Tish Loosley.
Collateral materials designed by Tish Loosley and Heather Dunnigan; production
management by Rich O’Rielly.
Poser models by Zygote Media Group Inc. and Keith Hunter, Hunyes Publishing. Poser walk animations and gestures by Chris Derochie. Special thanks to the Poser Web Community and the Poser Forum members for their
Contents
CH0 Welcome to Poser 4
What’s New in Poser 4? 12
Conforming Figures and Clothing 12
Bendable Props 12
New Lighting Features 12 Deformers 12
Morph Targets 12
Hierarchy Editor 12
Sketch Designer 13
Grouping Tool 13
Copying and Pasting 13 New Document Display Styles 13 When You Have Questions 13
About Your User Guide 14
Technical Support 14
Web Support 14
Phone Support 14
Installing Poser 15
System Requirements (Macintosh) 15 System Requirements (Windows) 15 Macintosh Installation 15 Windows Installation 16
CH1 Poser 4 Overview
How Poser Works 19
The Poser Workspace 20
The Document Window 20
Camera Controls 21
Light Controls 22
Document Display Style Controls 22
Editing Tools 23
The Libraries Palette 23 Animation Controls 24
The Menu Bar 24
CH2 Poser 4 Basics
Setting Up Poser 25
Macintosh Setup 25
Setting Application Preferences 26 Setting Up Your Workspace 27
UI Memory Dots 28
Workspace Backgrounds 28 Setting Up the Document
Window 28 Placing Figures and
Elements in the Studio 32
Using the Libraries Palette 32 Deleting Objects from a Scene 35 Working in the
Document Window 36
[image:3.612.80.443.89.584.2]Viewing Your Figure 36 Previewing Your Figure 37 Figure Properties 41 Element Properties 42 Using the Editing Tools 42 Selecting Body Parts 43 Pasting Figures onto
the Background 43
C o n t e n t s
Displaying Guides 44 Undoing Operations 46 Restoring Default Settings 46 Changing Defaults 46 Printing 47
Importing and Exporting 47
Saving and Closing 48
CH3 Tutorial
Welcome 51
The Basics 52
Lesson 1: Setting Up a
Default Workspace 52 Lesson 2: Working with Cameras 55 Lesson 3: Tracking Modes 60 Lesson 4: Document Display Styles 60 Working with Lights 64
Lesson 1: Using the Light Control 64 Using Poser’s Tools 67
Lesson 1: The Parameter Dials 67 Lesson 2: The Rotate Tool 68 Lesson 3: The Twist Tool 70 Lesson 4: The Translate and Chain Break Tools 72 Posing 76
Lesson 1: Creating Poses 76 Lesson 2: Adding Poses to the
Pose Library 81
Lesson 3: Posing Faces 82 Rendering 84
Advanced Tutorials 87
Character Creation
and Animation 87
Lesson 1: Creating a Clown
from Scratch 87
Lesson 2: Making the
Clown Walk 91
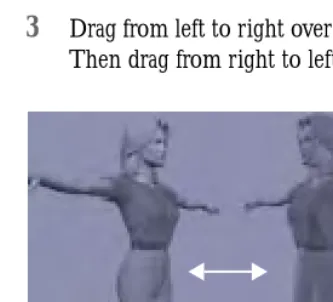
Lesson 3: The Walk Designer 96 Lesson 4: Keyframe Editing 100 Lesson 5: Adding the Final Touch 105 Lesson 6: Setting Animated
Cameras and Test Rendering 106 Lesson 7: Final Render 108
CH4 Posing
How Posing Works 109
Posing and Camera Views 110 Posing and the Library 110 Translation 110
Inverse Kinematics 111
Understanding IK 111
Turning IK On or Off 112
Limiting Motion 113
Posing Body Parts 113
Selecting Parts 113
Posing a Figure 113
Using the Editing Tools 114
Rotate Tool 115
Twist Tool 118
Translate/Pull Tool 119 Translate In/Out Tool 120
Chain Break Tool 120
Using the Parameter Dials 121
P o s e r 4
Symmetry 124
Drop to Floor 125
Copying and Pasting 125 Element Properties 126
Posing Hands 127
Using the Hand Model 128 Using Preset Hands 129
Posing Faces 129
Using the Parameter Dials 130
Posing Eyes 131
Faces and Phonemes 132 Using Preset Faces 133 Posing Animals 133
Posing Animal Heads 133 Pointing Body Parts 134
Locking Objects 134
Auto Balance and Posing 134
Saving Poses 135
Saving Poses in the
Libraries Palette 135 Using the Pose Memory Dots 136 Using Poses from the Libraries Palette 136
CH5 Body Shaping
General Characteristics 138
Selecting Figures from the Library 138
Figure Height 139
Using the Color Tool 139 Shaping Individual
Body Parts 140
Using the Shaping Tools 140 Using the Parameter Dials 141
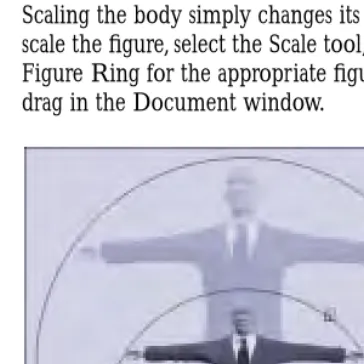
Symmetry 141 Scaling the Body as a Whole 142
Using Parameter Dials 142 Copying and Pasting 143
Using the Deformer Tools 143
The Magnet Deformer 144 The Wave Deformer 149 Using Morph Targets 152
Using Morph Targets to
Add Ethnicity 153
Using the Superhero
Morph Target 154
Creating Custom Morph Targets 154 Using the Grouping Tool 157
Using the Group Edit Palette 158 Locking Figures and
Body Parts 159
Saving Figures to the
Libraries Palette 160
CH6 Props
How Props Work 161
Using Hair 163
Working with Clothing 164
Using Clothing without a Figure 166 Adding and Importing Props 166
Using Props from the Library 166
Importing Props 166
Deleting Props 168
Working with Props 168
Deforming Props 168
Creating Props 168
C o n t e n t s
The Prop Origin 169
Prop Properties 170
Setting Prop Parents 171 Replacing a Body Part with a Prop 173 Adding Props to the Library 175
CH7 Cameras
How Cameras Work 177
The Main and Posing Cameras 179 The Auxiliary Camera 179 The Hand and Face Cameras 179
The Dolly Camera 179
The Orthogonal Cameras 179
Flyaround View 180
Selecting a Camera 180
The Camera Selection Control 180 Changing the Studio View 181
Positioning Cameras 181 Using Camera
Parameter Dials 183
Focal Length 183
xOrbit 184 yOrbit 184 zOrbit 184 Yaw 184 Pitch 184 Roll 184 Scale 184 xScale 184 yScale 185 zScale 185 DollyX 185 DollyY 185 DollyZ 185 Camera Options 185
Pointing Cameras 186
Locking Camera Positions 186
Saving Camera Positions 186
Saving Camera Sets to the Library 186 Using the Camera Memory Dots 187
CH8 Lights
How Lights Work 189
Infinite Lights 190
Spotlights 191 Light Properties 191
Adding Lights 193
Aiming Lights 193
Using the Light Control 194 Using Light Indicators 195 Aiming with Parameter Dials 197 Pointing a Light at an Object 199 Lighting Color 199
Setting a Light’s Color 199 Setting Light Intensity 200
Setting Spotlight
Characteristics 200
Using Shadows 201
Shadow Parameter Dials 202 Setting a Parent 202
P o s e r 4
CH9 Animating Figures
How Animation Works 206
Animation Tools 206
What You Can Animate 206
Animating Figures 206
Animating Hands 207
Animating Faces 207
Animating Props 208
Animating Deformers 208 Creating Animations 209
Setting Up Your Animation 210 Working with the Timeline 211 Recording Keyframes 212 Adding and Deleting Keyframes 213 Editing Animations 213
Editing Animation Setup 214 Viewing the Elements List 215 Editing Keyframes on the
Timeline 217
Retime Keyframes 223
Advanced Editing 224
Keyframe Interpolation 224 Editing Keyframe Interpolation 225 Previewing Animations 228
Setting the Play Range 229 Using the Libraries
Palette for Animations 229
Adding an Animation to
the Library 230
Using a Multi-Frame Animation
from the Library 230
CH10 Animation Techniques
Setting Keyframes 231
Creating Realistic Motion 232
Making Your Figure Walk 233
Creating a Walk Path 233 Designing a Walk 234
Editing a Walk 235
Saving a Walk 235
Loading a Walk 236
Applying a Walk 236
Animating Cameras 237
Turning Camera Animation
On or Off 239
Animating Lights 239
Adding Sound 240
Editing Sound 240
Syncing Sound and Motion 240 Using Poser with Other
Motion Graphics Programs 241
Motion Capture and Animations 241
CH11 Surface Materials
How Surface Materials Work 243
Applying Surface Materials 244
Applying Materials to Body Parts 245 Applying Bump Maps 247
Creating a Custom Bump Map 247 Applying Texture Maps 249
Creating a Custom Texture Map 250 Applying Transparency Maps 252
Creating a Custom
C o n t e n t s
Applying Reflection Maps 253
Reflective Color 254
Creating a Custom
Reflection Map 254
Setting Colors 255
Object Color 255
Highlight Color 256
Ambient Color 257
CH12 Rendering
How Rendering Works 259
Setting Up a Render 260
Setting Render Destination 261 Setting Image Size 261 Choosing a Rendering
Background 262 Setting Surface Detail 262 Rendering an Image 263 Using the Render Command 263 Antialias Rendering 263 Rendering an Animation 264
Using the Make Movie Dialog 264 Using the Sketch Designer 265
The Sketch Designer Window 266 Rendering a Sketch 269
CH13 Advanced Body Shaping
Creating Custom
Morph Targets 272
Setting up Morph Targets 272 Morph Target Tutorial 273
Lesson 1: Setting Up 273 Lesson 2: Creating the
Morph Target 275
Lesson 3: Using the Target
[image:8.612.66.430.56.581.2]in Poser 277
Figure Joints and
Blend Zones 278
Editing Joint Parameters 279 Using the Joint
Parameters Palette 280 Interactively Editing
Joint Parameters 280
Joint Attributes 282
Spherical Falloff Zones 287
CH14 Hierarchies
How Hierarchies Work 289
Using the Hierarchy Editor 290
Controlling what is Displayed 291 Collapsing the Hierarchy Editor 291 Selecting Objects 292
Deleting Objects 292
Renaming Objects 293
Reordering Objects 293 Displaying Object Properties 294
Changing Object Visibility 294
Establishing Hierarchical
Relationships 295
Creating Multi-Figure
Hierarchies 298
Applying the Standard
Hierarchy 299
Applying Standard
Rotation Order 299
P o s e r 4
CH15 Creating Custom Figures
Modifying Existing Figures 302
Combining Multiple Figures 303
Combining Props 303
Creating Figures using
other Software 304
Deciding how to Start 304 Understanding the Process 305 Determining Model Format 305 Grouping Body Parts 305
Naming Groups 306
Arranging Groups on a Model 307 Looking inside the Poser
Hierarchy File 308
Converting Hierarchy Files 312 Verifying Hierarchy Files 312 Adjusting Joint Parameters 312
Setting Limits 313
Setting Favored IK Angles 313 Memorizing Default Positions 314 Setting Surface Materials 314
Adding Morph Targets 314 Naming Body Parts 314 Tutorial: Creating a Figure
in Ray Dream Studio 315
CH16 Using Poser 4 with Other Applications
Using Poser with
Ray Dream Studio 5 323
Using Poser with Painter 3D 326
Using Poser with Bryce 3D 328
Using Poser on the
World Wide Web 331
Internet Connection 331
Using a Browser 331
Accessing the Web 332 Using Poser with MetaStream 333
Using Poser with Canoma 333
AppA Troubleshooting
C o n t e n t s
Welcome to
Poser 4
Poser is an easy-to-use figure design and
animation tool. With Poser you’ll produce lifelike 3D illustrations and animations of human and animal figures in action—dancing, scaling a cliff, meditating, even walking.
We l c o m e t o P o s e r 4
What’s New in
Poser 4?
If you’re a Poser 3 user, the following information will bring you up to date with the new features in Poser 4.
Conforming Figures and
Clothing
One of the most requested features for Poser is the ability to change clothes on the Poser figures. Poser now includes wardrobes of custom clothing in the Libraries palette. Custom clothing behaves the same as Poser figures; each article includes parameters for the corresponding body parts. You can conform clothing to a figure so that it moves as the figure moves. Refer to “Working with Clothing” on page 164 for complete information on clothing.
Bendable Props
When you attach a prop to a body part, you can configure it to bend as the body part bends. This feature is helpful for naturally bendable objects, such as a rollerblader’s elbow pads. For details, refer to “Setting Prop Parents” on page 171.
New Lighting Features
Poser’s lighting controls are completely redesigned. Now you have the choice of using traditional infinite lighting or spotlights that you can move around the studio. You can add an unlimited number of lights, as well as
delete them, to fit your needs. The new light control also includes an intensity control. All the new lighting features are discussed in
“Lights” on page 189.
Poser now supports spherical reflection maps and transparency maps. For details, refer to
“Surface Materials” on page 243.
Deformers
Poser now includes two deforming tools. The Magnet deformer allows you to stretch and pull body parts and props. The Wave deformer lets you add ripples to objects such as clothing, ground planes, and props. Deformers can be animated and used to create morph targets. These tools are discussed in detail in “Using the Deformer Tools” on page 143.
Morph Targets
You can now access a library of figures and props with built-in morph targets. Poser includes targets for single body parts as well as a full figure morph. You can also use the deformers and Parameter Dials to create your own morph targets. The possible applications for morph targets are infinite. Learn all about morph targets in “Using Morph Targets” on page 152.
Hierarchy Editor
P o s e r 4
Hierarchy Editor, you can adjust parent-child relationships and create IK chains. For the truly ambitious, the Hierarchy Editor is an exciting route to creating brand new Poser figures. Refer to “Hierarchies” on page 289
for complete information.
Sketch Designer
Rendering possibilities are greatly expanded with the new Sketch Designer, which lets you create and refine hand-drawn quality portraits of your scenes. Drawings are rendered with a series of brush strokes that define the background, edges, and actual elements. Many drawing options are available, so you can tailor the strokes to your liking. For details, refer to “Using the Sketch Designer” on page 265.
Grouping Tool
The new grouping tool is a powerful feature for assigning materials and generating new props and objects. It also complements the deformer tools and morph targets: you can specify sections of a body part or prop for deforming and morphing. Refer to “Using the Grouping Tool” on page 157 for complete information.
Copying and Pasting
Cut, Copy, and Paste commands are now included in the Edit menu, so you can easily copy poses, body shaping, and animations to other figures, body parts, and props. This new functionality is explained in detail in
“Copying and Pasting” on page 143.
New Document Display
Styles
You can choose from 12 interactive display styles in the Document Display Style palette. New styles include flat shaded with mesh, smooth shaded with mesh, and cartoon style without lines. Refer to “Previewing Your Figure” on page 37 for explanations of all 12 display styles.
When You Have
Questions
You can find answers to most of your questions in the following sources:
• Status line tips - As you move the cursor over most UI elements, descriptions appear at the top of their palette or window.
• Poser 4 User Guide - Provides all the information you need to get the most out of Poser. The Poser CD includes a PDF version of the User Guide. Adobe Acrobat Reader is required to read the PDF file format. Adobe Acrobat Reader software is available on the Poser CD or downloadable for free from
www.adobe.com.
• Web links - You can launch your web browser and access MetaCreations and Poser-related web sites directly from Poser. To do this, choose Help menu>
We l c o m e t o P o s e r 4
About Your User
Guide
The Poser 4 User Guide is for both Macintosh and Windows. By convention, Macintosh commands precede Windows commands in the text. For example, Command/Ctrl+I, is equivalent to the Macintosh Command-I and the Windows Ctrl+I. For simplicity, the term “folder” refers to directories as well as folders. The Poser interface for Macintosh and Windows platforms is identical, unless otherwise specified.
When a modifier key differs between the Macintosh and Windows platform, the Macintosh modifier is listed first followed by a slash and the Windows modifier key. Option/ Alt means Macintosh users press the Option key and Windows users press Alt.
There are several conventions used to identify paths to certain tools and controls. The convention to a menu follows the rule of the
menu name> menu item. The convention to a palette follows the rule of the palette
name: subpalette name. The convention to a palette menu follows the rule of palette
name: palette menu> menu item.
Technical Support
Online technical support is free to registered users of Poser. There are two easy ways to contact technical support for questions about installation, configuration, or functionality. These options are: Web support and phone support.You’ll find the answers to most of your questions in this User Guide. If you need further assistance, you can contact MetaCreations’ Technical Support in the following ways:
Web Support
Many of the answers to your questions are available 24 hours a day on our Web site:
http://www.metacreations.com/support
In addition to frequently asked questions (FAQs), the Web site provides troubleshooting techniques, late breaking product news, and other resources to help you get the most out of Poser.
Phone Support
Free phone support is available for a limited duration after your first call. The length of time varies based on the product and whether it is an upgrade or a first-time purchase. MetaCreations also provides additional paid support options. Details about phone support can be found in the Technical Support insert included with your product.
Phone support hours are Monday–Friday, 8:00 AM–5:00 PM Pacific Standard Time, excluding holidays.
For Standard Support, call (831) 430-4000. Please have your serial number handy and be at the computer where you need assistance.
For international support, please contact your local distributor. To locate the distributor nearest to you, check the Web site at:
P o s e r 4
Installing Poser
This section provides installation instructions for both Macintosh and Windows. Follow the instructions appropriate to your system.
System Requirements
(Macintosh)
• Power PC and compatible models
• System 8.0 or higher
• 32 MB application RAM (64+ MB recommended)
• 240 MB available hard disk space
• 16-bit color (24-bit recommended)
• CD-ROM drive
System Requirements
(Windows)
• IBM® PC compatible
• Pentium processor
• Microsoft® Windows® 95, Windows 98, or Windows NT version 4.0 with Service Pack 3 or later
• 32 MB available system RAM (64+ MB recommended)
• 240 MB available hard disk space
• Color display (true color recommended)
• CD-ROM drive
Macintosh Installation
When you install Poser on a Macintosh, create a custom extension set for the installation. You can save your current extension set, so that you can go back to it after installation.
To create a custom extension set:
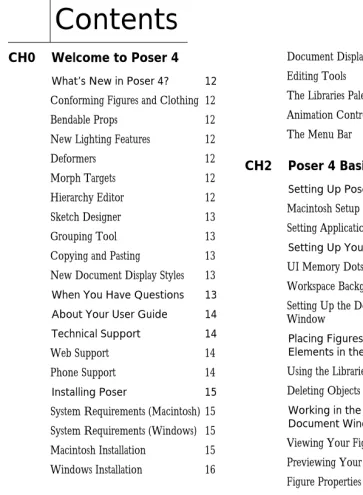
1
Select Apple menu> Control Panels.2
Double click the Extension manager.3
Save your current extension set by selecting duplicate set; give it a new name. After installation, you can go back to this set.4
Deselect everything.5
Expand the Extensions folder by clicking the arrow to the left of it.6
Check the Apple CD-ROM, Quicktime, and Quicktime Powerplug extensions.7
Restart.To enable extensions:
1
Double-click to open the hard drive.2
Double-click to open the System Folder.3
Open Control Panels.4
Double-click the Extension Manager.5
Check all to enable all extensions or choose your own custom set.To install Poser 4 on a Macintosh:
1
Choose Apple menu> ControlPanels> Extensions Manager.
We l c o m e t o P o s e r 4
2
To save your current extensions setting, click Duplicate Set, and enter a name in the dialog that appears. This will be the set of extensions you use for the installation.3
In the new set, expand the Extensions folders and deselect all extensions except those for:• CD-ROM or DVD-ROM
• Quicktime
• Quicktime Powerplug
4
Insert the Poser 4 CD-ROM into your computer’s CD-ROM drive. The Install Poser dialog appears.5
Double-click the Poser icon.6
Follow the instructions provided by the installer.The installation dialog displays an important ReadMe.
7
Click Accept after reading the complete ReadMe.Windows Installation
Before you install on Windows, you must end any background tasks except for Systray and Explorer.
To end background tasks in Windows:
1
Type Ctrl-Alt-Delete. The Close Program dialog appears.2
Click End Task for all items except Systray and Explorer.This must be done one item at a time; repeat these steps to end each task that is open.
To install Poser 4 on Windows:
1
Insert the Poser 4 CD-ROM into your computer’s CD-ROM drive. The Install Poser dialog appears.2
Double-click the Poser icon.3
Follow the instructions provided by the installer.The installation dialog displays an important ReadMe.
Note
If you are not using standard Apple drives, your drives may require additional extensions to run properly. If so, turn those extensions on.
P o s e r 4
4
Click Yes after reading the complete ReadMe.We l c o m e t o P o s e r 4
1
Poser 4 Overview
How Poser Works
Poser is the easiest and most effective tool you can use to pose and animate figures. It is the perfect complement to any 3D illustration or character animation tool.
With Poser you can:
• Choose a figure from a large number of pre-built models included in the Poser Libraries
• Pose the figure using the posing tools
• Add colors and textures to your figures to create realistic or fantastic looks
• Set up poses to use as keyframes for an animation
P o s e r 4 O v e r v i e w
The Poser Workspace
This section leads you through the Poser Workspace. Whether you are a previous Poser user or new to Poser, this section familiarizes you with the new Workspace.You’ll notice that Poser doesn’t use traditional floating palettes and toolbars. Most of Poser’s features are integrated into the Workspace, which fills your entire screen. This keeps the space uncluttered and makes tools easy to locate.
The new Workspace is incredibly flexible. Feature controls float over the top of the Workspace. You can move controls to any location and save their positions for later use. You can also change the color of the Workspace and add stylistic elements to its background. For more information on setting up the Workspace, refer to “Setting Up Poser” on page 25.
The Document Window
The Document window is where you view and pose your figure. It acts like a
photographer’s studio; you can move lights and shift between cameras to get a different perspective on your figure.
The view of your figure in the Document window is taken through a camera. Since you’re in a three dimensional space, you can use this camera to view your figure from any angle, including above and below.
You can resize the Document window to best suit your needs. In addition, several controls around the window let you change the appearance of elements within the window, such as the ground plane and the background.
The Poser Workspace fills the screen and provides access to all of Poser’s controls.
P o s e r 4
The Ground Plane
The Ground plane represents the floor of the posing studio. This plane helps you orient the figure in 3D space. It also helps you orient your view of the figure. As you move the camera, the ground plane tilts or rotates to indicate the new orientation.
Camera Controls
The Camera Controls set the view of your figure in the Document window. There are two types of Camera Controls: the View controls and the Positioning controls.
The View controls let you move between a number of preset views. By clicking or dragging this control, you can access all the available views in Poser.
The Positioning controls let you move the camera interactively. There are two sets of positioning controls: the Camera Plane controls and the Rotation Trackball. The
Use the Ground Plane to orient your figure in 3D space.
Use the Camera Controls to set the view of your scene.
P o s e r 4 O v e r v i e w
Camera Plane controls let you move the camera along specific planes. For example, you can move the camera in only a vertical or horizontal direction.
Tool titles indicate which two axes the camera is moving in.
The Rotation Trackball control lets you tilt and spin a camera around the studio. With this control you can move the camera to almost any position while still keeping the figure in the center of your field of view.
Light Controls
The Light Controls let you define preset positions for the lights in your virtual studio. With these controls you can change light color or illuminate your figure from various angles.
Document Display Style
Controls
The Document Display Style controls let you set the preview quality of the figure in the Document window.
There are several preview styles available. Different styles work best for different operations. For example, at times you may want to view the entire mesh of a figure (Wireframe), at other times you may prefer a realistic look (Smooth Shaded).
The Camera Plane controls let you move the camera along a plane in 3D space.
The Rotation Trackball lets you move a camera around the Document window.
Note
The Rotation trackball does not affect the orthogonal cameras.Use the Light Controls to set up the lighting for your figure.
P o s e r 4
Editing Tools
The Editing Tools let you adjust the position of the figure’s body parts to create specific poses. Each tool moves the figure in a different way. Using a combination of controls, you can create an infinite number of poses.
The Parameter Dials
The Parameter Dials let you pose figures more precisely than the Editing Tools by adjusting the values of specific parameters.
If all the Parameter Dials do not fit in the window, use the scroll bar to slide through the list.
The Libraries Palette
The Libraries palette contains all the figures and props available in Poser, as well as custom poses and light and camera settings. From this palette, you can access sub-categories and preview each figure or prop.
Use the Libraries palette to add or replace figures or props in the Document window.
The Editing Tools let you set the position of your figure’s body parts.
The Parameter Dials let you precisely pose your figure using numerical values.
P o s e r 4 O v e r v i e w
Animation Controls
The Animation controls let you quickly set up animation keyframes. You can set up a pose as a keyframe, change to a new keyframe, change the pose, then set another keyframe. When you play the animation, the figure appears to move from one pose to the other.
With the Animation controls, you can move quickly through keyframes, and add or delete them as needed.
Animation Palette
The Animation palette displays the animation timeline and lists all the keyframes that you have created for the figure. Use the palette to fine tune an animation.
The Menu Bar
Although the Poser Workspace fills the entire screen, you can still access several features through the Menu Bar. You can also switch between Poser and other applications. On the Macintosh, the Menu Bar appears when you move the cursor over the top of the
Workspace.
The Animation controls let you quickly set up keyframes for your animation.
2
Poser 4 Basics
This chapter describes how to set up Poser 4 and describes some basic techniques for posing figures.
Setting Up Poser
Poser is a color application. For the best preview display, set your display to the highest color depth possible. To do this, use the Macintosh Monitors control panel, the Windows Setup options, or your video adapter control panel.
Macintosh Setup
P o s e r 4 B a s i c s
application performance. To check the application’s memory allocation, choose the
Apple Menu> About this Macintosh in the Finder.
To increase Poser’s memory allocation:
1
Make sure Poser is not running.2
From the Finder, click the Poser program icon.3
Choose File menu> Get Info. The Poser Information dialog appears.4
For System 8.5 or higher, choose Memory from the Show popup5
In the Memory Requirements section, increase the Preferred Size to a level appropriate for your system.For Poser to operate well with fully articulated Poser people figures, it must have at least 32 MB of RAM. However, do not use all the available memory on your computer; leave one megabyte or more for the system.
If you don’t have enough RAM, you can turn on virtual memory, which uses some disk space with a cost of slower
performance.
Setting Application
Preferences
Poser’s preferences dialog lets you control how the application appears when it opens.
To set application preferences:
•
Choose Edit menu> GeneralPreferences. The General Preferences dialog appears.
Document Preference
The Document Preference controls how the document appears when you start Poser or create a new document. You can make the document appear as it did when you last closed it, or in its default state.
For example, if you want to always start Poser with the Casual Woman and the ground plane on, you can load the woman, turn on the Ground Plane, and set this as the preferred state.
To set the Preferred State:
1
In the Poser workspace, move the palettes and controls to the positions you prefer.Use the Get Info dialog to allocate memory to Poser on the Macintosh
P o s e r 4
2
Choose Edit menu> GeneralPreferences. The General Preference dialog appears.
3
Click the Set Preferred State button.To set the Factory state:
1
Enable the Launch to Factory State button.2
Click OKInterface Preference
The Interface Preference controls how the interface appears when you open Poser without using an existing document.
To set interface preferences:
•
If you want the application to appear as it did when you closed it, enable the Use to Previous State radio button.•
If you want the application to launch in its default state, enable the Use to Factory State radio buttonTo close the General Preferences dialog, click OK.
Setting Up Your
Workspace
Your Workspace reflects the layout of the controls and Document window. You can customize most controls within the Workspace can be customized to suit the way you work; place controls anywhere in the Workspace and store those changes for later use.
To re-position an element in the Workspace:
•
Click the element’s title and drag it to a new position.You can drag any of the controls, such as the Camera, Light, Display Style, and Parameter Dial controls.
To re-position the Document window:
•
Click the text label above the Document window and drag it to a new location.To “window shade” a control so only its title appears:
•
Double-click the title bar.P o s e r 4 B a s i c s
UI Memory Dots
The nine UI dots in the bottom-right corner of the Workspace store Workspace layouts, Poses, and Camera positions.
To save a Workspace layout:
1
Click the arrow icon next to the memory dot element title and choose UI Dots from the menu that appears.2
Arrange the Workspace controls to their optimal positions.3
Click an empty UI Dot. The Workspace layout is stored in that memory dot.To retrieve a Workspace layout:
1
Make sure the memory Dot element title is selected.2
Click on a full memory dot. The interface elements are re-arranged to conform to the stored layout.To delete a saved Workspace layout:
•
Option/Alt-click a full memory dot. The layout information is deleted from the memory dot.Workspace Backgrounds
The Poser Workspace background includes several stylistic elements. You can change, move, or hide the figure, and you can change the Workspace background color.
To change the Workspace background figure:
•
Option/Alt-click the background figure. Continue clicking until an image you like appears (one option is no figure).To reposition the background image:
•
Drag the figure to a new position.To change the Workspace background color:
1
Click the Color tool.2
Click on the background and choose a color from the Color picker.To restore the default Workspace background color:
•
Option/Alt-click the background.Setting Up the
Document Window
The Document window provides a view of the studio where you pose and view your figure. There are several parameters that allow you to change the window appearance to suit the way you work.
Use the Memory dots to save Workspace layouts, Poses, and Camera positions.
Note
You cannot use Poser 3 UI preferences in Poser 4
P o s e r 4
To interactively set the Document window size:
•
Drag the size control circle until the window is the desired size.To numerically set the Document window size:
1
Double-click the window dimensions at the top-right corner of the Document window, or choose Window menu>Document Window Size. The Set Window Size dialog appears.
2
Enter Width and Height values.3
Click OK.To move the Document window:
•
Drag the Document window’s title to a new position.Document Window Color
To improve your view of the figure, you can set the background, foreground, shadow, and ground colors of the document window.
The Color controls are located in the bottom-right corner of the window.
To set the Document window colors:
1
Click the appropriate color button on the bottom-right corner of the Document window.2
Drag the dropper icon over the color picker that appears. Release the mouse button when you select the desired color.Drag the size control to resize the Document window.
Use the Color controls to set the color of Document window elements.
Tip
To access the standard Macintosh or Windows color picker, Command/Ctrl-click the color button.Foreground Color
Background Color
Shadow Color
P o s e r 4 B a s i c s
Depth Cueing
Depth Cueing adds dimension to objects in the Document window. Elements that are farther away fade into the distance.
To enable or disable Depth Cueing:
•
Click the Depth Cueing button on the bottom-left corner of the Document window.Figure Tracking
Tracking is a performance enhancing feature that changes the display of an object as you reposition its parts. For example, if you use Fast Tracking, a figure’s body parts display as boxes when you’re moving them, then revert to their display style when they stop moving,
You can use the following types of tracking in the Document window:
• Box Tracking displays figures and objects as boxes at all times. Box Tracking is the fastest way to render objects.
• Fast Tracking displays figures and objects as boxes only when they are being dragged or animating.
• Full Tracking uses the display style at all times. With Full Tracking, large or complex objects render more slowly.
An example of Depth Cueing with a figure in Wireframe display style.
The Depth Cueing button.
Enabled Disabled
P o s e r 4
To enable a tracking mode:
•
Click one of the tracking option buttons on the top-right corner of the Document window.Paper Textures
You can enhance the view of the Document window by changing the Paper Texture. There are several texture options available—such as Paper, Weave, and Grid—to help you precisely position your figure.
To choose a paper texture:
•
Choose Display menu> PaperTexture> desired texture.
To clear a paper texture:
•
Choose Display menu> PaperTexture> None.
Drop Shadows
Figures in the studio cast drop shadows directly on the ground plane. Shadows can help you orient a figure in 3D space. You can turn shadows off to save on redraw time.
To turn drop shadows on or off:
•
Click the Display Shadows button on the right side of the Document window.The Figure Tracking option buttons.
A figure with a grid line texture applied to the background.
Full Tracking Fast Tracking Box Tracking
The Display Shadows option button.
Note
Drop shadows are not actually shadows cast by a light; they always appear directly beneath an object on the ground floor. Shadows cast by lights appear only when a scene is rendered. Refer to “Rendering” on page 259 for details.P o s e r 4 B a s i c s
Placing Figures and
Elements in the
Studio
The main working area of the Poser Workspace is the studio in the Document window. The figure that appears in the studio is determined by the model you load from the Figures category of the Libraries palette, or from a document or import. The Libraries palette is the main tool you’ll use to load figures and props.
Using the Libraries
Palette
The Libraries palette provides access to all the preset figures, props, light sets, and camera sets available in Poser. The content of the libraries palette is divided into eight categories.
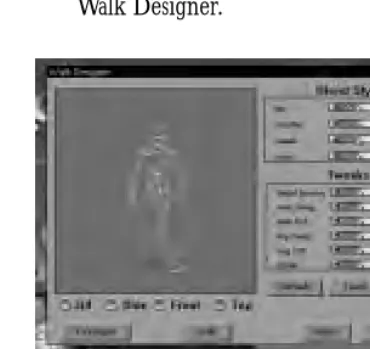
Each category includes sub-categories. For example, the Figures category includes the subcategories People, Animals, Poser2 figures, etc. Each sub-category contains figures to
choose from. Once you load a figure into your studio from the library, you can customize it and save it back to the library for future use.
To display the Libraries palette:
•
Click the handle on the right side of the screen.or
Choose Windows menu> Libraries.
Note
Some figures are more posable than others. The People sub-category of the Figures sub-category give you more control over hands and faces. Poser 2 figures have less control.The Libraries palette divides the available content into categories. Each category palette provides previews.
Sub-category popup
Categories
P o s e r 4
To resize the Libraries palette:
•
Drag the palette’s handles up or down. Release the mouse when the palette is the desired height.Loading from the Libraries
Palette
Loading content is a matter of selecting a category, a sub-category, and then a specific item. The Libraries palette makes these selections easy. It displays categories using descriptive button icons and provides previews of each item.
To choose a category:
1
Click a category button.If all the icons are not visible, move your cursor over the small dots next to the category icon, or click on the current category.
2
When the desired category icon appears, click the mouse button.To choose a sub-category:
•
Click the arrow icon below the category icon and choose an item from the popup.The content within the selected category appears in the main body of the palette.
To change or add an item to the studio:
1
Click the category of content (such as Figures or Props) you want to use.2
Choose a sub-category from the popup.If you select a figure, pose, or body part, it will replace the current figure content in the studio. If you select a prop, it will be added to the scene.
3
Click a preview in the main body of the palette. If the figure you want is not displayed, use the scroll bar to view additional previews.4
Click the Change Figure icon at the bottom of the palette.The Create New Figure icon is only available in the figures category, so that you can add additional figures to the studio.
To add an additional figure to the studio:
1
Click the content category you want to use.2
Choose a sub-category from the popup.3
Click the preview of the figure you want to add to the studio.4
Click the Create New Figure icon at the bottom of the palette.Move your cursor over the small dots next to a category icon to cycle through all the available categories.
The Change Figure icon.
P o s e r 4 B a s i c s
Saving to the Libraries
Palette
In the Libraries palette, you can create your own set of customized figures and poses, which you can easily retrieved and use in other illustrations. You can save custom camera and light configurations, poses, and figures to the library.
When you save an item to the Libraries palette, you create a new set within the currently selected sub-category.
You can either save an item to an existing sub-category, or create a new sub-category for your item.
To create a new sub-category:
1
Click the category of content where you want to add a new sub-category.2
Click the sub-category popup and choose Add category. The New Library dialog appears.3
Enter a name for your new sub-category and click OK.Your new sub-category appears at the end of the menu.
To save an item to a library:
1
Click the content category you want to save to. For example, if you want to save a pose, click the Poses category.2
Choose a sub-category from the popup.3
Click the Add to Library (+) icon at the bottom of the palette. A dialog appears.4
For the Poses, Faces, Props, Lights, and Cameras categories, you can specify parts of the scene to include or not include. To do this, click the Select Subset button. In the Hierarchy Selection list that appears, deselect any items in the scene that you don’t want to include, then click OK.5
Enter a name for your library item and click OK.
P o s e r 4
6
A dialog appears asking if you want to save a Single frame or a multi-frame animation.• If you select the Single frame option, the current pose is saved, or if you have an animation set up, only the current frame is saved.
• If you select the Multi-frame animation option, you can specify a range of frames to save.
Select either Single frame or Multi-frame animation and click OK.
The item is added to the selected category.
To delete an item from the library:
1
Select the preview of the item you want to delete.2
Click the Delete from Library (-) icon at the bottom of the palette.Deleting Objects from a
Scene
At some point you may wish to delete one or more of the figures and props you have added to the studio.
To delete a figure or prop from the studio:
1
Select the figure or prop you want to delete from the Current Figure or Current Element popup.2
Press Delete.You can also delete items using the Hierarchy Editor. For details, refer to “Deleting
Objects” on page 292.
You can save a still or the entire animation.
Note
This command permanently deletes items from the library; make sure you really want to delete the item before accepting the message in the warning dialog.P o s e r 4 B a s i c s
Working in the
Document Window
Viewing Your Figure
The camera position determines your view in the Document window. The Camera Controls let you quickly move the camera to different positions as you pose your figure.
You can move the camera in any direction within the studio. However, positioning it can be an involved process. This section outlines how to quickly move the camera to the most commonly used positions. For more detailed instruction on positioning the cameras, refer to “Changing the Studio View” on page 181.
The available cameras are: Main, Auxiliary, Left, Right, Top, Bottom, Front, Back, Right Hand, Left Hand, Face, Posing, Dolly, and Flyaround View.
To select a camera view:
•
Drag the cursor over the Select Camera control, until the desired Camera view appears.or
Click the Select Camera popup and choose the desired view.
To switch to the face camera:
•
Click the Face Cam icon at the top of the Camera controls.or
Click the Select Camera popup and choose Face Camera.
To switch to a hand camera:
•
Click either the Left or Right Hand Camera icons.or
Click the Select Camera popup and choose either Right Hand or Left Hand Camera.
To view the entire figure:
•
Click the Select Camera popup and choose Main Camera or Posing Camera.
P o s e r 4
Flyaround View
In Flyaround view, Poser places the camera on a virtual track above and away from the center of the studio. Thus, the camera circles the entire studio, displaying all the objects within it from various views. This is an excellent way to see how a figure pose looks within 3D space.
To activate flyaround view:
•
Click the Flyaround View icon.or
Click the Select Camera popup and choose Flyaround View.
Saving Camera Positions
You can quickly move between views of the studio by saving your most commonly used views into the Camera Memory dots. This makes it easy to recall a view with a simple mouse click.
To save a camera position:
1
Position the camera as desired.2
Click the Memory dots popup and choose Camera dots.3
Click an empty memory dot.Previewing Your Figure
The Document Display Style determines how a figure is displayed in the Document window. Different display styles have different
purposes. Some save on memory, while others can be used to make positioning easier.
To choose a display style:
•
Click one of the style icons in the Display Style controls.or
Choose Display menu> Document
Style> desired display style.
The following display styles are available:
Silhouette displays figures only as a cutout.
Click a Display Style icon to switch to a different display style.
P o s e r 4 B a s i c s
Outline displays only the outline of the figure.
Wireframe displays figures and objects as a mesh.
Hidden Line displays figures and objects as a mesh, but portions of the mesh not is the cameras field of view do not display.
Lit Wireframe displays figures and objects as a colored mesh, where the color of a section of mesh corresponds to the color of the surface material.
An example of Outline style.
An example of Wireframe style.
An example of Hidden Line style.
P o s e r 4 Flat Shaded displays figures and objects with
a colored surface, where the mesh facets are clearly visible.
Flat Lined displays figures and objects as a colored flat shaded surface, covered by a black mesh.
Cartoon displays figures using a hand-drawn style.
Cartoon w/Line displays figures using a hand-drawn style with black outlines.
An example of Flat Shaded style.
An example of Flat Lined style.
An example of Cartoon style.
P o s e r 4 B a s i c s
Smooth Shaded displays figures and objects as a smooth continuous surface.
Smooth Lined displays figures and objects as a smooth shaded surface, covered by black mesh lines.
Texture Shaded displays figures and objects using texture mapping.
All styles except Silhouette, Outline, Wireframe, and Hidden Line are affected by lighting changes.
You can apply a Display Style to a figure, the entire document, or a specific body part. Different styles can save on redraw time and help you isolate specific body parts while you’re working. Cartoon w/Line, Flat Lined, and Smooth Lined styles are slower than their non-lined counterparts.
To apply a display style to the entire document:
•
Click the popup next to the Display Style icons and choose Document Styles.To apply a display style to the entire figure:
•
Click the popup next to the Display Style icons and choose Figure Styles.An example of Smooth Shaded style.
An example of Smooth Lined style.
P o s e r 4
To apply a display style to an element:
•
Click the popup next to the Display Style icons and choose Element Styles.When you assign a Figure or Element style, an additional display style control, an upward arrow, appears. With this control, you can quickly reset elements with different display styles to the Figure’s display style, or figures with different styles to the Document’s display style. In the above example, to reset the hand to match the figure’s wireframe style, select the hand, then click the arrow icon.
Figure Properties
You can control several behavior options for figures in the Figure Properties dialog.
To change options for a figure:
1
Click the Figure menu under the Document window and choose the figure you want to work with.2
To select the entire figure, choose Body from the Current Element popup.3
Choose Object menu> Properties. The Properties dialog appears.The options in the Figure Properties dialog are:
• Name: rename the figure. Giving your figures descriptive names can make it easier to locate them in the Current Figure popup, Animation palette, and Hierarchy Editor.
• Visible: toggle the figure visible or invisible. Visibility is global to the file. In an animation, you cannot make a figure visible in one frame, but hidden in another.
The figure is shown in wireframe style, while the hand (an element) is shown in smooth shaded style.
P o s e r 4 B a s i c s
Element Properties
You can control several behavior options for body parts in the Element Properties dialog. You can rename parts, make them invisible, and control whether they cast shadows or not.
To change options for a body part:
1
Click the Figure menu under the Document window and choose the figure you want to work with.2
Choose a specific body part from the Current Element popup.3
Choose Object menu> Properties. The Properties dialog appears.4
Set any of the following options in the Element Properties dialog:• Name: rename the part.
• Visible: toggle the part visible or invisible. In an animation, you cannot make an element visible in one frame, but hidden in another.
• Casts Shadow: toggle shadow casting for the part.
• Bend: toggle the part bendable or not. For details, refer to “About Bending” on page 127.
• Add Morph Target: add a custom morph target to the part. For details, refer to “Adding Custom Morph Targets” on page 156.
5
Click OK to close the dialog.Using the Editing Tools
Poser includes several Editing tools for manipulating figures, objects, lights, and cameras.
To change the Editing toolbar’s orientation:
•
Option/Alt-click the Editing toolbar. The orientation toggles between horizontal and vertical.Editing Tools are discussed throughout this book:
• For information on the Rotate, Twist, Translate, and Chain Break tools, refer to
“Using the Editing Tools” on page 114.
• For information on the Scale, and Taper tools, refer to “Using the Shaping Tools” on page 140.
• For information on the Color Tool, refer to “Using the Color Tool” on page 139.
• For information on the Grouping Tool, refer to “Using the Grouping Tool” on page 157.
The Editing Tools allow you to manipulate figures, objects, lights, and cameras.
Rotate Scale Chain
P o s e r 4
Selecting Body Parts
Before you start posing a figure, you need to know how to select the part of the figure you want to move. You can select a body part with an Editing Tool or from the Current Element popup located beneath the Document window.
Body parts are highlighted as you move the cursor over them.
To select a body part using an Editing Tool:
1
Click one of the Editing Tools.2
Click a body part on the figure.The selected body part is highlighted in the Document window and the name appears in the Current Element popup menu.
To select a body part using the menus:
•
Click the Current Element popup located beneath the Document window and choose the desired body part from the menu.Pasting Figures onto the
Background
At any point, you can paste an image of the figure onto the studio background. When you choose this command, the current view of the figure becomes part of the background bitmap.
The Figure’s body parts are posable elements.
Posable hand elements. The Right and Left hand have the same elements.
Thigh Shin Foot Figure’s left Figure’s right Head Shoulder Abdomen Hip Chest Neck Forearm Hand Collar Ring 2 Pinky 1 Mid 3 Index 1 Thumb 1 Hand Thumb 2 Thumb 3 Pinky 2 Pinky 3 Index 2 Index 3 Mid 2 Mid 1 Ring 1 Ring 3
Posable face elements. Pose face features using Parameter Dials.
Head
P o s e r 4 B a s i c s
At first glance, you might not notice the affects of applying this command. This is because the figure itself blocks the background-pasted image. However, any changes you make—such as moving the figure or camera—reveal the background image.
To paste the figure onto the studio background:
1
Choose Display menu> Paste ontoBackground.
2
The figure is pasted over the background image.To clear the background:
•
Choose Display menu> ClearBackground Picture.
Hiding Figures
Hiding a figure makes it temporarily disappear from the Poser studio. This feature is useful when you have two figures close together, and one gets in the way when you try to select the other.
To hide a figure:
1
Click the Current Element popup and choose Body.2
Choose Object menu> Properties. The Figure Properties dialog appears.3
Disable the Visible option.To hide a figure when you have two or more figures:
1
Click the Figure popup and choose the figure you want to hide.2
Choose Figure menu> Hide Figure.This command is only available when you have more than one figure in the studio.
To display a hidden figure:
•
Choose Figure menu> Show AllFigures.
Displaying Guides
Poser provides several guides to assist you in posing figures. Guides help you achieve a particular perspective more easily. The guides Poser offers are a ground plane, horizon line, vanishing lines, the hip-shoulder relationship, and head lengths.
To display a guide:
•
Choose Display menu> Guides and select the guide you want.To hide a guide:
•
Choose Display menu> Guides again and de-select the guide.Ground Plane
P o s e r 4
The display style of the ground place can be the same as the document or figure, or it can have its own element display style. Using the Wireframe style, the ground plane is a grid. Using the Flat Shaded display style, the ground plane is a solid color. When tracking or moving, the ground plane is displayed in Wireframe.
Head Lengths
The head lengths guide references the figure’s height. You may want to use this guide when body shaping.
Horizon Line
The horizon line provides a reference to the studio’s horizon. When you use the x, y, and z orbit controls to move the camera, you can see how far you’ve gone by checking the horizon line.
The horizon line is especially helpful in creating perspective between two figures when one figures is in the distance. Arrange the figures in the same relationship to the horizon line.
For example, if the horizon line crosses at the center of the front figure’s chest, arrange the distant figure so that the horizon crosses its chest at the same position. This arrangement contributes to the sense that all figures have their feet on the ground.
Hip-Shoulder Relationship
The hip to shoulder relationship shows the alignment between the figure’s upper and lower body. This guide helps you see the side-to-side, bend, and twist in the hip, abdomen, and chest. To see a particular aspect, try a different camera view.
The ground plane, shown in wireframe display.
P o s e r 4 B a s i c s
Vanishing Lines
Vanishing lines are an artistic technique for achieving realistic perspective. In Poser, the vanishing lines guide provides a reference of the perspective.Vanishing lines are helpful when matching the view of the figure with the perspective in a background image.
Undoing Operations
You can reverse the effects of your last action using the Undo command.
To undo an operation:
•
Choose Edit menu> Undo or, press Command/Ctrl+Z.Restoring Default
Settings
You can restore the default settings for a body part, figure, lights, or camera. Restoring the lights resets their colors and positions. Restoring the current camera reset its scale, position, and focal length. Restoring All resets all figures, cameras, and lights.
To restore an object to its default setting:
1
Select the item from the document window or the Current Element popup.2
Choose Edit menu> Restore> the itemyou want restored.
Changing Defaults
Poser uses default settings to set up a new document. As you work, however, you may achieve a position that you’d prefer over the default.
To change Poser defaults:
•
Choose Edit menu> Memorize> theelement you want to memorize. The new
setting applies only to the current file.
The vanishing lines guide.
P o s e r 4
Printing
The Print command sends the contents of the Document window to your selected printer.
When printing, Poser always prints to the full page size.
Importing and
Exporting
Importing Content
Use the Import commands to bring the contents of other files into the current document. You can import figures, props backgrounds, surface materials such as texture and bump maps, sounds, and animations.
Importable file formats include PICT (Macintosh), TIF, JPEG, and BMP files for backgrounds or surface materials. You can import saved Poser documents for figures and props. And you can import QuickTime (Macintosh), MetaStream, VRML, and AVI (Windows) files for background footage in animations.
You can import prop geometry files in DXF, BVH, 3DMF, Wavefront OBJ, 3D Studio (Windows), and Painter3D (Detailer) formats. For details on importing props, refer to
“Importing Props” on page 166.
If you import a Poser document that contains more than one figure or prop, Poser imports all of them.
To import a file:
1
Choose File menu> Import> file type.2
Select the file you want to import in the resulting dialog.Exporting Files
You can export the contents of the Document window to an image file at any time, from any display style. You may do this to save the wireframe image of a figure.
The exported image includes the highlighted body part and any currently displayed guides. If you don’t want to export these, deselect the figure and hide the guides before exporting.
Note
When in Wireframe display style with a black background, Poser automatically inverts the colors to prevent printing a large black background.Note
If you import a prop with textures, place the textures in theP o s e r 4 B a s i c s
You can export the geometry contents of a Poser file in other formats, which you can transfer to a 3D graphics program. Transferable formats are: OBJ, 3D Studio, Detailer, DXF, RIB, Wavefront, 3DMF, and VRML/H-Anim formats.
To export a file:
1
Choose File menu> Export> file type.2
A dialog appears asking if you want to save a Single frame or a multi-frame animation.• If you select the Single frame option, the current frame is exported.
• If you select the Multi-frame animation option, you can specify a range of frames to export.
Select either Single frame or Multi-frame animation and click OK.
3
In the Hierarchy Selection list that appears, uncheck any items that you donot want to be included in the export, then click OK.
4
In the Export dialog that appears, specify a filename and location and click Save.Saving and Closing
To save a Poser file:
1
Choose File menu> Save. The Save dialog appears.2
Choose a name and location for your file and click Save.Note
For file format plugin updates, check the Poser section of the MetaCreations web site: www.metacreations.com.You can save a still or the entire animation.
P o s e r 4
To save a Poser file under a different name:
1
Choose File menu> Save As. The Save As dialog appears.2
Choose a new name and location for your file and click Save.To close the application:
P o s e r 4 B a s i c s
3
Tutorial
Welcome
Welcome to the Poser 4 tutorial. This tutorial is designed to introduce all the major features and functions in Poser. Its main goal is to teach you the techniques you need to know to create realistic poses and animations.
This Tutorial chapter is divided into two sections:
• The Basics, which contains a basic tutorial to help you get started using Poser.
Tu t o r i a l
The Basics
The following set of lessons is designed to help you learn the basic operations in Poser 4. They cover topics such as setting up your workspace and working with posing tools.
Lesson 1: Setting Up a
Default Workspace
When you first open Poser 4, you see the palettes and toolbars in their default
position.You can change these positions, hide elements, and save the new positions as a Preferred State. The new arrangement appears the next time you open the application.
The default figure in the Document window is a Poser 3 figure. You can delete this figure and set up a new default figure as part of the Preferred State.
To delete the default figure:
1
Select either the Rotation Tool or Translate Pull Tool.2
Click any part of the figure in the Document Window.The selected part appears outlined in red.
3
Press the Delete key.A dialogue box appears asking you to confirm the figure deletion.
4
Click OK.You should now have a blank document.
The default Poser 4 workspace.
The Rotation and Pull tool are the most commonly used posing tools.
P o s e r 4
To set up an new default figure:
1
Choose Windows menu> Libraries.The Libraries palette appears. From top to bottom the Library categories are: Figures, Poses, Faces, Hair, Hands, Props, Lights and Cameras.
<