CLIPPER System Administrator's Guide
DSA029910
January 1990
SSSOO61.SSS0062.SSS0075.SSAD075
DSA02991S (Spine). DSA02991T (Bleed Tabs). DIXGDMRS4 (Binder)
Warranties and Liabilities
All warranties given by Intergraph Corporation about equipment or software are set forth in your purchase contract. '
The information and the software discussed in this document are subject to change without notice and should not be considered commitments by Intergraph Corporation. Intergraph Corporation assumes no responsibility for any errors that may appear in this document.
The software discussed in this document is furnished under a license and may be used or copied only in accordance with the terms of this license.
No responsibility is assumed by Intergraph for the use or reliability of software on equipment that is not supplied by Intergraph or its . affiliated companies.
Trademarks
Intergraph is a registered trademark of Intergraph Corporation. InterPro. interAct. InterView. and InterServe are registered trademarks of Intergraph· Corporation. CLIPPER and CLIX. are trademarks of Intergraph Corporation.
Other brands and product names are trademarks of their respective owners.
Oassifications
CLIPPER System Administrator's Guide
DSA029910
January 1990
SSS0061.SSS0062.SSS0075.SSAD075
Warranties and Liabilities
All warranties given by Intergraph Corporation about equipment or software are set forth in your purchase contract.
The information and the software discussed in this document are subject to change without notice and should not be considered commitments by Intergraph Corporation. Intergraph Corporation assumes no responsibility for any errors that may appear in this document.
The software discussed in this document is furnished under a license and may be used or copied only in accordance with the terms of this license.
No responsibility is assumed by Intergraph for the use or reliability of software on equipment that is not supplied by Intergraph or its affiliated companies.
Trademarks
Intergraph is a registered trademark of Intergraph Corporation. InterPro. InterAct. InterView. and InterServe are registered trademarks of Intergraph Corporation. CLIPPER and CLIX are trademarks of Intergraph Corporation.
Other brands and product names are trademarks of their respective owners.
Oassifications
Copyright
@ 1990 INTERGRAPH CORPORATION
INCLUDING THIS DOCUMENTATION, AND ALL SOFfWARE AND ITS FILE FORMATS AND AUDIO-VISUAL DISPLAYS DESCRIBED HEREIN; All RIGHTS RESERVED; CONTAINS
CONFIDENTIAL AND PROPRIETARY INFORMATION OF INTERGRAPH AND/OR OTHER TIfiRD PARTIES WIlleH IS PROTECTED BY COPYRIGIIT, TRADE SECRET AND TRADEMARK LAW AND MAY NOT BE PROVIDED OR OTHERWISE MADE AVAILABLE WITHOUT PRIOR WRITTEN AUTIIORIZATION.
RmTRICTED RIGHTS LEGEND
Use, dupli.catio~ o:r disclosure by the United States Government is subject to restrictions as set forth in
subdivision (cX1Xii) of the rights in technical data and computer software clause at 52.227-7013. Unpublished-rights reserved under the Copyright Laws of the United States.
Preface
This guide provides system managers with instructions for using and managing Intergraph workstations and servers.
The information in this guide is built on the information presented in the CLIPPER User's Guide (DSA0300). For information on topics such as the screen display, input
devices, basic CLIX operating system concepts, AScn text editors, the floppy disk drive, and Intergraph Toolbox utilities, refer to the CLIPPER User's Guide.
Preface vU
Document Conventions
The following conventions and symbols appear in this guide:
1. Command names and user actions appear in bold type.
2. The term workstatlon refers to an InterPro, InterAct, or InterView workstation.
The term server refers to an InterServe processor.
3. Select means to place the screen cursor on the desired option and tap <0> (middle
cursor button).
4. Warnings are used to emphasize potential physical danger. Cautions are used to emphasize critical information or potential errors.
Notes are used to emphasize important information.
5. Press a button means to press a button and hold it down.
6. Tap a button means to press and immediately release a button.
7. Key in means to enter input at the keyboard and press <Return>.
8. Various symbols appear in the text. They represent the following keys or cursor buttons:
<Ctr1>
<Ctrl-D>
<Return>
<Esc>
Control key
Unless otherwise noted in the text, you must hold down the <Ctr1> key while pressing the second key.
Return key
Preface vlU
Additional References
The UNIX System V documentation is useful reference material. The following Release 5.3 documents can be purchased individually or in sets from Intergraph:
Tit,.
UNIX System V User's Guide-CLIPPER
UNIX System V Programmlng Gulde-CLIPPER UNIX System V Admln,lstrator's Guide-CLIPPER UNIX System V User's Reference Mo.1'UJ,Dl-CLIPPER AT&T 5.3.1 User's Reference Addendum
UNIX System V Admln,lstrator's RBference Mo.1'UJ,Dl-CLIPPER AT&T 5.3.1 Admln/,strator's Reference Addendum
UNIX System V Programmer's Reference Mo.1'UJ,Dl-CLIPPER AT&T 5.3.1 Programmer's Reference Addendum
CLIX System AdmJ,n/,strators RBlerence Mo.1'UJ,Dl
Addendum to CLIX System Admln,lstrator's Reference Manuol Addendum to CLIX System AdmlnLstrator's Reference Manuol CLIX Programmer's &; User's Rs/erence Mo.1'UJ,Dl
Addendum to CLIX Programmer's cl User's Rsference Manual Addendum to CLIX Programmer's cl User's Reference Manual CLIX System Gulde
Addendum to CLIX System Guide Addendum to CLIX System Gulde
CLIX Pernwted Index (master index to CLIX and AT&T reference manuals)
Ordering and Support Information
To order any of these documents:
klease V.3
DSYS08010 DSYS08410 DSYS08210 DSYS08110 DSYS19410 DSYS08310 DSYS19710 DSYS08510 DSYS19510 DSYS18310 DSYS18311 DSYS18312 DSYS18410 DSYS18411 DSYS18412 DSYS18510 DSYS18511 DSYS18512 DSA027410
• Within the United States contact your customer engineer or sales account representative.
• For international locations, contact the Intergraph subsidiary or distributor where you purchased your workstation.
If you have trouble with the workstation/server or the procedures described in this guide, contact Intergraph Customer Support at 1-800-633-7248. International customers should contact the Intergraph subsidiary or distributor where the workstation/server
Contents
x Contents
Qapter 1:
SettlDa
Up a New System. 1.1 1.2 1.2.1 1.2.2 1.3 1.4 1.5 1.61.7
1.8Setting Up and Adjusting the Hard'W~ _ _ _ _ _ _ _ _ _ _ _ ,10,_1-3
Evaluating the Default Partitions ... 1-4
Default Partitions 1111111.1-4
Determining Partition Sizes _ _ _ _ _ _ _ _ _ _ _ _ _ _ _ _ '10_'" 1-5 Configuring the Workstation Using the Utility Pages _, _ _ _ _ 10_'''_",,_1-6 Setting Up User Accounts
Assigning an Internet Address
" , ,1-8
"asM .. 1-9
Delivering Software _ _ _ _ _ _ _ _ _ _ _ _ _ _ _ _ _ _ 1-10 Determining a Backup Schedule _ _ _ _ _ _ _ _ _ _ _ _ _ _ ",_"'1-11 Using Intergraph System Documentation H . I I • 111, . . . 1-12
Qapter 2: System. Startup and Initialization
2.1 The /etclinit Process, ... 2-3
2.2 The Jete/getty Process , 2-5
2.3 Modifying the inittab and gettydefs Files for a 32-Channel RS-232 Interface
Assembly " 110 2-6
2.3.1 Modifying the /etclinittab File 2-6
2.3.2 Modifying the /etclgettydefs '" 2-8
2.4 The /etclrc2 Process , " 2-9
2.4.1 The /etc/init.d ~ 2-10
2.4.2 InitiaHzing Additional Processes from Multiuser
Mode'
2-10Chapter 3: Creating and. MaiDtaining User Accounts
3.1 3.1.1 3.1.2 3.1.3 3.1.4 3.1.5 3.2 3.2.1 3.2.2 3.3 3.3.1 3.3.2 3.4 3.4.1 3.4.2 3.4.3 3.4.4 3.4.4.1 3.4.4.2 3.4.4.3
System and Administrative Accounts _ _ _ _ _ _ _ _ _ _ _ _ _ ,,3-3
The root Account ,3-3
The sysadm Account , ,,3-3
The setup Account _ _ _ _ _ _ _ _ _ _ _ _ _ _ _ _ _ _ _ _ .... 3--4 The ~ Account _______________________________ -... ___ 3--4
The nuucp Account ' . " 3-4 " ~
Adding User Accounts "'" 3-~
Using addusers to Add User Accounts _ _ _ _ _ _ _ _ _ _ _ _ _ 3-6
Using sysadm to Add User Accounts _ _ _ _ _ _ _ _ _ _ _ _ _ .. _000 3-8 Removing User Accounts _ _ _ _ _ _ _ _ _ _ _ _ _ _ _ _ _ _ , ~10
Using rmusers to Remove User Accounts "" .... " .... 3-10 Using sysadm to Remove User Accounts _ _ _ _ _ _ _ _ _ _ _ _ _ .. _00.3-11 Assigning, Changing, and Removing Passwords , "" , 3-13
Restrictions on Passwords ".3-13
Creating a Password 10 .. 3-13
Forcing a Password Change 3-14
Removing a Password , 3-15
Removing a Password from User Accounts ",3-15
Removing the root Password ",3-15
Removing the Utility Pages Password 3-18
3.5 3.5.1 3.5.1.1 3.5.1.2 3.5.2 3.5.3 3.5.4 3.5.4.1 3.5.4.2
Using Protection Codes to Manage Files _ _ _ _ _ _ ,_,._" ... ,,, ... ,,_,, .... ,, _ _ _ " .. 3.;.19 File Protection COOes I I . , " " " " " " . . . 3-19
Directory Files
Ordinary Files ...
Modifying File Permissions • Modifying File Ownership".", Changing Group Access
Changing Your Active Group 'OI ...
Changing the Group of a File " ..
U I I I " " U I I U U I ' " f J I U ' I Q r 3-20
'.1111 . . 1 . . . 3-21
L I 1111 . . . '111 11 . . . 3.;.21
. . . , t l l . . . 3-22
... 3-23 I I III 1111111111111" 1111 . . . I 11 . . 111 . . . 3-23
11.11. 1 " ' T l l l f l l l l ' . . . 11 . . . 111 . . . 3-24
Qapter« Modifying tho Login Environment 4.1 4.1.1 4.1.2 4.2 4.3 4.4 4.4.1 4.4.1.1 4.4.1.2 4.4.1.3 4.S
4.6
4.7 4.7.1 4.7.2The getty and login Processes
The /etc/passwd File II ..
Customizjng the /etclpasswd File " The tete/profile File
l U l l I II 111111&'''1111111' .as IIn.4-3
... 4-4
11 . . . '11.1 . . 11.1 . . . . 11111114-5 I I •• 111 . . 4-6 The .profile file _ _ _ _ _
1,---4-8
The.mv
File _ _ _ _ _ _ _ _ _ _ _ _ _ _ _ _ _ _ _ ,,_,_ .... 4-10 Command Recall (The .history File)Command Recall Using the vi Editor Command Recall Using the emacs Editor Temporary Editors for Command Recall The .exrc File
Creating a Reminder Service .
.
'1"1"11111'"111 I I J nil I IIIIU .4-11
11111£ II 111 ... .4-12 1 111111 I f 11111111111111111114-12
1,31111 III' I '88. I I I ' . 1 1 111 4-12 '" ,'I, I '1"1" "1"".' 1, •• "',,, •• 4-13
! II I. 18 . . , . . . . 4-14 Usina cron III II . . . . 'IIHI I III r 11 111111111 4-15 The crontab Command _ _ _ _ _ _ _ _ _ _ _ _ , ._,,_._. _"._._"._,,_ ... ,,' 4-16 Executing One Command at a Specified Time . , . , n l l .. l1., . , L II. I 1I1 . . 1I1u . . . 4-17
Qapter S: Window and ScreeD. Omfiguration
5.1 Setting the Workstation User ... 5-3
S.2 Crea;~i 'VT220 Win-do'WS . ... II"""'. Ill'., II • • 18' III I ••• ,111'" III1I 1 " 5 - - 4 .
5.2.1 Usin.a vte'rm I I 1111 I . . . . " t U M . I I J l I I I I J I I J l l i l l . 5 - 4 5.2.2 Creating Local Win-dows Through the Workstation Menu ... """" ... "",, .. ,, "" ",,5-8 5.2.3 Creating a Terminal. Win-dow '011" I " ... 5-8
5.3 Usin.g the General Setup Menu to Define VT220 Characteristics , "''' .' ,5-10 5.4 Using the Display Setup Menu to Define Display Characteristics " .. ,,"" " ... 5-12 5.5 Using the Keyboard Setup Menu to Define Keyboard Characteristics _5-13 5.6 Using the Tab Setup Menu to Define Tabs "" . ",,"""'. ,,,. "''''' , , "",,,,,5-14 5.7 Using the Printer Setup Menu to Define a Win-dow Attached to a
I:>ec1iQtec1 PriD.ter Il II 11 1111 • • I I , I I I ' 111'11 fllI5-1S
5.8 Using the Macro Setup Menu to Assign Macros to Keys , """" """ "",,"' .... 5-16
Contents xUl
S.9 Creating Color Windows I I 5-18
S.9.1 The Intergraph-Deve1oped regis Color Command ,,5-18
S.9.2 The ReGIS Color Command 5-19
S.9.3 The ANSI Color
Escape
Sequences , 1111111111111 'III 5-22S.10 Using the
Catalog
Function to Save Customized Windows I I 5-24S.11 Altering the Workstation Pulldown Menu 11,5-26
S.11.1 Adding Processes to the Workstation Pulldown Menu 11111 11111111111115-26
5.11.2 Modifying the Workstation Pulldown Menu 5-28
5.11.3 Deleting Processes from the Workstation Pulldown Menu I I 5-28
S.12 Changing Screen Configuration 5-30
5.12.1 Changing the Number of Virtual Screens (Single-Monitor
Workstations Only) . 11,5-30
5.12.2 Changing the Number of Message Strips CDual-Monitor Workstations
Only) 5-31
5.12.3 Changing the Message StripCs) Location 5-31
5.13 Changing the Background Pattern ,5-32
5.14 Changing the Screen Color 5-33
S.1S Invoking Processes Automatically 5-34
5.15.1 The def_proc File , 5-34
S.15.2 The ·.def_proc File 5-35
5.15.3 The syB_proc File 5-36
Chapter 6: Setting Up a Uno Printer and Printing
6.1 6.2 6.2.1 6.2.2 6.2.3
Configuring a Line Printer _ _ _ _ _ _ _ _ _ _ _ _ _ _ _ _ 6-3
Using the Line Printer I I 6-4
Submitting a Print Request 6-4
Monitoring a Print Request 6-4
Canceling a Print Request ,6-5
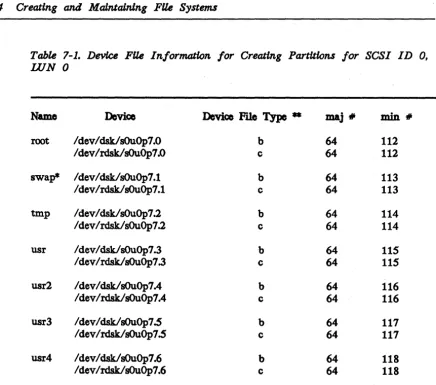
Clapter 7: Creating and Maintaining F1le Systems
7.1 7.1.1 7.1.2 7.1.2.1 7.1.2.2 7.1.3 7.2 7.2.1 7.2.2 7.2.3 7.3
Creating a File System _ _ _ _ _ _ _ _ _ _ _ _ _ _ _ _ _ ",_,"7-3 Creating a Device File _ _ _ _ _ _ _ _ _ _ _ _ _ _ _ _ _ _ 7-3
Creating a File System on a Partition 7-9
Creating a Standard File System 7-10
Creating a Fast File System ,7-11
Mounting a Partition 7-12
Monitoring Disk. Space 7-13
Displaying the Amount of Free Disk. Space 7-13 Displaying the Amount of Disk. Space Used , 7-14
Freeing Disk Space 7-14
Checking the Integrity of a File System , , 7-17
xiv Contents
Chapter 8:
8.1 8.2 8.2.1 8.2.2 8.3 8.4 8A.l 8.4.2
8.4.3
8.4.3.1
8.4.3.28.4.3.3
8~4.3.48.4.3.5
8.4.3.6 8.4.3.7 8.4.3.88.4.3.9
8.5
8.5.1 8.5.2 8.5.2.1 8.5.2.2 8.5.2.3 8.5.2.4 8.5.2.5 8.5.2.6 8.5.2.7 9.1 9.2 9.2.1 9.2.2 9.3 9.3.1 9.3.2 9.3.3 9.3.4 9.3.59.3.6
9.3.79.3.8
Installing aM' ~., 1.1 &1 •• t l l •• I ••••••• t ••• '"e:l~~~~~~oo.o~:e~;c;xtu:>~~<tl~~~3 Invoking the Curses-Based FMLI Interface for CRM _ ... _ _ _ 8-4
Graphi~ MOnito~O,.1 II 'Nt ",,,,n ... t l i l l IITI"I I f C'trt~~.It .... sIUU1 . . UItt.Of . . . . I . . . U . . . lttllll&;IU . . G"O 8-4
Alphanumeric TermLli~nlJa!u.:ls.s... ... __ .... ""u ... _ _ ... , .... , .. u ... ..,u_, ... ,. .. ,"" ... , ... u ... , .. " ... e ... ~t04UI • • • S •• t. IUI . . . " ' ... 8-4
Usin.g 1:lle FMI.l Interface. "'li'&."" 'i' . ' . p ' I •• IfS ••• M ... e ••• 'M~ct" $ . . . . c .. .,.~ ... 8-5 System Monitors
Running System Monitors from the Command Line __ ... ..una .. 1 . . un ... 8-7 Running Graphics-Based System Monitom _ ... ,&<%0$ _ _ _ " Ull . . . tlU . . . 8-9
Using the Syst.em Monitors from the Curses-Based FMLI Menus _ _ 8-10 Change Defaults Fonn. _ _ ... . "_,, "" "or ", " " ... ,,, .. 8-1.0 Monitor Parameters Cmonpa,ram) _ ... , ... , ... . ~... ptl d .II'UIOII . . . "81 .8-11
Top Faul.t Monitor (topfault) HI . . . unt$n;CU~~M4Irn8 . . . . IlIIUUnllll! i l l l J.~III)I\I . . II.u .. u . . . IlMeM8-12
Top Memory Monitor (topmem) _ _ " ... _ ... _ ... _ ... " " _ ... ~"' ... _ 8 - 1 4 Top CPU Monitor (toPCPll) Hilil r '&I.ei8.tlITr'''~''HI.~.8.,Ui'''t.t.el. "11ee.'.0 •• ,I$." •• " " ' , •••• 0.,.1' . . . .,,, ... 8-15 Top I/O Monitor (topio) ... "',, ... ,,'
Top System Monitor (topsys) ... 00' " " ... _ _ .... _ _ _ _ _ _ _ ... , ... " ... _8-16
Show Open Files Cshowfiles) __ .. """ " ... _ _ _ _ _ , _ _ _ ... _ .... _ ... 8-17 Show Memory Usage Cshowmemory) _ _ _ _ _ ... Ii " t ,..11 •• 111 ••••• 8--11
Pr~ Moni:tou .... 111 '.'Nte . " u .... UUIt I " . . . ltltt . . . 1 O.«I,.~ .. "ru .. t a ••••• ...w ... IUIUU uo ... a •• 8-19 Running Process Monitors from the Command Une .. _ , "" ... " ... 8-19 Usin.g the Process Monitors Interactively from Cu.rses-Based ~ Menus 8-24
.select Process to Monitor ~S$~","~~M3~~~4 . . . t ' l ' • • : S' '.tt.~~ 11i •••• ,a~ .. a 8-24 Select Profiler OptiollS ~MlaGlO".'I' ••• ill~~~..,.~lJ'Ct)a .. t • • ' . t . l t . 1'.'4'101."". , . , PI . . . ~8-2S
Enable Page Faults _ _ _ _ _ ... _~''''' _ _ _ _ _ .. _8-26
En.able System Ca.1.1s •.•. , •.. 1ml.e" . . , •• "f1't1.,8'9'tI'.,....~~ . . . N~ . . . ~:»8"rJ.t~4~fl ••• 4' ... "~8-26 Run Profiler ... _ ... , .. , ____ ... _'I]~ .. aa" ... u .. ' .. t I . . U ... IIf .... Ot ... u ... u ... U _ _ ' . . I1 ... U ... 'SGtl . . D.U13e.'It.Cl1frttil •• OGILIeat . . . iII~ . . . ~.8-27
Run Memory Monitor
Backing Up and Restoring Flles
Determining a Backup Schedu.le -.'""*_._~
__ .""""''''''' ____ .. , ... ''"' .... , ....
9-l Devising a, Backup Plan According to System Cclnfiguration _, _ _ ,_94 Full Network Configuration _ _ _ _ _ _ . _ , .. , ... , ... __ ... 9-4Sta,n,dalone <:Onfiguration """'""'0' .... ". " u n . . . ~.f!<S1M"'''t ••• ''l1t "U8"UtSCtU.t"'~G¥ l!tt3T'IIte,' 8 •• 9-5
:Backup Commands and Utilities _ _ ~ _ _ ... , ... , ... _ ... 9-6 The dd Command .. 11 ... , _ _ _ _ _ _ _ ... n ... tt ... u"" .... u .. n .. ' .. I I _ ... _ _ o(U\~t • • • 1'8etttl$$!tdJIJUOO"!.111 "$1~~ . . . ~ . . . 9-10 The tar <:Omm.8J1d ~,*"I"'QIIA$.a.'C' tG1qr".lr.t~0<IIte .. s.fI.Rt.*tI ••• ".«tOt . . . ~$~,~4IJotMU~9-13
The cpio/scpio Commatlds _ ... _ _ . _ _ _ . _ ... _ ... " .... __ 9-18 The backup and restore Commands ~, _ _ _ $O ... "O~. _ _ _ _ _ _ 9-26
The ansitape Utility .. _ ... _ ...
o_
... _ ,
... _
.. ___
~_,'_ _ _
... _ _
9-36The vmsba.ckup Utili'ty G . . . . ~#t' ~fil.'llIr~I'CI'"'O • • M '51 I ,~.t. D.I~G.l.rr.III."tI~~~~942
The compress tJtility .. 8G ... u .... _ _ ... et .... _-e'fl~l<MH .. ~ .... ~~ . . acMCSNC$ .. '1'01.Q •••• 11 . . . 9-47
Contents xv ,---~-.--.---9.4 9.4.1 9.4..2 9.4.3 9A.4 9.4.5
Additional OJmmands fOl' Floppy I)isk",,'l _ _ _ _ ._. __ ... _. _ _ _ _ " ... 9-51
The format Comm.alld _,10 • • ... .. 9-52
The mkfs ~mman.d ~, _ _ "" ... '_. _ _ . . . . ~ __ .. _ ... 9-54
'The cpflop C.A).tlllnand N"~~~("""'O$'iM.~"{\<lt"«</il'~~~et~~""'NJl1'" • tJ a • J • • U t i . . . 9-56
The w-.J1op 'CctIlllmJallQ .. ~~·~q,otaHol~1'~~l!tlQoct;~ ... I'l()tJ.09M~ . . . O~., ••• a'D"J"UIl!$OO"~""""cr . . . 9-56
11le fr_~f1op C.Almnll!Ul.d "",' ••. ,.,-.-.~~ ... _ _ _ _ ", .... _ ... o,m"_",,, ... _. _ _ _ _ 9-56
Chapter 10: Using the Utility Pages 10.1 10.1.1 10.1.2 10.1.3 10.1.4 10.1.5 10.1.6 10.1.1 10.1.8 10.1.9 10.1.10 10.2 10.2.1 10.22 10.2.3 10.2.4 10.2.5 10.2.6 10.2.1 10.2.8 10.2.9
Workstation Utility Menus _ _ , ... ... _10-3 ~ Utili'ty Page ~.,... ... "."'t I a ".151 •• , •• ~ r Q, •••••••• ' l . I I I I . • •• 10-4
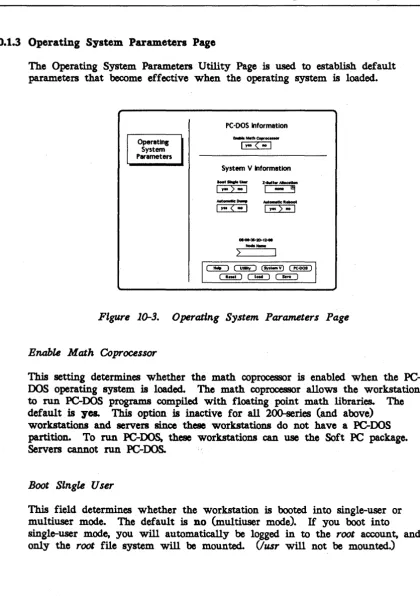
Ptripheral Configuration Page _ _ , .. _ ... ___ ... _ _ ... ... .. 10-7' O]?eratin.g Sj"Stem Parameters Page _ ... _ . . 10 • • " . " . " • , •• 10-11 Disk.' ~tenanct' Utilit·y· Page _ _ ... _ " , _ . _ ... " .... _.... .. ... 10-13
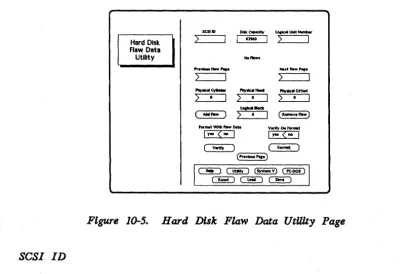
.Hard Dislk. Flaw Dat1l Utility Page .. _ ... " ... _10-16
Verify Utility Page _~ ... _ _ .. _ _ _ _ .... ,.~.*_".,
..
10 . . . _ _ I0-19Form.at lJtility Page _ ... " ... " .... "" ... _... . ... , .. 10-21
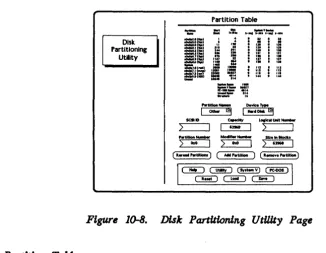
Disk Partitiowng Utility' Page .~\.,... ... , ... '.:aIl.11 t .. M . . . N~ . . . t . l • "11111.10-23
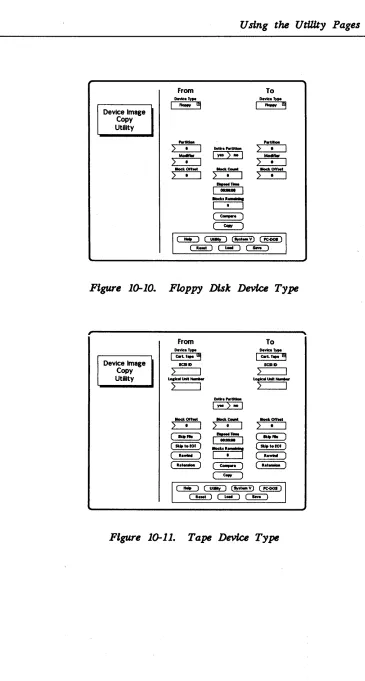
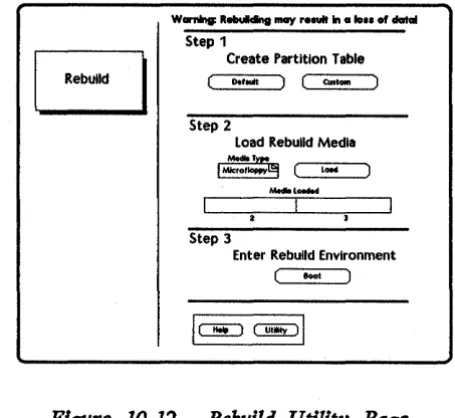
Device lJnage Copy Utility _ " . _ . _ ... _ .. , .... 10-26 Rebuild Utility Page _ _ _ ._.""",_~ .. , . ,... ... . .. 10-30 ~fV'el" Utility Men.us ~ .. ~~~~·tI • ..,u ... u ... '~OO<fl~ ... ~tl I . . I ""un sa • • 1111 1 . . 10-32
Startup Configuration lJtility Menu _____ ... _ ... _ _ 10-34 Main Utility lVlenu, _ _ _ ... _ .. _ _ _ _ ... _ ... _ _ ... "... " 10-35
Peripheral Co;u.figw'atiO,tl Men'!.l _ ... _ ... ., ___ . . ... " .... _ .. 10-39 Operating System Pard-meters Menll _ .. _ _ _ _ ... ,. ... __ .• _" .. 10-42 Disk Maintenan.ce Ut.Uities Menu " _ _ _ _ ' _ _ _ m,," I " , . . 10-43
l:>isk. Partiti.oning l'vfenu ... , ... _""_ .... __
"o.e_... ,_,, _ _ _
10-46 Device Jmage (;opy 'Utility Menu - -_ _ , _ _ "..., ... _ _ _ _ ... 10-48 Rebuild Utility Menu ________ ... - - -... _ .. 10-S411.1 Backing Up FUes _ .•. _ .... 0 _ _ _ _ . . . " • • ,
.«_, _ _ _
11-311.2 Creating (,urrent Rebuild Floppy Disks .. _ _ _ .. , _ _ _ _ ... _11-4 11.3 Booting fr01n the Rebuild Boot Floppy Disk _ H l _ _ _ ' " "",11-7 11A Entering the lTtility· Pages _ _ , ... , ... , ... ,., ... _ _ _ , _ _ _ 11-8 11.4.1 Entering the Utility Pages (In a Workstation " .. . , ... "'" ... " ... " ... "' ... 11-8 11.4.2 Entering the Utility Pages on a Server _ _ _ _ ~ .. "r .",,,._11-9
11..5 Verifyin.g lIa:rd Disk. Flaws _ .. , ... ,. '" '" ... ,.. . " ... 11-10
11.s~1 Verifying a Workstation. :Ual'd Disk. .. ""~... • ... "' .... e." ... 10. " ' _11-11
11.5.2 Verif-yin,g a .server HaJ:d :Dis.l.:. ~~(I",".'" JlIJl1 •••••• N~ . . . &II •• 8 •• M . . . . M ••• M .. mD • • • • 1 ••••• , •••• 11-12 11.6 FO:rnlat'ting the .fwd D~~" ~~ ... ~ •. ooe"I" I I . ' I I I . ' .i.,.le1M . . . III.~flJt.UI. • • .1 III • • • • • 11-13 11..6.1 Formatting 'Workstation FIa:rd llisks ... " ... _ _ ... " I . . . , . . . 11-13
11.6.2 Formatting Server
Ham
Disks _ _ _ _ _ """'''' .. . .. , 1M • 11-1411.7 Selecting the Rebuild Utility I},age Icon .. _ _ _ _ , ____ ... "'.... ..11-16
xvi Contents 11.8 11.8.1 11.8.2 11.8.3 11.8.3.1 11.8.3.2 11.9 11.10 11.11 11.12 11.12.1 11.12.2 11.13 11.14 11.1S
Repartitioning the Hard Disk _,_,, _ _ _ _ _ _ _ _ _ _ _ _ ,11-17 Using the Current Partition Table 11-18 Repartitioning Using Default Partitions
Repartitioning Using Custom Partitions
. . . I f 1111 1 1 ' 1 1 ' ' ' " . . 11 . . . 111 . . . 11-19 .11 . . 11 . . 11.11-20
Partitioning Overview _ .. _ _ _ ... _ _ _ _ _ _ _ _ _ _ _ _ _ ... 11-20
Creating Nonstandard Partitions """"., ,;"",,,, '''' "",,, .. ,, "'" """""""'" .. , .... ", .. ,,""" , 11-27
Loading the. Rebuild Root Media _"_'.' _ _ _ _ _ _ _ _ _ _ _ _ ,,,11-31 Entering the Rebuild Environment _11-32 Restorin.g the File Systems ... III III HI 111111 111111111111111 I I I 1111111111111111111111 '111111111 I 1111 . . . . 11-33
Loading Nucleus Software with newprod '"'' , ,,11-37 Preparing the Hard Disk. to Load Software from CDROM '" , . 11-37
Loading Software' I ' Ill . . . . I f . . . 11111 11111 1111 I . . 11~38
Preparing Nonstandard Partitions for Use 11-40 Loading Application Software with the newprod Utility "'" , , , , " ,11-41 Restorin.g Files from Backups ,,,,,,,,,,, .... ,,,, ,,,,,,,,11-42
Appendix k Keyboard Character Codes I I I . . . A-l
Appendix B: Read/Write, Compatibility of Floppy Disks with Intergraph
Wor.ksta.tions and mM
Pes..
1 I III IIITI ITI III ••• 1.1111111 •• 11' •••••• .B-lAppendix C: System V /PC-DOS Utilities s · I J.,I . . . C-l
Glossary" . IJ' . . . , . . . I
II . . . 11 . . . gl-l
Index."" , " , 1 1 1 1 1 1 " " 1 TII . . .
m-l
-Chapter 1:
Setting Up a New System
This chapter familiarizes the system manager with the responsibilities involved in setting up and maintaining an Intergraph workstation or server. Tasks that should be performed when a system is first set up are listed and briefly explained, and the reader is referred to the appropriate documents for more thorough documentation.
This chapter contains the following sections:
1.1 Setting Up and Adjusting the Hardware 1.2 Evaluating the Default Partitions
1.2.1 Default Partitions
1.2.2 Determining Partition Sizes
1.3 Configuring the Workstation Using the Utility Pages 1.4 Setting Up User Accounts
1.5 Assigning an Internet Address 1.6 Delivering Software
1.7 Determining a Backup Schedule
1.8 Using Intergraph System Documentation
1-3 1-4
1-4 1-5
Setting Up a New System 1-3
1.1
Setting Up and Adjusting the Hardware
When you receive an Intergraph workstation or server, your first concern will
be setting up the system.. Your Intergraph Field Representative will unpack and set up all Intergraph systems when they are delivered. Thus, you will not need to be concerned with this task.
However, once the systems have been set up, you can adjust the monitors, keyboards, and digitizing tables to meet individual (ergonomic) preferences. The CLIPPER Hardware Setup and Maintenance Guide (which is shipped with each Intergraph workstation or server) describes hardware adjustments that can be made to Intergraph workstations and also points out hardware main
components and ports.
Please refer to the CLIPPER Hardware Setup and Maintenance Guide for
1-4 Settlng Up a New System
1.2
Evaluating the Default Partitions
Your next concern in setting up a new system should be to evaluate hard disk partitions and, if necessary, repartition the hard disk. This section lists the default partitions that will already exist on a new system. It also provides background information to help you determine the partition sizes best suited for your system. For step-by-step instructions for repartitioning the hard disk, refer
to Chapter 11, "Rebuilding and Repartitioning the Hard Disk."
1..2..1 Default Partitions
Intergraph ships all new systems with the following standard (or default) hard disk. partitions:
80 MB 1S6 MB 355 MB 584 MB 670 MB
boot: 3988 7988 7988 7988 7988
root: 25000 25000 25000 25000 25000
swap: 27360 71000 71000 71000 71000
PC-OOS: SOOO none none none none
usr: 100000 200600 590298 1037988 1204900
usr2: none none none none none
Note:
Setting Up a New System 1-5
1.2.2 Determining Partition Sizes
The following partition requirements must be met for all Intergraph internal hard disks. You may change the hard disk partitions, but you must meet these requirements:
• The root partition must have at least 25,000 blocks. • The swap partition must have at least 15,000 blocks. • The usr partition must exist.
Additional partition requirements will differ from machine to machine, depending on the application software being used.
When you are determining partition sizes, you may want to consider the following:
• Will you be using InterPlot software? IT so, you may need a stash partition. Refer to the InterPlot User's Gulde for information on
determining whether you need a stash partition and, if so, determining its size.
• Will you be using any application (such as EMS or DPlPublisher) that requires a certain amount of swap space? To check for application
requirements, use the review option in the newprod utility. This option allows you to review information about a software product (such as fixes, features, open problems, comments, and installation help) before you load the product. To use this option, invoke newprod, move the cursor to the product for which you need to check partition requirements, and press r. You will need to review each application product that you will load on the system.
1-6 Settlng Up a New System
1.3
Configuring the Workstation Using the Utility Pages
Another task that you must perform when you first set up a system is to set certain system parameters such as system time, date, and nodename. These system parameters can be set using a series of menus called the UtiUty Pages.
This section lists the parameters that need to be configured when a system is being configured initially. For documentation on all of the Utility Page parameters, refer to Chapter 10, "using the Utility Pages."
To access the Utility Pages on a workstatlon, reboot the system and, at the
introductory screen, move the cursor within five seconds. Then, select the Utility icon. To access the Utility Pages on a server, reboot the system and,
at the introductory screen, press any key within five seconds. Then, key in
UT at the menu.
You should set the following Utility Page parameters when you first receive an Intergraph system:
•
•
•
•
•
•
Workstation Password. From the Main Utility Page, you can assign a password that restricts entrance to the Utility Page environment. It is important to restrict access to the Utility Pages because these menus allow you to format and repartition the hard disk. Only the system
administrator should be allowed to access the Utility Pages.
System Date. From the Main Utility Page, you can set the system date using the Month, Day, and Year, fields. When you first receive the system, you should set the system date.
System Time. From the Main Utility Page, you can set the system time using the Timezone, Daylight Savings, and Current Time fields. When you first receive the system, you should set the system time.
Screen Saver. From the Peripheral Configuration Utility Page, you can activate/deactivate the Screen Saver feature. Screen Saver causes the screen to dim. automatically after a certain period of inactivity. You will
probably wish to activate this feature to help preserve the screen.
Floating Menu Present. From the Peripheral Configuration Utility Page, you must specify whether a floating menu tablet will be used.
Setting Up a New System 1-7
• Serial Port Parameters. From the Peripheral Configuration Utility Page, you can configure the system for peripheral devices such as an alphanumeric terminal or a modem. Refer to the CLIPPER Hardware Setup and
Malntenance Gulde for more information on configuring a system for
peripheral devices.
• Automatic Dump. From the Operating System Parameters Utility Page, you can set the automatic dump switch on the system so that information pertinent to the cause of the crash will be provided.
• Automatic Reboot. From the Operating System Parameters Utility Page, you can determine whether the system will automatically reboot after a system crash.
1-8 Setting Up a New System
1.4
Setting Up User Accounts
Before you can log in to a system, you must have a user account. Intergraph
systems are delivered with certain system accounts that you can use to log in to the system initially. Once you have logged in using a system account, you can create your user accountCs).
Please read this section to become familiar with the system accounts that exist on Intergraph systems. Then refer to Chapter 3, "Creating and Maintaining User Accounts," for step-by-step instructions for creating user accounts.
The following are system and administrative accounts that you can use to log in to a new Intergraph workstation or server:
• sys Clog in to a local window)
• root (log in to the console window) • setup (log in to the console window) • sysadm (log in to the console window)
Note:
Setting Up a New System 1-9
1.5
Assigning an Internet Address
Another initial task is to assign an Internet address to your system. This task is necessary only if you will be using the TCPIIP, NFSIRFS, or NQS products. You will not be able to load these software products until you have assigned a valid Internet address to the node.
1-10 Settf,ng Upa New System
1.6
Delivering Software
The next task is to load software on your system(s). Intergraph workstations and servers are delivered with a set of nucleus products. These products are the minimum products required torq,n the System V operating system. Although these products will already reside on a new system, you must load any additional application software products that you purchased. Please refer to the CLIPPER Software Dellvery Gulde (DSA026420) for step-by-step
Setting Up a New System 1-11
1.7
Determining a Backup Schedule
1-12 Setring Up a New System
1.8
Using Intergraph System Documentation
Documentation for Intergraph workstation nucleus software products include the following:
CLIPPER User's Guide (DSA030010)
CLIPPER System Admlnlstrator's Guide (DSA029910)
CLIPPER Hardware Setup and Maintenance Guide (DSA025121) CLIPPER Software DeUvery Guide (DSA026320)
Intergraph Network Core User's Guide (DSA030110) InterPlot Users Guide (DP A025320)
IGDS Plotring Guide (DP A029610)
Network Queuing System User's Guide (DSA025411) CLIPPER Release News (DSA026920)
The following chart specifies the intended audience and purpose for each of these manuals.
Document
CLIPPER User's Guide
(nSA030010)
CLIPPER System Admlnlstrator's Guide
CDSA029910)
CLIPPER Hardware Setup
and Maintenance Guide
(nSA02S131)
CLIPPER Software DeUvery Guide
CDSA026320)
Intergraph Network Core User's Guide
CDSA030110)
To provide new users with a basic understanding of the workstation interface, including the CLIX operating system.
To provide system administrators with an understanding of the tasks involved in managing an Intergraph system.
To provide workstation users with instructions for adjusting
hardware components such as monitors and digitizing tables to to meet individual ergonomic requirements. In addition, this document contains information on maintaining hardware components.
To provide system administrators with instructions for setting up a delivery source and delivering software to Intergraph systems.
Document
InterPlot User's Guide
(DPA025320)
lGDS Plotting User's Guide
(DPA029610)
Network Queulng System
User's Gutde
(nSA025410)
CLIPPER Release News
(nSA026920)
Setting Up a New System 1-13
To provide workstation/server users with iustrnctiollB for using the utilities available on Intergraph systems to print jobs.
To provide IGDS plotting users with instructions for using the VPLOT, IPLOT, and V AXpath interfaces.
To provide workstation/server users with instructions for using the NQS product to print.
Chapter 2:
System Startup and Initialization
This chapter describes the processes invoked when a workstation or server is booting into the System V operating system.
This chapter contains the following sections:
2.1 2.2 2.3 2.3.1 2.3.2
The letc/init Process The I etcl getty Process The I etcl rc2 Process The letc/init.d Directory
Initializing Additional Processes from Multiuser Mode
2-3 2-5 2-6
2-7
System Startup and I nitiaUzation 2-3
2.1
The lete/init Process
The first process executed in System V version 3.1 is letclinit. The init process controls System V initialization.
The mit process invokes, or spawns, other processes. mit is invoked with one of seven arguments called run levels. The current run level determines the processes that init spawns. A run level is the current mode of system
operation. The following chart lists the system run levels (arguments for init) and describes their associated mode.
Run Level
o
1
2
3 4
5 6
Operation
shutdown single-user
multiuser, NFS support multiuser, RFS support not
used
not
used
rebootFor example, when the system is rebooting, it is operating at run level 6. When the workstation is running a MicroStation application and using NFS, it is functioning at run level 2.
The who -r command displays the current run level, as shown in the following example:
$ who -r
• run-level 2 May 29 14:44 2 0 S
$
2-4 System Startup and In/,ti,allzatlon
The letcllnlttab file associates processes with run levels. Study the following sample lnlttab file:
nt:sysinit:letclincd.start >/dev/console 2>&1
fs::bootwait:letclbcheckrc <ldev/console >/dev/console 2>&1 mt::bootwait:letc/bro <ldev/console >/dev/console 2>&1 sf:23:bootwait:letclsfsck -y <ldev/console >/dev/console 2>&1 is:2:initdefault
p3:s1234:powerfail:letc/shutdown -y -iO -gO >/dev/console 2>&1 sO:056.-wait:letc/rcO >/dev/console 2>&1 <ldev/oonsole
sl:l.-wait:letc/shutdown -y -is -gO >/dev/console 2>&1 <ldev/console n1:1:wait:lincd.start >/dev/console 2>&1
of:O:wait:letc/uadmin 2 0 >dev/console 2>&1 <ldev/console
RB:6.-wait:echo "\nThe system is being rebooted." >/dev/console 2>&1 rb:6.-wait:letcluadmin 2 1 >/dev/console 2>&1 <ldev/console
co:234:respawn:!etc/getty console console to:234:respawn:!etc!getty ttyOO 9600 none t1:234:off:letc/getty tty01 9600 none t2:234:off:letc/getty tty02 9600 none
s2:23:wait:letclrc2 >/dev/oonsole 2>&1 <ldev/console s3:3:wait:letc/rc3 >/dev/console 2>&1 <ldev/console
Each line, called a record, invokes a process. For example, the following
record invokes the leWrc2 process:
s2:23:wait:letc/rc2 >/dev lconsole 2>&1 <ldev lconsole The following describes each field in this record:
• sl is the unique identifier
~ 23 is the run level(s) at which the process executes
ED wait is the action status that determines when to execute the process
e leWrc2 >ldev/console 2>&1 <ldev/console is the process that mit executes
The second field indicates when (at which run level) the process in the last field is invoked. A process is executed at all run levels (all the time) if the second field is blank.
In the sample letcllnittab file, mit will execute the processes in the first three
records because the second field is blank. The mit process then continues to read the letcllrdttab file and looks for the inltdefault record (the fourth record
in th.e sample file). The lnltde/ault record specifies the default run level, which is 2 in this case. The mit process then executes all other I etcllnittab
records associated with run level 2 (those that have a 2 in the second field). Some of the processes invoked by mit are described in the following sections.
System Startup and [nlttalJ,zatf,on 2-5
2.2
The / etc/getty Process
The letJ;/getty process opens a device and spawns a login process to that device. For example, getty sets up a terminal line between workstation windows and the operating system or between CITs and the operating system.
The getty process reads the /etc/gettydeJs file, which contains information on setting the terminal type, modes, speed, and line discipline. The gettydeJs file also contains the default login prompt for the device.
The gettydeJs file is commonly modified so that the login prompt that appears on the device is changed. For example, if your configuration includes several servers with alphanumeric terminals connected to them, you can modify the login prompts so that they· uniquely identify the server. For example, you can modify a console login prompt to appear as "IS4000 console»".
2-6 System Startup and InltiaZlzation
2.3
Modifying the inlttab and
gettyde/s
Files for a 32-channel
RS-232 Iiiterface Assembly
If your workstation/server is equipped With a 32-channel RS-232 interface assembly, you may need to modify the letcltnlttob file before attaching external
devices that require a getty process to be running. (Any device that requires a login prompt requires a getty process to be running.) To determine if your workstation/server is equipped with a 32-channe1 RS-232 interface assembly, use the showconfig command to list the boards in the system. If the 32-channel serial interface board CMPcBS21) is listed, the workstation/server is equipped with the 32-channel interface assembly.
If the device you are attaching is not supported by the current gettydels
settings, the letclgettydels file may also need to be modified. The 9600 baud rate (and its associated settings) is the default gettydels setting and is suitable for most terminal devices. Refer to the information delivered with the external device being connected to determine the correct settings.
2.3.1 Modifying the / etcllnlttab Flle
In this subsection the terms respawn and
011
refer to how the port interprets the device attached to it. For example, a device (such as an alphanumeric terminal) that requires a login prompt requires the respawn delimiter. A device(such as a printer or plotter) that does not require a login prompt should use
the
011
delimiter. A modem should be set to respawn when used for dialing in only and011
when used for dialing out only.Note:
For more information on the ·tnlttab and gettydels files, refer to the
iDittab(4) and gettydefs(4) entries in the AT&T UNIX System V Programmer's Rslerence .Ma.ntJ4l. For more information on the getty
process,
see
the AT&T UNIX System V Admtnlstrator's Reference Manual.The 1 etc/iT'dttab file must include an entry beginning with "r" followed by the
number of the port (0-31) you are connecting a device to. Proceed through the following steps to modify the 1 etclln/,ttob file:
1. Access the superuser account by keying in su - at the system prompt.
Note:
Be sure to include the "-" after the "su" to access the . login environment of root.
System Startup and InltIallzcztlon 2-7
2. Change to the /ete ~ry.
3. Edit the Inlttab file and create an entry corresponding to the port the device
is being connected to. Be sure the device parameters entered (for example, 9600 baud rate in the following examples) match those of the device being
COllllected. The format for the mlttab entry is as follows: id:rstate:action:procesa
Notes:
For more information on the fields for the ,nlttab entries, refer to the iDittab(4) and gettydefs(4) entries in the AT&T UNIX System V
Program.mer's
klerence
MQ.1UlQ/, and the entry for the getty entry in theAT&T UNIX System V System AdmJ,nLstrator's Reference Manual.
In the following examples, "9600" is a label that refers to the associated baud rate entry in the gettydels file .
• For a device requiring the respawn delimiter, an example of the syntax for port 0 is as follows:
rO-.234:respawn:letc/getty ttrOO 9600 none
An example of the syntax for port 1 is as follows: rl:234:respawn:letc/getty ttrOl 9600 nono
• For a device requiring the off delimiter, an example of the syntax for port 0 is as follows:
rO:234:off:letc/getty ttrOO 9600 none
An example of the syntax for port 1 ~ as follows: rl:234:off:/ etc/getty ttrOl 9600 none
4. Continue adding the appropriate 1i11e for each port being connected.
2-8 System Startup and InltIalizatlon
2.3.2 Modifying the /etc/gettyM/s Fl1e
If you are connecting a device whose parameter setup is not supported in the
/etc/gettyde/s file, you need to modify the file to support the new device. The
new entry should match the terminal settings (such as baud rate, local echo, stop bits, or data bits) of the device, being connected. Refer to the information
delivered with the device to determine its correct settings.
Note:
Refer to the termioC7S) entry in the CLIX System Administrator's
Reference MatUltIl, for more information on terminal settings.
Proceed through the following steps to modify the /etc/gettyde/s file: 1. Access the superuser account by keying in su - at the system prompt.
Note:
Be sure to include the "-" after the "su" to access the root login environment.
2. Change to the / etc directory.
3. Edit the gettydefs file and create an entry whose parameters correspond to those of the device being connected.
Note:
When editing the file, verify that the entry contains no carriage returns before the end of the line.
System Startup and 1 nltf,Qllzatlon 2-9
2A
The
letc/rc2
Process
The letclrc2 file is a shell script eXecuted (spawned) on run level 2 (multiuser environment). The letclrc2 file starts the
processes
forrun
level 2. The processes invoked by rc2 reside in fUes in an associated directory, letclrc2.Jl. The letclrc2.Jl directory contains startup processes for run level 2. Each startup file starts with an S and is followed by a two-digit priority number. The following is a sample listing of the rc2.d directory:# Is /etc/rc2.d
SOlMOUNTFSYS S04enocl
SOlSW APADD SOSRMTMPPILES
S02DODOO S20st18etup # S10uucp S15ctoD SSOlmgr Wino S90nqs
These startup files are shell scripts. These shell scripts invoke standard
processes (such as setting up and mounting the lusr file system(s), cleaning up and removing the Itmp and lusrltmp directories, and starting cron) that must be started for run level 2. In addition, they initialize products (such as the Screen Manager and Intergraph Network Core ONC)) specific to the mtergraph multiuser environment.
Any other processes that need to be initial.ized when the system boots into multiuser mode
<run
level 2) must be linked from the I etcltnlt.Jl directory to the rc2.Jl directory.Note:
"Initializjng Additional Processes from Multiuser Mode" in 2.4.2 describes how to link. and initialize processes such as Ip, Ipr, perf, and acoountiq so they start automatically in multiuser mode.
2.4.1 The / etc/init.d Directory
All startup and kill processes invoked at system initialization or shut down are stored in one common directory. letc/tnlt.Jl. The files in rc2.d and rc3.Jl are linked to I etcllnJt.d so they are executed at the specified run level The lnJt.d directory acts as a common holding place for startup and kill shell scripts. Some startup and kill files, such as accounting, Ip, Ipr, and perf may not be linked to the rc<n>.d directory, and, therefore, will not be started automatically. The following section describes how to add processes to rc2.d so they are automatically started at bootup.
2-10 System. Startup and In/,tI,al/,zatlon
2A.2 Initializing Additional Programs from Multiuser Mode
The startup files for aooounting, Ip (line printer spooling utilities), Ipr (Berkley printer spooling utilities), and perf (performance measurement utilit.ies) are stored in the letcllnit.d directory but are not li.nk.ed to a multiuser directory
Cletclrc2.d or letclrc3.d) by default.
Follow these'steps to link accounting, Ip. Ipr, or perf to a multiuser directory so they are invoked automatically when the system boots:
1. Access the superuser account and change to the /etc/inlt.d directory as
follows:
# cd letcliDiUl
2. Key in the program filename followed by init, as shown in the following example:
# Jlp mit :# Jacct bUt
:61 Jlpr iDit 1# Jper:f hUt
The programs are now linked to the rc2.d directory and will be automatically invoked when you enter run level 2. They are automatically assign.ed a new
filename and priority number. '
Note:
For information on Ipr refer to the CLIX Programmer's and User's Reference ManuaL For information on the Ip command refer to the AT&T UNIX System V User's la/erenes Manual.. For information on
aocounting
refer to the AT&T UNIX System V Programmer's Reference Manual. For information on the perf program refer to the sa(l) and sa(1M) commands in the AT&T UNIX System. V System AtlmJ.nlstrator's laferenes Ma7UUJl.Chapter 3:
Creating and Managing User Accounts
Before you can add user accounts to a new system, you must be able to log in to the system. Several system and administrative accounts are available for this purpose. This chapter begins by listing and describing these accounts. Then, procedures for adding and removing user accounts and administering passwords are provided. In addition, this chapter discusses file protection codes and how they apply to user accounts.
This chapter contains the following sections:
3.1 3.1.1 3.1.2 3.1.3 3.1.4 3.1.5 3.2 3.2.1 3.2.2 3.3 3.3.1 3.3.2 3.4 3.4.1 3.4.2 3.4.3 3.4.4 3.4.4.1 3.4.4.2 3.4.4.3 3.5 3.5.1 3.5.1.1 3.5.1.2 3.5.2 3.5.3 3.5.4 3.5.4.1 3.5.4.2
System and Administrative Accounts The root Account
The sysadm Account The setup Account The sys Account The nuucp Account Adding User Accounts
Using addusers to Add User Accounts Using sysadm. to Add User Accounts Removing User Accounts
Using rmusers to Remove User Accounts Using sysadm. to Remove User Accounts Assigning, Changing, and Removing Passwords Restrictions on Passwords
Creating a Password
Forcing a Password Change Removing a Password
Removing a Password from User Accounts Removing the root Password
Removing the Utility Pages Password Using Protection Codes to Manage Files File Protection Codes
Directory Files Ordinary Files
Modifying File Permissions Modifying File Ownership Changing Group Access Changing Your Active Group Changing the Group of a File
Creatl.ng and Managlng User Accounts 3-3
3.1
System and Admjnjstrative Accounts
The following are system and administrative login accounts. The system administrator will need to log in using one of these accounts to set up user accounts on a new system.
o
rooto
sysadmo
setupo
sysEach of these accounts is described in the following sections.
3.1.1 The root Account
The root account is a special account that only the system administrator should
access. This account (also known as the superuser account) has special
privileges, including access to all system files and resources. Thus, this account should be passworded at all times.
You can gain superuser privileges by logging in as root in the console window or by issuing the su (set user) command at the system ($) prompt. The
default prompt is
*
and the home directory is the root (!) directory when you are working in superuser mode.Note:
Any user who knows the root password can key in so. at the system prompt and gain superuser privileges. To maintain system security, keep the
root password confidential. Only users who should have system
management privileges should know the root password.
3.1.2 The sysadm Account
The sysadm account is an administrative account that invokes the sysadm utility. You should restrict access to this account by assigning a password to it because this utility provides a mechanism for adding and removing users from the system.
You must log in to this account through the console window. The sysadm
account uses the restricted shell (rsh). When you log in, the sysadm utility is
invoked automatically, and when you quit this utility, you will automatically
3-4 Creating and Managlng User Accounts
The sysadm utility is a menu-driven utility that allows you to perform file management, machine management, package management, system setup, and user management tasks. For more information on this utility, refer to the AT&T System V manual page for sysadm(lM).
3.1.3 The setup Account
The setup account is an administrative account that invokes the setup utility.
You should restrict access to this account by assigning a password to it because this utility establishes the current user as the owner of the machine.
You must log in to this account through the console window. The setup
account uses the restricted shell (rsh). When you log in, the setup utility is invoked automatically, and when you quit this utility, you will automatically
be logged out. Thus, when you log in using this account, you can access only the setup utility.
The setup utility is a menu-driven utility that is actually a part of the
sysadm utility. -The setup utility allows you to set the system time and date, system owner, and system and administrative passwords. This utility is
intended to be used for initial system setup tasks. For more information on this utility, refer to the AT&T System V manual page for setup(l).
3.1.4 The sys Account
The sys account can be used to log in to the console window or a local window. This account does not assume superuser privileges. The home directory for sys is lusr/src.
3.1.5 The nuucp Account
Creatlng and Managlng User Accounts 3-5
3.2
Adding User Accounts
One primary duty for the system manager is to set up and maintain user accounts.
The following steps are required to add user accounts to the system. You can perform these steps manually, or you use the addusers or sysadm utility to automate the process.
1. Create a new user record for the account in the /etc/passwd file. 2. Create a default user directory (/usr/<logln» for the new user. 3. Change ownership of the new user directory.
Note:
When you add user accounts, the usemame must consist of eight or fewer alphanumeric characters, beginning with an alphabetic character.
The addusers utility has the following advantages:
•
•
•
addusers copies skeleton files (.env, .exrc, and .prolile) to the new user directory, and sysadm does not.
addusers allows you to specify the login shell, whereas sysadm does not.
If you specify the new usemame as an argument to the addusers command (as in addusers j)hn), the user account will be added and you will not be prompted for information. If you normally accept all installation defaults, this feature allows you to add user accounts easily and quickly.
The sysadm utility has the following features:
• sysadm allows you to edit or skip (cancel without saving) a user account before it is saved, whereas addusers does not allow input errors.
• sysadm allows you to assign a password to the new user account, whereas addusers does not.
• sysadm allows you to assign a user ID number to the new account, whereas addusers does not.
3-6 Creating and Managlng User Accounts
3.2.1 Using addusers to Add User Accounts
The addusers utility automates the process of adding user accounts to the system. Follow these steps to use this utility:
1. A<X:eSS the superuser account by· keying in
su.
at the system prompt.2. To initiate the addusers utility, key in the following:
*
addusem Note:As an alternative, if you specify the new username as an argument to the ad.dusers command, the user account will be added and you will not be
prompted for information. If you normally accept all installation defaults,
this feature allows you to add user accounts easily and quickly.
3. The utility prompts for the new login name(s). The login name can contain a maxjmum of eight characters.
You can add one or many user accounts. When addusers adds multiple user accounts, it assigns the same group name, user. information, login
directory (such as lusr or lusr2), and login shell for all new users. If you need to set up the user accounts differently for the new
users,
add each account separately.To add one user account, key in the new username as follows:
New login name(s) - ) acott
To add multiple user accounts, key in the new usernames separated by
spaces as follows:
New login name(s) - ) donna deana paul
4. The adciusers utility prompts you for the following information:
• Group name? [users]
The group name determines the group identification number (GID) in the
Creattng and Managlng User Accounts 3-7
• User info? [new user]
The user information that you supply will be placed in the miscellaneous information field (the fifth. field) in the / etc/ passwd file. This
information is used for identification. For example, if the system manager is checking the / etc/ passwd file, information such as employee department, position, and phone number might be useful. User
information defaults to "new user."
• Login directory? [/usr]
Login directory defaults to /usr/<logln>, where <login> represents the new login name. However, the system manager may place a user in /usr2, /usr3, or any other file system.
• Login shell? [/binlksh]
The login shell is the UNIX shell that the user will log in under. The default is the Korn shell (/bln/ksh), but the system manager may choose
to have users log in under the Bourne shell (/bln/sh) or the C shell (/btn/ csh). The Bourne shell is the standard System V shell; the Korn shell is very similar to the Bourne shell but has additional features such as command recall; the C shell has a syntax similar to the C
programming language.
After you have responded to all prompts, the following message appears for each user added:
Username "scott" added
3-8 Creating and Managing User Accounts
3.2.2 Using sysadm to Add User Accounts
The sysadm utility also automates the process of adding user accounts to the system. Follow these steps to use this utility:
1. Access the superuser account by keying in su at the system prompt.
2. To initiate the sysadm utility, key in the following:
:# sysadm
3. The following menu appears:
SYSTEM ADMINISTRATION
1 filemgmt 2 machinemgmt 3 packagemgmt 4 syssetup
5 usermgmt
file management menu machine management menu package management menu system setup menu user management menu
To add user account(s), key in S.
4. The following menu appears:
USER MANAGEMENT
1 addgroup
2 adduser 3 delgroup 4 deluser
5 lsgroup
6 lsuser 7 modadduser 8 modgroup 9 moduser
add a group to the system add a user to the system delete a group from the system delete a user from the system
list groups in the system
list users in the system
modify defaults used by adduser
menu of commands to modify group attributes menu of commands to modify a user's login
To add a user, key in 2.
5. The sysadm utility prompts for the following information. If you wish to quit the utility (without adding the user), key in q at any of the
following prompts. If you wish to see additional information on any prompt, key in ? at that prompt.
• Enter user's full name [1, q]:
This information is not the login name. The information will be placed in the / etc/ passwd file's miscellaneous information field. For example,