Biotechnology Explorer
™
Chromosome 16:
PV92 PCR Informatics Kit
Catalog #166-2100EDU
explorer.bio-rad.com
Note: Kit contains temperature-sensitive
reagents. Open immediately upon arrival
and store components at –20°C or at 4°C
as indicated.
Welcome to Biotechnology Explorer
Technical advances over the past several decades have created a new branch of science, biotechnology, which has transformed and revolutionized life science research. Powerful methods to isolate, analyze and manipulate DNA, the basic building block of life, have already allowed many breakthroughs in understanding biological processes, human disease states and therapeutic methodologies. For these reasons, it is becoming increasingly important to expose students to these concepts. In the coming decades, when a routine visit to a family doctor might include a battery of DNA diagnostic tests — and DNA fingerprints will become the definitive form of personal identification — an understanding of these principles will be as important as learning about hygiene and nutrition.
In order to provide students at the high school, junior college and college levels with exposure to the technologies and applications of biotechnology, Bio-Rad has developed a series of easy-to-use instructional classroom kits supported by inquiry-based-curricula, equipment, and supplies. The Biotechnology Explorer Program has become the program of choice for both beginning and expert teachers seeking to bridge the gap between science in their classrooms and science in the real world.
Because of the increasing use of the polymerase chain reaction (PCR1) in modern
medicine and science, and the potential impact on every member of society, it is important to provide students with an understanding of the basic principles and applications of PCR. In this kit, students perform PCR to amplify a segment of their own DNA. The segment of DNA they will amplify is present in the genes of many, but not all individuals. Analysis of the data generated in the laboratory will open the door to teaching basic principles of molecular biology, population genetics, and DNA fingerprinting and will illustrate how PCR is being used in many other areas of biology.
The Biotechnology Explorer program is totally unique and extremely innovative. Our laboratory-based activities capture the imagination while enhancing students’ awareness and understanding of the applications of biotechnology which will increasingly influence their lives and affect their personal and community decisions.
Developed over five years in collaboration with the San Francisco Bay Area Biotechnology Educational Consortium, Rutgers University, Maxygen Inc., and the Stanford Human Genome Center Education Program, our curricula and kits were created by teachers and scientists working together. We strive to continually improve our curriculum and products. Your input is extremely important to us. We welcome your stories, comments and suggestions!
Ron Mardigian
Biotechnology Explorer Program Bio-Rad Laboratories
[email protected] explorer.bio-rad.com
Table of Contents
Page
Instructor’s Guide
Kit Inventory Checklist ...1
Background for Teachers ...3
Suggested Lesson Flow ...12
Instructor’s Advance Preparation Overview ...13
Instructor’s Advance Preparation ...16
Lesson Highlights ...25
Interpretation of Results and Troubleshooting Guide ...30
Quick Guides...33
Student Manual
Introduction ...39Lesson 1 Cheek Cell DNA Template Preparation ...41
Hair Follicle DNA Template Preparation...45
Focus Questions ...49
Lesson 2 PCR Amplification ...50
Focus Questions ...56
Lesson 3 Gel Electrophoresis and Staining of Agarose Gels...57
Focus Questions ...68
Lesson 4 Analysis and Interpretation of Results ...69
Focus Questions ...70
Lesson 5 Analysis of Classroom Data Using Bioinformatics ...73
Appendices
Appendix A Review of Molecular Biology ...74Appendix B Glossary of Terms...80
Appendix C PCR Amplification and Sterile Technique ...82
Appendix D Teacher Answer Guide ...83
Appendix E Typical Classroom Results ...89
Appendix F References ...90
Appendix G Gel Loading Template...91
Kit Inventory Checklist
This section lists the components provided in the PV92 PCR/informatics kit. It also lists required accessories. Each kit contains sufficient materials for 8 student workstations, with 4 students at each station. Please use this checklist to take inventory of your supplies before beginning this lab.
Note: If preparing genomic DNA using the hair follicle protocol (page 45), protease (catalog #166-2003EDU) must be ordered separately from the kit.
Kit Components Quantity (✔✔)
Store at –20°C (temperature-sensitive components)
PV92 homozygous (+/+) control, 100 µl 1 vial ❐
PV92 homozygous (–/–) control, 100 µl 1 vial ❐
PV92 heterozygous (+/–) control, 100 µl 1 vial ❐
PCR master mix (dNTPs, Taq DNA polymerase, buffer),
2x, 1.2 ml 1 vial ❐
Forward and reverse primer mix, 50x, 25 µl 1 vial ❐
EZ Load™molecular mass ruler (DNA standard), 100 µl 1 vial ❐
Store at 4°C
50x TAE buffer, 100 ml 1 ❐
Agarose powder, 5 g 1 ❐
Fast Blast™DNA stain, 500x, 100 ml 1 bottle ❐
InstaGene™matrix, 20 ml 1 bottle ❐
PV92 XC loading dye, 5x, 1 ml 1 vial ❐
Store at room temperature
PCR tubes 50 ❐
Screwcap tubes, 1.5 ml 50 ❐
Micro test tubes, capless, 1.5 ml 50 ❐
Micro test tubes, with attached caps, 1.5 ml 60 ❐
Foam micro test tube holders 16 ❐
Gel staining trays 4 ❐
Manual 1 ❐
Refills available separately
PV92 PCR Kit TS refill: 166-2119EDU (includes PCR primers, positive controls, DNA molecular mass ruler, master mix containing dNTPs, buffer, DNA polymerase)
PV92 PCR kit RT refill: 166-2139EDU (includes InstaGene matrix, PV92 XC DNA loading dye, Fast Blast DNA stain, agarose, 50x TAE)
Required Accessories - Not Included in This Kit
Student workstation (4 students) Quantity per Station
P-20 micropipets, 2–20 µl (catalog #166-0506EDU)
or 10 µl fixed-volume pipet 1 ❐
and 20 µl fixed-volume pipet 1 ❐
Xcluda pipet tips (filter type) 2–20 µl (catalog #211-2006EDU) 1 rack ❐ Mini-Sub®Cell GT electrophoresis chamber
with 7 x 7 cm gel tray, 8-well comb
(catalog #166-4400EDU) 1 ❐
PowerPac™Junior power supply (catalog #165-5048EDU), or 1 ❐
PowerPac™Basic power supply (catalog #164-5050EDU) 1 ❐
Ice bucket with chipped or crushed ice 1 ❐
Permanent markers 1 ❐
Large containers for destaining (if applicable) 1–3 per 2 stations ❐
Cups with 10 ml 0.9% saline 4 ❐
Copy of Quick Guide or protocol 1 ❐
Tweezers or forceps (for hair follicle protocol) 1 ❐
Scissors or razor blade (for hair follicle protocol) 1 ❐
Teacher setup or lab equipment Quantity per Kit
P-20 micropipet, 2–20 µl (catalog #166-0506EDU) 1 ❐
P-200 micropipet, 20–200 µl (catalog #166-0507EDU) 1 ❐
P-1000 micropipet, 100–1,000 µl (catalog #166-0508EDU) 1 ❐
Xcluda®pipet tips (PCR filter type)
2–20 µl (catalog #211-2006EDU) 3 racks ❐
20–200 µl (catalog #211-2016EDU) 3 racks ❐
100–1,000 µl (catalog #211-2021EDU) 1 rack ❐
Gene Cycler™thermal cycler (catalog #170-6700EDU) or 1 ❐
MyCycler™ thermal cycler (catalog #170-9701EDU) 1 ❐
Microwave oven 1 ❐
Water bath (56 and 100°C) (catalog #166-0504EDU) 1 each ❐
Protease (catalog #166-2003EDU), for hair follicle protocol only 1.3 ml ❐
0.9% saline solution 500 ml ❐
Distilled or deionized water 500 ml ❐
1,000 ml Erlenmeyer flask for preparing agarose 1 ❐
500 ml flask or beaker for DNA stain 1 ❐
Lab tape (not Scotch tape) 1 ❐
Microcentrifuge (catalog #166-0602EDU) or 1 ❐
Mini centrifuge (catalog #166-0603EDU) 4 ❐
Optional Accessories Quantity per Class
Gel support film for agarose (catalog #170-2984EDU) 1 ❐
Rocking platform (catalog #166-0709EDU) 1 ❐
Vortexer (catalog #166-0610EDU) 1 ❐
Acetate sheets for tracing gels 8 ❐
Storage and stability: Although the kit is shipped under ambient conditions, the components are guaranteed for 1 year from the date of purchase when stored under the appropriate conditions. The kit contains temperature sensitive components. Open the kit immediately and store the components at either –20°C, 4°C, or room
Background for Teachers
Introduction to PCR
In 1983, Kary Mullis2at Cetus Corporation developed the molecular biology technique
that has since revolutionized genetic research, earning him the Nobel Prize in 1993. This technique, termed the polymerase chain reaction (PCR), transformed molecular biology into a multidisciplinary research tool. Many molecular biology techniques used before PCR were labor intensive, time consuming and required a high level of technical expertise. Additionally, working with only trace amounts of DNA made it difficult for researchers in other biological fields (pathology, botany, zoology, pharmacy, etc.) to incorporate molecular biology into their research schemes.
PCR had an impact on four main areas of biotechnology: gene mapping, cloning, DNA sequencing, and gene detection. PCR is now used as a medical diagnostic tool to detect specific mutations that may cause genetic disease,3in criminal investigations and courts of
law to identify suspects on a molecular level,4and in the sequencing of the human genome.5
Prior to PCR the use of molecular biology techniques for therapeutic, forensic, pharmaceutical, or medical diagnostic purposes was not practical or cost-effective. The development of PCR technology changed these aspects of molecular biology from a difficult science to one of the most accessible and widely used tools in genetic and medical research. PCR and Biotechnology — What Is It and Why Did It Revolutionize an Entire Research Community?
PCR produces exponentially large amounts of a specific piece of DNA from trace amounts of starting material (template). The template can be any form of double-stranded DNA, such as genomic DNA. A researcher can take trace amounts of DNA from a drop of blood, a single hair follicle, or a cheek cell and use PCR to generate millions of copies of a desired DNA fragment. In theory, only one single template strand is needed to generate millions of new DNA molecules. Prior to PCR, it would have been impossible to do forensic or genetic studies with this small amount of DNA. The ability to amplify the precise sequence of DNA that a researcher wishes to study or manipulate is the true power of PCR.
PCR amplification requires the presence of at least one DNA template strand. In this kit, human genomic DNA isolated from students’ own cells will be the source of the template strands. One of the main reasons PCR is such a powerful tool is its simplicity and specificity. All that is required are inexpensive reaction buffers, four DNA subunits (deoxynucleotide triphosphates of adenine, guanine, thymine, and cytosine), a DNA polymerase, two DNA primers, and minute quantities of the template strand that one wants to amplify. Specificity comes from the ability to target and amplify one specific segment of DNA out of a complete genome.
PCR Makes Use of Two Basic Processes in Molecular Genetics 1. Complementary DNA strand hybridization
2. DNA strand synthesis via DNA polymerase
In the case of PCR, complementary strand hybridization takes place when two different oligonucleotide primers anneal to each of their respective complementary base pair sequences on the template. The two primers are designed and synthesized in the laboratory with a specific sequence of nucleotides such that they can anneal at the opposite ends and on the opposite strands of the stretch of double-stranded DNA (template strand) to be amplified.
Before a region of DNA can be amplified, one must identify and determine the sequence of a piece of DNA upstream and downstream of the region of interest. These areas are then used to determine the sequence of oligonucleotide primers that will be synthesized and used as starting points for DNA replication. Primers are complimentary to the up- and downstream regions of the sequence to be amplified, so they stick, or anneal, to those regions. Primers are needed because DNA polymerases can only add nucleotides to the end of a preexisting chain.
The DNA polymerase used in PCR must be a thermally stable polymerase because the polymerase chain reaction cycles between temperatures of 60°C and 94°C. The
thermostable DNA polymerase (Taq) used in PCR was isolated from a thermophilic bacterium, Thermus aquaticus, which lives in high-temperature steam vents such as those found in Yellowstone National Park.6
Two new template strands are created from the original double-stranded template on each complete cycle of the strand synthesis reaction. This causes exponential growth of the number of template molecules, i.e., the number of DNA strands doubles at each cycle. Therefore, after 30 cycles there will be 230, or over 1 billion, times more copies than at the beginning. Once
the template has been sufficiently amplified, it can be visualized. This allows researchers to determine the presence or absence of the desired PCR products and determine the similarities and differences between the DNA of individuals. Depending on the DNA sequence analyzed, differences among individuals can be as great as hundreds of base pairs or as small as a single base pair or single point mutation.
Genes and DNA
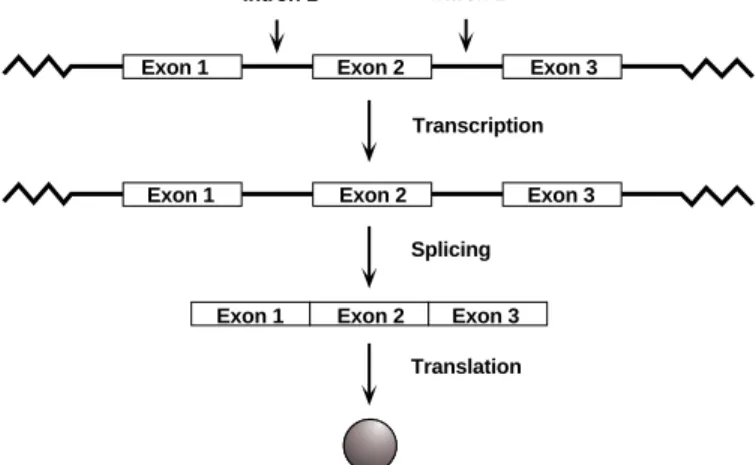
It is estimated that the 23 pairs of chromosomes (46 total chromosomes) of the human genome contain a total of 30,000–50,000 genes. Each gene holds the code for a particular protein. Interestingly, these 30,000–50,000 genes comprise only about 5% of chromosomal DNA. The other 95% is noncoding DNA. This noncoding DNA is found not only between, but within genes, splitting them into segments. In eukaryotes, these sequences within genes (called introns) are transcribed into RNA but in the end do not make a protein called introns. The sequences that do code for proteins are called exons. Both introns and exons are initially transcribed, then introns are spliced out of the RNA to create messenger RNA (mRNA).
In eukaryotes, genomic DNA is transcribed into RNA molecules containing both introns and exons for a particular gene. While the RNA is still in the nucleus (before being trans-ported out of the nucleus), the introns (in = stay within the nucleus) must be removed from the RNA while the exons (ex = exit the nucleus) are spliced together to form the complete coding sequence for the protein (Figure 1). This process is called RNA splicing. Some genes may contain a few introns, others may contain dozens.
Fig. 1. Splicing of introns from genes.
As we have discussed, functional segments of genes (exons) code for proteins — molecules that carry out most cellular functions. Exon sequences are therefore similar among individuals. Introns, on the other hand, often vary in size and number among individuals. Intron sequences are thought to be the result of the differential accumulation of mutations throughout evolution that are silently passed to descendants through the hereditary code. It is this difference in intron sequences that allows us to determine human genetic diversity. The identification of these distinctive characteristics in the DNA represent the molecular basis for human identification and population genetics.
Throughout evolution, intron sequences have been the target of random insertions by short repetitive interspersed elements, also known as SINEs.7SINEs have become randomly
inserted within our introns over millions of years. One such repetitive element is called the Alu sequence7(Figure 2). This is a DNA sequence about 300 base pairs long that is
repeated, one copy at a time, almost 500,000 times within the human genome.8The origin
and function of such randomly repeated sequences is not yet known. The Alu name comes from the Alu I restriction enzyme recognition site that is found in this sequence.
Fig. 2. Location of an Alu insertion within an intron.
Some of these Alu elements have characteristics that make them very useful to geneticists. If present within introns of genes associated with particular pathologies, they can thereby be associated with that disease. When present within the introns of genes, Alu repeats can also be used to estimate relatedness among individuals. In this activity, analysis of Alu repeats is used to estimate the frequency of an insert in a population and is a simple measure of molecular genetic variation — with no reference to disease or relatedness among individuals. Intron 1 Exon 1 5' 5' 5' 3' 3' 3'
Exon 2 Exon 3 Genomic DNA
Genotype Phenotype Pre-mRNA mRNA Protein Exon 3 Exon 2 Exon 1
Exon 1 Exon 2 Exon 3 Intron 2 Transcription Splicing Translation Intron ALU
This kit provides a simple PCR-based screen for a single Alu sequence within the PV92 locus on chromosome 16. This particular Alu intron is dimorphic. That is, the element is present in some individuals but not others (Figure 3). Some people have the insert in the PV92 locus of one of their chromosome 16, others may have the insert in both homologous chromo-somes (two alleles), and some do not have the insert in either chromosome. The presence or absence of this insert can be detected using the polymerase chain reaction followed by agarose gel electrophoresis.
In this activity, students will isolate their own genomic DNA from their cells. They will use primers that flank both the entire Alu insertion (300 base pairs in length) and 641 base pairs of the PV92 locus to amplify a 941 base pair fragment (if the Alu element is present) or a 641 base pair fragment (if the Alu element is absent). Agarose gel electrophoresis of the PCR products is sufficient to distinguish among homozygotes (+/+) for the presence of the Alu repeat (941 base pair product only), homozygotes (–/–) for the absence of the Alu repeat (641 base pair product only), and heterozygotes (+/–) having both the 641 and the 941 base pair products.
Fig. 3. The presence or absence of the Alu insert within the PV92 locus on chromosome 16.
Important Notes for the Instructor
Please note that since PV92 alleles are inherited from parents and can potentially reveal information about family relationships, we caution against generating genotypic data from multiple members of a family. If confidentiality is a concern, we suggest that the instructor mix up student samples to ensure anonymity. Student samples can be randomized at any point after cells are harvested.
Two protocols are provided for genomic DNA preparation. One involves the collection of oral epithelial cells using a saline mouthwash. The other isolates genomic DNA from hair follicles. Both methods are minimally invasive, and yield robust PCR products. Instructors may choose either protocol based on personal or student preference, or local restrictions.
ALU
PV92 Genotype Size of PCR Products
Homozygous (+/+) 941 base pairs
641 base pairs
941 and 641 base pairs Homozygous (–/–)
Heterozygous (+/–) ALU
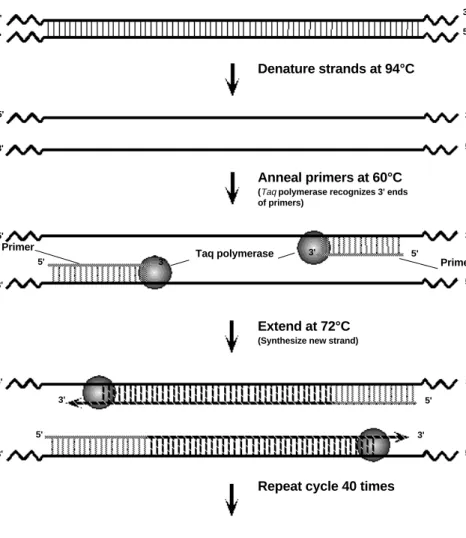
PCR Step by Step
PCR involves a repetitive series of cycles, each of which consists of template denaturation, primer annealing, and extension of the annealed primer by Taq DNA polymerase. Before beginning DNA amplification, genomic DNA is prepared from students' cells.
Following sample preparation, the template DNA, oligonucleotide primers, thermostable DNA polymerase (Taq), the four deoxynucleotides (A, T, G, C), and reaction buffer are mixed in a single micro test tube. The tube is placed into the Gene Cycler™ or MyCycler™ thermal cycler. These thermal cyclers contain an aluminum block that holds the samples and can be rapidly heated and cooled across extreme temperature differences. The rapid heating and cooling of this thermal block is called temperature cycling or thermal cycling.
The first step of the PCR temperature cycling procedure involves heating the sample to 94°C. At this high temperature, the template strands separate (denature). This is called the denaturation step.
The thermal cycler then rapidly cools to 60°C to allow the primers to anneal to the sepa-rated template strands. This is called the annealing step. The two original template
strands may reanneal to each other or compete with the primers for the primers comple-mentary binding sites. However, the primers are added in excess such that the primers actually out-compete the original DNA strands for the primers’ complementary binding sites.
Lastly, the thermal cycler heats the sample to 72°C for Taq DNA polymerase to extend the primers and make complete copies of each template DNA strand. This is called the extension step. Taq polymerase works most efficiently at this temperature. Two new copies of each complementary strand are created. There are now two sets of double-stranded DNA (dsDNA). These two sets of dsDNA can now be used for another cycle and subsequent strand synthesis.
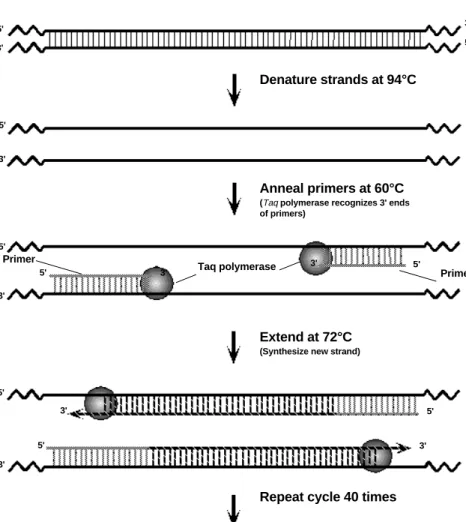
At this stage, a complete temperature cycle (thermal cycle) has been completed (Figure 4).
Fig. 4. A complete cycle of PCR.
Usually, thermal cycling continues for about 40 cycles. After each thermal cycle, the number of template strands doubles, resulting in an exponential increase in the number of template DNA strands. After 40 cycles there will be 1.1 x 10¹²more copies of the original number of
template DNA molecules.
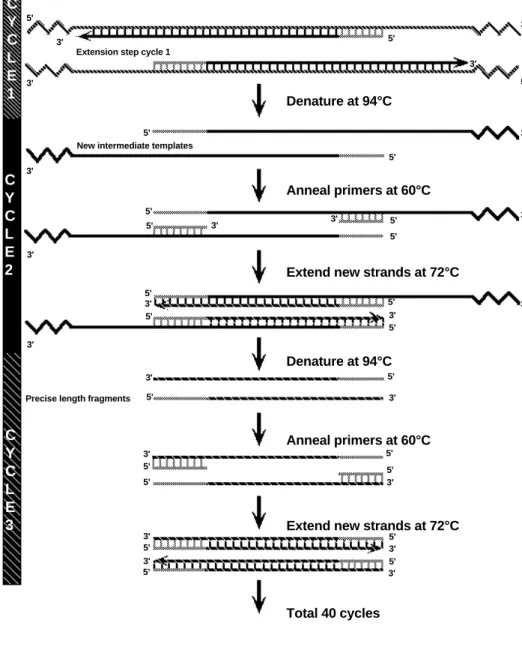
PCR generates DNA of a precise length and sequence. On the first cycle, the two primers anneal to the original genomic template DNA strands at opposite ends and on opposite strands. After the first complete temperature cycle, two new strands are generated that are shorter than the original template strands but still longer than the length of the DNA that the researcher wants to amplify. It isn’t until the third thermal cycle that fragments of the precise length are generated (Figure 5).
Denature strands at 94°C
Anneal primers at 60°C
(Taq polymerase recognizes 3' ends
of primers)
Extend at 72°C
(Synthesize new strand)
Repeat cycle 40 times
5' 5' 5' 5' 5' 5' 5' 5' 5' 5' 3' 3' 3' 3' 3' 3' 3' 3' 3' 3' 5' 5' 3' 3' Primer Taq polymerase Primer
Fig. 5. Generation of precise-length fragments.
It is the template strands of the precise length that are amplified exponentially (Xn, where
X = the number of original template strands and n = the number of cycles). There is always one set of original long-template DNA molecules which is never fully duplicated. After each thermal cycle, two intermediate-length strands are produced, but because they can only be generated from the original template strands, the intermediate strands are not exponentially amplified. It is the precise-length strands generated from the intermediate strands that amplify exponentially at each cycle. Therefore, if 20 thermal cycles were conducted from one double-stranded DNA molecule, there would be 1 set of original genomic template DNA strands, 20 sets of intermediate template strands, and 1,048,576 sets of precise-length template strands. After 40 cycles, there would be 1 set of original genomic template DNA strands, 40 sets of intermediate template strands, and 1.1 x 10¹² sets of precise-length
template strands (Figure 6).
Total 40 cycles
Extend new strands at 72°C Anneal primers at 60°C Denature at 94°C
Extend new strands at 72°C Anneal primers at 60°C Denature at 94°C 3' 3' 3' 3' 3' 3' 3' 3' 3' 3' 3' 3' 3' 3' 3' 3' 3' 3' 3' 3' 3' 5' 5' 5' 5' 5' 5' 5' 5' 5' 5' 5' 5' 5' 3' 5' 5' 5' 5' 5' 5' 5' 5' 5' 5'
Extension step cycle 1
New intermediate templates
Precise length fragments
C Y C L E 1 C Y C L E 2 C Y C L E 3
Fig. 6. Schematic of PCR amplification of DNA fragments.
The Relevance of Alu to Hardy-Weinberg Theory
The value of this Alu insert residing in a noncoding region of PV92 is that it does not code for any protein sequence and is not related to a particular disease. Because Alu repeats have inserted randomly in humans, the Alu insert in the PV92 locus can be very useful in studies of allele and genotype frequencies in the human population. In the lab exercise (Lesson 4), the principles of the Hardy-Weinberg theory can be applied to analyze genotypic and allelic frequencies of the Alu insert in populations. By determining the genotypic frequencies of the Alu genotype within your student population, the corresponding allelic frequencies can also be calculated. Additionally, the genotypic frequencies of your class population can be compared to published results of larger population sizes. This activity opens the door to teaching the principles of the Hardy-Weinberg theory. Use the student data generated in Tables 1 and 2 (pages 70–71) to discuss whether human populations are in Hardy-Weinberg equilibrium.
Analysis of Classroom Data Using Bioinformatics
Bioinformatics is a discipline that integrates mathematical, statistical, and computer tools to collect and process biological data. Bioinformatics has become an important tool in recent years for analyzing the extraordinarily large amount of biological information that is being generated by researchers around the world. In Lesson 5, students will perform a bioinformatics exercise to investigate the genotypic frequencies for the Alu polymorphism in their class population and compare them with the genotypic frequencies of other
populations. Start
1 20 1,048,576
Final Count After 20 Cycles
Template DNA Intermediate DNA Precise Length DNA
Following PCR amplification and electrophoresis of their samples, students will analyze their experimental data to determine their genotypes for the Alu insertion within the PV92 locus on chromosome 16. The classroom genotype data can then be entered into Allele Server of Cold Spring Harbor Laboratory’s Dolan DNA Learning Center. Allele Server is a Web-based database that contains genotype data from populations around the world as well as other classrooms and teacher training workshops. It also provides a collection of statistical analysis tools to examine the Alu insertion polymorphism at the population level. Students can either analyze their classroom data as an individual population or compare their population with other populations in the database.
Once students enter classroom data into Allele Server, they can perform a Chi-square analysis to compare the Alu genotype frequencies within the class population with those predicted by the Hardy-Weinberg equation. The genotypic frequencies of the class population can also be compared with the genotypic frequencies of another population in the database. Using this database, students will determine if their class data are in agreement with the expected Hardy-Weinberg genotypic frequencies.
Suggested Lesson Flow
There are four student lessons in this PCR curriculum. All lessons are designed to be carried out in consecutive 50 minute periods. Lessons 1 and 2 have convenient stop points and two options. Teachers should choose cheek cell (page 41) or hair follicle (page 45) DNA preparation. Instructors may wish to offer either method as an option for students, or may elect to perform a particular protocol based on local restrictions. The samples can be stored for several days to accommodate weekends or labs that meet every other day. Student Schedule
Lesson 1 Cheek Cell DNA Template Preparation
Activity Isolate cheek cells
Prepare genomic DNA from cheek cells (Stop point)
Lesson 1 Hair Follicle DNA Template Preparation
Activity Isolate hairs
Prepare genomic DNA from hair follicles (Stop point)
Lesson 2 PCR Amplification
Activity Set up and perform PCR reactions
Pour agarose gels (this may be performed by the instructor during the advance preparation)
(Stop point)
Lesson 3 Gel Electrophoresis of Amplified PCR Samples and Staining of Agarose Gels
Activity Load and run gels
Stain gels
(Note: If you are using the quick staining protocol, record the results and dry the gels)
Lesson 4 Analysis and Interpretation of Results
Activity Record the results and dry the gels (if using the overnight staining protocol)
Analyze and discuss results
Lesson 5 Interpretation of Results: Bioinformatics
Instructor’s Advance Preparation Overview
This section outlines the recommended schedule for advanced preparation on the part of the instructor. A detailed Advance Preparation Guide is provided on pages 16–24.
When Activity Time Required
Immediately Read PCR manual 2 hours
Prior to Lesson 1 Aliquot InstaGene matrix 30 min
Set up student workstations
Prior to Lesson 2 Prepare complete master 1 hour
mix and aliquot
Set up control PCR reactions Prepare TAE buffer
Prepare molten agarose
Program Gene Cycler™ or MyCycler™ Set up student workstations
Prior to Lesson 3 Prepare Fast Blast DNA stain 20 min
Set up student workstations
Prior to Lesson 4 Set up student workstations 10 min
Note: Choose one of the two options for DNA template preparation.
Workstation Daily Inventory Checklist
Student Workstations: Materials and supplies required at each student workstation prior to exercise are listed below. The components provided in this kit are sufficient for 8 student workstations with 4 students at each station.
Instructor’s (Common) Workstation: Materials, supplies, and equipment required at a location that can be accessed by all students are also listed below. It is up to the teacher whether students will have access to common buffer solutions/equipment, or the teacher will aliquot the solutions and operate the equipment.
Lesson 1 DNA Template Preparation
Student workstations Quantity per Station (✔✔)
1.5 ml micro test tubes (for cheek cell protocol) 4 ❐
Screwcap tubes with InstaGene™matrix (for cheek cell protocol)* 4 ❐
Screwcap tubes with InstaGene™matrix and protease* 4 ❐
(for hair follicle protocol)
Foam micro test tube holders 2 ❐
P-20 micropipet, for cheek cell protocol only 1 ❐
Pipet tips (filter type), 2–20 µl, for cheek cell protocol only 4 ❐
Permanent marker 1 ❐
Waste container 1 ❐
Copy of Quick Guide or protocol 1 ❐
Cups with 10 ml 0.9% saline (for cheek cell protocol) 4 ❐
Tweezers or forceps (for hair follicle protocol) 1 ❐
Scissors or razor blade (for hair follicle protocol) 1 ❐
Instructor’s (common) workstation Quantity per Class
P-1000 micropipet, or P-200 micropipet 1 ❐
Pipet tips (filter type), 20–200 µl, 1 box ❐
or Pipet tips (filter type), 100–1,000 µl 1 box ❐
Water baths (56 and 100°C) 1 each ❐
Microcentrifuge 1 ❐
or mini centrifuge 4 ❐
Vortexer (optional) 1 ❐
Lesson 2 PCR Amplification
Student workstation Quantity per Station (✔✔)
PCR tubes 4 ❐
Micro test tubes, capless 4 ❐
Complete master mix (containing primers) on ice 1 tube ❐
P-20 micropipet 1 ❐
or 10 µl and 20 µl fixed-volume pipets 1 of each ❐
Pipet tips (filter type), 2–20 µl 8 ❐
Foam micro test tube holders 2 ❐
Ice bucket with ice 1 ❐
Permanent marker 1 ❐
Copy of Quick Guide or protocol 1 ❐
Waste container 1 ❐
Instructor’s (common) workstation Quantity per Class
Gel trays 1 per 2 stations ❐
Molten agarose (see advance prep) 40 ml per gel ❐
Lab tape for gel trays 1 per station ❐
Gene Cycler or MyCycler thermal cycler 1 ❐
Microcentrifuge 1 ❐
Lesson 3 Gel Electrophoresis of Amplified PCR Samples and
Staining of Agarose Gels
Student workstations Quantity per Station (✔✔)
Agarose gel 1 ❐
PCR samples 1 per student ❐
PV92 XC DNA loading dye 1 tube ❐
P-20 micropipet 1 ❐
or 10 µl and 20 µl fixed-volume pipets 1 of each ❐
EZ Load™molecular mass ruler (DNA standards) 1 tube ❐
Pipet tips (filter type), 2–20 µl 12 ❐
Permanent marker 1 ❐
Foam micro test tube holders 2 ❐
Gel box and power supply 1 ❐
Gel staining tray 1 per 2 stations ❐
Fast Blast™DNA stain, 1x or 100x solution* 120 ml per 2 stations ❐
Gel support film (optional) 1 ❐
Clear acetate sheets for tracing gels (optional) 1 ❐
Warm tap water for destaining gels (if performing
quick staining protocol) 1.5–2 L per 2 stations ❐
Large containers for destaining
(if performing quick staining protocol) 1–3 per 2 stations ❐
Waste container 1 ❐
Copy of Quick Guide or protocol 1 ❐
Instructor’s workstation Quantity per Class
1x TAE electrophoresis buffer 275 ml per gel box ❐
Amplified positive control samples (4 each) 12 ❐
PV92 homozygous (+/+) PV92 homozygous (–/–) PV92 heterozygous (+/–)
Rocking platform (optional)** 1 ❐
Microcentrifuge 1 ❐
or mini centrifuge 4 ❐
Lesson 4 Analysis and Interpretation of Results
Student workstations Quantity per Station (✔✔)
Gel support film (optional) 1 ❐
Clear acetate sheets for tracing gels (optional) 1 ❐
Copy of Quick Guide or protocol 1 ❐
Instructor’s workstation None required
* Depending on whether the quick staining or overnight staining protocol will be followed. ** Strongly recommended.
Instructor’s Advance Preparation
This section describes the preparation to be performed by the instructor before each exercise. An estimate of preparation time is included in each section.
Lesson 1 DNA Template Preparation
Advance Preparation
Objectives Aliquot InstaGene™matrix
Set up student and instructor workstations Set water baths to 56 and 100°C
Time required 30 minutes
Materials required Screwcap tubes Micro test tubes
InstaGene™ matrix Tweezers (for hair follicle prep) P-20 micropipet (2–20 µl) Scissors (for hair follicle prep) Filter tips (2–20 µl) Cups (for cheek cell prep) P-200 micropipet (20–200 µl) Protease (for hair follicle prep) Filter tips (20–200 µl)
Vortexer
Procedures
1. Aliquot InstaGene™ matrix (cheek cell preparation).*
A. Thoroughly mix the InstaGene matrix by gently shaking or vortexing the bottle several times to resuspend the matrix. Be sure that the matrix is well mixed when you aliquot it. The beads settle out of solution quickly, so gently remix the bottle several times during aliquotting.
B. Pipet 200 µl of InstaGene matrix into each screwcap tube. Distribute one tube to each student. Each student workstation should get 4 tubes of matrix for 4 students. 2. Prepare and aliquot InstaGene matrix with protease (hair follicle protocol).*
A. Prepare a solution of InstaGene matrix containing 66 µg/ml protease. Protease (catalog #166-2003EDU) is supplied at a concentration of 20 mg/ml. To obtain 66 µg/ml, dilute stock protease 1:300 by volume into InstaGene matrix.
For example, to make 5 ml of InstaGene matrix containing 66 µg/ml protease (enough for approximately 20 students):
• Aliquot 5 ml InstaGene matrix to a new tube (be sure to mix the InstaGene well before aliquoting)
• Add 17 µl of stock protease to the 5 ml of InstaGene matrix
B. Pipet 200 µl of InstaGene matrix with protease into each screwcap tube. Distribute one tube to each student. Each student workstation should get 4 tubes of matrix for 4 students.
3. Prepare and aliquot saline solution (cheek cell protocol).
A. Prepare a 0.9% saline solution. To a 500 ml bottle of drinking water, add 4.5 grams of noniodinated salt. Table salt is recommended. Invert the bottle until the salt goes into solution.
B. For each student, place 10 ml saline into a separate cup. Each student workstation should have 4 cups of saline.
Lesson 2 PCR Amplification
Advance Preparation (for 8 student workstations)
Objectives Prepare complete master mix by mixing in primers, and aliquot (no more than 30 minutes before PCR cycling)
Set up control PCR reactions
Program Gene Cycler or MyCycler thermal cycler
Pour agarose gels. If you have your students pour their own gels during the lab, prepare the agarose ahead of time. Agarose, once molten, may be kept in a water bath set at 45–50°C until used by the students.
Set up student and instructor workstations
Time required 1–1.5 hours (depending on how you choose to prepare agarose gels)
Prepare master mix and set up control samples towards the end of the advance preparation.
Materials required Micro test tubes (with attached caps) Screwcap tubes Master mix Primer mix PV92 homozygous (+/+) control PV92 homozygous (–/–) control PV92 heterozygous (+/–) control 12 PCR tubes
Electrophoresis gel boxes, casting trays, and combs Electrophoresis buffer (50x TAE)
Agarose powder
Micropipets (P-20 and P-200)
Filter tips (20–200 µl and 100–1,000 µl)
The Gene Cycler thermal cycler accommodates 24 samples, whereas the MyCycler thermal cycler holds 96 samples. If the Gene Cycler is being used, you will have to run the PCR machine more than once if there are more than 24 samples (including positive control samples). For best results, prepare the student reactions and control samples no more than 30 minutes before PCR cycling.
Procedures
Note: Before opening any of the reagent tubes, pulse-spin the contents (~3 seconds) in a centrifuge to bring contents to the bottom of the tubes. Contents often become lodged underneath the caps during shipping.
1. Prepare complete master mix by adding primers. For best results, the following steps should be performed within 15–30 minutes of the PCR reaction.
A. Pipet 1,100 µl of master mix into a labeled micro test tube. If you choose to amplify 16 student samples or less, divide the master mix into two tubes with 550 µl each. One tube will be used immediately, and the remaining master mix can be refrozen for later use.
B. For 32 students or 8 student workstations (halve for 16 students), label 8 micro test tubes “Master” and place the tubes on ice.
C. Add 22 µl of the primer mix to the 1,100 µl of master mix. Vortex 10 seconds to mix. It is imperative that the master mix be evenly mixed after the addition of the primers. The solution should be yellow.
The primers are supplied as a concentrated yellow solution in a Tris buffer. Since the primers are much more stable in a concentrated form, add the primers to the master mix just prior to beginning the laboratory exercise — not more than 15–30 minutes before the PCR amplification.
D. Aliquot 95 µl of the complete master mix into the 8 micro test tubes labeled “Master”, supplying one tube for each student workstation (1–8). Save the remaining complete master mix for the positive control reactions. Place these tubes on ice until they will be used.
2. Set up control PCR reactions.
A. Label the control PCR tubes: +/+, –/–, and +/–. If you will be using the entire kit with a single lab period set up 4 of each control or 12 tubes total. If you will be splitting the kit between two lab periods, set up 2 of each control, or 6 tubes total. The unused control solutions should be stored in the freezer until used.
• Pipet 20 µl of the +/+ template into each +/+ PCR tube. • Pipet 20 µl of the –/– template into each –/– PCR tube. • Pipet 20 µl of the +/– template into each +/– PCR tube.
B. Pipet 20 µl of the complete master mix into each of the control tubes. Use a fresh tip for each tube.
C. Place the tubes on ice until ready to load into the Gene Cycler or MyCycler. Amplify PCR control samples along with student samples during this lesson (see Quick Guide).
3. Prepare agarose gels. These procedures may be carried out 1 to 2 days ahead of time by the teacher or done during class by individual student teams.
A. Prepare electrophoresis buffer. The electrophoresis buffer is provided as a 50x concentrated solution. 1x TAE buffer is needed to make the agarose gel and is also required for each electrophoresis chamber. Three liters of 1x TAE buffer will be sufficient to run 8 electrophoresis chambers and pour 8 agarose gels. To make 3 L of 1x TAE from a 50x TAE concentrate, add 60 ml of concentrate to 2.94 L of distilled water.
B. Make the agarose solution. The recommend gel concentration for this classroom application is 1% agarose. This agarose concentration provides excellent resolution and minimizes run time required for electrophoretic separation of PCR fragments. To make a 1% solution, add 1 g of agarose to 100 ml of 1x TAE electrophoresis buffer. For 8 gels, you will need approximately 350 ml of molten agarose (3.5 g agarose per 350 ml 1x TAE buffer). The agarose must be made using electrophoresis buffer, not water.
Add the agarose powder to a suitable container (e.g., 1,000 ml Erlenmeyer flask, Wheaton bottle, etc.). Add the appropriate amount of 1x TAE electrophoresis buffer and swirl to suspend the agarose powder in the buffer. If using an Erlenmeyer flask, invert a 50 ml Erlenmeyer flask onto the open end of the 1,000 ml Erlenmeyer flask containing the agarose. The small flask acts as a reflux chamber, allowing boiling without much loss of buffer volume. The agarose can be melted for gel casting on a magnetic hot plate or in a microwave oven (see below). Heat the mixture to boiling using a microwave oven or hot water bath until the agarose powder has dissolved completely.
Careful observation is necessary to determine when the powder is completely dissolved. Hold the flask up to a light and look for small transparent bits of suspended agarose. These particles indicate that the agarose is not fully dissolved. Heating and swirling should be continued until no more of these transparent particles can be seen. Caution: Use protective gloves, oven mitts, goggles, and lab coat as appropriate while preparing and casting agarose gels. Boiling molten agarose or the vessels containing hot agarose can cause severe burns.
Magnetic hot plate method. Add a stir bar to the flask containing agarose and buffer. Heat the mixture to boiling while stirring on a magnetic hot plate. Bubbles or foam should break before rising to the neck of the flask. Boil the solution until all of the small transparent agarose particles are dissolved. With the small flask still in place, set aside the agarose to cool to 60°C before pouring gels.
Microwave oven method. Place the agarose solution into the microwave. Loosen the bottle cap if present. Use a medium setting and set to 3 minutes. Stop the microwave oven every 30 seconds and swirl the flask to suspend any undissolved agarose. This technique is the fastest and safest way to dissolve agarose. Boil and swirl the solution until all of the small transparent agarose particles are dissolved. With the small flask still in place, set aside to cool to 60°C before pouring.
Convenient precast agarose gels (catalog #161-3057EDU) are available from Bio-Rad. These are 2 x 8-well, 1% TAE gels.
Procedure for Casting Gels
Using Bio-Rad’s Mini-Sub®Cell GT system, gels can be cast directly in the gel box by using
the casting gates with the gel tray. If casting gates are unavailable, use the taping method for casting gels, as outlined below. Other methods are detailed in the Bio-Rad
Sub-Cell GT instruction manual.
Step 1. Seal the ends of the gel tray securely with strips of standard laboratory tape. Press the tape firmly to the edges of the gel tray to form a fluid-tight seal.
Step 2. Level the gel tray on a leveling table or workbench using the leveling bubble provided with the instrument.
Step 3. Prepare the desired concentration and amount of agarose in 1x TAE electrophoresis buffer. Boil the agarose until dissolved.
Step 4. Cool the agarose to at least 60°C before pouring.
Step 5. While the agarose is cooling to 60°C, place the comb into the appropriate slot of the gel tray. Gel combs should be placed within ~2 cm of the end of the gel casting tray (not in the middle of the gel).
Step 6. Allow the gel to solidify at room temperature for 10 to 20 minutes — it will be translucent when ready to use.
Step 7. Carefully remove the comb from the solidified gel. Remove the tape from the edges of the gel tray.
Step 8. Place the tray onto the leveled DNA electrophoresis cell so that the sample wells are at the cathode (black) end of the base. DNA samples will migrate towards the anode (red) end of the base during electrophoresis.
4. Program Gene Cycler or MyCycler thermal cycler.
The thermal cycler should be programmed for 3 steps in cycle 2, which will repeat 40 times. The final cycle 3 ensures that the final extension reaction goes to completion and all possible PCR products are made. The PCR reaction will take approximately 3.5 hours.
Cycle Step Function Temperature Time
1 Step 1 Pre-denaturation 94°C 2 minutes
Repeat 1 time
2 Step 1 Denature 94°C 1 minute
Step 2 Anneal 60°C 1 minute
Step 3 Extend 72°C 2 minutes
Repeat 40 times
3 Step 1 Final extension 72°C 10 minutes
Repeat 1 time
Refer to the Gene Cycler or MyCycler instruction manual for specific programming instructions or to the instructions in Appendix H.
Lesson 3 Electrophoresis of Amplified PCR Samples and Staining of
Agarose Gels
Advance Preparation
Objectives Prepare amplified positive control samples Aliquot PV92 XC loading dye
Aliquot EZ Load molecular mass ruler (DNA standards) Set up student and instructor workstations
Prepare either 1x or 100x Fast Blast DNA stain (depending on whether the quick staining or overnight staining protocol will be followed)
Time required 40 minutes
Materials required 8 micro test tubes with attached caps
Micropipets (P-20, P-200, and P-1000) and filter tips 8 screwcap tubes
Distilled or deionized water to prepare Fast Blast DNA stain Gel support film (if performing quick staining protocol) Acetate to trace gels (if performing quick staining protocol) 500 ml flask
Procedures
1. Prepare positive control samples. Add 10 µl of PV92 XC loading dye to each amplified positive control sample (+/+, –/–, +/–). Place the tubes at the teacher’s workstation. Either you or a student group will load the positive and negative control samples on each gel, as indicated on page 28.
2. Aliquot DNA size standards. Aliquot 11 µl of the EZ Load molecular mass ruler into 8 microtubes and label “MMR”. The sizes of the DNA standard bands are 1,000 bp, 700 bp, 500 bp, 200 bp, and 100 bp (see page 59).
3. Aliquot PV92 XC loading dye. Label 8 screwcap tubes “LD” for loading dye, and aliquot 50 µl into each tube. Distribute to student workstations.
4. Prepare Fast Blast DNA stain. Fast Blast DNA stain is provided as a 500x concentrate that must be diluted prior to use. The stain can be used as a quick stain when diluted to 100x to allow the visualization of DNA within 12–15 minutes, or it can be used as an overnight stain when diluted to 1x. When an agarose gel is immersed in Fast Blast DNA stain, the dye molecules attach to the DNA molecules trapped in the agarose gel. When the DNA bands are visible, your students can determine their genotypes for the Alu insert.
Fast Blast DNA stain is a convenient, safe, and nontoxic alternative to ethidium bromide for the detection of DNA in agarose gels following electrophoresis. Fast Blast contains a cationic compound that belongs to the thiazin family of dyes. The positively charged dye molecules are attracted to and bind to the negatively charged phosphate groups on DNA. The proprietary dye formula stains DNA deep blue in agarose gels and provides vivid, consistent results.
WARNING
Although Fast Blast DNA stain is nontoxic and noncarcinogenic, latex or vinyl gloves should be worn while handling the stain or stained gels to keep hands from becoming stained blue. Lab coats or other protective clothing should be worn to avoid staining clothes. Dispose of the staining solutions according to protocols at your facility. Use either 10% bleach solution or 70% alcohol solution to remove Fast Blast from most surfaces. Verify that these solutions do not harm the surface prior to use.
1. To prepare 100x stain (for quick staining), dilute 100 ml of 500x Fast Blast with 400 ml of distilled or deionized water in an appropriately sized flask or bottle and mix. Cover the flask and store at room temperature until ready to use.
2. To prepare 1x stain (for overnight staining), dilute 1 ml of 500x Fast Blast with 499 ml of distilled or deionized water in an appropriately sized flask or bottle and mix. Cover the flask and store at room temperature until ready to use.
(Detailed instructions on using Fast Blast are included in the student manual.) Note:
• We recommend using 120 ml of diluted Fast Blast to stain two 7 x 7 cm or 7 x 10 cm agarose gels in individual staining trays provided in the kit (you may want to notch the gel corners for identification). If alternative staining trays are used, add a sufficient volume of staining solution to completely submerge the gels.
• Following electrophoresis, agarose gels must be removed from their gel trays before being placed in the staining solution. This is easily accomplished by holding the base of the gel tray in one hand and gently pushing out the gel with the thumb of the other hand.
• Because the gel is fragile, special attention must be given when handling it. We highly recommend using a large spatula or other supportive surface to transfer the gel from one container to another during the destaining steps involved with the quick staining protocol.
• Destaining (when performing the quick staining protocol) requires the use of at least one large-volume container, capable of holding at least 500 ml, at each student workstation. Each student team may utilize separate washing containers for each wash step, or simply use a single container that is emptied after each wash and refilled for the next wash.
• It is crucial that you shake gels gently and intermittently during the overnight staining in Fast Blast DNA stain; small DNA fragments tend to diffuse without shaking.
• 100x Fast Blast can be reused at least 7 times.
Lesson 4 Analysis and Interpretation of Results
Advance Preparation
Objectives No advance preparation required
Materials required Gel support film (if performing the overnight staining protocol) Acetate to trace gels (if performing the overnight staining protocol) Obtaining a Permanent Record of the Gel Before Drying
To obtain a permanent record of the gel before it is dried, either trace the gel outline (including wells and DNA bands) on a piece of paper or acetate, take a photograph using a standard camera and film (Bio-Rad’s standard Polaroid gel documentation system, catalog #170-3742EDU), or photocopy the stained gel.
Note: Drying agarose gels requires the use of Bio-Rad’s specially formulated
high-strength analytical grade agarose. Other gel media may not be appropriate for this purpose.
We recommend using Bio-Rad’s exclusive gel support film (catalog #170-2984EDU) to dry agarose gels. Remove the stained agarose gel from its staining tray and trim away any unloaded lanes with a knife or razor blade. Place the gel directly upon the hydrophilic side of a piece of gel support film. (Water will form beads on the hydrophobic side but will spread out on the hydrophilic side of the film.) Center the gel on the film and remove bubbles that may form between the gel and film. Place the film on a paper towel and let the gel dry, making sure to avoid direct exposure to light. As the gel dries it will bond to the film but will not shrink. If left undisturbed on the support film, the gel will dry completely at room temperature after 2–3 days. The result will be a flat, transparent, and durable record of the experiment.
Note: Avoid extended exposure of dried gels to direct light to prevent band fading. However, DNA bands will reappear if the dried gels are stored in the dark for 2–3 weeks after fading.
Lesson 5 Analysis of Classroom Data Using Bioinformatics
Advance Preparation
Objectives Become familiar with Allele Server on the Dolan DNA Learning Center web site
Register to set up a free personal account
Time required 30–45 minutes
Materials required None
Getting Started on Allele Server
Note: The Dolan DNA Learning Center web site is continually updated. Some of the following information may change.
1. On your Web browser, go to vector.cshl.org 2. Click on Resources
3. Click on BioServers
4. Under Allele Server, click on Register. Registration is free and allows you to set up a personal account. There is no need to register everytime you return to this site. Using Allele Server
1. Log in to Allele Server using the username and password you registered. 2. Once you have logged in, follow instructions provided in the pop-up window for
using Allele Server. You may also open a new window and go to
dnalc.org/help/sad/topic_3.html to get more detailed instructions. Follow the detailed instructions on how to populate the workspace, analyze groups, compare groups, and query the database. Remeber that as a registered user, you may store any groups that you loaded in your personal Allele Serverdatabase and analyze them at your
Lesson Highlights — Frequently Asked Questions
(FAQs)
This section describes steps in the experimental protocols that may be technically challenging or that are extremely important to the overall outcome and understanding of the experiments. Instructors should alert their students’ attention to these points, and, when possible, demonstrate the technique before the students attempt the procedure.
The Student Manual and Quick Guide contain detailed descriptions and drawings of all laboratory steps and techniques employed in each of the Lessons. Refer to them for questions about the experimental protocols used in the labs.
Lesson 1 Sample Preparation
Processing Cheek Cell and Hair Follicle Samples to Obtain a Genomic DNA Template for PCR
A. InstaGene matrix: What function does it perform?
InstaGene matrix consists of a suspension of negatively charged Chelex® microscopic
beads, which bind divalent cations like magnesium (Mg2+). It is important to remove divalent
cations from students’ genomic DNA samples because the cations assist enzymes that degrade the DNA template. When cheek cells or hair follicles are lysed and boiled in the presence of InstaGene matrix, the divalent cations released from the cells bind to the beads, and the heat inactivates the DNA-degrading enzymes. The beads are then pelleted by centrifugation. The supernatant, which contains clean, intact genomic DNA, can be used as the template in the PCR reactions.
The beads in the InstaGene matrix quickly settle out of solution. It is extremely important that the vial of matrix be thoroughly mixed before pipetting aliquots for each student workstation, so that the aliquots contain equivalent amounts of beads.
Each student will prepare genomic DNA from cheek cells isolated using a saline mouth-wash or from hair follicles. For students using the cheek cell protocol, 1 ml of cells collected using the mouthwash should provide sufficient material for DNA preparation. Some stu-dents may need to use 2 ml or more of the saline mouthwash to obtain sufficient cells to prepare DNA. Please note: it is not recommended to use more than 3 ml of the saline mouthwash to prepare DNA, (see ‘Interpretation of Results and Troubleshooting Guide’ on page 30). Once the cells have been spun in a centrifuge, a cell pellet about the size of a matchhead should yield enough cells for subsequent steps. Eating just prior to cell
collection is not recommended, as food particles may make cell preparation more difficult. If a P-1000 micropipet is not available, students may carefully pour ~1 ml of their swished saline into a micro test tube. The gradations on the side of the micro test tube may be used to judge the amount of liquid in the tube.
If the DNA samples will not be amplified within 24 hours, they can be stored in the refrigerator in the InstaGene matrix for up to 1 week. For longer storage, place samples in the freezer to prevent DNA degradation. Before the samples are used in PCR, the beads should be re-pelleted by centrifugation just prior to making up the PCR reactions. However, processing the samples within 24 hours is recommended. See the next steps for processing tips.
B. Genomic DNA Preparation from cheek cells or hair follicles
For students using the cheek cell DNA protocol, cells are collected using a saline mouthwash. For students using the hair follicle DNA protocol, it is recommended that students collect two hairs for genomic DNA preparation.
C. Incubation: What are the functions of each incubation step? The preincubation step is carried out at 56°C and performs two functions:
1. Heating the cell suspension aids in the breakup of connective tissue that holds the cells together. Breaking up the tissue makes the cells easier to lyse during the subsequent 100°C incubation step.
2. Preincubation at 56°C inactivates DNases, enzymes that are naturally present in the cell suspensions, and which could degrade the genomic DNA and inhibit the PCR reactions.
Heating the cell samples to 100°C ruptures the cell membranes, thereby releasing the cellular contents, which include genomic DNA. The genomic DNA serves as the
template in the PCR reactions.
D. Do I have to remove the InstaGene matrix before PCR?
It is extremely important to pellet the InstaGene beads completely to the bottom of the tube before an aliquot of the lysate is removed for the PCR reaction. The beads bind to divalent cations such as Mg2+, which are essential to the function of Taq DNA polymerase.
Thus, if any beads are carried over into the PCR reaction, the reaction could be inhibited. The InstaGene matrix can be effectively pelleted by centrifugation (6,000 x g for 5 min).
The supernatant above the beads (which contains the genomic DNA) is taken for the PCR reaction. Carefully remove 20 µl of the supernatant, without disturbing the InstaGene matrix, and transfer it into a PCR tube that is placed within a capless adaptor.
Lesson 2 PCR Amplification of Genomic DNA Samples
Master mix: What is it?
The master mix contains a mixture of nucleotides, or dNTPs (dATP, dTTP, dCTP, and dGTP), buffer, and Taq DNA polymerase. Complete master mix is prepared by adding primers to the master mix just prior to the laboratory period. Thus, when a 20 µl aliquot of the cheek cell or hair follicle lysate (which provides the DNA template) is added to a 20 µl aliquot of complete master mix, all of the necessary components for a 40 µl PCR reaction are present. The 2x master mix contains 0.05 units/µl Taq DNA polymerase, 3 mM MgCl2, 1.6 mM dNTPs, and 1 µM of each primer. The final 1x or working concentration of these components in the PCR tube after the primers, master mix, and template are combined will be one-half of the above values.
Note: Once the master mix and primers are mixed, they should be kept on ice and used within 15–30 minutes. These reagents are extremely sensitive.
DNA template
Supernatant
Why are the primers yellow?
The primer mix contains a PCR
-
compatible dye called tartrazine, which comigrates with DNA of ~50 bp. This yellow dye was added to allow students to easily visualize the sample.PCR in a Thermal Cycler
The PCR amplification takes place in a thermal cycler that performs cycles of
alternating heating and cooling steps. This lab utilizes a three-step cycle: the DNA undergoes denaturation at 94°C for 1 minute, annealing at 60°C for 1 minute, and extension at 72°C for 2 minutes. This cycle is repeated 40 times during the course of PCR amplification. During the denaturation, the two strands of the DNA template are melted apart to provide access for the PCR primers. During the annealing step, the PCR primers recognize and bind to the DNA template. Once the primers are bound, Taq DNA polymerase extends the primers to replicate the segment of DNA during the extension step. The PCR reaction will take approximately 3.5 hours to complete.
The PCR tubes are very small and require care when handling. It is important to carefully and completely cap the tubes before placing them into the thermal cycler. If the tubes are not closed completely, substantial evaporation can take place, and PCR amplification will be inhibited. For best results, if you have to run the thermal cycler more than once (that is, if you have more than 24 samples and you are using Bio-Rad’s Gene Cycler), prepare each group of student reactions no more than 30 minutes before PCR cycling. Extended incubation of master mix and genomic DNA decreases amplification efficiency.
Bio-Rad’s thermal cyclers were developed for oil-free operation. Oil is not needed in the thermal block wells or in the sample tubes. The sample wells are shaped to provide uniform contact with most standard 200 µl thin-wall PCR tubes. Do not use 500 µl thin-wall micro test tubes with these thermal cyclers. The heated sample block cover maintains a higher temperature than the sample block at all times during a thermal cycling program. This keeps water vapor from condensing under the cap of the sample tube, thereby reducing sample evaporation and eliminating the need for oil overlays in the tubes.
Manual PCR
It is possible to perform PCR manually without an automated thermal cycler, although the PCR will not be as efficient. For manual PCR amplification, reactions should be performed in screwcap tubes and topped off with a drop of mineral oil to prevent evaporation. The tubes are placed in a heat block or water bath set at 95°C for 1 minute, then manually transferred to a heat block or water bath set at 60°C for 1 minute, and finally transferred to a heat block or water bath set at 72°C for 2 minutes. Forty cycles of manual PCR should take ~3 hours. It is tedious but it works. Good luck!
Lesson 3 Gel Electrophoresis of Amplified PCR Samples and
Staining of Agarose Gels
Sample Preparation for Electrophoresis
Before the amplified samples are electrophoresed, students need to add 10 µl of 5x PV92 XC loading dye to each of their PCR tubes. The DNA loading dye contains glycerol, which increases the density of the sample and ensures that it sinks into the well of the agarose gel. In addition, the DNA loading dye contains a dye called Xylene Cyanole that comigrates at the same rate as a 4,000 bp DNA fragment toward the anode.
What volume of PCR samples is best loaded onto gels?
For optimum visibility, 10 µl of each control sample, 10 µl of the EZ Load molecular mass ruler (DNA standard), and 20 µl of amplified student samples should be loaded on each gel. A gel template is provided below and the gel set up is also described (Figure 7).
* MMR = molecular mass ruler (DNA standard)
Fig. 7. Gel template and suggested sample loading order.
1 2 3 4 5 6 7 8
Lane Sample Load Volume
1 MMR 10 µl 2 Homozygous (+/+) control 10 µl 3 Homozygous (–/–) control 10 µl 4 Heterozygous (+/–) control 10 µl 5 Student 1 20 µl 6 Student 2 20 µl 7 Student 3 20 µl 8 Student 4 20 µl
Gel Setup (1 gel for 4 students; 8 gels for 32 students) Controls Student samples
Staining the Gels
Detailed instructions on using Fast Blast DNA stain are included in the student manual. Because of the thickness of the gels, gentle rocking on a shaking table produces more efficient staining.
The gels can also be stained and visualized with ethidium bromide (not included in the kit). If ethidium bromide is used as a stain, the gels should contain 0.05 µg/ml ethidium bromide in the agarose. This concentration of ethidium bromide produces maximum contrast of the amplified bands. Note: Fast Blast DNA stain quenches ethidium bromide staining, so visualize with ethidium bromide before Fast Blast stain.
Lesson 4 Analysis and Interpretation of Results
Once the gel has been stained with Fast Blast DNA stain (using either the quick or overnight staining protocol), it will be analyzed. Because the bands fade slightly upon drying of the gel, it is best to analyze the stained gels before drying. The gels can be illuminated from below to enhance visualization of the bands.
a. Place your gel on a light background and record your results by making a diagram as follows. Place a clear sheet of plastic or acetate over the gel. With a permanent marker, trace the wells and band patterns onto the plastic sheet to make a replica picture of your gel. Remove the plastic sheet for later analysis. Alternatively, gels can be photocopied on a yellow piece of transparent film for optimal contrast.
b. Dry the agarose gel as a permanent record of the experiment.
i. Trim away any unloaded lanes with a knife or razor blade. Cut your gel from top to bottom to remove the lanes that you did not load samples into.
ii. Place the gel directly upon the hydrophilic size of a piece of gel support film. (Water will form beads on the hydrophobic side of a piece of gel support film.) Center the gel on the film and remove bubbles that may form between the gel and film. Place the film on a paper towel and let the gel dry in a well-ventilated area, making sure to avoid direct exposure to light. As the gel dries it will bond to the film but will not shrink. If left undisturbed on the support film, the gel will dry completely at room temperature after 2–3 days. The result will be a flat, transparent, and durable record for the experiment.
Interpretation of Results and Troubleshooting Guide
Explanations for “Empty Lanes” or Unamplified Samples
Multiple explanations can account for student samples not being amplified in the PCR reactions.
1. Inadequate collection of cheek cells. A visible cell pellet about the size of a match head should be obtained following centrifugation of the saline mouthwash. If no cell pellet is visible, or the pellet is too small, additional swished saline may be centrifuged until a pellet of the desired size is obtained. However, it is not recommended to collect more than 3 ml of cells (see point below).
2. Excessive number of cells. Just as too few cells will yield insufficient genomic DNA, an excessive number of cells will saturate the capacity of the InstaGene, resulting in little or no amplification.
3. InstaGene matrix not transferred. Each workstation is supplied with tubes of
InstaGene matrix that were aliquotted by the instructor and placed on ice. These tubes of matrix must be mixed prior to each pipetting to bring the beads up into suspension. If no beads were transferred into the student’s tube, the divalent cations will not be removed from the genomic DNA preparation, and the PCR reaction will be inhibited. 4. Carryover of InstaGene into PCR reaction. Although the beads in the InstaGene
matrix are required for the DNA template preparation, it is critical that none of the InstaGene matrix be carried over into the PCR reaction. If beads are transferred into the PCR tube, the magnesium ions needed by the Taq polymerase will be removed, and the PCR reaction will be inhibited.
DNA template
Supernatant
(contains DNA template)
Interpretation of Heterozygous Samples
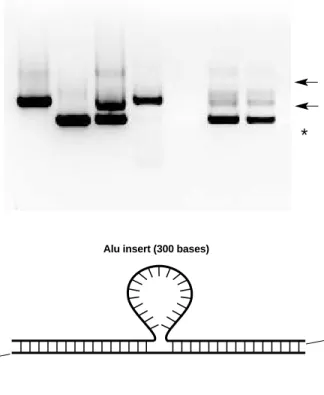
1. Competition during amplification. Amplification of heterozygous samples is more difficult than both homozygous amplifications because of competition between the reactions that produce the smaller (641 bp) and larger (941 bp) bands. Because the smaller 641 bp band is amplified more efficiently than the 941 bp band, heterozygous samples on agarose gels will show the smaller band being more intense than the larger band (see the band indicated by an asterisk in the gel below). For this reason,
heterozygous samples can often be interpreted as homozygous (–/–) because of a faint upper band. Careful examination of the gels is required to distinguish between heterozygous (+/–) and homozygous (–/–) individuals. Alternatively, the use of ethidium bromide and photodocumentation equipment (the Bio-Rad gel documentation system) will increase the sensitivity and allow easier visualization of faint heterozygous samples.
2. Larger band in (+/–) samples. The heterozygous samples will often contain larger bands which migrate at ~1,100 bp and 1,700 bp in the gel (see the bands indicated by arrows in the gel below). These bands are heteroduplexes that form between the 641-and 941-nucleotide str641-ands 641-and contain secondary structure which results in the DNA bands migrating at a slower rate in the gel (Figure 8).
Fig. 8. Heteroduplex formed between 941- and 641-nucleotide strands.
641 bases
941 bases Alu insert (300 bases)
+/+ –/– +/– S1 S2 S3 S4
3. Primer-dimer formation. Some PCR reactions may show primer-dimer formation. Primer dimers are bands that are seen at the bottom of the gels and which correspond to complexes of both primers. Primer-dimer formation is more intense in reactions that show little or no amplified product. Thus, primer-dimer formation is more likely to occur in reaction tubes with InstaGene contamination, little or no template, or in samples that were prepared well in advance of placing into the thermal cycler. The arrow in the figure below shows primer-dimers.
4. Bands appear to be fading. The blue dye in the Fast Blast DNA stain is subject to reversible bleaching when exposed to bright room lights. When the dried gels are examined 3–5 days after drying, the bands may appear faint. Placing the gels in a dark location (in a box or taped in a closed notebook) and examining several hours later will provide the most intense bands. It is most convenient to let the gels dry on the lab bench for 3–5 days, tape them into a lab notebook, and examine the gels the following day.
1. Label one 1.5 ml micro test tube with your initials. Label one screwcap tube containing 200 µl of InstaGene matrix with your initials. 2. Obtain a cup containing saline solution from
your instructor. Pour the saline into your mouth and rinse vigorously for 30 seconds. Expel the saline back into the cup.
3. Transfer 1 ml of your saline rinse in