PHOSPHOR
MEDIA
Your success is our business
Merchant Moogle
Google XML Site Map for Miva Merchant
PHOSPHOR
MEDIA
Your success is our business
Overview
Merchant Moogle is simple-to-use, fully compliant Google XML Site map generator for Miva Merchant Stores. It automatically creates an XML Site Map of your store pages that Google—and other search engines—can use to quickly index your site.
What the heck is XML? XML is basically a language for computers. XML makes is
easy to express simple to complex information in a basic “text” file without required proprietary file formats such Excel, MySQL, etc. Though it’s intended to be read by computers, you can easily open and read it in a text editor or web browser.
Moogle will also let you include additional pages (outside of Merchant) if you want to include those pages as well.
Moogle supports most styles of URL store links (Short Links or SEO Links) for example:
Standard Miva Merchant style links
(i.e., www.mydomain.com/mm5/merchant.mvc?Screen=SFNT)
Phosphor Media Merchant Optimizer style links (and other SEO Module styles) (i.e., www.mydomain.com/store-directory/products/product-code.html) Default Miva Merchant SEO links
(i.e., www.mydomain.com/p/product-code.html)
Moogle automatically detects Standard Merchant links, Merchant SEO/Short Links, or Merchant Optimizer links. If you are using a third-party tool to create SEO links, Moogle offers a Manual “pattern” match feature.
Operation is simple and in many cases, all you need to do is install it and click Create to create the site map. Afterwards, Moogle will give you an option to submit the site map to Google, Bing and Ask.com directly from the module.
Alternately, you can create an account with the specific search engine and submit the file yourself. We recommend using these search engine accounts (where
possible) because they let you track the performance of your site map and links and perform general link maintenance that is completely outside the scope of the Moogle module.
Installation and Licensing Instructions
Installation and licensing procedures are covered in the Module Installation and Licensing Guide.
PHOSPHOR
MEDIA
Your success is our business
Using Moogle
The Moogle admin interface has four tabs: Manage Sitemap
Merchant Pages Non-Merchant Pages Link Style
After you have used the following sections to setup the module, you will probably only need to use the Manage Sitemap tab. The Merchant Pages, Non-Merchant Pages and Link Style tabs are where you add/remove Merchant/non-Merchant pages and configure the module settings.
So, let’s get set up.
Setting Your Link Styles
Moogle can create a site map to match many URL link styles. It automatically detects if you are using Merchant SEO/Short Links, Optimizer, or Standard Merchant links. If neither Optimizer nor Short Links are in use, Moogle defaults to standard Miva Merchant link styles.
Note:
Moogle makes every attempt to AUTOMATICALLY select the correct link styles for you.
If Merchant SEO/Short Links are active, Moogle will always use them as the reference for Merchant links.
If Optimizer is active AND in Live mode, Moogle will use the Optimizer-style links. If neither SEO/Short Links or Optimizer are in use, then Moogle defaults to using standard Merchant links.
Only use the Manual Pattern choice if you are using a third-party URL tool or you have customized your URLs to the point that none of the above choices cover your needs.
The Manual Pattern allows for three groups of page patterns: Category, Product and all other pages. IF your URL scheme does not fit into this system, then Moogle will not be able to generate correct URLs.
PHOSPHOR
MEDIA
Your success is our business
Figure 1: Link Style tab
Typically, you will only need to use the following procedure if you are using a third-party SEO module, or have some other modification that changes your site’s link pattern.
To change the link style
1. Click the Link Style tab.
2. Choose the type of URLs you want to index. 3. Click Save Settings.
Other styles of links
If you are using some “search friendly” linking scheme, you will need to use the Patterned Link style.
To use Patterned link styles
1. Click the Link Style tab.
2. Select the Manual Pattern option.
3. Type the pattern you want to match as follows:
Category Display: Enter the URL “pattern” you want to use for Category pages.
The text %category_code% will be replaced by the actual category code for each category.
Example - if your category FatCat is reached by a URL of www.mysite.com/c/FatCat.html you would use the pattern: /c/%category_code%.html
Example - if your category FatCat is reached by a URL of
PHOSPHOR
MEDIA
Your success is our business
/catalog/%category_code%.html
Product Display: Enter the URL “pattern” you want to use for Product pages.
The text %product_code% will be replaced by the actual Product code for each Product.
Example - if your Product ‘FatMouse’ is reached by a URL of www.mysite.com/p/FatMouse.html you would use the pattern: /p/%product_code%.html
Example - if your Product ‘FatMouse’ is reached by a URL of
www.mysite.com/products/FatMouse.html you would use the pattern: /products/%product_code%.html
All Other Merchant Pages: Enter the URL “pattern” you want to use for other
pages. The text %page_code% will be replaced by the actual page code for each page
If your About Us page is reached by a URL of www.mysite.com/ABUS.html you would use the pattern:
PHOSPHOR
MEDIA
Your success is our business
Including Merchant Pages
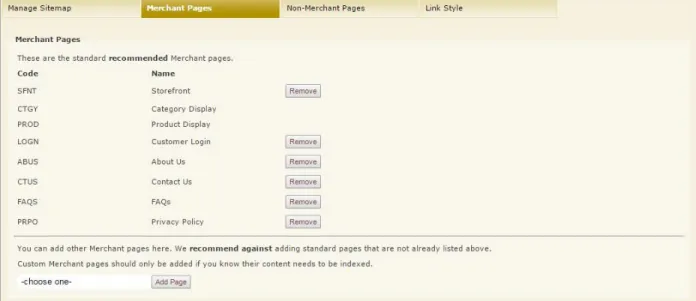
You use the Merchant Pages tab to select which Merchant pages you want to include in your site map.
Figure 2: Merchant Pages tab
We have already included the standard and RECOMMENDED Merchant pages. However, you can choose to remove these recommended pages, and/or add other non-recommended or custom Merchant pages.
IMPORTANT: Custom Merchant pages should only be added if you know their
content needs to be indexed. For example, if you added a custom page containing recipes or product reviews, that would be a very good page to include. Conversely, if you added a page that is used by customers to WRITE recipes or product reviews, you would NOT want to include those pages.
To remove a recommended page
1. Click the Merchant Pages tab.
2. In the Merchant Pages tab, click the Remove button next to the page Code or Name.
To add a non-recommended or custom merchant page
1. Click the Merchant Pages tab.
2. In the Merchant Pages tab, from the Add Page drop down, select the page you want to add.
3. Click the Add Page button.
PHOSPHOR
MEDIA
Your success is our business
Including Non-Merchant Pages
Moogle gives you the option to include pages that are not generated through Merchant (e.g. a blog or forum that you might have on your site).
These types of pages contain important content that will help to enhance the overall Search Engine ranking of your site. Again, ONLY include pages with content for general consumption. You do not want to include pages that are for specific customers or uses.
Figure 3: Non-Merchant Pages tab
To add non-Merchant pages
1. Click the Non-Merchant Pages tab.
2. In the empty Name field, enter a name for this page. This name is just for your reference. It is not included in the site map.
3. In the empty URL field, enter the path to the page, relative to your domain. For example, if the page you want to include is accessed by entering
www.mydomain.com/blog/index.php, you would type “blog/index.php”. 4. Click Add Page.
To update a non-Merchant page
1. Click the Non-Merchant pages tab.
2. Make the changes to the Name and/or URL field. 3. Click Update.
To remove a non-Merchant page
1. Click the Non-Merchant pages tab. 2. Click Remove.
PHOSPHOR
MEDIA
Your success is our business
Creating and Submitting Your Site Map
You can create and submit your site map directly from the Moogle admin. You have three choices when it comes to creating and submitting your site map from within Moogle.
Create: Creates the site map files(s) so you can preview them first. Submit: Submits the current site map file(s) to Google for indexing.
Create and Submit: Creates and then submits the site map files to Google.
When you first setup Moogle, or after making modifications, you may want to use the
Create button, and then review the site map file(s). (To review a file, click the link
of the file(s) under Current Files.) Afterwards, you can use the Submit button to submit the file(s) listed.
As you add, remove or modify categories and products, you will just want to use the
Create and Submit button to update the file and submit it to the search engines. Include product image URLs in sitemap: Check this box to include your main
product image URL along with the product. (Recommended.) Note, you must have images assigned to the Product’s “Main” image. If you are using ONLY image machine images, you may have left this field blank, in which case this option won’t help you.
Use https always: Check this box if you have a fully secure site using only https
(vs. http) URLs.
Alternately, you can submit your site map from within Google Web Master Tools
(and other search engine accounts). You do NOT NEED a search engine account to use Merchant Moogle, however, we recommend it. Search accounts, along with other useful items, will show how many pages have been indexed from the site map. See, “Manually Submitting Your Site Map”.
PHOSPHOR
MEDIA
Your success is our business
PHOSPHOR
MEDIA
Your success is our business
Manually Submitting Your Site Map
After creating your site map from the Moogle admin, you can manually submit the file to Google Web Master Tools or other search engine account. This will not only let you monitor how many links have been indexed, but also provides you with many other tools useful for managing your site.
Because Google frequently changes its interface, we can only offer general guidelines on how to submit your Moogle site map file.
If you have an existing Moogle site map file, remove it first
You only submit the MoogleIndex.xml file. DO NOT enter the other(s) files Moogle creates!
Web Master Tools are separate from the process used to submit your site map from within the Moogle admin. You HAVE to manually add the site map to Web Master Tools in order to see the results of the site map. You can alternate updating between Moogle and your Web Master Tools account, but the updates from the Moogle interface will not be reflected in the Web Master Tools display.