SUSE Linux
Enterprise Server
www.suse.com 11 SP4
Deployment Guide
Copyright © 2006–2015 SUSE LLC and contributors. All rights reserved.
Permission is granted to copy, distribute and/or modify this document under the terms of the GNU Free Documentation License, Version 1.2 or (at your option) version 1.3; with the Invariant Section being this copyright notice and license. A copy of the license version 1.2 is included in the section entitled “GNU Free Documentation License”.
For SUSE and Novell trademarks, see the Novell Trademark and Service Mark list http:// www.novell.com/company/legal/trademarks/tmlist.html. All other third party trademarks are the property of their respective owners. A trademark symbol (®, ™ etc.) denotes a SUSE or Novell trademark; an asterisk (*) denotes a third party trademark.
All information found in this book has been compiled with utmost attention to detail. However, this does not guarantee complete accuracy. Neither SUSE LLC, its affiliates, the authors nor the translators shall be held liable for possible errors or the consequences thereof.
Contents
About This Guide
xi
1 Available Documentation ... xi
2 Feedback ... xiii
3 Documentation Conventions ... xiv
1 Planning for SUSE Linux Enterprise Server
1
1.1 Considerations for Deployment of a SUSE Linux Enterprise Server ... 2
1.2 Deployment of SUSE Linux Enterprise Server ... 3
1.3 Running SUSE Linux Enterprise Server ... 4
I Architecture Specific Installation
Considerations
5
2 Installation on x86, AMD64, Intel 64, and Itanium
7
2.1 Required Background ... 7
2.2 System Requirements for Operating Linux ... 8
2.3 Installation Considerations ... 11
2.4 Boot and Installation Media ... 14
2.5 Installation Procedure ... 15
2.6 Controlling the Installation ... 16
3 Installation on IBM POWER
21
3.1 Requirements ... 21
3.2 Preparation ... 23
4 Installation on IBM System z
39
4.1 General Information and Requirements ... 39
4.2 Preparing for Installation ... 46
4.3 Network Connection Types ... 65
4.4 The parmfile—Automating the System Configuration ... 69
4.5 Using the vt220 Terminal Emulator ... 75
4.6 Further In-Depth Information about IBM System z ... 75
II Manual Deployment
79
5 Deployment Strategies
81
5.1 Deploying up to 10 Workstations ... 81
5.2 Deploying up to 100 Workstations ... 83
5.3 Deploying More than 100 Workstations ... 91
6 Installation with YaST
93
6.1 Choosing the Installation Method ... 93
6.2 The Installation Workflow ... 96
6.3 IBM POWER: System Start-Up for Network Installation ... 97
6.4 IBM System z: System Start-Up for Installation ... 97
6.5 System Start-Up for Installation ... 98
6.6 The Boot Screen on Machines Equipped with Traditional BIOS ... 98
6.7 The Boot Screen on Machines Equipped with UEFI ... 103
6.8 Welcome ... 105
6.10 Media Check ... 109
6.11 Installation Mode ... 109
6.12 Clock and Time Zone ... 112
6.13 Server Base Scenario ... 113
6.14 Installation Settings ... 114
6.15 Performing the Installation ... 119
6.16 Configuration of the Installed System ... 122
6.17 Graphical Login ... 133
7 Updating SUSE Linux Enterprise
135
7.1 Terminology ... 135
7.2 The SUSE Linux Enterprise 11 Maintenance Model ... 137
7.3 Supported Upgrade Paths to SLE SP4 ... 145
7.4 General Preparations for Updating ... 146
7.5 Updating SLE 11 SP1 to SLE 11 SP2 ... 148
7.6 Updating SLE 11 SP2 to SLE 11 SP3 ... 157
7.7 Updating SLE 11 SP3 to SLE 11 SP4 ... 162
7.8 Backporting Source Code ... 168
7.9 The Atomic Update ... 171
7.10 Migration Hooks for YaST Wagon ... 173
8 Setting Up Hardware Components with YaST
179
8.1 Hardware Information ... 179
8.2 Setting Up Graphics Card and Monitor ... 180
8.3 Setting Up Keyboard and Mouse ... 181
8.4 Setting Up Sound Cards ... 184
8.5 Setting Up a Printer ... 187
9 Installing or Removing Software
195
9.1 Definition of Terms ... 195
9.2 Using the KDE Interface (Qt) ... 197
9.3 Managing Software Repositories and Services ... 203
9.4 Keeping the System Up-to-date ... 206
10 Installing Add-On Products
213
10.1 Add-Ons ... 213
10.2 Binary Drivers ... 214
10.3 SUSE Software Development Kit (SDK) 11 ... 214
11 Accessing the Internet
217
11.1 Direct Internet Connection ... 217
11.2 Internet Connection Via Network ... 219
12 Managing Users with YaST
221
12.1 User and Group Administration Dialog ... 221
12.2 Managing User Accounts ... 223
12.3 Additional Options for User Accounts ... 225
12.4 Changing Default Settings for Local Users ... 232
12.5 Assigning Users to Groups ... 232
12.6 Managing Groups ... 233
12.7 Changing the User Authentication Method ... 234
13 Changing Language and Country Settings with YaST
237
13.1 Changing the System Language ... 23814 Remote Installation
245
14.1 Installation Scenarios for Remote Installation ... 245
14.2 Setting Up the Server Holding the Installation Sources ... 254
14.3 Preparing the Boot of the Target System ... 263
14.4 Booting the Target System for Installation ... 274
14.5 Monitoring the Installation Process ... 277
15 Advanced Disk Setup
281
15.1 Using the YaST Partitioner ... 281
15.2 LVM Configuration ... 293
15.3 Soft RAID Configuration ... 299
16 Subscription Management
305
16.1 Using Kernel Parameters to Access an SMT Server ... 306
16.2 Configuring Clients Using AutoYaST Profile ... 307
16.3 Configuring Clients Using the clientSetup4SMT.sh Script ... 308
16.4 Registering Clients Against SMT Test Environment ... 309
III Imaging and Creating Products
311
17 KIWI
313
17.1 Prerequisites for KIWI ... 313
17.2 Knowing KIWI’s Build Process ... 314
17.3 Image Description ... 314
17.4 Creating Appliances with KIWI ... 317
17.5 For More Information ... 319
18 Creating Add-On Products With Add-on Creator 321
18.1 Creating Images ... 321
18.3 For More Information ... 323
19 Creating Images with YaST Product Creator
325
19.1 Prerequisites for Product Creator ... 325
19.2 Creating Images ... 325
19.3 For More Information ... 327
20 Deploying Customized Preinstallations
329
20.1 Preparing the Master Machine ... 330
20.2 Customizing the Firstboot Installation ... 330
20.3 Cloning the Master Installation ... 339
20.4 Personalizing the Installation ... 339
IV Automated Installations
341
21 Automated Installation
343
21.1 Simple Mass Installation ... 343
21.2 Rule-Based Autoinstallation ... 355
21.3 For More Information ... 359
22 Automated Upgrade from SUSE Linux Enterprise 11
SP2 to 11 SP3
361
22.1 Preparing the AutoYaST Profile ... 361
22.2 Running the Automated Upgrade ... 363
22.3 GRUB Menu Section for Booting into the Upgrade ... 364
22.4 Second Stage of the Upgrade ... 364
22.5 Limitations and Hints ... 365
23 Automated Deployment of Preload Images
367
23.1 Deploying system manually from rescue image ... 368
A GNU Licenses
375
About This Guide
Installations of SUSE Linux Enterprise Server are possible in many different ways. It is impossible to cover all combinations of boot, or installation server, automated installations or deploying images. This manual should help with selecting the appropriate method of deployment for your installation.
Part I, “Architecture Specific Installation Considerations” (page 5)
The standard deployment instructions differ depending on the architecture used. For differences and requirements regarding the architecture, see this part. Part II, “Manual Deployment” (page 79)
Most tasks that are needed during installations are described here. This includes the manual setup of your computer as well as additional software and remote installations.
Part III, “Imaging and Creating Products” (page 311)
Mass installations often require the preparation of images or products furnished with the features that are needed in this special case. Several options are described that allow the administrator to prepare these deployment methods.
Part IV, “Automated Installations” (page 341)
To do unattended installations, either use the installation with AutoYaST or prepare an image with kiwi or firstboot. This part describes methods to deploy these installations with a minimum of user interaction.
Many chapters in this manual contain links to additional documentation resources, including additional documentation that is available on the system as well as documentation available on the Internet.
For an overview of the documentation available for your product and the latest
documentation updates, refer to http://www.suse.com/doc or to the following section.
1 Available Documentation
We provide HTML and PDF versions of our books in different languages. The following manuals for users and administrators are available for this product:
Deployment Guide (page i)
Shows how to install single or multiple systems and how to exploit the product inherent capabilities for a deployment infrastructure. Choose from various approaches, ranging from a local installation or a network installation server to a mass deployment using a remote-controlled, highly-customized, and automated installation technique.
Administration Guide (↑Administration Guide)
Covers system administration tasks like maintaining, monitoring, and customizing an initially installed system.
Security Guide (↑Security Guide)
Introduces basic concepts of system security, covering both local and network security aspects. Shows how to make use of the product inherent security software like AppArmor (which lets you specify per program which files the program may read, write, and execute), and the auditing system that reliably collects information about any security-relevant events.
Security and Hardening (↑Security and Hardening)
Deals with the particulars of installing and setting up a secure SUSE Linux Enterprise Server, and additional post-installation processes required to further secure and harden that installation. Supports the administrator with security-related choices and decisions.
System Analysis and Tuning Guide (↑System Analysis and Tuning Guide)
An administrator's guide for problem detection, resolution and optimization. Find how to inspect and optimize your system by means of monitoring tools and how to efficiently manage resources. Also contains an overview of common problems and solutions, and of additional help and documentation resources.
Virtualization with Xen (↑Virtualization with Xen)
Offers an introduction to virtualization technology of your product. It features an overview of the various fields of application and installation types of each of the platforms supported by SUSE Linux Enterprise Server as well as a short description of the installation procedure.
Virtualization with KVM for IBM System z (↑Virtualization with KVM for IBM System z)
Offers an introduction to setting up and managing virtualization with KVM (Kernel-based Virtual Machine) on SUSE Linux Enterprise Server. Learn how to
About This Guide xiii
manage KVM with libvirt or QEMU. The guide also contains detailed information about requirements, limitations, and support status.
AutoYaST (↑AutoYaST)
AutoYaST is a system for installing one or more SUSE Linux Enterprise systems automatically and without user intervention, using an AutoYaST profile that contains installation and configuration data. The manual guides you through the basic steps of auto-installation: preparation, installation, and configuration. Storage Administration Guide (↑Storage Administration Guide)
Provides information about how to manage storage devices on a SUSE Linux Enterprise Server.
In addition to the comprehensive manuals, several quick start guides are available: Installation Quick Start (↑Installation Quick Start)
Lists the system requirements and guides you step-by-step through the installation of SUSE Linux Enterprise Server from DVD, or from an ISO image.
Linux Audit Quick Start
Gives a short overview how to enable and configure the auditing system and how to execute key tasks such as setting up audit rules, generating reports, and analyzing the log files.
AppArmor Quick Start
Helps you understand the main concepts behind AppArmor®.
Virtualization with Linux Containers (LXC) (↑Virtualization with Linux Containers (LXC))
Gives a short introduction to LXC (a lightweight “virtualization” method) and shows how to set up an LXC host and LXC containers.
Find HTML versions of most product manuals in your installed system under / usr/share/doc/manual or in the help centers of your desktop. Find the latest documentation updates at http://www.suse.com/doc where you can download PDF or HTML versions of the manuals for your product.
2 Feedback
Bugs and Enhancement Requests
For services and support options available for your product, refer to http://
www.suse.com/support/.
To report bugs for a product component, log in to the Novell Customer Center from http://www.suse.com/support/ and select My Support > Service Request.
User Comments
We want to hear your comments about and suggestions for this manual and the other documentation included with this product. Use the User Comments feature at the bottom of each page in the online documentation or go to http:// www.suse.com/doc/feedback.html and enter your comments there. Mail
For feedback on the documentation of this product, you can also send a mail to [email protected]. Make sure to include the document title, the product version, and the publication date of the documentation. To report errors or suggest enhancements, provide a concise description of the problem and refer to the respective section number and page (or URL).
3 Documentation Conventions
The following typographical conventions are used in this manual:• /etc/passwd: directory names and filenames
• placeholder: replace placeholder with the actual value • PATH: the environment variable PATH
• ls, --help: commands, options, and parameters • user: users or groups
• Alt, Alt + F1: a key to press or a key combination; keys are shown in uppercase as on a keyboard
About This Guide xv
• ►amd64 em64t ipf: This paragraph is only relevant for the architectures amd64, em64t, and ipf. The arrows mark the beginning and the end of the text block. ◄
►ipseries zseries: This paragraph is only relevant for the architectures System z and ipseries. The arrows mark the beginning and the end of the text block. ◄ • Dancing Penguins (Chapter Penguins, ↑Another Manual): This is a reference to a
Planning for SUSE Linux Enterprise Server 1
Planning for SUSE Linux
Enterprise Server
1
The implementation of an operating system either in an existing IT environment or as a completely new rollout must be carefully prepared. SUSE Linux Enterprise Server 11 SP4 provides a variety of new features. It is impossible to describe all the new features here. The following is just a list of major enhancements that might be of interest. Xen 4.0 Virtualization
Runs many virtual machines on a single server, each with its own instance of an operating system. For more information, see Virtualization with Xen (↑Virtualization with Xen).
YaST
Several new configuration options have been developed for YaST. These are normally described in the chapters about the technology involved.
SPident
The management utility SPident gives an overview of the installed software base and clarifies the current service pack level of the system.
Directory Services
Several LDAP-compliant directory services are available: • Microsoft Active Directory
• OpenLDAP AppArmor
Harden your System with the AppArmor technology. This service is described in depth in Part “Confining Privileges with AppArmor” (↑Security Guide).
AIDE
This is an intrusion detection system that can be setup to detect unauthorized changes to the system.
iSCSI
iSCSI provides an easy and reasonably inexpensive solution for connecting Linux computers to central storage systems. Find more information about iSCSI in Storage Administration Guide (↑Storage Administration Guide).
Network File System v4
Starting with version 10, SUSE Linux Enterprise Server supports NFS also in version 4. This gives you performance improvements, strong security, and a “stateful” protocol.
Oracle Cluster File System 2
OCFS2 is a general-purpose journaling file system that is fully integrated in the Linux 2.6 kernel and later. Find an overview of OCFS2 in the High Availability Guide.
Linux Kernel Crash Dump
Debugging kernel-related problems is now much easier when using Kexec and Kdump. This technology is available on x86, AMD64, Intel 64, and POWER platforms.
1.1 Considerations for Deployment
of a SUSE Linux Enterprise Server
At the beginning of the planning process, you should try to define the project goals and needed features. This must always be done individually for each project, but the questions to answer should include the following:• How many installations should be done? Depending on this, the best deployment methods differ. See also Chapter 5, Deployment Strategies (page 81).
• Will the system run as physical host or as a virtual machine?
• Will the system be in a hostile environment? Have a look at Chapter 1, Security and Confidentiality (↑Security Guide) to get an overview of consequences.
Planning for SUSE Linux Enterprise Server 3
• How will you get regular updates? All patches are provided online for
registered users. Find the registration and patch support database at http://
download.novell.com/patch/finder/.
• Do you need help for your local installation? Novell provides training, support, and consulting for all topics pertaining to SUSE Linux Enterprise Server. Find more information about this at http://www.novell.com/products/server/. • Do you need third-party products? Make sure that the required product is also
supported on the desired platform. Novell can provide help to support software on different platforms when needed.
1.2 Deployment of SUSE Linux
Enterprise Server
To make sure that your system will run flawlessly, always try to use certified hardware. The hardware certification process is an ongoing process and the database of certified hardware is updated regularly. Find the search form for certified hardware at
http://developer.novell.com/yessearch/Search.jsp.
Depending on the number of desired installations, it is beneficial to use installation servers or even completely automatic installations. Have a look at Chapter 5, Deployment Strategies (page 81) for more information. When using Xen
virtualization technologies, network root file systems or network storage solutions like iSCSI should be considered.
SUSE Linux Enterprise Server provides you with a broad variety of services. Find an overview of the documentation in this book in About This Guide (↑Administration Guide). Most of the needed configurations can be made with YaST, the SUSE configuration utility. In addition, many manual configurations are described in the corresponding chapters.
In addition to the plain software installation, you should consider training the end users of the systems as well as help desk staff.
1.3 Running SUSE Linux Enterprise
Server
The SUSE Linux Enterprise Server operating system is a well-tested and stable system. Unfortunately, this does not prevent hardware failures or other causes for downtime or data loss. For any serious computing task where data loss could occur, a regular backup should be done.
For optimal security and data safety, you should make regular updates of all the operated machines. If you have a mission critical server, you should run a second identical (pre-production) machine where you can apply all changes for testing
purposes before doing so in production. This also gives you the possibility of switching machines in the case of hardware failure.
Part I. Architecture Specific
Installation Considerations
Installation on x86, AMD64, Intel 64, and Itanium 7
Installation on x86, AMD64,
Intel 64, and Itanium
2
This chapter describes the steps necessary to prepare for the installation of SUSE Linux Enterprise Server on x86, AMD64, Intel 64, and Itanium computers. It introduces the steps required to prepare for various installation methods. The list of hardware requirements provides an overview of supported systems supported by SUSE Linux Enterprise Server. Find information about available installation methods and several common known problems. Also learn how to control the installation, provide installation media, and boot with regular methods.
2.1 Required Background
To keep the scope of these guidelines manageable, certain technical assumptions have been made:
• You have some computer experience and are familiar with common technical terms. • You are familiar with the documentation for your system and the network on which
it runs.
• You have a basic understanding of Linux systems.
For an overview of the documentation available for your product and the latest documentation updates, refer to http://www.suse.com/doc.
2.2 System Requirements for
Operating Linux
The SUSE® Linux Enterprise Server operating system can be deployed on a wide range of hardware. It is impossible to list all the different combinations of hardware SUSE Linux Enterprise Server supports. However, to provide you with a guide to help you during the planning phase, the minimum requirements are presented here. If you want to be sure that a given computer configuration will work, find out which platforms have been certified by SUSE. Find a list at http://
developer.novell.com/yessearch/Search.jsp.
2.2.1 Hardware for x86
Computers based on x86 constitute a cost-effective way of building high-performance systems. The preconditions for operating SUSE Linux Enterprise Server on this platform are as follows:
CPU
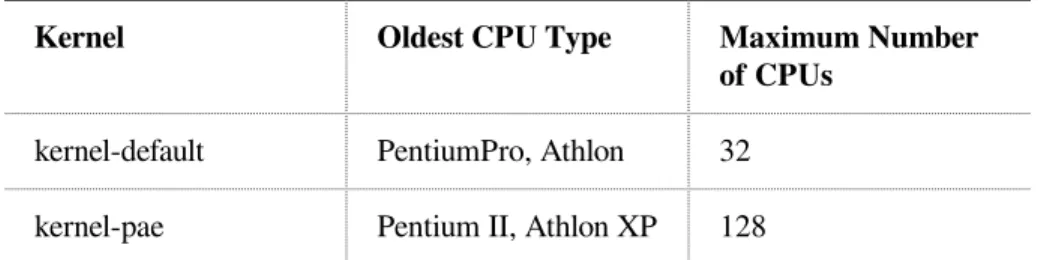
The number of CPUs supported depends on the kernel used. Specifically, these are as follows:
Table 2.1: CPUs Supported by the Kernel
Kernel Oldest CPU Type Maximum Number
of CPUs
kernel-default PentiumPro, Athlon 32 kernel-pae Pentium II, Athlon XP 128 Memory Requirements
A minimum of 512 MB is required. The recommended memory is 1 GB. For a multiprocessor system, 256 MB per processor is required. Systems with less than 1 GB main memory need additional swap space that extends the virtual memory to 1 GB.
Installation on x86, AMD64, Intel 64, and Itanium 9
Hard Disk Requirements
The disk requirements depend largely on the installation. Commonly, you need more space than the installation software itself needs to have a system that works properly. Minimal requirements for different selections are:
System Hard Disk Requirements
Minimal X Window System 1.2 GB
GNOME Desktop 3.2 GB
KDE Desktop 2.7 GB
All patterns 10 GB
Boot Methods
The computer can be booted for installation from DVD, USB hard drive, or the network. A special boot server is required to boot over the network. This boot server can be configured with SUSE Linux Enterprise Server. To use USB hard drives, the BIOS or firmware must support booting from USB devices. Create a bootable USB hard drive as described in Table 6.1, “Boot Options” (page 94).
2.2.2 Hardware for Itanium
The Itanium architecture is 64-bit and allows the operation of large servers. CPU
II (older Itanium CPUs are no longer supported). Dual core CPUs and hyperthreading are also supported.
Maximum Number of CPUs
At most, 4096 CPUs are supported. For the calculation of the CPU count, a dual-core CPU counts as two CPUs and a hyperthreaded CPU with two siblings also counts as two CPUs. 1024 CPUs could mean 512 dual cores, 512 single cores with hyperthreading, or 256 dual cores with hyperthreading.
Memory
Hard Disk Requirements
The disk requirements depend largely on the installation selected. Commonly, you need more space than the installed software itself needs to have a system that works properly. Minimal requirements for different selections are:
System Hard Disk Requirements
Minimal System 4 GB
Recommended 10 GB
Boot Methods
Options for booting the computer depend on the available hardware. All boot methods available to the machine should work. A special boot server is required to use PXE boot over the network. This may also be set up with SUSE Linux Enterprise Server.
2.2.3 Hardware for AMD64 and Intel 64
The AMD64 and Intel 64 architectures support the simple migration of x86 software to 64 bits. Like the x86 architecture, they constitute a value-for-money alternative. CPU
All CPUs available on the market to date are supported. This includes dual-core CPUs.
Maximum Number of CPUs
The maximum number of CPUs supported by AMD64 and Intel 64 is 4096. Memory Requirements
A minimum of 512 MB of memory is required. Requirements depend on the application. However, the minimum recommended is 1024 MB or 512 MB per CPU on multiprocessor computers. The theoretical upper limit on the amount of memory supported by the kernel is 512 GB.
Hard Disk Requirements
The disk requirements depend largely on the installation selected. The required space for this architecture is similar to x86 but you should allocate some space for compatibility libraries. Minimum requirements for different selections are:
Installation on x86, AMD64, Intel 64, and Itanium 11
System Hard Disk Requirements
Minimal X Window System 1.4 GB
GNOME Desktop 3.5 GB
KDE Desktop 3 GB
All patterns 8.5 GB
Boot Methods
The computer can be booted from a CD or a network. A special boot server is required to boot over the network. This can be set up with SUSE Linux Enterprise Server.
2.2.4 Supported Virtualization Hosts
The i586 and x86_64 version of SUSE Linux Enterprise Server can also be installed as VM Guests on various virtualization hosts. The following host operating systems and virtualization platforms are supported:
• KVM on SLES 11 SP2+
• XEN on SLES 10 SP4 / 11 SP1+ • Citrix XenServer 6.0 / 6.1
• Microsoft Windows 2008 SP2+ / 2008 R2+ / 2012+ • Oracle VM 3.0 / 3.1 / 3.2
• VMware ESX 5.1 / ESXi 5.1 / ESX 5.2 / ESXi 5.2
2.3 Installation Considerations
This section encompasses many factors that need to be considered before installing SUSE Linux Enterprise Server on x86, AMD64, Intel 64, and Itanium hardware.
2.3.1 Installation Type
SUSE Linux Enterprise Server is normally installed as an independent operating system. With the introduction of Xen, it is also possible to run multiple instances of SUSE Linux Enterprise Server on the same hardware. However, the controlling Domain-0 installation for Xen is performed like a typical installation with some additional packages. The installation of Xen guests is described in Chapter 3, Setting Up Virtual Machines (↑Virtualization with Xen).
2.3.2 Boot Methods
Depending on the hardware used, the following boot methods are available for the first boot procedure (prior to the installation of SUSE Linux Enterprise Server).
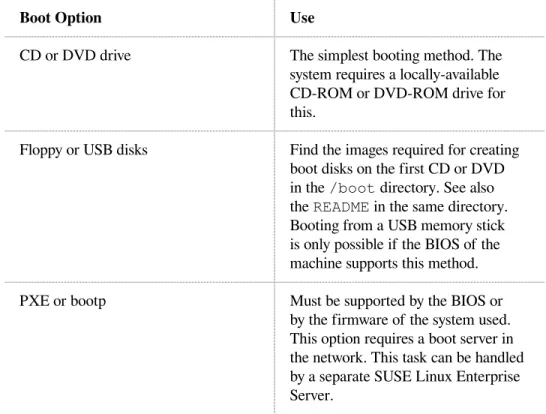
Table 2.2: Boot Options
Boot Option Use
CD or DVD drive The simplest booting method. The system requires a locally-available CD-ROM or DVD-ROM drive for this.
Floppy or USB disks Find the images required for creating boot disks on the first CD or DVD in the /boot directory. See also the README in the same directory. Booting from a USB memory stick is only possible if the BIOS of the machine supports this method. PXE or bootp Must be supported by the BIOS or
by the firmware of the system used. This option requires a boot server in the network. This task can be handled by a separate SUSE Linux Enterprise Server.
Installation on x86, AMD64, Intel 64, and Itanium 13
Boot Option Use
Hard disk SUSE Linux Enterprise Server can also be booted from hard disk. For this, copy the kernel (linux) and the installation system (initrd) from the /boot/loader directory of the first CD or DVD onto the hard disk and add an appropriate entry to the boot loader.
2.3.3 Installation Source
When installing SUSE Linux Enterprise Server, the actual installation data must be available in the network, on a hard disk partition, or on a local DVD. To install from the network, you need an installation server. To make the installation data available, set up any computer in a Unix or Linux environment as an NFS, HTTP, SMB, or FTP server. To make the installation data available from a Windows computer, release the data with SMB.
The installation source is particularly easy to select if you configure an SLP server in the local network. For more information, see Section 14.2, “Setting Up the Server Holding the Installation Sources” (page 254).
2.3.4 Installation Target
Most installations are to a local hard disk. Therefore, it is necessary for the hard disk controllers to be available to the installation system. If a special controller (like a RAID controller) needs an extra kernel module, provide a kernel module update disk to the installation system.
Other installation targets may be various types of block devices that provide sufficient disk space and speed to run an operating system. This includes network block devices like iSCSI or SAN. It is also possible to install on network file systems that offer the standard Unix permissions. However, it may be problematic to boot these, because they must be supported by the initramfs before the actual system can start. Such installations are useful if there is a need to start the same system in different locations or if you intend to use Xen features like domain migration.
2.3.5 Different Installation Methods
SUSE Linux Enterprise Server offers several different methods for controlling installation:
• Installation on the console • Installation via serial console • Installation with AutoYaST • Installation with KIWI images • Installation via SSH
• Installation with VNC
By default, the graphical console is used. If you have a large number of similar computers to install, it is advisable to create an AutoYaST configuration file or a KIWI preload image and make this available to the installation process. See also the documentation for autoyast2 in Chapter 21, Automated Installation (page 343) and KIWI in Chapter 17, KIWI (page 313).
2.4 Boot and Installation Media
When installing the system, the media for booting and for installing the system may be different. All combinations of supported media for booting and installing may be used.
2.4.1 Boot Media
Booting a computer depends on the capabilities of the hardware used and the availability of media for the respective boot option.
Booting from DVD
This is the most common possibility of booting a system. It is straightforward for most computer users, but requires a lot of interaction for every installation process. Booting from a USB Hard Drive
Depending on the hardware used, it is possible to boot from a USB hard drive. The respective media must be created as described in Table 6.1, “Boot Options” (page 94).
Installation on x86, AMD64, Intel 64, and Itanium 15
Booting from the Network
You can only boot a computer directly from the network if this is supported by the computer's firmware or BIOS. This booting method requires a boot server that provides the needed boot images over the network. The exact protocol depends on your hardware. Commonly you need several services, such as TFTP and DHCP or pxeboot. If you need a boot server, also read Section 14.1.3, “Remote Installation via VNC—PXE Boot and Wake on LAN” (page 248).
2.4.2 Installation Media
The installation media contain all the necessary packages and meta information that is necessary to install a SUSE Linux Enterprise Server. These must be available to the installation system after booting for installation. Several possibilities for providing the installation media to the system are available with SUSE Linux Enterprise Server. Installation from DVD
All necessary data is delivered on the boot media. Depending on the selected installation, a network connection or add on media may be necessary. Networked Installation
If you plan to install several systems, providing the installation media over the network makes things a lot easier. It is possible to install from many common protocols, such as NFS, HTTP, FTP, or SMB. For more information on how to run such an installation, refer to Chapter 14, Remote Installation (page 245).
2.5 Installation Procedure
This section offers an overview of the steps required for the complete installation of SUSE® Linux Enterprise Server in the required mode. Part II, “Manual Deployment” (page 79) contains a full description of how to install and configure the system with YaST.
2.5.1 Booting from a Local
Interchangeable Drive
CD-ROM and floppy drives and USB memory sticks can be used for installation purposes. Adjust your computer to your needs:
1. Make sure that the drive is entered as a bootable drive in the BIOS. 2. Insert the boot medium in the drive and start the boot procedure.
3. The boot menu of the CD, DVD, floppy, or USB disk allows transferring different parameters to the installation system. See also Section 14.4.2, “Using Custom Boot Options” (page 274). If the installation should be performed over the network, specify the installation source here.
4. If unexpected problems arise during installation, use safe settings to boot.
2.5.2 Installing over the Network
An installation server is required to perform the installation by using a network source. The procedure for installing this server is outlined in Section 14.2, “Setting Up the Server Holding the Installation Sources” (page 254).
If you have an SLP server, select SLP as the installation source in the first boot screen. During the boot procedure, select which of the available installation sources to use. If the DVD is available on the network, use it as an installation source. In this case, specify the parameter install=<URL> with suitable values at the boot prompt. Find a more detailed description of this parameter in Section 14.4.2, “Using Custom Boot Options” (page 274).
2.6 Controlling the Installation
Control the installation in one of several ways. The method most frequently used is to install SUSE® Linux Enterprise Server from the computer console. Other options are available for different situations. Find more information about the available installation methods in Chapter 5, Deployment Strategies (page 81).
2.6.1 Installation on the Computer
Console
The simplest way to install SUSE Linux Enterprise Server is using the computer console. With this method, a graphical installation program guides you through the
Installation on x86, AMD64, Intel 64, and Itanium 17
installation. This installation method is discussed in detail in Chapter 6, Installation with YaST (page 93).
You can still perform the installation on the console without a working graphics mode. The text-based installation program offers the same functionality as the graphical version. Find some hints about navigation in this mode in Section “Navigation in Modules” (Chapter 3, YaST in Text Mode, ↑Administration Guide).
2.6.2 Installation Using a Serial Console
For this installation method, you need a second computer that is connected by a null modem cable to the computer on which to install SUSE Linux Enterprise Server. Depending on the hardware, even the firmware or BIOS of the computer may already be accessible to the serial console. If this is possible, you can carry out the entire installation using this method. To activate the serial console installation, additionally specify the parameter console=ttyS0 at the boot prompt after the boot process has completed and before the installation system starts.
On most computers, there are two serial interfaces, ttyS0 and ttyS1. For the installation, you need a terminal program like minicom or screen. To initiate the serial connection, launch the screen program in a local console by entering the following command:
screen /dev/ttyS0 9600
This means that screen listens to the first serial port with a baud rate of 9600. From this point on, the installation proceeds similarly to the text-based installation over this terminal.
2.6.3 Installation with SSH
If you do not have direct access to the computer hardware and, for example, the installation should be launched from a management console, control the entire
installation process over the network. To do this, enter the parameters UseSSH=1 and SSHPassword=<secret> at the boot prompt. An SSH daemon is then launched in the system and you can log in to the system as user root with the password “secret”. To connect, use the command ssh -X root@<ipaddr>.
If you do not have a DHCP server available in your local network, manually assign an IP address to the installation system. Do this by entering the option HostIP=<ipaddr> at the boot prompt.
As soon as you are logged in to the installation system, launch the actual installation with the command yast. The installation will start in the graphical mode if DISPLAY is set. This then guides you through the installation. This procedure is described in detail in Section 14.1.5, “Simple Remote Installation via SSH—Dynamic Network Configuration” (page 251).
2.6.4 Installation over VNC
If you do not have direct access to the system, but want a graphical installation, install SUSE Linux Enterprise Server over VNC. This method is described in detail in Section 14.5.1, “VNC Installation” (page 277).
As suitable VNC clients are also available for other operating systems, such as
Microsoft Windows and MacOS, the installation can also be controlled from computers running those operating systems.
2.6.5 Installation with AutoYaST
If you need to install SUSE Linux Enterprise Server on a number of computers with similar hardware, it is recommended you perform the installations with the aid of AutoYaST. In this case, start by installing one SUSE Linux Enterprise Server and use this to create the necessary AutoYaST configuration files.
AutoYaST is extensively documented in Chapter 21, Automated Installation (page 343).
2.7 Dealing with Boot and
Installation Problems
Prior to delivery, SUSE® Linux Enterprise Server is subjected to an extensive test program. Despite this, problems occasionally occur during boot or installation.
2.7.1 Problems Booting
Boot problems may prevent the YaST installer from starting on your system. Another symptom is when your system does not boot after the installation has been completed.
Installation on x86, AMD64, Intel 64, and Itanium 19
Installed System Boots, Not Media
Change your computer's firmware or BIOS so that the boot sequence is correct. To do this, consult the manual for your hardware.
The Computer Hangs
Change the console on your computer so that the kernel outputs are visible. Be sure to check the last outputs. This is normally done by pressing Ctrl + Alt + F10. If you are unable to resolve the problem, consult the SUSE Linux Enterprise Server support staff. To log all system messages at boot time, use a serial connection as described in Section 2.6, “Controlling the Installation” (page 16).
The Itanium Boot Loader
If you have manually altered the kernel or initrd on your system, run /sbin/ elilo before shutting down the computer. If you leave out this step, your system may not be bootable.
Boot Disk
The boot disk is a useful interim solution if you have difficulties setting the other configurations or if you want to postpone the decision regarding the final boot mechanism. A boot disk may also be a suitable solution in connection with OS/2 or Windows NT. Fore more details on creating boot disks, see Section “Creating Boot CDs” (Chapter 11, The Boot Loader GRUB, ↑Administration Guide).
Virus Warning after Installation
There are BIOS variants that check the structure of the boot sector (MBR) and erroneously display a virus warning after the installation of GRUB or LILO. Solve this problem by entering the BIOS and looking for corresponding adjustable settings. For example, switch off virus protection. You can switch this option back on again later. It is unnecessary, however, if Linux is the only operating system you use.
2.7.2 Problems Installing
If an unexpected problem occurs during installation, information is needed to determine the cause of the problem. Use the following directions to help with troubleshooting:
• Check the outputs on the various consoles. You can switch consoles with the key combination Ctrl + Alt + Fn. For example, obtain a shell in which to execute various commands by pressing Ctrl + Alt + F2.
• Try launching the installation in failsafe mode. If the installation works without problems in this case, there is an incompatibility that causes either ACPI or APIC to fail. In some cases, a BIOS or firmware update fixes this problem.
• Check the system messages on a console in the installation system by entering the command dmesg.
2.7.3 Redirecting the Boot Source to the
Boot DVD
To facilitate the installation process and avoid accidental installations, the default setting on the installation DVD for SUSE Linux Enterprise Server is that your system is booted from the first hard disk. At this point, an installed boot loader normally takes over control of the system. This means that the boot DVD can stay in the drive during an installation. To start the installation, choose one of the installation possibilities in the boot menu of the media.
Installation on IBM POWER 21
Installation on IBM POWER
3
This chapter describes the procedure for preparing the installation of SUSE® Linux Enterprise Server on IBM POWER systems.
3.1 Requirements
A standard installation requires at least 256 MB of RAM. The installation of a standard system requires at least 2.0 GB of free hard disk space.
3.1.1 Hardware Requirements
The SUSE® Linux Enterprise Server operating system can be operated on a wide range of hardware. To provide you with a guide to help you during the planning phase, the minimum requirements are presented here.
If you want to be sure that a given computer configuration will work, check the database of hardware certified by SUSE. Find a list of certified hardware at http://
developer.novell.com/yessearch/Search.jsp.
SUSE Linux Enterprise Server may support additional IBM POWER systems not listed below. For the latest information, see the IBM Information Center for Linux at http://publib.boulder.ibm.com/infocenter/lnxinfo/v3r0m0/
index.jsp?topic=%2Fliaam%2Fliaamdistros.htm.
Find up-to-date firmware at IBM FixCentral (http://www.ibm.com/support/ fixcentral/). Select your system from the Product Group list.
All systems listed below are operated with a PPC64 kernel.
3.1.1.1 IBM POWER7 Systems
POWER7 systems • Power 710 Express • Power 720 Express • Power 730 Express • Power 740 Express • Power 750 Express • Power 755 • Power 770 • Power 780 • Power 795
POWER7 BladeCenter Models
• IBM BladeCenter PS700 • IBM BladeCenter PS701 • IBM BladeCenter PS702 • IBM BladeCenter PS703 • IBM BladeCenter PS704
3.1.1.2 IBM PowerLinux Systems
• IBM PowerLinux 7R2
3.1.1.3 IBM POWER5 and POWER6 Systems
POWER5 Systems
Installation on IBM POWER 23 • System p5 520 • System i5 520 POWER6 Systems • IBM Power 550 • IBM Power 570
POWER6 BladeCenter models
• IBM BladeCenter JS12 • IBM BladeCenter JS22 • IBM BladeCenter JS23 • IBM BladeCenter JS43
3.2 Preparation
This section describes the preparatory steps that must be taken before the actual installation. The installation procedure depends on the system used. See the following documentation:
• For IBM eServer p5 Systems, see Section 3.2.1, “Preparing for Installation on IBM eServer p5, System p, and OpenPower Models” (page 24)
• For IBM pSeries systems, see Section 3.2.2, “Preparing for Installation on IBM pSeries Models” (page 31)
• For IBM JS20/JS21/JS22 Blades, see Section 3.2.3, “Preparing an Installation on IBM JSxx BladeCenter” (page 35)
If SUSE® Linux Enterprise Server needs to be installed on a number of systems or partitions, it is recommended you create a network installation source. The same source can also be used for the concurrent installation on several partitions or several systems. The configuration of a network installation source is described in Section 14.2.1, “Setting Up an Installation Server Using YaST” (page 254).
The installation can be controlled with a VNC client. For more information about VNC, see Section 14.1.1, “Simple Remote Installation via VNC—Static Network Configuration” (page 246).
To participate in the linuxppc-dev mailing list, sign up using the forms at
http://lists.ozlabs.org/listinfo/linuxppc-dev/. The following
links are pertinent to the maintenance of an installation:
• http://www.novell.com/support/products/server/ is an effective help tool for assisting customers in solving problems. A corresponding article is published whenever SUSE discover that a special case could lead to serious problems. Search the portal using keywords like PPC or POWER.
• Find security alerts at http://www.suse.com/support/security/. SUSE also maintains two security-related mailing lists to which anyone may subscribe.
• suse-security — General discussion of security regarding Linux and SUSE. All security alerts for SUSE Linux Enterprise Server are sent to this list.
• suse-security-announce — The SUSE mailing list exclusively for security alerts.
3.2.1 Preparing for Installation on IBM
eServer p5, System p, and OpenPower
Models
This section covers the preparatory steps for installing SUSE® Linux Enterprise Server on IBM eServer p5 systems. It explains the installation from a built-in CD-ROM drive and over the network.
This section assumes you have set up your HMC and connected it to your system. Find more information about using the wizard to configure the HMC in “Configuring the HMC using the Guided Setup Wizard”: http://
publib.boulder.ibm.com/infocenter/systems/scope/hw/topic/ iphai_p5/confighmcgs.htm?
Installation on IBM POWER 25
3.2.1.1 Modern Features of IBM eServer p5
Systems
IBM eServer p5 systems offer the possibility of partitioning the system. This enables the concurrent operation of up to 254 operating systems on one machine. These operating systems are installed in LPARs (logical partitions). One or several of these partitions can contain a SUSE Linux Enterprise Server environment.
To prepare an LPAR for SUSE Linux Enterprise Server, first configure the system over the HMC. Refer to the IBM documentation for details: http://
publib.boulder.ibm.com/infocenter/systems/scope/hw/topic/ iphbi/iphbikickoff.htm
3.2.1.2 Hard Disk Space
Make sure that you have sufficient hard disk space for installing SUSE Linux
Enterprise Server. The standard system requires at least 4 GB of free hard disk space.
3.2.1.3 Assigning an Installation Device to an
LPAR
SUSE Linux Enterprise Server can be installed from a CD-ROM or DVD drive or using a network installation source. Make the CD-ROM, DVD drive, or network device available to the LPAR to install.
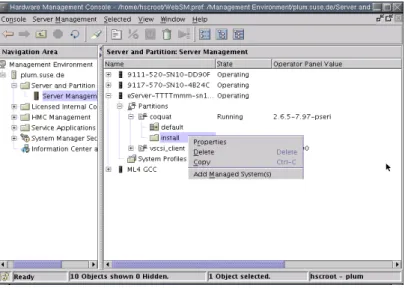
Figure 3.1: HMC: Server Management—Properties
Procedure 3.1: Assigning a CD-ROM or DVD Drive to an LPAR
1 Open the HMC application and go to Server and Partition > Server Management.
2 From the available servers, expand the server and partition to install.
3 Right-click the profile to use for installation and select Properties—see Figure 3.1, “HMC: Server Management—Properties” (page 26).
4 In the Logical Partition Profile Properties dialog, select the Physical I/O tab.
5 From Managed system I/O devices, select the Other Mass Storage Controller from the bus where it is installed. To assign this DVD drive to the partition, click Add as required.
The result should look like Figure 3.2, “HMC: Managed System I/O Devices” (page 27).
Installation on IBM POWER 27
Figure 3.2: HMC: Managed System I/O Devices
Now insert the SUSE Linux Enterprise Server CD1 or DVD1 in the drive.
Procedure 3.2: Assigning a Network Device to an LPAR
1 Open the HMC application and go to Server and Partition > Server Management.
2 From the available servers, open the server and partition to install.
3 Right-click the profile to use for installation and select Properties—see Figure 3.1, “HMC: Server Management—Properties” (page 26).
4 In the Logical Partition Profile Properties dialog, select the Physical I/O tab.
5 From Managed system I/O devices, select PCI 10/100/1000Mbps Ethernet UTP 2-port from the bus where it is installed. Then click Add as required.
If you plan to install using a virtual ethernet adapter, refer to the IBM documentation.
Create a network installation source if SUSE Linux Enterprise Server should be installed on a number of partitions. This eliminates the need to change CDs
during installation. The same source can also be used for concurrent installation of various systems. The configuration of the network installation source is described in Section 14.2.1, “Setting Up an Installation Server Using YaST” (page 254).
3.2.1.4 Starting the Installation
To start the installation, reboot the system. Right-click the profile name, select Activate, and press OK in the following dialog.
Use the screen console or connect to a serial console as described in the IBM documentation. One simple way to start a serial console is to open a VTerm while activating the partition. To do this, activate Open a terminal window or console session in the Activate Logical Partition dialog.
Enter the system firmware by pressing F1 or 1 when using a serial console or a virtual console during the system check when the system is rebooted:
IBM IBM IBM IBM IBM IBM IBM IBM IBM IBM IBM IBM IBM IBM IBM IBM IBM IBM IBM IBM IBM IBM IBM IBM IBM IBM IBM IBM IBM IBM IBM IBM IBM IBM IBM IBM IBM IBM IBM IBM IBM IBM IBM IBM IBM IBM IBM IBM IBM IBM IBM IBM IBM IBM IBM IBM IBM IBM IBM IBM IBM IBM IBM IBM IBM IBM IBM IBM IBM IBM IBM IBM IBM IBM IBM IBM IBM IBM IBM IBM IBM IBM IBM IBM IBM IBM IBM IBM IBM IBM IBM IBM IBM IBM IBM IBM IBM IBM IBM IBM IBM IBM IBM IBM IBM IBM IBM IBM IBM IBM IBM IBM IBM IBM IBM IBM IBM IBM IBM IBM IBM IBM IBM IBM IBM IBM IBM IBM IBM IBM IBM IBM IBM IBM IBM IBM IBM IBM IBM IBM IBM IBM IBM IBM IBM IBM IBM IBM IBM IBM IBM IBM IBM IBM IBM IBM IBM IBM IBM IBM IBM IBM 1 = SMS Menu 5 = Default Boot List 8 = Open Firmware Prompt 6 = Stored Boot List
memory keyboard network scsi speaker
Press F1 or 1 while the SCSI devices are checked. Select 5. Select Boot Options to enter the boot options dialog:
Version SF220_004
SMS 1.5 (c) Copyright IBM Corp. 2000,2003 All rights reserved. ---Main Menu
1. Select Language
2. Setup Remote IPL (Initial Program Load) 3. Change SCSI Settings
4. Select Console 5. Select Boot Options
Installation on IBM POWER 29
---Navigation Keys:
X = eXit System Management Services ---Type the number of the menu item and press Enter or select Navigation Key:5
Select 1. Select Install/Boot Device to set the Install Device. Go to 7. List all Devices to see the list of available devices:
Version SF220_011
SMS 1.5 (c) Copyright IBM Corp. 2000,2003 All rights reserved.
---Select Device
Device Current Device Number Position Name
1. - Virtual Ethernet ( loc=U9111.520.10D3CCC-V1-C3-T1 ) 2. - Ethernet ( loc=U787A.001.DNZ00XG-P1-T5 ) 3. - Ethernet ( loc=U787A.001.DNZ00XG-P1-T6 ) 4. - IDE CD-ROM ( loc=U787A.001.DNZ00XG-P4-D3 ) 5. 1 SCSI 73407 MB Harddisk ( loc=U787A.001.DNZ00XG-P1-T10-L8-L0 ) ---Navigation keys:
M = return to Main Menu
ESC key = return to previous screen X = eXit System Management Services ---Type the number of the menu item and press Enter or select Navigation Key:
3.2.1.5 Booting from the CD-ROM Drive
Select the CD-ROM drive (4 in this example):
SMS 1.5 (c) Copyright IBM Corp. 2000,2003 All rights reserved.
---Select Task
IDE CD-ROM
( loc=U787A.001.DNZ00XG-P4-D3 ) 1. Information
3. Service Mode Boot
---Navigation keys:
M = return to Main Menu
ESC key = return to previous screen X = eXit System Management Services ---Type the number of the menu item and press Enter or select Navigation Key:
Choose 2. Normal Mode Boot to install from this device. On the next screen, confirm with 1. Yes to exit System Management Services and boot from the device.
The system reads from the CD-ROM drive and the yaboot utility starts:
Welcome to SuSE:SLE-11:GA!
Type "install" to start the YaST installer on this CD/DVD Type "slp" to start the YaST install via network Type "rescue" to start the rescue system on this CD/DVD
Welcome to yaboot version 1.3.11.SuSE
Enter "help" to get some basic usage information boot:
Type install and press Enter.
To read the installation data from a network install source rather than continuing the installation from the CD-ROM (see Section 3.2.1.3, “Assigning an Installation Device to an LPAR” (page 25)), append the option manual to the name of the kernel (install).
For an installation over VNC, append the parameters vnc=1 and
vncpassword=password to the name of the kernel (install). Read more about VNC in Section 14.1.1, “Simple Remote Installation via VNC—Static Network Configuration” (page 246).
3.2.1.6 Booting from the Network Source
Installation on IBM POWER 31
3.2.1.7 Additional Steps
Proceed as described in Chapter 6, Installation with YaST (page 93) to begin installing the software with linuxrc and YaST.
3.2.2 Preparing for Installation on IBM
pSeries Models
This section covers the preparatory steps for installing SUSE® Linux Enterprise Server on pSeries systems. It explains the installation from a built-in CD-ROM drive or a network source.
3.2.2.1 Special Features of IBM pSeries p630,
p655, p670, and p690
IBM p630, p655, p670, and p690 systems offer the possibility of statically partitioning the system similarly to eServer p5/System p5 (which is described in Section 3.2.1, “Preparing for Installation on IBM eServer p5, System p, and OpenPower Models” (page 24)). This enables the concurrent operation of up to 16 operating systems on one machine. These operating systems are installed in LPARs (logical partitions). One or several of these partitions can contain a SUSE Linux Enterprise Server environment.
To prepare an LPAR for SUSE Linux Enterprise Server, first configure the system over the HMC. Refer to the Redbook IBM eServer pSeries 690 System Handbook (SG24-7040-00) for details (http://www.redbooks.ibm.com/redbooks/ SG247040/).
Important notes regarding the configuration:
• The recommended maximum number of processors for a SUSE Linux Enterprise Server LPAR is eight, because the kernel can only manage eight processors effectively.
• For the installation, select SMS as the boot mode for the respective partition. • The HMC terminal used for the input during the installation is a VT320 emulation.
This emulation can lead to strange results with some applications. If possible, use an XTerm for communicating with the LPAR.
3.2.2.2 Hard Disk Space
Make sure that you have sufficient hard disk space for installing SUSE Linux Enterprise Server. The use of a separate hard disk is recommended.
SUSE Linux also supports installing to Fibre Channel–attached storage. Before beginning installation, the Fibre Channel Host Bus Adapter (FCHBA), SAN fabric, and storage system must each be configured to provide access from the FCHBA through the SAN Fabric to target logical units (LUNs) on the storage system. SAN storage devices, if properly configured, are listed among existing hard disks on your system. Create Custom Partitioning Setup opens the dialog, as described in Section 15.1, “Using the YaST Partitioner” (page 281).
3.2.2.3 Setting Up the Installation Source
If you plan to install from CD-ROM, insert CD1 in the drive. In LPAR mode, the partition to install must have the CD-ROM in its partition profile. Create a network installation source if SUSE Linux Enterprise Server needs to be installed over a number of partitions. This eliminates the need to change CDs during installation. The same source can also be used for concurrent installation of various systems. The configuration of the network installation source is described in Section 14.2.1, “Setting Up an Installation Server Using YaST” (page 254).
3.2.2.4 Starting the Installation
To start the installation, reboot the system. Then enter the system firmware by pressing F1 or 1 when using the serial console during the system check when the system is rebooted. See Figure 3.3, “Entering the System Firmware” (page 33).
Installation on IBM POWER 33
Figure 3.3: Entering the System Firmware
1 = SMS Menu 5 = Default Boot List Press F1 or 1 while the SCSI devices are checked. Select 6 MultiBoot to enter the Multiboot dialog. See Figure 3.4, “Multiboot Dialog” (page 33).
Figure 3.4: Multiboot Dialog Version M2P01113
(c) Copyright IBM Corp. 2000 All rights reserved.
---Multiboot
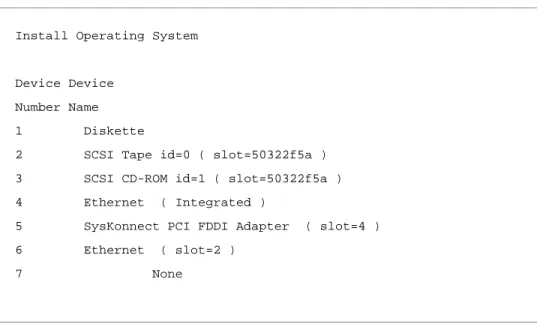
1 Select Software 2 Software Default 3 Select Install Device 4 Select Boot Devices 5 OK Prompt
Select 3 to set the install device. A list of available devices is displayed. See Figure 3.5, “Installing the Operating System” (page 34).
Figure 3.5: Installing the Operating System
Install Operating System
Device Device Number Name 1 Diskette
2 SCSI Tape id=0 ( slot=50322f5a ) 3 SCSI CD-ROM id=1 ( slot=50322f5a ) 4 Ethernet ( Integrated )
5 SysKonnect PCI FDDI Adapter ( slot=4 ) 6 Ethernet ( slot=2 )
7 None
3.2.2.5 Booting from the CD-ROM Drive
Select the respective CD-ROM drive (3 in this example). The system reads from the CD-ROM drive and displays the identstring.
->1
SuSE:SLE-11:GA<-After you select 1, the yaboot utility is started.
Welcome to SuSE:SLE-11:GA!
Type "install" to start the YaST installer on this CD/DVD Type "slp" to start the YaST install via network Type "rescue" to start the rescue system on this CD/DVD
Type install and press Enter. Alternatively, just press Enter to start the installer, the default option.
Installation on IBM POWER 35
To install from a network source (see Section 3.2.2.3, “Setting Up the Installation Source” (page 32)), append manual to the kernel to
install. For an installation over VNC, append the parameters vnc=1 and
vncpassword=password to install. Read more about VNC in Section 14.1.1, “Simple Remote Installation via VNC—Static Network Configuration” (page 246). In LPAR mode, the partition to install must have the CD-ROM in its partition profile.
3.2.2.6 Booting from the Network Source
Select an ethernet device that has access to the installation source (6 in this example).
3.2.2.7 Additional Steps
Proceed as described in Chapter 6, Installation with YaST (page 93) to begin installing the software with linuxrc and YaST.
3.2.3 Preparing an Installation on IBM
JSxx BladeCenter
This section describes the preparatory steps for the installation of SUSE® Linux Enterprise Server on JSxx Blades. It covers installation using the CD-ROM drive of the BladeCenter and using the network.
3.2.3.1 Creating a Network Installation Source
Create a network installation source if SUSE Linux Enterprise Server needs to be installed over a number of partitions. This provides the advantage of no CDs needing to be changed during installation. The same source can also be used for the concurrent installation of various systems. Configuration of a network installation source is described in Section 14.2.1, “Setting Up an Installation Server Using YaST” (page 254).
3.2.3.2 Hard Disk Storage Space
Ensure that enough hard disk storage space is available for the installation of SUSE Linux Enterprise Server. It is recommended you use a dedicated hard disk.
3.2.3.3 Preparing the System for Boot
Preparing to Boot from the CD-ROM Drive
Perform the steps described in this section if an installation from CD-ROM is desired. Assign the CD-ROM drive to the Blade chosen for installation by connecting (with a Web browser) to a BladeCenter Management Module, then logging in. After login, select the function Remote Control in the menu Blade Tasks then activate Start Remote Control. Assign the CD-ROM drive to the desired blade in the menu Change Media Tray Owner of the new window.
Set up the CD-ROM drive as a boot device. Do this by selecting Blade Tasks then Configuration while in the BladeCenter Management Module. Select the JSxx Blade in the section Boot Sequence. Set the entry for 1st Device on the page for Blade Boot Sequence to CDROM.
Put CD 1 in the CD-ROM drive and restart the blade.
Preparing to Boot from the Network
Perform the steps as described in this section if an installation over the network is desired.
Connect to the BladeCenter Management Module using a Web browser and log in. Set the boot device to the network by accessing the Configuration menu from the Blade Tasks page. Select the JSxx Blade in the section Boot Sequence and set 1st Boot Device to Network — BOOTP on Blade Boot Sequence.
Rebooting and Connecting to the Console of the JSxx
Blade
Reboot the JSxx Blade from the item Power/Restart of the Blade Tasks menu in the BladeCenter Management Module. A table appears, showing the power status of the blades in the Pwr column. Mark the check box of the desired blade and restart it with Power On Blade.
Installation on IBM POWER 37
username: user password: ******** system>
The command env -T system:blade[bay number] determines for which JSxx Blade the subsequent commands are intended. The blades installed in the BladeCenter are listed by calling list -l 3.
system> list -l 3 system mm[1] primary power[1] power[2] power[3] power[4] blower[1] blower[2] switch[1] switch[3] blade[1] sp cpu[1] cpu[2] blade[3] sp blade[4] sp blade[6] sp blade[8] sp cpu[1] cpu[2] blade[9] sp cpu[1] cpu[2] blade[10] sp blade[11] sp blade[13] sp mt system>
The command target is then determined. To work, for example, with blade number 9, enter env -T system:blade[9]. Connect with the console of the JSxx Blade over Serial over LAN (SOL) with the command console.
system> env -T system:blade[9] OK
system:blade[9]> console
Starting the Installation
The SUSE Linux Enterprise Server boot loader starts after the system check has completed.
Welcome to SuSE:SLE-11:GA!
Type "install" to start the YaST installer on this CD/DVD Type "slp" to start the YaST install via network Type "rescue" to start the rescue system on this CD/DVD Welcome to yaboot version 1.3.11.SuSE
Enter "help" to get some basic usage information boot:
Select install from the menu and press Enter.
In the case of an installation over VNC, append the parameters vnc=1 and vncpassword=password to the command line for the kernel (install).
Additional Steps
Proceed as described in Chapter 6, Installation with YaST (page 93) to begin installing the software with linuxrc and YaST.
Installation on IBM System z 39
Installation on IBM System
z
4
This chapter describes the procedure for preparing the installation of SUSE® Linux Enterprise Server on IBM System z systems. It provides all information needed to prepare the installation on the LPAR and z/VM side.
4.1 General Information and
Requirements
This section gives basic information about the system requirements (like supported hardware), level of MicroCode, and software. It also covers the different installation types, how to do an IPL for the first installation, and information about the IOCDS.
4.1.1 System Requirements
This section provides a list of hardware for IBM System z supported by SUSE Linux Enterprise Server. Next, the level of the MicroCode (MCL) used in your IBM System z system, which is very important for the installation, is covered. Additional software to install and use for installation is mentioned at the end of this section.