Using Imported Graphics in L
A
TEX 2
ε
Keith Reckdahl
Version 2.0
December 15, 1997
SummaryThis document explains how to use imported graphics in LATEX 2εdocuments.
While reading the entire document is certainly worthwhile, most users should be able to locate the necessary information by browsing the table of contents on pages 3-5 or the index on pages 84-86.
While LATEX can import virtually any graphics format, Encapsulated PostScript
(
eps
) is the easiest graphics format to import into LATEX. For example,eps
filesare inserted by specifying
\usepackage{graphicx}
in the document’s preamble and then using the command
\includegraphics{file.eps}
Optionally, the graphic can be scaled to a specified height or width
\includegraphics[height=4cm]{file.eps} \includegraphics[width=3in]{file.eps}
Additionally, theangleoption rotates the included graphic
\includegraphics[angle=45]{file.eps}
The\includegraphicscommand and the rest of the LATEX 2εgraphics bundle are
covered in Part II of this document.
This document is divided into the following four parts Part I: Background Information
This part provides historical information and describes basic LATEX
terminol-ogy. It also describes the Encapsulated PostScript (
eps
) format, differencesbetween
eps
andps
files, and methods for converting non-eps
graphics toeps
.Part II: The LATEX Graphics Bundle
This part describes the commands in the graphics bundle which import, scale, and rotate graphics. This part covers much of the information in the graphics bundle documentation (reference [5]).
Part III: Using Graphics Inclusion Commands
This part describes how the graphics bundle commands are used to import, rotate, and scale graphics. Three situations where graphics inclusion is mod-ified are also covered:
• Compressed
eps
files and non-eps
graphic formats (tiff
,gif
,jpeg
,pict
, etc.) can also be inserted on-the-fly whendvipsis used with anoperating system which supports pipes (such as Unix). When using other operating systems, the non-
eps
graphics must be converted toeps
beforehand.Since neither LATEX nordvipshas any built-in decompression or
graphics-conversion capabilities, that software must be provided by the user. c
Copyright 1995-97 by Keith Reckdahl. All rights reserved. Reproduction and distribution is allowed under terms of thegnuGeneral Public License.
• Since many graphics applications support only
ascii
text, theps
fragsystem allows text in
eps
files to be replaced with LATEX symbols ormathematical expressions.
• When an
eps
graphic is inserted multiple times (such as a logo behindthe text or in the page header) the final PostScript includes multiple copies of the graphics. When the graphics are not bitmapped, a smaller final PostScript file can be obtained by defining a PostScript command for the graphics.
Part IV: The figure Environment
There are several advantages to placing graphics in figure environments. Fig-ure environments automatically number graphics, allowing them to be ref-erenced or included in a table of contents. Since the figures can float to avoid poor page breaks, it is much easier to produce a professional-looking document.
In addition to general information about the figure environment, this section describes the following figure-related topics:
• How to customize the figure environment, such as adjusting figure place-ment, figure spacing, caption spacing, and adding horizontal line be-tween the figure and the text. Caption formatting can also be cus-tomized, allowing users to modify the style, width, and font of captions. • How to create marginal figures and wide figures which extend into the
margins.
• How to produce figures with landscape orientation in a portrait docu-ment.
• How to place captions beside the figure instead of below or above the figure.
• For two-sided documents, how to ensure that a figure appears on an odd or even page. Also, how to ensure that two figures appear on facing pages.
• How to create boxed figures.
• How to form side-by-side graphics, side-by-side figures, and side-by-side subfigures.
• How to construct continued figures which can span multiple pages.
Where to Get this Document
This document is available in PostScript form as CTAN/info/epslatex.psor in pdf
form asCTAN/info/epslatex.pdf, whereCTANcan be replaced by any of the following
ctan
(Comprehensive TEX Archive Network) sites and mirrorsEngland ftp://ftp.tex.ac.uk/tex-archive/ Deutschland ftp://ftp.dante.de/tex-archive/ Eastern U.S. ftp://tug2.cs.umb.edu/tex-archive/ Western U.S. ftp://ftp.cdrom.com/pub/tex/ctan/ Australia ftp://unsw.edu.au/tex-archive/
Japan ftp://ftp.riken.go.jp/pub/tex-archive/
A complete list of
ctan
mirrors can be obtained from the CTAN.sites file at anyctan
site, or by fingering[email protected]Contents
I
Background Information
6
1 Introduction 6
2 LATEX Terminology 7
3 Encapsulated PostScript 8
3.1 Forbidden PostScript Operators . . . 8
3.2 The EPS BoundingBox . . . 8
3.3 Converting PS files to EPS . . . 9
3.4 Fixing Non-standard EPS files . . . 9
4 How EPS Files are Used by LATEX 10 4.1 Line Buffer Overflow . . . 10
5 Obtaining GhostScript 11 6 Graphics-Conversion Programs 12 6.1 Level 2 EPS Wrappers . . . 12
6.2 Editing PostScript . . . 13
II
The L
ATEX Graphics Bundle
14
7 EPS Graphics Inclusion 14 7.1 The includegraphics Command . . . 148 Rotating and Scaling Objects 16 8.1 The scalebox Command . . . 16
8.2 The resizebox Commands . . . 16
8.3 The rotatebox Command . . . 17
9 Advanced Commands 17 9.1 The DeclareGraphicsExtensions Command . . . 18
9.2 The DeclareGraphicsRule Command . . . 18
III
Using Graphics-Inclusion Commands
20
10 Horizontal Spacing and Centering 20 10.1 Horizontal Centering . . . 2010.2 Horizontal Spacing . . . 20
11 Rotation, Scaling, and Alignment 21 11.1 Difference Between Height and Totalheight . . . 21
11.2 Scaling of Rotated Graphics . . . 21
11.3 Alignment of Rotated Graphics . . . 22
11.4 Minipage Vertical Alignment . . . 24
12 Using Subdirectories 26 12.1 TEX Search Path . . . 26
12.2 Graphics Search Path . . . 27
13 Compressed and Non-EPS Graphics Files 28
13.1 Compressed EPS Example . . . 28
13.2 TEX Search Path and dvips . . . 29
13.3 Non-EPS Graphic Files . . . 30
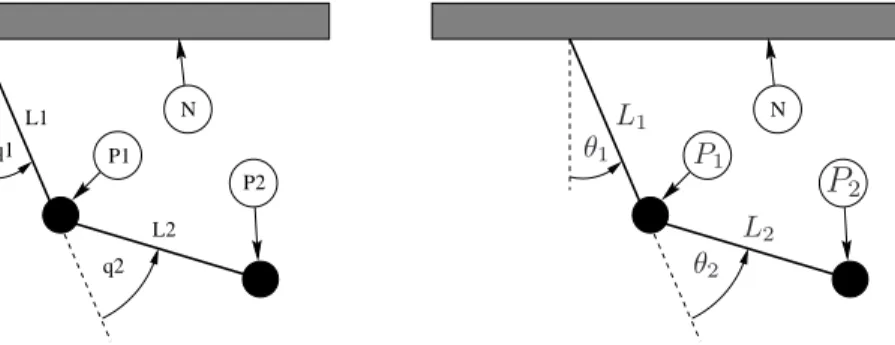
14 The PSfrag Package 31 14.1 PSfrag Example #1 . . . 33
14.2 PSfrag Example #2 . . . 33
14.3 LATEX Text in EPS File . . . . 34
14.4 Figure and Text Scaling with PSfrag . . . 34
14.5 PSfrag Incompatibilities . . . 35
15 Including An EPS File Multiple Times 35 15.1 Defining a PostScript Command . . . 36
15.2 Graphics in Page Header or Footer . . . 37
15.3 Watermark Graphics in Background . . . 39
IV
The Figure Environment
41
16 The Figure Environment 41 16.1 Creating Floating Figures . . . 4116.2 Figure Placement . . . 42
16.3 Clearing Unprocessed Floats . . . 43
16.4 Too Many Unprocessed Floats . . . 44
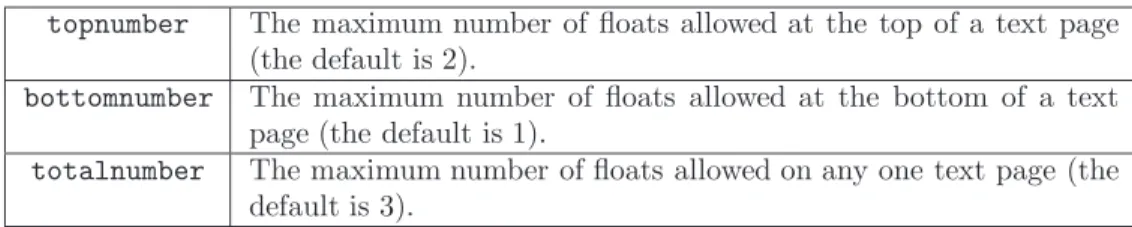
17 Customizing Float Placement 45 17.1 Float Placement Counters . . . 45
17.2 Figure Fractions . . . 45
17.3 Suppressing Floats . . . 47
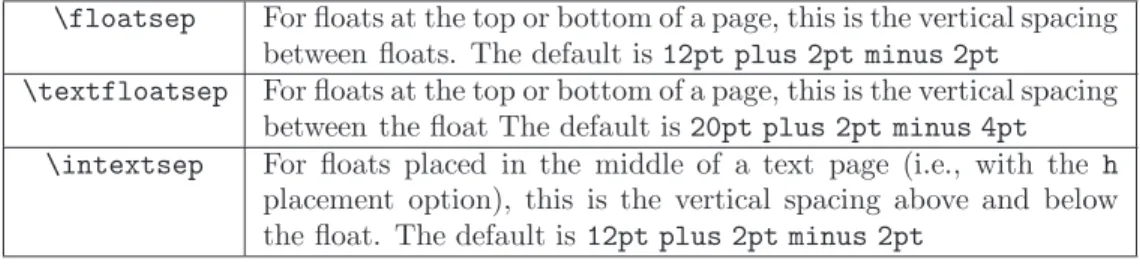
18 Customizing the figure Environment 47 18.1 Figure Spacing . . . 47
18.2 Horizontal Lines Above/Below Figure . . . 48
18.3 Caption Vertical Spacing . . . 49
18.4 Caption Label . . . 50
18.5 Moving Figures to End of Document . . . 50
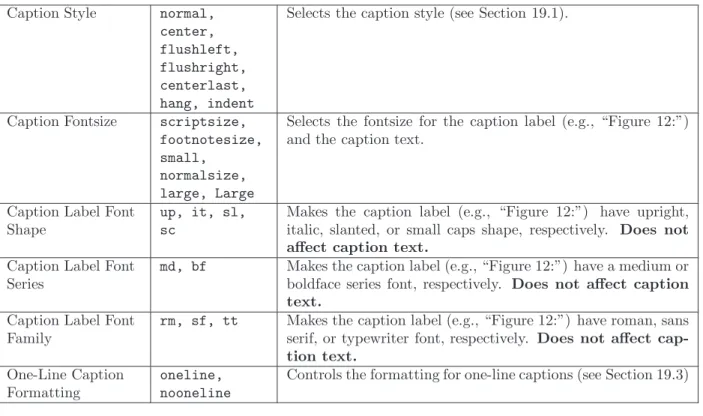
19 Customizing Captions with caption2 51 19.1 Caption Styles . . . 51
19.2 Changing the Caption Style . . . 52
19.3 One-Line Captions . . . 53
19.4 Caption Widths . . . 54
19.5 Caption Delimiter . . . 55
19.6 Caption Font . . . 56
19.7 Custom Caption Styles . . . 57
19.8 Linebreaks in Captions . . . 58
19.9 Adjusting Caption Linespacing . . . 58
20 Non-Floating Figures 59 20.1 Thefloat Package’s[H]Placement Option . . . 60
22 Wide Figures 61
22.1 Wide Figures in One-sided Documents . . . 62
22.2 Wide Figures in Two-sided Documents . . . 62
23 Landscape Figures 63 23.1 Landscape Environment . . . 63
23.2 Sidewaysfigure Environment . . . 64
23.3 Rotcaption Command . . . 64
24 Captions Beside Figures 66 24.1 Caption to Left of Figure . . . 66
24.2 Caption on Binding Side of Graphic . . . 67
24.3 The Sidecap Package . . . 67
25 Figures on Even or Odd Pages 68 25.1 Figures on Facing Pages . . . 69
26 Boxed Figures 70 26.1 Box Around Graphic . . . 70
26.2 Box Around Figure and Caption . . . 71
26.3 Customizing fbox Parameters . . . 72
26.4 The Fancybox Package . . . 72
27 Side-by-Side Graphics 73 27.1 Side-by-Side Graphics in a Single Figure . . . 74
27.2 Side-by-Side Figures . . . 75
27.3 Side-by-Side Subfigures . . . 77
28 Stacked Graphics 79 29 Placing a Table Beside a Figure 80 30 Continued Figures 81
References 83
Index 84
Acknowledgements
I thank David Carlisle for providing me with a great deal of assistance. I also thank Donald Arseneau, Robin Fairbairns, Jim Hafner, Piet van Oostrum, and other contrib-utors to thecomp.text.texnewsgroup, whose posts provided much of the information for this document. Thanks also goes to the many people who provided me with valuable suggestions and bug reports for this document.
Part I
Background Information
1
Introduction
When TEX was written, PostScript/
eps
,jpeg
,gif
, and other graphic formats didHistory
not exist. As a result, Knuth’s
dvi
format does not have direct support for importedgraphics. However, TEX allows
dvi
files to contain\special commands which passcommands to programs which use
dvi
files. This allows TEX and LATEX to import anygraphic format which is supported by the
dvi
program being used.Since
dvi
files are often converted to PostScript, the best-supportedimported-graphic format is Encapsulated PostScript (
eps
) which is a subset of the PostScript language. Insertingeps
graphics in LATEX originally required the low-level \specialcommand. To make graphic-insertion easier and more portable, two higher-level pack-agesepsf andpsfigwere written for LATEX2.09. Inepsf, the graphics insertion was done
by the \epsfbox command, while three other commands controlled graphic scaling. In psfig, the \psfig command not only inserted graphics, it also scaled and rotated them. While the psfig syntax was popular, its code was not as robust as epsf. As a result, the epsfig package was created as a hybrid of the two graphics packages, with its\epsfigcommand using the\psfigsyntax and much of the more-robust\epsfbox code. Unfortunately,\epsfigstill used some of the less-robust \psfigcode.
With the release of LATEX 2εin 1994, the LATEX3 team addressed the general problem LATEX
Graphics Bundle
of inserting graphics in LATEX 2ε. Their efforts produced the “LATEX graphics bundle1,”
which contains totally re-written commands that are more efficient, more robust, and more portable than other graphics-insertion commands.
The graphics bundle contains the “standard”graphics package and the “extended” graphicx package. While both packages contain an \includegraphicscommand, the packages contain different versions of \includegraphics. The graphicx version uses “named arguments” (similar to the \psfig syntax) which, although convenient, vio-late the LATEX syntax guidelines which require that optional arguments be positional.
As a compromise, two versions of \includegraphicswere written, with the graphics package following the LATEX syntax guidelines and thegraphicxpackage using the
more-convenient named arguments. Thegraphicx\includegraphicssupports scaling and ro-tating, but thegraphics\includegraphicscommand must be nested inside\rotatebox or\scaleboxcommands to produce rotating or scaling.
This document uses thegraphicxpackage because its syntax is more convenient than thegraphicssyntax. Since both packages have the same capabilities, the examples in this document can also be performed with thegraphicspackage, although the resulting syntax may be more cumbersome and slightly less efficient. For a more-detailed description of the packages, see the graphics bundle documentation [5].
For backward-compatibility, the graphics bundle also includes the epsfig package which replaces the original LATEX 2ε epsfig package. The new epsfig package defines
the \epsfbox, \psfig, and \epsfig commands as wrappers which simply call the \includegraphics command. Since these wrappers are less efficient, the wrapped packaged should be used only for old documents, with \includegraphicsused for all new documents.
In addition to improving
eps
graphics-inclusion, the LATEX graphics bundle also Non-EPSGraphics addressed the problem of including non-
eps
graphic formats such asjpeg
andgif
.Since
dvi
converters generally do not support direct inclusion of most non-eps
formats,these graphics must be converted to
eps
for insertion into LATEX documents. In many1
Note that there is a plain TEX version of the LATEX graphics bundle. See the files in the directory
cases, this graphics conversion can be performed on-the-fly by the
dvi
-to-ps
converter.Section 6 describes graphics-conversion programs while Section 13 describes how to use non-
eps
graphics in LATEX.2
L
ATEX Terminology
A box is any LATEX object (characters, graphics, etc.) that is treated as a unit (see
[1, page 103]). Each box has a reference point on its left side. The box’sbaseline is a horizontal line which passes through the reference point (see Figure 1). When LATEX
forms lines of text, characters are placed left-to-right with their reference points aligned on a horizontal line called the current baseline, aligning the characters’ baselines with the current baseline. LATEX follows the same process for typesetting graphics or other
objects; the reference point of each object is placed on the current baseline.
Baseline depth totalheight height width Point Reference
Figure 1: Sample LATEX Box
The size of each box is described by three lengths: height, depth, width. Theheight
is the distance from the reference point to the top of the box. Thedepthis the distance from the reference point to the bottom of the box. Thewidth is the width of the box. Thetotalheight is defined as the distance from the bottom of the box to the top of the box, or totalheight=height+depth.
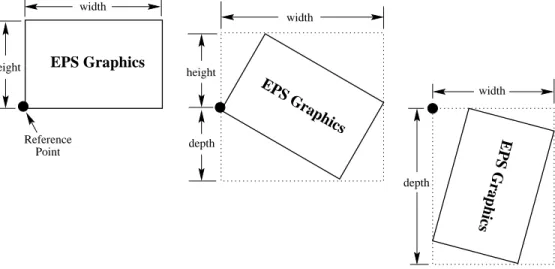
The reference point of a non-rotated
eps
graphic is its lower-left corner (see leftReference depth height width depth width height Point EPS Graphics EPS Graphics EPS Graphics width
box in Figure 2), giving it zero depth and making its totalheight equal its height. The middle box in Figure 2 shows a rotated graphic where the height is not equal to the totalheight. The right box in Figure 2 shows a rotated graphic where the height is zero.
3
Encapsulated PostScript
The PostScript language can describe graphics and text. The PostScript language is used in conventional PostScript (
ps
) files to describe multiple-page documents and alsoin Encapsulated PostScript (
eps
) files to describe graphics for insertion into documents.There are two main differences between PS and EPS files
• EPS files can contain only certain PostScript operators.
• EPS files must contain a BoundingBox line which specifies the size of the EPS graphic.
3.1
Forbidden PostScript Operators
Since
eps
graphics must share the page with other objects, the commands in aneps
file cannot perform page operations such as selecting a page size (such asletterora4) or erasing the entire page witherasepage. The following PostScript operators are not allowed in
eps
files:a3 a4 a5 banddevice clear
cleardictstack copypage erasepage exitserver framedevice grestoreall initclip initgraphics initmatrix letter legal note prenderbands quit renderbands setdevice setglobal setpagedevice setpageparams setsccbatch setshared startjob stop
Although the following PostScript operators can be used in
eps
files, they may cause problems if not used properly.nulldevice setcolortransfer setgstate sethalftone setmatrix setscreen settransfer undefinedfont
Some of the above operators may cause the
dvi
-to-ps
process to fail, while othersmay cause strange problems like misplaced or invisible graphics. Since many of these operators do not affect the PostScript stack, these problems can often be eliminated by simply deleting the offending operator. Other cases may require more complicated hacking of the PostScript.
3.2
The EPS BoundingBox
By convention, the first line of a PostScript file specifies the type of PostScript and is then followed by a series of comments called the header or preamble. (Like LATEX,
PostScript’s comment character is %). One of these comments specifies the Bounding-Box. The BoundingBox line contains four integers
1. Thex-coordinate of the lower-left corner of the BoundingBox. 2. They-coordinate of the lower-left corner of the BoundingBox. 3. Thex-coordinate of the upper-right corner of the BoundingBox. 4. They-coordinate of the upper-right corner of the BoundingBox. For example, the first 5 lines of an
eps
file created by gnuplot are%!PS-Adobe-2.0 EPSF-2.0 %%Creator: gnuplot
%%DocumentFonts: Times-Roman %%BoundingBox: 50 50 410 302 %%EndComments
Thus the gnuplot
eps
graphic has a lower-left corner with coordinates (50,50) and anupper-right corner with coordinates (410,302). The BoundingBox parameters have units of PostScript points which are 1/72of an inch, making the above graphic’s natural width
5 inches and its natural height 3.5 inches. Note that a PostScript point is is slightly larger than a TEX point, which is 1/72.27of an inch. In TEX and LATEX, PostScript
points are called “big points” and abbreviated bpwhile TEX points are called “points” and abbreviatedpt.
3.3
Converting PS files to EPS
Single-page PostScript files without any improper commands can be converted to
eps
by using one of the following methods for adding a BoundingBox line. Since these methods do not check for illegal PostScript operators, they do not produce usable EPS files unless the PS files are free of forbidden operators.
1. The most convenient option is to use theps2epsiutility distributed with Ghostscript (see Section 5), which reads the PostScript file, calculates the BoundingBox pa-rameters, and creates an
eps
file (complete with a BoundingBox) which containsthe PostScript graphics.
The resulting file
eps
file is inepsi
format, which means it contains alow-resolution bitmapped preview at the beginning of the file. Since this preview is
ascii
-encoded, it does not cause the Section 4.1bufsize errors. However, thisepsi
preview increases the file size.2. Alternatively, the BoundingBox parameters can be calculated and inserted in the PostScript file’s BoundingBox line or specified in the graphics-insertion command (e.g., the \includegraphicscommand’s bboption). There are several ways to calculate the BoundingBox parameters
(a) Use Ghostview/GSview to display the PostScript graphic. As the pointer is moved around the graphic, the pointer’s coordinates (with respect to the lower-left corner of the page) are displayed. To determine the BoundingBox parameters, record the pointer coordinates at the lower-left corner of the graphic and the upper-right corner of the graphic.
(b) Print out a copy of the PostScript graphics and measure the horizontal and vertical distances (in inches) from the lower-left corner of the paper to the lower-left corner of the graphics. Multiply these measurements by 72 to get the BoundingBox’s lower-left coordinates. Likewise, measure the distances from the lower-left corner of the paper to the upper-right corner of the graph-ics to get the BoundingBox’s upper-right coordinates.
(c) The bbfigscript uses a PostScript printer to calculate the BoundingBox. bbfig adds some PostScript commands to the beginning of the PostScript file and sends it to the printer. At the printer, the added PostScript com-mands calculate the BoundingBox of the original PostScript file, printing the BoundingBox coordinates superimposed on the PostScript graphic.
3.4
Fixing Non-standard EPS files
Some applications produce non-standard
eps
files which cannot be used in otherpro-grams such as LATEX. Some applications have developed their own “improved” flavor of
PostScript with additional features, while other applications use poor PostScript pro-gramming. Fortunately, there are utilities which fix the non-standard
eps
files createdby the following applications.
Mathematica
eps
files produced by Mathematica 2.x are written in Mathematica’smust be fixed to remove the non-standard extensions.
dos
versions ofMathemat-ica 2.x include a utility called eitherprintps.exeorrasterpswhich removes the non-standard extensions. On Unix versions of Mathematica 2.x, this can be done with the psfixutility. Reference your Mathematica documentation or contact Wolfram Research for more information.
FrameMaker PostScript produced by FrameMaker fails to follow Adobe’s specification for page independence. PostScript files produced by FrameMaker Version 4 and 5 can be respectively fixed using the scripts
ftp://ftp.irisa.fr/pub/FrameMaker/Filters/fixfm4-1.3.tar.gz ftp://ftp.irisa.fr/pub/FrameMaker/Filters/fixfm5-2.0.tar.gz
Correction scripts for FrameMaker Version 3 and 4 are also available from
ftp://ftp.frame.com/pub/techsup/framers/platform.ind/filters/fixfm3ps.sh ftp://ftp.frame.com/pub/techsup/framers/platform.ind/filters/fixfm4ps.sh
4
How EPS Files are Used by L
ATEX
The
eps
files are used by both LATEX and thedvi
-to-ps
converter.1. LATEX scans the
eps
file for the BoundingBox line, which tells LATEX how muchspace to reserve for the graphic.
2. The
dvi
-to-ps
converter then reads theeps
file and inserts the graphics in theps
file.This has the following ramifications
• LATEX never even reads the
eps
file if the BoundingBox parameters are specifiedin the graphics-insertion command (e.g., the bboption of \includegraphicsis used).
• Since TEX cannot read non-
ascii
files and cannot spawn other programs, LATEXcannot read the BoundingBox information from compressed or non-
eps
graph-ics files. In these cases, the BoundingBox parameters must be specified in the graphics-insertion command (e.g., in thebboption of the\includegraphics com-mand) or stored in a non-compressed text file (see Section 13).• The
eps
graphics are not included in thedvi
file. Since theeps
files must bepresent when the
dvi
file is converted tops
, theeps
files must accompanydvi
files whenever they are moved.
• The
eps
graphics do not appear in mostdvi
viewers. To help the user withplacement of the graphics,
dvi
viewers generally display the BoundingBox inwhich the graphics will be inserted. (Some viewers, such asxdvi, use ghostscript to interpret the
eps
graphics and display them in thedvi
viewer.)4.1
Line Buffer Overflow
LATEX reads
ascii
files one line at a time, putting each line in its line buffer, which isusually about 3000 characters long. If any of the lines of the
eps
file is longer than theline buffer, the following error is displayed
Unable to read an entire line--bufsize=3000. Please ask a wizard to enlarge me.
Since
eps
rarely have lines longer than 3000 characters, there are two possible causes of such an error1. The EPS file contains a long binary preview.
Some applications place a binary preview of the graphics at the beginning of the
eps
file. This allows applications (such asdvi
viewers) to display the graphics even though the application cannot interpret PostScript. Currently, relatively few TEX-related applications use such previews.If the binary preview is smaller than the line buffer, the\includegraphics com-mand skips over the preview (this is not the case with\psfigand other obsolete graphics commands). However, the overfull bufsize error occurs if the binary preview is larger than the line buffer. There are a couple work-arounds for this problem
(a) If the preview won’t be used, the problem can be avoided by either deleting it with a text editor or by preventing the original graphics application from creating the preview.
(b) Since LATEX reads the
eps
file to only obtain the BoundingBoxparam-eters, LATEX does not read the
eps
file if the BoundingBox parametersare provided by the graphics-insertion command (e.g., the bb option to \includegraphics)
2. The file’s end-of-line characters are corrupted by an improper transfer.
(The problem described in this section does not occur with the latest web2c distri-bution and some commercial distridistri-butions whose TEX are smart enough to identify all end-of-line characters.)
Different platforms use different end-of-line characters: Unix uses a line feed char-acter (^J), Macintosh uses a carriage return (^M), while
dos
/Windows uses acarriage return and line feed pair (^M^J). For example, if an
eps
file is transferredin binary mode from a Macintosh to a Unix machine, the Unix TEX doesn’t see any ^Jend-of-line characters and thus thinks the entire file is one big line, overfilling the line buffer.
If the
eps
file has no binary sections (e.g., no binary preview and no embeddedgraphics) this problem can be avoided by transferring the
eps
file in text mode. However,eps
files with binary sections must be transferred with binary mode, since the text mode transfer may corrupt the binary section. However, such binary transfer results in incorrect end-of-line characters, requiring the BoundingBox information be provided by the graphics-insertion command (e.g., the bb option to \includegraphics).5
Obtaining GhostScript
Ghostscript is a PostScript interpreter which runs on most platforms and is distributed for free2 by Aladdin Enterprises. This allows PostScript and EPS files to be displayed on the screen and printed to non-PostScript printers. Aladdin Ghostscript is avail-able fromCTAN/support/ghostscript/aladdin/. It is also available directly from the Ghostscript home page
http://www.cs.wisc.edu/~ghost/index.html
whose
html
interface provides better directions than do thectan ftp
sites.These sites contains pre-compiled Windows/
dos
/OS/2 and Macintosh executables,along with ready-to-compile source code for Unix/
vms
. Also available aregraphi-cal interfaces (GSview for Windows 3.1/95/NT/OS/2, Ghostview for Unix/
vms
) forGhostscript which makes the viewing of PostScript much easier.
2Although Aladdin Ghostscript is distributed for free, it is not in the public domain. It is copyrighted
and comes with certain limitations such as no commercial distribution. When versions of Aladdin Ghostscript become approximately one year old, Aladdin releases them as “GNU Ghostscript” whose use is governed by the less-restrictive GNU Public License.
6
Graphics-Conversion Programs
The following freeware and shareware programs convert non-
eps
graphics toeps
. Someof the programs allow command-line conversion which makes it possible to convert the graphics on-the-fly duringdvipsconversion (see Section 13.3).
• ImageMagick is a very good graphics-conversion utility that is distributed for free from ftp.wizards.dupont.comand other sites. See
http://www.wizards.dupont.com/cristy/ImageMagick.html
In addition to Unix and Linux, it now also runs under Windows NT, Macintosh, and
vms
.• xvis $25 shareware which provides graphics viewing and conversion programs for X-Windows systems. Note that xv does not provide command-line conversion capabilities for on-the-fly graphics conversion. Forxvinformation, see
http://www.sun.com/sunsoft/catlink/xv/note.html
an on-linexvmanual is available from
http://is.rice.edu/~shel/xv-3.10a/
• DISPLAYis
dos
freeware which converts between many types of graphic formats.It is available asdisp189a.zipanddisp189b.zipfrom the SimTel archives
http://www.simtel.net/simtel.net/msdos/graphics-pre.html http://oak.oakland.edu/simtel.net/msdos/graphics-pre.html
Future versions will increment the 189version number.
• WMF2EPS is a freeware
wmf
-to-eps
conversion program which runs onWin-dows 95 and NT. It is available from
CTAN/support/wmf2eps/readme.txt
It requires an Adobe-compatible printer driver on your system.
• KVEC is $25 shareware which converts bitmap graphics (
bmp
,gif
,tiff
) intoPostScript and other vector formats. KVECis available for Windows, OS/2,
next
and Unix.
http://ourworld.compuserve.com/homepages/kkuhl/
• NetPBMis a maintained and improved version of the unsupportedPBMPLUSpackage. It runs under Unix,
vms
, and reportedly evendos
.http://wuarchive.wustl.edu/graphics/graphics/packages/NetPBM/
• ImageCommander ($19 shareware) is a graphics-conversion program for Win-dows 3.1/95/NT which reads many types of graphics formats (
gif
,jpeg
,pict
,wmf
, etc) and writeseps
and other formats. For more information, seehttp://www.jasc.com/
JASC’s Paint Shop Pro painting program ($69 shareware) has the same graphics-conversion capabilities.
6.1
Level 2 EPS Wrappers
Unlike conventional PostScript, Level 2 PostScript supports compressed binary graphics. This produces better quality and smaller files than converting the graphics to conven-tional
eps
. If one has a Level 2 PostScript printer, it is better to use the followingwrapper programs instead of the conversion programs listed above. Since the resulting PostScript files can only be printed on Level 2 printers, the documents are less portable.
• A
jpeg
graphic can be converted to level 2 PostScript by the C programjpeg2pswhich is available from
http://www.muc.de/~tm/free/free.html
• A
tiff
graphic can be converted tolzw
-encoded Level-2 PostScript by usingtiff2ps, whose source is available from
ftp://ftp.sgi.com/graphics/tiff/tiff-v3.4-tar.gz
A tar.Z file is also available. tiff2ps can be compiled on Unix,
dos
, Mac,and
vms
platforms. Although thelzw
PostScript files are small, they require aLevel-2 PostScript printer.
6.2
Editing PostScript
While the graphics in an
eps
file can be modified by editing the file’s PostScript com-mands, this is difficult for most people. Instead, it is easier to use the following programs to editeps
graphics• pstoedit is a free program for Unix,
dos
, Windows, and OS/2 whose C++source code is available from
ftp://ftp.x.org/contrib/applications/pstoedit/pstoedit.html http://www.cdrom.com/pub/X11/contrib/applications/pstoedit/
when used with ghostscript, pstoedit translates PostScript and
into other vector formats (such asxfig’s.figformat).
• Mayura Draw (formerly known as PageDraw) is a drawing program for Windows 3.1/95/NT which is available from
http://www.wix.com/PageDraw
When used with ghostscript, Mayura Draw can edit PostScript files.
Older versions of Mayura Draw are distributed for free, while more recent versions are $15 shareware. Note that Mayura Draw requires Adobe Type Manager (ATM) to place text on the graphics. Although ATM is now commercial software, Adobe formerly distributed it for free with Acrobat Reader 2.0, which is available from Winsite at
ftp://ftp.winsite.com/pub/pc/win3/util/acroread.zip
• xfigis a free drawing program for Unix/Xwindows available from
ftp://ftp.x.org/contrib/applications/drawing_tools/
http://www.cdrom.com/pub/X11/contrib/applications/drawing_tools/
xfigcan import EPS drawings and add annotations, but currently cannot modify the original
eps
graphics.Part II
The L
A
TEX Graphics Bundle
7
EPS Graphics Inclusion
The best reference for thegraphicsandgraphicxpackages is the graphics guide [5] or the
LATEX Graphics Companion [4]. The coverage of the graphicx package in other LATEX
references is sporadic: [2] covers both thegraphicsandgraphicxpackages, [1] only covers thegraphicspackage and [3] describes neither.
7.1
The includegraphics Command
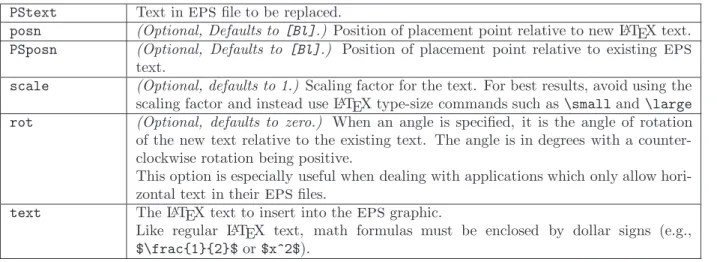
Syntax:
\includegraphics[options]{filename}
where the options are listed in Tables 1, 2, and 3. Since\includegraphicsdoes not end the current paragraph, it can place graphics within text such as or . The commands \documentclass{article} \usepackage{graphicx} \begin{document} \includegraphics{file.eps} \end{document}
include the graphics fromfile.epsat its natural size.
When the specified filename has no extension \includegraphicsappends the ex-tensions in the \DeclareGraphicsExtensionsextension list (See Section 9.1). Since the default extension list does not include the null extension,\includegraphics{file} doesnot readfileunless the null extension is added to the extension list.
Table 1: includegraphics Options
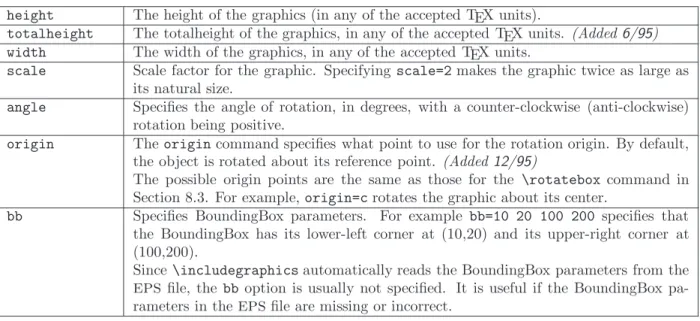
height The height of the graphics (in any of the accepted TEX units).totalheight The totalheight of the graphics, in any of the accepted TEX units. (Added6/95)
width The width of the graphics, in any of the accepted TEX units.
scale Scale factor for the graphic. Specifying scale=2makes the graphic twice as large as its natural size.
angle Specifies the angle of rotation, in degrees, with a counter-clockwise (anti-clockwise) rotation being positive.
origin Theorigincommand specifies what point to use for the rotation origin. By default, the object is rotated about its reference point. (Added12/95)
The possible origin points are the same as those for the \rotatebox command in Section 8.3. For example,origin=crotates the graphic about its center.
bb Specifies BoundingBox parameters. For example bb=10 20 100 200 specifies that the BoundingBox has its lower-left corner at (10,20) and its upper-right corner at (100,200).
Since\includegraphicsautomatically reads the BoundingBox parameters from the
eps
file, the bb option is usually not specified. It is useful if the BoundingBox pa-rameters in theeps
file are missing or incorrect.The command
Specifying
Width \includegraphics[width=3in]{file.eps}
includes the graphics fromfile.epsscaled such that its width is 3 inches. Instead of making the width be a fixed length such as 3 inches, making the width of function of \textwidthor\emmakes a document more portable. For example, the command
Table 2: includegraphics Cropping Options
viewport Specifies what portion of the graphic to view. Like a BoundingBox, the area is specified by four numbers which are the coordinates of the lower-left corner and upper-right corner. The coordinates are relative to lower-left corner of the BoundingBox.(Added
6/95)
For example, if the graphic’s BoundingBox parameters are 50 50 410 302, viewport=50 50 122 122displays the 1-inch square from the lower left of the graphic, and viewport=338 230 410 302displays the 1-inch square from the upper right of the graphic.
The clip option (see Table 3) must be used to prevent the portion of the graphic outside the viewport from being displayed.
trim An alternate method for specifying what portion of the graphic to view. The four numbers specify the amount to remove from the left, bottom, right, and top side, respectively. Positive numbers trim from a side, negative numbers add to a side.
(Added 6/95)
For example,trim=1 2 3 4trims the graphic by 1bpon the left, 2bpon the bottom, 3bpon the right, 4 bpon the top.
The clip option (see Table 3) must be used to prevent the trimmed portion from being displayed.
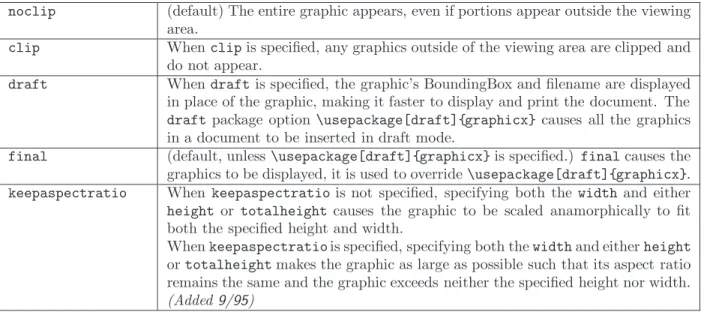
Table 3: includegraphics Boolean Options
noclip (default) The entire graphic appears, even if portions appear outside the viewing area.
clip Whenclipis specified, any graphics outside of the viewing area are clipped and do not appear.
draft Whendraftis specified, the graphic’s BoundingBox and filename are displayed in place of the graphic, making it faster to display and print the document. The draftpackage option \usepackage[draft]{graphicx}causes all the graphics in a document to be inserted in draft mode.
final (default, unless\usepackage[draft]{graphicx}is specified.) finalcauses the graphics to be displayed, it is used to override\usepackage[draft]{graphicx}. keepaspectratio When keepaspectratiois not specified, specifying both the widthand either height or totalheight causes the graphic to be scaled anamorphically to fit both the specified height and width.
Whenkeepaspectratiois specified, specifying both thewidthand eitherheight ortotalheightmakes the graphic as large as possible such that its aspect ratio remains the same and the graphic exceeds neither the specified height nor width.
\includegraphics[width=\textwidth]{graphic.eps}
scales the included graphic such that it is as wide as the text. The command
\includegraphics[width=0.80\textwidth]{graphic.eps}
makes the included graphic 80% as wide as the text. When the calc package is used, the following command make the graphic width 2 inches less than the width of text
\includegraphics[width=\textwidth-2.0in]{graphic.eps}
(This requiresgraphicxversion12/95 or later).
8
Rotating and Scaling Objects
In addition to the \includegraphicscommand, thegraphicx package includes 4 other commands which rotate and scaleany LATEX object: text,
eps
graphic, etc.\scalebox{h-scale}[v-scale]{argument} \resizebox{width}{height}{argument} \resizebox*{width}{totalheight}{argument} \rotatebox[options]{angle}{argument}
Since thegraphicx \includegraphicscommand supports rotating and scaling options such as angle and width, the commands in this section rarely need to be used with
eps
graphics. For example,\includegraphics[scale=2]{file.eps} \includegraphics[width=4in]{file.eps} \includegraphics[angle=45]{file.eps}
produce the same three graphics as
\scalebox{2}{\includegraphics{file.eps}} \resizebox{4in}{!}{\includegraphics{file.eps}} \rotatebox{45}{\includegraphics{file.eps}}
However, the first syntax is preferred because it is faster and produces more efficient PostScript.
8.1
The scalebox Command
Syntax:
\scalebox{h-scale}[v-scale]{argument}
The \scalebox command scales an object, making its width be h-scale times its original width and making the object’s height bev-scaletimes its original height. If v-scaleis omitted, it defaults toh-scale, keeping the aspect ratio constant. Negative values reflect the object.
8.2
The resizebox Commands
Syntax:
\resizebox{width}{height}{argument}
\resizebox*{width}{totalheight}{argument}
The\resizeboxcommand resizes an object to a specified size. Specifying ! as either height or width makes that length be such that the aspect ratio remains constant. For example,\resizebox{2in}{!}{argument}scales the argument to be 2 inches wide.
The standard LATEX 2ε arguments\height,\width,\totalheight,\depthcan be
used to refer to the original size ofargument. So\resizebox{2in}{\height}{argument} makesargumentkeep its same height but have a width of 2 inches.
The\resizebox*command is identical to\resizebox, except the second argument specifies thetotalheightof the object.
8.3
The rotatebox Command
Syntax:
\rotatebox[options]{angle}{argument}
The \rotatebox command rotates an object by an angle given in degrees, with a counter-clockwise rotation being positive. By default, the object is rotated about its reference point. The\rotateboxoptions allow the point of rotation to be specified.
1. Specifying the [x=xdim,y=ydim], the object is rotated about the point whose coordinates relative to the reference point are (xdim,ydim).
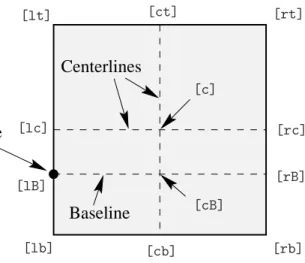
2. Theoriginoption specifies one of 12 special points shown in in Figure 3.
Reference
Point
Baseline
Centerlines
[lt] [lc] [lB] [lb] [ct] [c] [cB] [cb] [rt] [rc] [rB] [rb] Figure 3: Available Origin PointsThe horizontal position of the origin points is specified by one of three letters: lcr (which stand for left, center, right, respectively), while the vertical position is specified by one of four letters: t,c,B,b(which stand for top, center, Baseline, bottom, respectively). For example
[rb] specifies the bottom-right corner [lt] specifies the top-left corner
[cB] specifies the center of the graphic’s Baseline Note that
• The order of the letters is not important, making[br]equivalent to[rb].
• c represents either the horizontal center or vertical center depending what letter is used with it.
• If only one letter is specified, the other is assumed to be c, making [c] equivalent to [cc],[l]equivalent to[lc],[t]equivalent to[tc], etc.
9
Advanced Commands
This section describes advanced commands which are needed in the following situations 1. When the specified filename has no extension. For example
\includegraphics{file}
2. When compressed
eps
graphics are used (see Section 13.1).3. When non-EPS graphics are used (see Section 13.3).
In these situations, the \DeclareGraphicsRule and \DeclareGraphicsExtensions commands are needed to control how LATEX deals with files specified in\includegraphics.
• The\DeclareGraphicsExtensionscommand specifies the extensions to attempt (e.g., .eps, .ps, .eps.gz, etc.) when the specified filename does not have an extension.
• The\DeclareGraphicsRulespecifies a command which operates on the file. The execution of this command requires an operating system which support pipes. For example, Unix supports pipes while
dos
does not.Making this command a decompression command allows compressed
eps
graphicsto be used. Making this command a graphics-conversion command allows non-
eps
graphics to be used.
9.1
The DeclareGraphicsExtensions Command
The\DeclareGraphicsExtensionscommand tells LATEX which extensions to try if a
file with no extension is specified in the \includegraphicscommand.
For convenience, a default set of extensions is pre-defined depending on which graph-ics driver is selected3. For example if dvipsis used, the following graphic extensions
(defined indvips.def) are used by default
\DeclareGraphicsExtensions{.eps,.ps,.eps.gz,.ps.gz,.eps.Z}
With the above graphics extensions specified,\includegraphics{file}first looks for file.eps, then file.ps, then file.eps.gz, etc. until a file is found. This allows the graphics to be specified with
\includegraphics{file}
instead of
\includegraphics{file.eps}
The first syntax has the advantage that if you later decide to compress file.eps, you need not edit the LATEX file.
Note that
Filenames Without
Extensions \includegraphics{file}
doesnot attempt to openfileunless the null extension{}is included in the extension list. For example,
\DeclareGraphicsExtensions{.eps,.eps.gz,{}}
causes fileto be attempted if file.epsandfile.eps.gzare not found.
Specifying no file extension and relying on LATEX to choose the correct extension from Pool Space
Problems the \DeclareGraphicsExtensions extension list can aggravate pool space problems (see Section 12.3). If pool space is a concern, \includegraphics{file}should only be used with a\DeclareGraphicsExtensionscommand containing a minimal number of extensions, such as
\DeclareGraphicsExtensions{.eps,.eps.gz}
9.2
The DeclareGraphicsRule Command
The\DeclareGraphicsRulecommand specifies how\includegraphicsshould treats file, depending on their extensions. Multiple \DeclareGraphicsRulecommands may be issued.
Syntax: \DeclareGraphicsRule{ext}{type}{sizefile}{command} For example, the command
\DeclareGraphicsRule{.eps.gz}{eps}{.eps.bb}{‘gunzip -c #1}
3Specifying a graphics-driver package option such as\usepackage[dvips]{graphicx}overrides the
Table 4: DeclareGraphicsRule Arguments
ext The file extension.type The graphics type for that extension.
sizefile The extension of the file which contains the BoundingBox information for the graph-ics. If this option is blank, then the size information must be specified by the \includegraphicscommand’sbboption.
command The command to be applied to the file. (often left blank). The command must be preceded by a single backward quote (not to be confused with the more common forward single quote.) Currently, only dvipsallows execution of such a command. See Section 13 for examples of using this command for use with compressed and
non-eps
graphics.specifies that any file with a.eps.gzextension is treated as compressed
eps
file, withthe the BoundingBox information stored in the file with a.eps.bbextension, and the gunzip -c command uncompresses the file. (Since LATEX cannot read BoundingBox
information from a compressed file, the BoundingBox line must be stored in an uncom-pressed file.)
The\DeclareGraphicsRuleallows*to signify any unknown extension. For exam-ple,
\DeclareGraphicsRule{*}{eps}{*}{}
causes any unknown extension to be treated as an
eps
file. For example, this causesfile.EPS) to be treated as a an
eps
file.The extension is defined as the portion of the filename after the first period, which
Periods In
Filenames makes it possible for files ending ineps.gzto be identified as compressed
eps
files. Toavoid confusion, the base portion of the filename should not contain a period. For ex-ample, specifyingfile.name.eps.gzmakes\includegraphicslook for a graphics rule associated with the extension name.eps.gz. Since such a graphics rule probably does not exist, the graphics rule for the unknown extension is used. (Filenames with multiple periods work if their type happens to be the default type. For example, when files with unknown extensions are treated as
eps
, the filename file.name.eps is coincidentlytreated correctly.)
For convenience, a default set of graphics rules is pre-defined depending on which
Pre-defined
Commands graphics driver is selected4. For example if the dvips driver is used, the following
graphic rules (defined indvips.def) are used by default
\DeclareGraphicsRule{.eps}{eps}{.eps}{} \DeclareGraphicsRule{.ps}{eps}{.ps}{} \DeclareGraphicsRule{.pz}{eps}{.bb}{‘gunzip -c #1} \DeclareGraphicsRule{.eps.Z}{eps}{.eps.bb}{‘gunzip -c #1} \DeclareGraphicsRule{.ps.Z}{eps}{.ps.bb}{‘gunzip -c #1} \DeclareGraphicsRule{.eps.gz}{eps}{.eps.bb}{‘gunzip -c #1} \DeclareGraphicsRule{.ps.gz}{eps}{.ps.bb}{‘gunzip -c #1} \DeclareGraphicsRule{.pcx}{bmp}{}{} \DeclareGraphicsRule{.bmp}{bmp}{}{} \DeclareGraphicsRule{.msp}{bmp}{}{} \DeclareGraphicsRule{*}{eps}{*}{}
The first two commands define the.epsand.psextensions as
eps
files. The next fivecommands define extensions for compressed
eps
files. The next three commands defineextensions for bitmaps (see Section 13.3.2). The last command causes filenames with unknown extensions to be treated as an
eps
file.4Specifying a graphics-driver package option such as\usepackage[dvips]{graphicx}overrides the
Part III
Using Graphics-Inclusion Commands
10
Horizontal Spacing and Centering
10.1
Horizontal Centering
The placement of the graphic is controlled by the current text justification. To center the graphic, put it inside a center environment
\begin{center}
\includegraphics[width=2in]{graphic.eps} \end{center}
If the \includegraphics command is inside an environment (such as minipage or figure), the\centeringdeclaration centers the remaining output of the environment. For example \begin{figure} \centering \includegraphics[width=2in]{graphic.eps} \end{figure} is similar to \begin{figure} \begin{center} \includegraphics[width=2in]{graphic.eps} \end{center} \end{figure}
The\centeringsyntax is preferred because the\begin{center}syntax produces dou-ble vertical space above and below the figure due to the space produced by the figure environment and by the center environment. If extra vertical space is desired, the commands in Section 18.1 should be used.
Bugs in the\psfigand\epsfboxcommands made it difficult to produce
horizontally-Obsolete
Syntax centered graphics. The TEX commands \centerlineand \leavevmodewere used as work-arounds for bugs in\psfigand\epsfbox. Since the\includegraphicscommand is written correctly, the\centerlineand\leavevmodeare no longer needed, allowing graphics to be centered with the\centeringcommand or the centerenvironment.
10.2
Horizontal Spacing
It is important to realize that LATEX arranges graphics the same way it formats other
objects such as letters. For example, an interword space is introduced between LATEX
input lines unless the line ends with a%. For example, just as
Hello World
put an interword space between “Hello” and “World”
\includegraphics{file.eps} \includegraphics{file.eps}
puts an interword space between the graphics. Ending the first line with a comment character
\includegraphics{file.eps}% \includegraphics{file.eps}
puts no space between the graphics. When horizontal spacing is desired between graph-ics, the \hspacecommand inserts a specific amount of space5 while \hfill inserts a
rubber length which provides which expands to fill the available space. For example,
5Instead of making the\hspaceamount a fixed length such as 1 inch, making the\hspaceamount
\includegraphics{file.eps}\hfill\includegraphics{file.eps}
pushes the graphics to the left and right margins, while
\hfill\includegraphics{file.eps}%
\hfill\includegraphics{file.eps}\hspace*{\fill}
puts equal spacing before, between, and after the graphics. Since \hfill commands which occur before a linebreak are ignored, the\hspace*{\fill}was needed to supply the trailing space.
11
Rotation, Scaling, and Alignment
Since the \includegraphicsoptions are interpreted from left to right, the order in which the angle and size are specified makes a difference. For example
\begin{center} \includegraphics[angle=90,totalheight=1cm]{graphic.eps} \includegraphics[totalheight=1cm,angle=90]{graphic.eps} \end{center} produces Graphic Graphic
The first box is rotated 90 degrees and then scaled such that its height is one centimeter. The second box is scaled such that its height is one centimeter and then it is rotated 90 degrees.
11.1
Difference Between Height and Totalheight
Users must be careful when using the height option, as they often mean the overall height which is set by thetotalheightoption (see Figure 1 on Page 7). When the object has zero depth, thetotalheightis the same as theheightand specifyingheightworks fine. When the object has a non-zero depth, specifyingheightinstead of totalheight causes either an incorrectly-sized graphic or a divide-by-zero error. For importing
eps
files, the distinction betweenheightandtotalheightis most important when rotating and then scaling a graphic. For example,
\includegraphics[angle=-45,totalheight=1in]{file.eps} \includegraphics[angle=-45,height=1in]{file.eps}
The first command scales the rotated graphic such that its total height is 1 inch. The second command scales the rotated graphics such that the portion above its reference point is 1 inch tall.
11.2
Scaling of Rotated Graphics
When the height or width of a graphic is specified, the specified size is not the size of the graphic but rather of its BoundingBox. This distinction is especially important in the scaling of rotated graphics. For example
\begin{center}
\includegraphics[totalheight=1in]{rosette.eps}
\includegraphics[angle=45,totalheight=1in]{rosette.eps} \includegraphics[angle=90,totalheight=1in]{rosette.eps} \end{center}
produces
Although it may seem strange that the graphics have different sizes, it should make sense after viewing the BoundingBoxes
Each graphic is scaled such that its rotated BoundingBox is 1 inch tall.
11.3
Alignment of Rotated Graphics
When graphics are rotated, the objects may not align properly. For example
\begin{center} \includegraphics[totalheight=1in]{rosette.eps} \includegraphics[totalheight=1in,angle=-45]{rosette.eps} \includegraphics[totalheight=1in,angle=-90]{rosette.eps} \end{center} produces
In this case, the objects’ reference points (original lower-left corners) are aligned on a horizontal line. If it is desired to instead have the centers aligned, theoriginoption of \includegraphicscan be used
\begin{center}
\includegraphics[totalheight=1in]{rosette.eps}
\includegraphics[totalheight=1in,origin=c,angle=-45]{rosette.eps} \includegraphics[totalheight=1in,origin=c,angle=-90]{rosette.eps} \end{center}
This aligns the centers of the graphics
Similarly, the commands
\begin{center}
\includegraphics[width=1in]{graphic.eps} \hspace{1in}
\includegraphics[width=1in,angle=-90]{graphic.eps} \end{center}
rotate the right graphic around its lower-left corner, producing
Graphic
Graphic
To align the bottoms of the graphics, use the following commands
\begin{center}
\includegraphics[width=1in]{graphic.eps} \hspace{1in}
\includegraphics[width=1in,origin=br,angle=-90]{graphic.eps} \end{center}
which rotate the right graphic about its lower-right corner, producing
Graphic
11.4
Minipage Vertical Alignment
It is often useful to place graphics inside of minipage environments (for example, see Section 27). When minipages are placed side-by-side, LATEX places them such that their
reference points are vertically aligned. By default, the minipage’s reference point is vertically centered on its left edge. An optional argument modifies the location of a minipage’s reference point.
[b] causes the minipage’s reference point to be vertically aligned with the reference point of the bottom line in the minipage.
[t] causes the minipage’s reference point to be vertically aligned with the reference point of the top line in the minipage.
Note the[b] doesnot put the reference point at the bottom of the minipage (unless the bottom line’s reference point happens to be at its bottom.) Likewise, the [t]does
not put the reference point at the top of the minipage (unless the top line’s reference point happens to be at its top.)
When the minipage contains only one line, the [b] and [t] options produce the same results. For example, both
\begin{center} \begin{minipage}[b]{.25\textwidth} \centering \includegraphics[width=1in]{graphic.eps} \end{minipage}% \begin{minipage}[b]{.25\textwidth} \centering \includegraphics[width=1in,angle=-90]{graphic.eps} \end{minipage} \end{center} and \begin{center} \begin{minipage}[t]{.25\textwidth} \centering \includegraphics[width=1in]{graphic.eps} \end{minipage}% \begin{minipage}[t]{.25\textwidth} \centering \includegraphics[width=1in,angle=-90]{graphic.eps} \end{minipage} \end{center}
produce Figure 4. In both of these cases, reference point of the minipage is the reference point (original lower-left corner) of the
eps
graphic.Graphic
Graphic
11.4.1 Aligning the Bottoms of Minipages
One method for aligning the bottoms of minipages is to make the minipage baseline be the bottom of the minipage. If a line with zero height and zero depth is added inside the minipage after the graphics then the[b]option makes the bottom of the minipage be minipage’s baseline. The command\par\vspace{0pt}creates such a zero-height, zero-depth line. Since the baseline of this zero-depth line is the bottom of the minipage, the[b]option now aligns the bottom of the minipage. For example
\begin{center} \begin{minipage}[b]{.25\textwidth} \centering \includegraphics[width=1in]{graphic.eps} \par\vspace{0pt} \end{minipage}% \begin{minipage}[b]{.25\textwidth} \centering \includegraphics[width=1in,angle=-90]{graphic.eps} \par\vspace{0pt} \end{minipage} \end{center} produces Figure 5. Graphic Graphic
Figure 5: Minipages with Bottoms Aligned
11.4.2 Aligning the Tops of Minipages
To align the tops of the minipages, one must add a zero-height, zero-depth line to the top of the minipage. Then the [t] option makes the minipage baseline be the top of the minipage. Preceding \includegraphicscommand by \vspace{0pt}inserts a zero-height, zero-depth line above the graphic. Since the baseline of this zero-height line is the top of the minipage, the[t]option now aligns the top of the minipage. For example \begin{center} \begin{minipage}[t]{.25\textwidth} \vspace{0pt} \centering \includegraphics[width=1in]{graphic.eps} \end{minipage}% \begin{minipage}[t]{.25\textwidth} \vspace{0pt} \centering \includegraphics[width=1in,angle=-90]{graphic.eps} \end{minipage} \end{center} produces Figure 6.
This aligns the tops of the minipages with the current baseline. If it is instead desired to align the tops of the minipages with the top of the current line of text, replace \vspace{0pt}with \vspace{-\baselineskip}. This topic is mentioned in [3, pages 456-457].
Graphic Graphic
Figure 6: Minipages with Tops Aligned
12
Using Subdirectories
When importing a large number of graphics files, it may be desirable to store the graphics files in a subdirectory. For example, when the subdirectory is namedsub, one may be tempted to then include the filefile.epswith the following command
\includegraphics{sub/file.eps}
While this syntax works for most Unix and
dos
TEX distributions, there are problemswith such usage
Inefficiency
Whenever TEX opens a file, the filename is saved in TEX memory. When open-ing a large number of files, this lost memory may cause a poolsize error (see Section 12.3). Since specifying subdirectories increases the filename length, it aggravates this pool space problem.
Unportability
One of LATEX’s advantages is that its files can be used on any platform. However,
embedding the subdirectory in the filename results in the file becoming operating-system dependent. The file now cannot be used on
vms
or Macintosh computerswithout significant modification.
Instead of embedding the subdirectory in the filename, there are two other options 1. The best method is to modify the TEX search path (see Section 12.1).
2. Another method is to specifysub/in a\graphicspathcommand (see Section 12.2). However, this is much less efficient than modifying the TEX search path.
Both of these options causing\includegraphicsto automatically search the graphics subdirectory, allowing
\includegraphics{sub/file.eps}
to be replaced with
\includegraphics{file.eps}
12.1
TEX Search Path
Since the method for changing the directories in which TEX looks depends on the TEX distribution, it becomes very complicated to provide a general description. As an ex-ample, this section describe the strategy used by the web2c/teTeX Unix distributions. Although the method for changing the search path differs for other TEX distributions, most employ similar strategies.
For web2c/teTeX Unix distributions, the TEX search path can be modified by setting theTEXINPUTSenvironment variable. When usingcshshells,
setenv TEXINPUTS /dir1:/dir2:
causes /dir1 and /dir2 to be searched before the default directories. Without the trailing colon, the default directories are not be searched. SettingTEXINPUTSwith
causes /dir1and/dir2to be searched after the default directories, while
setenv TEXINPUTS /dir1::/dir2
causes /dir1 to be searched before the default directories and /dir2 to be searched
after the default directories.
Putting // after a directory causes all of its subdirectories to be searched. For example,
setenv TEXINPUTS /dir1//:/dir2:
causes all the subdirectories (and sub-subdirectories) of/dir1to be searched. Be careful in using //as it may slow down the searching if the directory contains many files. These examples also work forshshells, although the syntax should be changed to
TEXINPUTS="/dir1:/dir2:"; export TEXINPUTS
When LATEX finds files on the TEX path, it does not include the entire filename in the
dvi
file. As a result, old versions of dvipsorxdviwhich do not search the TEX pathcannot find the file (see Section 13.2).
12.2
Graphics Search Path
By default, LATEX looks for graphics files in any directory on the TEX search path.
In addition to these directories, LATEX also looks in any directories specified in the
\graphicspathcommand. For example,
\graphicspath{{dir1/}{dir2/}}
tells LATEX to also look for graphics files in dir1/ and dir2/. For Macintosh, this
becomes
\graphicspath{{dir1:}{dir2:}}
It is important to note that the file-searching associated with\graphicspathdirectories is much slower than that associated with TEXINPUTS directories. Furthermore, each file search done in a \graphicspath directory consumes additional pool space (see section 12.3).
Due to these inefficiencies, it is recommended that the \graphicspathnot be used. Instead, subdirectories should be specified by modifying the TEXsearch path (see Sec-tion 12.1).
12.3
Conserving Pool Space
TEX reserves a portion of its memory calledpool space for its internal passing of strings. Whenever TEX opens a file (or tries to open a file), some pool space is permanently used. When opening a large number of files, this lost memory may cause TEX to run out of pool space, causing an error similar to
! TeX capacity exceeded, sorry [poolsize=72288]
Since the amount of lost pool space is a function of the length of the filename, specifying subdirectories aggravates this pool space problem.
With the exception of the latest web2c version and some commercial distributions, the only way to increase the pool size is to recompile TEX. Fortunately, the following pool-conservation rules usually solves the problem.
• Avoid excessively-long file names.
• Don’t include the subdirectory names
\includegraphics{sub/file.eps}
Instead, change the TEX search path or move the files out of the subdirectory.
\graphicspath{{dir1/}{dir2/}} ...
\includegraphics{file.eps}
causes \includegraphicsto try to open the following files
file.eps dir1/file.eps dir2/file.eps
Each of these attempts consumes pool space. Instead of using \graphicspath, modify the TEX search path.
• Specify the entire filename, do not omit the files extension/suffix (e.g., .eps). With the default\DeclareGraphicsExtensions(see Section 9.1), the command
\includegraphics{file}
causes \includegraphicsto try to open the following files
file.eps file.ps file.eps.gz file.ps.gz file.eps.Z
This is especially inefficient when used in conjunction with\graphicspath. Issuing a \DeclareGraphicsExtensions command with a minimal number of extensions minimizes the inefficiency of omitting the extension.
13
Compressed and Non-EPS Graphics Files
When usingdvips, users can specify an operation to be performed on the file before it is inserted. Making this operation a decompression command allows compressed graphics files to be used. Making this operation a graphics-conversion command allows non-
eps
graphics files can be used. Sincedvipsis currently the only
dvi
-to-ps
converter withthis capability, everything in this section requires dvips. Users need to pass thedvips option to thegraphicxpackage. This can be done by either specifying thedvipsglobal option in the\documentclasscommand
\documentclass[dvips,11pt]{article}
or by specifying thedvipsoption in the\usepackagecommand
\usepackage[dvips]{graphicx}
Specifying the dvips option in \documentclassit is preferred because it passes the dvipsoption to all packages.
When using an operating system which supports pipes6, the
\DeclareGraphicsRule (see Section 9.2) specifies a command which operates on the file. Making this command a decompression command allows compressed
eps
files to be used. Making this command a graphics-conversion command allows non-eps
graphics files to be used. When using operating systems which do not support pipes, such on-the-fly conversion is not possible and all graphics must be stores as uncompressedeps
files.13.1
Compressed EPS Example
The steps for using compressedeps
files are1. Create an
eps
file (file1.epsfor example)2. Store the BoundingBox line in another file (file1.eps.bb) 3. Compress the
eps
file. For example, the Unix commandgzip -9 file1.eps
creates the compressed file file1.eps.gz. The -9 (or -best) option specifies maximum compression.
4. Include the proper\DeclareGraphicsRulecommand before the\includegraphics command in the LATEX file. The\DeclareGraphicsRulecommand informs LATEX
how to treat the particular suffix (see Section 9.2). For example
\documentclass[dvips]{article} \usepackage{graphicx} \begin{document} \DeclareGraphicsRule{.eps.gz}{eps}{.eps.bb}{‘gunzip -c #1} \begin{figure} \centering \includegraphics[width=3in]{file1.eps.gz} \caption{Compressed EPS Graphic}
\label{fig:compressed:eps} \end{figure}
\end{document}
In this particular case, the\DeclareGraphicsRulecommand is actually not necessary because it happens to be one of the graphics rules pre-defined indvips.def. If another compression program or suffixes were used, the\DeclareGraphicsRulecommand would be mandatory. For example, if the BoundingBox file had been stored infile1.bb, the corresponding\DeclareGraphicsRulewould be
\DeclareGraphicsRule{.eps.gz}{eps}{.bb}{‘gunzip -c #1}
13.2
TEX Search Path and dvips
When LATEX encounters an\includegraphicscommand, it looks in the current
direc-tory for the file. If it does not find the file in the current direcdirec-tory, it searches through the TEX path for the file. When the
dvi
file is converted to PostScript, dvipsper-forms the same search routine and everything works well. However, when an on-the-fly command is specified in the\DeclareGraphicsRulecommand, the on-the-fly command preventsdvipsfrom properly searching the TEX path.
For example, the rule
\DeclareGraphicsRule{.eps.gz}{eps}{.eps.bb}{‘gunzip -c #1}
specifies that thegunzip -ccommand be used on files having a.eps.gzsuffix. Suppose the following command is used
\includegraphics{file.eps.gz}
If file.eps.gz and file.eps.bb are in the current directory, the path-searching is not needed and everything works well. LATEX uses file.eps.bband dvips executes
gunzip -c file.eps.gzto uncompress the file.
However, things don’t work if file.eps.gzand file.eps.bbare not in the cur-rent directory. If they are instead in the directory /a/b/c/ (on the TEX path), LATEX
searches the path to find/a/b/c/file.eps.bb. However, problems occur whendvips executes ‘gunzip -c file.eps.gz because gunzip cannot find file.eps.gz. If the TEX distribution uses a recentkpathsea library (as does theteTeXdistribution), this problem can be solved by the following graphics rule
\DeclareGraphicsRule{.eps.gz}{eps}{.eps.bb}%
{‘gunzip -c ‘kpsewhich -n latex tex #1‘}
which useskpsewhichto find the file forgunzip. The‘kpsewhich -n latex tex #1 command causes dvips look for the compressed file on the TEX search path. The full filename (including subdirectories) is then appended to thegunzip -c command, allowinggunzipto find the file even though it is not in the current directory.
While this new\DeclareGraphicsRulecommand can be placed at the beginning of every document, i