726+,%$
Telecommunication Systems DivisionDigital Business Telephone Systems
DK Admin/DK Backup
Release 4
Publication Information
Toshiba America Information Systems, Inc., Telecommunication Systems Division, reserves the right, without prior notice, to revise this information publication for any reason, including, but not limited to, utilization of new advances in the state of technical arts or to simply change the design of this document.
Further, Toshiba America Information Systems, Inc.,
Telecommunication Systems Division, also reserves the right, without prior notice, to make such changes in equipment design or
components as engineering or manufacturing methods may warrant. DKA-UG-ADBKP-VC
Version C, March 1999 Version B2, November 1998 Version B1, October 1998
© Copyright 1999
Toshiba America Information Systems, Inc. Telecommunication Systems Division
All rights reserved. No part of this manual, covered by the copyrights hereon, may be reproduced in any form or by any means—graphic, electronic, or mechanical, including recording, taping, photocopying, or information retrieval systems—without express written permission of the publisher of this material.
Strata and Perception are registered trademarks of Toshiba Corporation.
Stratagy is a registered trademark of Toshiba America Information Systems, Inc.
Contents
Introduction
Organization ... vii
Conventions...viii
Screen Variations...viii
Related Documentation ... ix
How To Use This Manual ... ix
Chapter 1 – The Grand Tour
Capabilities... 1Basic Operations ... 2
Screen Conventions... 4
Chapter 2 – Installing DKAdmin
Step 1: Check System Requirements ... 7Step 2: Power Up DKAdmin PC ... 8
Step 3: (Optional) Make Installation Floppy Disks ... 9
From Windows ... 9
From DOS Only PC... 9
Step 4: Install DKAdmin ... 10
Windows PC from CD-ROM ... 10
Windows PC from Floppy Disks... 10
DOS Only PC from CD-ROM... 11
DOS Only PC from Floppy Disks ... 11
Step 5: Run DKAdmin Program ... 12
Start-up DKAdmin under Windows 98, 95 or Windows NT 4.0 ... 12
Start-up DKAdmin in MS-DOS ... 12
Run DKAdmin... 12
Set Windows DKAdmin Program Properties ... 13
Step 6: Connect to the Strata DK Telephone System ... 15
Chapter 3 – Installing DKBackup
Step 1: Check System Requirements ... 17Step 2: Power Up DKBackup PC ... 18
Step 3: (Optional) Make Installation Floppy Disks ... 19
From Windows ... 19
From DOS Only PC... 19
Step 4: Install DKBackup ... 20
Windows PC from CD-ROM ... 20
DOS Only PC from CD-ROM... 21
DOS only PC from Floppy Disks ... 21
Step 5: Run DKBackup Program ... 22
Start-up DKBackup under Windows 3.11, 95, 98 or Windows NT 4.0 ... 22
Start-up DKBackup in MS-DOS ... 22
Run DKBackup... 22
Set Windows DKBackup Program Properties... 23
Step 6: Connect to the Strata DK Telephone System ... 25
Chapter 4 – Using DKAdmin/DKBackup
Before You Start ... 27Logging On ... 27
DKAdmin ... 27
DKBackup ... 30
Keyboard Conventions... 31
Using the Pull-Down Menus... 32
System Messages ... 32
Error Messages... 32
On-Line Help ... 32
Logging Off... 33
Chapter 5 – File Menu
Quick-start Procedures for Using DKAdmin ... 35For an Existing Customer ... 35
For a New Customer... 36
Maintain Customer File... 36
Select Customer ... 39
Dial DK ... 40
Hangup Connection... 42
Transfer DK Data ... 42
About... 42
Exit ... 42
Chapter 6 – Administration Menu (DKAdmin)
View Cabinet Diagram... 44Check Processor Type... 44
System/Station Administration ... 44
Programming/Updating System ... 46
Printing Port/Station Information (F3) ... 47
System Speed Dial Number (F7)... 48
System LCD Messages (F8) ... 49
Station Port Attributes (Ctrl Enter)... 49
Saving/Uploading Programmed Data (F9) ... 56
Flexible Button Programming Section... 61
Telephone Flexible Button Assignments... 61
Add-On Module Button Assignments ... 63
DSS Console Button Assignments ... 65
Speed Dial Programming Section ... 68
System Speed Dial Numbers ... 68
Station Speed Dial Numbers... 69
ACD Administration ... 70
ACD Programs ... 70
ACD Agent Programs... 72
Program Administration Section... 73
View All Programs (Download, Edit, Upload) ... 74
Security Maintenance Section... 77
Program Security (Default Levels)... 78
Directory Number Administration ... 85
DNIS Administration ... 89
DNIS/DID/ANI Line Assignments ... 89
DNIS Number/Name/Ringing/VM-ID Assignments ... 90
DNIS Network Table Assignments ... 91
DNIS Tenant Lock Assignments ... 92
Distributed Hunt Group Administration ... 92
Call Forward Assignments... 93
E911/CAMA Trunk Programs (R4 Only)... 94
ISDN Programs (R4 Only)... 97
Backup/Restore Data... 98
View/Print Data... 98
Chapter 7 – Backup Menu (DKBackup)
Check Processor Type... 100Backup Data ... 100
Restore Data ... 102
Upgrade ... 107
Upgrading a Customer’s Processor ... 107
Strata DK Processor PCB Upgrade ... 107
View/Print Data... 115
Chapter 8 – Options Menu
System Installation ... 117Company General Information ... 117
Screen Type/Color Installation ... 118
Printer Type Selection ... 119
System Miscellaneous Variables ... 120
User Password Level Setup ... 121
Communications Setup... 124
System Utilities ... 125
ReIndex Files ... 125
Appendix A – Connecting to Strata DK
Hardware Requirements... 127System Connection Configurations... 127
PIOU/PIOUS/RSSU/RSIU Setup ... 128
Direct Connection to Strata DK ... 130
Connection to Strata DK Via Toshiba Data Interface Units... 131
Customer Dialer Setup... 131
To Make Connection ... 131
Remote Modem Connection to External Modem/TTY Port ... 132
Communication Setup ... 132
Customer Dialer Setup... 132
To Make Connection ... 132
Voice Call Transferred to Modem Connection ... 133
Communication Setup ... 133
Customer Dialer Setup... 133
To Make Connection ... 134
Remote Modem Connection to Modem Pool... 135
Communication Setup ... 135
Customer Dialer Setup... 135
To Make Connection ... 136
PC DIU/DIU Modem Pool Connection to Strata DK Modem... 137
Voice Call First, then Modem to Modem Connection ... 137
Communication Setup ... 137
Customer Dialer Setup... 137
To Make Connection ... 138
PC DIU/DIU Modem Pool Connection to Strata DK Modem... 139
DIU to DIU Connection, then Modem to Modem Connection ... 139
Communication Setup ... 139
Customer Dialer Setup... 139
To Make Connection ... 140
PDIU-DS Modem Pool Installation ... 141
To Make Connection ... 141
External Maintenance Modem Installation... 142
Appendix B – DK424 RCTUE/F Upgrade Using DKAdmin
Upgrading to RCTUE/F ... 145Off-site Upgrade ... 145
On-Site Upgrade ... 146
Important Things to Do After Upgrading to an RCTUE/F Processor ... 147
Appendix C – Upgrading Strata DK Systems to DK424 Release 4.0
DK424 Release 4.0 Upgrade Procedure... 150Upgrading Strata DK Systems to DK424 Release 4.0 ... 151
DK424 Release 4.0 Upgrade Programming Example... 154
Cabinet Station Port Counting Before/After Release 4.0 Upgrade ... 154
System/Station Administration Screen Before/After Release 4.0 Upgrade ... 155
Program Changes Before/After Release 4.0 Upgrade ... 157
Introduction
This User Guide introduces you to the DKAdmin/DKBackup programs (previously called 280Admin/280Backup) which support the Strata DK14, DK16e, DK40 and DK424 digital telephone systems.
Note DKAdmin/DKBackup Release 4 software supports Strata DK14, DK16e, DK40, DK280 and DK424 systems.
It guides you step-by-step to mastering the few simple procedures that enable you to fully utilize DKAdmin/DKBackup. With this accomplished, you will find DKAdmin/DKBackup to be invaluable tools.
Organization
This guide contains the following information:
♦ Chapter 1 – The Grand Tour gives you a general description of the capabilities, screen
conventions and basic operations of the DKAdmin/DKBackup programs.
♦ Chapter 2 – Installing DKAdmin shows you how to install DKAdmin onto your PC. ♦ Chapter 3 – Installing DKBackup shows you how to install DKBackup onto your PC. ♦ Chapter 4 – Using DKAdmin/DKBackup explains how to log on and off of DKAdmin/
DKBackup, as well as how to use the pull-down menus, view and respond to system messages, and understand the keyboard conventions.
♦ Chapter 5 – File Menu provides easy step-by-step instructions for using DKAdmin/
DKBackup to program and update the Strata DK, including procedures for both new and existing customers. The chapter also includes instructions on how to transfer data to a floppy disk.
♦ Chapter 6 – Administration Menu (DKAdmin) provides complete how-to instructions
on using the Administration Menu options (e.g., flexible key and speed dial programming, system/station and ACD administration, etc.).
♦ Chapter 7 – Backup Menu (DKBackup) provides detailed instructions on checking the
processor type, backing up and restoring system data, and upgrading processors. This menu is only available in the DKBackup program. The options available on this menu — Check Processor Type, Backup/Restore Data, and View/Print Data — also appear on the DKAdmin Administration Menu.
♦ Chapter 8 – Options Menu explains how to change basic system parameters, maintain
your communication setup, view and print data, reindex files, and view system files.
♦ Appendix A – Connecting to Strata DK shows how to connect a DKAdmin/DKBackup
Conventions–––––––––––––––––––––––––––––––––––––––––––––––––––––––––––––––––––––––––––––––––––
♦ Appendix B – DK424 RCTUE/F Upgrade Using DKAdmin
♦ Appendix C – Considerations for Upgrading DK Systems to DK424 Release 4.0
♦ Index
Conventions
This guide uses the following conventions:
Note Elaborates specific items or references other information. Within some tables, General Notes apply to the entire table and numbered Notes apply to specific items.
Important! Calls attention to important instructions or information.
CAUTION! Advises you that hardware, software applications or data could be damaged if the instructions are not followed closely.
Courier shows a computer keyboard entry or screen display. “Type” indicates
entry of text. “Press” indicates pressing the designated key. Example of both:
Type prog then press Enter.
+ shows a multiple PC keyboard or phone button entry. Entries without spaces between them show a simultaneous entry. Example:
Delete+Enter. Entries with spaces between them show a sequential
entry. Example: # + 5.
~ means “through.” Example: 1 ~ 5. ➤ denotes the beginning of a procedure.
➤ denotes the step in a one-step procedure.
Letters in [brackets] represent buttons which have Directory Numbers on them. For example: [DN] Directory Number button (also known as an Extension or Intercom
Number).
[PDN] Primary Directory Number button (the extension Number for your telephone).
[SDN] Secondary appearance of a [PDN]. A [PDN] which appears on another telephone is considered an [SDN].
[PhDN] Phantom Directory Number button (an additional Directory Number).
Screen Variations
––––––––––––––––––––––––––––––––––––––––––––––––––––––––––––––––––––––––– Related Documentation
Related Documentation
The following documents can be used to reference more information about the Strata DK systems.
♦ Strata DK Programming Manual provides all instructions necessary to program the
system and system record sheets.
♦ Strata DK Installation & Maintenance Manual provides installation instructions for
configuring and installing the Strata DK14, DK16e, DK40 and DK424. It also includes T1/DS-1 interface installation and configuration instructions and fault finding provides flowcharts to troubleshoot the systems, and user guides for stations and peripherals. An ACD Section provides instructions for installing ACD into the Strata DK424 and includes all ACD programming instructions and record sheets.
♦ Strata DK Library CD-ROM – contains all current Strata DK documentation and
enables you to view, print, navigate and search publications.
How To Use This Manual
You can use this guide in a variety of ways, depending on your level of experience with the system and your assigned password level.
If you are a new user of DKAdmin/DKBackup, you should attempt to read this entire guide. It introduces you to all the features and procedures of the system and will enable you to begin working with DKAdmin/DKBackup quickly.
The Grand Tour
1
Important!
● DKAdmin/DKBackup support all releases of the Strata DK14, DK16e, DK40, DK280, and
DK424 (all processors). This guide refers to these systems as Strata DK systems.
● DKAdmin/DKBackup programs do not support Strata DK8, DK16, or any DK24/56/96
releases.
The Toshiba Strata DK systems are powerful, state-of-the-art modular digital key/hybrid/PBX telephone systems offering customers outstanding performance and flexibility. The advanced technology behind the Strata DK enables customers to configure a system based on their current telecommunications requirements. Small systems can be expanded over time through the addition of flexible modular units. As needs expand, so does the Strata DK.
DKAdmin/DKBackup are interactive software applications with user-friendly menus and screens that let you program, update, back up and restore Strata DK.
DKAdmin/DKBackup are DOS programs that run on your IBM-compatible personal
computer. Although they are not Microsoft® Windows® programs, you can run them as a DOS session under Windows and configure them with an icon in Program Manager (see your Windows manual).
Capabilities
DKAdmin/DKBackup make the installation, programming and support process easier and more efficient. Among other functions, you can:
♦ Program, update, back up, restore and upgrade all Strata DK system databases from your IBM-compatible personal computer rather than from a programming telephone.
♦ Support DK14, DK16e, DK40 RCTUA, RCTUB, RCTUBA/BB, RCTUC/D, RCTUE/F processors (all releases).
Note Whenever a DKAdmin/DKBackup screen refers to Strata DK Release 3.0, Release 3, etc., the function will also work with Strata DK Release 3.10. DK16e, Release 1 is equivalent to the RCTUA3 feature set but does not provide Distributed Hunt.
♦ Backup, restore and upgrade station features, port locations and Strata DK individual customer data programs. This includes:
♦ Station and system speed dial numbers ♦ User names
Basic Operations –––––––––––––––––––––––––––––––––––––––––––––––––––––––––––––––––––––––––––––––
♦ Voice mail message waiting ID codes ♦ Station and system speed dial memos ♦ Station and system LCD messages ♦ Station feature options
♦ CO line to station ringing and access assignments ♦ Flexible button assignments
♦ Directory number call forward status (Release 3 or above) ♦ Directory number message waiting status (Release 3 or above) ♦ ANI/Caller ID lost call telephone numbers (Release 3 or above)
♦ Display existing station and port data in ASCII format.
♦ Control certain system menu access through menu-specific user passwords. ♦ Use advanced search features to locate customers, features and programs. ♦ Backup, restore, and upgrade existing Strata DK programmed customer data.
♦ Transfer DK data to/from the database on the DKAdmin/DKBackup PC hard drive and/or
programmed databases from one PC to another, using a floppy disk.
♦ Upgrade automatically to a larger processor.
Note A customer database (PRGALL) that is backed up from one type of processor can be upgraded to a larger type of processor, but not to a smaller one. For example, a PRGALL file that is backed up for RCTUB cannot be restored RCTUA but it can be restored (upgraded) to a RCTUC/D type processor.
Basic Operations
The DKAdmin and DKBackup Main Menu consists of the following menus:
Note The Backup Menu consists of three functions also available on the DKAdmin Administration Menu.
DKAdmin DKBackup
File Menu File Menu
Administration Menu Backup Menu
–––––––––––––––––––––––––––––––––––––––––––––––––––––––––––––––––––––––––––––– Basic Operations
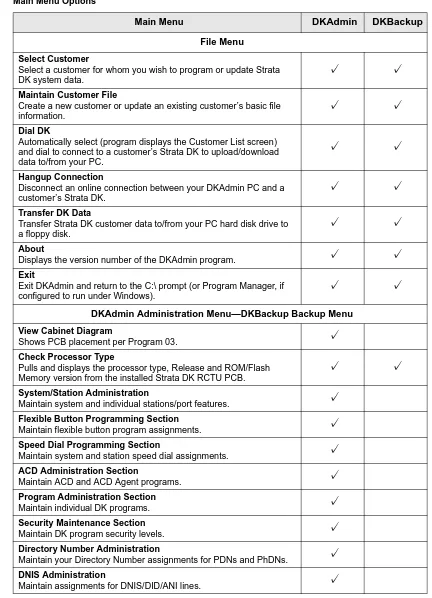
The table below lists the options for each menu. A check mark (✓) appears next to the functions which are available on that menu:
Table 1 Main Menu Options
Main Menu DKAdmin DKBackup
File Menu
Select Customer
Select a customer for whom you wish to program or update Strata DK system data.
✓
✓
Maintain Customer File
Create a new customer or update an existing customer’s basic file information.
✓
✓
Dial DK
Automatically select (program displays the Customer List screen) and dial to connect to a customer’s Strata DK to upload/download data to/from your PC.
✓
✓
Hangup Connection
Disconnect an online connection between your DKAdmin PC and a customer’s Strata DK.
✓
✓
Transfer DK Data
Transfer Strata DK customer data to/from your PC hard disk drive to a floppy disk.
✓
✓
About
Displays the version number of the DKAdmin program.
✓
✓
Exit
Exit DKAdmin and return to the C:\ prompt (or Program Manager, if configured to run under Windows).
✓
✓
DKAdmin Administration Menu—DKBackup Backup Menu
View Cabinet Diagram
Shows PCB placement per Program 03.
✓
Check Processor Type
Pulls and displays the processor type, Release and ROM/Flash Memory version from the installed Strata DK RCTU PCB.
✓
✓
System/Station Administration
Maintain system and individual stations/port features.
✓
Flexible Button Programming Section
Maintain flexible button program assignments.
✓
Speed Dial Programming Section
Maintain system and station speed dial assignments.
✓
ACD Administration Section
Maintain ACD and ACD Agent programs.
✓
Program Administration Section
Maintain individual DK programs.
✓
Security Maintenance Section
Maintain DK program security levels.
✓
Directory Number Administration
Maintain your Directory Number assignments for PDNs and PhDNs.
✓
DNIS Administration
Screen Conventions ––––––––––––––––––––––––––––––––––––––––––––––––––––––––––––––––––––––––––––
Screen Conventions
All DKAdmin/DKBackup screens are organized in a similar manner (see Figure 1).
Screen elements include:
♦ Screen title (at the top of the screen): tells you what screen is displayed.
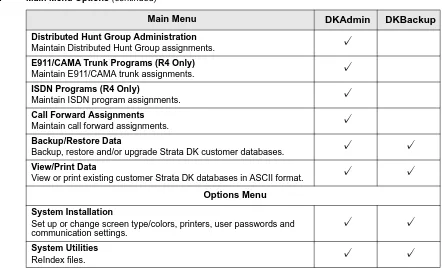
Distributed Hunt Group Administration
Maintain Distributed Hunt Group assignments.
✓
E911/CAMA Trunk Programs (R4 Only)
Maintain E911/CAMA trunk assignments.
✓
ISDN Programs (R4 Only)
Maintain ISDN program assignments.
✓
Call Forward Assignments
Maintain call forward assignments.
✓
Backup/Restore Data
Backup, restore and/or upgrade Strata DK customer databases.
✓
✓
View/Print Data
View or print existing customer Strata DK databases in ASCII format.
✓
✓
Options Menu
System Installation
Set up or change screen type/colors, printers, user passwords and communication settings.
✓
✓
System Utilities
ReIndex files.
✓
✓
Table 1 Main Menu Options (continued)
Main Menu DKAdmin DKBackup
Select Local Printer
Available Printer Drivers
Local Printer
FIND: H
Screen Title
Scroll Arrows
Hewlett-Packard Laserjet Compatible Hewlett-Packard Laserjet Series II Hewlett-Packard Laserjet Series III IBM 80 CPS Graphics
IBM 80 CPS Matrix IBM 80 CPS/Epson LX-90 IBM Color Printer IBM Proprinter
0903 Select Local Printer
F1-Help
Function Keys Find Feature
Message Line
–––––––––––––––––––––––––––––––––––––––––––––––––––––––––––––––––––––––––––– Screen Conventions
♦ Find feature: Many of the screens in the DKAdmin/DKBackup programs have a Find
feature for customer IDs, program numbers, or port numbers. To use the feature, highlight the number field you are searching (e.g., program number) and type the desired number. The DKAdmin/DKBackup programs move the highlighter to the field requested. If the number you have entered is incorrect, the program displays a dialog box telling you that it could not be found.
To repeat the search, press Esc, the highlighter moves back to the first number in the column and you can type in the new search number.
Note If the feature is available on the screen you have displayed, the word FIND appears at the bottom left corner.
♦ Scroll arrows: If scroll arrows appear in the bottom right-hand corner of the screen,
additional screen information is available. Some screens cannot display all the information they contain within the boundaries of the screen display. Scroll arrows allow you to move the screen (vertically or horizontally). Tab and Shift+Tab keys enable you to move the bar up and down the screen vertically.
♦ Function keys (appear above the message line): tell you the processing options available
from this screen.
♦ Message line (at the bottom of the screen): tells you important information about the task
Installing DKAdmin
2
Step 1: Check System Requirements
For optimum performance, run DKAdmin on a personal computer with the following minimum specifications:
♦ IBM-compatible Pentium® personal computer ♦ 100MB or larger hard drive
♦ CD-ROM or 3.5" 1.44KB high-density floppy drive
Note DKAdmin software is distributed on a CD-ROM disk. Installation can be performed using the CD-ROM disk or from floppy disk(s) copied from the CD-ROM DKAdmin install program.
♦ VGA or SVGA monitor preferred ♦ 4MB RAM (minimum)
♦ Microsoft
MS-DOS
6.22, Windows
3.11 or higher (Windows 95, 98 or WindowsNT
4.0 recommended).♦ A laser printer is recommended
♦ For network users, a minimum of 2MB of disk space is required for each person using
DKAdmin on the network.
♦ DKAdmin hardware key (red)
DKAdmin is a MS-DOS program that can be installed and run under Microsoft Windows 3.11, 95, 98 and NT or MS-DOS (6.22 or higher)
.
The installation and run instructions in this chapter include both Windows and DOS installation information.Important!
● If your PC has Windows 3.11 installed, setting your Windows SYSTEM.INI and DOS
CONFIG.SYS files with the commands below may help DKAdmin run on your PC.
SYSTEM.INI [NonWindowsApp]
COMMANDENVSIZE=1024
DOS CONFIG.SYS
SHELL=C:\COMMAND.COM/e:1024/p
● If DKAdmin displays a “Run time error” message during installation or operation, erase
Step 2: Power Up DKAdmin PC –––––––––––––––––––––––––––––––––––––––––––––––––––––––––––––––––––
● From C:\280ADMIN\Data, type del *.ntx and press Enter. ● From C:\280ADMIN\XXX.DK, type del *.ntx and press Enter.
● Run ReIndex Files under Options/System Utilities Menu each time before you start to use
DKAdmin.
● Always exit DKAdmin before you turn your computer off.
Step 2: Power Up DKAdmin PC
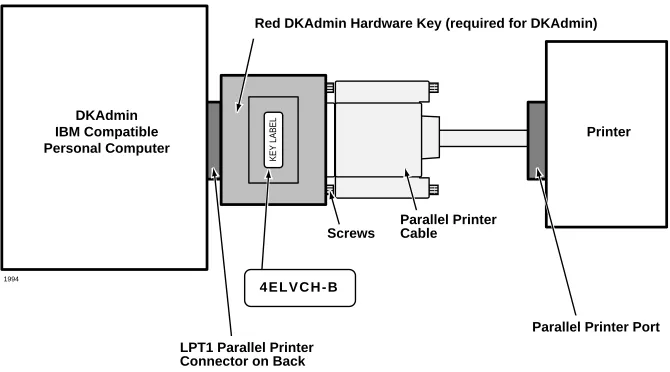
Note The DKAdmin Hardware Key must be installed on the PC LPT1 port, to enable the DKAdmin program to be used after it is installed. If you install DKAdmin without the key, it will not run.
1. Install the DKAdmin hardware key (red) on the LPT1 parallel printer port as shown in
Figure 2.
Notes
● If you wish, you can install a printer on the end of the LPT1 Admin Hardware Key. ● The printer can be installed and used on the LPT1/Admin Hardware Key. But, it is not
necessary to install a printer to enable DKAdmin to be installed or used. 2. Turn on your computer.
,,
,, ,
,
KEY LABEL
DKAdmin IBM Compatible Personal Computer
Printer
4 E L V C H - B
LPT1 Parallel Printer Connector on Back
Red DKAdmin Hardware Key (required for DKAdmin)
Parallel Printer Cable Screws
Parallel Printer Port
1994
––––––––––––––––––––––––––––––––––––––––––––––––––––– Step 3: (Optional) Make Installation Floppy Disks
Step 3: (Optional) Make Installation Floppy Disks
From Windows
If you wish to install DKAdmin on a PC that does not have a CD-ROM, you will need to make installation floppies from a PC that has a CD-ROM. You can make installation disks that install the program using a Windows application (this works on all PCs with Windows 3.x, 95, 98 or Windows NT) or you can make DOS only installation disks.
CAUTION! Do not use the DOS installation program on a Windows PC.
Note Be sure to exit all programs running in Windows before starting.
1. Insert the CD-ROM into your CD-ROM drive. The Main Menu appears.
...or if the Main Menu does not appear after you insert the CD-ROM, click Start, Run, then Browse. Select your CD-ROM drive from the Look in: pull down list. Locate and double-click mainmenu.exe. The Main Menu opens.
2. From the Main Menu, select “Make Floppy Installation Disks” then select “DKAdmin Windows Installation Disks” or “DKAdmin DOS Installation Disks” (depending which target PC will get the installation). Follow the prompts.
From DOS Only PC
If you wish to install DKAdmin on a PC that does not have a CD-ROM, we recommend that you use a Windows PC and the preceding instructions to make installation floppy disks. However, in the rare case you are using a DOS only PC that has a CD-ROM, follow these steps:
1. Place a blank floppy in floppy drive A: (or B:). Insert the CD-ROM into your CD-ROM drive. Change the DOS prompt to the CD-ROM drive letter and type:
cd\dkados\disk1 and press Enter.
2. Type: copy*.*A:(or B:) and press Enter.
3. Place a another floppy in floppy drive A: (or B:) and type: cd\dkados\disk2 and press Enter.
Step 4: Install DKAdmin –––––––––––––––––––––––––––––––––––––––––––––––––––––––––––––––––––––––––
Step 4: Install DKAdmin
DKAdmin is a DOS application program that can be installed and run in either DOS or as a Windows DOS session.
CAUTION! If any earlier DKAdmin (280Admin) release is already installed on the PC, do not delete it; install DKAdmin Release 4.XX over the existing DKAdmin (280Admin) version as described below. DKAdmin is always installed in the 280Admin directory, overwriting the old DKAdmin (280Admin) operating software but not customer database directories. Existing 280Admin customer data can be used with DKAdmin Release 4.XX.
Note DKAdmin software is also available from the Toshiba FYI Internet site.
Windows PC from CD-ROM
Notes
● When installing DKAdmin to run as a DOS session in Windows NT, the install program
assumes that the default directory name (WINNT) and the default system drive (Drive C) contain the system files. The installation procedure looks for this directory (C:\WINNT) and, if found, copies the necessary drivers for Windows NT onto the hard disk.
● Be sure to exit all programs running in Windows before starting.
1. Insert the CD-ROM into your CD-ROM drive. The Main Menu appears.
...or if the Main Menu does not appear after you insert the CD-ROM, click Start, Run, then Browse. Select your CD-ROM drive from the Look in: pull down list. Locate and double-click mainmenu.exe. The Main Menu opens.
2. From the Main Menu, select “Install DKAdmin” and follow the prompts.
Important! Remember that the “Install DKAdmin” selection in the Main Menu is a Windows application, but the actual DKAdmin application is a DOS/Windows DOS session application.
Windows PC from Floppy Disks
Note Be sure to exit all programs before running the Setup program.
1. Insert Floppy Disk #1 into the floppy drive and click Start, then Run. Type a:\setup (or
b:\setup). Click OK. Follow the prompts to install DKAdmin.
CAUTION! During installation, selecting “New Installation” overwrites the existing DKAdmin customer list if you already have DKAdmin or 280Admin installed on your PC. Although the customer list is overwritten, you can still retrieve the existing customer data associated to that name by adding that customer’s name using the “Maintain Customer” selection on the newly installed DKAdmin. Do this for each customer name that is overwritten on the list.
–––––––––––––––––––––––––––––––––––––––––––––––––––––––––––––––––––––––––Step 4: Install DKAdmin
Notes
● If you installed DKAdmin for the first time, a 280ADMIN directory was created and the
DKAdmin files copied to it.
● If you upgraded an existing DKAdmin program, your customer database has been
maintained in the 280ADMIN directory.
DOS Only PC from CD-ROM
In the rare case your DOS only PC has a CD-ROM, follow these steps:
1. Insert the CD-ROM into your CD-ROM drive. Change the DOS prompt to that drive and type: cd\dkados and press Enter.
Type: install and press Enter.
2. Go to Step 3 of the procedure entitled “DOS Only PC from Floppy Disks” below. Disregard procedures refering to Disk #2.
CAUTION! During installation, selecting “New Installation” overwrites the existing DKAdmin customer list if you already have DKAdmin or 280Admin installed on your PC. Although the customer list is overwritten, you can still retrieve the existing customer data associated to that name by adding that customer’s name using the “Maintain Customer” selection on the newly installed DKAdmin. Do this for each customer name that is overwritten on the list.
DOS Only PC from Floppy Disks
1. Insert the DKAdmin Disk #1 into drive A: (or B:).
2. Using DOS, type: a:\install (or b:\install) at the C: prompt and press Enter. The Toshiba Install DKAdmin System screen automatically displays. Follow the prompts to install DKAdmin.
3. During installation, if you have an existing customer file in an older version of DKAdmin (280Admin) on your PC, highlight the DKAdmin 4.0 Upgrade Installation Only selection and press Enter.
...or if you are installing for the first time, highlight the DKAdmin 4.0 New
Installation selection and press Enter.
CAUTION! During installation, selecting “New Installation” overwrites the existing DKAdmin customer list if you already have DKAdmin or 280Admin installed on your PC. Although the customer list is overwritten, you can still retrieve the existing customer data associated to that name by adding that customer’s name using the “Maintain Customer” selection on the newly installed DKAdmin. Do this for each customer name that is overwritten on the list.
4. Remove the floppy disk from your floppy disk drive and reset the PC to initialize the changes made during installation.
5. Go to Step 3 in the “Run DKAdmin Program” on Page 12.
Notes
● If you installed DKAdmin for the first time, a 280ADMIN directory was created and the
Step 5: Run DKAdmin Program –––––––––––––––––––––––––––––––––––––––––––––––––––––––––––––––––––
● If you upgraded an existing DKAdmin program, your customer database has been
maintained in the 280ADMIN directory.
● If your Config.sys file is changed and you have problems with the new file when you
reboot your computer, restore the original file (i.e., Config. bak).
Step 5: Run DKAdmin Program
Note Running the program under Windows 95, 98 or Windows NT is recommended for the best performance.
Start-up DKAdmin under Windows 98, 95 or Windows NT 4.0
➤ Click on the DKAdmin icon. The Toshiba Title screen displays.
Start-up DKAdmin in MS-DOS
1. From the C:\ prompt, type CD 280ADMIN and press Enter.
2. From the C:\280ADMIN prompt, type dkadmin and press Enter. The Toshiba Title screen displays.
Run DKAdmin
Note If the DKAdmin red hardware key is not installed, the following message displays:
Hardware key Not Installed. Exiting to DOS. OK. Install the
DKAdmin hardware key, then retry running the program.
1. Once the Toshiba Title screen displays, press any key to continue. This message appears:
Please Enter Your User ID:
2. Type Master and press Enter. This message appears: Please Enter Your Password.
3. Type Master and press Enter. For security, your password does not display on the screen as you type it.
The default DKAdmin Password File
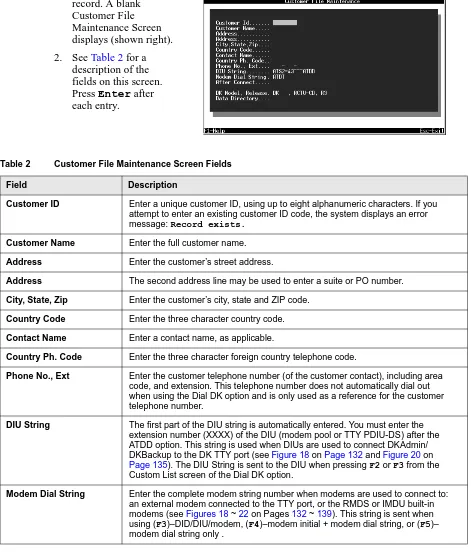
Maintenance screen displays (shown right). It is recommended that you change the MASTER password and create any other user passwords. 4. To change or add
passwords, see “User Password Level Setup” on
Page 121.
5. After completing your password setup, press Esc. The message Do You Want To
–––––––––––––––––––––––––––––––––––––––––––––––––––––––––––––––––––Step 5: Run DKAdmin Program
6. Highlight Yes and press Enter. If you choose No, your new passwords are not installed on the disk.
7. A “Copy to Drive” dialog box displays. The box defaults to drive A:. If you do not want drive A:, type the drive letter to which you wish to copy the installation information. Press Enter. A dialog box displays asking you to insert the DKAdmin Installation Disk #1 into the appropriate disk drive.
8. Insert DKAdmin Installation Disk #1 into the floppy-disk drive and press any key to continue. When complete, a message Process Successful displays and your new passwords are now available on your DKAdmin Installation Disk #1.
9. Press any key to display the DKAdmin Main Menu screen (shown right). You are now ready to use DKAdmin and can use your:
♦ Modified installation disks to install
DKAdmin on additional workstations.
♦ New passwords to log in to DKAdmin.
Set Windows DKAdmin Program Properties
Set these properties when running DKAdmin as a DOS session under Windows: 1. Right click on the DKAdmin desktop icon,
then click on Properties.
The DKAdmin Properties dialog box displays (shown at right).
2. Select the Program Tab screen (shown at right). You should see:
Cmd line: C:\280ADMIN\DKADMIN.BAT
Working: C:\280ADMIN
3. In the Run box, select Maximized from the drop-down menu.
4. Click Apply.
Step 5: Run DKAdmin Program –––––––––––––––––––––––––––––––––––––––––––––––––––––––––––––––––––
6. From Advanced Program Settings screen (shown at right), check only the Suggest
MS-DOS mode as necessary option.
Click on OK.
Note Other screen settings should not be selected.
7. Select the Memory Tab screen (shown at right). All fields should read Auto. If you make changes, click on OK.
8. Select the Screen Tab screen (shown at right). The selected settings should be:
Usage: Full-screen
Window:
Display toolbar
Restore settings on startup
Performance:
Fast ROM emulation
Dynamic memory allocation
–––––––––––––––––––––––––––––––––––––––––––––––––– Step 6: Connect to the Strata DK Telephone System
9. Select the Misc Tab screen (shown at right). 10. Only the items in the Termination, Other and
Windows shortcut keys boxes should be selected.
NoteIt is best not to allow screen savers.
If you make changes, click on Apply.
11. Close the DKAdmin Properties dialog box and return to Step 3 of “Start-up DKAdmin under Windows 98, 95 or Windows NT 4.0”
on Page 12.
Step 6: Connect to the Strata DK Telephone System
Installing DKBackup
3
Step 1: Check System Requirements
For optimum performance, run DKBackup on a personal computer with the following minimum specifications:
♦ IBM-compatible 386/486 personal computer or higher level ♦ 20MB or larger hard drive
♦ CD-ROM or 3.5" 1.44KB high-density floppy drive
Note DKBackup software is distributed on a CD-ROM disk. Installation can be performed using the CD-ROM disk or from floppy disk(s) copied from the CD-ROM DKBackup install program.
♦ VGA or SVGA monitor preferred ♦ 640KB RAM (minimum)
♦ Microsoft
MS-DOS
6.22, Windows
3.11 or higher (Windows 95, 98 or WindowsNT
4.0 recommended).♦ A laser printer is recommended
♦ For network users, a minimum of 2MB of disk space is required for each person using
DKBackup on the network.
♦ DKBackup hardware key (green or red)
DKBackup is a MS-DOS program that can be installed and run under Microsoft
Windows 3.11, 95, 98, NT or MS-DOS (6.22 or higher)
.
The installation and run instructions in this chapter include both Windows and DOS installation information.Important!
● If your PC has Windows installed, setting your Windows SYSTEM.INI and DOS
CONFIG.SYS files with the commands below may help DKBackup run on your PC.
SYSTEM.INI [NonWindowsApp]
COMMANDENVSIZE=1024
DOS CONFIG.SYS
SHELL=C:\COMMAND.COM/e:1024/p
● If DKBackup displays a “Run time error” message during installation or operation, erase
Step 2: Power Up DKBackup PC ––––––––––––––––––––––––––––––––––––––––––––––––––––––––––––––––––
● From C:\280BCKUP\Data, type del *.ntx and press Enter. ● From C:\280BCKUP\XXX.DK, type del *.ntx and press Enter.
● Run “ReIndex Files” under Options/System Utilities Menu each time before you start to
use DKBackup.
● Always exit DKBackup before you turn your computer off.
Step 2: Power Up DKBackup PC
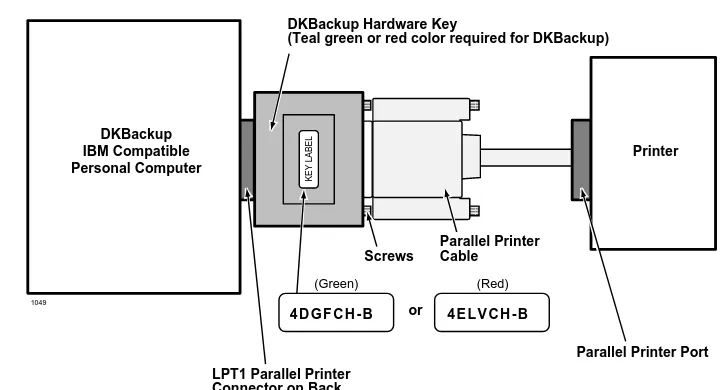
Note The DKBackup or DKAdmin Hardware Key must be installed on the PC LPT1 port, to allow the DKBackup program to be used after it is installed. If you install
DKBackup without the key, it will not run.
1. Install the DKBackup hardware key (green or red) on the LPT1 parallel printer port as shown in Figure 3.
Figure 3 DKBackup Hardware Connections
Notes
● If you wish, you can install a printer on the end of the LPT1 Admin Hardware Key. ● The printer can be installed and used on the LPT1/Backup Hardware Key. But, it is not
necessary to install a printer to enable DKBackup to be installed or used. 2. Turn on your computer.
,,
,, ,
,
KEY LABEL
DKBackup IBM Compatible Personal Computer
Printer
4 D G F C H - B 4 E L V C H - B
LPT1 Parallel Printer Connector on Back
or
(Green) (Red)
DKBackup Hardware Key
(Teal green or red color required for DKBackup)
Parallel Printer Cable Screws
Parallel Printer Port
––––––––––––––––––––––––––––––––––––––––––––––––––––– Step 3: (Optional) Make Installation Floppy Disks
Step 3: (Optional) Make Installation Floppy Disks
From Windows
If you wish to install DKBackup on a PC that does not have a CD-ROM, you will need to make installation floppies from a PC that has a CD-ROM. You can make installation disks that install the program using a Windows application (this works on all PCs with Windows 3.x, 95, 98 or Windows NT) or you can make DOS only installation disks.
CAUTION! Do not use the DOS installation program on a Windows PC.
Note Be sure to exit all programs running in Windows before starting.
1. Insert the CD-ROM into your CD-ROM drive. The Main Menu appears.
...or if the Main Menu does not appear after you insert the CD-ROM, click Start, Run, then Browse. Select your CD-ROM drive from the Look in: pull down list. Locate and double-click mainmenu.exe. The Main Menu opens.
2. From the Main Menu, select “Make Floppy Installation Disks” then select “DKBackup Windows Installation Disks” or “DKBackup DOS Installation Disks” (depending which target PC will get the installation). Follow the prompts.
From DOS Only PC
If you wish to install DKBackup on a PC that does not have a CD-ROM, we recommend that you use a Windows PC and the preceding instructions to make installation floppy disks. However, in the rare case you are using a DOS only PC that has a CD-ROM, follow these steps:
1. Place a blank floppy in floppy drive A: (or B:). Insert the CD-ROM into your CD-ROM drive. Change the DOS prompt to the CD-ROM drive letter and type:
cd\dkbdos\disk1 and press Enter.
2. Type: copy*.*A:(or B:) and press Enter.
3. Place a another floppy in floppy drive A: (or B:) and type: cd\dkbdos\disk2 and press Enter.
Step 4: Install DKBackup ––––––––––––––––––––––––––––––––––––––––––––––––––––––––––––––––––––––––
Step 4: Install DKBackup
DKBackup is a DOS application program that can be installed and run in either DOS or as a Windows DOS session.
CAUTION! If any earlier DKBackup (280Backup) release is already installed on the PC, do not delete it; install DKBackup Release 4.XX over the existing DKBackup (280Backup) version as described below. DKBackup is always installed in the 280Backup directory, overwriting the old DKBackup (280Backup) operating software but not customer database directories. Existing 280Backup customer data can be used with DKBackup Release 4.XX.
Note DKBackup software is also available from the Toshiba FYI Internet site.
Windows PC from CD-ROM
Notes
● When installing DKBackup to run as a DOS session in Windows NT, the install program
assumes that the default directory name (WINNT) and the default system drive (Drive C) contain the system files. The installation procedure looks for this directory (C:\WINNT) and, if found, copies the necessary drivers for Windows NT onto the hard disk.
● Be sure to exit all programs running in Windows before starting.
1. Insert the CD-ROM into your CD-ROM drive. The Main Menu appears.
...or if the Main Menu does not appear after you insert the CD-ROM, click Start, Run, then Browse. Select your CD-ROM drive from the Look in: pull down list. Locate and double-click mainmenu.exe. The Main Menu opens.
2. From the Main Menu, select “Install DKBackup” and follow the prompts.
Important! Remember that the “Install DKBackup” selection in the Main Menu is a Windows application, but the actual DKBackup application is a DOS/Windows DOS session application.
Windows PC from Floppy Disks
Note Be sure to exit all programs before running the Setup program.
1. Insert Floppy Disk #1 into the floppy drive and click Start, then Run. Type a:\setup (or
b:\setup). Click OK. Follow the prompts to install DKBackup.
CAUTION! During installation, selecting “New Installation” overwrites the existing DKBackup customer list if you already have DKBackup or 280Backup installed on your PC. Although the customer list is overwritten, you can still retrieve the existing customer data associated to that name by adding that customer’s name using the “Maintain Customer” selection on the newly installed DKBackup. Do this for each customer name that is overwritten on the list.
––––––––––––––––––––––––––––––––––––––––––––––––––––––––––––––––––––––––Step 4: Install DKBackup
Notes
● If you installed DKBackup for the first time, a 280BCKUP directory was created and the
DKBackup files copied to it.
● If you upgraded an existing DKBackup program, your customer database has been
maintained in the 280BCKUP directory.
DOS Only PC from CD-ROM
In the rare case your DOS only PC has a CD-ROM, follow these steps:
1. Insert the ROM into your
CD-ROM drive. Change the DOS prompt to that drive and type: cd\dkados and press
Enter.
Type: install and press Enter. 2. Go to Step 3 of the procedure
entitled “DOS only PC from Floppy Disks” below. Disregard procedures refering to Disk #2.
CAUTION! During installation,
selecting “New Installation” overwrites the existing DKBackup customer list if you already have DKBackup or 280Backup installed on your PC. Although the customer list is overwritten, you can still retrieve the existing customer data associated to that name by adding that customer’s name using the “Maintain Customer” selection on the newly installed DKBackup. Do this for each customer name that is overwritten on the list.
DOS only PC from Floppy Disks
1. Insert the DKBackup Disk #1 into drive A: (or B:).
2. Using DOS, type: a:\install (or b:\install) at the C: prompt and press Enter. The Toshiba Install DKBackup System screen automatically displays. Follow the prompts to install DKBackup.
3. During installation, if you have an existing customer file in an older version of DKBackup (280Backup) on your PC, highlight the DKBackup 4.0 Upgrade Installation Only selection and press Enter.
...or if you are installing for the first time, highlight the DKBackup 4.0 New
Installation selection and press Enter.
CAUTION! During installation, selecting “New Installation” overwrites the existing DKBackup customer list if you already have DKBackup or 280Backup installed on your PC. Although the customer list is overwritten, you can still retrieve the existing customer data associated to that name by adding that customer’s name using the “Maintain Customer” selection on the newly installed DKBackup. Do this for each customer name that is overwritten on the list.
4. Remove the floppy disk from your floppy disk drive and reset the PC to initialize the changes made during installation.
Step 5: Run DKBackup Program ––––––––––––––––––––––––––––––––––––––––––––––––––––––––––––––––––
Notes
● If you installed DKBackup for the first time, a 280BCKUP directory was created and the
DKBackup files copied to it.
● If you upgraded an existing DKBackup program, your customer database has been
maintained in the 280BCKUP directory.
● If your Config.sys file is changed and you have problems with the new file when you
reboot your computer, restore the original file (i.e., Config. bak).
Step 5: Run DKBackup Program
Note Running the program under Windows 95, 98 or Windows NT is recommended for the best performance.
Start-up DKBackup under Windows 3.11, 95, 98 or Windows NT 4.0
➤ Click on the DKBackup icon. The Toshiba Title screen displays.
Start-up DKBackup in MS-DOS
1. From the C:\ prompt, type CD 280BCKUP and press Enter.
2. From the C:\280BCKUP prompt, type dkbackup and press Enter. The Toshiba Title screen displays.
Run DKBackup
Note If the DKBackup red or green hardware key is not installed, the following message displays: Hardware key Not Installed. Exiting to DOS. OK. Install the DKBackup hardware key, then retry running the program.
1. Once the Toshiba Title screen displays, press any key to continue. This message appears:
Please Enter Your User ID:
2. Type Master and press Enter. This message appears: Please Enter Your Password.
3. Type Master and press Enter. For security, your password does not display on the screen as you type it.
The default DKBackup Password File
Maintenance screen displays (shown right). It is recommended that you change the MASTER password and create any other user passwords. 4. To change or add
passwords, see “User Password Level Setup” on
––––––––––––––––––––––––––––––––––––––––––––––––––––––––––––––––––Step 5: Run DKBackup Program
5. After completing your password setup, press Esc. The message Do You Want To
Copy User File Back On The Installation Disk? displays.
6. Highlight Yes and press Enter. If you choose No, your new passwords are not installed on the disk.
7. A “Copy to Drive” dialog box displays. The box defaults to drive A:. If you do not want drive A:, type the drive letter to which you wish to copy the installation information. Press Enter. A dialog box displays asking you to insert the DKBackup Installation Disk into the appropriate disk drive.
8. Insert the DKBackup Installation Disk into the floppy-disk drive and press any key to continue. When complete, a message Process Successful displays and your new passwords are now available on your DKBackup Installation Disk.
9. Press any key to display the DKBackup Main Menu screen (shown right). You are now ready to use DKBackup and can use your:
♦ Modified installation disks to install DKBackup on additional workstations.
♦ New passwords to log in to DKBackup.
Set Windows DKBackup Program Properties
1. Right click on the DKBackup desktop icon, then click on Properties.
The DKBackup Properties dialog box displays (shown at right).
2. Select the Program Tab screen (shown at right). You should see:
Cmd line: C:\280BCKUP\DKBCKUP.BAT
Working: C:\280BCKUP
3. In the Run box, select Maximized from the drop-down menu.
4. Click Apply.
Step 5: Run DKBackup Program ––––––––––––––––––––––––––––––––––––––––––––––––––––––––––––––––––
6. From Advanced Program Settings screen (shown at right), check only the Suggest
MS-DOS mode as necessary option.
Click on OK.
Note Other screen settings should not be selected.
7. Select the Memory Tab screen (shown at right). All fields should read Auto. If you make changes, click on OK.
8. Select the Screen Tab screen (shown at right). The selected settings should be:
Usage: Full-screen
Window:
Display toolbar
Restore settings on startup
Performance:
Fast ROM emulation
Dynamic memory allocation
–––––––––––––––––––––––––––––––––––––––––––––––––– Step 6: Connect to the Strata DK Telephone System
9. Select the Misc Tab screen (shown at right). 10. Only the items in the Termination, Other and
Windows shortcut keys boxes should be selected.
NoteIt is best not to allow screen savers.
If you make changes, click on Apply.
11. Close the DKBackup Properties dialog box and return to Step 3 of “Start-up DKBackup under Windows 3.11, 95, 98 or Windows NT 4.0” on Page 22.
Step 6: Connect to the Strata DK Telephone System
Using DKAdmin/DKBackup
4
This chapter shows you how to log on and off DKAdmin/DKBackup, use the pull-down menus and select system options, respond to system and error messages, and describes the keyboard conventions used in the programs.
Before You Start
Before using DKAdmin/DKBackup, you must:
♦ Connect your personal computer to a Strata DK in order to send/receive data between the DKAdmin/DKBackup PC and a Strata DK (see Appendix A – Connecting to Strata DK
for procedures).
♦ Properly install the DKAdmin/DKBackup hardware key (see Chapter 2 – Installing DKAdmin and Chapter 3 – Installing DKBackup for procedures).
♦ Correctly set your communications (see Chapter 8 – Options Menu).
Logging On
DKAdmin
➤
To log on to DKAdmin1. After powering up your computer, at the C:\ prompt type CD
280ADMIN and press
Enter.
2. From the C:\280ADMIN prompt, type dkadmin
and press Enter. The Toshiba start-up page displays (shown right). 3. Type your User ID and
press Enter.
Logging On –––––––––––––––––––––––––––––––––––––––––––––––––––––––––––––––––––––––––––––––––––
If you have entered your User ID and password correctly, the DKAdmin Main Menu displays (shown right). All DKAdmin activity originates from the DKAdmin Main Menu.
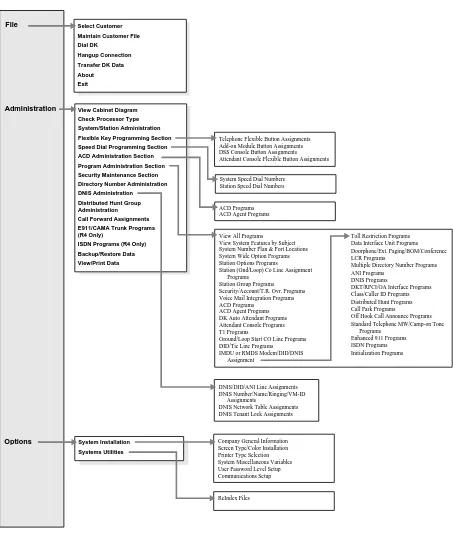
The three items across the DKAdmin Main Menu bar (i.e., File, Administration,
Options) enable you to perform the many functions shown in Figure 5. Some items may not be available for selection, depending on your assigned User ID and password. The menus shown here depict DKAdmin Master password Level 9 options.
–––––––––––––––––––––––––––––––––––––––––––––––––––––––––––––––––––––––––––––––––––Logging On
Figure 4 DKAdmin Main Menu Options
1089 File
Administration
Options
Select Customer
Maintain Customer File
Dial DK
Hangup Connection
Transfer DK Data
About
Exit
Telephone Flexible Button Assignments Add-on Module Button Assignments DSS Console Button Assignments Attendant Console Flexible Button Assignments
System Speed Dial Numbers Station Speed Dial Numbers View Cabinet Diagram
Check Processor Type
System/Station Administration
Flexible Key Programming Section
Speed Dial Programming Section
ACD Administration Section
Program Administration Section
Security Maintenance Section
Directory Number Administration
DNIS Administration
Distributed Hunt Group Administration
Call Forward Assignments
E911/CAMA Trunk Programs (R4 Only)
ISDN Programs (R4 Only)
Backup/Restore Data
View/Print Data
ACD Programs ACD Agent Programs
View All Programs View System Features by Subject System Number Plan & Port Locations System Wide Option Programs Station Options Programs
Station (Gnd/Loop) Co Line Assignment Programs
Station Group Programs Security/Account/T.R. Ovr. Programs Voice Mail Integration Programs ACD Programs
ACD Agent Programs DK Auto Attendant Programs Attendant Console Programs T1 Programs
Ground/Loop Start CO Line Programs DID/Tie Line Programs IMDU or RMDS Modem/DID/DNIS
Assignment
Toll Restriction Programs Data Interface Unit Programs Doorphone/Ext. Paging/BGM/Conference LCR Programs
Multiple Directory Number Programs ANI Programs
DNIS Programs
DKT/RPCI/OA Interface Programs Class/Caller ID Programs Distributed Hunt Programs Call Park Programs
Off Hook Call Announce Programs Standard Telephone MW/Camp-on Tone
Programs Enhanced 911 Programs ISDN Programs Initialization Programs
DNIS/DID/ANI Line Assignments DNIS Number/Name/Ringing/VM-ID
Assignments
DNIS Network Table Assignments DNIS Tenant Lock Assignments
System Installation
Systems Utilities
Company General Information Screen Type/Color Installation Printer Type Selection System Miscellaneous Variables User Password Level Setup Communications Setup
Logging On –––––––––––––––––––––––––––––––––––––––––––––––––––––––––––––––––––––––––––––––––––
DKBackup
➤
To log on to DKBackup1. After powering up your computer, at the C:\ prompt type
CD 280BCKUP and
press Enter. 2. From the
C:\280BCKUP prompt, type
dkbckup and press
Enter. The Toshiba
start-up page displays (shown right).
3. Type your User ID and press Enter.
4. Type your password and press Enter.
If you have entered your User ID and password correctly, the DKBackup Main Menu displays (shown right).
All DKBackup activity originates from the DKBackup Main Menu.
The three items across the DKBackup Main Menu bar (i.e., File, Backup, Options) enable you to perform the many functions shown in Figure 5. Some items may not be available for selection, depending
–––––––––––––––––––––––––––––––––––––––––––––––––––––––––––––––––––––––––– Keyboard Conventions
Keyboard Conventions
While working within DKAdmin/DKBackup, you can use the following keys to:
Esc Escapes from the current screen/menu and returns you
to the previous screen/menu.
Page Up/Page Down Moves to the previous/next questions screen.
Enter Executes a screen selection/transaction.
Left/Right Arrow Moves the selection highlighter left/right. Up/down Arrow Moves the selection highlighter up/down.
Spacebar Depending on the screen, toggles between selections for the field or selects the list item and places a check mark next to it.
1088DK File
Backup
Options
Select Customer
Maintain Customer File
Dial DK
Hangup Connection
Transfer DK Data
About
Exit
Check Processor Type
Backup/Restore Data
View/Print Data
System Installation
Systems Utilities
Screen Type/Color Installation Printer Type Selection System Miscellaneous Variables User Password Level Setup Communications Setup
ReIndex Files
Using the Pull-Down Menus ––––––––––––––––––––––––––––––––––––––––––––––––––––––––––––––––––––––
Using the Pull-Down Menus
You can perform all basic operations from the Main Menu’s menu bar. When you select an item in the menu bar, a “pull-down” options menu appears, listing all the functions which you can perform (shown right).
➤
To use a pull-down menu1. Use the left/right arrow keys to highlight the item and press Enter. Or, if you prefer, you can type the highlighted letter for the item you wish to “pull down”:
F = File B = Backup O = Options
2. Once in a pull-down menu, you can use the same keyboard conventions you do to make a menu
selection (use the up/down arrow keys or type the highlighted letter). 3. To close a menu, press Esc.
System Messages
At the bottom of each DKAdmin/DKBackup screen is a message line (see Page 5). Pay particular attention to this line as you work, since it displays important system information and processing options for the application or screen in which you are currently working.
Error Messages
If you make an incorrect entry while working in DKAdmin/DKBackup, you are sometimes prompted with an error message. This tells you why DKAdmin/DKBackup cannot process the attempted transaction. By reviewing the error message, you will be able to determine your error and successfully execute the desired transaction.
On-Line Help
–––––––––––––––––––––––––––––––––––––––––––––––––––––––––––––––––––––––––––––––––––Logging Off
Logging Off
➤
To exit the DKAdmin/DKBackup system1. Return to the DKAdmin/DKBackup Main Menu by pressing Esc until the Main Menu displays.
2. Highlight the File Menu option and press Enter, or type f. 3. Highlight Exit and press Enter, or type x.
DKAdmin/DKBackup shuts down and returns the screen to a DOS prompt.
File Menu
5
This chapter gives you step-by-step instructions on using the options available on the File Menu. The options are:
♦ Select Customer ♦ Maintain Customer File ♦ Dial DK
♦ Hangup Connection ♦ Transfer DK Data ♦ About
♦ Exit
Quick-start Procedures for Using DKAdmin
For an Existing Customer
➤
To quickly use DKAdmin with a previously programmed Strata DK1. Create a new customer record, using the Maintain Customer File option from the File Menu.
2. Select the newly created customer, using the Select Customer option from the File Menu. 3. If you will be Uploading/Downloading data between the DKAdmin PC and a Strata DK
and you must dial via modem or Toshiba DIU to connect, use the Dial DK option to select and dial the customer; or, connect the DKAdmin PC directly to the DK system (see
Appendix A – Connecting to Strata DK).
4. When the DKAdmin PC first connects to the Strata DK, verify that the selected customer processor is the same type as the one installed in the DK system. Highlight the Check Processor Type option under the Administration Menu and press Enter. Enter the applicable DK code. The Strata DK sends the processor type and version to the DKAdmin PC.
5. Back up (download) the customer’s original data using the Backup option (F2) and (F3) from the Backup/Restore Data option under the Administration Menu.
6. Update the customer DK data, using options from the Administration Menu.
Maintain Customer File ––––––––––––––––––––––––––––––––––––––––––––––––––––––––––––––––––––––––––
For a New Customer
➤
To quickly use DKAdmin with a new installation of Strata DK1. Create a new customer record, using the Maintain Customer File option from the File Menu.
2. Select the newly created customer, using the Select Customer option from the File Menu. 3. Program the customer DK data, using the ACD Administration Section and Program
Administration Section options from the Administration Menu.
4. Dial the Strata DK, using the Dial DK option from the File Menu, or connect the DKAdmin PC directly to the Strata DK (see Appendix A – Connecting to Strata DK). 5. When the DKAdmin PC first connects to the Strata DK, verify that the selected customer
processor is the same type installed in the DK system. Highlight the Check Processor Type option in the Administration Menu and press Enter. Enter the applicable DK code. The Strata DK sends the processor type and version to the DKAdmin PC.
6. Initialize the Strata DK processor PCB by running Program 91-9 from the Initialization Programs option located in the Program Administration Menu (this option will interrupt service and drop all calls).
Note If initializing from a remote location, the DKAdmin PC must be connected to the Strata DK via modems as shown in Figure 18 on Page 132 only.
7. Restore (upload) the new data to the customer’s Strata DK, using the Restore option (F2) and (F4) from the Backup/Restore Data option in the Administration Menu.
Maintain Customer File
Using this option, you can insert a new customer, review and update a customer’s information, delete a customer or upgrade a customer’s processor.
Note In the procedures for upgrading a customer’s processor, the word “original” describes the existing processor and “new” describes the upgraded processor.
➤
To access the Maintain Customer File option1. Type m and the Customer List displays (shown right).
The list shows each customer’s ID, name, assigned directory, and the last date the customer’s Strata DK data was downloaded and uploaded. If upgrading a processor, you should always create a new customer,