170 West Tasman Drive San Jose, CA 95134-1706 USA
http://www.cisco.com Cisco Systems, Inc.
Corporate Headquarters
Tel:
800 553-NETS (6387) 408 526-4000
Fax: 408 526-4100
Catalyst 6000 Family Command
Reference
THE SPECIFICATIONS AND INFORMATION REGARDING THE PRODUCTS IN THIS MANUAL ARE SUBJECT TO CHANGE WITHOUT NOTICE. ALL STATEMENTS, INFORMATION, AND RECOMMENDATIONS IN THIS MANUAL ARE BELIEVED TO BE ACCURATE BUT ARE PRESENTED WITHOUT WARRANTY OF ANY KIND, EXPRESS OR IMPLIED. USERS MUST TAKE FULL RESPONSIBILITY FOR THEIR APPLICATION OF ANY PRODUCTS.
THE SOFTWARE LICENSE AND LIMITED WARRANTY FOR THE ACCOMPANYING PRODUCT ARE SET FORTH IN THE INFORMATION PACKET THAT SHIPPED WITH THE PRODUCT AND ARE INCORPORATED HEREIN BY THIS REFERENCE. IF YOU ARE UNABLE TO LOCATE THE SOFTWARE LICENSE OR LIMITED WARRANTY, CONTACT YOUR CISCO REPRESENTATIVE FOR A COPY.
The Cisco implementation of TCP header compression is an adaptation of a program developed by the University of California, Berkeley (UCB) as part of UCB’s public domain version of the UNIX operating system. All rights reserved. Copyright © 1981, Regents of the University of California.
NOTWITHSTANDING ANY OTHER WARRANTY HEREIN, ALL DOCUMENT FILES AND SOFTWARE OF THESE SUPPLIERS ARE PROVIDED “AS IS” WITH ALL FAULTS. CISCO AND THE ABOVE-NAMED SUPPLIERS DISCLAIM ALL WARRANTIES, EXPRESSED OR IMPLIED, INCLUDING, WITHOUT LIMITATION, THOSE OF MERCHANTABILITY, FITNESS FOR A PARTICULAR PURPOSE AND
NONINFRINGEMENT OR ARISING FROM A COURSE OF DEALING, USAGE, OR TRADE PRACTICE.
IN NO EVENT SHALL CISCO OR ITS SUPPLIERS BE LIABLE FOR ANY INDIRECT, SPECIAL, CONSEQUENTIAL, OR INCIDENTAL DAMAGES, INCLUDING, WITHOUT LIMITATION, LOST PROFITS OR LOSS OR DAMAGE TO DATA ARISING OUT OF THE USE OR INABILITY TO USE THIS MANUAL, EVEN IF CISCO OR ITS SUPPLIERS HAVE BEEN ADVISED OF THE POSSIBILITY OF SUCH DAMAGES.
Access Registrar, AccessPath, Aironet, Any to Any, AtmDirector, Browse with Me, CCDA, CCDE, CCDP, CCIE, CCNA, CCNP, CCSI, CD-PAC, the Cisco logo, Cisco Certified Internetwork Expert logo, CiscoLink, the Cisco Management Connection logo, the Cisco NetWorks logo, the Cisco Powered Network logo, Cisco Systems Capital, the Cisco Systems Capital logo, Cisco Systems Networking Academy, the Cisco Systems Networking Academy logo, the Cisco Technologies logo, ConnectWay, Fast Step, FireRunner, Follow Me Browsing, FormShare, GigaStack, IGX, Intelligence in the Optical Core, Internet Quotient, IP/VC, Kernel Proxy, MGX, Natural Network Viewer, NetSonar, Network Registrar, the Networkers logo, Packet, PIX, Point and Click Internetworking, Policy Builder, Precept, RateMUX, ScriptShare, Secure Script, ServiceWay, Shop with Me, SlideCast, SMARTnet, SVX, The Cell, TrafficDirector, TransPath, ViewRunner, Virtual Loop Carrier System, Virtual Voice Line, VlanDirector, Voice LAN, Wavelength Router, Workgroup Director, and Workgroup Stack are trademarks; Changing the Way We Work, Live, Play, and Learn, Empowering the Internet Generation, The Internet Economy, and The New Internet Economy are service marks; and ASIST, BPX, Catalyst, Cisco, Cisco IOS, the Cisco IOS logo, Cisco Systems, the Cisco Systems logo, the Cisco Systems Cisco Press logo, Enterprise/Solver, EtherChannel, EtherSwitch, FastHub, FastLink, FastPAD, FastSwitch, GeoTel, IOS, IP/TV, IPX, LightStream, LightSwitch, MICA, NetRanger, Post-Routing, Pre-Routing, Registrar, StrataView Plus, Stratm, TeleRouter, and VCO are registered trademarks of Cisco Systems, Inc. or its affiliates in the U.S. and certain other countries. All other trademarks mentioned in this document are the property of their respective owners. The use of the word partner does not imply a partnership relationship between Cisco and any of its resellers. (0004R)
Catalyst 6000 Family Command Reference
C O N T E N T S
Preface
xixAudience
xixOrganization
xixRelated Documentation
xixConventions
xxObtaining Documentation
xxiWorld Wide Web
xxiDocumentation CD-ROM
xxiOrdering Documentation
xxiObtaining Technical Assistance
xxiCisco Connection Online
xxiiTechnical Assistance Center
xxiiDocumentation Feedback
xxiiiC H A P T E R 1
Command-Line Interfaces
1-1Switch CLI
1-1Accessing the Switch CLI
1-1Operating the Switch CLI
1-3ROM Monitor CLI
1-12Accessing the ROM Monitor CLI
1-12Operating the ROM Monitor CLI
1-13C H A P T E R 2
Catalyst 6000 Family Switch and ROM Monitor Commands
2-1alias
2-2boot
2-4cd
2-5clear alias
2-6clear arp
2-7Contents
clear cam
2-12clear channel statistics
2-13clear config
2-14clear config pvlan
2-16clear cops
2-17clear counters
2-19clear gmrp statistics
2-20clear gvrp statistics
2-21clear igmp statistics
2-22clear ip alias
2-23clear ip dns domain
2-24clear ip dns server
2-25clear ip permit
2-26clear ip route
2-28clear kerberos clients mandatory
2-29clear kerberos credentials forward
2-30clear kerberos creds
2-31clear kerberos realm
2-32clear kerberos server
2-33clear key config-key
2-34clear lda
2-35clear log
2-37clear logging buffer
2-38clear logging server
2-39clear mls
2-40clear mls exclude protocol
2-43clear mls multicast statistics
2-44clear mls nde flow
2-45clear module password
2-46Contents
clear pvlan mapping
2-53clear qos acl
2-54clear qos config
2-56clear qos cos-dscp-map
2-57clear qos dscp-cos-map
2-58clear qos ipprec-dscp-map
2-59clear qos mac-cos
2-60clear qos map
2-61clear qos policed-dscp-map
2-63clear qos policer
2-64clear qos statistics
2-66clear radius
2-67clear rgmp statistics
2-68clear security acl
2-69clear security acl capture-ports
2-70clear security acl map
2-71clear snmp access
2-73clear snmp group
2-74clear snmp notify
2-75clear snmp targetaddr
2-76clear snmp targetparams
2-77clear snmp trap
2-78clear snmp user
2-79clear snmp view
2-80clear spantree portvlancost
2-81clear spantree portvlanpri
2-82clear spantree root
2-83clear spantree statistics
2-84clear spantree uplinkfast
2-85clear tacacs key
2-86clear tacacs server
2-87clear timezone
2-88Contents
clear vlan mapping
2-93clear voicevlan
2-94clear vtp pruning
2-95clear vtp statistics
2-96commit
2-97commit lda
2-98configure
2-99confreg
2-101context
2-103copy
2-105delete
2-110dev
2-111dir—ROM monitor
2-112dir—switch
2-113disable
2-115disconnect
2-116download
2-117enable
2-120format
2-121frame
2-123history—ROM monitor
2-124history—switch
2-125meminfo
2-126ping
2-127pwd
2-129quit
2-130reload
2-131repeat
2-132reset—ROM monitor
2-134Contents
set accounting exec
2-144set accounting suppress
2-146set accounting system
2-147set accounting update
2-149set alias
2-150set arp
2-151set authentication enable
2-153set authentication login
2-155set authorization commands
2-157set authorization enable
2-159set authorization exec
2-161set banner motd
2-163set boot auto-config
2-164set boot config-register
2-166set boot config-register auto-config
2-168set boot device
2-171set boot system flash
2-173set cam
2-175set cdp
2-177set channel cost
2-179set channel vlancost
2-180set config acl
2-181set cops
2-183set default portstatus
2-185set enablepass
2-186set errdisable-timeout
2-187set errordetection
2-189set feature mdg
2-190set garp timer
2-191set gmrp
2-193set gmrp fwdall
2-194set gmrp registration
2-195Contents
set gvrp dynamic-vlan-creation
2-200set gvrp registration
2-201set gvrp timer
2-203set igmp
2-205set igmp fastleave
2-206set igmp mode
2-207set inlinepower defaultallocation
2-208set interface
2-209set ip alias
2-212set ip dns
2-213set ip dns domain
2-214set ip dns server
2-215set ip fragmentation
2-216set ip http port
2-217set ip http server
2-218set ip permit
2-219set ip redirect
2-221set ip route
2-222set ip unreachable
2-224set kerberos clients mandatory
2-225set kerberos credentials forward
2-226set kerberos local-realm
2-227set kerberos realm
2-228set kerberos server
2-229set kerberos srvtab entry
2-230set kerberos srvtab remote
2-232set key config-key
2-233set lcperroraction
2-234set lda
2-235Contents
set logout
2-248set mls agingtime
2-249set mls exclude protocol
2-251set mls multicast
2-253set mls nde
2-255set mls statistics protocol
2-258set module
2-259set module name
2-261set module power
2-262set module shutdown
2-263set msmautostate
2-264set multicast router
2-265set ntp broadcastclient
2-266set ntp broadcastdelay
2-267set ntp client
2-268set ntp server
2-269set password
2-270set port auxiliaryvlan
2-271set port broadcast
2-273set port channel
2-274set port cops
2-277set port disable
2-278set port duplex
2-279set port enable
2-280set port flowcontrol
2-281set port gmrp
2-283set port gvrp
2-284set port host
2-286set port inlinepower
2-287set port jumbo
2-288set port membership
2-290set port name
2-291Contents
set port qos cos
2-297set port qos trust
2-298set port qos trust-ext
2-300set port rsvp dsbm-election
2-301set port security
2-302set port speed
2-304set port trap
2-305set port voice interface dhcp
2-306set power redundancy
2-308set prompt
2-309set protocolfilter
2-310set pvlan
2-311set pvlan mapping
2-313set qos
2-314set qos acl default-action
2-315set qos acl ip
2-317set qos acl ipx
2-322set qos acl mac
2-325set qos acl map
2-327set qos bridged-microflow-policing
2-328set qos cos-dscp-map
2-329set qos drop-threshold
2-330set qos dscp-cos-map
2-332set qos ipprec-dscp-map
2-333set qos mac-cos
2-335set qos map
2-336set qos policed-dscp-map
2-338set qos policer
2-339set qos policy-source
2-341Contents
set radius retransmit
2-350set radius server
2-351set radius timeout
2-352set rcp username
2-353set rgmp
2-354set rspan
2-355set security acl capture-ports
2-358set security acl ip
2-359set security acl ipx
2-364set security acl mac
2-367set security acl map
2-369set snmp access
2-371set snmp community
2-373set snmp extendedrmon netflow
2-374set snmp group
2-375set snmp notify
2-376set snmp rmon
2-378set snmp targetaddr
2-379set snmp targetparams
2-381set snmp trap
2-383set snmp user
2-385set snmp view
2-387set span
2-389set spantree backbonefast
2-392set spantree disable
2-393set spantree enable
2-394set spantree fwddelay
2-395set spantree hello
2-396set spantree maxage
2-397set spantree portcost
2-398set spantree portfast
2-399set spantree portfast bpdu-guard
2-400Contents
set spantree portvlanpri
2-405set spantree priority
2-406set spantree root
2-407set spantree uplinkfast
2-409set summertime
2-411set system baud
2-413set system contact
2-414set system countrycode
2-415set system highavailability
2-416set system highavailability versioning
2-417set system location
2-419set system modem
2-420set system name
2-421set tacacs attempts
2-422set tacacs directedrequest
2-423set tacacs key
2-424set tacacs server
2-425set tacacs timeout
2-426set test diaglevel
2-427set time
2-428set timezone
2-429set trunk
2-430set udld
2-433set udld aggressive-mode
2-435set udld interval
2-436set vlan
2-437set vlan mapping
2-440set vtp
2-442set vtp pruneeligible
2-444Contents
show boot device
2-453show cam
2-454show cam agingtime
2-456show cam count
2-457show cam msfc
2-458show cdp
2-459show channel
2-463show channel group
2-470show config
2-474show config qos acl
2-480show cops
2-481show counters
2-484show default
2-489show environment
2-490show environment power
2-492show errdisable-timeout
2-494show errordetection
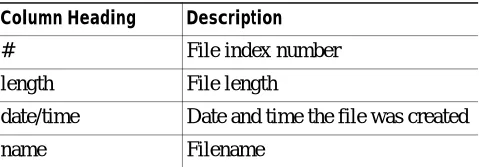
2-495show file
2-496show flash
2-497show gmrp configuration
2-500show gmrp statistics
2-502show gmrp timer
2-503show gvrp configuration
2-504show gvrp statistics
2-506show ifindex
2-508show igmp mode
2-509show igmp statistics
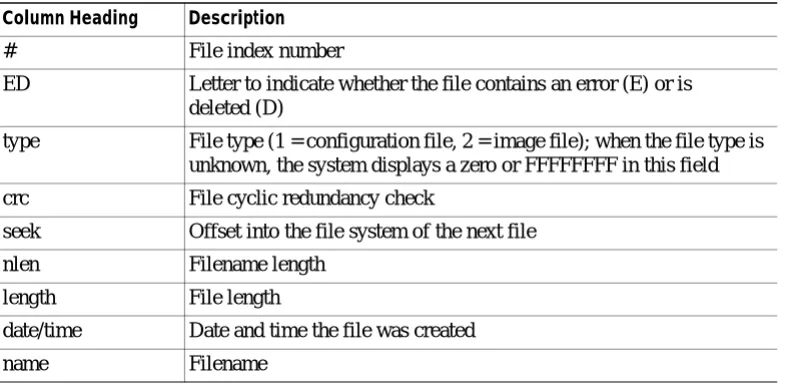
2-510show imagemib
2-512show interface
2-513show ip alias
2-515show ip dns
2-516show ip http
2-517Contents
show kerberos creds
2-524show lcperroraction
2-525show lda
2-526show log
2-530show logging
2-533show logging buffer
2-535show mac
2-536show microcode
2-538show mls
2-539show mls entry
2-541show mls exclude protocol
2-546show mls multicast
2-547show mls statistics
2-550show module
2-553show moduleinit
2-556show msmautostate
2-558show multicast group
2-559show multicast group count
2-561show multicast protocols status
2-562show multicast router
2-563show netstat
2-565show ntp
2-572show port
2-574show port auxiliaryvlan
2-581show port broadcast
2-583show port capabilities
2-584show port cdp
2-588show port channel
2-589show port cops
2-595Contents
show port qos
2-605show port rsvp
2-607show port security
2-608show port status
2-610show port voice
2-611show port voice active
2-615show port voice fdl
2-619show port voice interface
2-621show proc
2-622show protocolfilter
2-625show pvlan
2-626show pvlan mapping
2-628show qos acl editbuffer
2-630show qos acl info
2-631show qos acl map
2-633show qos acl resource-usage
2-635show qos bridged-packet-policing
2-636show qos info
2-637show qos mac-cos
2-642show qos maps
2-644show qos policer
2-647show qos policy-source
2-649show qos rsvp
2-650show qos statistics
2-651show radius
2-653show reset
2-654show rgmp group
2-655show rgmp statistics
2-656show rspan
2-657show security acl
2-659show security acl capture-ports
2-661show security acl map
2-662Contents
show snmp counters
2-667show snmp engineid
2-671show snmp group
2-672show snmp notify
2-674show snmp targetaddr
2-676show snmp targetparams
2-678show snmp user
2-680show snmp view
2-682show span
2-684show spantree
2-686show spantree backbonefast
2-689show spantree blockedports
2-690show spantree portvlancost
2-691show spantree statistics
2-692show spantree summary
2-697show spantree uplinkfast
2-698show summertime
2-699show system
2-700show system highavailability
2-702show tacacs
2-703show tech-support
2-705show test
2-707show time
2-712show timezone
2-713show top
2-714show top report
2-716show trace
2-718show trunk
2-720show udld
2-723Contents
slip
2-738squeeze
2-739stack
2-740switch
2-741switch console
2-742sync
2-743sysret
2-744telnet
2-745test snmp trap
2-746traceroute
2-747unalias
2-750undelete
2-751unset=
2-752upload
2-753varname=
2-754verify
2-755wait
2-756whichboot
2-757write
2-758A P P E N D I X A
Acronyms
A-1Preface
This preface describes the audience, organization, and conventions of this publication and provides information on how to obtain related documentation.
Audience
This publication is for experienced network administrators who are responsible for configuring and maintaining Catalyst 6000 family switches.
Organization
This guide is organized as follows:
Related Documentation
Other documents in the Catalyst 6000 family switch documentation set include: • Catalyst 6000 Family Installation Guide
• Catalyst 6000 Family Module Installation Guide
• Catalyst 6000 Family Software Configuration Guide
• System Message Guide—Catalyst 6000 Family, 5000 Family, 4000 Family, Catalyst 2926G Series,
Chapter Title Description
Chapter 1 Command-Line Interfaces
Describes the two types of CLIs found on Catalyst 6000 family switches
Chapter 2 Catalyst 6000 Family Switch and ROM Monitor Commands
Lists alphabetically and provides detailed information for all Catalyst 6000 family switch and ROM-monitor commands Appendix A Acronyms Defines the acronyms used in this
Preface Conventions
• Catalyst 6000 Family Multilayer Switch Feature Card and Policy Feature Card Configuration Guide
• Release Notes for Catalyst 6000 Family Software Release 6.1
• ATM Software Configuration Guide and Command Reference for the Catalyst 5000 Family and 6000 Family Switches
For information about MIBs, refer to:
http://www.cisco.com/public/sw-center/netmgmt/cmtk/mibs.shtml
Conventions
This document uses the following conventions:
Convention Description
boldface font Commands and keywords are in boldface.
italic font Arguments for which you supply values are in italics. [ ] Elements in square brackets are optional.
{ x | y | z } Alternative keywords are grouped in braces and separated by vertical bars.
[ x | y | z ] Optional alternative keywords are grouped in brackets and separated by vertical bars.
string A nonquoted set of characters. Do not use quotation marks around the string or the string will include the quotation marks.
screen font Terminal sessions and information the system displays are in screen font.
boldface screen
font
Information you must enter is in boldface screen font.
italic screen font Arguments for which you supply values are in italic screen font.
^ The symbol ^ represents the key labeled Control—for example, the key combination ^D in a screen display means hold down the Control key while you press the D key. < > Nonprinting characters, such as passwords are in angle
brackets.
[ ] Default responses to system prompts are in square brackets. !, # An exclamation point (!) or a pound sign (#) at the beginning
Preface
Obtaining Documentation
Cautions use the following conventions:
Caution Means reader be careful. In this situation, you might do something that could result in equipment damage or loss of data.
Obtaining Documentation
World Wide Web
You can access the most current Cisco documentation on the World Wide Web at http://www.cisco.com, http://www-china.cisco.com, or http://www-europe.cisco.com.
Documentation CD-ROM
Cisco documentation and additional literature are available in a CD-ROM package, which ships with your product. The Documentation CD-ROM is updated monthly. Therefore, it is probably more current than printed documentation. The CD-ROM package is available as a single unit or as an annual subscription.
Ordering Documentation
Registered CCO users can order the Documentation CD-ROM and other Cisco Product documentation through our online Subscription Services at http://www.cisco.com/cgi-bin/subcat/kaojump.cgi. Nonregistered CCO users can order documentation through a local account representative by calling Cisco’s corporate headquarters (California, USA) at 408 526-4000 or, in North America, call 800 553-NETS (6387).
Obtaining Technical Assistance
Preface Obtaining Technical Assistance
Cisco Connection Online
Cisco continues to revolutionize how business is done on the Internet. Cisco Connection Online is the foundation of a suite of interactive, networked services that provides immediate, open access to Cisco information and resources at anytime, from anywhere in the world. This highly integrated Internet application is a powerful, easy-to-use tool for doing business with Cisco.
CCO’s broad range of features and services helps customers and partners to streamline business processes and improve productivity. Through CCO, you will find information about Cisco and our networking solutions, services, and programs. In addition, you can resolve technical issues with online support services, download and test software packages, and order Cisco learning materials and merchandise. Valuable online skill assessment, training, and certification programs are also available. Customers and partners can self-register on CCO to obtain additional personalized information and services. Registered users may order products, check on the status of an order and view benefits specific to their relationships with Cisco.
You can access CCO in the following ways: • WWW: www.cisco.com
• Telnet: cco.cisco.com
• Modem using standard connection rates and the following terminal settings: VT100 emulation; 8 data bits; no parity; and 1 stop bit.
– From North America, call 408 526-8070
– From Europe, call 33 1 64 46 40 82
You can e-mail questions about using CCO to [email protected].
Technical Assistance Center
The Cisco Technical Assistance Center (TAC) is available to warranty or maintenance contract customers who need technical assistance with a Cisco product that is under warranty or covered by a maintenance contract.
To display the TAC web site that includes links to technical support information and software upgrades and for requesting TAC support, use www.cisco.com/techsupport.
To contact by e-mail, use one of the following:
Language E-mail Address
English [email protected]
Preface
Obtaining Technical Assistance
Documentation Feedback
If you are reading Cisco product documentation on the World Wide Web, you can submit technical comments electronically. Click Feedback in the toolbar and select Documentation. After you complete the form, click Submit to send it to Cisco.
You can e-mail your comments to [email protected].
To submit your comments by mail, for your convenience many documents contain a response card behind the front cover. Otherwise, you can mail your comments to the following address:
Cisco Systems, Inc.
Document Resource Connection 170 West Tasman Drive
San Jose, CA 95134-9883
C H A P T E R
1
Command-Line Interfaces
This chapter describes the command-line interfaces (CLI) available on the Catalyst 6000 family switches and contains these sections:
• Switch CLI, page 1-1
• ROM Monitor CLI, page 1-12
For definitions of terms and acronyms listed in this publication, see Appendix A, “Acronyms.”
Switch CLI
The Catalyst 6000 family switches are multimodule systems. Commands you enter from the CLI can apply to the entire system or to a specific module, port, or VLAN.
You can configure and maintain the Catalyst 6000 family switches by entering commands from the switch CLI. The CLI is a basic command-line interpreter similar to the UNIX C shell. Using the CLI
session command, you can access the router configuration software and perform tasks such as history
substitution and alias creation.
Note The Catalyst 6000 family consists of the Catalyst 6000 and 6500 series switches. The Catalyst 6000 series consists of the Catalyst 6006 and 6009 switches; the Catalyst 6500 series consists of the Catalyst 6506 and 6509 switches. Throughout this publication and all Catalyst 6000 family documents, the phrase Catalyst 6000 family switches refers to all four switches, unless otherwise noted.
Accessing the Switch CLI
You can access the switch CLI from a console terminal connected to an EIA/TIA-232 port or through a Telnet session. The CLI allows fixed baud rates. Telnet sessions disconnect automatically after remaining idle for a user-defined time period.
Chapter 1 Command-Line Interfaces Switch CLI
Accessing the Switch CLI via the Console Port (EIA/TIA-232)
To access the switch through the console (EIA/TIA-232) port, perform these steps:
After connecting through the console port, you see this display: Cisco Systems Console
Enter password: Console> Console>
Accessing the Switch CLI via Telnet
To access the switch through a Telnet session, you must first set the IP address for the switch. You can open multiple sessions to the switch via Telnet.
To access the switch from a remote host with Telnet, perform these steps:
Task Command
Step 1 From the Cisco Systems Console prompt, press Return.
Step 2 At the prompt, enter the system password. TheConsole>prompt appears indicating that you have accessed the CLI in normal mode.
<password>
Step 3 Enter the necessary commands to complete your desired tasks.
Appropriate commands
Step 4 When finished, exit the session. quit
Task Command
Step 1 From the remote host, enter the
telnet command and the name or
IP address of the switch you want to access.
telnet hostname | ip_addr
Step 2 At the prompt, enter the password for the CLI. If no password has been configured, press Return.
<password>
Step 3 Enter the necessary commands to complete your desired tasks.
Appropriate commands
Step 4 When finished, exit the Telnet session.
Chapter 1 Command-Line Interfaces
Switch CLI
Operating the Switch CLI
This section describes command modes and functions that allow you to operate the switch CLI.
Accessing the Command Modes
The CLI has two modes of operation: normal and privileged. Both are password-protected. Use normal-mode commands for everyday system monitoring. Use privileged commands for system configuration and basic troubleshooting.
After you log in, the system enters normal mode, which gives you access to normal-mode commands only. You can enter privileged mode by entering the enable command followed by the enable password. Privileged mode is indicated by the word “enable” in the system prompt. To return to normal mode, enter the disable command at the prompt.
The following example shows how to enter privileged mode: Console> enable
Enter password: <password> Console> (enable)
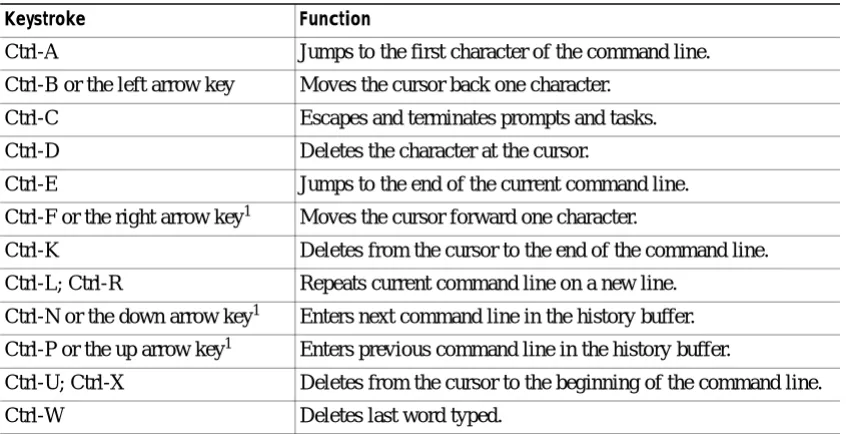
Using Command-Line Processing
Switch commands are not case sensitive. You can abbreviate commands and parameters as long as they contain enough letters to be different from any other currently available commands or parameters. You can scroll through the last 20 commands stored in the history buffer, and enter or edit the command at the prompt. (See Table 1-1.)
Table 1-1 Command-Line Processing Keystroke
Keystroke Function
Ctrl-A Jumps to the first character of the command line. Ctrl-B or the left arrow key Moves the cursor back one character.
Ctrl-C Escapes and terminates prompts and tasks. Ctrl-D Deletes the character at the cursor.
Ctrl-E Jumps to the end of the current command line. Ctrl-F or the right arrow key1 Moves the cursor forward one character.
Ctrl-K Deletes from the cursor to the end of the command line. Ctrl-L; Ctrl-R Repeats current command line on a new line.
Ctrl-N or the down arrow key1 Enters next command line in the history buffer. Ctrl-P or the up arrow key1 Enters previous command line in the history buffer.
Ctrl-U; Ctrl-X Deletes from the cursor to the beginning of the command line.
Chapter 1 Command-Line Interfaces Switch CLI
Using the Command-Line Editing Features
Catalyst 6000 family switch software includes an enhanced editing mode that provides a set of editing key functions similar to those of the Emacs editor. You can enter commands in uppercase, lowercase, or a mix of both. Only passwords are case sensitive. You can abbreviate commands and keywords to the number of characters that allow a unique abbreviation.
For example, you can abbreviate the show command to sh. After entering the command at the system prompt, press Return to execute the command.
Moving Around on the Command Line
Perform one of these tasks to move the cursor around on the command line for corrections or changes:
Completing a Partial Command Name
If you cannot remember a complete command name, press the Tab key to allow the system to complete a partial entry. To do so, perform this task:
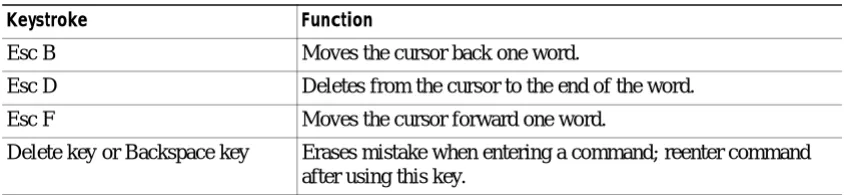
Esc B Moves the cursor back one word.
Esc D Deletes from the cursor to the end of the word. Esc F Moves the cursor forward one word.
Delete key or Backspace key Erases mistake when entering a command; reenter command after using this key.
1. The arrow keys function only on ANSI-compatible terminals such as VT100s.
Table 1-1 Command-Line Processing Keystroke (continued)
Keystroke Function
Task Keystrokes
• Move the cursor back one character.
Press Ctrl-B or press the left arrow key1.
1. The arrow keys function only on ANSI-compatible terminals such as VT100s.
• Move the cursor forward one character.
Press Ctrl-F or press the right arrow key1.
• Move the cursor to the beginning of the command line.
Press Ctrl-A.
• Move the cursor to the end of the command line.
Press Ctrl-E.
Chapter 1 Command-Line Interfaces
Switch CLI
If your keyboard does not have a Tab key, press Ctrl-I instead.
In the following example, when you enter the letters conf and press the Tab key, the system provides the complete command:
Console> (enable) conf<Tab>
Console> (enable) configure
If you enter a set of characters that could indicate more than one command, the system beeps to indicate an error. Enter a question mark (?) to obtain a list of commands that begin with that set of characters. Do not leave a space between the last letter and the question mark (?). For example, three commands in privileged mode start with co. To see what they are, enter co? at the privileged prompt. The system displays all commands that begin with co, as follows:
Console> (enable) co? configure connect copy
Pasting in Buffer Entries
The system provides a buffer that contains the last ten items you deleted. You can recall these items and paste them in the command line by performing this task:
The buffer contains only the last ten items you have deleted or cut. If you press Esc Y more than ten times, you cycle back to the first buffer entry.
Editing Command Lines That Wrap
The new editing command set provides a wraparound feature for commands that extend beyond a single line on the screen. When the cursor reaches the right margin, the command line shifts ten spaces to the left. You cannot see the first ten characters of the line, but you can scroll back and check the syntax at the beginning of the command. To scroll back, perform this task:
Use line wrapping with the command history feature to recall and modify previous complex command entries. See the “Using History Substitution” section on page 1-8 for information about recalling previous command entries.
Task Keystrokes
• Recall the most recent entry in the buffer.
Press Ctrl-Y.
• Recall the next buffer entry. Press Esc Y.
Task Keystrokes
Return to the beginning of a command line to verify that you have entered a lengthy command correctly.
Press Ctrl-B or the left arrow key repeatedly until you scroll back to the beginning of the command entry, or press Ctrl-A to return directly to the beginning of the line1.
Chapter 1 Command-Line Interfaces Switch CLI
Deleting Entries
Perform one of these tasks to delete command entries if you make a mistake or change your mind:
Scrolling Down a Line or a Screen
When you use the help facility to list the commands in a particular mode, the list is often longer than the terminal screen can display. In such cases, a ---More--- prompt is displayed at the bottom of the screen. To view the next line or screen, perform these tasks:
Note The ---More--- prompt is used for any output that has more lines than can be displayed on the terminal screen, including show command output.
Redisplaying the Current Command Line
If you enter a command and the system suddenly sends a message to your screen, you can recall your current command line entry. To do so, perform this task:
Task Keystrokes
• Erase the character to the left of the cursor.
Press the Delete or Backspace key.
• Delete the character at the cursor. Press Ctrl-D. • Delete from the cursor to the end of the
command line.
Press Ctrl-K.
• Delete from the cursor to the beginning of the command line.
Press Ctrl-U or Ctrl-X.
• Delete the word to the left of the cursor. Press Ctrl-W. • Delete from the cursor to the end of the
word.
Press Esc D.
Task Keystrokes
• Scroll down one line. Press the Return key. • Scroll down one screen. Press the Spacebar.
Task Keystrokes
Chapter 1 Command-Line Interfaces
Switch CLI
Transposing Mistyped Characters
If you mistype a command entry, you can transpose the mistyped characters by performing this task:
Controlling Capitalization
You can change words to uppercase or lowercase, or capitalize a set of letters, with simple keystroke sequences:
Designating a Keystroke as a Command Entry
You can use a particular keystroke as an executable command. Perform this task:
Using Command Aliases
Like regular commands, aliases are not case sensitive. However, unlike regular commands, some aliases cannot be abbreviated. See Table 1-2 for a list of switch CLI aliases that cannot be abbreviated.
Task Keystrokes
Transpose the character to the left of the cursor with the character located at the cursor.
Press Ctrl-T.
Task Keystrokes
• Capitalize at the cursor. Press Esc C. • Change the word at the cursor to
lowercase.
Press Esc L.
• Capitalize letters from the cursor to the end of the word.
Press Esc U.
Task Keystrokes
Insert a code to indicate to the system that the keystroke immediately following should be treated as a command entry, not an editing key.
Press Ctrl-V or Esc Q.
Table 1-2 Switch CLI Command Aliases
Alias Command
? help
batch configure
di show
Chapter 1 Command-Line Interfaces Switch CLI
Using History Substitution
Commands that you enter during each terminal session are stored in a history buffer, which stores the last 20 commands you entered during a terminal session. History substitution allows you to access these commands without retyping them by using special abbreviated commands. (See Table 1-3.)
Accessing Command Help
To see a list of top-level commands and command categories, type help or ? in normal or privileged mode. Context-sensitive help (usage and syntax information) for individual commands can be seen by appending help or ? to any specific command. If you enter a command using the wrong number of arguments or inappropriate arguments, usage and syntax information for that command is displayed. Additionally, appending help or ? to a command category displays a list of commands in that category.
Top-Level Commands and Command Categories
In normal mode, use the help or ? command to display a list of top-level commands and command categories, as follows:
Console> help Commands:
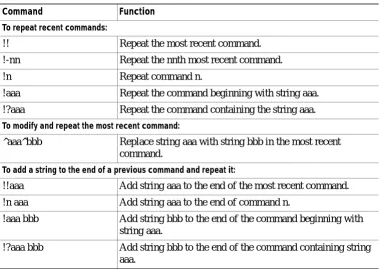
---Table 1-3 History Substitution Commands
Command Function
To repeat recent commands:
!! Repeat the most recent command. !-nn Repeat the nnth most recent command.
!n Repeat command n.
!aaa Repeat the command beginning with string aaa. !?aaa Repeat the command containing the string aaa. To modify and repeat the most recent command:
^aaa^bbb Replace string aaa with string bbb in the most recent command.
To add a string to the end of a previous command and repeat it:
!!aaa Add string aaa to the end of the most recent command. !n aaa Add string aaa to the end of command n.
!aaa bbb Add string bbb to the end of the command beginning with string aaa.
Chapter 1 Command-Line Interfaces
Switch CLI
quit Exit from the Admin session session Tunnel to ATM or Router module set Set, use 'set help' for more info show Show, use 'show help' for more info traceroute Trace the route to a host
verify Verify checksum of file on flash device wait Wait for x seconds
whichboot Which file booted Console> Console>
In privileged mode, enter the help or ? command to display a list of top-level commands and command categories, as follows:
Console> (enable) help Commands:
---cd Set default flash device
clear Clear, use 'clear help' for more info configure Configure system from network
copy Copy files between TFTP/module/flash devices delete Delete a file on flash device
dir Show list of files on flash device disable Disable privileged mode
disconnect Disconnect user session download Download code to a processor enable Enable privileged mode format Format a flash device help Show this message
history Show contents of history substitution buffer ping Send echo packets to hosts
pwd Show default flash device quit Exit from the Admin session reconfirm Reconfirm VMPS
reload Force software reload to linecard reset Reset system or module
session Tunnel to ATM or Router module set Set, use 'set help' for more info show Show, use 'show help' for more info slip Attach/detach Serial Line IP interface squeeze Reclaim space used by deleted files switch Switch to standby <clock|supervisor> telnet Telnet to a remote host
test Test, use 'test help' for more info traceroute Trace the route to a host
undelete Undelete a file on flash device upload Upload code from a processor
verify Verify checksum of file on flash device wait Wait for x seconds
whichboot Which file booted
Chapter 1 Command-Line Interfaces Switch CLI
Command Categories
On some commands (such as clear, set, and show), typing help or ? after the command provides a list of commands in that category. For example, this display shows a partial list of commands for the clear category:
Console> (enable) clear help
Clear commands:
---clear alias Clear aliases of commands
clear arp Clear ARP table entries
clear banner Clear Message Of The Day banner clear boot Clear booting environment variable clear cam Clear CAM table entries
clear channel Clear PAgP statistical information ...
Context-Sensitive Help
Usage and syntax information for individual commands can be seen by appending help or ? to any specific command. For example, the following display shows usage and syntax information for the set
length command:
Console> set length help
Usage: set length <screenlength> [default]
(screenlength = 5..512, 0 to disable 'more' feature) Console>
Designating Modules, Ports, and VLANs
The Catalyst 6000 family modules (module slots), ports, and VLANs are numbered starting with 1. The supervisor engine module is module 1, residing in the top slot. On each module, port 1 is the leftmost port. To reference a specific port on a specific module, the command syntax is mod/port. For example,
3/1 denotes module 3, port 1. In some commands, such as set trunk, set cam, and set vlan, you can
enter lists of ports and VLANs.
You can designate ports by entering the module and port number pairs, separated by commas. To specify a range of ports, use a dash (-) between the module number and port number pairs. Dashes take precedence over commas. The following examples show several ways of designating ports: Example 1: 2/1,2/3 denotes module 2, port 1 and module 2, port 3.
Example 2: 2/1-12 denotes module 2, ports 1 through 12. Example 3: 2/1-2/12 also denotes module 2, ports 1 through 12.
Each VLAN is designated by a single number. You can specify lists of VLANs the same way you do for ports. Individual VLANs are separated by commas (,); ranges are separated by dashes (-). In the following example, VLANs 1 through 10 and VLAN 1000 are specified:
Chapter 1 Command-Line Interfaces
Switch CLI
Designating MAC Addresses, IP and IPX Addresses, and IP Aliases
Some commands require a MAC address that you must designate in a standard format. The MAC address format must be six hexadecimal numbers separated by hyphens, as shown in this example: 00-00-0c-24-d2-fe
Some commands require an IP address. The IP address format is 32 bits, written as four octets separated by periods (dotted decimal format). IP addresses are made up of a network section, an optional subnet section, and a host section, as shown in this example:
126.2.54.1
If DNS is configured properly on the switch, you can use IP hostnames instead of IP addresses. For information on configuring DNS, refer to the Software Configuration Guide for your switch.
If the IP alias table is configured, you can use IP aliases in place of the dotted decimal IP address. This is true for most commands that use an IP address, except commands that define the IP address or IP alias.
When entering the IPX address syntax, use the following format: • IPX net address—1..FFFFFFFE
• IPX node address—x.x.x where x is 0..FFFF
• IPX address—ipx_net.ipx_node (for example 3.0034.1245.AB45, A43.0000.0000.0001)
Using Command Completion
The command completion feature consists of these functions: • Command self-repeat
• Keyword lookup or partial keyword lookup • Command completion
Use the command self-repeat function to display matches to all possible keywords if a string represents a unique match. If a unique match is not found, the longest matching string is provided. To display the matches, enter a space after the last parameter and enter ?. Once the matches are displayed, the system comes back to the prompt and displays the last command without the ?. In the example below, notice how the system repeats the command entered without the ?.
Console> (enable) set mls nde
disable Disable multilayer switching data export filter enable Enable multilayer switching data export filter engineer Engineer setting of the export filter
flow Setting multilayer switching export filter <collector_ip> IP address
Chapter 1 Command-Line Interfaces ROM Monitor CLI
Use the keyword-lookup function to display a list of valid keywords and arguments for a command. To display the matches, enter a space after the last parameter and enter ?. For example, eight parameters are used by the set mls command. To see these parameters, enter set mls ? at the privileged prompt. In the example below, notice how the system repeats the command entered without the ?:
Console> (enable) set mls ?
agingtime Set agingtime for MLS cache entry disable Disable MLS in the switch
enable Enable MLS in the switch nde Configure Netflow Data Export flow Set minimum flow mask
include Include MLS-RP
multicast Set MLS feature for multicast
statistics Add protocols to protocol statistics list Console> (enable) set mls
Use the partial-keyword-lookup function to display a list of commands that begin with a specific set of characters. To display the matches, enter ? immediately after the last parameter. For example, enter co? at the privileged prompt to display a list of commands that start with co. The system displays all commands that begin with co and repeats the command entered without the ?:
Console> (enable) co?
configure Configure system from network
copy Copy files between TFTP/RCP/module/flash devices Console> (enable)co
Use the command completion function to complete a command or keyword. When you enter a unique partial character string and press Tab, the system completes the command or keyword on the command line. For example, if you enter co at the privileged prompt and press Tab, the system completes the command as configure because it is the only command that matches the criteria.
If no completion can be done, no action is carried out and the system returns to the prompt and the last command. The cursor appears immediately after the keyword, allowing you to enter additional information.
ROM Monitor CLI
The ROM monitor is a ROM-based program that executes upon platform power-up, reset, or when a fatal exception occurs.
Accessing the ROM Monitor CLI
The system enters ROM-monitor mode if the switch does not find a valid system image, if the NVRAM configuration is corrupted, or if the configuration register is set to enter ROM-monitor mode. From the ROM-monitor mode, you can load a system image manually from Flash memory, from a network server file, or from bootflash. You can also enter ROM-monitor mode by restarting the switch and pressing the
Chapter 1 Command-Line Interfaces
ROM Monitor CLI
Operating the ROM Monitor CLI
The ROM monitor commands are used to load and copy system images, microcode images, and configuration files. System images contain the system software. Microcode images contain microcode to be downloaded to various hardware devices. Configuration files contain commands to customize Catalyst 6000 family software.
The manual boot command has the following syntax:
Note Enter the copy file-id {tftp | flash | file-id} command to obtain an image from the network.
• boot
—
Boot from ROM• boot [-xv] [device:][imagename]
—
Boot from the local device. If you do not specify an image name, the system defaults to the first valid file in the device. The image name is case sensitive. Once you are in ROM-monitor mode, the prompt changes to rommon 1>. While you are inC H A P T E R
2
Catalyst 6000 Family Switch and ROM Monitor
Commands
This chapter contains an alphabetical listing of all switch and ROM monitor commands available on the Catalyst 6000 family switches.
Chapter 2 Catalyst 6000 Family Switch and ROM Monitor Commands alias
alias
Use the alias command to set and display aliases.
alias [name=value]
Syntax Description
Defaults This command has no default setting.
Command Types ROM monitor command.
Command Modes Normal.
Usage Guidelines If value contains white space or other special (shell) characters, you must use quotation marks. If value has a space as its last character, the next command line word is checked for an alias (normally, only the first word on a command line is checked).
Without an argument, this command prints a list of all aliased names with their values. An equal sign (=) is required between the name and value of the alias.
You must issue a sync command to save your change. If you do not issue a sync command, the change is not saved and a reset removes your change.
Examples This example shows how to display a list of available alias commands and how to create an alias for the
set command:
rommon 1 > alias r=repeat
h=history ?=help b=boot ls=dir i=reset k=stack
rommon 2 > alias s=set rommon 3 > alias r=repeat
name= (Optional) Name you give to the alias.
Chapter 2 Catalyst 6000 Family Switch and ROM Monitor Commands
alias
k=stack s=set
rommon 4 > s PS1=rommon ! >
BOOT=bootflash:RTSYNC_llue_11,1;slot0:f1,1;
=========================================================================
Chapter 2 Catalyst 6000 Family Switch and ROM Monitor Commands boot
boot
Use the boot command to boot up an external process.
boot [-x] [-v] [device:][imagename]
Syntax Description
Defaults This command has no default setting.
Command Types ROM monitor command.
Command Modes Normal.
Usage Guidelines With no arguments, boot will boot the first image in bootflash. Specify an image by typing its name. Specify the device by typing the device ID.
If no device is given with an imagename, the image is not booted.
If a device name is not recognized by the monitor, the monitor passes the device ID to the boot helper image.
This command will not boot the MSFC if the PFC is not present in the Catalyst 6000 family switch.
Examples This example shows how to use the boot command:
rommon 2 > boot bootflash:cat6000-sup.5-5-1.bin
CCCCCCCCCCCCCCCCCCCCCCCCCCCCCCCCCCCCCCCCCCCCCCCCCCCCCCCCCCCC Uncompressing file:
######################################################################################### ######################################################################################### ##################################################################################
-x (Optional) Load the image but do not execute.
-v (Optional) Toggle verbose mode.
device: (Optional) ID of the device.
Chapter 2 Catalyst 6000 Family Switch and ROM Monitor Commands
cd
2 2
cd
Use the cd command to set the default Flash device for the system.
cd [[m/]device:]
Syntax Description
Defaults The default Flash device is bootflash.
Command Types Switch command.
Command Modes Normal.
Usage Guidelines A colon (:) is required after the specified device.
For those commands where device is an option, the device set by cd is used if the default device is not specified.
Examples This example shows how to set the system default Flash device to bootflash:
Console> cd bootflash:
Default flash device set to bootflash. Console>
Related Commands pwd
m/ (Optional) Module number of the supervisor engine containing the Flash device.
Chapter 2 Catalyst 6000 Family Switch and ROM Monitor Commands clear alias
clear alias
Use the clear alias command to clear the shorthand versions of commands.
clear alias {name | all}
Syntax Description
Defaults This command has no default setting.
Command Types Switch command.
Command Modes Privileged.
Examples This example shows how to erase the arpdel alias:
Console> (enable) clear alias arpdel Command alias deleted.
Console> (enable)
This example shows how to erase all the aliases: Console> (enable) clear alias all
Command alias table cleared. (1) Console> (enable)
(1) indicates the number of command aliases cleared.
Related Commands set alias
show alias
name Alternate identifier of the command.
Chapter 2 Catalyst 6000 Family Switch and ROM Monitor Commands
clear arp
clear arp
Use the clear arp command to delete a specific entry or all entries from the ARP table.
clear arp [all | dynamic | permanent | static] {ip_addr}
Syntax Description
Defaults This command has no default setting.
Command Types Switch command.
Command Modes Privileged.
Examples This example shows how to remove IP address 198.133.219.209 from the ARP table:
Console> (enable) clear arp 198.133.219.209 ARP entry deleted.
Console> (enable)
This example shows how to remove all entries from the ARP table: Console> (enable) clear arp all
ARP table cleared. (1) Console> (enable)
(1) indicates the number of entries cleared.
This example shows how to remove all dynamically learned ARP entries: Console> (enable) clear arp dynamic
Unknown host
Dynamic ARP entries cleared. (3) Console> (enable)
This example shows how to clear all permanently entered ARP entries: Console> (enable) clear arp permanent
Unknown host
Permanent ARP entries cleared.(5) Console> (enable)
all (Optional) Keyword to clear all ARP entries.
dynamic (Optional) Keyword to clear all dynamic ARP entries.
permanent (Optional) Keyword to clear all permanent ARP entries.
static (Optional) Keyword to clear all static ARP entries.
Chapter 2 Catalyst 6000 Family Switch and ROM Monitor Commands clear banner motd
clear banner motd
Use the clear banner motd command to clear the message-of-the-day banner.
clear banner motd
Syntax Description This command has no arguments or keywords.
Defaults This command has no default setting.
Command Types Switch command.
Command Modes Privileged.
Examples This example shows how to clear the message-of-the-day banner:
Console> (enable) clear banner motd MOTD banner cleared
Console> (enable)
Chapter 2 Catalyst 6000 Family Switch and ROM Monitor Commands
clear boot auto-config
clear boot auto-config
Use the clear boot auto-config command to clear the contents of the CONFIG_FILE environment variable used to specify the configuration files used during bootup.
clear boot auto-config [mod]
Syntax Description
Defaults This command has no default setting.
Command Types Switch command.
Command Modes Privileged.
Examples This example shows how to clear the auto-config file:
Console> (enable) clear boot auto-config CONFIG_FILE variable =
Console> (enable)
Related Commands set boot auto-config
show boot
Chapter 2 Catalyst 6000 Family Switch and ROM Monitor Commands clear boot device
clear boot device
Use the clear boot device command to clear the contents of the CONFIG_FILE environment variable used to specify the NAM startup configuration files used.
clear boot device mod
Syntax Description
Defaults This command has no default setting.
Command Types Switch command.
Command Modes Privileged.
Usage Guidelines This command is supported by the NAM module only.
Examples This example shows how to clear the NAM boot string from NVRAM for module 2:
Console> (enable) clear boot device 2 Device BOOT variable =
Console> (enable)
Related Commands set boot device
show boot device
Chapter 2 Catalyst 6000 Family Switch and ROM Monitor Commands
clear boot system
clear boot system
Use the clear boot system command set to clear the contents of the BOOT environment variable and the configuration register setting.
clear boot system all [mod]
clear boot system flash device:[filename] [mod]
Syntax Description
Defaults This command has no default setting.
Command Types Switch command.
Command Modes Privileged.
Examples This example shows how to clear the whole BOOT environment variable:
Console> (enable) clear boot system all BOOT variable =
Console> (enable)
This example shows how to clear a specific device:
Console> (enable) clear boot system flash bootflash:cat6000-sup.5-5-1.bin BOOT variable = bootflash:cat6000-sup.5-2-1.bin,1;bootflash:cat6000-sup.4-5-2. bin,1;
Console> (enable)
Related Commands set boot system flash
show boot
all Keyword to clear the whole BOOT environment variable.
mod (Optional) Module number of the supervisor engine containing the Flash device.
flash (Optional) Keyword to clear the Flash device.
device: Name of the Flash device.
Chapter 2 Catalyst 6000 Family Switch and ROM Monitor Commands clear cam
clear cam
Use the clear cam command to delete a specific entry or all entries from the CAM table.
clear cam {mac_addr | dynamic | static | permanent} [vlan]
Syntax Description
Defaults This command has no default setting.
Command Types Switch command.
Command Modes Privileged.
Examples This example shows how to remove MAC address 00-40-0b-a0-03-fa from the CAM table:
Console> (enable) clear cam 00-40-0b-a0-03-fa CAM table entry cleared.
Console> (enable)
This example shows how to clear dynamic entries from the CAM table: Console> (enable) clear cam dynamic
Dynamic CAM entries cleared. Console> (enable)
Related Commands set cam
show cam
mac_addr One or more MAC addresses.
dynamic Keyword to clear the dynamic CAM entries from the CAM table.
static Keyword to clear the static CAM entries from the CAM table.
permanent Keyword to clear the permanent CAM entries from the CAM table.
Chapter 2 Catalyst 6000 Family Switch and ROM Monitor Commands
clear channel statistics
clear channel statistics
Use the clear channel statistics command to clear PAgP statistical information.
clear channel statistics
Syntax Description This command has no arguments or keywords.
Defaults This command has no default setting.
Command Types Switch command.
Command Modes Privileged.
Examples This example shows how to clear PAgP statistical information:
Console> (enable) clear channel statistics PAgP statistics cleared.
Console> (enable)
Chapter 2 Catalyst 6000 Family Switch and ROM Monitor Commands clear config
clear config
Use the clear config command to clear the system or module configuration information stored in NVRAM.
clear config {mod | rmon | all | snmp | acl {nvram}}
Syntax Description
Defaults This command has no default setting.
Command Types Switch command.
Command Modes Privileged.
Usage Guidelines When using an MSM, clear config clears the portion of the MSM configuration kept by the
Catalyst 6000 series switch supervisor engine. The portion of the configuration kept by the MSM must be cleared at the router level (router> prompt).
Before using the clear config all command, save a backup of the configuration using the copy command.
Examples This example shows how to delete the configuration information in NVRAM on module 2:
Console> (enable) clear config 2
This command will clear module 2 configuration. Do you want to continue (y/n) [n]? y
... Module 2 configuration cleared. Console> (enable)
mod Number of the module.
rmon Keyword to clear all RMON configurations, including the historyControlTable, the alarmTable, the eventTable, and the ringStation ControlTable.
all Keyword to clear all module and system configuration information, including the IP address.
snmp Keyword to clear all SNMP configurations.
Chapter 2 Catalyst 6000 Family Switch and ROM Monitor Commands
clear config
This example shows how to delete the configuration information stored in NVRAM on module 1 (the supervisor engine):
Console> (enable) clear config 1
This command will clear module 1 configuration. Do you want to continue (y/n) [n]? y
...
Module 1 configuration cleared. host%
This example shows how to delete all the configuration information for the Catalyst 6000 family switches:
Console> (enable) clear config all
This command will clear all configuration in NVRAM. Do you want to continue (y/n) [n]? y
... Connection closed by foreign host
host%
This example shows how to delete all the SNMP configuration information for the Catalyst 6000 family switches:
Console> (enable) clear config snmp
This command will clear SNMP configuration in NVRAM. Do you want to continue (y/n) [n]? y
... Connection closed by foreign host
host%
This example shows how to delete all ACL configuration information from NVRAM: Console> (enable) clear config acl nvram
ACL configuration has been deleted from NVRAM.
Warning: Use the copy commands to save the ACL configuration to a file and the 'set boot config-register auto-config' commands to configure the auto-config feature.
Console> (enable)
Related Commands configure
Chapter 2 Catalyst 6000 Family Switch and ROM Monitor Commands clear config pvlan
clear config pvlan
Use the clear config pvlan command to clear all private VLAN configurations in the system including port mappings.
clear config pvlan
Syntax Description This command has no arguments or keywords.
Defaults This command has no default setti