Division VI
MODELING PRE AND POST TENSIONED CONCRETE
Leonard E Schwer
Owner, Schwer Engineering & Consulting Services, United States
INTRODUCTION
Modern concrete construction often uses pre-stressing of the portions of the structure to improve the inherent tensile weakness of concrete. A compressive pre-stress is introduced into the concrete using steel tendons loaded under tension. These tendons are either included in the concrete when the concrete is poured, i.e. pre-tension, or run through tubes that were cast in the concrete and then tensioned after the concrete is set, i.e. post-tensioned. Pre-tensioned components are often constructed off-site and shipped to the construction site. There are two types of post-tensioning: grouted or ungrouted. After the tendons are post-tensioned, the tubes containing the tendons may be back filled with grout (cement), this is primarily to minimize corrosion of the tendons. If grout is not used, then the tendons are typically lubricated, also to prevent corrosion.
PHASE I –TENDON TENSIONING
The amount of tensile force applied to the tendons is typically specified as an axial force, axial stress, or the desired amount of compression in the concrete. To determine the required tensioning force in the latter case requires an accurate estimate of the stiffness of the concrete and any included nominal reinforcement, as the reinforced concrete and tendons act as springs in parallel resisting the tendon tension.
The available options of including the initial tension in the tendons are: Static implicit solution
Transient explicit solution Dynamic Relaxation solution
The solution method selected is largely a function of the analyst’s experience with each technique. The implicit solver is a good choice, but familiarity with the keywords required for the implicit solution is a prerequisite. Almost all LS-DYNA users will have experience with the transient explicit solver. However, the disadvantage of the explicit solver, for this application, is guessing how long to run model to obtain a quasi-static state. Dynamic relaxation requires one new keyword with several parameters that can initially be left as default; indeed the keyword *CONTROL_DYNAMIC_RELAXATION need not be entered at all if one of the included *DEFINE_CURVE keywords has the parameter SIDR=1 which will automatically start the dynamic relaxation solver with default parameters. The advantage of using the dynamic relaxation solver is there is a kinetic energy based convergence tolerance that provides guidance as to how close the solution is to the desired quasi-static state.
The present manuscript uses Dynamic Relaxation to establish the initial quasi-static tension in
the tendons, and in the next phase combining the tensioned tendons with the concrete slab, in the
final quasi-static configuration before any other loads are applied to the prestressed structure.
PHASE II – COMBINING THE TENSIONED TENDONS & CONCRETE STRUCTURE
The d3dump file from any of the three above mentioned quasi-static solution options, combined with the keyword *STRESS_INITIALIZATION.
A DYNAIN.ASCII file created using LS-PrePost and the d3plot file from any of the three above mentioned quasi-static solution options.
Another option is to continue the transient explicit solution used for tensioning the tendons, along with judicial use of the START/END (BIRTH/DEATH) LS-DYNA features on many keywords; in this case no ancillary file is required.
Storing the Initialized Stresses
The present manuscript will use the DYNAIN.ASCII file created using LS-PrePost. This file is created by opening the d3plot using LS-PrePost then the menus “Post” > “Output” > Format: DYNAIN ASCII is selected with either the active parts of the entire model along with selecting the appropriate State – typically the last state, and writing the file with a user selected file name. Note: if beam elements are included in the model, the original input file must also be opened in the same LS-PrePost session as the beam type (ELFORM) is not included in the d3plot file. Care should also be taken that the number of integration points for any element type is consistent between the various *SECTION keywords and the corresponding output parameters specified on the *DATABASE_EXTENT_BINARY keyword. If material models are used that require more than the default one history variable, the additional number of history variables should also be specified on the *DATABASE_EXTENT_BINARY keyword.
The resulting DYNAIN.ASCII file is typically quite large as in addition to initial element stresses and strains the deformed geometry is include via *NODE and *ELEMENT keywords. For the purpose of stress initialization of an undeformed geometry, e.g. the present Phase II geometry, all the *NODE and *ELEMENT keywords should be removed, leaving only *INITIAL_STRESS and *INITIAL_STRAIN keywords for all the appropriate element types. Having created and appropriately edited the
DYNAIN.ASCII file, this file is included in the concrete structure model to be pre-stressed using the keyword *INCLUDE.
The above described use of the DYNAIN.ASCII file is more labor intensive than using a d3dump file with *STRESS_INITIALIZATION. However for complex models, e.g. reinforced concrete with pre-stressing, the former seems to be more robust than the latter.
Coupling the Tendons to the Concrete Structure
The available options for coupling beams (rebar or tendons) to concrete solid meshes are, in historical order are:
Shared nodes
*CONSTRAINED_LAGRANGE_IN_SOLID *ALE_COUPLING_NODAL_CONSTRAINT *CONSTRAINED_BEAM_IN_SOLID
The Shared nodes method is by far the senior member of this coupling group and has always been an option. Besides conflicting degrees-of-freedom, i.e. solid nodes have 3 and beam nodes have 6, the main drawback of the shared nodes approach is creating a shared nodes mesh. For complex rebar
configurations, creating a shared node concrete mesh can be tedious at best. Thus the motivation to develop penalty based coupling (contact) methods where the rebar and concrete meshes are constructed independently and then topographically superimposed.
basically a trimmed down keyword version of *CONSTRAINED_LAGRANGE_IN_SOLID, i.e. all the leakage related parameters were eliminated to form the new keyword. Both these keywords exhibited some problems in special circumstances of coupling beams to solids – not surprising as that was never their original intent. In about 2014 LSTC decided to create a new keyword
*CONSTRAINED_BEAM_IN_SOLID to specifically address penalty coupling of beams to solid elements. The older two penalty coupling methods are no longer recommended for beam to solid coupling.
In addition to the typical Slave/Master coupling (contact) keyword parameters,
*ALE_COUPLING_NODAL_CONSTRAINT adds two parameters unique to beam-to-solid coupling: CDIR and AXFOR. The parameter CDIR has two possible values: =0 couple in all directions and =1 couple only normal to the beam, i.e. no coupling along the length of the beam. The parameter AXFOR, if non-zero, indicates a user supplied *DEFINE_FUNCTION providing the coupling force versus slip along beam in axial direction. This can be used to model so called rebar ‘pull out’ tests.
Omitting coupling between beams and solids in the axial direction (CDIR=1) allows modeling post-tensioning of concrete. As mentioned above, in post-post-tensioning the concrete is poured and cured around tubes through which the tendons are subsequently pulled and tensioned againt the sides of the concrete structure. Thus there is no axial interaction along the length of the tendons with the concrete, only at the outer edges of the concrete where the tendons are anchored against the concrete. However, in subsequent loading of the prestressed concrete structure, e.g. projectile impact, the concrete surrounding the tendon tubes will interact and hence the tendon interacts in the directions normal to the tendon.
ILLUSTRATIVE PRESTRESSED COLUMN EXAMPLE
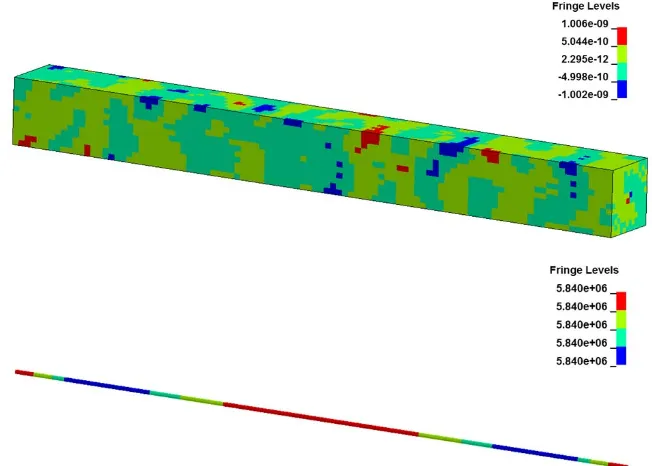
Figure 1 shows a 1.4m square cross section concrete column of length 14m with a central tendon of circular cross sectional area 5876mm2 (86.5mm diameter). The tendon is initially tensioned via equal and opposite nodal end forces of 5.84MN for an initial axial stress of 993MPa; the tendon yield stress is 1654MPa. There are 100 beams elements (ELFORM=1) of length 0.14m along the 14m long of the tendon.
Figure 1 Concrete column with prestressing tendon.
The concrete is modelled using *MAT_CSCM_CONCRETE with the default parameters for a concrete with unconfined compressive strength of 41.37MPa. The square cross section has 12x12 elements of side length 0.1166m and 100 elements of side length 0.14m along the 14m length of the column; single point integration solid elements (ELFORM=1) are used with hourglass stabilization (TYPE=3 QH=0.1).
As discussed above, the tendon is tensioned using dynamic relaxation without coupling along the axial direction of the tendon (CDIR=1). Note: the tendons can either be removed or included in the concrete column model, since there is no axial coupling between the two parts. The dynamic relaxation tolerance is
4
10 and the tolerance is checked every 250 cycles (pseudo time steps). Figure 2 shows fringes of axial stress in the concrete column and axial force in the tendon after the dynamic relaxation has converged. Basically, the stress in the concrete is zero and a uniform axial force of 5.84MN exists in the tendon.
Figure 2 Axial (x-direction) stress in concrete column and axial force in the tendon after dynamic relaxation convergence; note fringe scales.
The next step is to create the DYNAIN-TENDON.ASCII file with only the tendon (beam elements) saved to the file. An example of the information for beam element 20001 follows:
*INITIAL_STRESS_BEAM
$# eid rule nint local large nhisv naxes 20001 2 4 1 1 0 0
$# SIG11 SIG22 SIG33 SIG12 SIG23 9.937804e+008 0.000000e+000 0.000000e+000 -9.269643e-009 0.000000e+000 $# SIG31 EPS HISV1 HISV2 HISV3 7.522458e-009 0.000000e+000
9.937804e+008 0.000000e+000 0.000000e+000 -1.324924e-009 0.000000e+000 -1.613336e-009 0.000000e+000
9.937804e+008 0.000000e+000 0.000000e+000 -9.280976e-009 0.000000e+000 7.512568e-009 0.000000e+000
9.937804e+008 0.000000e+000 0.000000e+000 -1.168024e-009 0.000000e+000 -1.793130e-009 0.000000e+000
Note – the quadrature rule is QR=2 (2x2 Gauss) so NINT= 4 integration points, and there are zero extra history variables NHISV=0; the effective plastic strain is stored by default as a history variable but it is not considered an extra history variable. Thus the *DATABASE_EXTENT_BINARY parameter BEAMIP=4:
*DATABASE_EXTENT_BINARY
$# cmpflg ieverp beamip dcomp shge stssz n3thdt ialemat 0 0 4 1 1 1 2 1
Phase II – Combining the Tensioned Tendons & Concrete Structure
The above tendon initial stress file, DYNAIN-TENDON.ASCII, will be used for both the pre-and post-tension cases, as the only difference will be the coupling to the concrete solid elements and the tendon end conditions.
Pre-Tensioned Column
In this phase the tensioned tendon is coupled to the concrete solid elements using
*CONSTRAINED_BEAM_IN_SOLID with CDIR=0 for coupling in all directions. Again a dynamic relaxation solution is used to share the tendon tension with compression in the concrete column; Note – the nodal end loads are removed as the tensioned tendon stress relaxes to equilibrium with the concrete column. In this phase, the dynamic relaxation convergence tolerance is set to 3.5 10 4 slightly larger than when just the tendons were stretched. LS-PrePost can plot the dynamic relaxation convergence factor using the ASCII file feature and the “relax” file, see log-linear plot shown in Figure 3. Note the
convergence is not always monotonic and can diverge if too many iterations occur. Typically look for the convergence factor value to essentially repeat once, or twice, and stop the dynamic relaxation at that point.
Figure 3 Dynamic relaxation convergence factor as a function of pseudo-time.
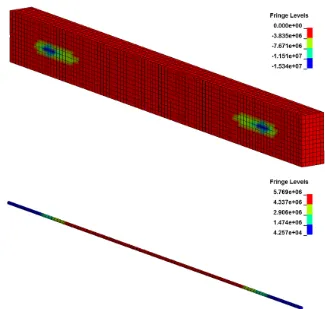
Figure 4 Pre-tensioned concrete fringes of axial stress and remaining axial force tension in the tendon after dynamic relaxation convergence; half the cross section of the concrete column has been removed for
visualization.
The axial force along the middle of the tendon is about 5.5MN (9.5MPa axial stress) with less tension at both ends where the free ends of the concrete column provide less axial resistance to the tensioned tendons.
Another way to assess the axial force sharing between the concrete column and tendon is to define a cross section at the mid-length of the column via *DATABASE_CROSS_SECTION_PLANE and have LS-DYNA record the resulting axial force for both components; Figure 5 is an illustration of the mid-span cross section definition. The axial force for the two components is equal and opposite, for static equilibrium, at about 5.73MN. This implies the average compressive stress in the concrete is about 2.92MPa (=5.73MN/1.42m2) and the average tension in the tendon is about 975MPa
(=5.73MN/5876mm2). Note – the original tendon tension was 993MPa.
Figure 5 Illustration of cross section at mid-length of column.
Post-Tensioned Column
In this phase the tensioned tendon is coupled to the concrete solid elements using
*CONSTRAINED_BEAM_IN_SOLID with CDIR=1 for coupling in the normal directions, but no coupling along the axis of the tendon. The prestress in the concrete column is provided by circular end plates (shell elements ELFORM=2) attached at their centers to the ends of the tendon, see Figure 6. The end plates interact with the ends of the concrete column via
*CONTACT_AUTOMATIC_SURFACE_TO_SURFACE.
Figure 6 Concrete column with tensioned tendon and end plates to transfer prestress to the concrete column.
Again a dynamic relaxation solution is used to share the tendon tension with compression in the concrete column; Note – the nodal end loads are removed as the tensioned tendon is stress relaxed to equilibrium with the concrete column. In this phase, the dynamic relaxation convergence tolerance was set to
4
Figure 7 Dynamic relaxation convergence tolerance for pre-tension concrete column.
Figure 8 shows fringes of axial stress in the post-tensioned concrete and fringes of tensile axial force in the tendon after the converged dynamic relaxation. Note – the concrete column has been sectioned along the length at the midway through the cross section for illustration purposes. The majority of the concrete elements are at a compressive axial stress of about 2.8MPa with the exception two more compressed regions near each end of the column that contact the end plates.
The axial force along the middle of the tendon is about 5.5MN (9.4MPa axial stress) with less tension at both ends where the free ends of the concrete column provide less axial resistance to the tensioned tendons.
The axial force sharing between the concrete column and tendon is again evaluated using a cross section at the mid-length of the column via *DATABASE_CROSS_SECTION_PLANE. The axial force for the two components is equal and opposite, for static equilibrium, at about 5.53MN. This implies the average compressive stress in the concrete is about 2.82MPa (=5.53MN/1.42m2) and the average tension in the tendon is about 941MPa (=5.53MN/5876mm2). Note – the original tendon tension was 993MPa.
Recall for the pre-tension case, the cross sectional force was about 5.73MN and for the post-tension case it was 5.53MN, i.e. about a 3.5% difference in axial force.
PRESTRESSED REINFORCED CONCRETE SLAB EXAMPLE
A more practical example of concrete pre-stressing, using LS-DYNA, was presented at the 2015 SMiRT conference by Jung et al. (2015). The focus of this paper was on how adding pre-stress to the concrete structure changed the impact response, i.e. front surface penetration depth and central deflection. In addition, the authors looked at three curvature cases: a flat slab, a curved cylindrical wall and a spherical dome. The authors of that SMiRT paper were most generous and agreed to share their models with the present author. To date, only the flat slab model has been examined, but much can be, and has been, learned by examining this model. Figure 9 shows the model overview indicating the impacting projectile, concrete slab, inner and outer reinforcement, and tendons.
The as received model dimensions, and placement of the reinforcement and tendons, differed significantly from that described by Jung et al. (2015). The overall size of the concrete slab model received was
Figure 8 Post-tensioned concrete fringes of axial stress and remaining axial force tension in the tendons after dynamic relaxation convergence; half the cross section of the concrete column has been removed for
visualization.
Figure 10 Comparison of reported (Jung 2025) and as received (right) rebar and tendon placement in the concrete slab cross section.
The placement of the reinforcement and tendons in the concrete differed, as indicated in Figure 10. In addition, the cross section image from Jung et al. (2015) indicates #11 bars were used for both rear and front vertical reinforcement and #14 bars for the horizontal reinforcement. The model uses #11 bars for both vertical and horizontal bars near the inner surface and #14 bars in both directions near the outer surface. Note – the model used the terms ‘inner’ and ‘outer’ to refer to the two sets of reinforcement. The reinforcement is uniformly spaced in both directions at 0.424m using 38 reinforcement bars in each direction for the inner and outer sets. Although the vertical and horizontal reinforcement is in the same plane, there is no interaction between the two directional sets. There are 18 tendons in each direction spaced uniformly at 0.829m.
As much of the original flat slab model as possible was retained. The significant changes made were:
The primary change was from the use of *CONSTRAINED_LAGRANGE_IN_SOLID to *CONSTRAINED_BEAM_IN_SOLID for both the tendons and reinforcement coupling to the concrete.
The most dramatic change to the slab response was from changing the hourglass control. The provided model used hourglass TYPE=4, i.e. stiffness form of type 2 (Flanagan-Belytschko), with a non-default coefficient of 0.03. The stiffness forms of hourglass control should only be used for quasi-static simulations where the velocities are small and hence the viscosities from the viscous hourglass control forms may be insufficient to prevent excessive hourglass energy. The hourglass form was change to TYPE=3, i.e. viscous form (Flanagan-Belytschko) with exact volume integration for solid elements, using the default value QH=0.1. A demonstration of the model response for these two hourglass forms is provided below.
The detailed aircraft jet engine in Jung et al. (2015) was replaced by a rigid cylinder of diameter 3m and length 7m with a mass of 7.5Mk. The same 150m/s impact speed was retained, and the cylinder (engine) impacted the inner surface of the slab.
The concrete slab edge boundary conditions were changed from all nodes fully fixed to just the edge nodes on the outer surface fully fixed. This change in boundary condition revealed a bug in the *CONSTRAINED_BEAM_IN_SOLID formulation that has since been fixed by LSTC. For the post-tensioning case, all the tendons were attached to circular end plates in the same
manner as described above for the simple column example.
Tendon Tensioning & Concrete Prestressing
Figure 11 shows uniform fringes of axial stress, 994MPa, in the vertical and horizontal tendons. This initial tension was achieved via dynamic relaxation with a convergence tolerance of 105, using prescribed loads of 5.84MN on the ends on all the tendons.
Figure 11 Fringes of axial stress in the pre-tensioned tendons.
The tensioned tendons were then included in the concrete slab using
*CONSTRAINED_BEAM_IN_SOLID and dynamic relaxation to prestress the concrete as follows: Pre-Tensioned Concrete – Coupling in all directions (CDIR=0) with dynamic relaxation
convergence tolerance of 2 10 5
Post-Tension Concrete – Coupling in normal directions (CDIR=1), i.e. no coupling along the length of the tendons, and dynamic relaxation convergence tolerance of 3 10 2
The resulting equilibrium axial stresses in the tendons for the two cases are shown in Figure 12. The largest difference between the two axial stress states for the tendons is at the ends of the tendons near the edges of the concrete slab for the tensioned case. Most of the central tendon elements in the pre-tensioned case have an axial stress in the range of 957 to 1030MPa. The tendons in the post-tension case have a narrow range of axial stresses as they are constrained at the edges of the concrete slab via
Figure 12 Fringes of axial stress in the tendons for the pre-tensioned (upper) and post-tensioned (lower) concrete slabs.
The most obvious concrete damage for the present simulations is primarily erosion of the concrete on the outer (away from the impact) side of the slab, see Figure 13. The impacting cylinder does little to the impacted (inner) face of the concrete slab, but the transmitted compression wave reflects as a tensile wave from the opposite (outer) face and fails a large conical section of concrete – a combination of shear and tensile failure of the concrete.
Figure 13 Cutaway views (left and center) of eroded concrete elements and isometric view (right) of damaged rear surface of concrete and outer reinforcement.
Table 1 lists the above metric results for the special case of no tendons included, i.e. no prestress, with the TYPE=4 stiffness hourglass and the TYPE=3 viscous hourglass control. The viscous hourglass form allows a significantly larger amount of damage by all metric measures, except for the number of reinforcement beams that are eroded; the hourglass resistance is applied to the solid concrete elements and not the beam elements in the model. The reason there is less damage with the stiffness form of hourglass control (TYPE=4) is additional stiffness is added to the concrete via this form of hourglass control. As mentioned above, the hourglass form was changed to the viscous form for the subsequent simulations.
Table 1 Flat slab damage metrics for two types of hourglass control.
Metric No Tendons TYPE=4 TYPE=3 Eroded Solids 2409 6045
Eroded Beams 18 16
% Mass Eroded 0.09 2.36
% Thickness Eroded 50 80
Table 2 lists the four damage metrics for pre and post-tensioned concrete slabs. In addition, the models were run without the tendon tensioning to observe the effect of the tendon tensioning. For the two pre-tension cases, there is not much difference observed in the damage metrics without or with the tendon pre-tensioning. For the two post-tension cases, the damage metrics are reduced when the tendons are tensioned. For the two cases with tendon tensioning, the pre-tension results indicate less damage than the post-tension case.
Table 2 Comparison of flat slab damage metrics for prestressed-and post-tensioned concrete.
Metric Pre-Tension Post-Tension 0 MPa 945MPA 0MPa 939MPa Eroded Solids 5549 5149 9370 7202
Eroded Beams 20 31 0 0
% Mass Eroded 2.17 2.01 3.66 2.81
Figure 14 Comparison of mid-slab cross section regions of eroded concrete (brown). shows a comparison of the eroded concrete regions for all four simulations. The concrete slabs have been cross sectioned along the mid-span to expose the eroded concrete conical cross sections. The simulations without tendon tensioning general have a larger lateral extent of the eroded concrete region than the corresponding tensioned tendon simulation. The through thickness erosion of the concrete is limited to some extent due to the rather coarse discretization (10 elements) through the thickness of the slab.
Figure 14 Comparison of mid-slab cross section regions of eroded concrete (brown).
Prestress and Damage
Experimental observations reported by Orbovic et al. (2015) for prestressed reinforced concrete slabs subjected to projectile impact indicate that the least damage occurs when no tendons are present. Further, when tendons are present, including tension in the tendons results in more damage than when there is no tension in the tendons. The damage measure reported includes back face scabbing and cracked through thickness area near the point of impact:
Damage=1.315 – Reinforcement only & Projectile speed reduction 73%.
Damage=1.465 – Reinforcement with no tension tendons & Projectile speed reduction 75%. Damage=1.770 – Reinforcement with tension generating 10MPa confinement of the concrete &
Projectile speed reduction 100% (project did not perforate).
While it is obvious that inclusion of tendons increases the observed damage, the reason for the damage increase is unknown.
Some of the additional damage for the tensioned tendons can be attributed to the additional kinetic energy absorbed due to stopping the perforation of the projectile. However this is only about 7.5% of the initial kinetic energy.
Figure 15 illustrates the triaxial compression and triaxial extension shear failure surfaces for a 54MPa unconfined compression strength concrete; obtained from the default parameters for MAT159. Also indicates in this figure is the stress state for a 10MPa biaxial compression confinement.
It is possible the biaxial prestress places the concrete fairly close to the triaxial extension failure surface. Then depending on the subsequent stress trajectory due to impact, the concrete might fail sooner under the prestress than without a prestress, or equivalently incur more damage. Recall, the purpose of the prestress is to suppress cracking in selected parts of a structure, and not to provide additional confinement as implied by the 10MPa confinement statement.
Consider the case of impact of a prestress concrete slab. If the axial stress is compressive, as could be envisioned near the projectile impact surface, then indeed there could be an increase in strength; black dashed line in Figure 15. On the other hand, if the axial stress is tensile, as would be the case on the surface opposite the impact, then a relatively small tensile axial stress will fail the concrete in triaxial extension; blue dotted line in Figure 15. This provides some insight into the increased damage when the tendons are tensioned versus no tension.
Figure 15 Illustration of 54MPa unconfined compression triaxial compression and extension shear failure surfaces and 10MPa confinement prestress.
CYLINDRICAL WALL PRESTRESS
The cylindrical wall model, see Figure 16 generously provided by Jung et al., was used to test the idea that the tendons could be tensioned while coupled to the concrete using the two axial coupling modes available with *CONSTRAINED_BEAM_IN_SOLID.
Like the flat slab, a few model modifications were made:
The hourglass control was changes from TYPE=4 with a value of 0.03 to TYPE=3 with the default value 0.1
The *DAMPING_GLOBAL keyword was removed.
The reinforcement and tendons were changed from ELFORM=3 truss elements to ELFORM=1 beam elements, with 2x2 Gauss integration.
The position of the tendons and reinforcement were changed to reflect positioning provided in Figure 2 of Jung et al. (2015).
Figure 16 Overview of cylindrical wall reinforced concrete impact model.
Repositioning of the tendons and reinforcement uncovered another ambiguity in the model description provided in Jung et al.: in their Figure 2 is one viewing a radial cross section r one parallel to the axis of the cylindrical wall, as this affects the position of the vertical, i.e. parallel to the axis of the cylindrical wall, and hoop tendon and reinforcement. Figure 17 shows a comparison of the as provided model positions of the tendons and reinforcement and as interpreted from Figure 2 in Jung et al.. Consider the tendons shown in the right most image which is Figure 2 from Jung et al., if that cross section represent a radial plane through the cross section then the vertical tendons are in the middle and the hoop tendon are closer to the outer surface. However, if that is a plane normal to the axis of the cylindrical wall, then the hoop tendons are in the middle of the cross section and the vertical tendons are near the outer wall; the same is true for the vertical and hop inner and outer reinforcement. In the present variation of the cylindrical wall model, the assumption was made that the provided Figure 2 cross section was from a radial plane – thus the vertical tendons are in the middle of the cross section.
Tensioning the Tendons
As was done for the flat slab, the tendons were tensioned by applying nodal forces to the ends of the tendons. The hoop tendons will have two components of the axial force. It was determined that the included angle of the cylindrical wall was 146.38 with a half angle of 73.19and the complement of that half angle of 16.81 has direction cosines of 0.285 and 0.9585 providing the components of the 5MN applied axial tendon tensioning force. Jung et al. quoted the curvature [sic] of the wall as 22.86m.
Figure 17 Comparison of as provided model tendon and reinforcement positioning (left images) and as adjusted to agree with Figure 2 from Jung et al (right images).
The coupled concrete, tendon, and reinforcement model was run with using dynamic relaxation with a convergence tolerance of 104. The axial force was ramped from zero to 5MN over the first 5ms of a maximum 020ms dynamic relaxation. The fully constrained concrete edge conditions were removed to allow the concrete to deform as necessary. For this stage of the simulation, the
*CONSTRAINED_BEAM_IN_SOLID parameter CDIR=1 to allow no coupling in the axial direction for the tendons; the reinforcement was fully coupled via CDIR=0.
Figure 18 shows fringes of axial forces in the reinforcement and tendons and the minimum principal (compressive) stress in the concrete. Of note here is unlike for the flat slab where there was no interaction between the tendon tensioning and the reinforcement and concrete, for the cylindrical wall, the curved geometry generates force and stress in the reinforcement and concrete.
Since tensioning the tendons tends to slightly straighten the wall, the inner reinforcement is primarily in tension and the outer reinforcement is primarily in compression. The outer surface of the concrete is also in compression while the inner surface is in tension.
Figure 18 Axial forces in the reinforcement and tendons and minimum principal stress in the concrete for tendon prestress stage.
In this stage of the simulation, the coupled concrete, tendon, and reinforcement model was initialized to the forces and stress obtained from the tendon tensioning phase. A dynamic relaxation simulation was run with a convergence tolerance of 104. The axial forces on the tendons were removed and the fully
constrained concrete edge conditions were removed to allow the concrete to deform as necessary. For this stage of the simulation, the *CONSTRAINED_BEAM_IN_SOLID parameter CDIR=0 to allow all direction coupling in the tendons; the reinforcement was again fully coupled via CDIR=0.
Figure 19 compares the concrete prestress (minimum principal stress) for the two cases of reinforcement and tendon positioning. The large green regions in both fringe plots have similar levels of compressive stress: 5 – 10MPa for the original positions and 4.5 – 10MPa for the adjusted positions. The primary difference is the increased region of compressive stress for the adjusted position case, right image. Also, for the original position case (left image) the smallest minimum principal stress is negative, at about 5MPa, while for the adjusted case smallest minimum principal stress is tensile at about 60MPa.
Figure 19 Comparison of prestressed concrete minimum principal stress using the provided (left) and adjusted (right) reinforcement and tendon positions.
REFERENCES
Jung, R., J. Hwang, C. Chung and J. Lee, (2015) “Assessment of Impact Resistance Performance of Post-Tensioned Curved Wall using Numerical Impact Simulation,” Transactions, SMiRT-23
Manchester, United Kingdom - August 10-14, 2015 Division III, Paper ID 256.