All Rights Reserved.
Program Copyright © 1982 VisiCorp All Rights Reserved.
Printed in U.S.A.
Centronics@ is a registered trademark of Centronics Data Computer Corp. Diablo@ is a registered trademark of Xerox Corporation
DIFTM is a trademark of Software Arts, Inc.
IBM@ is a registered trademark of International Business Machines Corp. Paper TigerTM is a trademark of Integral Data Systems, Inc.
VISISCHEDULETM
AUTOMATIC PROJECT SCHEDULING & JOB COSTINGUser's Guide
for the IBM® Personal Computer
Program by Dr. Michael Posehn Manual Written by Richard Ewing and Kate Carroll Published and Distributed Exclusively by
VisiCorp
V
VISICORPm
VISISCHEDULE™
USER'S GUIDEABOUT THIS MANUAL
ABOUT THE PROGRAM
PART I: THE LESSONS
LESSON 1
GETTING STARTED
CONTENTS
Setting Up Your Computer. . . 1-2 Handling Diskettes. . . . 1-3 Program Diskette Serial Number ... . . . 1-3 Loading the Program. . . 1-3 The Startup Menu. . . 1-4 Moving the Cursor. . . 1-5 Entering Startup Information ., . . . 1-6 The Main Menu. . . 1-7
LESSON 2
CREATING A SCHEDULE
VISISCHEDULE™
GUIDEIBM PERSONAL COMPUTER
CONTENTS
LESSON 3
HANDLING FILES AND MEMORY
Loading a Project File. . . .. 1-33 Saving a File. . . .. 1-35 Clearing Memory. . . .. 1-36 Changing the Data Disk Drive ... 1-37 Deleting a File ... 1-37 Formatting Disks ... 1-38 Backing Up Your Data. . . .. 1-38 Exiting the Program. . . .. 1-39
LESSON 4
REVIEWING AND UPDATING SCHEDULES
Moving the Schedule Graph. . . .. 1-41 Using the Goto Option. . . 1-42 Changing a Schedule. . . .. 1-43 Completing a Job. . . .. 1-44 Slipping a Schedule. . . .. 1-44 Erasing a Job. . . .. 1-46 Displaying Information. . . .. 1-47 Highlighting. . . .. 1-47 Displaying Costs. . . .. 1-48 Setting Milestones ... . . . .. 1-51 Evenly Distributing Manpower. . . .. 1-52 Using the Level Option. . . .. 1-53 Using the Schedule Option. . . .. 1-55
LESSON 5
PREPARING AND PRINTING REPORTS
IBM PERSONAL COMPUTER
CONTENTS
PART II: THE REFERENCE
MENUS
VISISCHEDULE™
USER'SGUIDE
Com Port Menu. . . 2-5 Display Menu . . . 2-6 Hardware Options Menu. . . 2-7 Job Location Menu. . . 2-8 Job Specification Menu. . . 2-8 Main Menu. . . 2-9 The Program Status Area ... " 2-10 The Project Status Area ... " 2-10 Milestone Menu. . . .. 2-11 Modify Menu. . . .. 2-12 Occupation Menu ... 2-12 Printer Setup Menu . . . .. 2-13 Printout Menu. . . .. 2-14 Project Description Menu. . . .. 2-15 Report Options Menu. . . .. 2-16 Schedule Menu ... 2-17 Startup Menu. . . .. 2-18 Workweek Menu ... 2-19
OPTIONS
VISISCHEDULE™
IBM PERSONAL COMPUTER
CONTENTS
Currency-Startup Menu . . . .. 2-27
Databits-Com Port Menu. . . .. 2-27
Dates-Report Options Menu. . . .. 2-27
Dates-Startup Menu. . . .. 2-27
Days-Workweek Menu. . . .. 2-28
Deadline-Job Specification Menu. . . .. 2-28
Delete-Main Menu. . . .. 2-28
Descrip-Modify Menu. . . .. 2-29
DIF Data-Printout Menu . . . .. 2-29
DIF Name-Report Options Menu . . . .. 2-30
Display-Schedule Menu Extension ... 2-30
Duration-Job Specification Menu ... 2-31
Earliest-Job Specification Menu. . . .. 2-31
End-Milestone Menu. . . .. 2-31
Erase-Schedule Menu. . . .. 2-31
Filename-Printer Setup Menu ... 2-32
First-Report Options Menu. . . .. 2-33
Format-Main Menu. . . .. 2-33
Formfeed-Printer Setup Menu. . . .. 2-34
Goto-Schedule Menu. . . .. 2-34
Graph-Printout Menu . . . .. 2-34
Hardware-Startup Menu. . . .. 2-35
Headings-Report Options Menu. . . .. 2-35
Highlite-Schedule Menu Extension. . . .. 2-35
Insert-Schedule Menu. . . .. 2-35
Job-Job Location Menu. . . .. 2-37
Last-Report Options Menu. . . .. 2-38
Leader-Project Description Menu. . . .. 2-38
Length-Printer Setup Menu .. . . .. 2-38
Level-Schedule Menu Extension. . . .. 2-38
Listing-Printout Menu. . . .. 2-39
Load-Main Menu. . . .. 2-39
Manpower-Display Menu . . . .. 2-40
Manpower-Modify Menu. . . .. 2-40
Manpower-Project Description Menu . . . .. 2-41
Memory-Hardware Options Menu. . . .. 2-41
Mileston-Schedule Menu Extension ... 2-42
Modify-Main Menu ... . . . .. 2-42
Modify-Schedule Menu. . . .. 2-42
More-Schedule Menu ... 2-42
IBM PERSONAL COMPUTER
CONTENTS
VISISCHEDULE™
USER'S GUIDENone-Display Menu. . . .. 2-43
None-Milestone Menu. . . .. 2-43
Normal-WorkweekMenu ... 2-43
Occupat-Occupation Menu . . . .. 2-44
Order-Report Options Menu. . . .. 2-44
Parity-Com Port Menu. . . .. 2-45
Prefix-Main Menu. . . .. 2-45
Prereq-Job Specification Menu. . . .. 2-46
Print-Main Menu . . . .. 2-46
Print-Report Options Menu ... 2-46
Printer-Hardware Options Menu. . . .. 2-47
Protocol-Com Port Menu. . . .. 2-47
Quit-Com Port Menu. . . .. 2-47
Quit-Display Menu . . . .. 2-47
Quit-Hardware Options Menu. . . .. 2-47
Quit-Job Location Menu. . . .. 2-47
Quit-Main Menu. . . .. . . .. 2-47
Quit-Milestone Menu. . . .. 2-48
Quit-Modify Menu. . . .. 2-48
Quit-Occupation Menu. . . .. 2-48
Quit-Printer Setup Menu ... 2-48
Quit-Printout Menu. . . .. 2-48
Quit-Project Description Menu. . . .. 2-48
Quit-Report Options Menu. . . .. 2-48
Quit-Schedule Menu. . . .. 2-48
Quit-Startup Menu. . . .. 2-48
Quit-Workweek Menu. . . .. 2-49
Hemout-Hardware Options Menu. . . .. 2-49
Renum-Schedule Menu Extension. . . .. 2-49
Reporter-Startup Menu. . . .. 2-49
Rev-Project Description Menu. . . .. 2-50
Salary-Display Menu. . . .. 2-50
Salary-Occupation Menu . . . .. 2-50
Save-Main Menu. . . .. 2-50
Schedule-Modify Menu. . . .. 2-51
Schedule-Schedule Menu ... 2-52
Setup-Printer Setup Menu ... 2-52
Setup-Printout Menu. . . .. 2-53
Sheets-Printer Setup Menu. . . .. 2-53
Skill-Job Specification Menu. . . .. 2-54
Skill-Report Options Menu. . . .. 2-54
VISISCHEDULE™
GUIDEIBM PERSONAL COMPUTER
CONTENTS
Start-Milestone Menu. . . .. 2-55 Start-Project Description Menu. . . .. 2-55 Stopbits-Com Port Menu. . . .. 2-56 Summary-Printout Menu. . . .. 2-56 Table-Printout Menu. . . .. 2-56 Time-Project Description Menu. . . .. 2-57 Title-Project Description Menu ... . . .. 2-57 Today-Startup Menu . . . .. 2-57 Top mar-Printer Setup Menu .. . . .. 2-58 Weeks-Workweek Menu. . . .. . . .. 2-58 Width-Printer Setup Menu. . . .. 2-59 Work-Modify Menu. . . .. 2-59 WriteDOS-Main Menu. . . .. . . .. . . .. 2-59
REPORTS
The Project Description Report ... 2-61 The Job Description Report. . . .. 2-63 The Tabular Job Report. . . .. 2-65 The Schedule Graph . . . .. 2-66 The Time Line. . . .. 2-68 Schedule Breaks. . . .. 2-69 Normal Working Week. . . .. 2-69 Scheduling Days With Nonworking Periods . . . .. 2-70 Scheduling Weeks With Nonworking Periods. . . .. 2-71
APPENDIX A
Error Messages. . . A-I
APPENDIX B
The IBM Keyboard. . . B-1
APPENDIX C
IBM PERSONAL COMPUTER
CONTENTS
APPENDIX D
VISISCHEDULE™
USER'S GUIDETransferring VisiSchedule Data to the VisiCalc Program. . . D-l Considerations When Using the VisiCalc Program. . . D-3 Exchanging Files . . . D-3 The DIFTM Format. . . D-3 Header. . . .. . .. . . .. . . .. . . D-4 Data Records. . . D-5 End-Of-Data Records. . . D-5 Programs That Work With the DIFTM Format. . . D-5 Dumping a DIFTM File. . . D-6 Printing a Data File From a DIFTM File . . . D-7 Creating a DIFTM File. . . D-9
APPENDIX E
Useful Facts About the VisiSchedule Program. . . E-l
BIBLIOGRAPHY
Bibliography. . . .. Bi-l
GLOSSARY
Glossary. . . .. GI-l
INDEX
VISISCHEDULE™
FIGURE
GUIDE
IBM PERSONAL COMPUTER
CONTENTS
TITLE
A. Sample Schedule. . . xvi B. VisiSchedule Diagram ... xvii 1-1. Startup Menu Screen. . . 1-4 1-2. The Main Menu. . . 1-7 1-3. Project Description Menu. . . .. 1-11 1-4. Updated Project Description Menu. . . .. 1-13 1-5. Completed Occupation Listing ... 1-15 1-6. Nonworking Weeks Display. . . .. 1-16 1-7. Schedule Menu .... . . .. 1-17 1-8. Job Specification Menu. . . .. 1-18 1-9. Skill Menu ... 1-19 1-10. Schedule Menu With a Job Added. . . .. 1-20 1-11. Add vs. Insert Options ... 1-22 1-12. The Effect of Before and After on
IBM PERSONAL COMPUTER
CONTENTS
VISISCHEDULE™
USER'S GUIDE1-38. Report Options Menu for Listing Option. . . .. 1-61 1-39. Order Option Display. . . .. 1-62 1-40. Sample Job Description Report ... 1-64 1-41. Sample Tabular Job Reports. . . .. 1-65 1-42. Report Options Menu for Table Option. . . .. 1-66 1-43. Columns Display. . . .. 1-67 1-44. Report Options Menu for Table Option. . . .. 1-70 1-45. Sample Schedule Graph. . . .. 1-71 2-1. VisiSchedule Menu Flow ... 2-3 2-2. Add vs. Insert Options ... 2-20 2-3. The Effect of Before and After on
Prerequisites During Add. . . .. 2-21 2-4. The Effect of Erase on Prerequisites. . . .. 2-32 2-5. Add vs. Insert Options ... 2-36 2-6. The Effect of Before and After on
Prerequisites During Insert ... " 2-37 2-7. Leveling... 2-39 2-8. Slip Option. . . .. 2-55 2-9. Sample Project Description Report. . . .. 2-62 2-10. Sample Job Description Report ... 2-64 2-11. Sample Tabular Job Report. . . . .. 2-65 2-12. Sample Schedule Graph. . . .. 2-66 2-13. The Schedule Time Line. . . .. 2-68 2-14. Calendar Used in Examples ... " 2-69 2-15. Project With Breaks (Days) . . . .. 2-70 2-16. Project With Breaks (Weeks) ... " 2-71 B-1. The IBM Keyboard. . . . B-1 D-1. Data Transferred in the DIF Format. . . D-l D-2. Sample File for Use With DIF . . . D-4
TABLE
TITLE
VISISCHEDULE™
GUIDEIBM PERSONAL COMPUTER
CONTENTS
IISI CORP
™
IISISCHEDULE™
USER'S GUIDEABOUT THIS MANUAL
~BOUT
THIS MANUAL
The VisiSchedule™ User's Guide teaches you how to use the iTisiSchedule program and gives you a quick reference to all functions of he program. Lessons One through Five teach you the program, and the
~eference lists alphabetically each menu, option and printed report. The
~ppendices cover related topics that you'll need to refer to only occa-;ionally. The following brief table of contents outlines the nanual's organization:
A.bout the Program Part I: The Lessons
Lesson One: Getting Started Lesson Two: Creating a Schedule
Lesson Three: Handling Files and Memory Lesson Four: Reviewing and Updating Schedules Lesson Five: Preparing and Printing Reports Part II: The Reference
Menus Options Reports
Appendices AError Messages B The IBM Keyboard CPrinters
D Transferring VisiSchedule Data to the VisiCalc Program E Useful Facts About the VisiSchedule Program
In addition, the Bibliography lists books and articles on the topic of scheduling, and the Glossary defines terms used in the VisiSchedule program that may be new to you. The Index helps you find any topic in the manual.
To use this manual most effectively, follow these suggestions:
VISISCHEDULE™
GUIDEIBM PERSONAL COMPUTER
ABOUT THIS MANUAL
If you're familiar with your IBM Personal Computer™, but have never used a VisiCorp product, read "About the Program" and skim Lesson One. Read Lessons Two and Three for basic program information. You can go on to read the remainder of the lessons, or you can look up infor-mation as you need it in the Reference.
If you're an old hand with personal computers and menu-driven pro-grams, skim Lesson One for loading instructions. Then, look at the VisiSchedule Menu Flow fold-out (Figure 2-1). You can begin using the program immediately after loading. You'll find that the VisiSchedule program is well-prompted on the screen. You can look up any piece of information in the Reference, which is organized into three sections: Menus, Options, and Reports.
Use this manual as a flexible guide that can be adapted to your own level of experience.
The IBM keyboard has several keys marked with arrows. This manual tells you to press these keys at certain times. To prevent any confusion, this manual represents the keys as follows:
Manual
Key Meaning Representation
~ enter ~
..
backspace BKSPi up arrow i
t down arrow t
+- left arrow
-VISISCHEDULE™
USER'S GUIDEABOUT THE PROGRAM
ABOUT THE PROGRAM
Complex projects involving many tasks, people and costs are often dif-ficult to manage. Some tasks within the project can't be started until others have been finished. It may take you days or weeks to estimate when a project can be completed. Then, delivery delays or unexpected equipment failures may destroy your schedule.
The VisiSchedule program shows you how to break complex projects into a series of simple jobs, how to indicate dependencies between jobs, how to figure the costs of the project, and what happens if one job slips. It calculates the final completion date automatically and lets you revise the project schedule easily and quickly. It displays the entire project schedule graphically by days or weeks. On one schedule graph you can track, modify, update and control the schedule for even the most com-plex projects. You can tryout different courses of action to see how they might affect the completion date of the schedule.
If you want to know which jobs within the project need to be closely managed, the VisiSchedule program helps you. It determines automatically which jobs can or cannot be delayed for the project to be completed on time. The jobs that can't be delayed are on the critical path.
VISISCHEDULE™
GUIDEIBM PERSONAL COMPUTER
ABOUTTHEPROGRAM
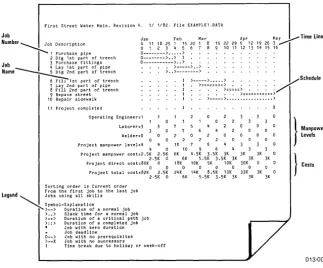
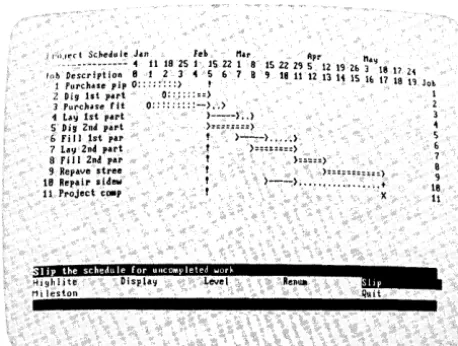
First Street Water Hain. Revision 4. l ' 1'82. File EXAHPLE1.DATA
Job
Number ~Ob Description
I
'
Purchase pipe 2 Dig 1st part of trench
Job ~ r~~c~:~e p~;~t~~g~iPe
Jan Feb Mar
4 11 18 25 1 15 22 1 8
o 1 2 3 4 5 6 7 8
0---> ... > , .
0---> .. > I . . 0---> .. > . .
. >---> .. > > .. >--->
15 22 29 ~pr12 19 26 ~a~Time Line
9 10 11 12 13 14 15 16
Name~nd part of trench
6 Fill 1 st part of trench
7 Lay 2nd part of pipe
8 Fill 2nd part of trench
9 Repave street
>--;::~ ~ ~ ~ ~ ~ ~::~::
i::
~:: ~::::: ~
/iSChedUle10 Repair sidewalk
11 Project completed
Operating Engineer:1
Laborer=3
Welder:O
Project manpower level:4
4 0
Project manpower cost:2.5K 2.5K
2.SK 0 Project direct cost:80K 0
o 0
Project total cost:82K 2.SK
Sorting order is Current order
From the first job to the last job
Legend ~JObS using all skills Symbol-Expl ana t i on
>--> Duration of a normal job
> •• > Slack time for a normal job
>::> Duration of a critical path job
>::> Duration of a completed job • Job loll th zero duration
Job deadline
0--> Job with no prerequisites >--X Job with no successors
2 ·SK 0
I Time break due to holiday or week-off
10 10 6K 6K 18K 0 24K 6K
>---> ... >
9 6
4.5K 3.5K 3K 3K 3K 5.SK 3.SK 3K 3K 3K 10K SK 10K 30K
0 0 0 0 14K 8.SK 13K 33K 3K
S.SK 3. SK 3K 3K 3K
V
L -_ _ _ _ _ _ _ _ _ _ _ _ _ _ _ _ _ _ _ _ _ _ _ _ _ _ _ _ _ _ _ _ _ _ _ _ _ _ - '
Figure A. Sample Schedule
}
Manpower Levels} c,,"
8M PERSONAL COMPUTER
\BOUT THE PROGRAM
VISISCHEDULE™
USER'S GUIDEFigure B shows how the program uses the information that you enter to produce calculations and prints results for you.
You Start a Project: "First Street Water Main"
Schedule Menu
You Enter Job Information:
Duration Job Job Name (Weeks)
1 Purchase pipe 3 2 Dig 1st part of trench 3
3 Purchase fittings 4
Lay 1st part of pipe 3 Dig 2nd part of trench 3
Modify Menu _
You Choose: Time Units IDays or Weeks) Start Date
Costs Units 1$, K$, or M$) Types of Workers Needed Salaries
Days or Weeks Off
Direct Costs Skills Prerequisites (in K$) Needed
0 50 nJa
0 5 3 Laborers
0 25 n/a 1,2,3 13 4 Laborers
2 5 3 Laborers
Program Displays Schedule Graph:
Project schedule
Job description 1 Purchase pip 2 Dig 1 st part 3 Purcbase fit 4 Lay lst part 5 Dig 2nd part
Jan Feb Mar
5 12 26 2 9 16 23 2 9 0 1 2 3 4 5 6 7 8
0---> .. > 0--'---> .. > !
0==========) !
)s=== __ ==).
)
..
) ---
----
- )l
0 ScheduleYou Print: Graph
I
0 Tables 0 0I
0 Job 0 00 0
0 0 Descriptions 0 0
0 Project 0 0 0
0 Description 0 0 0
0 0 0 0
0 0 0 0
0 0 0 0
0 0 0 0
0 0 0 0
0 0 0
0 0 0
0 0
0 0
Figure B. VisiSchedule Diagram
VISICORP™
VISISCHEDULE™
USER'S GUIDEPART I: THE LESSONS
PART I
THE
LESSOr~S
The Lessons are designed to teach you how to use the VisiSchedule program. Lesson One: Getting Started shows you how to set up your computer, load the program, and start using the VisiSchedule program.
VISISCHEDULE™
LESSON ONE
GUIDE
IBM PERSONAL COMPUTER
THE LESSONS
LESSON ONE: GETTING STARTED
Setting Up Your Computer 1-2
Handling Diskettes 1-3
Program Diskette Serial Number 1-3
Loading the Program 1-3
The Startup Menu 1-4
Moving the Cursor 1-5
Entering Startup Information 1-6
The Main Menu 1-7
SETTING UP YOUR COMPUTER
To use the VisiSchedule program, your IBM Personal ComputerTM must have:
• 64K bytes or more of RAM (random access memory). • A video monitor.
• At least two disk drives. The floppy drives can be either one-sided or two-sided, but the VisiSchedule Program Diskette and the Example Diskette are single-sided diskettes.
• The VisiSchedule Program Diskette and the Example Diskette. These diskettes are included in the VisiSchedule package.
• A printer, which is not required, but is recommended to make full use of the VisiSchedule report capabilities. See Appendix C for a list of the printers that have been tested with the program.
IBM PERSONAL COMPUTER
THE LESSONS LESSON ONE
If you have trouble setting up your computer, see your computer dealer. Do not load the VisiSchedule program until the computer is set up and operational.
HANDLING DISKETTES
A diskette is a small, magnetically coated plastic disk, sealed in a pro-tective square plastic cover. Through the oval cutout in the square cover, you can see the magnetic surface of the actual diskette. To protect yourself against data loss or program damage, handle your diskettes with extreme care.
Never touch the exposed magnetic surface with your fingers or any implement; you could lose data. Protect the diskette from dust by storing it in the paper sleeve it comes in. Keep it at least six inches from magnetic fields such as those generated by your video monitor or a television. Extremes of temperature (such as on a car dash on a warm day) can damage a diskette, destroying valuable data or your VisiSchedule program. Don't bend, staple, or write on the square plastic cover with a hard pen or pencil (use only a soft felt-tip pen).
Program Diskette Serial Number
When you load the VisiSchedule program, you see the Startup menu screen. It displays your program diskette serial number in the upper-right corner of the screen. Include the serial number on the Warranty Registration Card, which is at the back of the VisiSchedule manual binder. Mail in the Warranty Registration Card to take advantage of the diskette support policy in the event your VisiSchedule program diskette is ever lost or damaged. You will also be informed of new versions of the VisiSchedule program.
LOADING THE PROGRAM
VISISCHEDULE™
GUIDEIBM PERSONAL COMPUTER
LESSON ONE THE LESSONS
~~~~oe~-
_ _ _!;';"'~"'W
....
"0' .... ' -'
'-"'-"'W_"-'W_'''-'''-''C-Ui_Si_SC_he_d~_·.'_
, ... ",,~,,~~
~:~~
..Variable - { Information
Long
Tod~yo 11 1182
Reporter:
p"tes:ItI/DDffl
Currency:$
(or)lright Ie. 1992 h~ Organic Soll ... o ••• Inc, ' • Use IrNlW ~f1'J$J "space t.O Move cur'Sot
• Press ElITtR to select a Menu It . .
Prompt~ f"
-{
f--
!ill!!!"
lIilme-'"
.*'t...
, ... "
Menu
'.Hoilfd."'a.l'e . .
______
' _______
DatesQU.it _ _
_
Figure 1-1. Startup Menu Screen
THE STARTUP MENU
013-001/P
The top of the Startup menu screen contains the version number, the program diskette serial number, the copyright notice and general direc-tions on using amen u.
The middle of the screen display contains four items of information: the current date, the reporter's name, how the program displays dates, and the currency symbol to be used. The display shows the current value of each.
At the bottom of the screen is a seven-option menu. It contains two types of options: Continue, Hardware and Quit take you out of the menu, and Today, Reporter, Dotes, and Currency let you enter data.
To select a menu option, highlight it with the cursor, and press the ~ key. The cursor is the highlighted rectangle on the menu screen. In Figure 1-1, the cursor is highlighting Continue.
The top line of the menu (called the long prompt) is a description of the option that the cursor is highlighting. When the cursor is on Continue,
the long prompt reads Continue with dote and nome as shown.
Press the -+ key on the keyboard. The cursor moves to the word
IBM PERSONAL COMPUTER
THE LESSONS LESSON ONE
Each time you press the Num Lock key, you alternately switch the
numeric key pad from entering numbers to performing the functions printed under the numbers on each key. So, with Num Lock in one
posi-tion, the --. key is active. If you press Num Lock once after that, the
number 6 is active. For the VisiSchedule program, leave the Num Lock
key in the position that activates the arrow keys and the other special keys (Home, PgUp, End, and so forth).
With the cursor on Today, the long prompt changes to Today's dote.
MOVING THE CURSOR
You can move the cursor in three ways. You can type the first letter of the option name. You can use the arrow keys to move it in anyone of the four directions. Or, you can press the space bar to switch the cursor up and down between menu lines.
Continue to press the --. key until the cursor reaches the last option on the top line: Currency. Now press the --. key once more. The cursor jumps down to the first option on the bottom line. Press the --. key two more times to make the cursor jump to the first option in the top line. This is called wraparound.
Cursor wraparound works in both directions. Press the - key when the cursor is at the upper-left corner of the menu. It jumps to the last option on the bottom line.
Move the cursor to Today, and press the t key. The cursor jumps to
Quit. Press the i key, and the cursor jumps back to Currency in the top line. When you press the
t
key with the cursor in the top line, the cursor jumps to the option immediately below. If there is no option immediately below, it jumps to the first option below and to the right. If the cursor is in the bottom line and you press the i key, the cursor jumps to the option immediately above or to the first option above and to the left.You can use the space bar rather than the i or t keys if you find it more convenient. The space bar switches the cursor back and forth between menu lines. With the arrow keys or the space bar, you can quickly move the cursor to any desired option.
VISISCHEDULE™
LESSON ONE
GUIDE
IBM PERSONAL COMPUTER
THE LESSONS
ENTERING STARTUP INFORMATION
With the cursor on Today, press the ~ key. Enter the current date by typing one or two digits, as necessary, for the month and day and two digits for the year, separated by slashes. If you hear a beep, check the numbers to make sure your date is a real date. You can correct any mistakes by pressing the BKSP key and retyping the characters. If you still have trouble, refer to the Today option in Part II, The Reference.
When you are satisfied with your date entry, press the ~ key to record it. Now, the program displays the date you entered to the right of
Today= on the screen. Note that the cursor is highlighting Reporter. In many of the VisiSchedule menus, the cursor automatically moves to the next option after the one you just selected. Press the ~ key, and type your name. The name can be up to 24 characters long, including blanks. If you continue typing beyond that point, the computer beeps.
As with all of the options in the program, you can cancel your new entry and bring back the previous value by pressing the Esc key; you must do so before pressing the ~ key. Press the ~ key; the name is displayed on the screen after Reporter = .
If you had typed the name incorrectly, you could edit it without retyp-ing the entire entry. Move the cursor back to Reporter, and press the ~ key to select the option. Suppose you typed the second-to-Iast character incorrectly. Move to that character by pressing the ----. key until the underscore is flashing under that character. Then, retype the end of the entry, and press the ~ key to accept it. You can use this editing tech-nique with all of the VisiSchedule options that allow you to enter data. It can save you time, especially if your entry is long.
On the next two lines of screen text, Dotes = MM/DD/YY and
Currency = S show the way that the program displays dates and ,monetary values. For our purposes, leave these settings as they are. If you did want to change either setting, you would use the Dotes and Currency options. For an explanation of these options, find them under "Options" in Part II, The Reference.
Type H to move the cursor to Hardware. Then, press ~. The Hard-ware option takes you to the Hardware Options menu where you set up the program for your printer and for your computer's memory size.
The program is initially set up for an IBM Personal Computer with 64K
IBM PERSONAL COMPUTER
THE LESSONS LESSON ONE
If you try to use your VisiSchedule Program Diskette with an IBM Per-sonal Computer that has less memory than the current value of the
Memory option, the program will not load. Be sure to change the
Memory option to accommodate the computer you will be moving to if you will be changing computers.
There is no need to change any other values in the Hardware Options menu at this time. The Hardware option is explained in Appendix C, Printers. Type Q to highlight Quit, and press ~ to return to the Startup menu. If you changed the value for the Hardware option, press ~ to respond YES to the choice of restarting the system to incorporate the change. Then, hold down the etrl and Alt keys, and press the Del key to restart the program.
The Startup screen is now complete. Move on to the Main menu by selecting Continue (just press ~, because Continue is already highlighted). You also have the option of exiting the VisiSchedule pro-gram by selecting Quit.
THE MAIN MENU
The program displays the Main menu as shown in Figure 1-2.
Program
!::~us~
, l'r09' •• St.tu.: "etOor9=CI".red
Project Roa.=S8 _are jobs
Status ---,,:project Stdus:
Area
Titl.=
Menu-{
Rev'=S
flle=SCROLL. DATil Pret ix=B:
Changed:Ho She:S joh
OisiSch ... le nala nenu
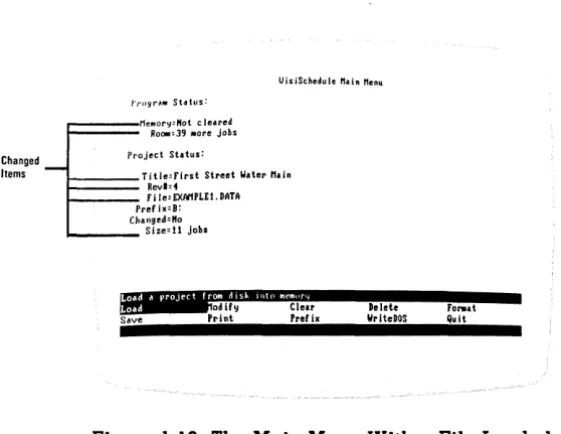
Figure 1-2. The Main Menu
VISISCHEDULE™
LESSON ONE
GUIDE
IBM PERSONAL COMPUTER
THE LESSONS
The Main menu screen display has three parts:
• The Program Status area tells you whether a project is loaded into the computer memory and how many jobs can be added to the project. • The Project Status area lists the project's title, its revision number, its
file name, the disk drive prefix, whether the project has been changed since it was loaded, and the number of jobs in the project. If no project file is loaded, some of these fields will be blank.
IBM PERSONAL COMPUTER
THE LESSONS LESSON TWO
LESSON TWO: CREATING A SCHEDULE
Entering the Project Description 1-10 Entering the Occupations and Salaries 1-13 Entering the Workweek Information 1-15
Entering the Jobs 1-17
Adding vs. Inserting a Job 1-21
Adding Jobs 1-24
Inserting a Job 1-26
Modifying Jobs 1-27
Cleaning Up the Schedule 1-27
Printing the Schedule Graph 1-28
Entering Your Own Projects 1-31
By the end of Lesson Two, you will know enough about the VisiSchedule program to experiment with it on your own. You'll create a project from the start. If you have an IBM 80 CPS Matrix Printer, you'll print the Schedule graph.
If you are not continuing directly from Lesson One, bring the Main menu onto your screen. The computer memory must be clear before you can begin entering a new file. If the first line in the Program Status area does not read Memory
=
Cleared, move the cursor to Clear, and press ~.VISISCHEDULE™
LESSON TWO
GUIDE
IBM PERSONAL COMPUTER
THE LESSONS
Many of the VisiSchedule options can be selected by pressing one of the function keys alone, without pressing
..J.
You will learn the uses of the function keys through the course of the lessons. Appendix B, The IBM Keyboard lists all of the special keys and their uses. The VisiSchedule Pocket Reference, which is at the back of the VisiSchedule manual binder, also provides a quick reference to the special keys.The project you are going to enter in this lesson is the schedule for creating a magazine advertisement. You will not enter the entire schedule, only the first four jobs. However, you will learn all you need to know to schedule a more complex project.
ENTERING THE PROJECT DESCRIPTION
To create a new project, select Modify. You could move the cursor to Modify, and press
..J,
but you can select the Modify option just by press-ing the F3 key. The Modify menu appears on your screen. It has four options:• The Descrip option takes you to the Project Description menu where you set options that apply to the project in general, such as the title, the unit of time to be used, and the start date.
• The Manpower option takes you to the Occupation menu where you specify up to nine occupation categories and the salaries for each. • The Work option takes you to the Workweek menu where you specify
which days or weeks employees will not be working.
• The Schedule option takes you to the Schedule menu where you enter the specifics for each job in the project. This menu is the heart of the VisiSchedule program. In this menu, you create the Schedule Graph by entering the jobs, their prerequisites, their durations, and other information.
BM PERSONAL COMPUTER
·HE LESSONS
t'l'oject Description: tedd.r'
T i •• ' Da~.
Start: 11 1182 Frl JAn 1 nanpower:$
Cost:k$ Critical:V •• Revision:8
in',!!
Leader CostTi ••
Critical
Start
Rev Qu it
Figure 1-3. Project Description Menu
LESSON TWO
013-003/P
The menu at the bottom of the screen contains eight options in addition o Quit. The initial value for each option is listed at the top of the screen.
The options are listed below:
Title is the name of the project. You can use up to 30 characters for the title. It is printed on reports the program generates.
Select Title and enter Widgit Advertisement. Use the Shift key for capital letters. If you make a mistake, press the BKSP key to erase the mistake. Then, retype the information. When the line is correct, press the ~ key. Now, the screen reads Title
=
Widgit Advertisement. The cursor has automatically jumped to the second menu option; Leader. Leader is the name of the project leader. You can use up to 24 characters. The leader name also appears on the program's printed reports. This name can be a different name than the one entered for Reporter in the Startup menu.Select Leader, and enter B. Wilson.
Time is the time unit for the project, either weeks or days.
VISISCHEDULE™
LESSON TWO
GUIDE
IBM PERSONAL COMPUTER
THE LESSONS• Start is the date when the project is scheduled to begin. At the top of the screen, it is listed in the current date format (MM/DD/YY, in this case). This date is followed with a spelled out date that includes the day of the week. If you change the start date, all jobs in the schedule change relative to the new date.
Select Start, and enter 1/18/82 for the start date of this project.
• Manpower is the monetary unit for salaries. You can choose dollars ( S), thousands of dollars (K S), or millions of dollars (M S) for this option. Later, you can enter up to four digits for salary figures. Negative numbers and decimal points are not allowed. So, you should select a unit that is meaningful for the manpower costs in each proj-ect. For example, if your salaries are in the $100 range, you would not want to use thousands or millions of dollars as your monetary unit. The screen shows Manpower = S. Because this monetary unit is appropriate for this project, leave the Manpower option as it is.
• Cost is the monetary unit for direct, one-time costs (any costs other than for salaries). The Cost option follows the same format as the
Manpower option. You can choose dollars (S), thousands of dollars (KS), or millions of dollars (MS) as the monetary unit. Again, cost values that you enter later are limited to four non-negative integers. Costs are already in K$, which is the unit needed for this project. Leave the Cost option as it is.
• Critical indicates whether the critical path is calculated for the proj-ect. If you set this option to no, critical and noncritical jobs are displayed with the same symbol, and slack times are not displayed. As the screen shows, Critical
=
Yes. Do not change the Critical option for this project.• Rev is the revision number of the project. This value is automatically increased by one each time the project file is saved. You can set the revision number to any integer between 0 and 999.
For now, leave the Rev option as it is.
IBM PERSONAL COMPUTER
THE LESSONS LESSON TWO
Project De.er I,t ion:
Tltle:l/ld./t Advertl.llllnt Leader: •. IIII.on
TI.e:l/eeh
Shrt: 1/18/82 Hon Jan 18 rt.n,ower:$
Co.t:lI$
Crltlc.!:Vea Revl.lon:.
lij'Mtiflm_+'MMbp
T it Ie Leader
Manpower COlt TI .. Critical
Start
Jev
r"
Figure 1-4. Updated Project Description Menu
013·004/P
If you see a mistake, select the appropriate option and reenter the value. When the description is correct, select Quit to return to the Modify menu.
ENTERING THE OCCUPATIONS AND SALARIES
The Modify menu returns with the cursor on Manpower. Select
Manpower.
The left side of the screen lists the occupations assigned to each of the nine skills levels. You need not assign a name to each; however, it makes a report more understandable if the job calls for two engineers rather than two people in skill
#
1.The right side of the screen lists the salaries for the occupations. The salaries are listed in manpower-cost units per time unit. For example, if manpower costs are defined in dollars ($) and the time unit is weeks, the salaries are listed in dollars per man-week.
To enter or change an occupation name or salary, you can use the i or
~ keys to move the cursor to the appropriate skill. You can also type the skill number, or the first letter of the skill name to move the cursor. Move the cursor to the top line, Skill # 1, and press ~.
Now, three options are displayed at the bottom of the screen:
VISISCHEDULE™
LESSON TWO
GUIDE
IBM PERSONAL COMPUTER
THE LESSONS
Select Occupat. The current name is displayed in the entry window. For this project, change the name by typing Copywriter, and pressing
the
.J key.
The cursor moves to Salary. Press the
.J key. The program asks for a
salary. If you cannot express the salary accurately in a four-digit number, the salary cost unit for the Manpower option ($, K$, or M$) in the Project Description menu should be changed.For this example, type 1000, and press the
.J
key.Now, the cursor highlights Quit. Press the
.J key to quit working with
skill level # 1. The cursor moves to highlight Skill # 2.Follow the same procedure to type in the occupation names and salaries listed below.
Skill #
2
3
4
Table 1-1. Occupations and Salaries
Occupation
Photographer Designer Model Builder
Salary
$1000 $1500 $900
The program asks for salaries in dollars per man-week, because you set Time to weeks and Manpower to dollars in the Project Description menu.
IBM PERSONAL COMPUTER
THE LESSONS LESSON TWO
Arrows _ave the cursor"
[liTER selects an itell Occupation 1 Cop.,..rlter
2 Photographer 3 D.signer
~ Model Bu IIdor
.. Md.,·
6 S.1I1 I 6 ? S. i II I 7 8 Ski II I 8 9 Ski II I 9 IDonel
Salary In
$11'I1n-lleek
11188 Ieee
1588 'J88
•
•
I I
•
Figure 1-5. Completed Occupation Listing Select [Done] to return to the Modify menu.
ENTERING THE WORKWEEK INFORMATION
013-005/P
The Modify menu returns with the cursor on Work. Select Work. The Workweek menu lets you specify the working days for a normal workweek (Normal), the holidays and other days off (Days), and the non-working weeks within the project (Weeks).
Because this announcement project is measured in weeks, you can use only one option from this menu: Weeks. The Normal and Days options can be used only if you selected Days for the Time option in the Project Description menu. Refer to the Reference for an explanation of the Normal and Days options.
The Weeks option lets you identify nonworking weeks for vacations, shutdowns for retooling, and the like.
This project has one nonworking week. Select Weeks. Type 2/15/82,
VISISCHEDULE™
GUIDEIBM PERSONAL COMPUTER
LESSON TWO THE LESSONS
This menu works differently from other menus. As the bottom line of the screen prompts, you press the Esc key when the list of nonworking weeks is correct. Instead, press the ~ key to see what happens. The non-working week you just entered is removed from the list. Press the ~ key again to put it back on the list. The ~ key alternately adds and removes weeks in this menu.
Your screen should look like Figure 1-6.
2/1 S/ 8Z- ZI21182
o add or fetlOVe c\ week. enter Its ticttf"
nhr a date ill the rorM "t1!VDD 'YY'
; 1'02
'l!Wr:t1!fI'twMWfWI,1. uy Wil'i"
Figure 1-6. Nonworking Weeks Display
013·006/P
IBM PERSONAL COMPUTER
THE LESSONS LESSON TWO
ENTERING THE JOBS
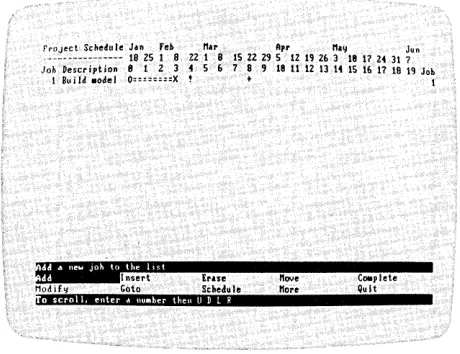
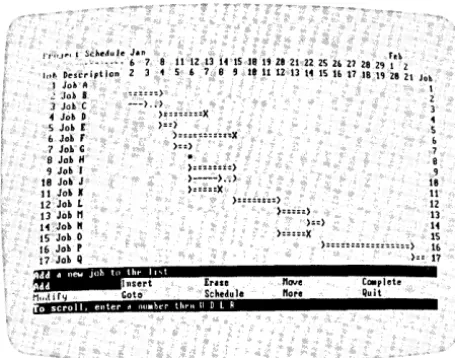
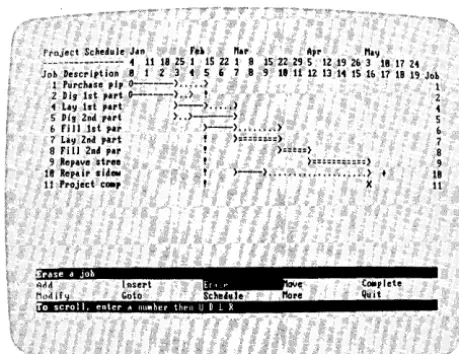
The Modify menu returns with the cursor on Schedule. Select Schedule. Figure 1-7 shows the Schedule menu.
Project Schedule Jan Feb 11., Apr ".~ Jun .--- 18 25 I 8 22 I 8 15 22 29 5 12 19 26 3 18 17 24 31 7 Job Description 8 1 Z 3 • 5 6 7 8 9 II 11 12 13 14 15 16 17 18 19 Job
ifCt'
c:."r~!!r
ErueMutiif~ Goto Schdule
,i.W];;.,.'CtSiJ.'.!!i
'.'.111"
l10ve
110re
Co.plete Quit
Figure 1-7. Schedule Menu
013·007/P
The Schedule menu is the core of the VisiSchedule program. From the Schedule menu, you define each job by number, name, duration, pre-requisites, earliest start times, costs, and other important factors. You enter the data; the program calculates and displays the results.
The top of the screen contains the time line in weekly units starting at O. When you enter each job, the job's line extends from under one time unit to another in the time line, reflecting the number of weeks it takes to complete the job. Because you chose Weeks for the Time option in the Project Description menu, the time line counts each week as one time unit. Because you typed 1/18/82 for the Start option, week 0 in the time line is Jon
18.
VISISCHEDULE™
GUIDEIBM PERSONAL COMPUTER
LESSON TWO THE LESSONS
Select Add. The program displays the Job Location menu. With the Job option, you can specify a job number. If you do not enter a job number, the program uses the number of the last job entered. When no jobs have been entered, it uses O. Then, you specify whether the new job is placed Before or After the job number. Select After. The job you'll add will be placed after job O.
After you specify where to add the job, the program displays the Job Specification menu as shown in Figure 1-8.
ProJect Schedule Jan Feb /lu Apr lilY Jon
- --- 18 25 1 8 22 1 8 IS 22 2'J 5 12 19 Z6 3 18 17 2. 31 7
Job Descriptioft 8 I 2 3 4 5 6 7 8 OJ III 11 1Z 13 14 15 16 17 18 19 Joh
P.e.e. rarl iest
Cancel
Figure 1-8. Job Specification Menu
013-008/P
This menu lets you define all details of an individual job. These details are discussed below:
• Nome is a 1- to 30-character name of the job. The name is listed at the left side of the schedule. On the screen, only the first 12 characters of the name are displayed; however, the whole name is included in reports.
Select Nome, and enter Build model of product. Nothing shows on the screen until you enter all the information and select Accept in a few minutes.
• Duration is how long the job takes. The duration is expressed in a whole number of weeks or days, depending on the time unit used in the project. In this case, it is expressed in number of weeks.
IBM PERSONAL COMPUTER
THE LESSONS LESSON TWO
• Prereq is a list of jobs that must be completed before this job can begin. You can specify no more than nine prerequisites for a given job. The initial entry for this option is the number of the preceding job, or if no other jobs exist, the initial entry is O.
No other jobs are defined, so no prerequisites exist for this job. Go on to the next option.
• Earliest is the earliest date at which this job can begin. If you do not enter a date for this option, the job begins after the last prerequisite is completed.
This job must start at the beginning because several other jobs will depend on it. Go on to the next option.
• Cost is the direct cost associated with the job. This cost is expressed in the cost units defined in the Project Description menu. For this project, it is thousands of dollars (K$).
Material and setup costs of $10,000 are associated with this job. Select Cost I and enter 1 O.
• Skill lets you specify the occupational skills required for the job along with the number of people needed for each skill category. From this information, the program calculates the manpower cost for each week.
Select Skill. The program displays the Skill menu shown in Figure 1-9.
PrOject Schedule J.n reb liar Apr lIa~ Jun --- 19 25 1 8 Z2 1 8 15 22 29 5 12 19 26 3 18 17 24 31 7 Job Description 8 I 2 3 4 5 6 7 8 9 18 11 12 13 14 15 16 11 18 19 Job
'BiUIP"P\¥ifi@!!ld:
2:8.8 " B 8 (,:8.8 1:8.8013-009/P
VISISCHEDULE™
GUIDEIBM PERSONAL COMPUTER
LESSON TWO THE LESSONS
As you move the cursor to each skill number, the program displays the assigned title in the top line of the menu. You can move the cursor in this menu with the arrow keys or by typing the skill level number. Select 4 (Model Builder) and enter 1, indicating that one model builder is needed for this job. Select Continue.
• Deadline lets you specify the date by which the job must be done. You specify the date by its day or week number on the time line. The deadline date shows on the graph as a plus sign (+), but it does not affect the scheduling. If you set a deadline beyond the project end date, it will be shown on the screen display, but will not be shown on the printed schedule.
Select Deadline. Enter 8 to mark a deadline at week 8.
You have entered all the values for job 1. If you wished, you could cancel all these values and return to the Schedule menu by selecting
Cancel. Instead, select Accept to record the values. The program displays the job on the schedule and returns to the Schedule menu as shown in Figure 1-10.
rroJect Schedu Ie Jan feb liar Apt II.~ Jun
- --- 18 25 1 8 ZZ 1 8 15 2l 29 5 12 19 26 3 18 17 24 31 7 Job Deser 'pt ion 8 1 Z 3 4 5 (, 7 8 , 18 11 12 13 14 15 16 11 18 19 Job
1 Build .odel O::n:===X ! t 1
Modify Goto Schedule t.,ij4;,;"aU;.'liii ' . , • • II'W·
nove 1I0re
Co.plet.
Quit
Figure 1-10. Schedule Menu With a Job Added
013-010IP
sym-IBM PERSONAL COMPUTER
THE LESSONS
Symbol
-)========)
)---)
> ••••••••
>
-)::::::::)
)::::====)
0========)
0---)
0: : : : : : :
:>
)========X
>: : : : : : :
:Xx
+
LESSON TWO
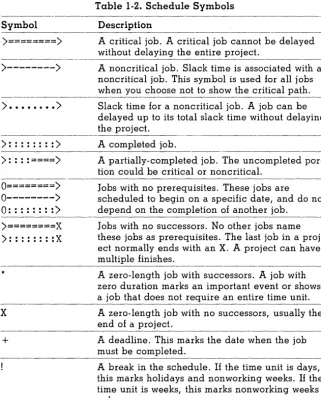
Table 1-2. Schedule Symbols Description
-A critical job. -A critical job cannot be delayed without delaying the entire project.
-A noncritical job. Slack time is associated with a noncritical job. This symbol is used for all jobs when you choose not to show the critical path. Slack time for a noncritical job. A job can be delayed up to its total slack time without delaying the project.
A completed job.
A partially-completed job. The uncompleted por-tion could be critical or noncritical.
Jobs with no prerequisites. These jobs are
scheduled to begin on a specific date, and do not depend on the completion of another job.
Jobs with no successors. No other jobs name these jobs as prerequisites. The last job in a proj-ect normally ends with an X. A projproj-ect can have multiple finishes.
A zero-length job with successors. A job with zero duration marks an important event or shows a job that does not require an entire time unit. A zero-length job with no successors, usually the end of a project.
A deadline. This marks the date when the job must be completed.
A break in the schedule. If the time unit is days, this marks holidays and nonworking weeks. If the time unit is weeks, this marks nonworking weeks only.
Adding vs. Inserting a Job
VISISCHEDULE™
IBM PERSONAL COMPUTER
LESSON TWO THE LESSONS
The major difference between the two options is in how they affect the scheduling of later jobs. Add puts the new job into the list of jobs, but does not have any effect on the schedules of existing jobs. Insert puts the new job between two jobs on the time line, and does affect the schedules of jobs that follow. Figure 1-11 shows the difference between the two options.
1 0========)
2 )====)
Original Schedule
1 0========)
3 )====)
2 )====)
Job 3 Added After Job 1
1 0========)
3 )====)
2 )====)
Job 3 Inserted After Job 1
Figure 1-11. Add vs. Insert Options
007-003
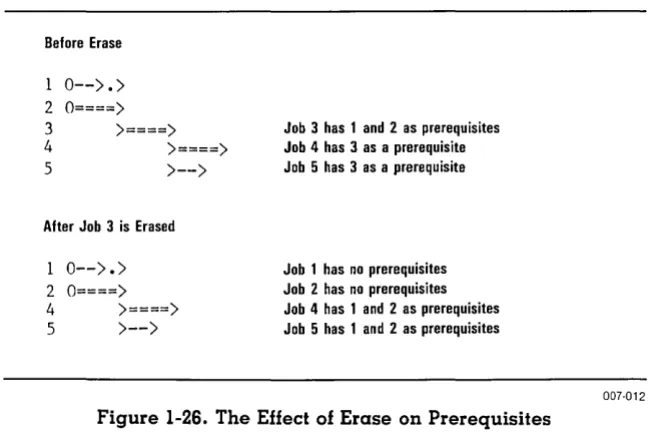
When you add or insert a new job, it assumes prerequisites depending on the option used to create it and on whether it is located before or after a specific job. Figure 1-12 shows the assignment of prerequisites for all comb ina tions.
IBM PERSONAL COMPUTER
THE LESSONS
Initial Job List
1 0--) •• )
2 0=====)
3 )==X
Adding Job 4 After Job 2
1 0--) •• )
2 0=====)
4 )==X
3 )==X
Adding Job 4 Before Job 3
1 0--) •• )
2 0=====)
4 )==X
3 )==X
Inserting Job 4 After Job 2
1 0--) ••••• )
2 0=====)
4 )==)
3 )==X
Inserting Job 4 Before Job 3
1 0--) •• )
2 0=====)
4 )==)
3 )==X
Job 3 has 1 and 2 as prerequisites
Job 4 has 2 as a prerequisite Job 3 has 1 and 2 as prerequisites
Job 4 has 1 and 2 as prerequisites Job 3 has 1 and 2 as prerequisites
Job 4 has 2 as a prerequisite Job 3 has 1 and 4 as prerequisites
Job 4 has 1 and 2 as prerequisites Job 3 has 4 as a prerequisite
LESSON TWO
007-004
VISISCHEDULE™
GUIDEIBM PERSONAL COMPUTER
LESSON TWO THE LESSONS
Adding Jobs
Now, you have one job in the schedule. When you entered job 1, it
made no difference whether you used Add or Insert to enter it. Begin-ning with the second job, you must decide which option to use. When the new job goes on the end of the list, Add is usually used.
Select Add. Then, select After. Enter job 2 according to Table 1-3.
Select Option
Name Duration Prereq Skill Accept
Table 1-3. Job 2 Data Enter
Write copy
5
o
(no prerequisites) Skill 1 (Copywriter) = 1 ContinueThe last selection is Accept from the Job Specification menu. This time you made an entry for Prereq. The program assumes a prerequisite as described in the preceding section. In this case, the assumption is wrong. There is no prerequisite, so you had to enter 0 for the
Prereq option.
Your schedule should now look like Figure 1-13.
Project Scho'. Ie Jan reb tlat Apr nay Jun
. --- 18 2S 1 8 ZZ 1 8 15 22 29 5 12 19 2& 3 18 17 24 31 7 Job Description 8 1 2 3 • 5 6 7 8 9 18 11 12 13 14 15 16 17 18 19 Job
1 Build .odol O:::;::==X ! + I
2 Write copy 0=:::==::===:;;)( Z
IBM PERSONAL COMPUTER
VISISCHEDULE™
~~T~~sTHE LESSONS LESSON TWO
Select Add. Then, select After. Enter job 3 according to Table 1-4.
Select Option
Name Duration Prereq Skill
Accept
Table 1-4. Job 3 Data Enter
Take photos of product 2
1,2
Skill 2 (Photographer) = 1 Skill 3 (Designer) = 1 Continue
This job caused quite a change in the schedule as shown in Figure 1-14. Because both jobs 1 and 2 must be completed before the photos can be taken and job 2 is two weeks longer than job I, job 1 is no longer on the critical path. Now, two weeks of slack time are indicated by the dotted line following the normal completion. If necessary, job 1 can begin as late as week 2 (Feb 1) and not affect the schedule.
Project Schedul. Jan reb Mar Apr M.~ Jun
. --- 18 25 1 8 22 1 8 15 22 29 5 12 19 26 3 18 17 24 31 7 Job Descript ion 8 1 2 3 4 5 6 7 8 9 18 11 12 13 14 15 16 17 18 19 Joh
1 Build Model 0---> ... > ~ 1 2 lirit. cop':l 0==============> 2
3 Take photos ! )=====X 3
1U't'
::'::'!!!r
EmeNod if~ Goto 8thed. Ie
,.,CS;g·IIDiaaM\!!! , • • • 11,'1;
Move More
Co.plete Quit
Figure 1-14. Schedule Menu With 3 Jobs Added
VISISCHEDULE™
IBM PERSONAL COMPUTER
LESSON TWO THE LESSONS
Inserting a Job
Suppose that you forgot a job. The copy must be reviewed before the photo session can take place. This job must fall between jobs 2 and 3. Job 2 has to be done before the new job can be started. The new job and job 1 have to be finished before job 3 can be started.
You could Add job 4, set its prerequisite, and use the Modify option to change the prerequisites for job 3. Or, you could Insert job 4 after job 2 and let the program do most of the work.
The VisiSchedule options that you have used so far were selected by moving the cursor to the option and pressing ~. Insert is one of the op-tions that can be selected by pressing only one key. Press the key on the numeric key pad that is labeled Ins. The screen immediately switches to the Job Location menu.
The Ins key works only when the Schedule menu is on the screen. Other special keys select certain options with only one keystroke; they will be explained as you use them.
Select Job and enter 2. Then, select After. Enter job 4 according to Table 1-5.
Select Option
Name Duration Skill Accept
Table 1-5. Job 4 Data
Enter
Review Copy
2
Skill 3 (Designer) = 1 Continue
IBM PERSONAL COMPUTER
THE LESSONS LESSON TWO
I'roJecl Schedu Ie J.. Fe. M.r Apr M.~ Jun --- 18 25 I 8 22 I B IS 22 29 5 12 19 2~ 3 18 17 2~ 31 7 Job Descri,tion II I 2 3 4 5 6 7 B , II 11 12 13 14 IS I~ 17 18 19 J.ob
~ ~~:~~ ~~::I g:~::~~::~~~;~;)
... )
t ~4 Revi ... CO,\I , ):::::) ~
3 Tak. ,hot os ' ) : ; ; ; ; x 3
013·013/P
Figure 1-15. Schedule Menu With 4 Jobs Added
MODIFYING JOBS
To change or check a value entered for a job, use the Modify option. For this project, use the Modify option to check that job 3 has the correct prerequisites. Select Modify, and enter 3. Then, select Prereq.
The option displays the current prerequisites. At this point, you could change the prerequisites, but jobs 1 and 4 are listed as prerequisites to job 3, as you wanted.
To exit this option without making a change, press Esc and select Cancel.
CLEANING UP THE SCHEDULE
The schedule might look better if the most important job were at the top of the list. Neither job 2 nor job 1 have prerequisites, so they could start at the same time. But because job 2 has no slack time, it must begin dur-ing week O.
VISISCHEDULE™
GUIDEIBM PERSONAL COMPUTER
LESSON TWO THE LESSONS
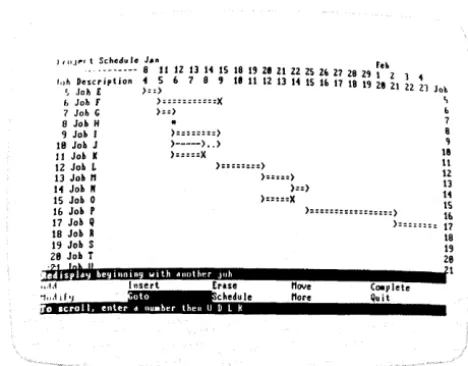
Select Move, and enter 2. Select Before. Job 2 is moved to the first position in the list, and the job list is now numbered 2, 1, 4, 3. It would look better if the jobs were numbered 1 through 4 from the top to the bottom. The Renum option does this.
Select M.ore. The More option takes you to an extension of the Schedule menu that contains several more options.
Select Renum. Because this option is irreversible, the program asks if you are sure you want to renumber. Enter Y to continue. N cancels the option. The jobs are now numbered 1 through 4 as shown in Figure 1-16.
:~~!~:~_~:~~~~~~
::n
2S fd 8 Z2 ~.r 8 15 22 29;,r
12 19 26 ~·\8 17 24 31 ~u.Joh Description 8 1 2 3 4 5 6 7 8 , 18 11 12 13 14 15 16 17 18 19 Joh
1 Write CO'II 0",===,====::,) 1
Z Bu lid second 0========) ! + Z
3 l!evietol copy }=====X 3
4 rake photos ! >'====X 4
013·014IP
Figure 1-16. Reformatted Schedule
Many more jobs can be added or inserted to complete this project. Now, you know the basics necessary to develop a complete project. You have not used all of the options (refer to Lesson Four for details on other options), but you can now create your own Schedule Graph.
Select Quit to return to the main Schedule menu.
PRINTING THE SCHEDULE GRAPH
IBM PERSONAL COMPUTER
THE LESSONS
VISISCHEDULE™
~~T~~sLESSON TWO
Before printing, it is a good idea to save the displayed project. Lesson Three discusses in detail all options associated with file and memory maintenance, including saving project files.
Beginning at the Schedule Iflenu, return to the Main menu by selecting
Quit twice. In the Main menu, select Save. Then, select [New nome].
Enter WIDGIT, and press ~J. Now the project is safely on disk.
Set up your printer according to the "IBM 80 CPS Matrix Printer Instructions" in Section 3 of the IBM Guide to Operations.
In the Main menu, press the F4 key to select Print. Select Graph. Then, select Print.
The program asks you if you wa.nt to look at the report on the screen before you print it. Enter Y. Then, press any letter key to display the top of the graph on the screen. Continue pressing any key to see the entire graph. When you are finished, the program asks if you want to print the graph.
If you don't have the standard printer, or if you're having trouble setting up your printer, press ~ to accept NO. Otherwise, enter Y.
VISISCHEDULE™
IBM PERSONAL COMPUTER
LESSON TWO THE LESSONS
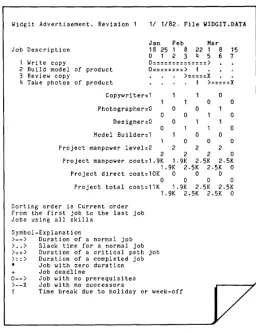
Widgit Advertisement. Revision 1 11 1/82. File WIDGIT.DATA
Jan Feb Mar
Job Description 18 25 1 8 22 1 8 15
0 1 2 3 4 5 6 1
1 Write copy 0::::::::::::::)
2 Build model of product 0::::::::) I
3 Review copy ) : : : : : x
4 Take photos of product I ) : : : : : x
Copywriter:1 0
0
Photographer:O 0 0
0 0 0
Designer:O
0 0
Model Builder:1 0 0
0 0
Project manpower level:2 2 2 2
2 2 0
Project manpower cost:1.9K 1·9K 2.5K 2.5K
1. 9K 2.5K 2.5K 0
Project direct cost:10K 0 0 0
0 0 0 0
Project total cost:11K 1. 9K 2.5K 2.5K
1. 9K 2.5K 2.5K 0
Sorting order is Current order From the first job to the last job Jobs using all skills
Symbol-Explanation
>--> Duration of a normal job
> .. ) Slack time for a normal job
>::> Duration of a critical path job
>::> Duration of a completed job
* Job with zero duration
+ Job deadline
0--) Job with no prerequisites >--X Job with no successors
Time break due to holiday or week-off
~---'
v
Figure 1-17. Schedule Graph for Widgit Project
Select Quit to return to the Main menu.
IBM PERSONAL COMPUTER
THE LESSONS LESSON TWO
ENTERING YOUR OWN PROJECTS
You have used the most important features of the VisiSchedule pro-gram. You know enough now to create your own projects.
You must understand a project before you begin entering the jobs. The VisiSchedule program is an aid in scheduling and determining costs and manpower requirements. It helps you see and understand the implica-tions of schedule changes, slips, and prerequisites. But it cannot break the project into manageable jobs, it cannot determine the time or man-power requirements for a specific job, and it cannot figure the costs associated with a job. These are things you must know before you can enter an intelligent plan.
VISISCHEDULE™
GUIDEIBM PERSONAL COMPUTER
LESSON THREE THE LESSONS
LESSON THREE: HANDLING FILES
AND MEMORY
Loading a Project File Saving a File
Clearing Memory
Changing the Data Disk Drive Deleting a File
Formatting Disks Backing up Your Data Exiting the Program
1-33 1-35 1-36 1-37 1-37 1-38 1-38 1-39
Lesson Three explains how to use the computer's memory and maintain project files. A project file is the collection of all information about a project.
The program contains eight options that deal with saving, retrieving, and managing storage files:
• Load reads a project file from disk and loads it into the computer memory.
• Save copies the project data in the computer memory onto disk for future use.
• Clear erases all project data from the computer memory.
• Prefix designates the disk drive used by the Load, Save, and Delete
options.
• Delete erases a project file from disk. Remember that you Delete the physical file from a disk and Clear the copy of a file from memory.
IBM PERSONAL COMPUTER
VISISCHEDULETM
~~~~~sTHE LESSONS LESSON THREE
• WriteDOS converts a Pascal text file to IBM DOS format. Pascal text files are created when you send a VisiSchedule report to a disk file name rather than to a printer. The WriteDOS option allows you to edit the files, line by line, with IBM DOS. This option is explained in Part II, The Reference.
• Quit lets you exit the program. At the same time, important data, such as printer setup information, is saved on disk for the next time you load the program.
If you are not continuing directly from Lesson Two, bring the Main menu on your screen.
LOADING A PROJECT FILE
Make sure the VisiSchedule Example Diskette is in the drive indicated by the Prefix
=
line in the Project Status area. If you have not changed the prefix, the line should read Prefix=
B:. The Prefix option is explained later in this lesson under "Changing the Data Disk Drive."Press the Fl key to select Load. If you are continuing directly from Lesson Two, the message, Do you wish to CLEAR memory? appears on the screen. Enter Y to clear the file from memory and continue with the load operation. If you had wanted to save the project in memory, you could have entered N.
VISISCHEDULE™
LESSON THREE
:om_'mb'."
-m'·
lfl"'rOWS .ave the c~rsor
E!'fUR seloct. an ,t ..
.. FaNf •••• ft·le]
LEVEL-DATA SCROLL. DATA
tH• BACX" t ilest (Hone]
IBM PERSONAL COMPUTER
THE LESSONS
013·015/P
Figure 1-18. Load Selection Screen
To select a file for loading, move the cursor to the file name. You can move the cursor with the i and t keys. The cursor wraps around to the opposite end of the list when you press the i key from the top of the list or the t key from the bottom of the list.
You can also jump the cursor to a file name by typing the first letter of the file name. Pressing the key again jumps the cursor to the second name beginning with that letter, and so on.
You can exit the Load option without loading a file by selecting [None]. The [". BACK" files] option allows you to load the previous ver-sion of a file .. BACK files are explained under the next section, "Saving a File. "
Move the cursor to the file name EXAMPLE1 ,DATA, and press ~. The cursor vanishes, and the drive that is specified by the Prefix option begins running.
IBM PERSONAL COMPUTER
THE LESSONS
VisiSchedule nain nenu
~
Me'lOr~'Hot clearedROOOl,39 More Jobs
Changed Project Status:
Items Title:Flrst Street Water Main
Rev.:.
F i le:EXAt1PLEI. DATA
Pref i.:D:
Challged:"o Size:l1 jobs
11"'t'ttcM",M'blii
\'11.,
Save Print Prefix Wrlt.DOS Delete
Fo",at Quit
LESSON THREE
013-016/P
Figure 1-19. The Main Menu With a File Loaded
SAVING A FILE
The Save option stores the project in memory to the data disk. It is a good idea to stop and save a project file at regular intervals as you enter it. This is especially true if the project contains many jobs. By storing the data frequently, you protect yourself against accidental data loss because of a power failure or a malfunction.
Press the F2 key to select Save. The program informs you that the proj-ect data has not been changed and asks if you want to save another copy anyway. It directs you to type Y for yes, or N for no.
It is important to keep a backup copy of your data. The methods of backing up an entire floppy disk are covered under "Backing Up Your Data" later in this lesson.
To see how the Save option works, type Y. The data entry line changes from NO to YES. Now, press
..J.
The program lists the names of all files that are on the data disk, just as
VISISCHEDULE™
LESSON THREE
GUIDE
IBM PERSONAL COMPUTER
THE LESSONS
Two items are on the list that are not file names: [New nome] and
[None]. If you select the [New nome] option, you are asked for a project file name. If you select [None], the Save option is canceled, and the Main menu is displayed.
Select [New nome]. The program asks for a new file name. The name may have up to 8 characters. Allowable characters are:
• A through Z. If you enter lowercase