CHAPTER 7
HANDHELD WEAPONS
Handheld weapons provide a significant advantage during afight. For soldiers to be well trained in their use there must be connectivity between the techniques of armed and unarmed fighting. As soldiers progress in their training, bayonet fighting techniques that are taught in initial entry training will merge with the other elements of hand-to-hand fighting to produce a soldier who is capable of operating across the full range of force.
Section I. OFFENSIVE TECHNIQUES
In most combat situations, small arms and grenades are the weapons of choice. However, in some scenarios, soldiers must engage the enemy in confined areas, such as trench clearing or room clearing or where noncombatants are present. In these instances, or when your primary weapon fails, the bayonet or knife may be the ideal weapon to dispatch the enemy. Soldiers must transition immediately and instinctively into the appropriate techniques based on the situation and the weapons at hand.
7-1. ANGLES OF ATTACK
Any attack, regardless of the type weapon, can be directed along one of nine angles of attack (Figure 7-1).
NO.6
NO." NO.3
a. No.1 Angle of Attack. A downward diagonal slash, stab, or strike toward the left
side of the defender's head, neck, or torso.
b. No.2 Angle of Attack. A downward diagonal slash, stab, or strike toward the
right side of the defender's head, neck, or torso.
c. No.3 Angle of Attack. A horizontal attack to the left side of the defender's torso
in the ribs, side, or hip region.
d. No.4 Angle of Attack. The same as No.3 angle, but to the right side.
e. No.5 Angle of Attack. A jabbing, lunging, or punching attack directed straight
toward the defender's front.
f. No.6 Angle of Attack. An attack directed straight down upon the defender. g. No.7 Angle of Attack. An upward diagonal attack toward the defender's
lower-left side.
h. No.8 Angle of Attack. An upward diagonal attack toward the defender's
lower-right side.
i. No.9 Angle of Attack. An attack directed straight up-for example, to the defender's groin.
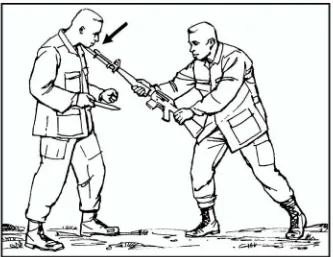
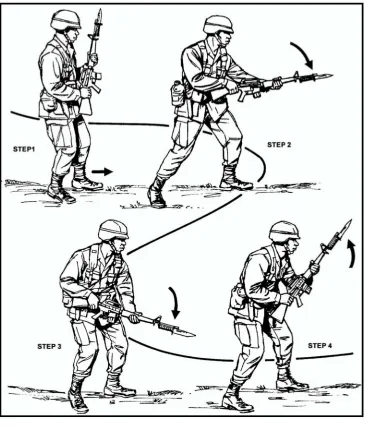
7-2. RIFLE WITH FIXED BAYONET
Figure 7-2. No.1 angle of attack with rifle and fixed bayonet.
---
)ILl- ~~:---'- .u'- ---::--
~'1':~._. --z:-...
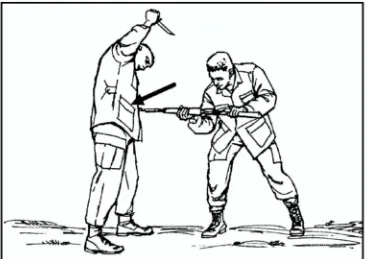
---.':+~J...Figure 7-4. No.3 angle of attack with rifle and fixed bayonet.
-
-~.-.;
~..~~=-- .
---=-~---;;~:i.~'~=--=--~~
Figure 7-6. Low No.5 angle of attack with rifle and fixed bayonet.
~ -,
~
-~- ~-:: - c::::: ...:3--=- =
<-.
~
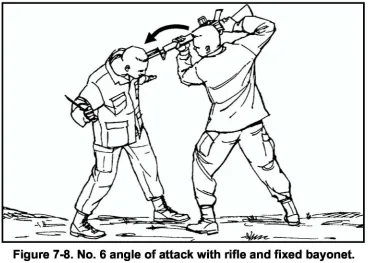
Figure 7-8. No.6 angle of attack with rifle and fixed bayonet.
a. Fighting Techniques.New weapons,improved equipment, and new tactics are
always being introduced; however, firepower alone will not always drive a determined enemy from his position. He will often remain in defensive emplacements until driven out by close combat. The role of the soldier, particularly in the final phase of the assault, remains relatively unchanged: His mission is to close with and kill, disable, or capture the enemy. This mission remains the ultimate goal of all individual training. The rifle with fixed bayonet is one of the final means of defeating an opponent in an assault.
(1) During infiltration missions at night or when secrecy must be maintained, the bayonet is an excellent silent weapon.
(2) When close-in fighting determines the use of small-arms fire or grenades to be impractical, or when the situation does not permit the loading or reloading of the rifle, the bayonet is still the weapon available to the soldier.
(3) The bayonet serves as a secondary weapon should the rifle develop a stoppage. (4) In hand-to-hand encounters, the detached bayonet may be used as a handheld weapon.
(5) The bayonet has many nonfighting uses, such as to probe for mines, to cut vegetation, and to use for other tasks where a pointed or cutting tool is needed.
b. Development. To become a successful rifle-bayonet fighter, a soldier must be
c. Principles. The bayonet is an effective weapon to be used aggressively; hesitation may mean sudden death. The soldier must attack in a relentless assault until his opponent is disabled or captured. He should be alert to take advantage of any opening. If the opponent fails to present an opening, the bayonet fighter must make one by parrying his opponent's weapon and driving his blade or rifle butt into the opponent with force.
(1) The attack should be made to a vulnerable part of the body: face, throat, chest, abdomen, or groin.
(2) In both training and combat, the rifle-bayonet fighter displays spirit by sounding off with a low and aggressive growl. This instills a feeling of confidence in his ability to close with and disable or capture the enemy.
(3) The instinctive rifle-bayonet fighting system is designed to capitalize on the natural agility and combative movements of the soldier. It must be emphasized that precise learned movements will NOT be stressed during training.
d. Positions. The soldier holds the rifle firmly but not rigidly. He relaxes all muscles not used in a specific position; tense muscles cause fatigue and may slow him down. After proper training and thorough practice, the soldier instinctively assumes the basic positions. All positions and movements described in this manual are for right-handed men. A left-handed man, or a man who desires to learn left-handed techniques, must use the opposite hand and foot for each phase of the movement described. All positions and movements can be executed with or without the magazine and with or without the sling attached.
(1) Attack Position. This is the basic starting position (A and B, Figure 7-9) from which all attack movements originate. It generally parallels a boxer's stance. The soldier assumes this position when running or hurdling obstacles. The instructor explains and demonstrates each move.
.~
--~
--=:.: : ~
(a) Take a step forward and to the side with your left foot so that your feet are a comfortable distance apart.
(b) Hold your body erect or bend slightly forward at the waist. Flex your knees and balance your body weight on the balls of your feet. Your right forearm is roughly parallel to the ground. Hold the left arm high, generally in front of the left shoulder. Maintain eye-to-eye contact with your opponent, watching his weapon and body through peripheral VISIon.
(c) Hold your rifle diagonally across your body at a sufficient distance from the body to add balance and protect you from enemy blows. Grasp the weapon in your left hand just below the upper sling swivel, and place the right hand at the small of the stock. Keep the sling facing outward and the cutting edge of the bayonet toward your opponent. The command is, ATTACK POSITION, MOVE. The instructor gives the command, and the soldiers perform the movement.
(2) Relaxed Position. The relaxed position (Figure 7-10) gives the soldier a chance to rest during training. It also allows him to direct his attention toward the instructor as he discusses and demonstrates the positions and movements. To assume the relaxed position from the attack position, straighten the waist and knees and lower the rifle across the front of your body by extending the arms downward. The command is, RELAX. The instructor gives the command, and the soldiers perform the movement.
~
---Figure 7-10. Relaxed position.
reflexes. His movements do not have to be executed in any prescribed order. He will achieve balance in his movements, be ready to strike in any direction, and keep striking until he has disabled his opponent. There are two basic movements used throughout bayonet instruction: the whirl and the crossover. These movements develop instant reaction to commands and afford the instructor maximum control of the training formation while on the training field.
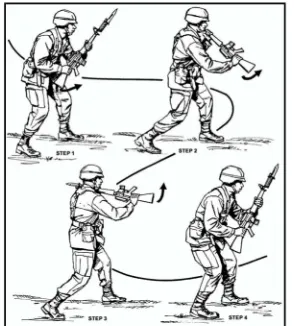
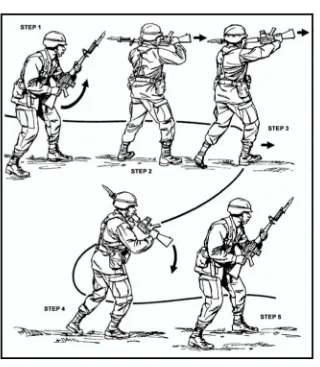
(1) Whirl Movement. The whirl (Figure 7-11, Steps 1, 2, and 3), properly executed, allows the rifle-bayonet fighter to meet a challenge from an opponent attacking him from the rear. At the completion of a whirl, the rifle remains in the attack position. The instructor explains and demonstrates how to spin your body around by pivoting on the ball of the leading foot in the direction of the leading foot, thus facing completely about. The command is, WHIRL. The instructor gives the command, and the soldiers perform the movement.
~=~
STEP 1 STEP 2 STEP 3
Figure 7-11. Whirl movement.
(2) Crossover Movement. While performing certain movements in rifle-bayonet training, two ranks will be moving toward each other. When the soldiers in ranks come too close to each other to safely execute additional movements, the crossover is used to separate the ranks a safe distance apart. The instructor explains and demonstrates how to move straight forward and pass your opponent so that your right shoulder passes his right shoulder, continue moving forward about six steps, halt, and without command, execute the whirl. Remain in the attack position and wait for further commands. The command is, CROSSOVER. The instructor gives the command, and the soldiers perform the movement.
Note: Left-handed personnel cross left shoulder to left shoulder.
be used for the initial attack or as a follow-up should the initial movement fail to find its mark. The soldiers learn these movements separately. They will learn to execute these movements in a swift and continuous series during subsequent training. During all training, the emphasis will be on conducting natural, balanced movements to effectively damage the target. Precise, learned movements will not be stressed.
(a) Thrust. The objective is to disable or capture an opponent by thrusting the bayonet blade into a vulnerable part of his body. The thrust is especially effective in areas where movement is restricted-for example, trenches, wooded areas, or built-up areas. It is also effective when an opponent is lying on the ground or in a fighting position. The instructor explains and demonstrates how to lunge forward on your leading foot without losing your balance (Figure 7-12, Step 1) and, at the same time, drive the bayonet with great force into any unguarded part of your opponent's body.
.
To accomplish this, grasp the rifle firmly with both hands and pull the stock in close to the right hip; partially extend the left arm, guiding the point of the bayonet in the general direction of the opponent's body (Figure 7-12, Step 2)..
Quickly complete the extension of the arms and body as the leading foot strikes the ground so that the bayonet penetrates the target (Figure 7-12, Step 3)..
To withdraw the bayonet, keep your feet in place, shift your body weight to the rear, and pull rearward along the same line of penetration (Figure 7-12, Step 4)..
Next, assume the attack position in preparation to continue the assault (Figure 7-12, Step 5). This movement is taught by the numbers in three phases:1. THRUST AND HOLD, MOVE. 2. WITHDRAW AND HOLD, MOVE. 3. ATTACK POSITION, MOVE.
STEP 1
,
r--STEP 4
STEP 5
~~"~---=.:.=; ~
"" ..
-~-'C!-- -~-'C!--'W'~ --:--~
~
Figure 7-12. Thrust movement.
(b) Butt Stroke. The objective is to disable or capture an opponent by delivering a forceful blow to his body with the rifle butt (Figure 7-13, Steps 1, 2, 3, and 4, and Figure 7-14, Steps 1, 2, 3, and 4). The aim of the butt stroke may be the opponent's weapon or a vulnerable portion of his body. The butt stroke may be vertical, horizontal, or somewhere between the two planes. The instructor explains and demonstrates how to step forward with your trailing foot and, at the same time using your left hand as a pivot, swing the rifle in an arc and drive the rifle butt into your opponent. To recover, bring your trailing foot forward and assume the attack position. The movement is taught by the numbers in two phases:
At combat speed, the command is, BUTT STROKE TO THE (head, groin, kidney) SERIES, MOVE. Training emphasis will be placed on movement at combat speed. The instructor gives the commands, and the soldiers perform the movement.
,-"" ~-:-.~,--~
STEP 1 STEP 2 STEP 3 STEP 4
Figure 7-13. Butt stroke to the head.
~-~ :_~-- -&_-STEP4
~
(c) Slash. The objective is to disable or capture the opponent by cutting him with the blade of the bayonet. The instructor explains and demonstrates how to step forward with your lead foot (Figure 7-15, Step 1).
.
At the same time, extend your left arm and swing the knife edge of your bayonet forward and down in a slashing arc (Figure 7-15, Steps 2 and 3)..
To recover, bring your trailing foot forward and assume the attack position (Figure 5-15, Step 4). This movement is taught by the number in two phases: 1. SLASH AND HOLD, MOVE.2. ATTACK POSITION, MOVE.
. At combat speed, the command is, SLASH SERIES, MOVE. Training emphasis will be placed on movement at combat speed. The instructor gives the commands, and the soldiers perform the movements.
STEP1
~._::
STEP 3 STEP 4
-~t..-
---..~'" -- --~
(d) Smash. The objective is to disable or capture an opponent by smashing the rifle butt into a vulnerable part of his body. The smash is often used as a follow-up to a butt stroke and is also effective in wooded areas and trenches when movement is restricted. The instructor explains and demonstrates how to push the butt of the rifle upward until horizontal (Figure 7-16, Step 1) and above the left shoulder with the bayonet pointing to the rear, sling up (Figure 7-16, Step 2). The weapon is almost horizontal to the ground at this time.
.
Step forward with the trailing foot, as in the butt stroke, and forcefully extend both arms, slamming the rifle butt into the opponent (Figure 7-16, Step 3)..
To recover, bring your trailing foot forward (Figure 7-16, Step 4) and assume the attack position (Figure 7-16, Step 5). This movement is taught by the numbers in two phases:1. SMASH AND HOLD, MOVE. 2. ATTACK POSITION, MOVE.
. At combat speed, the command is, SMASH SERIES, MOVE. Training emphasis will be placed on movement at combat speed. The instructor gives the commands, and the soldiers perform the movements.
..
STEP 3
~
STEP 4
(4) Defensive Movements. At times, the soldier may lose the initiative and be forced to defend himself. He may also meet an opponent who does not present a vulnerable area to attack. Therefore, he must make an opening by initiating a parry or block movement, then follow up with a vicious attack. The follow-up attack is immediate and violent.
CAUTION
To minimize weapon damage while using blocks and parries, limit weapon-to-weapon contact to half speed during training.
(a) Parry Movement. The objective is to counter a thrust, throw the opponent off balance, and hit a vulnerable area of his body. Timing, speed, and judgment are essential factors in these movements. The instructor explains and demonstrates how
to--.
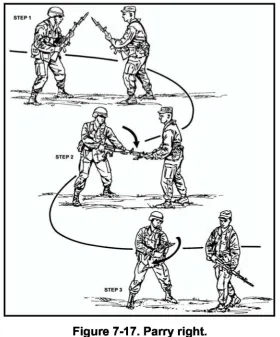
Parry right. If your opponent carries his weapon on his left hip (left-handed),you will parry it to your right. In execution, step forward with your leading foot (Figure 7-17, Step 1), strike the opponent's rifle (Figure 7-17, Step 2), deflecting it to your right (Figure 7-17, Step 3), and follow up with a thrust, slash, or butt stroke.
.
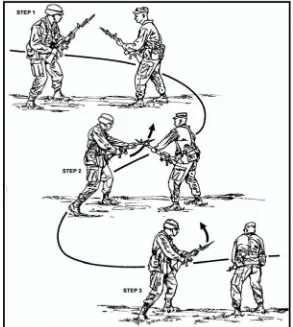
Parry left. If your opponent carries his weapon on his right hip (right-handed), you will parry it to your left. In execution, step forward with your leading foot (Figure 7-18, Step 1), strike the opponent's rifle (Figure 7-18, Step 2), deflecting it to your left (Figure 7-18, Step 3), and follow up with a thrust, slash, or butt stroke. A supplementary parry left is the follow-up attack (Figure 7-19, Steps 1,2,3,4, and 5).Figure 7-19. Parry left, slash, with follow-up butt stroke to kidney region.
.
Recovery. Immediately return to the attackposition after completing eachparry and follow-up attack. The movement is taught by the numbers in three phases:
1. PARRY RIGHT (OR LEFT), MOVE.
2. THRUST, MOVE.
3. ATTACK POSITION, MOVE.
. At combat speed, the command is, PARRY RIGHT (LEFT) or PARRY (RIGHT OR LEFT) WITH FOLLOW-UP ATTACK. The instructor gives the commands, and the soldiers perform the movements.
(b) Block. When surprised by an opponent, the block is used to cut off the path of his attack by making weapon-to-weapon contact. A block must always be followed immediately with a vicious attack. The instructor explains and demonstrates how to extend your arms using the center part of your rifle as the strike area, and cut off the opponent's attack by making weapon-to-weapon contact. Strike the opponent's weapon with enough power to throw him off balance. Blocks are taught by the numbers in two phases:
High block (Figure 7-20, Steps 1, 2, and 3). Extend your arms upward and forward at a 45-degree angle. This action deflects an opponent's slash movement by causing his bayonet or upper part of his rifle to strike against the center part of your rifle.
.
STEP 1
STEP 2
~
~>-~~
, (.
-~---=-~
.
Low block (Figure 7-21, Steps 1,2, and 3). Extend your arms downward and forward about 15 degrees from your body. This action deflects an opponent's butt stroke aimed at the groin by causing the lower part of his rifle stock to strike against the center part of your rifle.~~
STEP1~-- .):~
~TEP2
.~~
STEP 3
.
Side block (Figure 7-22, Steps I and 2). Extend your arms with the left hand high and right hand low, thus holding the rifle vertical. This block is designed to stop a butt stroke aimed at your upper body or head. Push the rifle to your left to cause the butt of the opponent's rifle to strike the center portion of your rifle..
Recovery. Counterattack each block with a thrust, butt stroke, smash, or slash..
At combat speed, the command is the same. The instructor gives the commands, and the soldiers perform the movement.-~
II' :-:--~-- -;;;....
(5) Modified Movements. Two attack movements have been modified to allow the rifle-bayonet fighter to slash or thrust an opponent without removing his hand from the pistol grip of the Ml6 rifle should the situation dictate.
(a) The modified thrust (Figure 7-23, Steps 1 and 2) is identical to the thrust with the exception of the right hand grasping the pistol grip.
--...
STEP 1 STEP 2
Figure 7-23. Modified thrust.
(b) The modified slash (Figure 7-24, Steps 1,2,3, and 4) is identical to the slash with the exception of the right hand grasping the pistol grip.
STEP1 STEP:!:
(6) Follow-up Movements. Follow-up movements are attack movements that naturally follow from the completed position of the previous movement. If the initial thrust, butt stroke, smash, or slash fails to make contact with the opponent's body, the soldier should instinctively follow up with additional movements until he has disabled or captured the opponent. It is important to follow-up the initial attack with another aggressive action so the initiative is not lost. The instructor explains and demonstrates how instinct should govern your selection of a specific follow-up movement. For
example-.
PARRY LEFT, BUTT STROKE TO THE HEAD, SMASH, SLASH, ATTACK POSITION.. PARRY LEFT, SLASH, BUTT STROKE TO THE KIDNEY, ATTACK POSITION.
. PARRY RIGHT, THRUST, BUTT STROKE TO THE GROIN, SLASH, ATTACK POSITION.
Two examples of commands using follow-up movements are:
.
PARRY LEFT (soldier executes), THRUST (soldier executes), BUTT STROKE TO THE HEAD (soldier executes), SMASH (soldier executes), SLASH (soldier executes), ATTACK POSITION (soldier assumes the attack position)..
THRUST (soldier executes), THRUST (soldier executes), THRUST (soldier executes), BUTT STROKE TO THE GROIN (soldier executes), SLASH (soldier executes), ATTACK POSITION (soldier assumes the attack position).All training will stress damage to the target and violent action, using natural movements as opposed to precise, stereotyped movements. Instinctive, aggressive action and balance are the keys to offense with the rifle and bayonet.
Note: For training purposes, the instructor may and should mix up the series of movements.
7-3. BAYONETIKNIFE
As the bayonet is an integral part of the combat soldier's equipment, it is readily available for use as a multipurpose weapon. The bayonet produces a terrifying mental effect on the enemy when in the hands of a well-trained and confident soldier. The soldier skilled in the use of the knife also increases his ability to defend against larger opponents and multiple attackers. Both these skills increase his chances of surviving and accomplishing the mission. (Although the following paragraphs say "knife," the information also applies to bayonets.)
a. Grips. The best way to hold the knife is either with the straight grip or the reverse grIp.
edge down. The cutting edge can also be held vertically or horizontally to the ground. Use the straight grip when thrusting and slashing.
(2) Reverse Grip. Grip the knife with the blade held parallel with the forearm, cutting edge facing outward. This grip conceals the knife from the enemy's view. The reverse grip also affords the most power for lethal insertion. Use this grip for slashing, stabbing, and tearing.
b. Stances. The primary stances are the knife fighter's stance and the modified stance.
(1) Knife Fighter's Stance. In this stance, the fighter stands with his feet about shoulder-width apart, dominant foot toward the rear. About 70 percent of his weight is on the front foot and 30 percent on the rear foot. He stands on the balls of both feet and holds the knife with the straight grip. The other hand is held close to his body where it is ready to use, but protected (Figure 7-25).
(2) Modified Stance. The difference in the modified stance is the knife is held close to the body with the other hand held close over the knife hand to help conceal it (Figure 7-26).
JI
-
--Figure 7-26. Modified
stance.
c. Range. The two primary ranges in knife fighting are long range and medium range. In long-range knife fighting, attacks consist of figure-eight slashes along the No.1, No.2, No.7, and No.8 angles of attack; horizontal slashes along the No.3 and No.4 angles of attack; and lunging thrusts to vital areas on the No.5 angle of attack. Usually, the straight grip is used. In medium-range knife fighting, the reverse grip provides greater power. It is used to thrust, slash, and tear along all angles of attack.
7-4. KNIFE-AGAINST-KNIFE SEQUENCE
a. Nos. 1 and 4 Angles. Two opponents assume the knife fighter's stance (Figure 7-27, Step 1). The attacker starts with a diagonal slash along the No.1 angle of attack to the throat (Figure 7-27, Step 2). He then follows through with a slash and continues with a horizontal slash back across the abdomen along the No.4 angle of attack (Figure 7-27, Step 3).He finishes the attack by using his entire body mass behind a
lunging stab into the opponent's solar plexus (Figure 7-27, Step4).
STEP 3
b. Nos. 5, 3, and 2 Angles. In this sequence, one opponent (attacker) starts an attack with a lunge along the No.5 angle of attack. At the same time, the other opponent (defender) on the left moves his body off the line of attack, parries the attacking arm, and slices the biceps of his opponent (Figure 7-28, Step 1). The defender slashes back across the groin along the No.3 angle of attack (Figure 7-28, Step 2). He finishes the attacker by continuing with an upward stroke into the armpit or throat along the No.2 angle of attack (Figure 7-28, Step 3). Throughout this sequence, the attacker's weapon hand is controlled with the defenders left hand as he attacks with his own knife hand.
STEP 1
STEP 3
c. Low No.5 Angle. In the next sequence, the attacker on the right lunges to the stomach along a low No.5 angle of attack. The defender on the left moves his body off the line of attack while parrying and slashing the wrist of the attacking knife hand as he redirects the arm (Figure 7-29, Step 1). After he slashes the wrist of his attacker, the defender continues to move around the outside and stabs the attacker's armpit (Figure 7-29, Step 2). He retracts his knife from the armpit, continues his movement
around the attacker, and slices his hamstring (Figure 7-29, Step3).
STEP 1
~~ ,...
-STEP 3
d. Optional Low No.5 Angle. The attacker on the right lunges to the stomach of his opponent (the defender) along the low No.5 angle of attack. The defender moves his body off the line of attack of the knife. Then he turns and, at the same time, delivers a slash to the attacker's throat along the No.1 angle of attack (Figure 7-30, Step 1). he defender immediately follows with another slash to the opposite side of the attacker's throat along the No.2 angle of attack (Figure 7-30, Step 2). The attacker is finished as the opponent on the left (defender) continues to slice across the abdomen with a stroke along the No.3 angle (Figure 7-30, Step 3).
Figure 7-30. Optional low No.5 angle.
7-5. ADVANCED WEAPONS TECHNIQUES AND TRAINING
For advanced training in weapons techniques, training partners should have the same skill level. Attackers can execute attacks along multiple angles of attack in combinations. The attacker must attack with a speed that offers the defender a challenge, but does not overwhelm him. It should not be a contest to see who can win, but a training exercise for both individuals.
a. Continued training in weapons techniques will lead to the partners' ability to engage in free-response fighting or sparring-that is, the individuals become adept enough to understand the principles of weapons attacks, defense, and movements so they can respond freely when attacking or defending from any angle.
Section II. FIELD-EXPEDIENT WEAPONS
To survive, the soldier in combat must be able to deal with any situation that develops. His ability to adapt any nearby object for use as a weapon in a win-or-die situation is limited only by his ingenuity and resourcefulness. Possible weapons, although not discussed herein, include ink pens or pencils; canteens tied to string to be swung; snap links at the end of sections of rope; kevlar helmets; sand, rocks, or liquids thrown into the enemy's eyes; or radio antennas. The following techniques demonstrate a few expedient weapons that are readily available to most soldiers for defense and counterattack against the bayonet and rifle with fixed bayonet.
7-6. ENTRENCHING TOOL
Almost all soldiers carry the entrenching tool. It is a versatile and formidable weapon when used by a soldier with some training. It can be used in its straight position-locked out and fully extended-or with its blade bent in a 90-degree configuration.
a. To use the entrenching tool against a rifle with fixed bayonet, the attacker lunges with a thrust to the stomach of the defender along a low No.5 angle of attack (Figure 7-31, Step 1).
(1) The defender moves just outside to avoid the lunge and meets the attacker's arm with the blade of the fully extended entrenching tool (Figure 7-31, Step 2).
(2) The defender gashes all the way up the attacker's arm with the force of both body masses coming together. The hand gripping the entrenching tool is given natural protection from the shape of the handle. The defender continues pushing the blade of the entrenching tool up and into the throat of the attacker, driving him backward and downward (Figure 7-31, Step 3).
STEP1
b. An optional use of entrenching tool against a rifle with fixed bayonet is for the attacker to lunge to the stomach of the defender (Figure 7-32, Step 1).
(1) The defender steps to the outside of the line of attack at 45 degrees to avoid the weapon. He then turns his body and strikes downward onto the attacking arm (on the radial nerve) with the blade of the entrenching tool (Figure 7-32, Step 2).
(2) He drops his full body weight down with the strike, and the force causes the attacker to collapse forward. The defender then strikes the point of the entrenching tool into the jugular notch, driving it deeply into the attacker (Figure 7-32, Step 3).
STEP 1
,
Figure 7-32. Optional use of the entrenching tool against
c. In the next two sequences, the entrenching tool is used in the bent configuration-that is, the blade is bent 90 degrees to the handle and locked into place.
(1) The attacker tries to stick the bayonet into the chest of the defender (Figure 7-33, Step 1).
(a) When the attack comes, the defender moves his body off the line of attack by stepping to the outside. He allows his weight to shift forward and uses the blade of the entrenching tool to drag along the length of the weapon, scraping the attacker's arm and hand (Figure 7-33, Step 2). The defender's hand is protected by the handle's natural design.
(b) He continues to move forward into the attacker, strikes the point of the blade into the jugular notch, and drives it downward (Figure 7-33, Step 3).
STEP 1
STEP 2 STEP 3
(2) The attacker lunges with a fixed bayonet along the No.5 angle of attack (Figure 7-34, Step 1). The defender then steps to the outside to move off the line of attack and turns; he strikes the point of the blade of the entrenching tool into the side of the attacker's throat (Figure 7-34, Step 2).
STEP 1
.:---STEP 2
-"",
~7-7. THREE-FOOT STICK
Since a stick can be found almost anywhere, a soldier should know its uses as a field-expedient weapon. The stick is a versatile weapon; its capability ranges from simple prisoner control to lethal combat.
a. Use a stick about 3 feet long and grip it by placing it in the "vee" formed between the thumb and index finger, as in a handshake. It may also be grasped by two hands and used in an unlimited number of techniques. The stick is not held at the end, but at a comfortable distance from the butt end.
b. When striking with the stick, achieve maximum power by using the entire body weight behind each blow. The desired point of contact of the weapon is the last 2 inches at the tip of the stick. The primary targets for striking with the stick are the vital body points in Chapter 4. Effective striking points are usually the wrist, hand, knees, and other bony protuberances. Soft targets include the side of the neck, jugular notch, solar plexus, and various nerve motor points. Attack soft targets by striking or thrusting the tip of the stick into the area. Three basic methods of striking
are-(1) Thrusting. Grip the stick with both hands and thrust straight into a target with the full body mass behind it.
(2) Whipping. Hold the stick in one hand and whip it in a circular motion; use the whole body mass in motion to generate power.
(3) Snapping. Snap the stick in short, shocking blows, again with the body mass behind each strike.
(a) When the attacker thrusts with a knife to the stomach of the defender with a low No.5 angle of attack, the defender moves off the line of attack to the outside and strikes vigorously downward onto the attacking wrist, hand, or arm (Figure 7-35, page 7-34, Step 1).
-~
-'--.,...-
--c:::r-:! ~~
~ :-=
~
~c,
STEP 1
STEP 2
STEP 3
~
Figure 7-35. Three-foot stick against knife.
c. When using a three-foot stick against a rifle with fixed bayonet, the defender grasps the stick with two hands, one at each end, as the attacker thrusts forward to the chest (Figure 7-36, Step 1).
(2) He then strikes forward with the forearm into the attacker's throat (Figure 7-36, Step 3). The force of the two body weights coming together is devastating. The attacker's neck is trapped in the notch formed by the stick and the defender's forearm.
(3) Using the free end of the stick as a lever, the defender steps back and uses his body weight to drive the attacker to the ground. The leverage provided by the stick against the neck creates a tremendous choke with the forearm, and the attacker loses control completely (Figure 7-36, Step 4).
STEP 2
===-~ STEP 1
~ ~~
STEP 3
7-8. SIX-FOOT POLE
Another field-expedient weapon that can mean the difference between life and death for a soldier in an unarmed conflict is a pole about 6 feet long. Examples of poles suitable for use are mop handles, pry bars, track tools, tent poles, and small trees or limbs cut to form a pole. A soldier skilled in the use of a pole as a weapon is a formidable opponent. The size and weight of the pole requires him to move his whole body to use it effectively. Its length gives the soldier an advantage of distance in most unarmed situations. There are two methods usually used in striking with a pole:
a. Swinging. Becoming effective in swinging the pole requires skilled body
movement and practice. The greatest power is developed by striking with the last 2 inches of the pole.
b. Thrusting. The pole is thrust straight along its axis with the user's body mass
firmly behind it.
(1) An attacker tries to thrust forward with a fixed bayonet (Figure 7-37, Step 1). The defender moves his body off the line of attack; he holds the tip of the pole so that the attacker runs into it from his own momentum. He then aims for the jugular notch and anchors his body firmly in place so that the full force of the attack is felt at the attacker's throat (Figure 7-37, Step 2).
(2) The defender then shifts his entire body weight forward over his lead foot and drives the attacker off his feet (Figure 7-37, Step 3).
Note: During high stress, small targets, such as the throat, may be difficult to hit. Good, large targets include the solar plexus and hip/thigh joint.
STEP 1
'-../
~--STEP 2
STEP 3