7RYLHZWKHUHSRVLWRU\
7RYLHZWKHRULJLQDOHPDLOV 7RYLHZWKHHPDLOUHSOLHV$SSHQGL[$
0LWHO1HWZRUNV0XOLWPHGLD
&RQWDFW&HQWHU
0LWHO1HWZRUNV0&&
&RQILJXULQJ0&&
To configure all components of Mitel Networks™ 6150 MCC (Mulitmedia Contact Center) you must configure 6150 MCC and some of Mitel Networks 6110 CCM (Contact Center
Management).
You can configure employees, agents, agent groups, queues, and responses with 6150 MCC Configuration.
You can configure Account Codes and Make Busy Reason Codes with 6110 CCM Configuration.
Using Internet Explorer 5.5, type in your 6110 CCM Enterprise Server IP address http:// [your 6110 CCM Enterprise Server address]/6110 CCM/
8QGHU8VHUQDPHW\SHWKHXVHUQDPH 8QGHU3DVVZRUGW\SHWKHSDVVZRUG
7RFRQILJXUHHPSOR\HHV
7RFRQILJXUHHPSOR\HHV
The Configuration window, Employees tab appears. (See Figure 1.)
$GGLQJ(PSOR\HHV
2QWKH&RQILJXUDWLRQZLQGRZFOLFNWKH(PSOR\HHVWDE &OLFN$GG
The Employee Properties window appears. (See Figure 2.)
8QGHU1DPHW\SHWKHHPSOR\HH¶VILUVWQDPHVSDFHDQGODVWQDPH
The name is two words separated by a space, and can be up to 50 characters.
NOTE: The name the employee currently uses as the window user name must be entered in the
Public Folder/Windows User Name box.
8QGHU3XEOLF)ROGHU:LQGRZV8VHU1DPHW\SHWKHHPSOR\HH¶V:LQGRZVXVHU QDPH
NOTE: The reporting number is used as identification. A reporting number for an employee can
be up to 20 characters or digits. For example, the agent Jane Smith might be reporting number JS1. This report number would be referenced when a report is created from Jane Smith’s e-mail data.
8QGHU5HSRUWLQJW\SHWKHUHSRUWLQJQXPEHU &OLFN2.
7RFRQILJXUHHPSOR\HHV
(GLWLQJ(PSOR\HHV
NOTE: You cannot edit the Public Folder/Windows User Name box therefore it does not appear
on the Employee Properties window when editing.
2QWKH&RQILJXUDWLRQZLQGRZFOLFNWKH(PSOR\HHVWDE 6HOHFWWKHHPSOR\HHZKRVHLQIRUPDWLRQ\RXZDQWWRHGLW
The Employee Properties box appears. (See Figure 3.)
6HOHFWWKHQDPHRUWKHUHSRUWLQJQXPEHU\RXZDQWWRHGLW 7\SHWKHQHZQDPHRUWKHQHZUHSRUWLQJQXPEHU
&OLFN2.
Figure 3 Employee Properties window
'HOHWLQJ(PSOR\HHV
You must delete all agents linked to the employee before the employee can be deleted. You will not be permitted to delete an employee without first deleting the linked agents. A single employee can use several agent names. Employees are linked to agent names to indicate that they refer to the same person.
&OLFNWKH$JHQWVWDE
6HOHFWDQDJHQWOLQNHGWRWKHHPSOR\HH\RXZDQWWRGHOHWH &OLFN'HOHWH
5HSHDWXQWLODOODJHQWVOLQNHGWRWKHHPSOR\HHDUHGHOHWHG &OLFNWKH(PSOR\HHVWDE
7RFRQILJXUHDJHQWV
2QWKH&RQILJXUDWLRQZLQGRZFOLFNWKH$JHQWVWDE
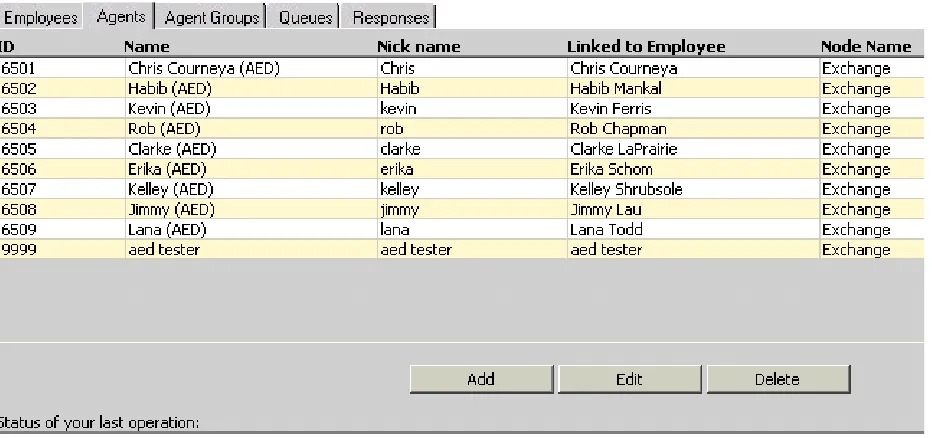
The Agents window appears. (See Figure 4.)
$GGLQJ$JHQWV
&OLFN$GG
7RFRQILJXUHDJHQWV
The Agent Properties window appears. (See Figure 5.)
8QGHU1DPHW\SHWKHQDPH
8QGHU1LFNQDPHW\SHWKHQLFNQDPH
8QGHU,'W\SHWKHHPSOR\HHLGHQWLILFDWLRQQXPEHU
8QGHU1RGHVHOHFWWKHQRGHIURPZKLFKWKHDJHQWZLOOUHFHLYHFDOOV
8QGHU/LQNHGWR(PSOR\HHVHOHFWWKHQDPHRIWKHHPSOR\HHZKRLVWKLVDJHQW
(GLWLQJ$JHQWV
2QWKH&RQILJXUDWLRQZLQGRZFOLFNWKH$JHQWVWDE
6HOHFWWKHDJHQW\RXZDQWWRHGLW &OLFN(GLW
The Agent Properties window appear. (See Figure 6.)
8QGHU1DPHW\SHWKHDJHQWQDPH
The name can be up to 50 characters.
8QGHU1LFNQDPHW\SHWKHQLFNQDPH
This nick name will help you to keep track of which queue you are working on, if you have several queues. The nick name can be up to 50 characters.
8QGHU,'W\SHWKHDJHQWLGHQWLILFDWLRQQXPEHU
The agent identification number can be from 1 to 7 digits.
8QGHU1RGHVHOHFWWKHQRGHIURPZKLFKWKHDJHQWZLOOUHFHLYHHPDLOV
A single employee can use several agent names. You must link the agent names to the employee to indicate that they refer to the same person.
8QGHU/LQNHGWR(PSOR\HHVHOHFWWKHQDPHRIWKHHPSOR\HHZKRLVWKLVDJHQW &OLFN2.
Figure 6 Agent Properties window
'HOHWLQJ$JHQWV
2QWKH&RQILJXUDWLRQZLQGRZFOLFNWKH$JHQWVWDE 6HOHFWWKHDJHQW\RXZDQWWRGHOHWH
7RFRQILJXUHDJHQWJURXSV
7RFRQILJXUHDJHQWJURXSV
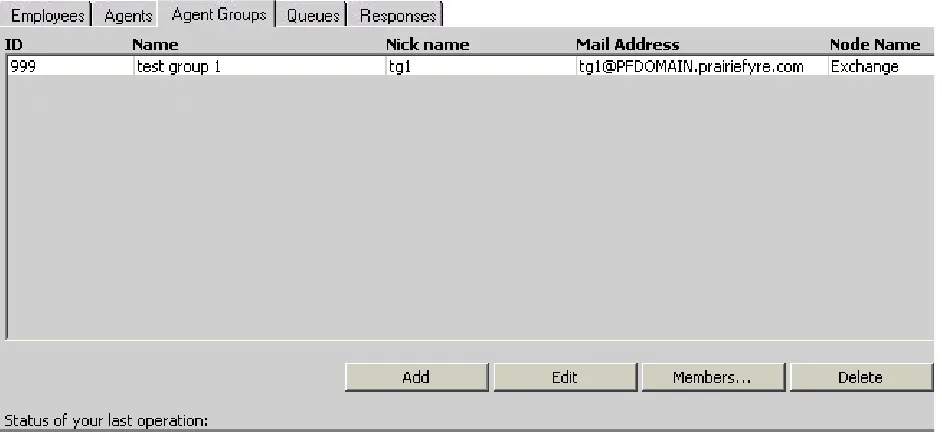
2QWKH&RQILJXUDWLRQZLQGRZFOLFNWKH$JHQW*URXSVWDE
The Agent Groups window appears. (See Figure 7.)
$GGLQJ$JHQW*URXSV
&OLFN$GG
The Agent Group Properties window appears. (See Figure 8.)
8QGHU1DPHW\SHWKHDJHQWJURXSQDPH
8QGHU3XEOLF)ROGHU1DPHW\SHWKHDJHQWJURXS¶V:LQGRZVXVHUQDPH 8QGHU,'W\SHWKHDJHQWJURXSLGHQWLILFDWLRQQXPEHU
The agent group identification number must be 3 digits.
8QGHU1RGHVHOHFWWKHQRGHIURPZKLFKWKHDJHQWJURXSZLOOUHFHLYHFDOOV &OLFN2.
Figure 8 Agent Group Properties window
(GLWLQJ$JHQW*URXSV
&OLFNWKH$JHQW*URXSVWDE 6HOHFWDQDJHQWJURXS &OLFN(GLW
The Agent Group Properties window appears. (See Figure 9.)
6HOHFWWKHQDPHRULGHQWLILFDWLRQ\RXZDQWWRHGLW
The agent group identification number must be 3 digits.
7\SHWKHQHZLWHP
$OWHUQDWLYHO\VHOHFWWKHQHZQRGH &OLFN2.
7RFRQILJXUHDJHQWJURXSV
'HOHWLQJ$JHQW*URXSV
You must delete all queues links to the agent group before the agent group can be deleted. You will not be permitted to delete an agent group without first deleting the linked queues.
&OLFNWKH4XHXHVWDE
6HOHFWDTXHXHOLQNHGWRWKHDJHQWJURXS\RXZDQWWRGHOHWH &OLFN'HOHWH
5HSHDWXQWLODOOTXHXHVOLQNHGWRWKHDJHQWJURXSDUHGHOHWHG &OLFNWKH$JHQW*URXSVWDE
7RFRQILJXUHPHPEHUVRIDQDJHQWJURXS
You can add or remove the agents that compose the agent group with the Members button.
$GGLQJDQDJHQWWRDQDJHQWJURXS
&OLFNWKH$JHQW*URXSVWDE
6HOHFWWKHDJHQWJURXSWRZKLFK\RXZDQWWRDGGWKHDJHQW &OLFN0HPEHUV
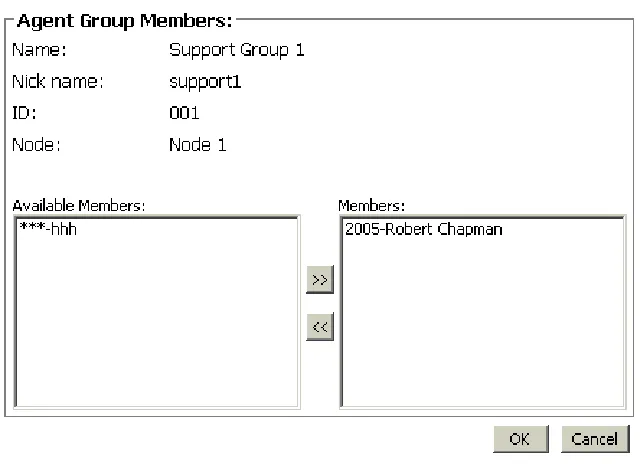
The Agent Group Members window appears. (See Figure 10.)
6HOHFWDQDJHQWIURPWKH$YDLODEOH0HPEHUVOLVW &OLFNWKHDUURZVSRLQWLQJWRZDUGVWKH0HPEHUOLVW &OLFN2.
Figure 10 Agent Group Members window
5HPRYLQJDQDJHQWIURPDQDJHQWJURXS
&OLFNWKH$JHQW*URXSVWDE
6HOHFWWKHDJHQWJURXSWRZKLFK\RXZDQWWRUHPRYHWKHDJHQW &OLFN0HPEHUV
6HOHFWDQDJHQWIURPWKH0HPEHUVOLVW
7RFRQILJXUHTXHXHV
7RFRQILJXUHTXHXHV
&OLFNWKH4XHXHVWDEThe Queues window appears. (See Figure 11.)
$GGLQJ4XHXHV
&OLFN$GG
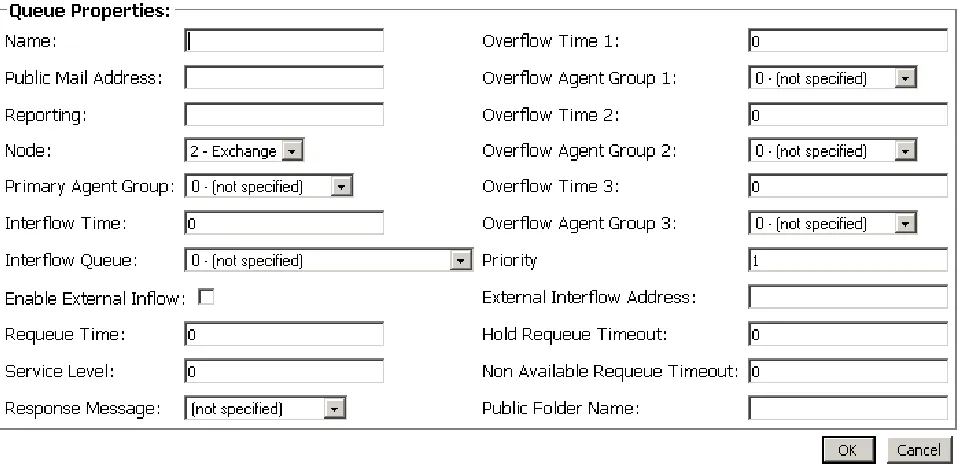
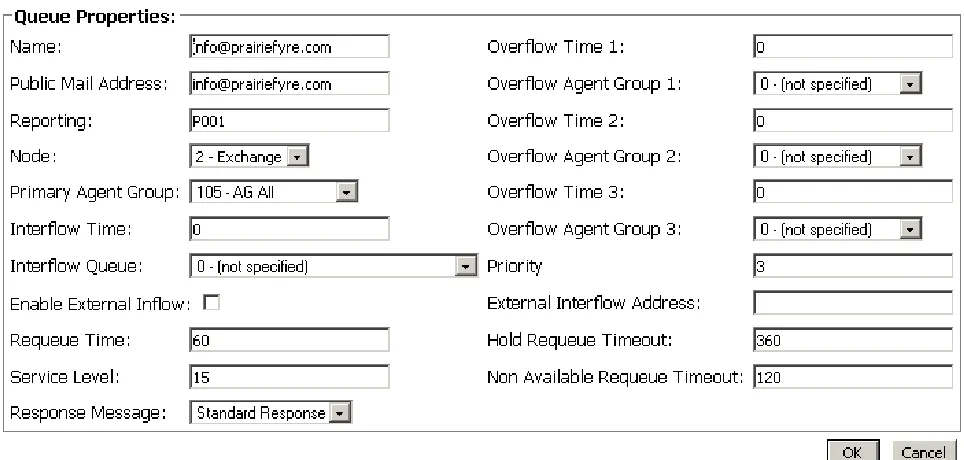
The Queue Properties window appears. (See Figure 12.)
8QGHU1DPHW\SHWKHTXHXHQDPHXSWRFKDUDFWHUV 8QGHU3XEOLF0DLO$GGUHVVW\SHWKHDGGUHVV
8QGHU5HSRUWLQJW\SHWKHTXHXHUHSRUWLQJQXPEHU3[[[ 6HOHFWWKH1RGH\RXZDQW
6HOHFWWKHTXHXHWRWKH3ULPDU\$JHQW*URXSQXPEHUUDQJLQJIURP 7\SHWKH,QWHUIORZ7LPHLQPLQXWHV
6HOHFWWKH,QWHUIORZ4XHXH
,I\RXZDQWWRGLUHFWLQFRPLQJHPDLOWRDQHPDLODGGUHVVFOLFNWKH(QDEOH([WHUQDO ,QIORZFKHFNER[
7\SHWKH5HTXHXH7LPHLQPLQXWHV 7\SHWKH6HUYLFH/HYHOLQPLQXWHV 6HOHFWD5HVSRQVH0HVVDJH
7\SHWKH2YHUIORZ7LPHDQGLQPLQXWHV
6HOHFWWKHTXHXHRIWKHDJHQWJURXSIRU2YHUIORZ$JHQW*URXSDQGUDQJLQJ IURP
7\SHWKH3ULRULW\YDOXHRIWKHTXHXH
,I\RXKDYHHQDEOHGWKH([WHUQDO,QIORZFKHFNER[W\SHWKH([WHUQDO,QWHUIORZ $GGUHVVHPDLODGGUHVV\RXZDQWWKHLQFRPLQJHPDLOWREHGLUHFWHGWR
7\SHWKH+ROG5HTXHXH7LPHRXWLQPLQXWHV
7\SHWKH1RQ$YDLODEOH5HTXHXH7LPHRXWLQPLQXWHV 7\SHWKH3XEOLF)ROGHU1DPH
&OLFN2.
7RFRQILJXUHTXHXHV
(GLWLQJ4XHXHV
&OLFNWKH4XHXHVWDE &OLFN(GLW
The Queue Properties window appears. (See Figure 13.)
7\SHRUVHOHFWWKHLQIRUPDWLRQWREHHGLWHG 7\SHRUVHOHFWWKHFRUUHFWLQIRUPDWLRQ &OLFN2.
Figure 13 Queue Properties window
'HOHWLQJ4XHXHV
Queues are linked to agent groups. Agent groups are linked to agents. You must first find the agent group(s) linked to the queue you want to delete. Then you must find the agents that are linked with that agent group.
You must delete all agents linked with the agent group before the agent group can be deleted. You will not be permitted to delete an agent group without first deleting the linked agents. Then you must delete the agent group, and only then can you delete the queue.
&OLFNWKH$JHQWVWDE
6HOHFWHDFKDJHQW\RXZDQWWRGHOHWH &OLFN'HOHWH
&OLFNWKH$JHQW*URXSVWDE
6HOHFWHDFKDJHQWJURXS\RXZDQWWRGHOHWH &OLFN'HOHWH
7RFRQILJXUHUHVSRQVHV
7RFRQILJXUHUHVSRQVHV
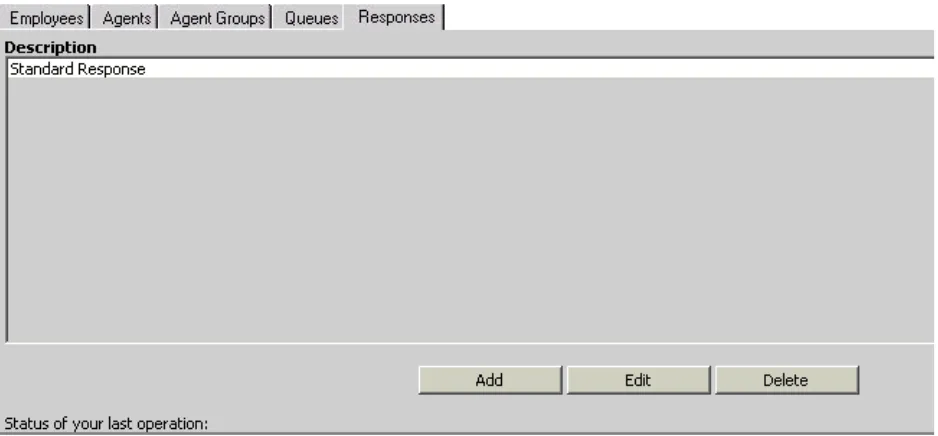
&OLFNWKH5HVSRQVHVWDEThe Responses window appears. (See Figure 14.)
&OLFN$GG
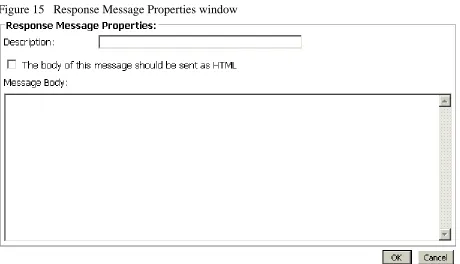
The Response Message Properties window appears. (See Figure 15.)
$GGLQJ5HVSRQVHV
8QGHU'HVFULSWLRQW\SHWKHUHVSRQVHGHVFULSWLRQ
For example, type “out of office” if you will use this response when you are out of the office.
6HOHFWWKH7KHERG\RIWKLVPHVVDJHVKRXOGEHVHQWDV+70/FKHFNER[
You must have Internet Explorer 5.5 to support the HTML features.
8QGHU0HVVDJH%RG\W\SHWKHPHVVDJH &OLFN2.
7RFRQILJXUHUHVSRQVHV
(GLWLQJ5HVSRQVHV
&OLFNWKH5HVSRQVHVWDE
6HOHFWWKHUHVSRQVH\RXZDQWWRHGLW &OLFN(GLW
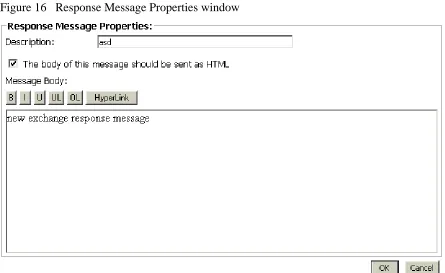
The Response Message Properties window appears. (See Figure 16.)
8QGHU'HVFULSWLRQW\SHWKHQHZGHVFULSWLRQ 8QGHU0HVVDJH%RG\W\SHWKHQHZPHVVDJH &OLFN2.
Figure 16 Response Message Properties window
'HOHWLQJ5HVSRQVHV
&OLFNWKH5HVSRQVHVWDE
&RQILJXULQJ&&0
8VLQJ,QWHUQHW([SORUHUW\SHWKH85/KWWS,3DGGUHVV&&0 VWDUWBHQDVS
8QGHU8VHUQDPHW\SHWKHXVHUQDPH 8QGHU3DVVZRUGW\SHWKHSDVVZRUG &OLFN<RXU6LWH !&RQILJXUDWLRQ
7RFRQILJXUH$FFRXQW&RGHV
$GGLQJDQ$FFRXQW&RGH
&OLFNWKH$FFRXQW&RGHWDE
The Account Code window appears. (See Figure 17.)
5LJKWFOLFNWKHILUVW$FFRXQW&RGHDQGVHOHFW$GG
7RFRQILJXUH$FFRXQW&RGHV
The Add Account Code window appears. (See Figure 18.)
8QGHU5HSRUWLQJW\SHWKH$FFRXQW&RGH
8QGHU1DPHW\SHWKHQDPHRIWKH$FFRXQW&RGH &OLFN$GG$OO
Figure 18 Add Account Code window
The Your Site Configuration window appears indicating the success or failure of the addition. (See Figure 19.)
&OLFN2.
(GLWLQJDQ$FFRXQW&RGH
&OLFNWKH$FFRXQW&RGHWDE
5LJKWFOLFNWKH$FFRXQW&RGHVDQGVHOHFW(GLW 6HOHFWWKH$FFRXQW&RGH\RXZDQWWRHGLW
8QGHU5HSRUWLQJW\SHWKHFRUUHFW$FFRXQW&RGH 8QGHU1DPHW\SHWKHFRUUHFWQDPH
3UHVV(QWHU &OLFN8SGDWH
The Your Site Configuration window appears indicating the success or failure of the edition.
7RFRQILJXUH$FFRXQW&RGHV
'HOHWLQJDQ$FFRXQW&RGH
&OLFNWKH$FFRXQW&RGHWDE
5LJKWFOLFNWKH$FFRXQW&RGHVDQGVHOHFW'HOHWH
The Delete Account Code window appears. (See Figure 20.)
6HOHFWWKH$FFRXQW&RGH\RXZDQWWRGHOHWH &OLFN5HPRYH
The Delete Account Code window appears. (See Figure 20.)
&OLFN<HV
The Your Site Configuration window appears indicating the success or failure of the deletion.
&OLFN2. &OLFN&ORVH
7RFRQILJXUH0DNH%XV\5HDVRQ&RGHV
$GGLQJD0DNH%XV\5HDVRQ&RGH
&OLFNWKH0DNH%XV\5HDVRQ&RGHVWDE
5LJKWFOLFNWKHILUVW0DNH%XV\&RGHDQGVHOHFW$GG
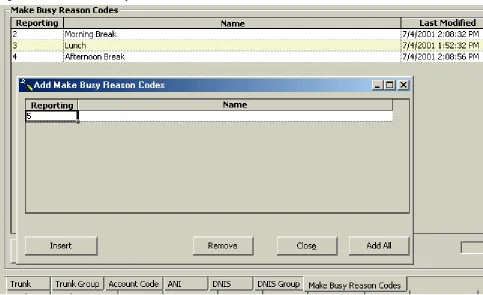
The Make Busy Reason Codes window appears. (See Figure 21.)
8QGHU5HSRUWLQJW\SHWKH0DNH%XV\&RGH
8QGHU1DPHW\SHWKHQDPHRIWKH0DNH%XV\&RGH &OLFN$GG$OO
7RFRQILJXUH0DNH%XV\5HDVRQ
The Your Site Configuration window appears indicating the success or failure of the addition. (See Figure 22.)
&OLFN2.
Figure 22 Your Site Configuration window
(GLWLQJD0DNH%XV\5HDVRQ&RGH
&OLFNWKH0DNH%XV\5HDVRQ&RGHWDE
5LJKWFOLFNWKH0DNH%XV\5HDVRQ&RGHVDQGVHOHFW(GLW 6HOHFWWKH0DNH%XV\5HDVRQ&RGH\RXZDQWWRHGLW
8QGHU5HSRUWLQJW\SHWKHFRUUHFW0DNH%XV\5HDVRQ&RGH 8QGHU1DPHW\SHWKHFRUUHFWQDPH
3UHVV(QWHU &OLFN8SGDWH
The Your Site Configuration window appears indicating the success or failure of the edition.
&OLFN2.
'HOHWLQJD0DNH%XV\5HDVRQ&RGH
&OLFNWKH0DNH%XV\5HDVRQ&RGHWDE
5LJKWFOLFNWKH0DNH%XV\5HDVRQ&RGHVDQGVHOHFW'HOHWH 6HOHFWWKH0DNH%XV\5HDVRQ&RGH\RXZDQWWRGHOHWH &OLFN5HPRYH
The Your Site Configuration window appears.
&OLFN<HV
The Your Site Configuration window appears indicating the success or failure of the deletion.
&KDQJLQJ0&&RSWLRQV
There are three types of 6150 MCC options that can be changed:
5HDO7LPH6HUYHU&RQQHFWLRQ3DUDPHWHUV 0&&6WDUWXS2SWLRQV
0&&0DLO$UULYDO2SWLRQV
RealTime Server Connection Parameters options allow you to change the IP address and port number.
The 6150 MCC Startup options allow you to change which inbox appears when Outlook 2000 is opened, make the log on window appear when Outlook is opened, and view the 6150 MCC shortcuts.
7RFKDQJHWKH,3DGGUHVVDQGSRUW
7RFKDQJHWKH,3DGGUHVVDQGSRUWQXPEHU
'RXEOHFOLFNRQWKH2XWORRNGHVNWRSLFRQOutlook 2000 opens.
&OLFN7RROV !2SWLRQV
The Options window appears. (See Figure 23.)
&OLFNWKH0&&WDE
8QGHU,3$GGUHVVW\SHWKHFRUUHFW,3$GGUHVV 8QGHU3RUW1XPEHUW\SHWKHFRUUHFW3RUW1XPEHU &OLFN2.
7RRSHQ2XWORRN
If you have not yet installed Microsoft Outlook 2000 on the client computer, do so now.
NOTE: The user name for the client computer installation is the user’s name not prairieFyre.
See Mitel Networks 6150 Mulitmedia Contact Center Installation Guide: Installing Outlook 2000 and Starting Outlook.
The first time you start Outlook 2000 after you have installed 6150 MCC, you will be asked if the 6150 MCC plug-in should be loaded each time Outlook 2000 is started.
NOTE: 'RQRWORDGWKH0&&SOXJLQLI\RXDUHRSHQLQJ2XWORRNRQDFRPSXWHU WKDWDFWVDVERWKVHUYHUDQGFOLHQWFRPSXWHU$VHUYHUZLOOVWDUW2XWORRNIRUUHDVRQV DGGLWLRQDOWRHPDLOUHWULHYDO ,I\RXGRQRWORDGWKHSOXJLQ\RXZLOOQHHGWRORDGLWPDQXDOO\ZKHQ\RXZDQWWR DFFHVV\RXU0&&HPDLO 2SHQLQJ2XWORRN
'RXEOHFOLFNWKH2XWORRNGHVNWRSLFRQ
The Inbox Microsoft Outlook window appears.
0DQXDOO\ORDGLQJWKH0&&SOXJLQ
&OLFN7RROV !2SWLRQV
The Options window appears.
&OLFNWKH2WKHUWDE
8QGHU*HQHUDOFOLFN$GYDQFHG2SWLRQV
The Advanced Options window appears.
&OLFN&20$GG,QV
6HOHFWWKH0&&2XWORRN3OXJLQFKHFNER[ &OLFN2.
7RYLHZWKH0&&LQER[ZKHQ
7RYLHZWKH0&&LQER[ZKHQ2XWORRNVWDUWVXS
If the 6150 MCC plug-in is loaded, then when you open Outlook 2000, by default, you will be directed to your 6150 MCC inbox, located in the Public Folders. That means that you already will view the 6150 MCC inbox when Outlook starts up. (See Figure 24.)
However, if the 6150 MCC plug-in is not loaded, then when you open Outlook 2000, you will be directed to your personal inbox. You will have to go to your options window and load 6150 MCC manually, and then change the Go to my Agent Inbox folder 6150 MCC Startup Option.
See “Manually loading the 6150 MCC plug-in” on page 28.
Go to my Agent Inbox folder 6150 MCC Startup Option
7RYLHZWKH0&&LQER[ZKHQ
The Options window appears. (See Figure 25.)
&OLFNWKH0&&WDE
8QGHU0&&6WDUWXS2SWLRQVVHOHFWWKH*RWRP\$JHQW,QER[IROGHUFKHFN ER[
&OLFN2.
7RGLVSOD\0&&VKRUWFXWV
You can display 6150 MCC shortcuts with the 6150 MCC Startup Options.
6HOHFW\RXU0&&LQER[ &OLFN7RROV !2SWLRQV
The Options window appears. (See Figure 26.)
&OLFNWKH0&&WDE
8QGHU0&&6WDUWXS2SWLRQVVHOHFWWKH'LVSOD\0&&VKRUWFXWVFKHFN ER[
&OLFN2.
7RGLVSOD\WKHORJRQZLQGRZZKHQ
7RGLVSOD\WKHORJRQZLQGRZZKHQ2XWORRNRSHQV
You can display the log on window when Outlook 2000 opens.
6HOHFW\RXU0&&LQER[ &OLFN7RROV !2SWLRQV
The Options window appears. (See Figure 27.)
&OLFNWKH0&&WDE
8QGHU0&&6WDUWXS2SWLRQVVHOHFWWKH'LVSOD\/RJLQIRUPFKHFNER[ &OLFN2.
7RPDNH2XWORRN\RXUWRSZLQGRZZKHQDQHPDLODUULYHV
You can make an incoming e-mail appear as your top window with the 6150 MCC Mail Arrival Options.
6HOHFW\RXU0&&LQER[ &OLFN7RROV !2SWLRQV
The Options window appears. (See Figure 28.)
&OLFNWKH0&&WDE
8QGHU0&&0DLO$UULYDO2SWLRQVVHOHFWWKH0DNH2XWORRNP\WRSZLQGRZ FKHFNER[
6HOHFWWKHXQOHVVDQHPDLOLVDFWLYHFKHFNER[ &OLFN2.
7RGLUHFWHPDLOWRWKH0&&LQ
7RGLUHFWHPDLOWRWKH0&&LQER[
All e-mail, by default, is sent to your personal inbox. You can send 6150 MCC e-mail to your Agent Inbox public folder with the 6150 MCC Mail Arrival Options.
6HOHFW\RXU0&&LQER[ &OLFN7RROV !2SWLRQV
The Options window appears. (See Figure 29.)
&OLFNWKH0&&WDE
8QGHU0&&0DLO$UULYDO2SWLRQVVHOHFW*RGLUHFWO\WRP\$JHQW,QER[ IROGHUFKHFNER[
&OLFN2.
7RFKDQJHWKH0&&HPDLODUULYDOVRXQGILOH
You can change the 6150 MCC e-mail arrival sound file with the 6150 MCC Mail Arrival Options.
6HOHFW\RXU0&&LQER[ FOLFN7RROV !2SWLRQV
The Options window appears. (See Figure 30.)
&OLFNWKH0&&WDE &OLFNWKHHOOLSVHVEXWWRQ
6HOHFWWKHVRXQGILOH:$9WKDW\RXZDQW &OLFN2SHQ
QGHU0&&0DLO$UULYDO2SWLRQVVHOHFW3OD\WKLVVRXQGILOHFKHFNER[ &OLFN2.
7RORJRQWR0&&
6HWWLQJDJHQWDFWLRQV
Agent actions are logging on, logging off, setting Make busy Reason Codes, and removing Make Busy codes.
7RORJRQWR0&&
2SHQ2XWORRN
&OLFN$JHQW$FWLRQV !/RJLQ6HH)LJXUH
Figure 31 6150 MCC: Login
The 6150 MCC Login window appears. (See Figure 32.)
&OLFNWKH$JHQW,'FKHFNER[WKDW\RXZLOOXVHWRORJRQ &OLFN/RJLQ
You are now logged on and available to answer incoming e-mails. (See Figure 33.)
Figure 33 6150 MCC: logged on and available
7RORJRIIIURP0&&
2QWKH,QER[0LFURVRIW2XWORRNZLQGRZFOLFN$JHQW$FWLRQV !/RJRXW6HH )LJXUH
7RVHWD0DNH%XV\5HDVRQ&RGH
7RVHWD0DNH%XV\5HDVRQ&RGH
2SHQ2XWORRN
&OLFN$JHQW$FWLRQV !6HW0DNH%XV\
6HOHFWWKH0DNH%XV\5HDVRQFRGH\RXZDQWWRDSSO\6HH)LJXUH
The Make Busy Reason (MKB) code now appears as Morning Break. (See Figure 36.)
Figure 36 Morning Break
7RUHPRYH0DNH%XV\
2QWKH,QER[0LFURVRIW2XWORRNZLQGRZFOLFN$JHQW$FWLRQV !5HPRYH0DNH %XV\6HH)LJXUH
7RUHPRYH0DNH%XV\
5HVSRQGLQJWRDQHPDLO
When you select a 6150 MCC e-mail, the e-mail window appears. (See Figure 38.)
You have five options when responding to the e-mail:
6HW$FFRXQW&RGHV
+ROGWKHHPDLO 7UDQVIHUWKHHPDLO
1R5HSO\1HHGHG
6HQGWKHHPDLO
You can add an account code to indicate if the customer was happy with the service. You can hold the e-mail while waiting for further information before you respond to the customer’s request, or you can transfer the e-mail to another agent or queue who has the required information. You can reply to the e-mail and send it, or you can tag it with No Reply Needed.
7RVHWDQ$FFRXQW&RGH
2QWKH0&&HPDLOZLQGRZFOLFN$FFRXQW&RGHV
The 6150 MCC Account Codes window appears. (See Figure 39.)
6HOHFWWKHFKHFNER[RIWKH$FFRXQW&RGH\RXZDQWWRDSSO\ &OLFN6XEPLW
7RKROGDQHPDLO
7RKROGDQHPDLO
If you cannot answer an e-mail immediately, you can hold it until you have the information required to answer it. You will still receive other e-mails while you are on hold. When you are ready to answer the e-mail, you select it, respond to it, and send it as you would a new e-mail.
2QWKH0&&HPDLOZLQGRZFOLFN+ROG
The agent state will indicate that the agent is holding an e-mail. (See Figure 40.)
7RWUDQVIHUDQHPDLO
You can transfer an e-mail to an agent or to a queue.
2QWKH0&&HPDLOZLQGRZFOLFN7UDQVIHU
The 6150 MCC Transfer window appears. (See Figure 41).
8QGHU7UDQVIHU7RVHOHFWDJHQWRUTXHXH
6HOHFWWKHFKHFNER[RIWKHDJHQWRUTXHXHWRZKRP\RXDUHVHQGLQJWKHHPDLO &OLFN7UDQVIHU
7RVHW1R5HSO\1HHGHG
7RVHW1R5HSO\1HHGHG
2QWKH0&&HPDLOZLQGRZFOLFN1R5HSO\1HHGHG
The 6150 MCC Outlook Plugin window appears. (See Figure 42.)
&OLFN<HV
Figure 42 6150 MCC Outlook Plugin
7RVHQGDUHSO\
There is no reply button, you click send to reply to the customer.
9LHZLQJHPDLOKLVWRU\
You can view e-mail history with the 6150 MCC e-mail response window. (See Figure 43.)
7RYLHZHPDLOKLVWRU\
&OLFNWKH&OLHQW+LVWRU\WDE7RYLHZHPDLOKLVWRU\
No history is currently displayed. (See Figure 44.)
You must choose from four types of client history:
&XUUHQWFDVH
The current case consists of the e-mail currently in the Message window and all associated correspondence spawning from that particular e-mail.
(QWLUHKLVWRU\
The entire history consists of all e-mails from that particular client and all the responses.
6SHFLILFHPDLO
A specific e-mail that you request by inputing the message ID of that e-mail.
&XUUHQWHPDLO
The current e-mail is the e-mail currently in the Message window.
7RYLHZ&XUUHQW&DVH
&OLFN'LVSOD\&XUUHQW&DVH
The e-mail currently in the Message window, and all associated correspondence spawning from that e-mail, appears in the Client History window. (See Figure 45.)
7RYLHZHPDLOKLVWRU\
7RYLHZ(QWLUH+LVWRU\
&OLFN'LVSOD\(QWLUH+LVWRU\
All e-mails from that particular client and the responses appear in the Client History window. (See Figure 46.)
7RYLHZD6SHFLILF(PDLO
&OLFN'LVSOD\6SHFLILF(PDLO
The Message ID box appears. (See Figure 47.)
7\SHWKHGLJLW0HVVDJH,'QXPEHURIWKHPHVVDJH\RXZDQWWRYLHZSUHFHGHGE\ SI)RUH[DPSOHW\SHSI
&OLFN2.
Figure 47 Display Specific E-mail: Message ID
7RYLHZHPDLOKLVWRU\
The specific e-mail that you requested appears in the Client History window. (See Figure 49.)
7RYLHZWKH&XUUHQW(PDLO
&OLFN'LVSOD\&XUUHQW(PDLO
The e-mail currently in the Message window appears in the Client History window. (See Figure 50.)
7RFUHDWHDWHPSODWH
&UHDWLQJDQGXVLQJD0&&WHPSODWH
You can create a template from a post in your personal inbox for use with each 6150 MCC queue you are assigned. This template is then used to frame your responses and should contain standard information. For example, the template should contain your name and your company’s e-mail address.
7RFUHDWHDWHPSODWH
2SHQ\RXUSHUVRQDOLQER[5LJKWFOLFN\RXUSHUVRQDOLQER[DQGVHOHFW1HZ)ROGHU
The Create New Folder window appears. (See Figure 51.)
8QGHU1DPHW\SH0&&7HPSODWHV &OLFN2.
Figure 51 Create New Folder
The 6150 MCC Templates folder appears under your personal inbox.
The Untitled - Discussion window appears.
8QGHU6XEMHFWW\SHWKHQDPHRIWKHTXHXHIRUZKLFK\RXDUHFUHDWLQJWKHWHPSODWH )RUH[DPSOHW\SH6XSSRUW
The name of the window changes to Support - Discussion. (See Figure 52.)
7\SHVWDQGDUGLQIRUPDWLRQIRUWKLVWHPSODWH)RUH[DPSOHODEHOWKHWHPSODWHDVD VXSSRUWUHVSRQVHWKHQW\SH\RXUQDPHWKHFRPSDQ\VQDPHDQGDJUHHWLQJ &OLFN3RVW
7RXVHD0&&WHPSODWH
7RXVHD0&&WHPSODWH
2SHQ\RXU0&&LQER[6HOHFWDQXQDQVZHUHGHPDLO
The 6150 MCC e-mail window appears. (See Figure 53.)
2SHQ$('7HPSODWHV
2SHQWKHWHPSODWHIRUWKHTXHXH\RXDUHFXUUHQWO\ZRUNLQJLQ)RUH[DPSOHVHOHFWWKH WHPSODWHODEHOOHG6XSSRUW
The 6150 MCC Support Templates information will be added above the e-mail request information.
7\SH\RXUUHVSRQVHWRWKHHPDLOLQWKHVXSSRUWWHPSODWH &OLFN6HQG
9LHZLQJ0LQL4XHXH1RZ6WDWV
Mini Queue Now Stats provides information on the number of available agents, the number of e-mails waiting, and the length of time the oldest e-mail has been waiting. However, if you have AgentAdvisor (a component of 6110 CCM) you have access to much more detailed queue information.
7RYLHZ0LQL4XHXH1RZ6WDWV
2QWKH,QER[0LFURVRIW2XWORRNZLQGRZFOLFN4XHXH
The list of queues available appears. (See Figure 54.)
6HOHFWWKHTXHXHWKDW\RXZDQWWRYLHZ
7RYLHZWKHUHSRVLWRU\
The statistics for [email protected] can now be viewed. There are four agents available, there are no e-mails waiting, and the length of time the oldest e-mail has waited is zero seconds. (See Figure 55.)
Figure 55 Support queue statistics
7RYLHZWKHUHSRVLWRU\
You can view each and every e-mail sent and the corresponding reply in the repository.
7RYLHZWKHRULJLQDOHPDLOV
,QWKH)ROGHU/LVWRI2XWORRNRSHQ5HSRVLWRU\ &OLFN2ULJLQDOV
The Originals window appears with the e-mails listed.
7RYLHZWKHHPDLOUHSOLHV
,QWKH)ROGHU/LVWRI2XWORRNRSHQ5HSRVLWRU\ &OLFN5HSOLHV
$SSHQGL[$
0&&7HUPLQRORJ\
(QDEOH([WHUQDO,QWHUIORZThe enable external interflow check box allows you to direct incoming e-mail to an e-mail address.
([WHUQDO,QWHUIORZ$GGUHVV
The external interflow address is the e-mail address the incoming e-mail is directed to.
+ROG5HTXHXH7LPHRXW
The hold requeue time is the length of time the e-mail message will sit in the assigned agent’s queue before a warning is flashed to indicate that the e-mail message will soon be reassigned to another agent’s queue if not answered.
,QWHUIORZ4XHXH
The interflow queue is the queue the e-mail message is directed to when it first arrives at a company’s e-mail address.
,QWHUIORZ7LPH
The interflow is the path along which the e-mail message is directed. The interflow time is the length of time the e-mail message will wait in the queue that the interflow directed it to. If the interflow timer expires, the call is removed from the original queue and re-directed to another answering point, such as a trunk. This ensures the e-mail message does not go unanswered for long.
1DPH
The name is the queue name. For example, the name might be Q1.
1RGH
The node is where 6150 MCC and 6110 CCM organizes and distributes e-mail and phone calls throughout your company. If your company is large, you might have several nodes.
1RQ$YDLODEOH5HTXHVW7LPHRXW
6150 MCC knows which agent answered which e-mail. If a customer has already received a response from an agent but has further questions, the customer’s next e-mail is directed back to the original agent. However, that agent might not be available. The non available request timeout time is the length of time the e-mail will sit in the original agent’s queue before being forwarded to another agent. If the non available request timeout is 60 minutes, and an e-mail is sent after office hours, then the e-mail would, of course, be forwarded to another agent.
2YHUIORZ$JHQW*URXS
0&&7HUPLQRORJ\
2YHUIORZ7LPH
The overflow time is the length of time an e-mail will sit in the primary agent group queue before also being forwarded to a overflow agent group.
3ULPDU\$JHQW*URXS
The primary agent group is the group assigned to answer a particular e-mail message first.
3ULRULW\
Priority assigns priority to queues. The highest priority is 1, and the lowest priority is 10. This
allows you to answer queues of higher priority first.
3XEOLF)ROGHU1DPH
The public folder name is the windows user name.
3XEOLF0DLO$GGUHVV
The public mail address is the company e-mail address. This is the address the customers will use to e-mail you.
5HSRUWLQJ1XPEHUIRUDTXHXH
The reporting number is assigned for reporting purposes. This report number is referenced when creating a report about e-mail data from a particular queue. A queue reporting number must start with P and have three digits following. For example, the reporting number for a queue might be P123.
5HTXHXHG7LPH
The requeue time is the length of time the e-mail will sit in the assigned agent’s queue before it is assigned to another agent’s queue.
When an agent receives an e-mail message and fails to respond to the e-mail after X seconds, 6150 MCC places the agent in Make Busy and the e-mail message is requeued (placed back in queue). This requeued e-mail message has priority over the others and will be the next e-mail message answered.
5HVSRQVH0HVVDJH
The response message is a message that is automatically sent to the client upon receipt of the clients e-mail. For example, “Thank you for your interest in prairieFyre Software. We have received your e-mail, and it is being handled by one of our agents. Please expect a reply shortly.” The response message is created with the Responses tab.
6HUYLFH/HYHO
The term service level is the turn-around-time goal. For example, if the service level is 20