File Management
Using Microsoft Windows
l a b
2
23
Objectives:
Upon successful completion of Lab 2, you will be able to ● Define the terms file and folder
● Understand file and memory storage capacity concepts including byte, kilobyte, megabyte, and gigabyte
● Create a folder in the Save Asdialog box in an application and save a file in the folder
● Create folders
● Copy and move files and folders
● Understand the concepts of file extensions and associations
● Delete files and folders permanently and recover files and folders from the Recycle Bin before they have been deleted
Resources required:
● A computer running Windows Vista
Starter files:
● None
Prerequisite skills:
● Basic familiarity with using a mouse to point, click, double-click and drag, and basic familiarity with using a keyboard.
● Windows manipulation skills—open, close, size, drag, maximize, minimize, restore
NRC’s Top Ten Skills, Concepts, and Capabilities:
● Skills
Use basic operating system facilities.
• Save files and create folders in an applet (WordPad) • Copy and move files and folders
● Concepts
Fundamentals of computers—File Management using Windows Vista Structuring information
● Capabilities
Lab Lesson
Files are everywhere! Documents such as a memo to your boss or a letter to your cousin are stored as files on your computer. A file can also contain a digital image, a Web page, a piece of music, a movie, or your family budget spreadsheet. Files can be stored on your computer’s hard drive, on a DVD, or on a USB memory stick, and sent as attachments to email messages. So it’s unavoidable. If you are using a computer, you are also using files to store your data. And as soon as you start working with files, you also need to organize them so that you can find them later. Files are organized using folders. Folders can contain many files and other folders as well, as we will see. You can think of a folder as a container. A folder can also contain other containers; like a tackle box contains drawers and compartments.
The purpose of this hands-on lab is to provide an introduction to file management using Windows Vista. Hands-on tasks will be identified by the symbol.
We’ll need to create some files so that we can also copy them and move them around. Let’s start by creating some files using WordPad.
Saving Files
Open WordPad. You should find it in Start, All Programs, Accessories, WordPad. Type: your name. Your name should appear at the insertion point.
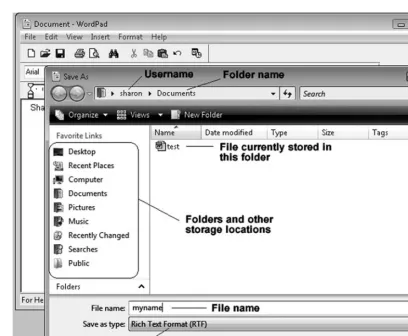
Click the menu items File, Save. The Save Asdialog box should appear as shown in Figure 2.1. If the dialog box does not display folders, click the Browse Folders buttonto see the folders.
In the File namebox, delete the current file name and type: myname, as shown in Figure 2.1.
Notice that the Save Asdialog box box identifies the Documentsfolder as the location for the file, as shown in Figure 2.1.
24 Computer Skills Workbook for Fluency with Information Technology, Third Edition
Figure 2.1 WordPad Save As dialog box showing name.rtf.
Click the Savebutton to save the file.
The new file, myname.rtf, has been saved in the Documentsfolder.
Let’s edit the myname.rtf file and save the changes as a different file.
Press the Enterkey to move the flashing insertion point to the next line. Type your address, pressing the Enterkey each time you need to move the insertion point to the next line.
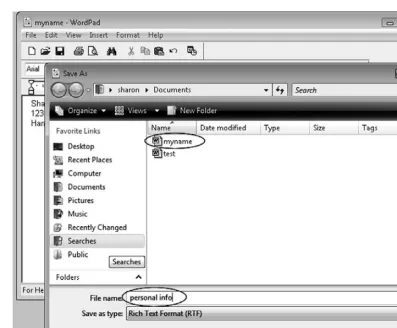
Click the File, Save Asmenu commands. The Save Asdialog box should appear as shown in Figure 2.2.
The difference between File, Saveand File, Save Asmight be a bit confusing! Use File, Save
when you wish to save the editing changes to a file, keeping the same file name. Use File, Save Aswhen you wish to save the file as a different name, preserving the “old” file and saving the newly edited file using this new file name.
In the File namebox, delete the current file name (myname.rtf) and any other characters that appear.
Type: personal info
This is shown in Figure 2.2.
Figure 2.2 WordPad Save As dialog box showing address.rtf.
Notice in Figure 2.2 that the myname.rtf file appears in the Documentsfolder list.
Click the Savebutton to save the personal info file in the Documentsfolder.
Organizing files and folders is as much of an art as a science. Your folder organization will evolve as you use your computer more. You may find that you need folders for personal correspondence, folders for each of the courses you are taking, folders for business dealings, and so forth. You will find yourself moving files into different folders as you decide on improved organization.
Sometimes folder organization ideas occur to you as you’re saving a file. Let’s look at creating a folder as we save a file.
Creating a Folder in WordPad
We will edit the current WordPad file and save it in a new folder using a different file name.
In WordPad, press the Enterkey twice to move the insertion point below the address.
Type: Things To Do Today
Press the Enterkey and type: get groceries
Feel free to add more items to the “To Do” list, but for this exercise, the data is not important.
26 Computer Skills Workbook for Fluency with Information Technology, Third Edition
Let’s save this new file in a folder called “personal.”
Click the File, Save Asmenu commands. The Save Asdialog box should appear, as we have seen previously.
This time, we will create the folder first, and then save the file in the new folder.
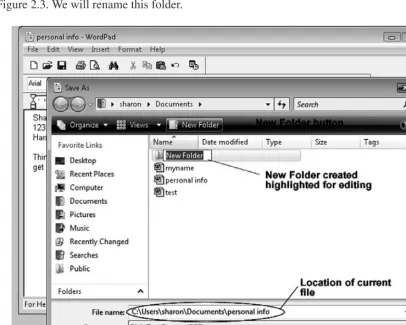
Click the New Folderbutton, as shown in Figure 2.3.
A new folder will be created, with the name “New Folder,” and it will be highlighted as shown in Figure 2.3. We will rename this folder.
Figure 2.3 WordPad Save As dialog box with the new folder created.
Now we will edit the New Folder name.
The New Folder is selected and highlighted. Type: personal
You should notice that the New Folder name has been replaced with “personal.”
Press the Enterkey to set the folder name and open the new folder.
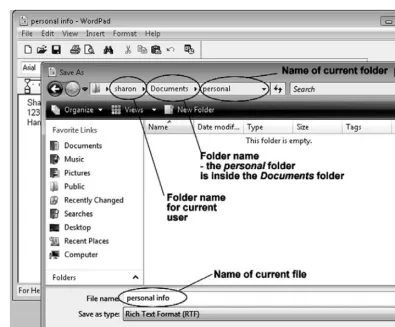
You should notice the personalfolder is open, as shown in Figure 2.4.
Figure 2.4 WordPad Save As dialog box with the personal folder in Documents list.
Delete the current file name and type: todo Click the Savebutton to save the file.
Let’s open one of our saved files.
Click the menu items File, Open.
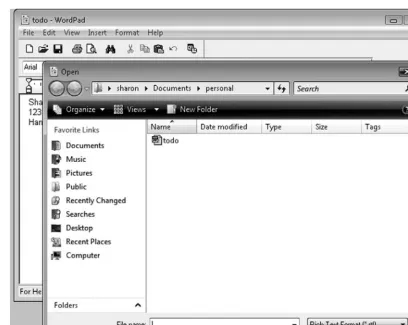
You should see the Opendialog box appear as shown in Figure 2.5. Notice that the previously used folder listing is open.
28 Computer Skills Workbook for Fluency with Information Technology, Third Edition
Figure 2.5 WordPad Open dialog box showing the personal folder list.
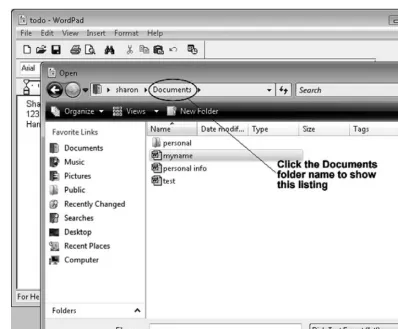
Let’s choose one of the files we saved in the Documentsfolder.
Click the Documentsfolder name to select it and list the files as shown in Figure 2.6.
Click the file name myname to select it as shown in Figure 2.6.
Figure 2.6 WordPad Open dialog box showing Documents folder contents.
Click the Openbutton to open the myname file in the Documents folder. Close the WordPad window. We’re finished creating files.
Using Windows Explorer
We created data files using WordPad and also created a folder in which data files can be stored. This method was convenient because we were already using WordPad when we decided to create a folder. However, when organizing and copying files, it is not necessary to be using the
application software in which the data files were created. Windows provides several methods for creating folders and copying and moving files and folders. One method is to use Windows Explorer to view and manage files and folders.
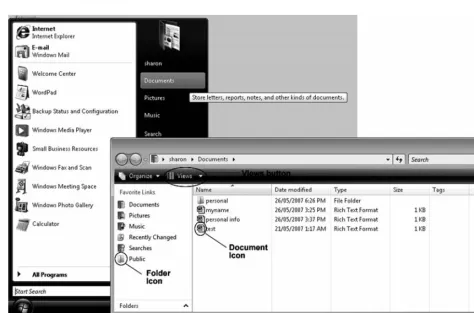
We can open the Windows Explorer Documents listing using the menu method.
Click the Startbutton to open the Startmenu. Click the Documentsmenu item.
The Windows Explorer window should open, as shown in Figure 2.7. Depending on the view you are using, the right pane view may be different. We’ll change it shortly.
30 Computer Skills Workbook for Fluency with Information Technology, Third Edition
Figure 2.7 Windows Explorer.
Lab 2: File Management Using Microsoft Windows 31
In the left-hand column, you will see a list of folders on your computer system. The list in the right-hand column of the Windows Explorer window in Figure 2.7 shows the details display of the documents and folders contained in the Documents folder.
The C: drive list should appear as shown in Figure 2.8. Your list of folders will be different because it is unique to your computer system. If the folders in the pane on the right side of the window display differently, don’t worry. We’ll be changing that shortly and you’ll see the options available.
Let’s have a look at the resources available on the computer.
Click the drop-down arrow to the left of your username as shown in Figure 2.8 to reveal the computer resources.
Click the Computeroption as shown in Figure 2.8.
Figure 2.8 Windows Explorer showing the Computer selection.
32 Computer Skills Workbook for Fluency with Information Technology, Third Edition
You can click the Backand Forwardbuttons to navigate through the previously viewed selections.
Click the Backbutton to view the Documentsfolder contents previously viewed.
Click the Forwardbutton to view the Computer Listing.
Let’s look at the files and folders listing on the hard drive.
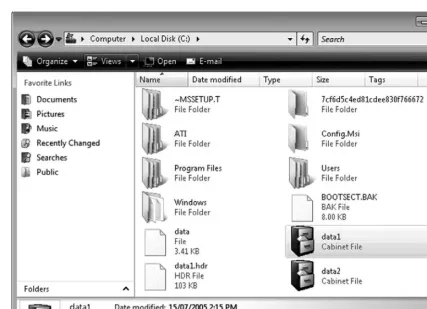
Double-click on the Local Diskicon. The listing will appear as shown in Figure 2.9.
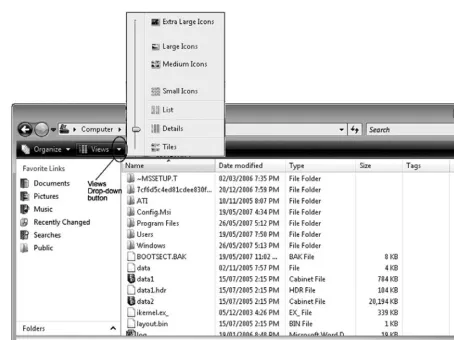
Let’s explore different methods available to view the listing.
Click the Viewsbutton.
Notice that the slider indicator is pointing to the Detailsview. If your view is not Details, the slider will point to your current view.
Click the Detailsmenu option to see the Detailsview.
Figure 2.9 Windows Explorer view of Local Disk files and folders with view options menu.
Lab 2: File Management Using Microsoft Windows 33
Viewsare simply alternate ways of displaying files and folders. Let’s look at the other views. The
Tilesand Iconsviews display the list with various sizes of icons.
Click the Viewsbutton. Click the Tilesmenu option.
Figure 2.10 Windows Explorer Tiles view.
Notice that some of the files in the Tileslist display the date and time the file was created and the file size. We will discuss file size later.
Click the Viewsbutton.
Click the Medium Iconsmenu item. You should notice icons that represent folders and files in this list, as shown in Figure 2.11.
34 Computer Skills Workbook for Fluency with Information Technology, Third Edition
Figure 2.11 Windows Explorer Medium Icons view.
Iconsare the small images such as the image of the folder, which represent files and folders.
Click the Viewsbutton.
Click the Listmenu item. You should notice that the folders and files are displayed in a vertical list, as shown in Figure 2.12.
Figure 2.12 Windows Explorer List view.
Finally, let’s look at the Detailsview.
Click the Viewsbutton.
Click the Detailsmenu item. You should notice that the files and folders are displayed in a list, with information about file size, file type, and modified date, as shown in Figure 2.13.
36 Computer Skills Workbook for Fluency with Information Technology, Third Edition
Figure 2.13 Windows Explorer Details view.
The Detailsview provides a lot of information about the files and folders. Let’s use this view and take a look at some of the other folders on the hard drive (C:).
You can change the widths of the columns by positioning the mouse pointer at the border between headings in the pane on the right side of the window, as shown in Figure 2.13.
Move the mouse pointer so that it is resting on the border between two headings in the pane on the right side of the window. The mouse pointer should change to a double arrow symbol.
When the mouse pointer is a double arrow symbol drag it to change the width of the column. Release the mousebutton when you have adjusted the width of the column to your liking.
We can display the folders for the C: drive in the left-hand pane as well.
Click the Foldersbutton on the left-hand pane as shown in Figure 2.13. Hover your mouse pointer over the folder listing in the left-hand pane.
Folders that contain other folders are indicated by an arrow symbol to the left of the folder name.
Click the Program Filesfolder in the left-hand pane if it is available. If the
Program Filesfolder is not in your listing, click one of the other folder names. The Program Fileslisting will be displayed as shown in Figure 2.14.
Figure 2.14 Windows Explorer showing Program Files folder listing.
Take a few minutes to click individual folder names to see the list of files in the folders you select.
Click the Local Disk (C:) option in the Folders listing in the left-hand pane to see the listing for the Local Hard Drives as shown in Figure 2.14.
At this point, we are simply viewing the contents of the folders and not affecting them.
Occasionally you may find that you click on a folder and an error message indicates that you do not have permission to access the contents. Some folders contain system files that affect programs or the operating system. If this happens, simply select a different folder.
You can change the sort order of any column by clicking on the column heading. If the list is already sorted by that heading, clicking on the column heading again will reverse the sort order.
Click the Name heading to reverse the sort order of file and folder names. Click the Size heading to list the folders and files by size. If your selected folder does not contain any files, you will not see any sizes listed.
Click the Size heading again to list the folders and files by size, in reverse order. Your list should look something like that shown in Figure 2.14.
Similarly, click the other headings: Name, Type, and Date Modified, to change the list order.
38 Computer Skills Workbook for Fluency with Information Technology, Third Edition
File Size and Hard Drive Capacity
File size and hard drive capacity are measured in bytes. A byte contains a single character. Notice that some of the files in your file list indicate KB. A Kilobyte (KB) is 1,024 bytes, or roughly 1,000 characters. Hard drives, RAM memory, USB memory sticks, CDs, and DVDs hold data and their capacities are also measured in terms of bytes. However these media hold so much data, that we talk about storage in terms of Megabytes (MB) (millions of bytes) and Gigabytes (GB) (billions of bytes).
Let’s look at the capacity of your hard drive.
Right-click the Local Drive (C:) icon in the Folders pane to reveal the short-cut menu, as shown in Figure 2.15.
Click the Propertiesmenu item.
A dialog box should appear indicating the Local Disk C: properties, as shown in Figure 2.15.
Figure 2.15 Local Disk (C:) properties.
The hard drive properties in Figure 2.15 indicate that this drive has a total capacity of 55.9 GB. There is 43.1 GB of storage used and 12.7 GB of free space, which is storage available for storing more files. You may notice rounding errors in the calculation of storage capacity as is the case in Figure 2.15. The total capacity indicated 55.9 GB yet the sum of Used and Free space is 55.8 GB. The difference of 0.1 GB is a rounding error caused by rounding Bytes to Gigabytes.
Click the OKbutton to close the Propertiesdialog box.
Searching for Files
We’ve looked through folders on the C: drive and displayed the folders and file names in various ways. Let’s look for a specific file.
At the beginning of this lab, we created several files. Where are they? We don’t need to browse through folders until we find a specific file. We can use the Search feature to do the searching for us. Let’s look for the personal info file we created at the beginning of this lab. Leave the Windows Explorer window open since we will use it to find the file.
In the Searchbox in the upper right corner of the Explorer window type: personal info. This is shown in Figure 2.16.
As you type, notice that search items are displayed. As you type more characters, the search results become more specific.
Figure 2.16 Search Results in File Explorer.
There are several options available for searching.
Let’s look at another method.
Close the File Explorer window.
Click the Startbutton as shown in Figure 2.17.
40 Computer Skills Workbook for Fluency with Information Technology, Third Edition
Figure 2.17 Search option from the Start menu.
This search feature allows us to limit the search to specific types of files.
Let’s search for a picture of a flower.
Click the Picturebutton as shown in Figure 2.18 to confine the search to picture files.
You may notice that picture files appear already in the search results. Let’s narrow this to pictures of flowers.
Click in the search box and type: flower, as shown in Figure 2.18.
You may find the search results appear before you have completed typing the search term. The search results in Figure 2.18 appear using the Medium Iconview. Your search results may appear using other views as well.
Figure 2.18 Search Results window with flower picture search results.
When viewing files and folders, you can double-click a file to open it. Let’s give that a try.
Double-click one of the pictures.
Depending on the configuration of your computer, an image editing application will launch and the picture file will be displayed. The Windows operating system allows us to double-click a file name and the application package associated with that file type will open and the file will be displayed.
Close the image editing application.
Let’s close the SearchResults window and return to the Windows Explorerwindow to view the
Documentsfolder list.
Close the Search Resultswindow.
Click the Startbutton and the Documentsmenu choice to open the Documents listing in Windows File Explorer.
Click the Viewsbutton and select the Detailsview.
You should see the Documentslist as shown in Figure 2.19.
42 Computer Skills Workbook for Fluency with Information Technology, Third Edition
Figure 2.19 Windows Explorer displaying My Documents.
Notice that we can see the personal folder in the folder list in the pane on the left, and in the files and folder list in the pane on the right. We can also see the myname file and personal info files listed in the pane on the right, along with the file size, type, and date modified.
Click the personal folder in the folder list pane on the left.
You should see the todo file listed in the file list on the right, as shown in Figure 2.20.
Figure 2.20 Windows Explorer displaying the personal folder.
Copying Files
It’s useful to be able to copy and move files and folders. Regardless of how organized you think your files and folders are, at some point you’ll want to reorganize some of them. We’ll start by copying and moving files; the same techniques apply to folders.
Let’s copy the todo.rtf file to the Documentsfolder. Currently it is in the personal folder only.
Click the todo file once to select it.
Click the Organizebutton to reveal a drop-down menu, as shown in Figure 2.21.
Click the Copymenu option.
Click the Documentsfolder in the folder pane to activate it.
Click the Organizebutton to reveal a drop-down menu as shown in Figure 2.21.
Click the Pastemenu option, as shown in Figure 2.21.
You should notice that there is a copy of the todo file in the Documentsfolder. 44 Computer Skills Workbook for Fluency with Information Technology, Third Edition
Figure 2.21 Windows Explorer showing Organize menu options.
Now we have two copies of the todo file. One copy is in the Documentsfolder and another copy is in the personal folder.
Click the personal folder to verify that the original is still there.
Deleting Files
Let’s delete the original todo file, which is in the personal folder.
Click the todo file once to select it. Press the Deletekey on the keyboard.
A confirmation box will appear, as shown in Figure 2.22.
Figure 2.22 Windows Explorer Delete File confirmation.
When we delete a file from the hard drive, Windows places it in the Recycle Bin. This gives us a chance to recover it or delete it permanently later. We’ll send the todo file to the Recycle Bin, recover it, and then permanently delete it.
Click the Yesbutton to send the todo file to the Recycle Bin.
You should notice that the todo file has been removed from the personal folder list. Let’s find it in the Recycle Bin list. The Recycle Bin is available as an icon on the Windows desktop as well as in the Windows Explorer list. Let’s look at the desktop icon features.
Minimize or move the windows so you can see the Recycle Bin icon on the desktop.
Double-click the Recycle Bin icon to open it.
The Recycle Bin list should be similar to that shown in Figure 2.23. Feel free to use the Details
view.
46 Computer Skills Workbook for Fluency with Information Technology, Third Edition
Figure 2.23 Recycle Bin list.
Notice that there are options available in the Recycle Bin Tasks list that include “Empty the Recycle Bin” and “Restore all items.” You can perform these tasks that apply to all files in the Recycle Bin, or you can select individual files to restore or delete permanently.
Click the todo file in the file list pane.
Notice that the “Restore all items” option has changed to “Restore this item.”
Click the “Restore this item” option in the Recycle Bin Tasks list.
Notice that the todo file has disappeared from the list. It’s back in the personal folder as before. It has been restored to its original location and removed from the Recycle Bin. Let’s verify this.
Close the Recycle Bin window.
Activate the Windows Explorer window and click the personal folder in the
Documentslist. Notice that the todo file has been restored to the personal folder.
Let’s delete it again, but this time we will remove it permanently.
Click the todo file once to select it.
Press the Deletekey on the keyboard. The Confirm File Deletebox should appear again, as shown in Figure 2.22.
Click the Yesbutton to send the todo file to the Recycle Bin.
Double-click the Recycle Bin icon on the desktop to open the Recycle Bin.
Again, notice that the todo file appears in the Recycle Bin list.
Click the “Empty the Recycle Bin” option in the Recycle Bin Tasks.
The Confirm File Deletebox will appear as shown in Figure 2.24.
Figure 2.24 Recycle Bin Confirm Delete box.
Click the Yesbutton to empty the Recycle Bin.
The todo file is now deleted permanently from the personal folder.
Close the Recycle Bin window.
You can delete and restore folders using the same method used to delete files. When you delete a folder, you also delete all of the contents in the folder. If the folder includes subfolders, they are deleted, as well as the files that are contained within them.
Creating Folders and Moving Files
Let’s finish this lab by creating some folders and moving some files.
In the Windows Explorer window, click the personal folder to activate it. The personal folder may be activated already.
Click the Organizebutton and select the menu item New Folder.
This creates a new folder inside the active folder. In this case, the new folder is created in the personal folder. The new folder will be selected and we can edit the name. This same technique was used when we created the personal folder while saving a file using WordPad.
Type: correspondence.
Press the Enterkey on the keyboard.
You have created a new folder called “correspondence,” which is a subfolder of “personal,” as shown in Figure 2.25.
48 Computer Skills Workbook for Fluency with Information Technology, Third Edition
Figure 2.25 Windows Explorer showing the personal folder and correspondence subfolder.
Let’s move some of the files into the personal and correspondence folders.
Moving Files Using Cut and Paste
Let’s move the myname file into the correspondence folder.
Click the Documentsfolder in the Folders pane to activate it. Click the myname file in the file list pane to activate it.
Click the Organizebutton and select the Cutoption, as shown in Figure 2.26. Double-click the personal folder to open it.
Double-click the correspondence folder to open it. Click the Organizebutton and select the Pasteoption.
Notice that the myname file now appears in the correspondence folder list. You can click the
Documentsfolder name to verify that the myname file is no longer in the list of Documents.
Figure 2.26 Windows Explorer showing the Documents folder and the Organize button drop-down menu.
This lab has demonstrated some basic features and methods for viewing folder contents and file lists. It has also demonstrated some simple methods for copying and moving single files. It’s also possible to select multiple files and move and copy them as a group but this is beyond the scope of this lab.
Review
This has been a busy lab! We have covered the following topics:
● Saving files to a specific folder location in an application (WordPad) ● Creating a folder in the Save Aswindow
● Using Windows Explorer
Choosing different views: tiles, icons, list, and details File size and hard drive capacity
● Using the Windows search feature to find files and folders ● Using Windows Explorer to create folders
● Using copy and paste to copy a file to a different folder location ● Using cut and paste to move a file to a different folder location ● Using the Recycle Bin
Restoring files that have been deleted Deleting files permanently
50 Computer Skills Workbook for Fluency with Information Technology, Third Edition
Exercises
1. Create the following folder structure. You can use Windows Explorer to create the folders and subfolders shown in Figure 2.27. You have already created the personal and
correspondence folders.
Figure 2.27 Folders and subfolders.
2. Copy the myname file into the following folders: bob, mom, sandy.
3. Move the myname file from the bob folder to the resume folder.
4. Delete the myname file from the sandy folder.
5. Restore the myname file using the Recycle Bin restore feature.