Cluster Installation
Manual
G4S Technology Limited.
G4S Technology Limited cannot be held liable for technical and editorial omissions or errors made herein; nor for incidental or consequential damages resulting from the furnishing, performance or use of this material.
NOTE: This equipment has been tested and found to comply with the limits for a Class A digital device, pursuant to part 15 of the FCC Rules. These limits are designed to provide reasonable protection against harmful interference when the equipment is operated in a commercial environment. This equipment generates, uses and can radiate radio frequency energy and, if not installed and used in accordance with the instruction manual, may cause harmful interference to radio communications.
Operation of this equipment in a residential area is likely to cause harmful interference. In which case, the user will be required to correct the interference at his own expense.
Cluster Installation Manual (9600-0406)
Issue 6.2.1 – 27th January 2010
Applies to version 6.2 SP1 or later of the SMS Software, until superseded by a later issue of the manual. All trademarks acknowledged.
XEON is a registered trademark of Intel Corporation.
Microsoft and Windows are registered trademarks of Microsoft Corporation. NEC is a registered trademark of NEC Corporation.
About this Installation Manual ... ii
1
Chapter 1: Introduction ...1
About Clustering ... 1
Microsoft Clustering... 1 NEC Clustering ... 2System Requirements... 2
Requirements for a Symmetry Server when using Microsoft Clustering ... 2
Requirements for a Symmetry Server when using NEC Clustering ... 3
2
Chapter 2: SMS Server Installation on a Microsoft Cluster ...4
Installation Procedure ... 4
Step 1 – Install SQL Server 2000/2005/2008 ... 4
Step 2 – Install and Configure Windows MSMQ ... 5
Step 3 – Install NovaBACKUP... 6
Step 4 – Install the SMS Server Software ... 6
Step 5 – Set Up the Generic Service Resources ... 7
Step 6 – Installing IIS, FTP and WWW for Digital Video Management... 10
Step 7 – Installation and Configuration for Digital Video Management ... 11
Step 8 – Installing the Global Edition Central Card Handler Database ... 12
Step 9 – Completing the Database Installation at a Global Edition Head Office Server ... 13
Step 10 – Completing the Database Installation at a Global Edition Regional Server ... 13
Step 11 – Install the SMS Clients and Additional Symmetry NVRs ... 13
Installing Chargeable Options after the Software is Installed ... 14
3
Chapter 3: Symmetry NVR Installation on a Microsoft Cluster...15
Installation Procedure ... 15
Step 1 – Install SQL Server 2000/2005/2008 (Local Digital Video Indexes Only) ... 15
Step 2 – Install IIS, FTP and WWW ... 16
Step 3 – Install MSMQ... 17
Step 4 – Set Up IIS and FTP Resources... 19
Step 5 – Configure IIS ... 19
Step 6 – Install the Symmetry NVR Software ... 19
Step 7 – Set up Video Storage Resources ... 20
Step 8 – Test Failover... 20
Step 9 – Activate License ... 20
4
Chapter 4: XML Web Server Installation on a Microsoft Cluster ...21
Installation Procedure ... 21
Step 1 – Install IIS and WWW ... 21
Step 2 – Set Up IIS Resource... 22
Step 3 – Configure IIS ... 22
Step 4 – Install the Software at the SMS Database Machine ... 22
Step 5 – Edit Web.config (Optional) ... 23
5
Chapter 5: SMS Server Installation on an NEC Cluster ...24
Step 1 – Change Message Queuing Registry Entry ... 24
Step 4 – Set Up the Services ...25
Step 5 – Move the SMS Databases to the Mirror Disk ...26
Step 6 – Script Resource Setup ...32
Known Issues ...37
About this Installation Manual
This manual explains the following:• The purpose, operating concepts and benefits of clusters.
• How to install clusters for use with the Security Management (SMS) software using Microsoft®
Windows® Clustering or the NEC® ExpressCluster software.
This manual is intended to be used by technical staff who need to install a cluster. Such staff should have experience with installing, configuring and maintaining network applications.
About Clustering
Clustering is generically known as "high-availability", "data protection" or "replication" software. The software is installed and configured on connected servers, which are also installed with the application software. Should the currently running server stop functioning, a "failover" process causes another server to assume control to provide continuous service.
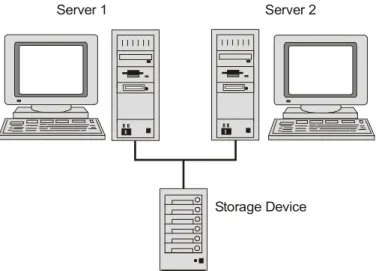
Microsoft Clustering
The Microsoft cluster implementation uses a common database storage device, such as a disk array, as illustrated in Figure 1.
Server 1 Server 2
Storage Device
Figure 1: Microsoft Clustering Configuration
A SMS system that uses Microsoft clustering can run one of the following:
• The Symmetry SMS Server software.
• The Symmetry Video Storage Management Module, which is used to create a Symmetry Network Video Recorder (NVR). This must be on a different cluster from that used for the SMS Server software.
• The XML Open Integration Module.
In Microsoft Windows clustering terminology, the server that is currently serving the clients is known as the "active node". The other is known as the "passive node". The passive node continually monitors the active node in the event that it needs to assume responsibility and become the active node. Once the passive
node is repaired, it monitors the active node and can automatically swap roles with the active node if that too should fail.
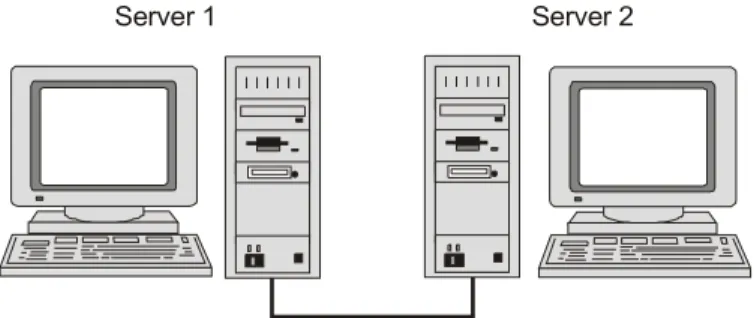
NEC Clustering
The NEC cluster implementation uses two separate storage devices that are local to each server, as illustrated in Figure 2.
Server 1 Server 2
Figure 2: NEC Clustering Configuration
An SMS system that uses NEC clustering can run only the Symmetry SMS Server software (the software that manages the SMS database).
In NEC clustering terminology, the server that is currently serving the clients is known as the "primary server". The other is known as the "secondary server". The secondary server continually monitors the primary server in the event that it needs to assume responsibility and become the active node. Once the secondary server is repaired, it monitors the primary server and can automatically swap roles with the primary server if that too should fail.
System Requirements
Requirements for a Symmetry Server when using Microsoft Clustering
HardwareTwo servers set up on a domain are required with the following minimum specification:
• Dual XEON® 2.8GHz processors
• 2GB RAM
• 80GB hard drive
• SVGA 1024x768 monitor
• 4MB video memory
• CDROM drive
• Two free USB ports (three if using the Central Card Handler software)
The server must be a dedicated machine; it must not be used as an SMS client machine.
Software
• Each server requires the 32-bit Windows Server 2003 Enterprise Edition with Service Pack 2, or Windows Server 2003 R2 Enterprise Edition with Service Pack 2.
• The SMS Server (Enterprise or Global Edition), Symmetry Video Storage Management Module or XML Open Integration Module software is required, as appropriate. A single license is sufficient. A domain-based network must be used.
Note: If the Digital Video Management software is required, a cluster-aware serial number and license are needed to enable this software on a cluster.
The following are required for each SMS Server in a cluster:
• Enterprise or Global Edition, with SQL Server 2000 Enterprise Edition (Service Pack 4), or SQL Server 2005 Enterprise Edition (Service Pack 3), or SQL Server 20081 Enterprise Edition (Service Pack 1).
• If required, NovaBACKUP® 7.2 or 8.0 (backups to tape not supported).
• Microsoft Outlook 2000 or 2003 (with Service Pack 1), if the MAPI Email Alarms option is used.
1The following must be installed before installing SQL Server 2008 on a Windows Server 2003 R2 (SP2) platform:
.NET 3.5 SP1, Windows Installer hotfix KB942288, and Filestreaming hotfix KB937444. These are available from the Microsoft web site.
Requirements for a Symmetry Server when using NEC Clustering
HardwareUse the standard hardware requirements for a Symmetry SMS server, as specified in the SMS Software Installation Manual.
The server must be a dedicated machine; it must not be used as an SMS client machine.
Note: The disk at each server must have two drives (e.g. C: and D:).
Software
• Each server requires the 32-bit Windows Server 2003 Enterprise Edition with Service Pack 2, or Windows Server 2003 R2 Enterprise Edition with Service Pack 2.
• Each server must use the NTFS file system and have Internet Explorer 8.0 or later installed.
• The SMS Server (Enterprise or Global Edition). A single license is sufficient. A domain-based network must be used.
Note: If the Digital Video Management software is required, a cluster-aware serial number and license are needed to enable this software on a cluster.
• NovaBACKUP is not supported.
The following are required for each SMS Server in a cluster:
• Enterprise Edition, with SQL Server 2000 Enterprise Edition (Service Pack 4), or SQL Server 2005 Enterprise Edition (Service Pack 3), or SQL Server 20081 Enterprise Edition (Service Pack 1).
• Microsoft Outlook 2000 or 2003 (with Service Pack 1), if the MAPI Email Alarms option is used.
1The following must be installed before installing SQL Server 2008 on a Windows Server 2003 R2 (SP2) platform:
.NET 3.5 SP1, Windows Installer hotfix KB942288, and Filestreaming hotfix KB937444. These are available from the Microsoft web site.
Microsoft Cluster
Installation Procedure
Note: This procedure does not describe the initial installation of a cluster. It is assumed that a Network Administrator has already carried out this work and is available during the installation of the SMS software on the cluster.
Note: This procedure assumes that the active node is the same machine throughout. If you install the software at different times, you should ensure that the active node is the same machine at both times. If you do not do this, uninstallation at a later time can be more difficult.
Once the initial installation of the cluster is complete, follow the steps given next.
Step 1 – Install SQL Server 2000/2005/2008
Install SQL Server 2000/2005/2008 Enterprise Edition as documented in the Software Installation Manual, but please note the following.
SQL Server 2000/2005:
• Install from the active node (SQL Server is installed automatically on the passive node).
• Install the SQL Server on the shared drive.
• Select Create a SQL Server failover cluster (SQL Server 2005).
Note: As documented in the Software Installation Manual, do not select Reporting Services. It is recommended that Analysis Services is also not selected.
• Choose to install as a Virtual SQL server (SQL Server 2005).
• On the Virtual Server Configuration screen, set the network to use a public adapter interface (not the heartbeat). Assign a unique new IP address for the virtual SQL server – type the IP address in the box, then click Add.
• Choose to install the virtual SQL data files on the shared drive.
• Select the defaults in the Cluster Node Configuration dialog.
• On the Domain Groups for Clustered Services page (SQL Server 2005), select the <DomainName>\Domain Admins group for each of the three listed services.
SQL Server 2008:
On the active node:
• Select New SQL Server 2008 Failover Installation on the SQL 2008 install screen.
• Specify the cluster network name on the Instance Configuration screen, and select Default Instance
and Default Instance Name.
• On the Cluster Network Configuration screen, specify the desired public SQL IP address.
• Specify the SQL Server service accounts on the Server Configuration screen.
• Ensure the Database directory(ies) on the Database Engine Configuration screen are located on the shared drive.
On the passive node:
• Select Add node to a SQL Server failover cluster on the SQL 2008 install screen.
• Verify the correct SQL cluster network name on the Cluster Node Configuration screen.
• Make sure that the user accounts specified on the Service Accounts screen are the same as were specified during the installation of the active node.
Step 2 – Install and Configure Windows MSMQ
You need to install the Microsoft message queue (MSMQ).
Installation on a Windows 2003 Cluster:
Note: For further information, please refer to Deploying Message Queuing (MSMQ) 3.0 in a Server Cluster, which is available at:
http://download.microsoft.com/download/4/f/5/4f518f76-c1ce-431b-b79f-71caf9e27578/MSMQ3incluster.doc Install MSMQ 3.0 on both nodes, as follows:
1. Select Start, Control Panel, Add or Remove Programs. 2. Click Add/Remove Windows Components.
3. In the Windows Components Wizard, select the Application Server check box, click Details, select the Message Queuing check box, and then click Details.
4. On the Message Queuing page, clear the Active Directory Integration check box. 5. Click OK, and then click Next.
6. Follow the remaining instructions in the wizard.
At the active node, create and configure an MSMQ resource and group (virtual server): 1. Click Start, All Programs, Administrative Tools, Cluster Administrator.
2. In Open Connection to Cluster, select the applicable cluster or server in the Cluster or server name list.
4. After the group is selected, select File, New, Resource.
5. In the New Resource Wizard, in Nameand Description, type a name and description for the MSMQ resource, and select Message Queuing in the Resource type list box.
6. In Group, select the group that you want the MSMQ resource to belong to, then click Next. 7. On the Possible Owners page, add the nodes that will own the MSMQ resource. If you want to
add nodes to the automatically chosen list under Possible owners, select them from the list under Available nodes and click Add. If you want to remove nodes from the automatically chosen list under Possible owners, select them in this list and click Remove. Then click Next. 8. On the Dependencies page, under Available resources, select the SQL Network Name
resource in the group and click Add, and then select the name of the Physical Disk resource in the group and click Add. Then click Finish.
At the active node, bring the MSMQ resource online:
1. Click Start, All Programs, Administrative Tools, Cluster Administrator.
2. In the console tree, click the Resources folder, and then in the details pane, click to select the MSMQ resource.
3. Select File, Bring Online.
At both nodes, enter the machine's IP address in the registry (IP address is used for messaging): 1. In HKEY_LOCAL_MACHINE\SOFTWARE\Microsoft\MSMQ\Parameters\ create a
BindInterfaceIP string value and enter the IP address of the physical node (not a virtual server) in the normal format.
2. After editing the registry, restart the MSMQ service for the changes to take effect. Remember that after restarting a node computer, the MSMQ service running on the node does not restart automatically, and you need to restart it manually. However, MSMQ resources that were online do come back online automatically.
Step 3 – Install NovaBACKUP
Note: The NovaBACKUP software is used to perform backups and archives from the SMS software. When using a Microsoft cluster, using NovaBACKUP to perform backups to tape is not supported.
If NovaBACKUP is to be used, install it on both nodes. Install on each local drive, using the same drivename and pathname. Do not install onto the shared drive, since full unrestricted access will not available to the passive node.
Step 4 – Install the SMS Server Software
Note: A domain install using domain-level permissions must be used.
Note: Do not connect the sentinels until told to do so. If you connect USB sentinels straight away, the driver installation may fail.
1. You must begin installation at the active node first:
Start the installation of the SMS server software as described in the SMS Software Installation Manual. Choose Custom installation, and make sure that the selected "Data Folder" is on the shared drive.
When you see the "InstallShield Wizard Complete" dialog, read the instructions, but do not restart the active node yet. Connect the base and options sentinels to the active node.
2. Install the SMS server software at the passive node. Only a few prompts are displayed. Connect the base and options sentinels to the passive node.
3. Shut down and restart the nodes in the correct sequence: a) Shut down the passive node.
b) Restart the active node, and enter the SMS registration ID in the normal way. c) Restart the passive node.
Step 5 – Set Up the Generic Service Resources
1. Start Cluster Administrator at the active node.
2. Open the Groups folder. Right-click on Cluster Group and select New, Resource. Create a new resource named SMS Services, of the Resource type named Generic Service, as shown next.
4. Move SQL Server Agent and MSMQ to the Resource dependencies, then click Next:
5. Set the Service name to MultimaxSupportService and select Use Network Name for computer name, then click Next:
6. Add software\group4\multimax and software\group4\crf to the list of registry keys:
7. Click Finish (you may see an exclamation mark on the cluster group folder), then repeat steps 2 to 6 to create another three resources with the following properties.
Name : SMS Transaction Service, of type Generic Service Possible owners: Both nodes
Resource dependencies: SMS Services
Service name: MultimaxTxnService (select Use Network Name for computer name) Registry replication: None
Name : SMS Client Services, of type Generic Service Possible owners: Both nodes
Resource dependencies: SMS Services
Service name: MultimaxClientService (select Use Network Name for computer name) Registry replication: None
Name : SMS Integration Server, of type Generic Service Possible owners: Both nodes
Resource dependencies: SMS Transaction Service
Service name: Integrationserver (select Use Network Name for computer name) Registry replication: None
8. Optional – If you want to view the MSMQs in Computer Management, add the following resource: Name : Computer Management, of type Generic Application
Possible owners: Both nodes Resource dependencies: MSMQ
Command line: c:\windows\system32\mmc.exe c:\windows\system32\compmgmt.MSC Current directory: c:\windows\system32
Set Allow application to interact with desktop and
Use Network Name for computer name
Note: The above assumes that the windows installation folder is c:\windows. If this is not the case, enter the correct path.
9. In the Groups folder, right-click on each resource and choose Bring Online, starting with SMS Services. An SMS login screen is displayed for the Service Status application – ignore this. 10 Test fail-over as follows:
a) Shut down the current active node. Using Cluster Administrator on the new active node, ensure that the SMS resources are online.
b) Restart the original active node. Once started, reboot the new active node. This will cause the original to be active again. Use Cluster Administrator to verify this.
Step 6 – Installing IIS, FTP and WWW for Digital Video Management
If Digital Video Management has been purchased, Make sure that the Windows IIS, FTP and WWW (World Wide Web) components are installed on both nodes before installing the Digital Video Management software:
1. Open the Windows Control Panel and start Add or Remove Programs.
2. Click Add/Remove Windows Components, shown on the left side of the screen. 3. For Windows Server 2003, select Application Server, then click Details.
4. A check (tick) mark is displayed next to Internet Information Services (IIS) if IIS is already installed. If no check (tick) mark is displayed, select the option.
5. Click Details, make sure that File Transfer Protocol (FTP) Service and World Wide Web Service
are selected, then click OK. 6. Click Next and follow the prompts.
7. Right-click the cluster group and select New, Resource to add two resources with the following properties:
Name : SMS IIS Resource, of type Generic Script Possible owners: Both nodes
Resource dependencies: The SQL network name and physical disk (e.g. DISK Q:S:) Script filepath: c:\windows\system32\inetsrv\clusweb.vbs
Name : FTP Resource, of type Generic Script Possible owners: Both nodes
Resource dependencies: The SQL network name and physical disk (e.g. DISK Q:S:) Script filepath: c:\windows\system32\inetsrv\clusftp.vbs
Note: The above assumes that the windows installation folder is c:\windows. If this is not the case, enter the correct path.
8. You need to ensure that the IIS configuration is the same on all nodes in a cluster. To do this, open a Command Line window on the active node and run the following commands:
cd c:\windows\system32
cscript iiscnfg.vbs /copy /ts PassiveNode /tu Domain\User /tp Password
Where PassiveNode is the server name of the passive node, Domain\User is the user who you are using to install clustering on the passive node, and Password is the user's password. Note: If the script is unable to run, make sure that the ability to execute VBS scripts has not been disabled in a domain policy, and that anti-virus programs are not blocking execution.
Step 7 – Installation and Configuration for Digital Video Management
If the Digital Video Management software has been purchased, carry out the following to install it.
Note: Make sure that you failed-over the cluster and back again (page 10) before doing this step, otherwise installation on the passive node is not possible.
1. Using Cluster Administrator at the active node, open the Groups folder, right-click each resource starting with "SMS" (as added in Step 5 above) and select Take Offline (if the resource is not already offline).
2. At the active node, insert the Digital Video Management CD and install the software as described in the Software Installation Manual, but note the following:
a) Remember the selected DVR types – you will need to select the same DVRs during installation at the passive node.
b) If you intend to use the server as a Symmetry NVR, choose a Digital Video Storage Folder that is on a shared drive or on a Network Attached Storage (NAS) device.
Note: Assuming the Symmetry NVR is also the FTP server (the default), the FTP Folder Path
specified in the Advanced tab of the Configure/Digital Video/Network Video Recorder screen also needs to be on a shared drive. In cases were large amounts of video data are being transferred, the NVR and FTP server functions may need to be on different PCs; please refer to the Digital Video Design Guide for design and configuration information about this subject. c) When you see "Installshield Wizard Complete", read the instructions, but do not restart the
active node yet.
3. Install the Digital Video Management software at the passive node, making sure you Select the same DVR types as you selected at the active node.
4. Connect the options sentinels to both machines, if they are not already present. 5. Shut down and restart the nodes in the correct sequence:
a) Shut down the passive node. b) Restart the active node. c) Restart the passive node.
6. At the active node, create resources with the following properties (as described on page 7): Name : SMS Transaction Parser, of type Generic Service
Possible owners: Both nodes Resource dependencies: SMSSERVICES
Service name: SMSTransactionparser (select Use Network Name for computer name) Registry replication: None
Name : SMS Archived Index, of type Generic Service Possible owners: Both nodes
Resource dependencies: SMSSERVICES
Service name: SMSArchivedIndex (select Use Network Name for computer name) Registry replication: None
Name : SMS Streaming Archiver, of type Generic Service Possible owners: Both nodes
Service name: SMSStreamingArchiver (select Use Network Name for computer name) Registry replication: None
Name : SMS Streaming Server, of type Generic Service Possible owners: Both nodes
Resource dependencies: SMSSERVICES
Service name: SMSStreamingServer (select Use Network Name for computer name) Registry replication: None
Note: The above assumes that the windows installation folder is c:\windows. If this is not the case, enter the correct path.
7. In the Groups folder, right-click on each "SMS" resource and choose Bring Online. Do the same for the FTP Resource.
8. Test fail-over as follows:
a) Shut down the current active node. Using Cluster Administrator on the new active node, ensure that the SMS resources are online. Check that the SMS Transaction Parser service appears in the Cluster Group folder on the new active node.
b) Restart the original active node. Once started, reboot the new active node. This will cause the original to be active again. Use Cluster Administrator to verify this.
Step 8 – Installing the Global Edition Central Card Handler Database
If centralized card handling is to be used in a Global Edition system, install the Card Handler database as described in the SMS Software Installation Manual. Install the database first on the active node, then on the passive node. Make sure that the destination folder is on the shared drive (e.g. s:\Program Files\Central Card Handler). You will notice fewer prompts on the passive node.
When the database installation is complete on both the active and passive nodes, shut down and restart the nodes in the correct sequence:
a) Shut down the passive node. b) Restart the active node. c) Restart the passive node.
Once you have installed the Card Handler database, you need to add a new resource. Open the Groups folder. In the Resource Group containing SQL Server, create a new resource with the following properties:
Name : SMS Card Handler Service, of type Generic Service Possible owners: Both nodes
Resource dependencies: SMS Services – if the Card Handler database is on the head office server SQL Server Agent – if the Card Handler database is NOT on the head office server
Service name: CardHandlerService (select Use Network Name for computer name) Registry replication: software\group4\CardHandler
Step 9 – Completing the Database Installation at a Global Edition Head Office Server
Note: Make sure that you failed-over the cluster and back again (page 10) before doing this step,otherwise installation on the passive node is not possible.
For a Global Edition head office server, complete the database installation at the head office server, as described in the SMS Software Installation Manual. Install the software first on the active node, then on the passive node.
When the software installation is complete on both the active and passive nodes, shut down and restart the nodes in the correct sequence:
a) Shut down the passive node. b) Restart the active node. c) Restart the passive node.
Once you have installed the Card Handler software, you need to add a new resource. Open the Groups folder. In the Resource Group containing SQL Server, create a new resource with the following properties:
Name : SMS Alarm Monitor Service, of type Generic Service Possible owners: Both nodes
Resource dependencies: SMS Services
Service name: EnterpriseAlarmService (select Use Network Name for computer name) Registry replication: None
Right-click on the resource and choose Bring Online.
Step 10 – Completing the Database Installation at a Global Edition Regional Server
For regions participating in a Global Edition system, complete the database installation at the regional server, as described in the SMS Software Installation Manual. If the region uses a cluster, install the software first on the active node, then on the passive node.
When the software installation is complete on both the active and passive nodes, shut down and restart the nodes in the correct sequence:
a) Shut down the passive node. b) Restart the active node. c) Restart the passive node.
Step 11 – Install the SMS Clients and Additional Symmetry NVRs
Install the SMS software at clients, as described in the SMS Software Installation Manual. Additional Symmetry NVRs can also be installed at this point by installing the Symmetry "Video Storage Management Module".
You are prompted to specify the name of the SMS server during the installation of the software. Since clusters use virtual names, you will need to enter the name of the SMS server manually.
Installing Chargeable Options after the Software is Installed
If a chargeable option has been purchased after the cluster software is installed, install the option as follows at the active node (it is unimportant which node was the active node at the time of the original installation).1. Using Cluster Administrator, open the Groups folder and ensure that "SMS Services" is online. 2. Run options.exe on the options disk supplied.
3. Right-click on "SMS Services" and choose Take Offline. 4. Bring online all resources starting with "SMS".
on a Microsoft Cluster
Installation Procedure
This chapter describes how to install the optional Symmetry NVR software (Video Storage Management Module) on a separate cluster, i.e. on a cluster not used to run the SMS Server software.
Note: This procedure does not describe the initial installation of a cluster. It is assumed that a Network Administrator has already carried out this work and is available during the installation of the Symmetry NVR software on the cluster.
Note: This procedure assumes that the active node is the same machine throughout. If you install the software at different times, you should ensure that the active node is the same machine at both times. If you do not do this, uninstallation at a later time can be more difficult.
Note: Network multicasting on clusters is not supported. Any devices (such as AXIS cameras) must be configured to use Unicast. Make sure that Multicast is not selected in the camera definition screens. Once the initial installation of the cluster is complete, follow the steps given next.
Step 1 – Install SQL Server 2000/2005/2008 (Local Digital Video Indexes Only)
When installing the Symmetry NVR software, you are prompted whether to store the digital video indexes (references to video files) locally on the Symmetry NVR, or on the SMS Server. The Digital Video Design Guide explains the factors to consider when making the decision.
If the indexes are to be stored locally, SQL Server 2000/2005/2008 Enterprise Edition must be clustered on the Symmetry NVRs. Install SQL Server 2000/2005/2008 Enterprise Edition as documented in the
Software Installation Manual, but please note the following.
SQL Server 2000/2005:
• Install from the active node (SQL Server is installed automatically on the passive node).
• Install the SQL Server on the shared drive.
• Select Create a SQL Server failover cluster (SQL Server 2005).
Note: As documented in the Software Installation Manual, do not select Reporting Services. It is recommended that Analysis Services is also not selected.
• On the Virtual Server Configuration screen, set the network to use a public adapter interface (not the heartbeat). Assign a unique new IP address for the virtual SQL server – type the IP address in the box, then click Add.
• Choose to install the virtual SQL data files on the shared drive.
• Select the defaults in the Cluster Node Configuration dialog.
• On the Domain Groups for Clustered Services page (SQL Server 2005), select the <DomainName>\Domain Admins group for each of the three listed services.
SQL Server 2008:
On the active node:
• Select New SQL Server 2008 Failover Installation on the SQL 2008 install screen.
• Specify the cluster network name on the Instance Configuration screen, and select Default Instance
and Default Instance Name.
• On the Cluster Network Configuration screen, specify the desired public SQL IP address.
• Specify the SQL Server service accounts on the Server Configuration screen.
• Ensure the Database directory(ies) on the Database Engine Configuration screen are located on the shared drive.
On the passive node:
• Select Add node to a SQL Server failover cluster on the SQL 2008 install screen.
• Verify the correct SQL cluster network name on the Cluster Node Configuration screen.
• Make sure that the user accounts specified on the Service Accounts screen are the same as were specified during the installation of the active node.
Step 2 – Install IIS, FTP and WWW
Make sure that the Windows IIS, FTP and WWW (World Wide Web) components are installed on both nodes before installing the Symmetry NVR software:
1. Open the Windows Control Panel and start Add or Remove Programs.
2. Click Add/Remove Windows Components, shown on the left side of the screen. For Windows Server 2003, select Application Server, then click Details.
3. A check (tick) mark is displayed next to Internet Information Services (IIS) if IIS is already installed. If no check (tick) mark is displayed, select the option.
4. Click Details, make sure that File Transfer Protocol (FTP) Service and World Wide Web Service
are selected, then click OK. 5. Click Next and follow the prompts.
Step 3 – Install MSMQ
At each node in the cluster:
1. Re-open Add/Remove Windows Components if it has been closed (as above). 2. Select Message Queuing, as shown next.
3. Click Details. Deselect Active Directory Integration, and select Triggers:
4. Click OK, then Next.
5. You are prompted for extra configuration information. Set up the following dialogs as shown next to ensure that MSMQ is set up as an ‘independent client’. This causes queues associated with the MSMQ service to be located on the machine running the service.
6. After clicking the final Next button, MSMQ installation starts. You are prompted for the Windows Installation CD at the appropriate point.
7. If MSMQ is installed successfully, the Message Queuing branch will appear under My Computer, Manage, Services and Applications.
Step 4 – Set Up IIS and FTP Resources
1. Start Cluster Administrator at the active node.
2. Open the Groups folder. Right-click on Cluster Group and select New, Resource. Add two resources with the following properties (see page 7 for help on creating resources):
Name : SMS IIS Resource, of type Generic Script Possible owners: Both nodes
Resource dependencies: The cluster network name and physical disk (e.g. DISK Q:S:) Script filepath: c:\windows\system32\inetsrv\clusweb.vbs
Name : FTP Resource, of type Generic Script Possible owners: Both nodes
Resource dependencies: The cluster network name and physical disk (e.g. DISK Q:S:) Script filepath: c:\windows\system32\inetsrv\clusftp.vbs
Note: The above assumes that the windows installation folder is c:\windows. If this is not the case, enter the correct path.
Step 5 – Configure IIS
You need to ensure that the IIS configuration is the same on all nodes in a cluster. To do this, open a Command Line window on the active node and run the following commands:
cd c:\windows\system32
cscript iiscnfg.vbs /copy /ts PassiveNode /tu Domain\User /tp Password
Where PassiveNode is the server name of the passive node, Domain\User is the user who you are using to install clustering on the passive node, and Password is the user's password. Note: If the script is unable to run, make sure that the ability to execute VBS scripts has not been disabled in a domain policy, and that anti-virus programs are not blocking execution.
Step 6 – Install the Symmetry NVR Software
1. At the active node, insert the Symmetry NVR media and install the software as described in the
Software Installation Manual. Choose a Digital Video Storage Folder that is on a shared drive or on a Network Attached Storage (NAS) device.
Note: Assuming the Symmetry NVR is also the FTP server (the default), the FTP Folder Path
specified in the Advanced tab of the Configure/Digital Video/Network Video Recorder screen also needs to be on a shared drive. In cases were large amounts of video data are being transferred, the NVR and FTP server functions may need to be on different PCs; please refer to the Digital Video Design Guide for design and configuration information about this subject.
SQL Server must be clustered if you choose video indexes to be stored locally (see page 15). When you see "Installshield Wizard Complete", read the instructions, but do not restart the active node yet.
3. Shut down and restart the nodes in the correct sequence: a) Shut down the passive node.
b) Restart the active node. c) Restart the passive node.
Step 7 – Set up Video Storage Resources
1. At the active node, create resources with the following properties: Name : SMS Archived Index, of type Generic Service Possible owners: Both nodes
Resource dependencies: SQL Server Agent
Service name: SMSArchivedIndex (select Use Network Name for computer name) Registry replication: software\group4\multimax
Name : SMS Streaming Archiver, of type Generic Service Possible owners: Both nodes
Resource dependencies: SMSArchivedIndex
Service name: SMSStreamingArchiver (select Use Network Name for computer name) Registry replication: None
Name : SMS Streaming Server, of type Generic Service Possible owners: Both nodes
Resource dependencies: SMSArchivedIndex
Service name: SMSStreamingServer (select Use Network Name for computer name) Registry replication: None
2. In the Groups folder, right-click on each "SMS" resource and choose Bring Online. Do the same for the FTP Resource.
Step 8 – Test Failover
Test fail-over as follows:
1. Shut down the current active node. Using Cluster Administrator on the new active node, ensure that the SMS resources are online.
2. Restart the original active node. Once started, reboot the new active node. This will cause the original to be active again. Use Cluster Administrator to verify this.
Step 9 – Activate License
on a Microsoft Cluster
Installation Procedure
Note: This procedure does not describe the initial installation of a cluster. It is assumed that a Network Administrator has already carried out this work and is available during the installation of the SMS XML Open Integration Module web server on the cluster.
It is advised not to install the XML Open Integration Module web server on the same cluster as used by the SMS Server (database). If this is unavoidable, tests should be carried out to ensure that the SMS database performance will not be compromised, since the additional loading produced by the XML service could possibly affect the performance of the whole SMS system.
Note: The following procedures assume that the active node is the same machine throughout. If you install the software at different times, you should ensure that the active node is the same machine at both times. If you do not do this, uninstallation at a later time can be more difficult.
Once the initial installation of the cluster is complete, follow the steps given next.
Step 1 – Install IIS and WWW
Before installing the XML Open Integration Module, carry out the following at both nodes: 1. Open the Windows Control Panel and start Add or Remove Programs.
2. Click Add/Remove Windows Components, shown on the left side of the screen. For Windows Server 2003, select Application Server, then click Details.
3. A check (tick) mark is displayed next to Internet Information Services (IIS) if IIS is already installed. If no check (tick) mark is displayed, select the option.
4. Click Details, make sure that the World Wide Web Service is selected, then click OK. 5. Click Next and follow the prompts. You may need the Windows CD.
Step 2 – Set Up IIS Resource
1. Start Cluster Administrator at the active node.
2. Open the Groups folder. Right-click on Cluster Group and select New, Resource. Add a resource with the following properties (see page 7 for help on creating resources):
Name : SMS IIS Resource, of type Generic Script Possible owners: Both nodes
Resource dependencies: The cluster network name and physical disk (e.g. DISK Q:S:) Script filepath: c:\windows\system32\inetsrv\clusweb.vbs
Note: The above assumes that the windows installation folder is c:\windows. If this is not the case, enter the correct path.
Step 3 – Configure IIS
You need to ensure that the IIS configuration is the same on all nodes in a cluster. To do this, open a Command Line window on the active node and run the following commands:
cd c:\windows\system32
cscript iiscnfg.vbs /copy /ts PassiveNode /tu Domain\User /tp Password
Where PassiveNode is the server name of the passive node, Domain\User is the user who you are using to install clustering on the passive node, and Password is the user's password. Note: If the script is unable to run, make sure that the ability to execute VBS scripts has not been disabled in a domain policy, and that anti-virus programs are not blocking execution.
In the Groups folder, right-click on the SMS IIS resource and choose Bring Online.
Step 4 – Install the Software at the SMS Database Machine
Carry out the following:
1. Start Cluster Administrator at the active node and take all the SMS cluster resources offline. 2. Install the XML Open Integration Module on the active node, as described in the XML Open
Integration Module Installation and User Guide.
3. When you see the "InstallShield Wizard Complete" dialog, read the instructions, click Finish, but do not restart the active node yet.
4. Install the XML Open Integration Module on the passive node, click Finish but again, do not restart the passive node yet.
5. Using the Cluster Administrator at the active node, start the SMS Services. 6. Shut down and restart the nodes in the correct sequence:
a) Shut down the passive node. b) Restart the active node.
Step 5 – Edit Web.config (Optional)
In high-security environments, it is recommended that a time server is used to synchronize the times of all machines, and that the time tolerance setting in Web.config is set to 300 seconds. Please refer to the XML Open Integration Module Installation and User Guide.
an NEC Cluster
This describes how to set up the SMS Server software on a pair of NEC cluster servers.
Note: This procedure does not describe the initial installation of a cluster. It is assumed that a Network Administrator has already carried out this work and is available during the installation of the SMS software on the cluster.
Please refer to the NEC cluster Installation Manuals for a more detailed explanation of NEC clustering and its options.
Before starting this procedure, make sure that the SQL Server and SMS software have been installed on both servers in the cluster.
Step 1 – Change Message Queuing Registry Entry
Carry out the following on both servers in the cluster, and on any SMS client that is working with the cluster:
1. Start the Registry Editor (Start, Run, Regedit).
2. Navigate to: HKEY_LOCAL_MACHINE\Software\Microsoft\MSMSQ\Parameters\ 3. Create a new DWORD registry key.
4. Name the new registry key IgnoreOSNameValidation
5. Set the registry key value to 1. 6. Reboot the machine.
7. Repeat for the second server in the cluster.
Step 2 – Set Up SQL Authentication in a Domain
The following procedures should be performed on both servers in the cluster. Disable strict name checking:
1. Start the Registry Editor (Start, Run, Regedit).
2. Navigate to: HKEY_LOCAL_MACHINE\System\CurrentControlSet\Services\lanmanserv\parameters 3. Create a new DWORD value.
4. Name the new registry key DisableStrictNameChecking
5. Edit the DisableStrictNameChecking registry key, and set its value to 1. 6. Repeat for the second server in the cluster.
Set up a back connection host name:
1. Start the Registry Editor (Start, Run, Regedit).
2. Navigate to: HKEY_LOCAL_MACHINE\System\CurrentControlSet\Control\Lsa\MSV 1_0 3. Create a new Multi-String Value.
4. Name the new registry key BackConnectionHostNames
5. Edit the BackConnectionHostNames registry key.
6. In the text box enter the virtual computer name of the cluster. 7. Repeat for the second server in the cluster.
Step 3 – Set Up Windows Hosts Entries
The windows hosts file must be edited as follows on both servers in the cluster: 1. Navigate to C:\WINDOWS\system32\drivers\etc
2. Open the hosts file with a text editor such as Wordpad or Notepad. 3. At the end of the hosts file, enter:
<ip_address> <virtual_computer_name>
Where <ip_address> is the floating IP address of the cluster, and <virtual_computer_name> is the virtual computer name. For example:
192.168.0.100 computer1 4. Save the hosts file and close it.
5. Repeat for the second server in the cluster.
Step 4 – Set Up the Services
For NEC ExpressCluster to control the SMS software, it is important for ExpressCluster to maintain explicit control of all SMS and SQL Server services on the system.
Note: Performing this action will stop your application until under full control of the cluster. Carry out the following.
1. Open the Windows Services Management Console:
2. Stop the following services and set each one to manual: Distributed Transaction Coordinator
Message Queuing
Message Queuing Triggers SMS Client Services SMS Integration Server SMS Services
SMS Transaction Service SQL Server (MSSQLSERVER) SQL Server Agent (MSSQLSERVER) 3. Repeat for the second server in the cluster.
Step 5 – Move the SMS Databases to the Mirror Disk
The following instructions must be followed to move the Security Management System databases to the mirror disk. Prior to performing these actions you should create a backup of any production data to prevent possible data loss.
Before performing these procedures all of the Security Management System services should be stopped on both the primary and secondary servers in the cluster. Failure to do this can result in an incorrect configuration.
2. Connect the SQL 2005/2008 Management Studio to the primary system (in the following example, NECAMPRIMARY):
3. Once connected to the SQL database, expand the database tree to view a list of all the SMS databases:
Perform this action for each database in the Databases tree. 5. Move the databases:
a) Navigate to C:\Program Files\Microsoft SQL Server\MSSQL.1\MSSQL\Data
b) Copy all of the databases and their corresponding log files that you detached (do not copy any of the system databases).
c) Navigate to the mirror disk.
d) Create a new folder on the mirror disk named MSSQL. e) Paste the files that you copied into the new folder. 6. Attach the databases:
a) Right-click the Databases tree and select Attach:
c) In the dialog displayed, navigate to the folder that you moved the databases to and click OK:
d) Repeat steps b) and c) for each of the other databases. e) Click OK in the Attach Databases window.
7. Stop the SQL Server services on the primary system:
8. In the NEC ExpressCluster manager, select the failover group, right-click and select Move (to migrate the group to the secondary server):
10. Once the group has been moved to the secondary system, connect SQL 2005/2008 Management Studio to the secondary system:
11. Once connected to the SQL database, expand the Databases tree to view a list of all SMS databases:
Perform this action for each database in the Databases tree.
Since the databases that need to be attached are already in the mirror disk, we do not need to move them again.
13. Attach the databases:
a) Right-click the Databases tree and select Attach:
b) In the Attach Databases window, click Add:
c) In the dialog displayed, navigate to the folder that you moved the databases to and click OK:
e) Click OK in the Attach Databases window.
14. Stop the SQL Server database services on the secondary system:
Step 6 – Script Resource Setup
1. Using the NEC ExpressCluster manager, stop the cluster by selecting Service, Stop Cluster:
2. In the confirmation dialog displayed, click OK.
3. Once the cluster has been stopped, open the Cluster Builder.
4. Right-click the failover group in the builder and select Add Resource:
6. Click Next:
7. Click the Start script, then click Replace:
9. Click Yes when you are prompted to replace the file. 10. Click the Stop script, then click Replace:
11. Select Stop.bat and click Open:
12. Click Yes when you are prompted to replace the file. 13. Click Add in the Resource Definition dialog:
15. Click Next:
17. Select File, Upload the Configuration File:
18. Click OK:
19. Start the Cluster:
The cluster should start and the application should now be running under control of the cluster. 20. Edit the following file variables in the start and stop.bat files:
DBServer=amagvirtual (specify the Virtual Computer Name you have set in the configuration) DB=MULTIMAX (do not edit this)
DBUSER=sa (do not edit this)
Known Issues
The following are known issues when using the SMS software on an NEC cluster:
• Network Video Recorder – At present, when installing a Network Video Recorder (NVR) on an NEC cluster, the SMS software will report the secondary server as not licensed after failover. This does not affect the functionality of the NVR, and will continue to operate.
• Command Centre – At present, after failover to the secondary server, the Command Center screen in the SMS software will not function correctly.