USER GUIDE
NEC America, Inc.
NEC America reserves the right to change the specifications, functions, or features in this document at any time without notice. NEC America has prepared this document for use by its employees and customers. The information contained herein is the property of NEC America and shall not be reproduced without prior written approval from NEC America.
Copyright 1997
TABLE OF CONTENTS
Page
Chapter 1 - Introduction . . . 1
General Description . . . 1
Manual Organization . . . 2
Chapter 2 - Administration . . . 3
Overview . . . 3
Log On Screen . . . 4
Main Menu . . . 5
Status Window . . . 5
Report Generation . . . 6
Create a Report . . . 6
Procedure . . . 6
View Report . . . 11
Procedure . . . 14
Print Report . . . 15
Procedure . . . 15
Transfer to Media . . . 16
Procedure . . . 16
Store on DOS Diskette. . . 17
Procedure . . . 17
Delete Report . . . 18
Procedure . . . 18
Erase Statistics . . . 18
Procedure . . . 18
Quit . . . 19
Trace Functions . . . 20
Initiate Trace . . . 20
Procedure . . . 22
Stop Trace . . . 25
Procedure . . . 25
View Trace . . . 25
Procedure . . . 26
Print Trace . . . 27
Procedure . . . 27
Transfer to Media . . . 27
Procedure . . . 27
Copy to DOS Diskette . . . 28
Procedure . . . 28
Quit . . . 28
Quit (Log Off) . . . 29
Chapter 3 - Limitations . . . 31
Appendix A - Error Messages. . . 33
LIST OF FIGURES
Figure Title Page
1-1 UCD-XL Environment with a VMS. . . 1
2-1 UCD-XL Log On screen . . . 4
2-2 UCD-XL Main Menu . . . 5
2-3 Report Generation menu. . . 6
2-4 Report Generation data entry screen . . . 7
2-5 View Report -- All Daily Statistics . . . 11
2-6 View Report -- Major Hourly Statistics. . . 11
2-7 View Report -- ANI Patterns . . . 12
2-8 Erase Statistics screen . . . 18
2-9 Trace Functions menu. . . 20
2-10 Initiate Trace screen . . . 22
Chapter 1
Introduction
General Description
UCD-XL is an Open Applications Interface (OAI) application that expands the capabilities of Uniform Call Distribution (UCD) in the NEAX2400 PBX. Although the PBX is limited to 60 extensions in a UCD group, this application can route a call to any extension in a group of any size (subject to a practical limit of 150 voice mail ports). Multiple UCD groups are supported. The application also monitors the calls and maintains cumulative statistics which can be reported.
UCD-XL has the ability to distribute calls to groups based upon the automatic number identification (ANI) of the call. Separate statistics are maintained for ANI patterns.
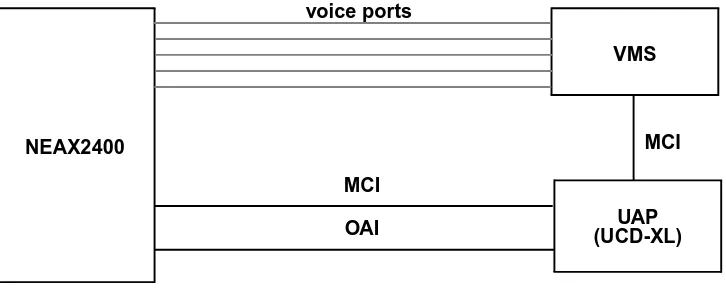
UCD-XL, which resides on the User Application Processor (UAP), may communicate with a voice mail system (VMS) via the standard Message Center Interface (MCI) link, as shown in Figure 1-1. When an incoming call is connected to a voice port, a message is sent to the VMS, identifying the originator and the port. The VMS, in turn, sends a message to the UAP controlling a message waiting lamp (MWL). UCD-XL passes this MCI message unaltered to the PBX.
Figure 1-1 UCD-XL Environment with a VMS
UCD-XL is able to receive calls across a CCIS network of PBXs. However, all extensions comprising the managed groups must reside on the PBX connected to the User Application Processor. Office codes are supported, and may be omitted or truncated in MCI messages.
If UCD-XL detects a failure of the OAI link with the PBX, the application will switch to passive mode. In this passive mode, UCD-XL passes MCI messages between the PBX and the VMS. Once the OAI link is re-established, UCD-XL will restore full functionality.
VMS
MCI
UAP (UCD-XL) NEAX2400
OAI voice ports
Manual
Organization
This document contains the following sections:
Chapter 1: Introduction A brief explanation of UCD-XL. Chapter 2: Configuration How UCD-XL should be
config-ured.
Chapter 3: Administration How to generate activity reports for UCD-XL.
Chapter 4: Limitations Limitations to UCD-XL. Appendix A: Error Messages UCD-XL error messages. Appendix B: Utilities UCD-XL Utilities.
Chapter 2
Administration
Overview
The UCD-XL Administrator gives you the capability of generating, viewing, and printing reports that quantify the call traffic managed by the application. The Administrator also gives you the ability to initiate, terminate, view, and print a trace of incoming calls for any combination of UCD groups and ANI patterns.
UCD-XL Monitor records statistics for each hour or for each day; the time frame is specified in Monitor’s configuration. For groups, major and minor statistics are maintained; for ANI patterns, there are only major statistics. At the end of the specified time period, the Monitor records the accumulated statistics into a data file, and then clears the internal buffer for the next collection period. Special statistics are maintained for queued and connected calls that overlap (“carryover”) consecutive collection periods. The collected statistics include:
Major Statistics
• the start of the time period (date and time)
• quantity of existing ports (for groups only)
• count of incoming calls per group or pattern
• count of abandoned calls per group or pattern
• count of queued calls per group or pattern
• count of queued calls carried over from previous collection period
• average duration (in seconds) a call is queued
• maximum duration (in seconds) a call is queued
• maximum duration of a queued call that was carried over Minor Statistics
• count of connected calls (excluding abandonments) per port
• count of connected calls carried over from previous collection period
• average duration (in seconds) of a completed call at each port
• maximum duration (in seconds) of a completed call at each port
• maximum duration of a queued call that was carried over
Through the Report Generation menu, the Administrator can create a report of these statistics for any range of dates. The report can be detailed by the day or by the hour, or can summarize the statistics. The report can cover any combination of groups and ANI patterns. The statistics remain in the data file until cleared by using the Erase Statistics option in the Report Generation menu.
Through the Trace Functions menu, the Administrator can observe UCD-XL call activity in real time. It produces a trace file which can be viewed on the screen, printed, or transferred onto a storage device. This trace file continues to exist after a trace is stopped, but is overwritten when another trace is initiated.
Log On Screen
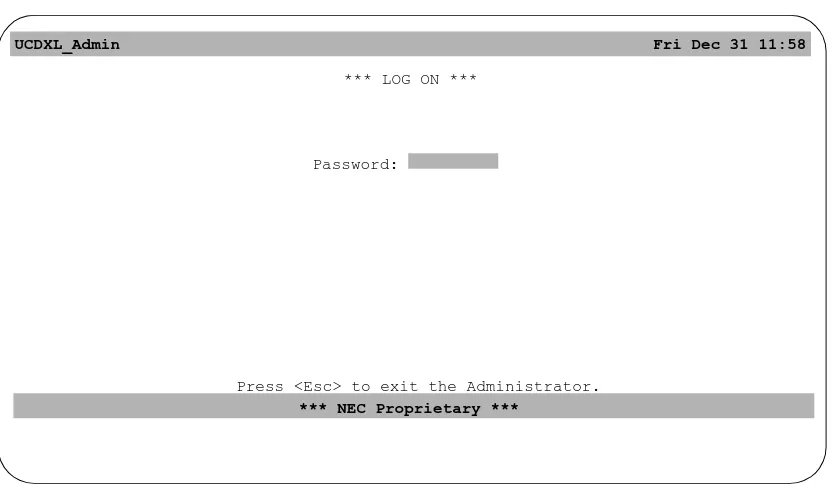
To log on to UCD-XL, initialize the UCD-XL Administrator. The UCD-XL Log On screen displays (see Figure 2-1).
Figure 2-1 UCD-XL Log On screen
Type the Administrator’s password and press Enter. This value must match the password specified in the configuration of the Administrator. If you enter the wrong password, the terminal will beep.
To exit the application, press the Esckey. The
prompt
1bU i_e cebU/ I>
will appear so that accidental termination is avoided. If you reply
Y, the
application will terminate and the screen will clear. Otherwise, the Log On
screen remains displayed
.UCDXL_Admin Fri Dec 31 11:58
*** LOG ON ***
Password:
Press <Esc> to exit the Administrator.
Main Menu
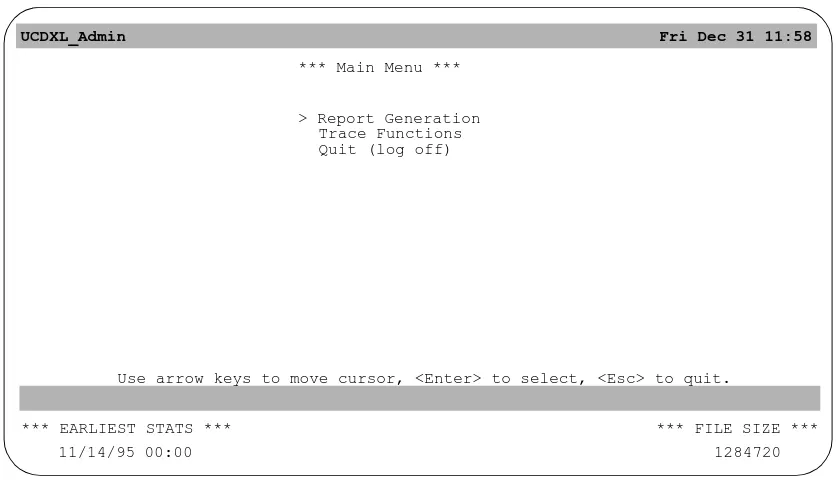
After logging on, the UCD-XL Main Menu displays (see Figure 2-2).Figure 2-2 UCD-XL Main Menu
The pointer (> symbol) indicates the current selection. Use the up arror and down arrow keys to move the pointer through the list of options; press Enter to execute the selected option. There are three options on the UCD-XL Main Menu: Report Generation, Trace Functions, and Quit (log off). The following sections describe each option.
Status Window
At the bottom of the screen, some information about the statistics file is displayed in a Status Window. On the left side, there is the date and time of the earliest recorded statistics. On the right side, there is the size (in bytes) of the file. A flashing value means that there is no more than 25% space available on the disk, in which case a warning message is also displayed. (If this happens, you may want to reduce the size of the file by erasing some statistics, as described on page 18.)
In the center of the Status Window, any of the following messages may appear in highlighted form:
B5@?BD 5H9CDC - when a statistics report has been created
DB135 ?> - when a trace of call activity is in effect
UCDXL_Admin Fri Dec 31 11:58
*** Main Menu ***
> Report Generation Trace Functions Quit (log off)
Use arrow keys to move cursor, <Enter> to select, <Esc> to quit.
*** FILE SIZE *** *** EARLIEST STATS ***
Report Generation
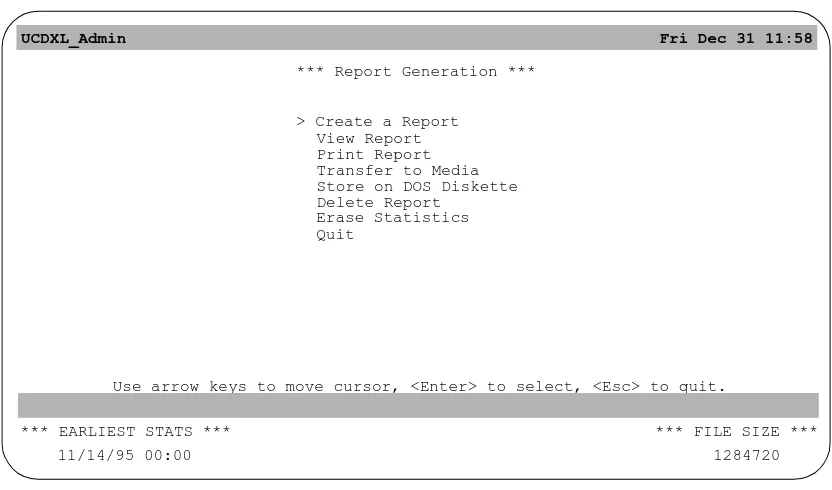
If you select Report Generation from the UCD-XL Main Menu, the menu shown in Figure 2-3 displays. This menu has seven entries; each is described below.
Note: Unless UCD-XL is configured to produce statistics, the Report Generation com-mands will fail, because the statistics file does not exist.
Figure 2-3 Report Generation menu
Create a Report
This selection allows you to generate reports of the collected statistics.Procedure
1. Select Create a Report from the Report Generation menu.
If the statistics file does not exist, UCD-XL displays the following message
3Q^^_d _`U^ cdQdYcdYSc VY\U ²eSTcdQdc³
and returns to the Report Generation menu.
2. If a report already exists, UCD-XL issues the prompt
BU`_bd UhYcdc ?fUbgbYdU/ I>
If you answer N, UCD-XL returns to the Report Generation menu.
UCDXL_Admin Fri Dec 31 11:58
*** Report Generation ***
> Create a Report View Report Print Report Transfer to Media Store on DOS Diskette Delete Report
Erase Statistics
Use arrow keys to move cursor, <Enter> to select, <Esc> to quit. Quit
*** FILE SIZE *** *** EARLIEST STATS ***
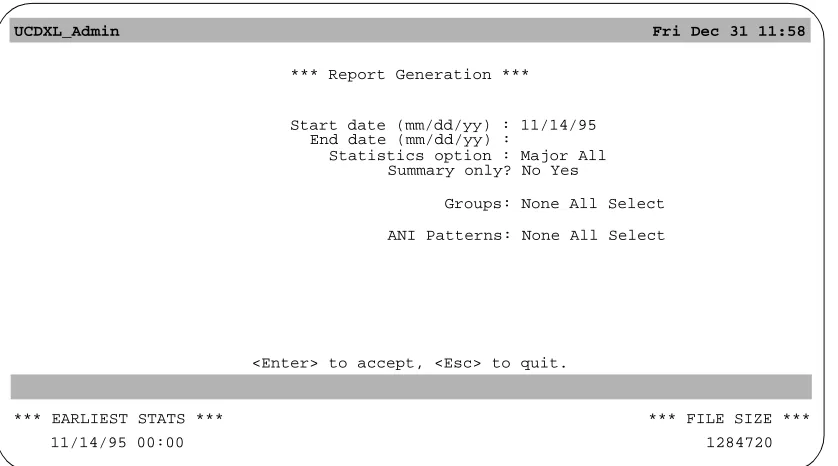
If you agree to overwrite the current report (by entering Y), or if there is no current report, the screen shown in Figure 2-4 is displayed.
Figure 2-4 Report Generation data entry screen
3. Enter the starting and ending dates of the statistics to be reported. By default, the start date is the first date of statistics in the statistics file, and the end date is the last date in the statistics file. When specifying the date range for a report:
• The dates are inclusive.
• The date format is month/day/year.
• Enter numbers separated by slashes.
• If you do not enter a year, UCD-XL uses the current year.
• If you enter only two digits for the year, 60-99 are interpreted as 1960-1999; 0-59 are interpreted as 2000-2059.
• It is not necessary to enter two digits each for the months and days; for ex-ample, you can enter 1/3 for January 3 of the current year.
• If the end date you enter is less than the start date, the following message dis-plays:
=ecd UaeQ\ _b UhSUUT cdQbdY^W TQdU
• If a date in the future (for example, June 6 of next year) is entered, the fol-lowing message displays:
6edebU TQdU ^_d `Ub]YddUT
• Pressing Ctrl+w or Home will clear a data entry field. This applies to all data entry fields in UCD-XL (dates, search strings, device names, and so forth).
UCDXL_Admin Fri Dec 31 11:58
*** Report Generation ***
Start date (mm/dd/yy) : 11/14/95 End date (mm/dd/yy) :
<Enter> to accept, <Esc> to quit. Statistics option : Major All
Summary only? No Yes
*** FILE SIZE *** *** EARLIEST STATS ***
11/14/95 00:00 1284720
Groups: None All Select
4. Enter the statistics option you want by using the spacebar to highlight the value (either Major or All) and then pressing Enter. “Major” refers to statistics about groups as a whole, such as the quantity of incoming calls, the quantity of queued calls, and the average duration of queuing. “Minor” refers to statistics about in-dividual ports within a group, such as the quantity of connected calls and the av-erage duration of a completed call. “All” means that both major and minor statistics will be reported.
5. Enter the summary report option you want by using the spacebar to highlight the value (Yes or No) and then pressing Enter. Yes produces a report summa-rizing statistics (within each group) for the reporting period. No produces a re-port detailing the hourly or daily statistics.
Note: Pressing Esc prior to this step stops report generation, and leaves any existing report unchanged.
6. Determine what groups you want to report. If you want every group reported, press A and Enter(or move the cursor to All using the space bar and press En-ter), then proceed with step 8. If you do not want any groups, press N and Enter (or move the cursor to None and press Enter), then proceed with step 8. If you want certain groups, press S and Enter (or move the cursor to Select and press Enter), then proceed with step 7.
7. After you have chosen the Select option under Groups, the current set of prompts on the screen is replaced by the prompt
CU\USd _^U _b ]_bU Wb_e`c*
Below it is a list of names of all groups defined in the Group Identification Database, with a cursor positioned on the first name. Use the arrow keys to move the cursor through the list. (If there are too many groups to fit on one page, you may press the PgDn and PgUp keys to scroll through the pages.) When the cursor is positioned at a desired group, press Enter to select it. The name is then highlighted. If you change your mind, move the cursor to a highlighted name and press Enter to deselect it. Proceed in this manner until you have selected all the groups that you want to report. Then press Esc. The highlighted groups are remembered, and the original set of prompts shown in Figure 2-4 is redisplayed with the cursor positioned at the next prompt.
8. If UCD-XL has been configured to distribute calls based upon ANI patterns, the prompt
1>9 @QddUb^c*
appears as shown in Figure 2-4. (Otherwise, skip to step 10.) Determine what ANI patterns you want to report. If you want every pattern reported, press A and Enter (or move the cursor to All using the space bar and press Enter), then proceed with step 10. If you do not want any patterns, press N and Enter(or move the cursor to None and press Enter), then proceed with step 10. If you want certain patterns, press S and Enter(or move the cursor to Select and press Enter), then proceed with step 9.
9. After you have chosen the Select option under ANI Patterns, the current set of prompts on the screen is replaced by the prompt
CU\USd _^U _b ]_bU 1>9 `QddUb^c*
Below it is a list of all patterns defined in the ANI Pattern Database, with a cursor positioned on the first item. You use the arrow keys to move the cursor through the list. (If there are too many patterns to fit on one page, you may press the PgDn and PgUp keys to scroll through the pages.) When the cursor is positioned at a desired pattern, press Enter to select it. The pattern is then highlighted. If you change your mind, move the cursor to a highlighted pattern and press Enter to deselect it. Proceed in this manner until you have selected all the patterns that you want to report. Then press Esc. The highlighted patterns are remembered, and the original set of prompts shown in Figure 2-4 is redisplayed along with the prompt of step 10.
Note: You cannot return to the list without starting from step 1 again.
10.Once groups and/or ANI patterns have been specified, the following prompt ap-pears:
@b_SUUT gYdX bU`_bd/ I>
If you answer N, UCD-XL returns to the Report Generation menu without producing a new report. If you answer Y, the following message is normally displayed as the report is created:
7U^UbQdY^W bU`_bd
If you see this message instead:
7b_e`c Q^T_b 1>9 `QddUb^c ]ecd RU c`USYVYUT
11.After the report is created, the message REPORT EXISTS appears at the bot-tom of the screen (see Figure 2-5).
12.UCD-XL returns to the Report Generation menu.
View Report
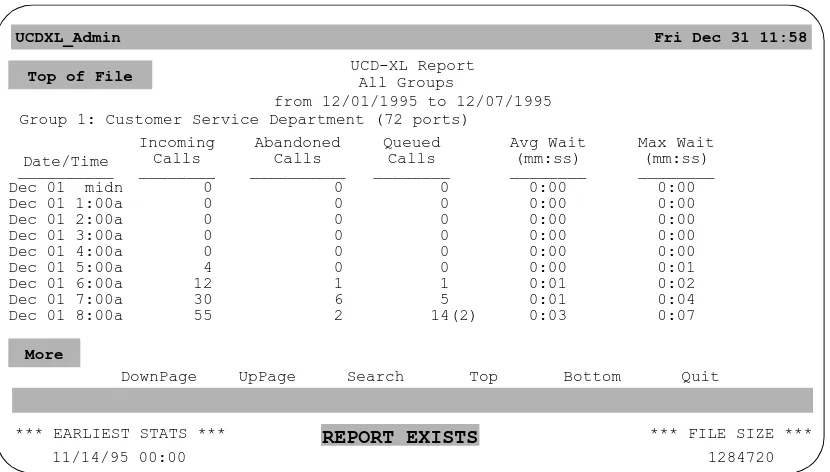
After a report is generated, you can review the report on screen. Within the report, the statistics are organized first by UCD group, and then chronologically within the collection period. Totals of the statistics are given for all ports in a group during each collection period, and for all collection periods within each group. Statistics for ANI patterns, if any, start on a separate page in the report, following groups.Figure 2-5 is a sample report of all statistics for all groups on a daily basis. Figure 2-6 is a sample report of major statistics on an hourly basis. Major statistics do not include the counts and durations computed per port.
Figure 2-5 View Report -- All Daily Statistics
UCDXL_Admin Fri Dec 31 11:58
REPORT EXISTS
DownPage UpPage Search Top Bottom Quit
More
Top of File
Group 1: Customer Service Department (72 ports)
Date/Time Incoming Calls Abandoned Calls Queued Calls Avg Wait (mm:ss) Max Wait (mm:ss) __________ ________ __________ ________ ________ ________
Dec 01 midn 475 31 107 0:06 0:25
Avg Conn (mm:ss) ________ Max Conn (mm:ss) ________ Connected Calls __________ Extn _____ 3001 3002 3003 0:44 1:20 1:16 1:27 2:08 1:53 10(1) 8 9 UCD-XL Report
from 12/01/1995 to 12/07/1995 All Groups
*** FILE SIZE *** *** EARLIEST STATS ***
11/14/95 00:00 1284720
UCDXL_Admin Fri Dec 31 11:58
UCD-XL Report
REPORT EXISTS
DownPage UpPage Search Top Bottom Quit
More
Top of File
from 12/01/1995 to 12/07/1995 Group 1: Customer Service Department (72 ports)
Date/Time Incoming Calls Abandoned Calls Queued Calls Avg Wait (mm:ss) Max Wait (mm:ss) __________ ________ __________ ________ ________ ________
Dec 01 midn 0 0 0 0:00 0:00
Dec 01 1:00a Dec 01 2:00a Dec 01 3:00a Dec 01 4:00a Dec 01 5:00a Dec 01 6:00a Dec 01 7:00a Dec 01 8:00a
0 0 0 0 4 12 30 55 0 0 0 0 0 1 6 2 0 0 0 0 0 1 5 14(2) 0:00 0:00 0:00 0:00 0:00 0:01 0:01 0:03 0:00 0:00 0:00 0:00 0:01 0:02 0:04 0:07
*** FILE SIZE *** *** EARLIEST STATS ***
11/14/95 00:00 1284720
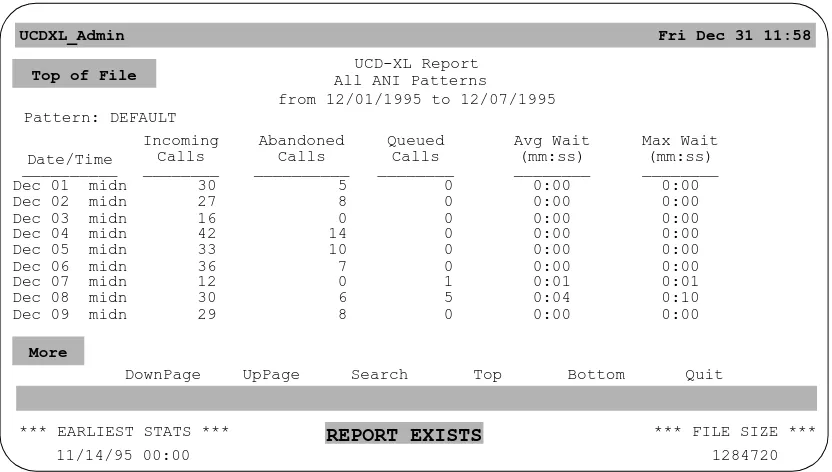
Figure 2-7 View Report -- ANI Patterns
The columns in the report are:
Date/Time - When the collection period began.
Incoming Calls - (Group) The number of calls directed to the group. (ANI Pattern) The number of calls whose ANI data matched the pattern. Abandoned Calls - The number of calls abandoned by the caller before the call was answered at a port.
Queued Calls - The number of calls that had to wait to be connected to a port because all ports were busy. An additional value in parentheses represents the number of queued calls that carried over from the previous collection period. Avg Wait - The average time (in minutes and seconds) a call was queued. Max Wait - The maximum time (in minutes and seconds) any call was queued. Extn - The extension of a port in the group. If the port had an abnormal status at the end of the collection period, one of the following two-letter codes appears after the extension: LO - locked out; MB - made busy; XX - unknown or non-existent.
Connected Calls - The number of calls connected to the port. (Only answered calls are counted.) An additional value in parentheses represents the number of connected calls that carried over from the previous collection period.
Avg Conn - The average time (in minutes and seconds) that a call is connected to the port.
Max Conn - The maximum time (in minutes and seconds) that a call is
UCDXL_Admin Fri Dec 31 11:58
UCD-XL Report
REPORT EXISTS
DownPage UpPage Search Top Bottom Quit
More
Top of File
from 12/01/1995 to 12/07/1995 Pattern: DEFAULT Date/Time Incoming Calls Abandoned Calls Queued Calls Avg Wait (mm:ss) Max Wait (mm:ss) __________ ________ __________ ________ ________ ________
Dec 01 midn 30 5 0 0:00 0:00
Dec 03 midn Dec 04 midn Dec 05 midn Dec 06 midn Dec 07 midn Dec 08 midn Dec 09 midn
27 16 42 33 36 12 30 29 8 0 14 10 7 0 6 8 0 0 0 0 0 1 5 0 0:00 0:00 0:00 0:00 0:00 0:01 0:04 0:00 0:00 0:00 0:00 0:00 0:00 0:01 0:10 0:00
*** FILE SIZE *** *** EARLIEST STATS ***
11/14/95 00:00 1284720
All ANI Patterns
Figure 2-7 is a sample report of all statistics for all ANI patterns on a daily basis. There are three special ANI patterns that might appear in a report:
DEFAULT - Statistics about calls whose ANI data doesn’t match any other patterns or calls that do not have any ANI data.
FOREIGN - Statistics about calls originating from outside the North American Numbering Plan (i.e., their ANI data is longer than 10 digits).
INTERNAL - Statistics about calls internal to the PBX network (i.e., originating from extensions).
In a summary report (or the grand totals of a detailed report), the following cumulative statistics are provided per group or per ANI pattern:
• The number of calls placed during the reporting period.
• The number of calls abandoned during the reporting period.
• The number of calls queued during the reporting period. (“Carryover” calls are only counted once.)
• The average time of a queued call during the reporting period.
• The maximum time of a queued call during the reporting period. This value may represent a “carryover” call (across consecutive collection periods) in-stead of a call during a single collection period.
• (minor) The number of calls connected to any port during the reporting pe-riod. (“Carryover” calls are only counted once.)
• (minor) The average time of a connected call during the reporting period.
Procedure
1. Select View Report from the Report Generation menu.
If a report does not exist, UCD-XL displays the following message
BU`_bd VY\U T_Uc ^_d UhYcd
and returns to the Report Generation menu.
2. If a report exists, a screen similar to Figure 2-5 or Figure 2-6 displays. The mes-sage REPORT EXISTS appears at the bottom of the screen, along with six subcommands.
• DownPage - Scroll down a page in the report.
• UpPage - Scroll up a page in the report.
• Search - Perform a case-sensitive search for a text string. UCD-XL issues the prompt
@QddUb^ d_ cUQbSX V_b*
Type the text string (maximum of 8 characters) and press Enter.
The search will start at the top of the next screen of the report and proceed forward. The first occurrence of the text string on that screen will be highlighted, as well as any other occurrence on that screen. To see the next screen with an occurrence of the string, repeat the search process. You can press Esc instead of Enter to abort the search.
If the text string is not found, UCD-XL displays the message
@QddUb^ ^_d V_e^T
• Top - Go to the first line of the report
• Bottom - Go to the last line of the report.
• Quit - Exit the report viewer, and return to the Report Generation menu. Use the left arrow and right arrow keys to scroll the cursor through the subcommand list. When a subcommand is highlighted, press Enter to execute that subcommand. Alternatively, you may execute a subcommand by pressing the first letter of the subcommand and then pressing Enter.
3. After viewing a report, select the Quit subcommand.
4. UCD-XL returns to the Report Generation menu.
Print Report
After you generate a report, you can print it. The method of printing is configured for the UCD-XL Administrator via APM. The default is the UNIX system printer.Procedure
1. Select Print Report from the Report Generation menu.
If a report does not exist, UCD-XL displays the following message:
BU`_bd VY\U T_Uc ^_d UhYcd
UCD-XL returns to the Report Generation menu. If the report exists, it is sent to the specified printer. UCD-XL issues the message
6Y\U Yc RUY^W `bY^dUT
2. UCD-XL returns to the Report Generation menu.
Transfer to Media
After you generate a report, it may be written as a UNIX-formatted file to an external device, such as a floppy disk or a cartridge tape.Note: The UNIX tar command is used to implement the Transfer to Media command. The tar command may generate an error message that overwrites part of the Re-port Generation menu.
Procedure
1. Select Transfer to Media from the Report Generation menu. If a report does not exist, UCD-XL displays the following message:
BU`_bd VY\U T_Uc ^_d UhYcd
UCD-XL returns to the Report Generation menu. If the report does exist, UCD-XL issues the prompt
>Q]U _V TUfYSU*
2. Type the name of the device and press Enter. (Make sure there is something in the device.) You may cancel the transfer by pressing Esc instead of Enter. While the transfer is taking place, UCD-XL displays the following messages:
1ddU]`dY^W d_ dbQ^cVUb dXU VY\U
and
>Q]U _V TUfYSU* ,TUfYSU ^Q]U.
Note: The last message displays on the left side of the screen (where <device name> is the name of the specified device).
If the transfer is successful, UCD-XL displays the message:
DbQ^cVUb S_]`\UdUT
If the transfer is not successful, UCD-XL displays the message:
DbQ^cVUb VQY\UT
3. UCD-XL returns to the Report Generation menu.
Store on DOS
Diskette
You may save a report on a DOS-formatted diskette (or other media).
Procedure
1. Select Store on DOS Diskette from the Report Generation menu. If a report does not exist, UCD-XL displays the following message:
BU`_bd VY\U T_Uc ^_d UhYcd
UCD-XL returns to the Report Generation menu. If the report does exist, UCD-XL issues the prompt:
4?C TbYfU \QRU\ 1 _b 2*
2. Enter the letter representing the DOS label for the diskette drive (usually A or B). If you want to provide a name for the file other than UCDRPT, follow the label with a colon and new name (e.g.: A:UCDXL.JAN). You may cancel by pressing Esc instead of Enter.
Note: Be sure there is a diskette in the drive before you press Enter.
While the file is being copied, UCD-XL displays the following message:
1ddU]`dY^W d_ S_`i _^d_ 4?C TYc[UddU
If the report was copied successfully, UCD-XL displays the message:
4?C S_`i S_]`\UdUT
If the report was not copied, UCD-XL displays the message:
4?C S_`i VQY\UT
3. UCD-XL returns to the Report Generation menu.
Delete Report
At any time, you can remove the existing report from the system. This does not affect the data in the statistics file.Procedure
1. Select Delete Report from the Report Generation menu. UCD-XL issues the prompt:
1bU i_e cebU/ I>
If you enter N, UCD-XL returns to the Report Generation menu, without affecting the report file.
If you enter Y, UCD-XL displays the following message
6Y\U TU\UdUT
and the REPORT EXISTS message is removed from the screen.
2. UCD-XL returns to the Report Generation menu.
End of procedure.
Erase Statistics
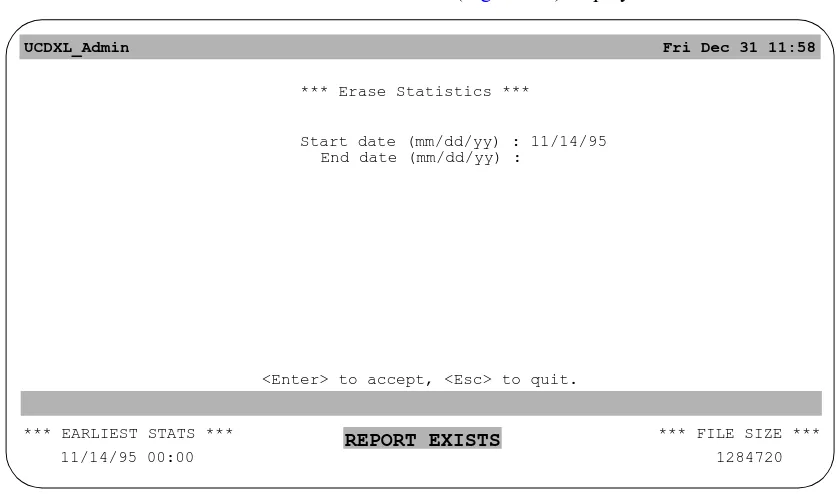
At any time, you can remove all statistics accumulated during a specified period.Note: This process is irreversible. After the statistics are deleted, no further reports from that period can be generated.
Procedure
1. Select Erase Statistics from the Report Generation menu. The Erase Statistics screen (Figure 2-8) displays.
UCDXL_Admin Fri Dec 31 11:58
*** Erase Statistics ***
2. Enter the starting and ending dates for the unwanted statistics, and press Enter. See page 7 for instructions on entering dates.
The default values for the dates are the same as those given for report creation. UCD-XL issues the prompt:
G1B>9>7* ?^SU bU]_fUT cdQdYcdYSc SQ^^_d RU bUS_fUbUT 5bQcU cdQdYcdYSc Vb_] !!!$!))% d_ ! !!))&* I>
(The starting and ending dates in the above prompt will match those you entered.)
3. If you enter Y, the statistics file is altered appropriately.
If you enter N, UCD-XL makes no changes to the statistics file.
4. UCD-XL returns to the Report Generation menu.
End of procedure.
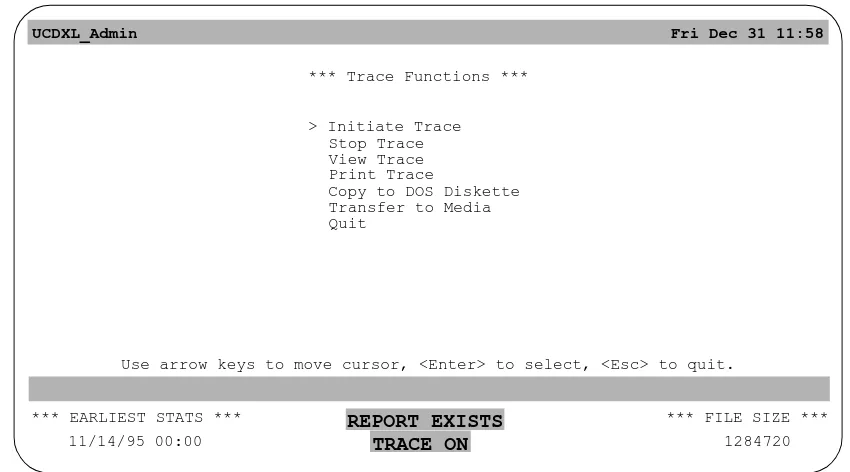
Trace Functions
If you select Trace Functions from the UCD-XL Main Menu, the menu shown in Figure 2-9 displays. This menu has seven entries; each is described below.
Figure 2-9 Trace Functions menu
Initiate Trace
This command starts a trace, which is a real-time recording of the call activity associated with a set of groups and/or ANI patterns. There are six events recorded:Incoming - A call initiated by a caller to the pilot number of a group. Connection - A call that has been routed to a port.
Failure - A call that failed to be connected to a port.
Release - A call that has been terminated after connection, or a port that has released after abandonment, or a port that has been freed upon inspection. Abandonment - A call that has been terminated, before answer, by the caller. Queuing - A call that was queued before connection because all ports were busy.
UCDXL_Admin Fri Dec 31 11:58
*** Trace Functions ***
> Initiate Trace Stop Trace View Trace Print Trace
Transfer to Media Quit
REPORT EXISTS
Use arrow keys to move cursor, <Enter> to select, <Esc> to quit.
TRACE ON
Copy to DOS Diskette
*** FILE SIZE *** *** EARLIEST STATS ***
Only one trace at a time can be executed. Details of every event concerning a call associated with a specified group or ANI pattern are logged in the trace file. These details are:
• Date
• Time
• Source of call (extension, route/trunk, or attendant)
• Event that occurred
• Extension to which it was connected, pilot number to which it came in, or port from which it released or abandoned.
• Forwarding/transferring extension or attendant, if any.
• Error code in hexadecimal (for failed connections only)
• ANI data, if requested and available (for incoming calls only)
While the trace is executing, the message TRACE ON appears at the bottom of the screen. The trace automatically terminates if you log off as UCD-XL
Administrator. If UCD-XL Monitor is not running, UCD-XL displays the message
3Q^^_d S_]]e^YSQdU gYdX E34H< =_^Yd_b
Procedure
1. Select Initiate Trace from the Trace Functions menu.
2. If a trace is already executing, UCD-XL displays the following message:
1\bUQTi `UbV_b]Y^W Q dbQSU
After receiving this message, press any key to continue. UCD-XL returns to the Trace Functions menu.
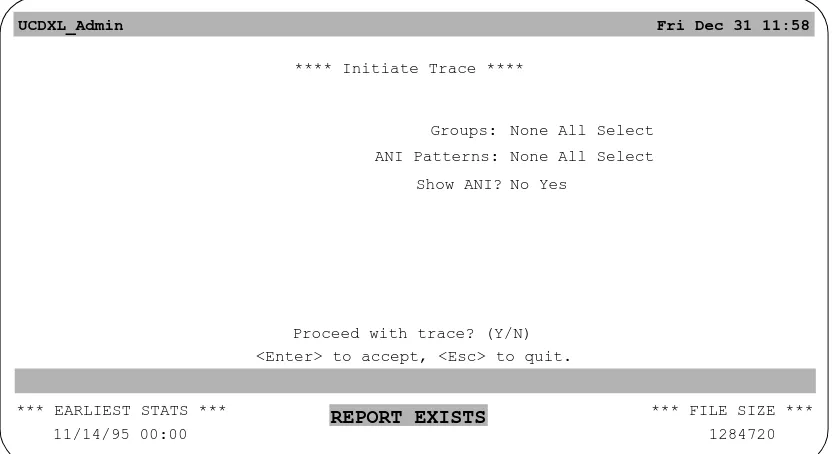
If a trace is not already being performed, the screen shown in Figure 2-10 is displayed.
3. Determine what groups you want to trace. If you want every group
traced, press A and Enter (or move the cursor to All using the space bar
and press Enter), then proceed with step
5.
If you do not want any
groups, press N and Enter (or move the cursor to None and press Enter),
then proceed with step
5.
If you want certain groups, press S and Enter
(or move the cursor to Select and press Enter), then proceed with step
4.
Figure 2-10 Initiate Trace screen
UCDXL_Admin Fri Dec 31 11:58
**** Initiate Trace ****
REPORT EXISTS
<Enter> to accept, <Esc> to quit.
*** FILE SIZE *** *** EARLIEST STATS ***
11/14/95 00:00 1284720
Groups: ANI Patterns: Show ANI?
Proceed with trace? (Y/N)
4. After you have chosen the Select option under Groups:, the current set of prompts on the screen is replaced by the prompt
CU\USd _^U _b ]_bU Wb_e`c*
Below it is a list of names of all groups defined in the Group Identification Database, with a cursor positioned on the first name. Use the arrow keys to move the cursor through the list. (If there are too many groups to fit on one page, you may press the PgDn and PgUp keys to scroll through the pages.) When the cursor is positioned at a desired group, press Enter to select it. The name is then highlighted. If you change your mind, move the cursor to a highlighted name and press Enter to deselect it. Proceed in this manner until you have selected all the groups that you want to trace. Then press Esc. The highlighted groups are remembered, and the original set of prompts shown in Figure 2-10 is redisplayed with the cursor positioned at the next prompt.
Note: You cannot return to the list without starting from step 1 again.
5. If UCD-XL has been configured to distribute calls based upon ANI patterns, the prompt ANI Patterns: appears as shown in Figure 2-10. (Otherwise, skip to step 8.) Determine what ANI patterns you want to trace. If you want every pat-tern traced, press A and Enter (or move the cursor to All using the space bar and press Enter), then proceed with step 8. If you do not want any patterns, press N and Enter (or move the cursor to None and press Enter), then proceed with step 8. If you want certain patterns, press S and Enter (or move the cursor to Select and press Enter), then proceed with step 6.
6. After you have chosen the Select option under ANI Patterns:, the current set of prompts on the screen is replaced by the prompt
CU\USd _^U _b ]_bU 1>9 `QddUb^c*
Below it is a list of all patterns defined in the ANI Pattern Database, with a cursor positioned on the first item. Use the arrow keys to move the cursor through the list. (If there are too many patterns to fit on one page, you may press the PgDn and PgUp keys to scroll through the pages.) When the cursor is positioned at a desired pattern, press Enter to select it. The pattern is then highlighted. If you change your mind, move the cursor to a highlighted pattern and press Enter to deselect it. Proceed in this manner until you have selected all the patterns that you want to trace. Then press Esc. The highlighted patterns are remembered, and the original set of prompts shown in Figure 2-10 is redisplayed along with the prompt of step 7.
7. The prompt
CX_g 1>9/
determines whether or not ANI data will appear in the trace. If you would like a record of the ANI data for all incoming calls, press Y and Enter (or move the cursor to Yes using the space bar and press Enter). Otherwise, press N and Enter (or move the cursor to No and press Enter).
8. Once groups and/or ANI patterns have been specified, the following prompt ap-pears:
@b_SUUT gYdX dbQSU/ I>
If you answer N, UCD-XL returns to the Trace Functions menu without producing a trace. If you answer Y, the following message is normally displayed at the bottom of the screen once the trace begins:
DB135 ?>
If you see this message instead:
7b_e`c Q^T_b 1>9 `QddUb^c ]ecd RU c`USYVYUT
then you have neglected to specify at least one group or ANI pattern, either by highlighting one or more items (via the Select option) or choosing the All option. You must repeat this procedure from step 1 if you still intend to initiate a trace.
9. UCD-XL returns to the Trace Functions menu.
Stop Trace
This command terminates the trace of incoming calls. The contents of the trace file can be viewed (using the View Trace command) until the UCD-XL Administrator is terminated, or until another trace is initiated. Anytime a trace is initiated, it overwrites the previous trace file, destroying it.Procedure
1. Select Stop Trace from the Trace Functions menu.
The TRACE ON message is removed from the bottom of the screen.
2. UCD-XL returns to the Trace Functions menu.
Note: The Administrator cannot stop the trace if UCD-XL Monitor has been ter-minated. Once Monitor has been restarted, you must reissue the command to stop the trace before you can initiate a new one.
End of procedure.
View Trace
Note: The View Trace command executes an OAI utility called viewa.At any time during or after a trace, you may view the results, as shown in Figure 2-11. You should use the AutoScroll subcommand to observe an active trace. The TRACE ON message, or any other information in the status window, is not displayed while the trace is viewed.
Figure 2-11 View of a Trace
UCD-XL Trace Fri Dec 31 11:58
Search Top Bottom Command AutoScroll Quit
Beginning of Data
Wed Dec 01 07:12 1995 Extn 2604 INCOMING to 3991 Wed Dec 01 07:12 1995 Rt 15 Tk 3 INCOMING to 3995 Wed Dec 01 07:12 1995 Extn 2604 CONNECTED to 3002 Wed Dec 01 07:13 1995 Rt 15 Tk 3 CONNECTED to 3347
Wed Dec 01 07:17 1995 Extn 2559 INCOMING to 3995 by 2645 FORWD Wed Dec 01 07:17 1995 Extn 2559 QUEUED
Wed Dec 01 07:20 1995 Rt 14 Tk 1 INCOMING to 3991 by 2620 BUSY Wed Dec 01 07:20 1995 Rt 14 Tk 1 CONNECTED to 3003
Wed Dec 01 07:21 1995 Extn 2688 INCOMING to 3995 by 2633 NOANS Wed Dec 01 07:22 1995 Extn 2617 INCOMING to 3991
Wed Dec 01 07:22 1995 Extn 2604 RELEASED
Wed Dec 01 07:23 1995 Extn 2617 CONNECTED to 3004 Wed Dec 01 07:27 1995 Rt 14 Tk 1 RELEASED from 3003
Wed Dec 01 07:30 1995 Rt 15 Tk 2 INCOMING to 3991 by Att 3 XFER
End of Data
Wed Dec 01 07:21 1995 Extn 2688 QUEUED
Procedure
1. Select View Trace from the Trace Functions menu.
Seven subcommands are displayed at the bottom of the View Trace screen:
Search - Perform a case-sensitive search for a text string. When you select this command, UCD-XL issues the prompt
CUQbSX*
Type the text string (maximum of 8 characters) and press Enter. The search will start at the top of the next screen of the report and proceed forward. The first occurrence of the text string on that screen will be highlighted, as well as any other occurrence on that screen. To see the next screen with occur-rences of the string, repeat the search procedure. You can press Esc instead of Enter to abort the search.
If the text string is not found, UCD-XL displays the message
@QddUb^ ^_d V_e^T
Top - Go to the first line of the trace file. Pressing the Home key has the same effect.
Bottom - Go to the last line of the trace file. Pressing the End key has the same effect.
Command - Execute a UNIX command. UCD-XL issues the prompt
5^dUb E>9H S_]]Q^T Q^T `bUcc B5DEB>
Type the command and press Enter. The command will execute, but any output from the command does not display. For this reason, use this sub-command sparingly.
Print - Send a snapshot of the current trace file to the default printer. Use the Print Trace command from the Trace Functions menu instead of this sub-command.
AutoScroll - Toggle the AutoScroll mode. When AutoScroll is on, the trace information on the display is scrolled as new information is written to the trace file. When AutoScroll is off, the displayed information will not change, even if activity is occurring. The activity information will be written to the trace file, but it will not display on screen. If AutoScroll is on, A-S displays on the right side of the screen.
Quit - Exit the view screen, and return to the Trace Functions menu.
2. After viewing a trace, execute the Quit subcommand.
3. UCD-XL returns to the Trace Functions menu.
End of procedure.
Print Trace
After initiating a trace, a snapshot of the trace file may be sent to a printer. The snapshot will only include data recorded up to the time the print command is selected. The method of printing is configured for the UCD-XL Administrator via APM. The UNIX system printer is the default.Procedure
1. Select Print Trace from the Trace Functions menu.
If the Trace file exists, it is sent to the specified printer.
2. UCD-XL returns to the Trace Functions menu.
End of procedure.
Transfer to Media
After initiating a trace, a snapshot of it may be written as a UNIX-formatted file to an external device, such as a floppy disk or a cartridge tape. The snapshot only includes trace data recorded up to the time you select the transfer command.Note: The UNIX tar command is used to implement the Transfer to Media command. The tar command may generate an error message that overwrites part of the Trace Functions menu.
Procedure
1. Select Transfer to Media from the Trace Functions menu. UCD-XL issues the prompt
>Q]U _V TUfYSU*
2. Type the name of the device and press Enter. (Be sure there is something in the device.)
You may cancel the transfer by pressing Esc instead of Enter.
While the transfer is taking place, UCD-XL displays the following messages:
1ddU]`dY^W d_ dbQ^cVUb dXU VY\U
and
>Q]U _V TUfYSU* ,TUfYSU ^Q]U.
If the transfer is successful, UCD-XL displays the message
DbQ^cVUb S_]`\UdUT
If the transfer is not successful, UCD-XL displays the message
DbQ^cVUb VQY\UT
3. UCD-XL returns to the Trace Functions menu.
End of procedure.
Copy to DOS
Diskette
You may save a trace on a DOS-formatted diskette (or other media).
Procedure
1. Select Copy to DOS Diskette from the Trace Functions menu. UCD-XL issues the prompt:
4?C TbYfU \QRU\ 1 _b 2*
2. Enter the letter representing the DOS label for the diskette drive (usually A or B). If you want to provide a name for the file other than “UCDTRC”, follow the label with a colon and new name (e.g.: “A:UCDTRACE”). You may cancel by pressing Esc instead of Enter.
Note: Be sure there is a diskette in the drive before you press Enter.
While the file is being copied, UCD-XL displays the following message:
1ddU]`dY^W d_ S_`i _^d_ 4?C TYc[UddU
If the trace was copied successfully, UCD-XL displays the message:
4?C S_`i S_]`\UdUT
If the trace was not copied, UCD-XL displays the message:
4?C S_`i VQY\UT
3. UCD-XL returns to the Trace Functions menu.
End of procedure.
Quit (Log Off)
Chapter 3
Limitations
Limitations of UCD-XL:
• The UCD-XL ports/lines must be connected to the same PBX as the OAI User Application Processor.
• All ports in a group must belong to the same tenant, but groups may be associated with different tenants.
• For a call transferred across CCIS, the PBX identifies the call as if the transferring party dialed direct. Hence, UCD-XL will use MCI call type 43 (Direct Call) to inform the VMS; the calling party is the transferring extension, not the original caller.
• If UCD-XL attempts to connect a call to a port that is also the pilot number of a UCD group defined in the PBX, the final destination of the call is determined by the PBX and may not be the port that UCD-XL requested.
• For a call forwarded across CCIS, UCD-XL will not know the tenant number of the forwarding party. Therefore, UCD-XL will specify tenant 0 in the called party field of the MCI message to the VMS.
• Groups must be in operation 24 hours a day, 7 days a week. All ports must be available for answering calls (unless made busy), and should not be used for outgoing calls.
• A port (especially a Dterm) in a UCD-XL group must not be call-forwarded to another extension at any time for any reason.
• A transferred call cannot be connected to an announcement message until the intermediate party releases.
• You can generate and examine only one report at a time
• All office codes in a PBX network must be the same size.
• UCD-XL can communicate (via a single MCI link) with only one VMS.
• You can initiate and examine only one trace at any time.
• An ANI number must consist of 10 digits: 3-digit area code, 3-digit exchange, and a 4-digit extension. Any value longer than that will only match the special ANI pattern “FOREIGN” or “DEFAULT”.
• UCD-XL does not receive ANI data across CCIS.
Appendix A Error Messages
Error Messages on Administrator Screen
The following are error messages you might encounter on the UCD-XL Administrator’s screen when running UCD-XL. None of these messages will appear in the log file. Many of these error messages are the result of incorrect data entry. Immediately following each error message is a brief explanation and a possible solution to the problem.
Note: “UDP” means User-defined Parameter. Refer to instructions for the Administra-tor’s configuration in the UCD-XL Installation Guide.
Cannot communicate with UCDXL Monitor.
The Administrator could not send a message to the Monitor. Without the Monitor, the Administrator cannot perform tracing functions but can still generate reports. Verify that the Monitor is an active application under the APM and is specified in UDP #5.
Cannot create trace file -- error <errno>
The Administrator could not create the trace file named ucdtrace in the statistics directory specified in UDP #6. Verify that UDP #6 contains a directory pathname. If necessary, create the directory using the UNIX command mkdir.
Note: <errno> is the UNIX error code.
Cannot lock statistics file.
The Administrator could not lock the statistics file, probably because the Monitor was accessing the file while performing statistics collection. Wait for the Monitor to complete its task (check the APM log), then select the function again.
Cannot open statistics file <filename>
The Administrator could not open the file named <filename> in the statistics direc-tory specified in UDP #6. Verify that UDP #6 contains a direcdirec-tory pathname. If nec-essary, create the directory using the UNIX command mkdir.
DANGER! Disk nearly full. Erase statistics immediately!
In addition to this message being displayed, the file size specified at the bottom of the screen is flashing. There is insufficient space (2% or less) in the /oai filesystem on disk to permit further growth of the statistics file. Select the “Erase Statistics” option in the Report Generation menu and delete a set of obsolete statistics in order to reduce the size of this file.
DOS copy failed.
The Administrator could not copy a file to a DOS-formatted diskette. The reason may be stated in file /tmp/ucderr; use the UNIX command cat or more to view the file. Possible reasons include: (1) the specified drive does not exist or is not acces-sible; (2) the drive does not contain a writeable DOS-formatted diskette.
Future date not permitted.
When the reporting period is being specified, the Administrator does not accept any date in the future. Enter a date in month/day/year format that is less than or equal to today's date, or press Esc to return to the menu.
Invalid format or value.
The starting and ending dates of a reporting period must be specified in the format “month/day/year”, or “month/day” where the current year is assumed. The month must range from 1 to 12 and the day must range from 1 to 31. (There is no valida-tion of the day combined with month.) A two-digit year value is converted to a four-digit year like so: 60-99 represents 20th century (1960-1999), 0-59 represents 21st century (2000-2059). Enter a different set of values or press Esc to return to the menu.
Must equal or exceed starting date.
The ending date of a reporting period cannot be less than the starting date. Enter a different set of values or press Esc to return to the menu.
Print failed.
The Administrator could not print a file as requested using the command specified in UDP #8. (If no command is given, lp is used.) The reason may be stated in file / tmp/ucderr; use the UNIX command cat or more to view that file. Possible reasons include: (1) the system printer is not enabled or on-line; (2) the specified command is invalid.
Report file does not exist.
A report must be created before any other reporting function can be accomplished. Select the option “Create a Report” first. Refer to page 6 for further instruction.
Trace file does not exist.
A trace must be initiated before any other tracing function can be accomplished. Select the option Initiate Trace first. Refer to page 20 for further instruction.
Transfer failed.
The Administrator could not transfer a file as requested using the UNIX command tar. The reason may be stated in file /tmp/ucderr; use the UNIX command cat or more to view that file. Possible reasons include: (1) the specified destination device does not exist or is not accessible; (2) the specified device does not contain a write-able UNIX-formatted diskette or cartridge.
Unable to generate report.
The Administrator could not create the report file named ucdreport in the statistics directory specified in UDP #6. Verify that UDP #6 contains a directory pathname.
Unable to access the statistics file. Try again?
The Administrator could not access the statistics file because the Monitor has locked it in order to perform statistics collection. Once the Monitor has completed its task (check the APM log), enter y to let Administrator try again. Enter n to abort the function.
WARNING! Disk is 75% full. Please erase statistics.