© 2005 Linux Web Host. All rights reserved. The content of this manual is furnished under license and may be used or copied only in accordance with this license. No part of this publication may be reproduced, stored in a retrieval system, or transmitted, in any form or by any means, electronic, mechanical, recording, or other-wise, without prior written permission of Linux Web Host.
Contents
First Things First
Chapter 1
Looking at the control panel 1
Understanding web directory structure 2 Using directory indexes 3
Authenticating
Us-ers
Chapter 2
Protecting directories 4
Managing FTP user accounts 5
Managing Files
Chapter 3
Performing basic file maintenance 6 Archiving 6
Working Securely
Chapter 4
Setting up SSH (Secure Shell) access 8
Determining the public IP address of a computer 8 Using RSA authentication 9
About SSH clients 9
Using SCP (Secure Copy) 10
Branding Your Web
Presence
Chapter 5
Using virtual name servers 12
Adding user-friendly error handlers 13
Reviewing Website
Statistics
Chapter 6
Using the Site Statistics tool 15 Implementing Urchin 16
Using Web
Author-ing Tools
Chapter 7
Macromedia Dreamweaver MX 2004 17 Adobe GoLive CS 18
Microsoft FrontPage 2000 19
CONTENTS ii
Installing htdig 20 Configuring htdig 20
Setting up search and result pages 21 Indexing your website 22
Other Features
Chapter 9
Scheduling cron jobs 24 Redirecting 24
Implementing e-commerce with AlaCart 25
Resources
Chapter 10
Chapter 1: First Things First
This guide is a digest of selected control panel features. It is intended to be a resource for people that develop, administer, or otherwise oversee a website hosted on our servers. In particular, this guide provides important details about our server configuration, information that experienced web developers can consult to make educated decisions about how to best deploy their websites.
The audience for this guide is a mixed one; it runs the gamut, from seasoned web professionals to “point-and-click” users who want to learn more about the backend that powers their websites.
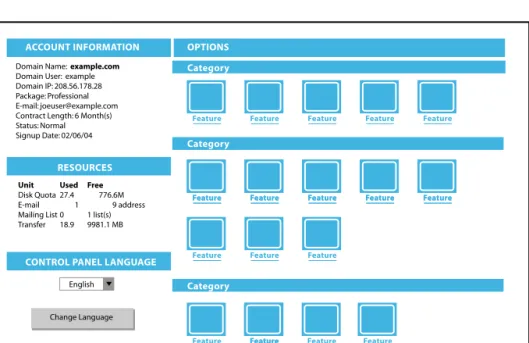
Looking at the control panel
Your control panel is a container for all the tools offered in your hosting package. Tools are categorized and iconified. Some are enabled; others require you to upgrade your package before they may be used. The control panel also displays your account
information (e.g. domain name, contract length, etc.) and the resources available to you (e.g. disk quota, used and free email accounts, etc.).
Figure 1: Control Panel Structure
OPTIONS ACCOUNT INFORMATION
RESOURCES
CONTROL PANEL LANGUAGE
Category
Category
Category
Feature Feature Feature Feature Feature
Feature Feature Feature Feature Feature Feature Feature Feature Feature Feature
Feature Feature Feature
Feature FeatureFeature Feature Feature
Domain Name:example.com
Domain User: example Domain IP: 208.56.178.28 Package: Professional E-mail: [email protected] Contract Length: 6 Month(s) Status: Normal Signup Date: 02/06/04
Unit Used Free
Disk Quota 27.4 776.6M E-mail 1 9 address Mailing List 0 1 list(s) Transfer 18.9 9981.1 MB
English
Web Developer Guide
2 To log into your control panel:
1 Enter your domain name with the trailing string “/menu” into the location bar of your web browser. For example, if your domain is “wondering-boy-poet.com” you would reach your control panel login screen by entering the following into the location bar of your web browser.
www.wondering-boy-poet.com/menu
2 To authenticate yourself in the system, enter your username and password in the login dialog and click OK.
Understanding web directory structure
When you sign up for a hosting account with our company, a placeholder website is installed in your webspace. The directories in this placeholder website are based on the first eight characters of your domain name. For example, if your domain name were
mydomain.com, your placeholder website would include the following directories:
mydomain-logs The archive location for your access log reports.
mydomain-mail The storage location for email messages sent to and from your website mail server.
mydomain-www The root directory of your website. The index page in this directory (named “index.html” by default) is the page that loads when a visitor enters your domain name (e.g. www.mydomain.com) in the location bar of her browser. This directory is the document root of your website—where you put your actual content (pages, images, scripts, etc.).
Note: Your default directory structure also includes two symbolic links to the root directory of your website: www and mydomain-secure. These two directories mirror the content of mydomain-www (i.e. they contain the exact same files and subdirectories). Any changes
you make in one of the directories (www, mydomain-secure, or mydomain-www) will be reflected in the other two.
Depending upon your hosting package, there may be more directories in the placeholder website; these directories are associated with premium features. In general, these additional directories are not created until you activate their associated features in your control panel.
Using directory indexes
A directory index—also known as an index page—is the file a web server loads when a visitor enters a URL that does not end in a filename. You might, for example, have a directory index at www.mydomain.com/products that opens www.mydomain.com/
products/default.htm; in this case, default.htm is the index page for the products directory. Our Apache web server is configured to look for—and attempt to load—the following directory index files in the order shown here:
• default.htm • index.phtml • index.php • index.cgi • index.shtml • index.html • welcome.cgi • welcome.htm • index.htm
To use a directory index:
1 Choose one of the filenames recognized by our Apache server from the list above and use it as the name for your directory index.
2 Ensure that no other file in the directory uses one of the other filenames in the list. web directory structure
for mydomain.com index.html images/ mydomain-logs/ mydomain-mail/ mydomain-www/
Web Developer Guide
4
If you have two recognized directory index files in the same directory, Apache will load the one that comes first on its list of acceptable directory index filenames. For example, default.htm will always load before index.htm. To avoid this issue all together, you can create an .htaccess file that specifies the index filename you want to use for the directory (your instructions will override the server setting).
For more information:
Visit the following online resource:
Redirect or Symbolic Link? by Jennifer Walsh.
Chapter 2: Authenticating Users
You can set up your website to restrict access to only those people that authenticate themselves with the valid username and password you assign to them. For example, if your website is commercial, you might want to create a special area—called an
extranet—reserved for content applicable to only those users affiliated with one of your clients. Or you may want to allow specific users to download, upload, or delete files to your webspace; in this case, you would create FTP (file transfer protocol) accounts to allow them this special privilege.
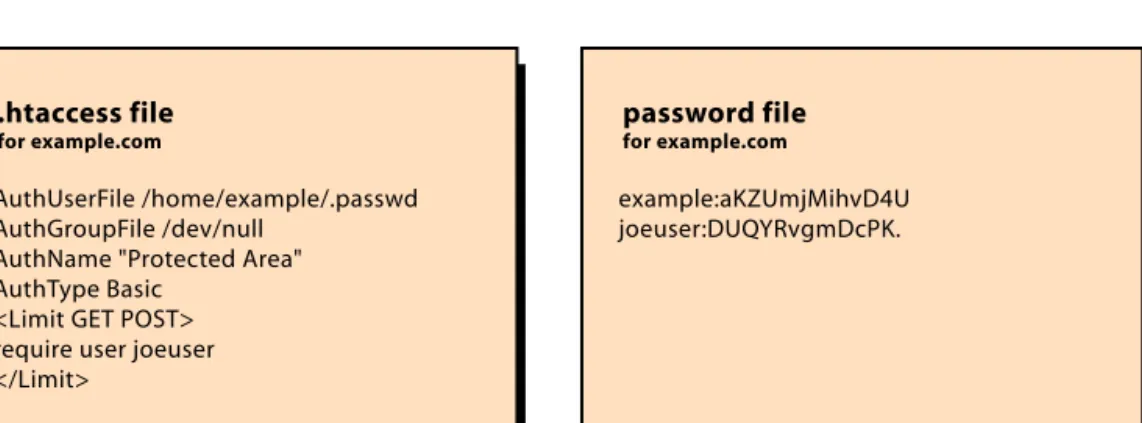
Protecting directories
A protected directory is one which contains an access file specifying the users you have set up with rights to access the directory. The access file contains special instructions that the Apache server processes first, before loading the index page. In order to be
recognized as the access file for a directory, a file must be named .htaccess—a dot (.) followed by the word “htaccess,” in lowercase and with no extension. Dot files are hidden files; they won’t appear in your File Manager, but will be shown when listing directory contents over an FTP, SSH or SCP connection.
Figure 2: .htaccess file and its associated password file (with encrypted passwords)
Your control panel includes a Protect Directories feature that simplifies the creation of .htacess files, and their corresponding password files (the non-public file that stores the valid usernames and passwords which can be used to access the directory).
To protect a directory:
1 Click the Protect Directories icon in your control panel. If you do not see this icon in your control panel, you will need to upgrade to a package that includes the feature.. 2 Choose the directory you want to protect.
3 Enter a userid and password to whom you want to provide directory access.
password file for example.com example:aKZUmjMihvD4U joeuser:DUQYRvgmDcPK. .htaccess file for example.com AuthUserFile /home/example/.passwd AuthGroupFile /dev/null
AuthName "Protected Area" AuthType Basic
<Limit GET POST> require user joeuser </Limit>
Web Developer Guide
5
4 Click Submit.
A .htaccess is automatically generated by the system and placed in the root level of the current directory. The user specified will have access to the current directory and any subdirectories therein.
Note: If you want a subdirectory of a protected directory to allow (or deny) different user access than its parent directory, simply use the file chooser to create a new .htaccess file with different user specifications.
For more information on using .htaccess files to protect directories:
Keep Your Secret Plans Hidden (with Authentication) by Kristin Windbigler. http://hotwired.lycos.com/webmonkey/html/97/08/index2a.html?tw=backend
Managing FTP user accounts
Your control panel includes an FTP User Manager tool that allows you to add FTP users to assist you in the maintenance of your website When you add a new user, you assign her username, password and starting directory. You also assign her
diskspace quota, which cannot exceed a value 5MB less than the diskspace quota of the website itself. The FTP User Account Manager also allows you to change
passwords and delete users, too.
To open the FTP User Manager:
Click the FTP User Manager icon in your control panel. If you do not see this icon in your control panel, you will need to upgrade to a package that includes the feature.
Chapter 3: Managing Files
Your control panel provides two file management tools: a File Manager for working with specific files or directories, and an Archive Manager, which you can use to backup or restore your website, or compress files to conserve diskspace.
If you have a digital certificate on your domain, you can use the File Manager to transfer files securely; simply log into your control panel using secure http (e.g., https://
yourdomain.com/menu). Optionally, you can use an SSH client to manage your files. For more information, see “Chapter 4:Working Securely” on page 8
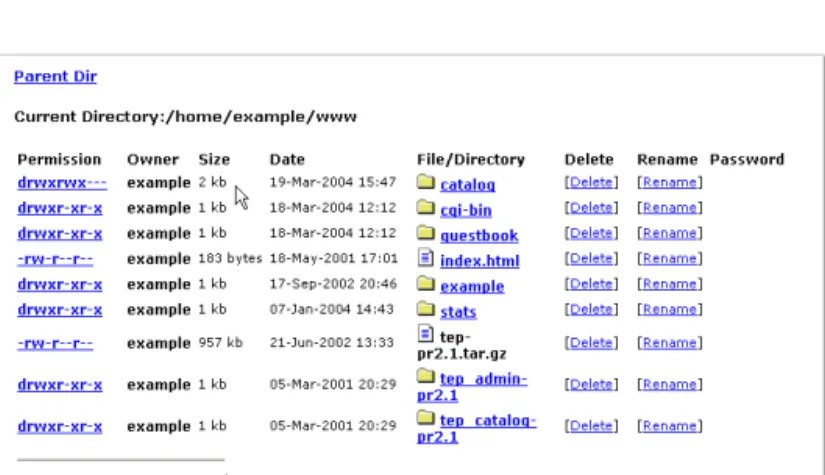
Performing basic file maintenance
The File Manager tool allows you to create, edit, rename, or delete files and directories. It displays the permissions set for each file, and also allows you to change the way items are sorted.
Figure 3: File Manager (detail view)
To open File Manager:
Click the File Manager icon in your control panel. If you do not see this icon in your control panel, you will need to upgrade to a package that includes the feature.
Archiving
The Archive Manager contains utilities for compressing files and extracting them. When archiving, you can choose to save the output as a Windows-compatible ZIP file or a UNIX “tarball” (a UNIX format similar to ZIP—only without the compression). You will find this utilities useful for backing up your website and, if necessary,
Web Developer Guide
7 To open Archive Manager:
Click the Archive Manager icon in your control panel. If you do not see this icon in your control panel, you will need to upgrade to a package that includes the feature.
Chapter 4: Working Securely
When you use File Manager or FTP to transfer files, the information you send and receive is unencrypted (in plain text) and, as such, is vulnerable to wire sniffers
(people that monitor the internet in hopes of harvesting a valid username and password combination). To connect to your web server securely, you set up an SSH connection to it.
Setting up SSH (Secure Shell) access
SSH (Secure Shell) is a program that allows you to securely log into a remote computer over a network, for example, the internet. There is only one SSH account on your domain; the username and password for it are the same as what you use to log into your control panel. There are two things you need to decide before you can enable SSH on your domain:
• the public IP addresses of the computers you want to connect from. • the method of authentication (RSA or username/password).
Once you have determined this information, you can download and install an SSH client.
Determining the public IP address of a computer
The public IP address of a computer is the address which uniquely identifies it on the internet. All IP addresses are unique with the exception of these four “non-routable” blocks:
• 10.102.0.35 (reserved for your local machine). • 10.0.0.0 -> 255.255.255 (reserved for your LAN). • 172.16.0.0 -> 172.31.255.255 (reserved for your LAN). • 192.168.0.0 -> 192.168.255.255 (reserved for your LAN).
To determine the public IP address of your computer:
If you are not sure what your public IP address is, there are many websites available that can tell you. One of the most convenient is ipchicken.com. Simply go to the URL, and note the IP address shown.
Web Developer Guide
9
Figure 4: IP Chicken website (your IP will be different than the one shown above)
Using RSA authentication
Most SSH clients (for example, PuTTY) can create an RSA key for you (a string of random characters that becomes your private key). When you authenticate yourself with RSA, you do not need to enter a password. Although this is convenient, you should be diligent about logging off (or locking your screen) when you are away from your computer to prevent other people from accessing your account.
About SSH clients
An SSH client is an alternative to establishing an SSH connection through the
command prompt; SSH clients provide such things as color coding and auto-completion of file names and directory names. There are a number of free SSH clients available at: freessh.org
One of the most popular is called PuTTY.
To set up SSH:
1 Fax or send a hard copy of your driver's license, passport or other photo ID to our Cus-tomer Service department. We will then enable the installer tool in your control panel. Note: If you do not see this icon in your control panel, you will need to upgrade to a pack-age that includes the feature.
2 Click the SSH icon in your control panel.
3 If you want to use RSA authentication, paste your private key into the input field and click OK; to use your control panel password, simply click OK.
4 Enter the IP addresses from which you want to connect to the web server. Click OK.
To establish an SSH connection with PuTTY:
Download the PuTTY executable.
Note: PuTTY does not need to be installed; you simply double-click the executable to launch the program.
The PuTTY configuration screen is shown.
For more information on SSH:
The Secure Shell FAQ
5 Enter the host name (e.g. www.example.com) or IP address of your domain. 6 Click SSH.
7 Click Open.
The following dialog may display:
8 Click Yes.
A shell window. At the prompts, enter your control panel username and password.
Using SCP (Secure Copy)
Establishing SSH on your domain also enables the use of SCP (Secure Copy). SCP
clients allow you to perform tasks visually, using a drag-and-drop feature to securely transfer files between the web server and a remote machine. Many SCP clients emulate Windows conventions and look-and-feel. WinSCP is one such application and, like PuTTY, WinSCP is a free download:
Web Developer Guide
11
Figure 5: WinSCP user interface
To set up WinSCP:
1 Download WinSCP.
2 Install and launch the program. 3 Click the New button.
4 Enter the host name or IP address of your domain. 5 Enter the username and password for your control panel. 6 Click Login.
Chapter 5: Branding Your Web Presence
Effective websites—be they commercial or personal—have one thing in common: solid branding. While your logo, color scheme, layout, font choices and content are all essential components of your web presence, there are two other (often overlooked) things you can do to strengthen your branding even more. You can use virtual name servers and employ custom error handlers.
Using virtual name servers
Your domain’s name servers are computers (servers) which map your domain name to an IP address (a number) and provide this information to other computers on the internet upon request. The DNS (Domain Name Service) record for your domain specifies two name servers: a primary server and a secondary server. The secondary server is a backup computer which is used if the primary server is down.
For example, If awesome-hosting-company.com handled your DNS, its name servers
might be:
ns1.awesome-hosting-company.com ns2.awesome-hosting-company.com
Some technically-oriented visitors to your website may use a WHOIS service to find out what your name servers are. If you do not want to expose this information to the outside world, you use virtual name servers. A virtual name server maps to an actual name server and can be named whatever you wish. For example, if your domain name is guru-4-hire.com, your virtual name servers might be:
ns1.guru-4-hire.com ns2.guru-4-hire.com
Using your domain name as the basis for your virtual name servers is a branding opportunity that is easy to take advantage of.
To use virtual name servers:
1 Click the Virtual Name Server icon in your control panel. If you do not see this icon in your control panel, you will need to upgrade to a package that includes the feature. 2 Enter a primary name server and a secondary name server.
Web Developer Guide
13
Adding user-friendly error handlers
Understanding Error Codes
Errors are associated with the client (4xx) or the server (5xx). There are eight error codes:
• 400 | Bad Request • 401 | Authorization • 403 | Forbidden
• 404 | Requested URL not found • 405 | Method Not Allowed • 408 | Request Timeout • 500 | Internal Server Error • 503 | Service Unavailable
You can configure an error handler for each one of these codes (or simply use the same error handler for all codes).
To add an error handler:
1 Click the Error Manager icon. If you do not see this icon in your control panel, you will need to upgrade to a package that includes the feature.
2 Click URL from the drop-down list.
3 Enter the URL information for the page or select a page from your home directory. 4 Click Apply Changes.
Note: If you have chosen to install FrontPage extensions on your domain, you will need to use the FrontPage method for adding error handlers; our Error Manager tool (and the other tools that write .htaccess files) only works when FrontPage extensions are not present on your domain.
For more information on error handlers:
The HTTP Error 404 Antidote by Paul Adams
Web Developer Guide
15
Chapter 6: Reviewing Website Statistics
When a web server receives a request for a document from a browser, it responds by attempting to return the document (along with any inline objects such as images, flash movies, audio files, etc.) and logs a record of the transaction. The serverlog is a raw text file which records each and every server response. You use a log analysis program to create and view reports based on the data in your server log. Your control panel includes two such programs:the Site Statistics Tool and Urchin.
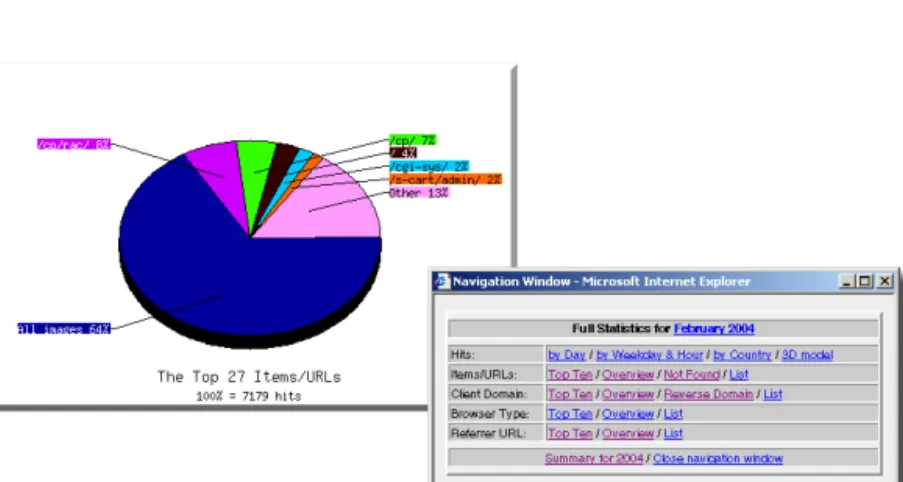
Using the Site Statistics tool
The Site Statistics tool interface provides basic access log information, including: • total page hits
• browser types • client domain • referring URL • unfound pages
The user interface of the Site Statistics tool consists of the report window (which displays tables, bar columns, pie charts, etc.) and a small popup window which you use to load a new report.
Figure 6: The Site Statistics tool report window and popup navigation box.
To use the Site Statistics tool:
Click on the Site Statistics icon in your control panel. If you do not see this icon in your control panel, you will need to upgrade to a package that includes the feature.
Implementing Urchin
Urchin is a sophisticated web analytics software that uses both log files and cookie information to capture visitor parameters and provide detailed and highly accurate reports. Charts and graphs are rendered in SVG (Scalable Vector Graphic) format, and can be easily exported for use in common office applications such as Microsoft
PowerPoint.
To install Urchin:
Click the Urchin icon in your control panel. If you do not see this icon in your control panel, you will need to upgrade to a package that includes the feature.
For more information on using Urchin:
Visit the support section of the Urchin website at http://www.urchin.com/support/. Here you will find links to an HTML help system, downloadable PDFs and FAQs; you can also sign up for an Urchin email newsletter. We have also published our own high-level reference guide (in PDF) format; to access it, click the “Urchin Documentation” link located on the Urchin main menu.
Web Developer Guide
17
Chapter 7: Using Web Authoring Tools
Web authoring tools are applications you use to create, manage and publish websites. The most popular ones have WYSIWG (“what you see is what you get”) interfaces that allow non-developers to build web pages visually, with little to no experience in hand-coding. This chapter provides some tips and techniques on using three popular web authoring tools Macromedia Dreamweaver MX, Adobe GoLive CS and Microsoft Frontpage 2000. It also highlights the different terminology each application employs to reference common website structure concepts.
Macromedia Dreamweaver MX 2004
The Dreamweaver help system includes a tutorial on how to publish a website to a remote location, in this case, the host server for your website. You can find this tutorial by selecting Help > Quick Site Set up in Dreamweaver.
When you need to update your website using Dreamweaver, you create two identical directory structures—one on your local machine, the other in the web root directory of your webspace—and use Dreamweaver to keep both instances synchronized. For information on the structure of your web server directory, see “To log into your control panel:” on page 2.
Understanding Dreamweaver terminology
Dreamweaver uses the word site in the following ways:
website pages on a web server, viewed by a visitor using a web browser.
remote site files on a web server (web pages, images, scripts, etc.) that make up a website, from your point of view rather than a visitor’s point of view.
local site files on your local disk that correspond to the files in the remote site.
Using Dreamweaver to develop your website
If you choose to use Dreamweaver to develop and maintain your website, keep the following points in mind:
Do not use an XML character encoding declaration in the page header
Our web servers parse all pages as PHP with the short_tags_open directive turned on. This means that you are free to embed PHP code in your pages (without having to use the PHP file extension) and, further, that you can trigger the PHP parsing engine with either a full opening tag (<?php) or a short opening tag (<?).
However, this convenience requires you to do some page editing if you choose to author a valid XHTML document that uses a character encoding other than the default UTF-8. In this situation, Dreamweaver inserts an XML declaration at the top of your document. It will look something like this:
<?xml version="1.0" encoding="iso-8859-1"?>
A document with this XML declaration will cause a PHP parsing error on our servers because the tag used to open the declaration is read as a PHP short tag. To correct for this, remove the XML declaration from your file, or set the character encoding with a meta tag instead.
Adobe GoLive CS
The Adobe GoLive CS help system includes a tutorial on how to publish websites. It provides details on a sophisticated synchronization feature that lets you control what happens to each file when you are reconciling local and remote sites. These options include:
• publish never • publish always • publish if referenced
Understanding GoLive terminology
GoLive uses the term publish server to mean the web server that is hosting your website.
Using GoLive to develop your website
If you choose to use GoLive to develop and maintain your website, keep the following points in mind:
Be careful when synchronizing.
GoLive allows you to set a Never Publish option (meaning that a web file or
subdirectory will never be deleted even if it is in a directory you have chosen to publish). If you forget to set this option, GoLive will automatically delete—without prompting before doing so—any item that exists in one location (local or remote) but not the other.
WebDAV is not supported by our servers.
WebDAV stands for Web-based distributed Authoring and Versioning and is a group of extensions to the HTTP protocol. It allows you to collaborate with others editing and managing files on a remote web server. Our servers are not configured to support WebDAV.
Web Developer Guide
19
Microsoft FrontPage 2000
Microsoft FrontPage 2000 ships with a Getting Started book; there are also many FrontPage resources on the Microsoft website (www.microsoft.com). One major
difference between FrontPage and other web authoring tools is that certain features will not work unless you have installed FrontPage extensions on your domain.
These features include: • Setting permissions. • Locking files.
• Automatically updating hyperlinks when you rename files. • Automatically generating a list of hyperlinks.
• Incorporating database access.
Understanding FrontPage 2000 terminology
FrontPage 2000 uses the word web in the following ways:
web a collection of pages, images and other items stored on a Web server.
subweb a web that is set up specifically for a select group of users (with certain rights and privileges on the files contained in the subweb).
Using FrontPage 2000 to develop your website
If you choose to use FrontPage to develop and maintain your website, keep the following point in mind:
Do not use Protect Directories if FrontPage Extensions are installed.
If FrontPage extensions have been installed on your domain, FrontPage uses its own version of an .htaccess file to protect directories. For this reason, you should not use the Protect Directories tool when maintaining a website with FrontPage; if you need to protect a directory, use the directory protection features in FrontPage.
Chapter 8: Making Your Site Searchable
Along with an intuitive structure and a persistent navigation mechanism, a search capability allows your visitors to find the information they need quickly and easily. In recognition of this, we offer htdig, an open-source site search tool. Deploying htdig is very straightforward: you simply specify the areas of your website you want to make
searchable, index them (generate a database of keywords that links search terms to matching pages), add a search form to your website and configure the htdig results page.
Installing htdig
The installation of htdig is a simple point-and-click operation.
To install htdig:
1 Click the htdig icon in your control panel. If you do not see this icon in your control panel, you will need to upgrade to a package that includes the feature.
2 Click the Install htdig button.
An htdig folder is added at the root level of your website (e.g. www.mydomain.com/htdig). This folder contains all the images, templates and executables necessary to deploy htdig.
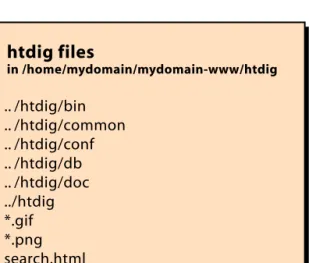
Figure 7: htdig directory structure
Configuring htdig
Our htdig installer automatically generates a configuration file that provides a site-wide search capability on your domain; unless you want to customize how searches are performed (e.g., specify directories and/or files you want htdig to exclude), you don’t have to do anything special to the configuration file; you can begin using htdig immediately.
htdig files in /home/mydomain/mydomain-www/htdig .. /htdig/bin .. /htdig/common .. /htdig/conf .. /htdig/db .. /htdig/doc ../htdig *.gif *.png search.html
Web Developer Guide
21
Should you desire to customize how htdig indexes pages—or where it saves certain work files—you may edit any of the following variables:
Explanations of each variable are in the configuration file itself: /home/mydomain/mydomain-www/htdig/conf/htdig.conf
To configure page indexing options:
1 Open the htdig configuration file in your favorite text editor. 2 Edit the desired variables.
Setting up search and result pages
Before you can deploy htdig, you encourage to edit its page templates to conform to the look-and-feel of your website. Those page templates include:
../htdig/search.html The default search page with option lists to control sort order, boolean settings, and format (long or short). If you prefer, you may simply add a form to one of your existing website pages to interface with the htdig database.
../htdig/common/footer.html The template that formats the page previous, page list and page next links at the bottom of the search results page.
../htdig/common/header.html The template used to render the results page when matches are found.
variable default value
database_dir /home/mydomain/mydomain-www//htdig/db
start_url http://www.mydomain.com/
limit_urls_to ${start_url}
exclude_urls /cgi-bin/ /stats/ .cgi .pl
bad_extensions .wav .gz .z .sit .au .zip .tar .hqx .exe .com .gif
.jpg .jpeg .aiff .class .map .ram .tgz .bin .rpm .mpg .mov .avi .css
maintainer [email protected]
max_head_length 10000
../htdig/common/long.html The template used to format long result returns. Long results include page titles and snippets of the body text where matches were found, with matches shown in bold.
../htdig/common/nomatch.html The template used when a search does not find any matching documents.
../htdig/common/short.html The template used to format short result returns. Short results only show page titles.
../htdig/common/syntax.html The template used to display an error message when the user enters a search string that does not follow the defined htdig search syntax.
Each one of these page templates include htdig variables which appear in the following format:
$&(VARIABLE)
You are free to change where these variables appear within a given template (just be careful not to edit them in anyway).
Note: As our servers parse all documents as PHP, you are free to use PHP include files within (or in lieu of) the default htdig templates.
To add a search form:
Do one of the following:
• Edit search.html as desired, and add the page to your website at an appropriate loca-tion.
• Copy the following text into the page(s) where you want the search form to appear: <form method="post" action="/cgi-bin/htsearch">
<input type="hidden" name="config" value="htdig"> <input type="hidden" name="restrict" value=""> <input type="hidden" name="exclude" value=""> <input type="text" size="20" name="words" value=""> <input type="submit" value="Search">
</form
To customize the results page:
Edit the relevant htdig templates listed above.
Indexing your website
When htdig performs a search, it does not search the text of each file within the search range; it queries the database of keywords generated when you last indexed your website. This index of keywords does not include html elements (<>) nor does it include
Web Developer Guide
23
the words specified in the bad words file (../htdig/common/badwords). You can index your website as often as you wish (although htdig will automatically do it for you once a week).
To index your website:
1 Click the htdig icon in your control panel. 2 Click the Re-index Your Site link.
To edit the bad words file:
Open the bad words file (../htdig/common/badwords) in your favorite text editor; add, revise or delete the words that you want htdig to skip when indexing your website.
Chapter 9: Other Features
Scheduling cron jobs
There are many administrative tasks associated with the upkeep of your domain— deleting temporary files to conserve disk space, backing up your website, and sending communications to your clients, to name but a few. Although you could execute these tasks manually, it is more efficient to automate them with cron jobs.
A cron job is a daemon (pronounced DEE-mun or DAY-mun), a program that runs in the background waiting for a certain event to occur. Once the event occurs, the daemon executes the task you have programmed it to perform and then goes “back to sleep,” waiting for the event to occur again.
Note: Different operating systems call the daemon mechanism by different names. For
example, Windows operating systems use the term service.
Your control panel includes a Cron Manager utility that enables you to manage cron jobs through a GUI (as opposed to directly editing the configuration files that define the associated events for each daemon).
To schedule a cron job:
1 Write the daemon you want to schedule.
2 Click the Cron Manager icon in your control panel. If you do not see this icon in your control panel, you will need to upgrade to a package that includes the feature.
3 Define the event(s) that will trigger the cron job.
Note: Daemon coding (the writing of a daemon script) is beyond the scope of this guide.
Redirecting
There come a time when you need to restructure your website to meet the needs of your audience. For example, if you run an online business and upgrade your website to offer online shopping, you might want to change the location of a products page from
yourdomain.com/products to yourdomain.com/shopping. To ensure that your existing customers (who may have bookmarked the old product page location) are not greeted with a Page Not Found error, you set up the old page location to redirect to the new page location. URL redirection, like directory protection, is accomplished through an .htacess file. Your control panel includes a utility for generating this file.
Web Developer Guide
25 To redirect a page:
Click the Redirect URL icon in your control panel and follow the instructions. If you do not see this icon in your control panel, you will need to upgrade to a package that includes the feature.
Note: You cannot use the URL Redirect tool if you have FrontPage extensions installed on your domain; instead use the URL direction feature offered in FrontPage.
Implementing e-commerce with AlaCart
AlaCart, powered by osCommerce is our implementation of the open source,
e-commerce utility, osCommerce. AlaCart provides an intuitive interface you use to set up, populate and manage an online product catalog.
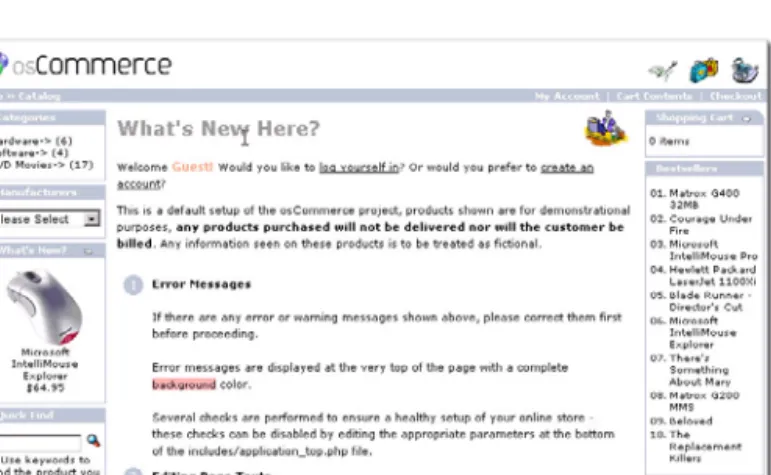
Figure 8: osCommerce (detail view)
AlaCart is built using PHP and MySQL, and incorporates a number of include files to allow for customization of its interface. You can edit these files directly or through the AlaCart interface; they are stored in the catalog directory at the root level of your website. Note: You are strongly encouraged to install an SSL certificate on your domain before installing AlaCart and offering an online transaction capability to your customers. If you use AlaCart without an SSL certificate, the financial information of your customers (e.g. their credit card numbers) will be transmitted in an unencrypted form, making the informa-tion extremely vulnerable to wire sniffers.
To install AlaCart, powered by osCommerce:
Click the osCommerce icon in your control panel. If you do not see this icon in your control panel, you will need to upgrade to a package that includes the feature.
For more information on using AlaCart, powered by osCommerce:
Visit the osCommerce website at http://www.oscommerce.com. As an osCommerce user
subscribe to a mailing list, and review (or contribute to) the collaboratively developed documentation. In addition, we have published our own Alacart, powered by
osCommerce User’s Guide (in PDF) which you can download from the main menu of the tool.
Web Developer Guide
27
Online Resources
The external resources cited within this guide, along with some other helpful online resources, have been consolidated in the list below:
e-commerce
The Official osCommerce Website http://www.oscommerce.com/
.htaccess files
Redirect or Symbolic Link? by Jennifer Walsh
http://hotwired.lycos.com/webmonkey/97/13/index4a.html?tw=backend
The HTTP Error 404 Antidote by Paul Adams
http://hotwired.lycos.com/webmonkey/02/40/index4a.html?tw=backend
log analysis
The Official Urchin Website http://www.urchin.com
secure shell
The Secure Shell FAQ
http://www.employees.org/~satch/ssh/faq/
web authoring tools
Adobe GoLive CS http://www.adobe.com/products/golive Macromedia Dreamweaver MX 2004 http://www.macromedia.com/software/dreamweaver/ Microsoft FrontPage 2000 http://www.microsoft.com/frontpage/