Wiley Publishing, Inc.
Introducing Mudbox
™
Pro duc tion Editor : Elizabeth Ginns Britten Copy Editor : Sharon Wilkey
Editorial M anager : Pete Gaughan Pro duc tion M anager : Tim Tate
V ice President and E xe cutive G roup Publisher : Richard Swadley V ice President and Publisher : Neil Edde
M e dia A sso ciate Proje c t M anager : Jenny Swisher M e dia A sso ciate Pro ducer : Doug Kuhn M e dia Q ualit y A ssurance: Shawn Patrick B o ok Designer : Caryl Gorska
Comp ositor : Kate Kaminski, Happenstance Type-O-Rama Pro of reader : Nancy Bell
Inde xer : Ted Laux
Proje c t Co ordinator, Cover : Lynsey Stanford Cover Designer : Ryan Sneed
Cover Images: Ara Kermanikian and Ashley Wood
Copyright © 2010 by Wiley Publishing, Inc., Indianapolis, Indiana Published simultaneously in Canada
ISBN: 978-0-470-53725-1 ISBN: 978-0-470-90809-9 (ebk) ISBN: 978-0-470-90813-6 (ebk) ISBN: 978-0-470-90811-2 (ebk)
No part of this publication may be reproduced, stored in a retrieval system, or transmitted in any form or by any means, elec-tronic, mechanical, photocopying, recording, scanning or otherwise, except as permitted under Sections 107 or 108 of the 1976 United States Copyright Act, without either the prior written permission of the Publisher, or authorization through payment of the appropriate per-copy fee to the Copyright Clearance Center, 222 Rosewood Drive, Danvers, MA 01923, (978) 750-8400, fax (978) 646-8600. Requests to the Publisher for permission should be addressed to the Permissions Department, John Wiley & Sons, Inc., 111 River Street, Hoboken, NJ 07030, (201) 748-6011, fax (201) 748-6008, or online at http://www.wiley.com/go/ permissions.
Limit of Liability/Disclaimer of Warranty: The publisher and the author make no representations or warranties with respect to the accuracy or completeness of the contents of this work and specifically disclaim all warranties, including without limitation warranties of fitness for a particular purpose. No warranty may be created or extended by sales or promotional materials. The advice and strategies contained herein may not be suitable for every situation. This work is sold with the understanding that the publisher is not engaged in rendering legal, accounting, or other professional services. If professional assistance is required, the services of a competent professional person should be sought. Neither the publisher nor the author shall be liable for damages arising herefrom. The fact that an organization or website is referred to in this work as a citation and/or a potential source of further information does not mean that the author or the publisher endorses the information the organization or website may provide or recommendations it may make. Further, readers should be aware that Internet websites listed in this work may have changed or disappeared between when this work was written and when it is read.
For general information on our other products and services or to obtain technical support, please contact our Customer Care Department within the U.S. at (877) 762-2974, outside the U.S. at (317) 572-3993 or fax (317) 572-4002.
Wiley also publishes its books in a variety of electronic formats. Some content that appears in print may not be available in electronic books.
Library of Congress Cataloging-in-Publication Data is available from the publisher.
TRADEMARKS: Wiley, the Wiley logo, and the Sybex logo are trademarks or registered trademarks of John Wiley & Sons, Inc. and/or its affiliates, in the United States and other countries, and may not be used without written permission. Mudbox is a trade-mark of Autodesk, Inc. All other tradetrade-marks are the property of their respective owners. Wiley Publishing, Inc. is not associated with any product or vendor mentioned in this book.
Dear Reader,
Thank you for choosing Introducing Mudbox. This book is part of a family of premium-quality Sybex books, all of which are written by outstanding authors who combine practical experience with a gift for teaching.
Sybex was founded in 1976. More than 30 years later, we’re still committed to produc-ing consistently exceptional books. With each of our titles, we’re workproduc-ing hard to set a new standard for the industry. From the paper we print on, to the authors we work with, our goal is to bring you the best books available.
I hope you see all that reflected in these pages. I’d be very interested to hear your com-ments and get your feedback on how we’re doing. Feel free to let me know what you think about this or any other Sybex book by sending me an email at nedde@wiley.com. If you think you’ve found a technical error in this book, please visit http://sybex.custhelp.com. Customer feedback is critical to our efforts at Sybex.
Best regards,
Neil Edde
This book is a result
of many deliberate and accidental events, and there are many people to thank and acknowledge for their involvement in making these events happen. If it weren’t for them, you wouldn’t be reading this book. ■ A very special and heartfelt thanks to my parents for their love,dedica-tion, faith, and support over the years. Thanks to my dear soul mate, Erin, for her encouragement, understanding, and devotion while I worked on the book. Thank you to my dearest sons, William and Jacob, for letting me see life as I had never seen it before; I hope this book is the start of my being able to do the same for you. ■ Another person pivotal to making this book possible is a dear friend and
fellow trench mate, Eric Keller. As a classmate, he asked to include an image of one of my ZBrush digital sculptures in his book Introducing ZBrush (Sybex, 2009), and it started a friendship that continues to grow. ■ This book would not have been
possible without Mariann Barsolo, who asked me to take the leap and write it, and then rode shotgun throughout the process. I would also like to thank Mariann for putting together an excellent team to work with me. Thanks to Keith Reicher for serving as technical editor and providing information about the Mac-specific features of Mudbox, and to Lisa Bishop for being an excellent development edi-tor. Thanks to Liz Britten for her magic touch as production editor, and for letting me see the content in book form rather than a Microsoft Word file and a bunch of images. Thanks to Ryan Sneed for his cover design. Thanks to Sharon Wilkey, copy editor, and all of the wonderful people at Sybex/Wiley who were involved in the production of this book. Finally, a special thanks to Neil Edde, publisher, and Pete Gaughan, editorial manager, for their involvement in the synchronicity of this book coinciding with the release of the 2011 version of Mudbox. ■ I was elated
and surprised when one of my favorite artists, and constant source of inspiration, Ashley Wood, responded to an email I sent asking to use his robot creation Bertie as the subject of the exercises in Chapters 1, 3, and 4. I would like to extend my extreme gratitude to him for allowing us to use it. To model Bertie in 3D was a very cool experience, and it is my hope that your work with Chapters 3 and 4 will cre-ate interesting variations as well. Please note, however, that Bertie is copyrighted, and the likeness and files on the DVD can be used only as the subject for the
Pete Zoppi for contributing work to the Gallery. It is good to know that there are such amazing artists creating incredible art with Mudbox. Their work continues to inspire me. ■ Thanks to the original creators of Mudbox, Andrew Camenisch, Dave Cardwell,
and Tibor Madjar, and the Autodesk team that continues to develop and enhance the program. A huge thanks to Dave and Andrew for answering my questions. Also, thanks to Brittany Bonhomme, Jodi Anderson, and Elizabeth Garreau from Autodesk for their help and support. ■ Very special thanks to Domi Pitturo and Mimi Tran at Icon
Imag-ing for providImag-ing me with the 3D scan data and helpImag-ing me with the content in Chapter 7. It is truly a pleasure and privilege to work with artists so integral to the development and implementation of 3D scanning technology. Please note that the scan data for the Chapter 7 is copyrighted, and the likeness and files on the DVD can be used only as the subject for the exercises and for personal education, noncommercial projects. ■ Big thanks also
to Dan Gustafson from NextEngine for his help with the NextEngine desktop scanner information and images in Chapter 7. ■ Thanks to Phil Dench at Headus for making
UVLayout, one of the most brilliant software applications I have ever used. ■ Thanks to
Thomas Teger at Luxion for assisting me with KeyShot in Chapter 9. ■ Thanks to Ofer
Alon for creating ZBrush and launching the world of digital sculpture. ■ A huge debt of
gratitude to Scott Spencer for being an incredible anatomy and advanced ZBrush teacher at the Gnomon School of Visual Effects, and writing two indispensable books on digital character design and sculpting human anatomy. I feel extremely fortunate to have taken your class, and appreciate your feedback on the anatomy of the model in Chapters 7 and 8. ■ I also want to acknowledge Kevin Hudson at the Gnomon School of Visual Effects,
and Rudy Wijaya, lead modeler at shadedbox, for teaching me everything I know about polygon modeling. ■ I want to take this opportunity to thank all my instructors at the
Gnomon School of Visual Effects: Jeremy Engleman, Ryan Kingslien, Loren Klein, and Ergin Kuke, for the excellent education I received in their areas of expertise, and want to extend that gratitude to Alex Alvarez for being the beacon of education in this field. ■ A
special thanks to Joey Jones from shadedbox for his excellent Maya animation class at the Art Center College of Design. ■ Thanks to my friend Brian, who cured my cabin fever
About the Author
Ara Kermanikian
is a freelance character, vehicle, and set designer in the entertainment industry. He has been working in the field since 2007, after a 22-year career in the software industry, 18 of which were at Microsoft as a sys-tems engineer, engineering manager, and technology director.He holds a bachelor of science degree in computer science from California State University, Northridge, and has stud-ied numerous courses with leaders in the field such as Scott Spencer, Kevin Hudson, Jeremy Engleman, and Joey Jones at
the Gnomon School of Visual Effects and Art Center College of Design.
Ara has been passionate about building models from his childhood years. His exposure to VU-3D on the Sinclair Spectrum fueled his passion for computer graphics, which continues to the current day. Ara loves modeling and digital sculpting because he can bring characters and images that fuel his imagination onto a digital canvas and visualize them in three dimensions.
He has written reviews and master classes for publications such as 3D Artist
Introduction xv
Chapter 1 ■ Getting Your Feet in the Mud:
The Basics of the Mudbox Production Pipeline 1
Chapter 2 ■ The Mudbox User Interface 41
Chapter 3 ■ Detail-Sculpting an Imported Model 89
Chapter 4 ■ Painting and Texturing an Imported Model 125
Chapter 5 ■ Digital Sculpting, Part I 151
Chapter 6 ■ Digital Sculpting, Part II 179
Chapter 7 ■ Working with 3D Scan Data 245
Chapter 8 ■ 3D Painting 269
Chapter 9 ■ Lighting and Rendering 309
Appendix ■ About the Companion DVD 355
Introduction xv
Chapter 1 ■ Getting Your Feet in the mud:
The Basics of the mudbox
Production Pipeline 1
Understanding the Mudbox
Workflow Stages 2
Loading a Base Mesh 5
Using the Camera to Navigate Your Scene 5
Blocking in the General Shape and
Adding Image Planes 8
Sculpting Your Model 13
Adding Paint Layers and Painting
Your Model 20
Rendering Your Image in Mudbox 26
Exporting Results from Mudbox 28
Rendering Your Image in Maya 32
Summary 40
Chapter 2 ■ The mudbox User interface 41
Starting Out with the Welcome Screen 42
Navigating the Main Viewport 44
Exploring the East Frame Window 51
Working with the South Frame Tray 62
Performing Map Extraction 78
Setting Mudbox Preferences 85
Summary 88
Chapter 3 ■ Detail-Sculpting an
imported model 89
Modeling the Base Mesh 90
Laying Out UVs 94
Your Model 103
Setting Scale, Location, and
Pose of the Model 104
Sculpting Surface Details 106
Sculpting Weathering and Wear and Tear 113
Summary 123
Chapter 4 ■ Painting and Texturing an
imported model 125
Texture-Painting Models in 2D and 3D 126
Laying Out UV Maps and Arranging UV Shells for Texture Painting 127
Creating Texture Maps 129
Using Materials and Textures 130
Working with Paint and Texture Layers 132
Using Specular, Gloss, and Bump Maps 134
Gathering Reference Images 134
Painting Bertie 136
Summary 150
Chapter 5 ■ Digital Sculpting, Part i 151
Understanding Digital Sculpting 152
Planning the Sculpture 152
Sculpting in Stages 154
Determining the Best Base Mesh
for Sculpting 155
Understanding the Mudbox Sculpt
Tools and Their Properties 157
Summary 178
Chapter 6 ■ Digital Sculpting, Part ii 179
Modeling the Base Mesh in Maya 180
Posing the Base Mesh 207
Sculpting the Model 225
Sculp Using a Vector Displacement
Map (VDM) 236
Summary 242
Chapter 7 ■ Working with 3D Scan Data 245
Understanding the Benefits and
Challenges of 3D Scan Data 246
Using 3D Scanners 250
Reviewing Scan Data Import Considerations 255
Importing 3D Scan Data and
Re-topologizing in Mudbox 257
Summary 268
Chapter 8 ■ 3D Painting 269
Painting Your Sculpture 270
Generating UVs on Subdivision Levels
and Painting Directly on UVs 270
Painting on Layers and Using Blend Modes 274
Using Color, Stamps, and Stencils 283
Workflow to Adobe Photoshop and Back 302
Loading Textures into Maya 305
Summary 307
Chapter 9 ■ Lighting and rendering 309
Rendering and Using Cameras in Mudbox 310
Lighting Your Model 312
Applying Visual Effects with
Viewport Filters 319
Creating Turntables and
Recording Sessions 325
Rendering in Mudbox and
External Programs 327
System Requirements 356
Using the DVD 357
Troubleshooting 358
Introduction
Digital sculpting
gives you the ability to create anything you can imag-ine. You can model, paint, and present characters, props, sets and environments in ways never before possible. After learning ZBrush, the leading digital sculpting software in the industry, I was curious to see what Mudbox had to offer. Upon using the software, I discov-ered that it provided greater accessibility to artists who were too intimidated by ZBrush’s interface, or who wanted to transfer their skills and familiarity with leading 3D software packages, such as Maya, to this medium. However, I found limited resources in my search to learn about the software, and even though I find the help in Mudbox to be top-notch, discovered that there were no books on the topic. I decided to write this book to fill the gap.The aim of this book is to be a companion that teaches you the concepts of digital sculpting and 3D painting via Mudbox, to produce results that can stand on their own or that are part of a workflow. The book is organized to teach you the concepts in waves. Chapter 1 takes you through the pipeline and gives you an idea of the workflow, and sub-sequent chapters give you more detail on specific stages of that workflow and expand on the requirements, concepts and capabilities of Mudbox.
I recommend going through Chapter 1 and using what you learn there to experiment further. When you run into situations where you need to ratchet up the complexity of what you are working on, jump to the specific chapter on that topic to get more informa-tion and exercises. You can also go through the book sequentially to learn the topics, because the chapters build on each other. Chapter 2 provides an in-depth tour of the software to help you understand the details of the user interface.
This is a pivotal and exciting time in the entertainment industry, as software such as Mudbox and ZBrush can contribute exponential advances to the production pipeline of special effects. Revolutionary capabilities continue to be added with every release, and the possibilities of what can be visualized with this art form are soon becoming limitless.
I hope this book will fuel your interest in learning about digital sculpting and 3D painting with Mudbox and will help you learn the intricacies of how to use it to achieve your potential in creating your own visions.
Who Should Read This Book
video games, and both 2D and 3D print. Chapter 1 uses a simple exercise to run through the Mudbox production pipeline. The subsequent chapters delve deeper into these stages and produce results that would be required at different stages of the pipeline.
This book is intended for readers with a background in art, and an understanding of the basics of 3D space and the basic workings of 3D software. It assumes you to be a sophisti-cated beginner or intermediate user of Mudbox. The book is mostly focused on Mudbox, but also covers other tools such as Maya, Photoshop, UVLayout, and KeyShot. Although a basic knowledge of the workings of those tools is assumed, I have also included the results from those programs for the various exercise steps if you do not have them available to you.
Mudbox is an artist’s tool, and I cover the topics from an artistic as well as a technical perspective. My hope is that upon reading this book, you will have all the answers to your questions about the technology and workings of Mudbox to maximize your workflow and to focus on creating your art.
What You Will Learn from This Book
This book introduces you to the tools and capabilities of Autodesk Mudbox 2011. You will learn the different stages of a production pipeline in which Mudbox is applicable, and the workflow of those stages.
You will learn how to start your model from a basic primitive shape, develop it into a sophisticated, realistic-looking digital sculpture, and render it using Mudbox, mental ray in Maya, and Luxion KeyShot.
You will learn how to import models into Mudbox and to sculpt high-frequency detail to give the surface a weathered and realistic look.
You will also learn how to tune surface materials and paint your model in 3D as well as how to use paint layers to create composite surface results to further your model’s realistic representation.
You will learn about planning your sculpture and taking it through the various stages such as posing, laying out UVs, and sculpting on various subdivision levels while custom-izing the Mudbox sculpting tools to get the results you want. I also cover the basics of 3D meshes and UVs and how to troubleshoot and optimize their use in your Mudbox workflow. You will learn how to import 3D scan data and how to use Mudbox to extract the details of the scan and place them on geometry you can sculpt and paint.
Introduction ■ xvii
Hardware and Software Requirements
To complete the exercises in this book, you will need Mudbox 2011 and a computer that meets the systems requirements listed for Mudbox on the Autodesk website.
I highly recommend that you pay close attention to the requirements for the video card, making sure you that you are using a certified video card for Mudbox. Mudbox uses OpenGL as its rendering engine, and you need a video card that will accelerate OpenGL. Certified Nvidia Quadro or AMD FireGL cards are your best bet.
The next most important hardware requirement is memory. As you subdivide your models, the memory requirement to store and process them also grows. Even though the system requirements mention 2GB, I highly recommend you have at least 4GB, if not 8GB or 16GB of RAM if you can accommodate for it.
The next important requirement is the operating systems, which are linked to the pre-ceding memory requirement. You can use Mudbox in Windows XP, Vista, or 7, or on Mac OS X 10.6.2. The Mudbox interface is mostly identical in all of these; however, you prob-ably want to use Mudbox on the 64-bit version of these operating systems because 32-bit operating systems can only access 4GB of RAM. With the 2011 version, Mudbox exclu-sively works in 64 bits on the Mac, so if you are on version 10.6.2 and above, you probably have the required Core 2 Duo or newer processor to support Mudbox. In Windows, you need the 64-bit version of Windows XP, Vista, or 7 and an Intel EM64T processor or an AMD Athlon 64 or AMD Opteron processor.
Make sure you also have plenty of hard disk space because, in addition to taking up a lot of memory, Mudbox models, which could easily be made up of multimillion polygons, also take up hard disk space when you save them.
Finally, you need a digital tablet, such as a Wacom Intuos or Cintiq, based on your pref-erence of having the tablet functionality detached or superimposed on the screen you are working on. Although you can follow the exercises in this book by using a three-button mouse, I have yet to see someone who is a proficient digital sculptor and 3D painter use just a mouse to achieve good results.
How to Use This Book
chapter exercises would be best accompanied with videos to help you watch the sequence of the exercise steps as a movie clip.
All of the topics are augmented and supported with artistic concepts such as form, ges-ture, proportion, rhythm, balance, and composition.
The book also has a full chapter dedicated to lighting and rendering your model in Mudbox, as well as in mental ray in Maya and in a top-notch rendering software called KeyShot.
Chapter 1, “Getting Your Feet in the Mud: The Basics of the Mudbox Production Pipeline,” runs you through the pipeline by creating a model of an egg and giving it the surface texture of an eggshell. Then you will paint it to have the material and texture of an egg. Finally, you will view your output in Mudbox, or export your work to Maya and ren-der it in mental ray.
Chapter 2, “The Mudbox User Interface,” gives you an in-depth tour of the interface of Mudbox with explanations of regions, panels, icons, tools, dialog boxes, and options.
Chapter 3, “Detail-Sculpting an Imported Model,” goes through an example of import-ing an intricate model and usimport-ing Mudbox to sculpt real-world wear and tear in fine detail on the surface of the model.
Chapter 4, “Painting and Texturing an Imported Model,” takes the work you did in Chapter 3 and allows you to apply paint to the surface features to push the realism of the model further.
Chapter 5, “Digital Sculpting, Part I,” goes deeper into digital sculpting concepts, such as the foundation of 3D models, and the stages they would need to go through in Mudbox. The chapter also covers advanced sculpting techniques and delves deeper into the sculpt-ing tools and their properties.
Chapter 6, “Digital Sculpting, Part II,” builds on the previous chapter with the incep-tion of a base mesh model in Maya, for which you will then create UVs in UVLayout, and pose it and sculpt it in Mudbox.
Chapter 7, “Working with 3D Scan Data,” is the final sculpting chapter. Here you will learn how to import a 3D scan of a human head into the software and run through the workflow of further sculpting it.
Chapter 8, “3D Painting,” focuses on the second core capability of Mudbox: painting. You will learn more about the paint tools in Mudbox while painting the model you created in Chapter 6.
Introduction ■ xix
presentation of the model you are working on. The chapter also covers how to export images of your work and composite them in Photoshop, and how to export your model and textures to render it with mental ray in Maya and in KeyShot.
The Companion DVD
The companion DVD includes all the files in the lessons saved at several stages along the process. It is organized by folders for the nine chapters, in addition to a Stamps folder, a Stencils folder, and a 3D Primitives folder that contain 2D images and objects you can use for the lessons or future projects. Some chapters include a Videos folder that has movies of some of the lessons and some bonus movies related to the topic of the chapter. All the video files were recorded using TechSmith Camtasia using the H.264 codec. Because Mudbox scene files tend to get big when you subdivide a model into multimillion polygons, we have compressed the chapters as zip files. You can use tools such as WinZip or 7-Zip to uncom-press these files. Please copy and uncomuncom-press the contents of the chapter you are working on from the DVD onto your hard drive before proceeding with the exercises. The head scan model on the DVD is provided by Icon Imaging. The Bertie robot model on the DVD is based on paintings and comic books by Ashley Wood. Both models are to be used for edu-cation purposes only. Commercial use is not allowed.
Essential Mudbox and Digital Sculpting Resources
The most essential resource of all is the community website built right into the software under the Mudbox Community tab. There you will find tutorial videos to take you beyond the offerings of this book, and demonstrate the work styles and tips and tricks of talented artists.
Another useful resource is the Autodesk AREA website (http://area.autodesk.com), which is a superset of what is included within the Community tab in Mudbox covering some of the other Autodesk products such as Maya, 3ds Max, and Softimage.
It is impossible to talk about Mudbox without mentioning Wayne Robson and his com-munity website, Mudbox Hub (mudboxhub.com). Here you can find additional tutorials, a forum dedicated to Mudbox, and some useful plug-ins.
Another thriving and excellent community for digital sculptors is ZBrush Central (www.zbrushentral.com). Although it is mainly aimed at ZBrush users, you can find some excellent techniques and inspiration from expert and seasoned digital sculptors.
As for resources on art and sculpting, there are too many to mention in this section, but I will list a few that I have within arm’s reach at all times for reference and inspiration.
Anatomy Essentials
Modeling and Sculpting the Human Figure
• by Edouard Lanteri (Dover Publications, 1985) Female and male anatomy reference figures from
• www.AnatomyTools.com
Lighting and Rendering
Digital Lighting & Rendering, Second Edition
• by Jeremy Birn (New Riders, 2006)
Lighting & Rendering in Maya: Lights and Shadows
• DVD by Jeremy Birn
Online Learning and DVDs
Gnomon Workshop online and DVD training at
• www.thegnomonworkshop.com
How to Contact the Author
I would love feedback from you regarding the content in this book, or future titles and top-ics you would like to see. Please feel free to contact me at kermaco@live.com. For more infor-mation about me or my work, visit www.kermaco.com.
Sybex strives to keep you supplied with the latest tools and information you need for your work. Please check their website at www.sybex.com or the website for this book at
www.sybex.com/go/intromudbox, where we’ll post additional content and updates that sup-plement this book should the need arise.
Chap TE r 1
Getting Your Feet in the Mud:
The Basics of the Mudbox
Production Pipeline
Digital sculpting
and 3D painting software is a relatively recent and significant milestone in computer graphics imagery (CGI). Audiences expect more and more from special effects that suspend their disbelief when the most extreme visions of an author’s imagination are brought to visual reality. As movie directors and game designers push the envelope to meet the demands of the market, tools such as Mudbox are becoming a requirement in every visual effects production pipeline.Mudbox is a sophisticated digital sculpting and painting software package that lets artists sculpt and paint digital models using software as their modeling clay or paint-brush. Mudbox enables you to create the realistic and detailed characters, props, vehicles, and sets that satisfy the audience’s expectations. The artists’ imagination and creativity are fast becoming the only limits to what they can show their audience.
This is the most important chapter in the book because it introduces all the concepts and stages models go through in the production pipeline. After learning this pipeline and the concepts, you will be ready to delve into the rest of the book, so make sure you are comfortable with this chapter’s contents, even if you have to go back through the steps before moving on.
This chapter includes the following topics:
Understanding the Mudbox workflow stages
■
Loading a base mesh
■
Using the camera to navigate your scene
■
Blocking in the general shape and adding image planes
■
Sculpting your model
■
Adding paint layers and painting your model
■
Rendering your image in Mudbox
■
Exporting the results from Mudbox
■
Rendering your image in Maya
Understanding the Mudbox Workflow Stages
Mudbox is used throughout the multiple stages of a production pipeline (Figure 1.1). It is used for speed-sculpting concept designs, digital sculpting art assets such as charac-ters, sets and props, painting models, sculpting blend shapes for animation, and projec-tion painting environments. Although these seem like completely different stages, the Mudbox work is fairly similar, so as you get a good grasp of what the software can do, you can apply it to any of the stages in the pipeline, or come up with completely new areas where Mudbox could help your project.
Mudbox can be used as a stand-alone application, enabling a user to start with one of the provided primitives and end up with a fi nal render of a sculpture. However, most artists use it in a production pipeline in which inputs fl ow into the program, and outputs fl ow out to 3D and 2D applications. The data fl owchart (Figure 1.2) demonstrates this sequence.
The starting point of Mudbox is a model. This model can be one of the provided Mudbox starter meshes, or a primitive or base mesh model you generate in a 3D program such as Maya, or a scan from 3D digital scanner. You can also import 2D images to use as textures, stamps, or stencils.
In Mudbox, you pose, sculpt, and detail the geometry of the model, and then use the 3D painting capabilities to texture and paint it. Mudbox includes some rendering capabilities—such as lighting based on high dynamic range imaging (HDRI) and ambi-ent occlusion (AO)—which give you a good idea of what your model will look like when output to an external renderer.
Figure 1.1
Typical workflow stages of a visual effects (VFX) pro-duction pipeline ; the darker sections indicate where Mudbox could be used
Typical Typical
T VFX Production Pipeline
Concept Design
Rigging / Character Setup
Lighting Rendering
Composting Special FX
3D Animatic / Animation Blocking Modeling
Digital Assets Texture Mapping /Painting
Understanding the Mudbox Workflow Stages ■ 3
After you are fi nished with your model in Mudbox, you will output the following fi les: A lower-subdivision-level version of your sculpted model, which has polygon counts
•
that the intended 3D application or game engine can support. These models have the overall shape of your final sculpture but lack the detail. These are exported as .obj or
.fbx files.
Two-dimensional images, called
• normal and displacement maps, to wrap around
[image:25.531.107.412.57.466.2]the lower-resolution version of your model that you exported as an .obj or .fbx file. These 2D images give the illusion of the detail you had on the high-subdivision-level,
Figure 1.2
Mudbox data flow
Input MudBox Output Deliverable User Primitive Library Mudbox Primitives Basemesh .obj from Maya, 3DS Max,
XSI or other 3D application 3D Digital Scanner Still Image Animation 2D Textures, Digital Photos 3D application, game engine, CAD application Sculpt Paint Render Normal Map Mesh
.obj DisplacementMap
2D Layers Diffuse
Print, Web,
Etc. Movies, TV,AdvertisingTV,TV Fine Art, ToysCollectibles Specular Bump Reflection Ambient Occlusion (AO)
high-polygon-count sculpture but require significantly less computing resources to render and animate.
Two-dimensional images of all the paint layers that you painted your sculpture with,
•
to composite onto your final deliverable.
Before moving to the next stages, I recommend you take some time to go through the five one-minute movies that come with Mudbox. You can find them on the Welcome screen that comes up when you launch Mudbox. If you closed this screen, you can also access the movies through Help ➔ Learning Movies, which brings up a Welcome screen
for you to click on the movies. These movies will get you started with Mudbox by show-ing you how to navigate with a mouse or a tablet, and how to paint and pose.
I can’t stress how important and indispensible a tablet is for digital sculpting and 3D painting in Mudbox. Even though it is possible to do the lessons with a mouse, it will be extremely tedious if not impossible to get good results. Tablets come with varying capa-bilities and sizes. Some come with a display that you can directly draw and sculpt on, others are wireless, and some have more sensitivity levels. I use the medium-size Intuos4 tablet from Wacom.
I will go through how to set up and optimize settings for the tablet in Mudbox, but for now, just make sure your tablet stylus buttons are set to Middle Click for the front button and Right Click for the back button. To do this for Wacom tablets, make sure Mudbox is running, open the Wacom control panel (Figure 1.3), and follow these steps:
1. Near the top of the dialog box, click the plus sign to the right of Application. 2. Click Mudbox and then click OK. Notice that Mudbox is added to your application
[image:26.531.24.235.387.618.2]list and has a highlight around it, indicating that it is selected.
Figure 1.3
Tablet control panel
3. Make sure you are on the Pen tab. Click the drop-down menu that is mapped to the back button and choose Clicks ➔ Right Click.
4. Click the drop-down menu for the front button on the stylus and choose Clicks ➔ Middle Click.
5. Close the Wacom control panel.
If you are using a tablet, henceforth in this book, sub-stitute a tap of the stylus for clicking the left button of the mouse, a tap of the forward button on the stylus for click-ing the middle button of the mouse, and a tap of the back button on the stylus for clicking the right button on the mouse. Tap the stylus and drag on the surface of the tablet to substitute left-clicking and dragging the mouse.
Using the Camera to Navigate Your Scene ■ 5
Loading a Base Mesh
A base mesh, or cage as it is sometimes referred to, is a 3D polygonal object that has been modeled in a 3D application and saved or exported as an .obj fi le.
To paint this model, we need to unwrap it into 2D before we bring it into Mudbox. If an object has been unwrapped and has UV coordinates associated with it, the UV infor-mation will be included in the .obj or .fbx fi le. Chapters 3, 4, 5, and 6 explain in depth what UVs are and how to generate them. For the examples in this chapter, where needed, the UVs are done and provided for you.
To load your base mesh into Mudbox, follow these steps:
1. Load Mudbox.
2. Close the Welcome screen by clicking the Close button. 3. Choose File ➔ Import.
4. Open the bertie_low.obj file in the Chapter 1\Bertie folder on your DVD.
Th E ar T O F aS h lE y WO O d
Bertie is a robot that can be found in Ashley Wood’s paintings and graphic novels. I have been inspired by Ashley’s work over the years and thought Bertie would be a perfect subject for sculpting details and 3D painting because of the bold shapes and amazing aesthetic of the robot. You will be working more with Bertie in Chapter 3, “Detail-Sculpting an Imported Model,” and Chapter 4, “Painting and Texturing an Imported Model.” To see more of Ashley’s work, go to his website at www.ashleywoodartist.com. (Please note that the Bertie images, and Bertie Maya and Mudbox models on the DVD are provided for your personal education only, and not for use in any commercial projects.)
Using the Camera to Navigate Your Scene
Now that the base mesh is in Mudbox, you can look at it from any angle and zoom in and out to enlarge areas you will be working on in depth. When you are performing the following actions, you are not moving the object but rather the camera through which you are looking at the object. This is similar to framing, let’s say, a statue in a museum, in the viewport of a point-and-shoot digital camera. You point your camera at the statue, and walk around it while using the zoom features to perfectly frame the feature you wish to capture in the camera’s display viewport before taking the snapshot. Becoming comfort-able with navigating the camera is critical to your workfl ow. Practice as long as you need to, until you are comfortable getting to the area you need to manipulate with minimal steps.
To work with the camera, follow these steps:
1. Press and hold down Alt and tap and drag your stylus tip on the tablet to tumble or spin the model; with a mouse, hold Alt while left-clicking and dragging.
Th E ar T O F aS h lE y WO O d
2. To pan, press and hold down the Alt key and the forward button on your stylus, and hover the stylus over the tablet without touching it. The equivalent movement with a mouse is holding Alt while middle-clicking and dragging.
3. To zoom in and out of your model, press and hold down the Alt key and the back button on the stylus, and hover the stylus over the tablet without touching it. The equivalent movement with a mouse is holding Alt while right-clicking and dragging.
4. Press W to show or hide the wireframe on the model.
5. To focus on a specific area, point to it with the cursor and press the F key on your keyboard. Now tumble around as you did in step 1, as you can see the center of your rotation is now your focus point. This is a handy way to set the focus on your work area.
6. To see all of your model, press the A key.
7. From the Window menu, choose Object List (see Figure 1.4). The Object List shows you all the cameras, lights, objects, and materials in your scene.
8. Notice that you have four default cameras already available to you. If you use other 3D applications, you are usually looking at your object in four views (Figure 1.5). In Mudbox, you work in only one viewport. You can switch from one camera to another by right-clicking the appropriate camera with your mouse, or by pressing the back button on your stylus, and selecting Look Through from the drop-down menu. Look through all four cameras.
9. Notice that as you select a camera, the properties of that camera are displayed below the Object List in the Properties tray (Figure 1.6).
Figure 1.4
Using the Camera to Navigate Your Scene ■ 7
Figure 1.5
Four viewports as seen in Maya
Figure 1.6
Camera properties
10. Look through the Front camera. Use the navigation methods I explained earlier to move around your model. Now look through the Top camera. Look through the Front camera again. You will notice that you are not looking at the model in the front view, but the view you actually left your model in. To get the camera to snap back to the front view, in the Transform properties of the camera, select the Roll, Rotate, Track, and Dolly check boxes and click the Reset button (Figure 1.7). This reverts your model to the original front view.
11. Note that there are three lock options in the Transform properties of your camera: Lock Pan, Lock Rotate, and Lock Zoom. When you want to restrict any of the three transform capabilities of the camera either for convenience or because you have attained a desirable camera view state, you can lock the change in the camera position, orientation, and magnification by choosing one, two, or three of these options. Note that the Front, Side, and Top cam-eras have the Orthographic option selected by default, which means they do not show your objects with any perspective depth. Experiment by navigating around your model with these options to get an idea of how they work.
Figure 1.7
WO r K pl aCE h i NT
When I sculpt, I usually bring up a second Object List window (by choosing Window ➔ Object List) that I can move anywhere on the screen. I usually have this second Object List either on my second monitor or somewhere on my fi rst monitor but out of the way of my sculpting. I then make sure the Lock Rotate option on all three of the Front, Side, and Top cameras is selected, which it should be by default, unless they were changed in a prior session. This helps me not to confuse the camera I am looking through, and even if I pan and zoom the camera, I am still looking at the model in the view that corresponds to the name of the camera.
You have now navigated the 3D view with your tablet or mouse and the Alt key. The introductory movies in the Welcome screen give an excellent demonstration on how to do this. Table 1.1 is a cheat sheet to get you started, but this will become second nature for you after your fi rst few sessions.
A C t I O N t A B l e t M O u S e
Tumble or spin Alt + click down and drag stylus Alt + left-click and drag mouse Pan or track Alt + forward button and drag stylus Alt + middle-click and drag mouse Dolly or zoom Alt + back button and drag stylus Alt + right-click and drag mouse
To focus on an area on your model, move your cursor to it and press the F key.
•
To see all of your model, press the A key. This repositions the camera so all the visible geometry is
•
in the 3D view.
Blocking in the General Shape and Adding Image Planes
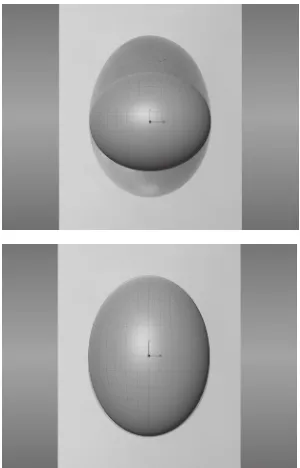
Now that you know how to navigate the camera around your model, you will go through the entire Mudbox pipeline with a simple example of an egg. You will start with a primi-tive sphere and then shape it into an egg. You’ll then sculpt the eggshell and paint it. Finally, you’ll output displacement, normal, and texture maps to Maya and use mental ray to do a fi nal render of the model.
You can follow these instructions step by step, or watch the movies of this project in the Chapter 1\videos folder of the DVD. These videos are divided as follows, based on the four stages in the chapter:
1. Blocking in shape: Chapter1-part1.mov
2. Subdivide and sculpt: Chapter1-part2.mov
3. Paint and render: Chapter1-part3.mov
4. Export and render in Maya: Chapter1-part4.mov
WO r K pl aCE h i NT
When I sculpt, I usually bring up a second Object List window (by choosing Window ➔ Object List) that I can move anywhere on the screen. I usually have this second Object List either on my second monitor or somewhere on my fi rst monitor but out of the way of my sculpting. I then make sure the Lock Rotate option on all three of the Front, Side, and Top cameras is selected, which it should be by default, unless they were changed in a prior session. This helps me not to confuse the camera I am looking through, and even if I pan and zoom the camera, I am still looking at the model in the view that corresponds to the name of the camera.
Table 1.1
Blocking in the General Shape and Adding Image Planes ■ 9
To block in the egg shape, follow these steps:
1. Start Mudbox and click the Close button in the bottom-right corner of the Welcome screen.
2. Choose Create ➔ Mesh ➔ Sphere.
3. Press W to show the wireframe, if it’s not showing. Tumble around the sphere and observe the polygons that compose the sphere. Notice that there are at most four edges coming out of each vertex, except for eight vertices that have only three edges. Also, notice that all of the polygons composing the sphere are four-sided quadrilater-als (or quads). Chapter 3 covers why this type of geometry layout is ideal.
4. Click the UV View tab on the top left of your screen to see the UVs of the sphere. Notice that the sphere is unwrapped perfectly into quads with no overlapping lines. Also note that the UVs fit perfectly into the first quadrant square (Figure 1.8). When you are finished looking at the UV view, click the 3D View tab.
5. The two sections on the right and bottom of the screen that contain tools and trays are referred to as the East and South Frame trays, respectively, even though they are not labeled as such. Click the Object List tab at the top of the East Frame tray. Notice that there are four cameras created for you already: Perspective, Top, Side, and Front. You also have a default Directional Light, a default Material, and the Sphere mesh geom-etry. Right-click the Sphere object in the list, choose Rename Object, and type egg.
6. Click the plus sign next to the mesh you just renamed to see the first-level mesh. Move your mouse between the Name and Information columns in the Object List, and resize the Name column by dragging the divider bar to the left so you see more information on the mesh. Notice that the Sphere primitive has two subdivision levels labeled level 0 and level 1. Notice that the first
subdivision level, level 0, has 384 polygons, and level 1 has 1,536. As you add layers, they will be listed under the mesh name. The Information column beside the Name column also gives you more details on the different objects in the scene. 7. Right-click the Front camera and select Look
Through. Notice that the Properties tray under the Object List has the properties of the camera. Make sure the Lock Rotate check box is selected. This prevents you from accidentally rotating the camera. If you accidentally change the camera view, select the Roll, Rotate, Track, and Dolly check boxes and click the Reset button to reset the camera to its original view.
Figure 1.8
8. Click the plus sign next to the Front camera and click ImagePlane. Notice that the ImagePlane properties replace the camera properties in the Properties tray under-neath the Object List. Click the drop-down arrows next to Advanced and Transfor-mation properties to open them. Click Import and navigate to the Chapter 1\egg\ reference and image plane files folder and load the egg_side.jpg image. It will load in front of your ball and might take up most of the 3D view.
9. In the Advanced section of the ImagePlane Properties tray, change the Depth to 100. Now you will see the sphere in front of the egg.
10. If you do not see the top and bottom of the egg in the 3D viewport, click in the Scale text box in the Transformation section of the ImagePlane Properties tray, and type 1
or 0.8 or 0.6 (80 percent or 60 percent resizing of the image) until you can see both the top and bottom of the egg in the 3D viewport. Notice that you can also rotate and translate the image plane, but for our example, this is good enough.
11. Now use Alt + middle mouse button, or Alt + forward button on the stylus, to posi-tion your egg so the leftmost and rightmost edges of the sphere line up with the leftmost and rightmost edges of the egg in the picture (Figure 1.9). Also line up the center as best as you can.
12. In the Object List, right-click the Side camera and select Look Through. You will no longer see the image plane, just the sphere. This is because you are now viewing the sphere through the Side camera that does not have an image plane yet.
13. Click the Image Browser tab at the top left of your Mudbox window.
Figure 1.9
Blocking in the General Shape and Adding Image Planes ■ 11
14. Click the Open Directory button.
15. Navigate to the Chapter 1\egg\reference and image plane files folder on the DVD. 16. Click the egg - high frequency detail.jpg thumbnail in the left Image Thumbnail tray and press Alt while clicking and dragging on the image to see the finer detail of the egg’s surface. As you can see, it is not smooth. Note the roughness that shows up, especially in the white, shiny specular region. Also note the variation of oranges in the diffuse color and the reddish blemishes on the surface. Observing reference material is critical to the creation of art. Whether you are imitating, exaggerating, or distorting what you see, you really need to look at it and understand its nuances first. Click the egg_top.jpg thumbnail and notice that from the top, an egg looks circular. Finally, click the egg_side.jpg thumbnail.
17. On the toolbar, click the Set Image Plane button.
18. Click the 3D View tab in the top-left corner. Notice that the egg is set as the image plane and is in front of your sphere. Click the plus sign next to the Side camera and click ImagePlane. In the ImagePlane properties, click the drop-down arrows next to Advanced and Transformation properties to open them. Change the Depth to 100. Now you will see the sphere in front of the egg.
19. Click Scale and choose the same scale that you used for the front image plane, either 1, or 0.8, or 0.6.
20. Switch back to the Front camera by right-clicking it in the Object List and choosing Look Through, and select Lock Zoom in the camera’s properties.
21. Click the Select/Move Tools tab at the bottom of the screen that contains the Mudbox tools. This area is referred to as the South Frame. Click the Objects icon and click on the sphere. Notice that it now appears a yellower shade of brown, which means it is selected. You can also select the egg by clicking on the egg mesh in the Object List. 22. Click the Scale button.
23. Click and drag the red square (x-axis) on the horizontal scale manipulator to widen the sphere so the edges line up with those of the egg. Align the sphere by pressing Alt + middle mouse button, or Alt + forward button on the stylus, to pan the camera and position your egg so the leftmost and rightmost edges of the sphere line up with the leftmost and rightmost edges of the egg in the picture (Figure 1.10).
25. Switch to the Side camera by right-clicking it in the Object List and selecting Look Through.
[image:34.531.136.436.60.528.2]26. Align the top and bottom of the sphere with the image plane by pressing Alt + middle mouse button, or Alt + forward button on the stylus. Click and drag the blue square (z-axis) on the horizontal scale manipulator to widen the sphere so the edges line up with those of the egg. Align the sphere by pressing Alt + middle mouse button,
Figure 1.10
Scale horizontally
Figure 1.11
Sculpting Your Model ■ 13
or Alt + forward button on the stylus, to position your egg so the leftmost and right-most edges of the sphere line up with the leftright-most and rightright-most edges of the egg in the picture.
27. Right-click the Perspective camera in the Object List and select Look Through. Tumble the camera around your egg and examine your work. Next press the L key and click and drag your mouse, or tap and drag your stylus, to change the direction of your light. 28. Click the Material Presets tab in the South Frame tray and select the material (Gesso).
You can identify a material’s name by hovering your mouse over it; Gesso is one of the white materials. This changes your egg color to white. To see the name of a mate-rial, hover your cursor on top of it in the Material Presets tray and wait for a pop-up that gives you a larger thumbnail and the name of the material.
29. Save your work by choosing File ➔ Save Scene As egg_step_01.mud. You can see me
going through the stages in this section in the Chapter1-part1.mov video in the
\Chapter 1\Videos folder.
Sculpting Your Model
Suppose that this egg will be used in a commercial or movie clip, where it is impossible to use a real organic prop because eggs are brittle and delicate. In the storyboard, we see that we’ll have a close-up shot requiring the details on the surface of the egg to be visible.
Now that you have the egg shape, you need to add the rough texture that you saw in the reference image. You can either continue from the previous lesson or load the scene fi le egg_step_01.mud from the Chapter 1\egg\egg_project\Mudbox folder on the DVD.
Press Pg Dn to go to subdivision level 0 on the egg. In the Object List, you can see that your egg has only 384 faces at level 0. Even though the egg looks smooth in the middle, you can see some faceting when you look at the edges of the egg. Faceting means you see big squares or polygons making up the surface instead of a smooth, polished surface. When we sculpt on a model, we are moving the vertices that make up the polygons. If we have only these few faces and we move the vertices at level 0, we will not be able to get the level of detail we want.
i m aG E pl aN E E r rO r
If you do load the egg_step_01.mud fi le from the DVD, upon loading the fi le, you will see a dialog box indicating that Mudbox is unable to fi nd the egg-side.jpg image plane fi le. This is because Mudbox saves a hard-coded image plane path name. Because it is extremely unlikely that you have egg-side.jpg in the exact same path on the hard drive of the computer you are working on as I do on mine, you will get this error dialog box. Click OK to dismiss the dialog box. Because we have two image planes in our scene, the dialog box will come up again. Just click OK a second time to dismiss the second dialog box. You can reload the front and side image planes into your scene again from the DVD, or from a location on your hard drive to which you copied the DVD fi les.
i m aG E pl aN E E r rO r
The lower levels of a mesh are great for blocking in the shape, but not for adding detail. If, for example, you want to make a character’s chin longer or work on the overall shape of your model, use the lower subdivision levels. This is where you will get the best result for the least amount of manipulation.
One of the skills that you will need to develop to be an effective digital sculptor is knowing which subdivision level best suits the task at hand. Another skill is knowing the optimal amount of geometry needed to display the required detail. It is a constant strug-gle between what the software and hardware can handle versus the detail level your proj-ect demands. As I noted before, our egg has too few polygons for us to to get the result we want, so we need to subdivide it to get more subdivision levels.
Adding Subdivision Levels to Your Model
Follow these steps to add subdivision levels to your model:
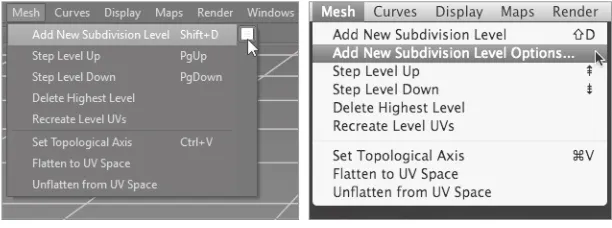
1. Press Pg Up to go back to subdivision level 1 at 1,536 polygons. Choose Mesh ➔ Add
[image:36.531.143.404.423.608.2]New Subdivision Level. Notice that as you do this, status information about the new subdivision level appears at the top-right corner of the 3D view. It stays on for only a few seconds. If you missed it, don’t worry, the same information is available to you if you click the plus sign next to the Egg mesh object in the Object List, and in the status line at the bottom-right of the Mudbox window. You can see that now you are at 6,144 polygons, which is four times the number of polygons you had. Every time you subdivide your model, you will end up with four times the number of poly-gons you had. At the lower levels, the number of polypoly-gons is not significantly greater than those of the previous level; however, as you get to higher subdivision levels, the numbers start going up significantly. For our simple egg, notice that as you get into level 6, you are already at 1.5 million polygons (Figure 1.12).
Figure 1.12
The growth in poly-gon count at every subdivision level of a model
Polygon Count Increase Rate with Every Subdivision Level
Sculpting Your Model ■ 15
2. Press Shift+D to subdivide your model one more time. If you don’t have the wire-frame display on, press the W key to see the wirewire-frame on the egg, and notice the new polygons that the new subdivision level has added. You are now at level 3, with 24,576 polygons. Also notice that a new line has been added to each of the levels under the Egg mesh object in the Object List.
3. To move up or down in levels, hover your cursor on the egg model, and press Pg Up or Pg Dn, respectively. To find what level you are on at any time, look at the status bar at the bottom right of your Mudbox window. The current level is listed as the Active level. You can also press Pg Up or Pg Dn and look at the information that pops up in the top-right corner of the 3D view. Subdivide your model up to level 6. If you have the wireframe on, you will notice that the lines show up as very dense on the surface, so turn off the wireframe by pressing the W key.
As the mesh is subdivided, notice that Mudbox creates a smooth-surfaced result. In our egg model, we do want that smooth subdivision result. However, if you are work-ing on a model requirwork-ing creased, hard-surface edges (for example, the edges of a box), you need to subdivide your model with the Smooth Positions option off in the Mesh ➔
Add New Subdivision Level Options dialog box (Figure 1.13).
To access the subdivision options, you need to click the options box next to the Add New Subdivision Level menu item (Figure 1.14). On the Mac, you need to select the Subdivision Level Options menu item.
Adding Sculpting Layers
Now that you have your egg of 1.5 million polygons, you will start adding the surface detail. But before you do that, you will add two sculpting layers. One layer is for the uni-formly rough, high-frequency detail on the surface of the egg, as you saw in the reference picture egg - high frequency detail.jpg on the DVD. The other layer is for the nonuni-form spots and bumps on the surface. The reason we do this in layers is so we can dial the detail of the sculpting layer up and down as needed. This will become clearer in the following steps. Sculpting in layers is a powerful capability you will learn to love because it will save you a lot of time during your work, specifi cally for exploring what if scenarios,
Figure 1.13
[image:37.531.105.411.357.471.2]Subdivision Options dialog box
Figure 1.14
undoing a whole bunch of sculpting in one swift step, and layering effects of surface detail. Follow these steps to add the two layers:
1. Click the Layers tab in the East Frame tray. Click the Sculpt button (Figure 1.15). 2. Click Pg Up until you are at subdivision level 6. Click the arrow under the Layers tab
[image:38.531.133.415.164.315.2]to open the Layers window menu and choose New Layer (Figure 1.16). Do this again to add another layer. Notice that you now have two sculpt layers in the Layers list.
Figure 1.15
Sculpt and Paint layer buttons
Figure 1.16
Layers window menu ➔ New Layer
3. Double-click sculpt layer 1, rename it eggshell, and press Enter. Do the same to sculpt layer 2 and call it spots. You now have your two sculpting layers.
Notice the fi ve columns in the Layers tray. The fi rst column indicates visibility of the model and can be toggled on and off by clicking the small circle next to the name of the layer. A full circle indicates that the layer is visible, and an empty circle indicates that the layer is hidden. The second column is Lock, which allows you to lock that layer from being edited. The third column shows the subdivision level assigned to this particular layer; this column is just informational and cannot be manipulated. The fourth column is the name of the layer with an icon in front of it, and it can be changed. The fi fth col-umn is the opacity of the layer (Figure 1.17). Note that Figure 1.17 is just for reference of the user interface and does not indicate what your Layers tray should look like for this project.
The fi ve columns in the Layer tray are as follows:
Visibility You can turn on the visibility of a layer by clicking the small circle in the Visibility column. If you use Photoshop, you are familiar with this because Photoshop uses the same method of showing and hiding layers.
Lock To lock a layer and disable editing on it, click on it in the Lock column. You will see an image of a closed padlock when a layer in the column is locked.
Sculpting Your Model ■ 17
Name You have already seen how to rename a layer. The icon in front of the layer name denotes whether you can sculpt on that layer. Even if there is no lock on the layer, you might not be able to sculpt on it because you may not be at the subdivision level the layer was created in. A sculpt layer can be assigned to only one single subdivision level. You can have multiple layers that have the same subdivision level, but each layer is assigned one and only one subdivision level. For example, sculpt layers 4, 6, and 7 can all be of subdivi-sion level 5. However, you can work only on subdivisubdivi-sion level 5 in sculpt layers 4, 6, and 7. The way you assign a level to a layer is to be at the desired level before you make your fi rst sculpting stroke on it. This could cause some frustration because you could be on a layer and not be able to sculpt on your model. If this happens, look at the layer to see whether there is a red circle with a line through it next to the layer name. If there is, you are at a different level than what this layer was set to. That’s why you are not able to sculpt on it. To fi x this, create a new layer for the level you are on, click on the base-level mesh in the Sculpt Layers tray, or press Pg Up or Pg Dn to get to the subdivision level to the left of the layer name.
Opacity You can either enter a numerical value or use the slider to show the opacity of your sculpt layer. This is useful for dialing up or dialing down the detail on a layer.
Sculpting the High-Frequency Detail
You are now going to sculpt the detail on the surface of the egg. This is a really simple example of sculpting, or rather surface detailing; you will do some more shape sculpting in Chapters 3, 5, and 6. Here are the steps:
1. Click on the eggshell layer in the Layers tray to select it.
2. Click on the Sculpt Tools tray in the South Frame tray panel and choose the Spray tool. Notice that the Spray tool properties come up in the Properties window. 3. As you move your cursor onto the egg, you will notice a circle with a dot in the
[image:39.531.72.415.64.211.2]mid-dle of it moving on the egg. This is your brush. The circle is the area you are affecting with your brush.
Figure 1.17
The Layers tray
Base-Level Mesh Layers Window Menu
Locked Layer Layer Visibility Off Layer Visibility On Subdivision Level Delete Selected LayerCreate New Layer
Sculpt/Paint Layer Display Show/Hide Mask
Layer Name
Layer at Level for Sculptingevel for Sculptingevel f
4. In the Falloff tray, choose Falloff 4 (the fifth one, because they start at 0). You will see the Falloff name pop up when you hover your cursor over it.
5. From the Stamp tray, look for and choose the bw_dots stamp (the 11th one). You will see the stamp name pop up when you hover your cursor on top of it. Notice as you choose the stamp that the Use Stamp Image check box gets selected in the Spray Tool properties.
6. In the Spray Tool properties, click the arrow to open the advanced options (Fig-ure 1.18) and select the Remember Size and Orient to Surface check boxes. The Remember Size check box sets your brush size to the size it was when you used the tool last. Orient to Surface makes your brush wrap around the model.
Figure 1.18
Stamp tool properties
7. While your cursor is on your model, press and hold the B key on your keyboard and drag. This changes the size of the circle and your brush. You will do this a lot to adjust the size of your brush.
8. While your cursor is on your model, press and hold the M key on your keyboard and drag. This shows you a line going up from the center of the circle. This is your brush strength, which determines how much the sculpt tool affects the surface. The longer the line from the center of the circle, the deeper an imprint your brush will make on the surface of your model. I recommend you start with a lower strength and dial it up as needed. Notice that you can enter numerical values for both Size and Strength of your tool in the Spray Tool properties (Figure 1.18).
9. For this lesson, let’s type in the strength and size of your brush. Set Size to 14 and Strength to 2.
10. Click the Mirror drop-down and select Local X. Also select the Ran-domize, Horizontal Flips, and Vertical Flips check boxes.
11. While holding down the Ctrl key, place your cursor on the top of the egg and then click and drag your mouse to start creating the eggshell pattern on the egg’s surface. Zoom in to see the detail (Figure 1.19). You are holding down the Ctrl key so you sculpt inward, into the egg, instead of creating a relief off the surface. You can also sculpt without holding down the Ctrl key to add some relief and create even more variation to the surface. Cover the entire surface of the egg with this pattern, alternating between pressing down and not pressing down Ctrl. Rotate your egg to make sure you cover all of it.
Sculpting Your Model ■ 19
some anomalies as you are doing this, but don’t worry, that’s Mudbox rendering the details, and it will eventually catch up to display the correct detail. Notice that this detail is a little exaggerated, but that’s by design, because you are going to dial it down by using the Opacity of the layer after you are finished sculpting.
13. A 6 appears next to the eggshell layer in the Layers tray, indicating that this layer is on subdivision layer 6 of the egg; the layer is at opacity level 100. Either type 0 or drag the opacity slider to 0 to hide the eggshell layer. You are back to your smooth egg. 14. Click the spots layer to select it.
15. In the Spray tool properties, select Off from the Mirror drop-down list. Also deselect the Randomize, Horizontal Flips, and Vertical Flips check boxes.
16. Change the Brush size to 50 and Strength to 2.5. Make short strokes on the surface by using the Ctrl key on and off to get some spots that poke out, and some that poke in. You want to have a very few of these, so go easy on the strokes. If you end up making a bad stroke, you can always use Ctrl+Z to undo your strokes. You should end up with an egg with some protruding and some indented spots (Figure 1.20). 17. Use the opacity sliders on your two layers to get the perfect look for your egg’s
sur-face. An opacity of 46 on the spots layer and 59 on the eggshell layer looked appro-priate for me. If yours doesn’t look right, load the scene file egg_step_02.mud from the
Chapter 1\egg\egg_project\Mudbox folder on the DVD to see an example of the results you are going for and try again (remember to dismiss the two dialog boxes that come up by pressing the OK button). When you are happy with your results, save your file as egg_step_02.mud. You can see me going through the stages in this section in the
[image:41.531.111.413.411.618.2]Chapter1-part2.mov video in the \Chapter 1\Videos folder.
Figure 1.19
The detail you have just sculpted onto the surface of the egg is called high-frequency detail. You will be using this to add fi ne detail such as wrinkles, cloth patterns, scratches, and dents to your sculptures. If you feel adventurous at this juncture, reload the egg_ step_01.mud fi le and use some of the different sculpting tools to add other details to the surface. I will cover all of the tools in later chapters, but for now, just remember that if you press Ctrl, you depress the surface, and if you use a tool without pressing Ctrl, you add to the surface. Also try different stamps to get a feel for what they do.
Adding Paint Layers and Painting Your Model
If you have used Adobe Photoshop, Corel Painter, or any image-processing or composit-ing application that has paint layers, you understand the benefi ts of overlaycomposit-ing layers, placing them in a certain order, and fi ne-tuning their opacity to get amazingly realistic results. In most 3D productions, texture artists usually paint textures in layers and then composite them onto the model at render time so adjustments can be made to them on an individual level.
In this section, you will paint a base layer of paint on your egg, accent it with a second layer of paint, and then add red spots. Then you will use a variant of the side image plane fi le (where I have removed some of the specular highlights in Photoshop) as a stencil to project paint the exact color of the egg in the picture onto yours. You will then add some specular and gloss highlights to your image. Let’s get started:
1. Either continue from the previous lesson or load the egg_step_02.mud file from the
[image:42.531.119.411.64.281.2]Chapter 1\egg\egg_project\Mudbox folder from the DVD.
Figure 1.20
Adding Paint Layers and Painting Your Model ■ 21
2. In the Layers tray, click the Paint button to activate the Paint Layers tray (Figure 1.21). Please note that Figure 1.21 is a reference to explain paint layers and is not what you will see in the current project.
3. Click the Layers window drop-down menu and choose New Layer (Figure 1.22).
Figure 1.21
Paint Layers tray
Figure 1.22
Layers window menu ➔ New Layer
4. This brings up the Create New Paint Layer dialog box (Figure 1.23). Type base coat
as the name for your layer, choose 2048 as the size, and TIFF [8 Bit, RGBA] as the image format. The 8 bits give us 16.8 million colors, which will work for this sce-nario. This will be one of three diffuse layers. Diffuse is the base color we see, with-out highlights or shininess, just the base paint color.
5. Add a total of three diffuse layers: base coat (which you already created in the previ-ous step), red spots,andprojection.
6. Add another layer, call it highlights, and choose Specular from the Channel drop-down menu. In this color image, the lighter colors will show up with specular high-lights, and the darker areas will not shine at all. A specular map is a way to indicate the areas on your model you want to highlight because they are part
of surfaces that have a more shiny, reflective property (for example, oily areas of the forehead).
7. Finally, add a layer, call it glossiness, and pick Gloss from the Chan-nel menu. Like the specular image, this one’s lighter colors represent areas that will appear glossy, and the darker areas will not. Areas that have high gloss values look wet, while areas with high specular values look shiny.
Figure 1.23