NetSolutions
Hosted Web Conferencing
User Guide
Table of Contents
Understanding NHWC Basics ... 5
What is NHWC? ... 5
Using the NHWC Communications Center ... 8
Where Do I Start? ... 8
Accessing Your Communications Center ... 8
Creating Your Own Account ... 9
Logging in to Your Communications Center ... 10
Understanding Your Communications Center ... 11
Navigating the Communications Center ... 13
Editing Your Profile ... 13
Adding or Changing Your User Picture ... 14
Editing Your Password ... 15
Reading the Green Meter ... 15
Next Steps... 16
Joining and Attending a Session ... 17
Understanding the NHWC Client ... 17
Joining a Session ... 17
Understanding the Session Tool Panel ... 19
Interacting in Your Session ... 20
Viewing Session Content ... 25
Launching Content ... 25
Using Session Tools ... 26
Delivering NHWC Sessions ... 32
Preparing for Your Session ... 32
Understanding NHWC ... 32
How Sessions Work ... 33
Leading a Session ... 43
Using Content from Breakout Groups ... 57
Sending Invites from Within a Session ... 57
Internet Audio and Video ... 60
Add-On Internet Audio and Video Licenses ... 60
Selecting a Conferencing Type for a Session ... 61
Communicating Using Audio and Two-Way Video ... 63
Leading Internet Audio or Video Sessions ... 64
Running the Audio Wizard ... 64
Assisting the Session Leader ... 66
The Role of Assistant ... 66
Understanding the Leader Tool Panel ... 66
Responding to Private Chat Messages ... 67
Monitoring Hand Raises, Feedback, Activity Level, and System Status ... 68
Launching Applications and Content ... 69
Glimpsing an Attendee's Desktop (Training Room Only)... 69
Dismissing an Attendee from the Session ... 69
Asking Multiple Choice Questions with Polling... 70
What Is Polling? ... 70
Making a Question List before a Session ... 70
Asking Questions during a Session ... 72
Editing Question Files ... 73
Deleting a Polling File ... 73
Gathering Information with TestLinc and Surveys ... 74
Creating Test or Survey Templates ... 74
Finding a Test or Survey Template ... 76
Grading TestLinc Tests ... 78
Using Reports to View Test or Survey Results ... 78
Presenting and Collaborating with Powerboard ... 79
Using Powerboard for PowerPoint Presentations ... 82
Using Powerboard as a Multi-User Whiteboard ... 84
Printing Powerboard Files ... 84
Deleting a Powerboard File ... 84
Sharing Applications or Desktop ... 85
What Is Sharing? ... 85
Setting Sharing Bandwidth ... 85
Sharing Applications with Other Users ... 86
Changing the Application You Are Sharing ... 87
Sharing Applications in Full Screen Mode ... 87
Allowing a Participant to Share an Application ... 87
Viewing a Shared Application ... 88
Closing Sharing ... 88
Presenting with WebSync ... 89
What Is the WebSync? ... 89
Deciding to Use WebSync ... 89
Browsing on an Intranet or the Internet ... 89
Launching WebSync ... 90
Closing WebSync ... 90
Playing Audio or Video Files ... 91
What Is Media Link? ... 91
Deciding to Use Media Link ... 91
Launching MediaLink ... 91
Closing Media Link ... 91
NHWC Administration ... 92
Managing Users ... 92
What is an NHWC User? ... 92
What Is a User Name? ... 92
What Is an Authority Level? ... 93
Adding and Editing Users ... 93
Adding and Editing Groups ... 95
Adding and Editing Guests ... 95
Finding a User or Guest ... 96
Deleting a User or Guest ... 96
Managing Divisions and Authority Levels ... 97
Accessing the Structure Pages ... 97
What are Divisions? ... 97
Adding or Editing a Division ... 97
Adding a User to a Division and Setting a Ceiling ... 98
What Are Authority Levels? ... 98
Adding or Editing an Authority Level ... 99
Assigning an Authority Level to a User ... 102
Scheduling Sessions in NHWC ... 103
What is an NHWC Session? ... 103
Scheduling or Editing a Session ... 103
Managing Sessions ... 112
Training Room Folders, Documents, Tests, and Surveys ... 114
Leading Sessions ... 120
Leading a Meeting Room Meeting ... 120
Leading a Training Room Class ... 120
Leading a Conference Room Conference ... 122
Running Reports ... 124
Authority Levels and Reports ... 124
Accessing Reports ... 125
Activity Reports ... 125
Accessing the Session Details Report ... 126
Accessing the Session Progress Report ... 127
Accessing the Site Activity Report ... 129
Accessing the Concurrent Usage Summary Report ... 129
Accessing the Web Usage Report ... 130
Accessing the Audio Usage Report ... 131
Accessing the Assessment Question Summary Report ... 132
Accessing the Assessment User Summary Report ... 133
User Reports ... 133
Accessing the User Profile Detail Report ... 134
Accessing the User Session Detail Report ... 135
Accessing the User Transcript Report ... 136
Accessing the Green Meter Summary Report ... 137
Accessing the Storage Summary Report ... 138
Customizing NHWC ... 139
Customizing Site Features ... 139
Customizing the Communications Center Interface ... 142
Customizing the Tool Panel Interface ... 144
Customizing User and Activity Fields ... 145
Customizing Site Announcements and Related Links ... 148
Customizing Site and Session Defaults ... 149
Configuring Session Access: Public, Instant, and Catalog ... 161
Configuring Public Sessions ... 161
Adding Sessions and Activities to the Catalog Page ... 163
Creating Instant Sessions ... 165
Managing Content in the Content Library ... 167
Creating or Editing Content ... 167
Finding Content ... 168
Changing the Active/Inactive Status of Content ... 168
Deleting Content ... 168
Adding Content to Your Session ... 168
NHWC 10 Outlook Plug-in ... 170
Install the NHWC Outlook Plug-in ... 170
Add a New Meeting and Customize Your Invitation ... 170
Schedule a Meeting and Invite Others ... 171
Join NHWC Outlook Meetings ... 171
Edit NHWC Outlook Meetings ... 171
Remove NHWC Outlook Meetings ... 172
Add an Existing Meeting, Class, or Conference ... 172
Appendices ... 173
Communications Center ... 174
Session ... 174
What Is Bandwidth? ... 175
Communications Center Issues ... 183
Session Issues ... 184
Voice-Over-IP (VoIP) Issues ... 185
Session Tools Issues ... 185
Copyright ... 188
Understanding NHWC Basics
This User Guide is designed for all new NetSolutions Hosted Web Conferencing (NHWC) Users. It provides information on setting up your user information, and joining and attending sessions. This User Guide will provide information on the tools in the navigation menu of the NHWC Communications Center.
In this section:
• What is NHWC?
• Using the NHWC Communications Center
• Joining and Attending a Session
What is NHWC?
In this chapter:
• Understanding Web Conferencing
• NHWC Suite Overview
The NHWC Suite is a tightly integrated quartet of cost effective and easy-to-use applications that give you an unprecedented ability to meet, conference, train and provide support across the Internet. With NHWC, you can communicate with people around the world without ever leaving your office.
This chapter describes how you can use NetSolutions hosted web conferencing collaboration for online business meetings, virtual classroom training, online sales training, web video conferencing, web casts, and customer support at your organization.
Understanding Web Conferencing
Web conferencing with Mitel is a quick and easy way to bring people at your organization together. In a nutshell, it is meeting in an online room that is equipped with a full set of communication and collaboration tools. There are four session modalities you can choose from, depending on the licensing options your organization has selected. Each session has the same type of room in which you meet, but different communication and collaboration tools are available.
NHWC Suite Overview
The NHWC Suite consists of four different web conferencing session modalities. The four modalities in the suite feature audio and video conferencing and a full set of collaboration tools, including the ability to “raise your hand” online, take and pass the floor, browse web content while everyone watches, and present and annotate PowerPoint presentations – just to name a few!
Figure 1: NHWC in-session client
One or more of the following modalities may be available, depending on your organization’s licensing options:
Meeting Room
Schedule, send e-mail invitations for, and host meetings for business collaboration. Communicate and collaborate in a meeting room that gives each meeting attendee an equal voice. An NHWC meeting session takes place in an online room in which each attendee is given equal control over the session where participants can take and pass the floor at any time to gain control session content, unless the Leader has restricted the floor control.
Training Room
Plan, add resources to, and conduct live, interactive training sessions. The Training Room is a full-featured learning environment that lets you attend live classes and gives you access to a full training curriculum; allows you to set up a training curriculum and schedule live classes. Training classes take place in an online room that is equipped with the full set of communication and collaboration web conferencing tools.
This also includes the capability to publish and track usage of asynchronous materials like recordings, tests, surveys, and other files for distribution purposes.
Conference Room
Conduct webinars, product demos, and companywide events in a roomy, virtual auditorium designed for a lecture or seminar where the leader will be presenting to many participants without the need for a lot of interaction. The NHWC Conference Room provides an interactive and easy-to-use virtual auditorium for delivering live sessions to large audiences, such as investors, customers, partners, analysts, the media, and global employees. The auditorium interface is different from other NHWC session rooms in the following ways:
• Participants do not see the Content tab
• Participants do not typically see the Attendees panel
• Participants cannot navigate through a Powerboard presentation on their own
• Chat can be restricted to enable chatting only with the Presenter and Assistants or one-to-one to other participants
Remote Support
Provide one-on-one user support through communication and direct desktop manipulation in an NHWC Remote Support session, with the ability to pull in additional resources as assistants to escalate a situation appropriately. The Picture ID or video conferencing personalizes the troubleshooting session and helps you feel comfortable and at ease while you work.
Remote Support is a virtual room in which a technician can help one or more users solve problems with his or her computer. It allows technicians to remotely control a user’s PC as if they were sitting at the computer’s keyboard, allowing them to troubleshoot and solve problems with remote computers without ever having to leave their desks. This includes the capability to remotely restart a machine and after signing into the operating system, that machine is brought automatically back into the Remote Support session.
Remote Support provides a virtual queue (waiting list) for attendees waiting to enter. This waiting list shows attendees how many people are ahead of them in the queue and allows the technician to control who enters the room.
Using the NHWC Communications Center
In this chapter:
• Where Do I Start?
• Accessing Your Communications Center
• Creating Your Own Account
• Logging in to Your Communications Center
• Understanding Your Communications Center
• Navigating the Communications Center
• Editing your Profile
• Adding or Changing Your User Picture
• Editing Your Password
• Reading the Green Meter
• Next Steps
Before you jump in and lead or participate in your first session, you may want to get familiar with the NHWC product. This chapter provides an overview of the Communications Center, where you can join and view information about your session, and the Client, which is the session room interface you see when you are in an NHWC session.
Where Do I Start?
Understanding NHWC
The NHWC offering consists of two major components:
The NHWC Communications Center is a web site that gives you easy access to all NHWC information. From your personal home page, you can:
• join classes, meetings, conferences, or support rooms.
• view session content.
• locate information about your session, session leader, and fellow participants.
• update your user profile.
The NHWC Client is a small piece of software that automatically installs on your computer when you join a session. The Client interface provides the in-session tools to enable you to interact with the session leaders and other attendees.
Where to Learn More about the Communications Center
The Communications Center will be the starting point of your NHWC experience. The rest of this chapter provides an overview of the Communications Center and describes how to complete basic user tasks before you attend your first session, such as editing your password and uploading a user picture.
Where to Learn More about the NHWC Client
Often session leaders send e-mail invitations containing a Join button. When you click the link, the Client software automatically launches and you enter an NHWC session. Refer to Chapter 3, Joining and Attending a Session for more information about the NHWC session.
Where to Learn More about Leading Sessions
If you will be leading sessions, you will want to review the [Delivering NHWC Sessions] carefully. This guide includes information on scheduling sessions in the Communications Center, communicating in a session, and presenting and collaborating during a session.
Accessing Your Communications Center
To access your Communications Center, you will need a web browser and your Communications Center web address. Your system administrator decides the web address, or URL, for your
organization’s Communication Center. If you do not have this information, contact your system administrator.
1. Open your web browser.
2. Type the URL in the address or location field.
3. Press Enter on your keyboard. The NHWC Communications Center Log In page opens.
Figure 2: Log In Page
If you ... Then ...
have an existing account you can log in. See Logging in to Your Communications Center.
have been asked to create an account See the next section, Creating Your Own Account.
Creating Your Own Account
In some cases, your system administrator may ask you to create your own account when you first access the Communications Center.
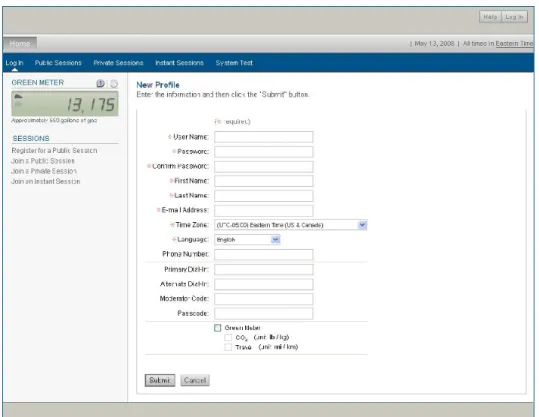
1. Open your web browser and navigate to your Communications Center. The Log In page opens. 2. Click here to create a new user account. The New Profile page opens.
Figure 3: New Profile Page
3. Enter information for the required fields described in the following table.
4. Click Submit. Your account is created and your Communications Center home page opens.
Field Name Enter/Select
User Name Type the user name that you will use to log in to NHWC. This can be your full name, an abbreviation, or a nickname. Make note of your user name because you will need it to access the Communications Center in the future.
Password/
Confirm Password
Type the password you will use to secure your account and then type it again to confirm it.
First Name/
Last Name Type your first and last names. This will appear in the Communications Center home page, user lists and Attendee list when you join a session. E-mail Address Type your e-mail address. This will be used to send you invitation e-mails
when you are invited to join a session.
Note: Your NHWC system administrator may add more required fields.
Logging in to Your Communications Center
If you already have an account, you can log in to the Communications Center on the Log In page. If you need to create an account, see Creating Your Own Account.
1. Open your web browser and navigate to your Communications Center. The Log In page opens. Note: Your system administrator may customize the options that appear on this page.
Figure 4: Communications Center Home
Understanding Your Communications Center
Your Communications Center is a web site that displays NHWC session information and provides you with a way to join sessions and access additional supporting content. It is also where you go if you need to edit your NHWC profile or change your password.
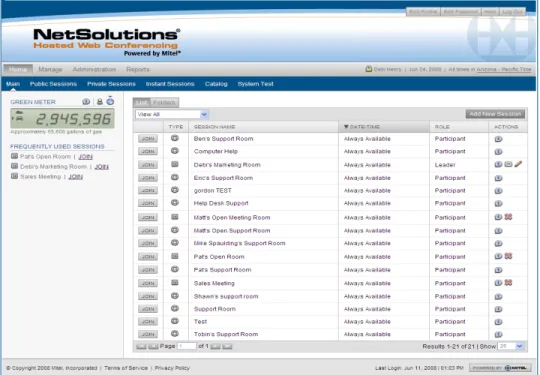
Your Home Page
Your home page opens when you log in to NHWC.
1. Navigation Menu: Click a link to navigate within the Communications Center page.
2. List of Sessions: Sessions you are scheduled to lead or attend are listed on your home page.
3. Folder View: Activities and content for which you are registered will appear under the Folder
tab on the home page.
Your home page lists all Meeting Room, Training Room, Conference Room, and Remote Support sessions that you are scheduled to attend. You may have one or more of these session types on your home page, depending on the licensing options your organization has chosen.
For each session (i.e., meeting, class, recording, test), you can view additional details if the session leader has added the information. Each option is described in the sections listed below.
• Viewing a Session/Activity Description
• Viewing Session Content
• Viewing Activity Progress
• Viewing Test Results
Viewing a Session/Activity Description
Your session leader has the option of adding a description for a session or activity. If you are wondering what a particular session will cover, or what an activity is designed for, click the Session Name or the More Info button next to the session title on your home page. The Session
Information page opens.
Figure 6: Session Information
Viewing Session Content
On your home page, you can access any supporting content that your session leader has added. Some examples of supporting content are PowerPoint Presentations, video clips, URLs, whiteboards, NHWC recordings, and other files for distribution. To view session materials, click the Session Name or the More Info button next to the session title on your home page. From the Session Information window, click Content.
Removing a Session from your Home Page
The session list displays all sessions for which you have a registration. You may have attended open, or always available, sessions in the past you wish to remove from your list. To do so, click the Remove button in the Actions column of the list. Your registration will be canceled from that session.
If you need to attend that session again in the future, the Leader will need to send you an invite or add you to the session’s details. The session will then appear in your list again.
Navigating the Communications Center
To navigate through the Communications Center, click a link on the navigation menu. Depending on the security established for your account by your system administrator, you may access one or more of the following pages within your Communications Center.
• Edit Profile: online form that contains your name, e-mail address, time zone and language,
and enables you to upload or remove a user picture.
• Edit Password: online form on which you can change your password.
• Help: list of online help files, user guides, tutorials, and other helpful information.
• Log Out: link for logging out of the Communications Center.
• Public Sessions: lists sessions that have been set to allow public join.
• Private Sessions: enables entry to an NHWC session with a session ID to join NHWC quickly
as a user or as a guest.
• Instant Sessions: online form used to create and join a session on-the-fly. An instant
session is created with defaults preset by your system administrator.
• Catalog: list of sessions available for public registration.
• System Test: Will test your system for compatibility with NHWC.
• Outlook Plug-In: The Outlook Plug-In allows you to schedule new Meeting Room meetings
directly in Microsoft Outlook or add existing classes, meetings, conferences, or support rooms.
• Green Meter: an automatic calculator that tracks CO2, cost, and travel reductions accrued by
meeting online rather than traveling
• Frequently Used Sessions: a list of your recently accessed sessions.
• Announcements: list of important announcements posted by your NHWC system
administrator.
• Related Links: list of links to web sites and resources relevant to your organization.
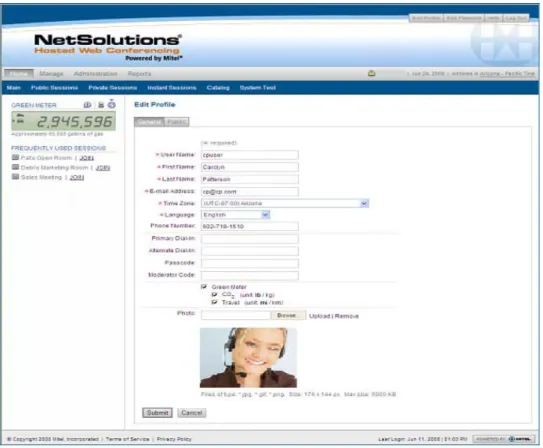
Editing Your Profile
You can edit your name or e-mail address, or add a picture of yourself that will display during a session. Note: Your NHWC system administrator may require additional fields.
1. In the navigation menu, click Edit Profile. The Edit Profile page opens. 2. Type your new or revised information in the fields provided.
3. If you would like to add a photo to appear in NHWC sessions, click Browse to select the photo you would like to upload. Once a photo has been selected, click Upload.
Figure 8: Edit Profile
Adding or Changing Your User Picture
When you add a photo to your profile, your picture will display to all attendees when you have the floor during a session.
Figure 9: Attendees Panel 1. At the top of the page, click Edit Profile button.
2. To add a picture, click Browse and select the image you would like to upload. Then click the Upload link. The picture must be in JPG, GIF or PNG format and no bigger than 5 megabytes. The recommended dimensions of the image are 176 X 144 pixels.
3. Click Submit. Your picture is added and appears on the Edit Profile page. To remove a picture, click the Remove link. Your picture is removed.
Editing Your Password
If you have been assigned a password by your system administrator, it is a good idea to change it after the first time you log in to NHWC.
1. At the top of the page, click Edit Password. The Edit Password page opens. 2. In the Password field, type your new password.
3. In the Confirm Password field, type the new password again. 4. Click Submit.
Figure 10: Edit Password
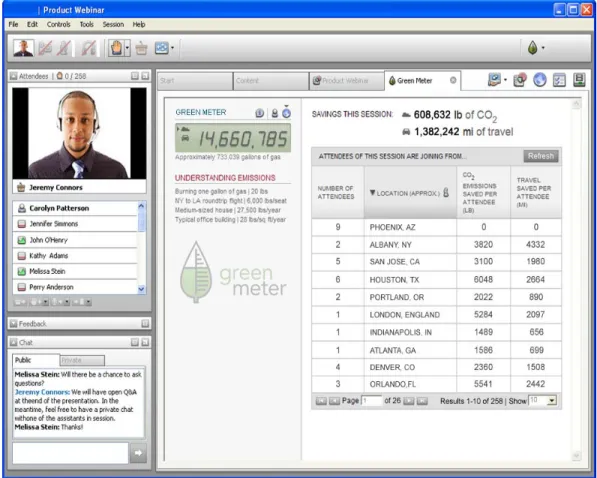
Reading the Green Meter
Mitel promotes an environmental (i.e. “green”) agenda that encourages meeting online, rather than using natural resources for travel. NHWC emphasizes the environmental principles of Mitel.
Whether traveling by air or by car, CO2 is released into the atmosphere. CO2 Emissions have been
proven to be the leading contributing factor in global warming. The NHWC Communications Center provides an at-a-glance total of the amount of CO2 Emissions you have saved by using online meeting,
class, conference, or support sessions. The more you meet the higher your number. In addition to CO2
Emissions, the Green Meter calculates Travel savings, providing a look at the distance that was not traveled by Attendees to attend your sessions.
Figure 11: Green Meter within the Communications Center To View Green Meter Savings
1. Click the Site Savings button to view Green Meter savings for all sessions held on this site. 2. If you have an user account and are logged in, click the Personal Savings button to view
3. To view the Green Meter Savings in CO2 Emissions, click the CO2 Savings button . 4. To view the Green Meter Savings for Travel, click the Travel Savings button . Click the More Info button to learn more about the Green Meter.
Next Steps
If you will be attending sessions, review Chapter 3, Joining and Attending a Session. This chapter provides information on how to join your session and what to expect once you are in it.
If you will be leading sessions, review Chapter 5, Leading a Session. This chapter provides information on scheduling and preparing for your session and gives detailed information on using session tools. You may also want to review Chapter 3 of this User Guide, Joining and Attending a Session, to get a good overview of the participant experience.
Joining and Attending a Session
In this chapter:
• Understanding the NHWC Client
• Joining a Session
• Understanding the Session Tool Panel
• Interacting in Your Session
• Viewing Session Content
• Using Session Tools
• Working in Breakout Groups
• Leaving a Session
You are now ready to attend your NHWC session. You may be wondering: What will my session look like? How will my session work? How do I join my session? These questions are all answered in this chapter. It describes the ways you can join a session and will arm you with a good working knowledge of NHWC’s session communication and collaboration tools so you can make the most of your online session.
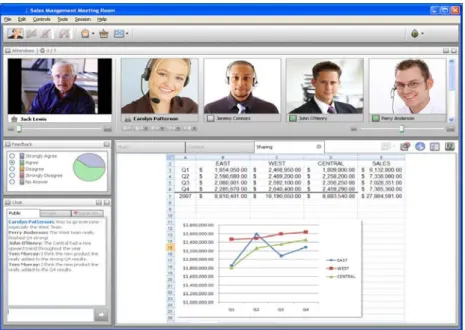
Understanding the NHWC Client
The NHWC Client is the virtual room in which you collaborate and communicate during an online session. The Client is a small piece of software that is automatically installed on your computer when you join a session. The session room looks slightly different depending on the session type you are attending (i.e., Meeting Room, Training Room, Conference Room, or Remote Support).
Figure 12: NHWC Client
Joining a Session
You can join a session three ways:
1. Join Using an Invitation E-mail Link
2. Join from Your Communications Center Home Page 3. Join from the Public Sessions Page
Each join method is described in the sections that follow. If this is the first time you are joining an NHWC session, the Client software will install when you click the Join button. Depending on the settings established by your site administrator, you may need to download and install to your temp
directory either a Java application or an ActiveX control. To complete the installation, accept the prompts as presented.
Note: A manual option is available if the automatic setup isn’t available.
Join Using an Invitation E-mail Link
If the session leader decides to send an invitation e-mail, you will receive an email with a join link to the session. Before you join a session, you will be prompted to enter your Password, or your First Name, Last Name and E-mail Address. If you have previously joined an NHWC session, a cookie on your machine will populate the information entered for the most recently joined session.
Click the link to join the session. If this is the first time you are joining a session, the Client installation begins. Otherwise, you simply enter the session.
In some cases, the invitation e-mail may also include a link that allows you to upload a user picture that will appear in the session when you have the floor. For more information on adding a user picture, refer to Adding or Changing Your User Picture in Chapter 2, Using the NHWC Communications Center.
Join from Your Communications Center Home Page
Sessions are categorized by session type on your home page. You may have one or more available session types, depending on your organization’s licensing options.
Figure 13: Communications Center Home Page
Your home page lists all Meeting Room, Training Room, Conference Room, and Remote Support sessions that you are scheduled to attend or lead. You may have one or more of these session types on your home page, depending on the licensing options your organization has chosen. To join a session, locate it on your list and click the Join button for the session.
Join from the Public Sessions Page
Depending on how your session leader has set up the session, you may be able to register for and/or join the session from the Public Sessions page.
1. Access the Public Sessions page. There are two ways to do this:
• navigate to a URL the session leader sent to you
• Click the Public Sessions link on the navigation menu
Figure 14: Login 2. Find your session on the list:
Figure 15: Public Sessions
If the session. . . Then ...
allows “public registration” select the check box preceding the session name, and click Register. You will receive an invitation email with a Join link. allows “public join” click the Join button to enter the session.
has session content click the session name and then click Content link to view session content. Refer to Using the NHWC Communications Center for more information.
Understanding the Session Tool Panel
The Tool Panel is the main interface element in an NHWC session. The Tool Panel displays the most commonly used tools, including audio or video conferencing, the class list, Feedback, and Chat. These tools enable leaders and participants to interact with one another in real time. For example, when a participant raises his or her hand, the leader sees a hand raise notification immediately.
The Tool Panel is configurable for each attendee in that you can collapse and expand, or dock and undock windows. When one window collapses or undocks, the rest of the windows move up in the panel area. Refer to Chapter 1, Understanding NHWC Basics.
If you are a session leader or assistant, refer to Chapter 5, Leading a Session for a diagram of the Leader Tool Panel.
Note: Your organization or session leader can also choose to configure the Tool Panel so that it does not show all windows and/or session tools. If that is the case, your session interface may look slightly different than the diagrams in this User Guide.
Interacting in Your Session
There are several ways you can communicate in your session. You can:
• talk with other participants over the telephone or Internet.
• control your settings during a session.
• see the videos or photos of the leader, assistants or other participants.
• provide feedback when your session leader asks questions using the Feedback tool.
• “instant message” participants and/or the leader using Chat. Each communication method is described in the sections that follow.
Talking in a Session
When you join your session, you will need either a telephone or computer audio equipment (speakers or headset).
If a teleconference has been set up for this session, you will see the Primary Dial-In and Passcode for the session in the Join message and to the right of the My Controls Panel in the client. Once you dial-in to the conference call, you are able to communicate with the session leader and other participants via your telephone.
If Internet audio is being used for this session, you will need either computer speakers or headphones to hear the attendees. You may also need a microphone if you want to speak during the session.
My Controls
Throughout your session, you may want to adjust your communication settings. For example, maybe you want to get the attention of the leader, the volume of your voice is too loud, or you can’t hear others clearly. The My Controls section of the Tool Panel gives you easy, one-click access to many tools to adjust and enhance your experience.
Figure 16: My Controls Panel Audio and Video Control
A key component of any session is the ability to hear and be heard by participants, especially in meetings and class activities. Depending on how you are connecting to the audio portion of the session, you may have access to microphone and speaker volume or video broadcasting.
• The microphone icon provides you one-click access to mute yourself or to click the volume meter to adjust if you are too loud or too soft.
• The speaker icon provides you one-click access to turn off your speakers or to click the volume meter if you cannot hear the other participants speaking or if they are too loud.
• The camera icon provides you the ability to either broadcast your video to your other participants or to turn it off. Once turned off, the floor holder cannot turn it on to view you in your environment.
Raise Your Hand
Imagine you are in the same room as all the attendees. If you wanted to ask a question, you would raise your hand to get the attention of the leader. Using the hand raise icon , you can grab the leader’s attention by virtually raising your hand. Any hand raise by a participant is highlighted to the leader and they can then address you so that you may ask your question to the entire session.
In addition to raising your hand, you can choose to step away or applaud by choosing an option from the Raise Hand dropdown menu.
Take the Floor
In a Meeting Room session and some Training Room activities, you may have the ability to take the floor at any time. Taking the floor means that you will be driving the experience of all participants which includes the ability to share your desktop or applications, open and navigate in Powerboard files, browse web sites, display video or play audio links, or pose questions to the other attendees. In order to take the floor, simply click the Take Floor icon . As the new floor holder, you can activate and use any feature of the session, including launching Content from the Content tab, opening a synchronized browser window, posing a Polling question or passing the floor to other participants. When you are finished as floor holder, you can pass the floor to someone else or wait for the next person to take the floor.
Display Settings
Throughout your session, you may want to adjust the display settings for how you or your attendees view content. You can access the display settings by clicking the arrow next to the Display icon . Attendees can choose to view the content Full Screen or Zoom to various settings.
View the Green Meter
When you join an NHWC session, a savings amount is generated for you. Those savings are then added together to obtain the CO2 and Travel savings amounts for the session. While you are in NHWC,
you can quickly view that session’s savings and get a look at where the attendees are located (based on Public IP Address).
Figure 17: My Controls Panel To Open the Green Meter
1. In the My Controls panel, locate the NHWC Green Meter button . 2. To open the Green Meter for yourself, simply click the button.
To Close the Green Meter
1. Click the Close x to close the Green Meter.
2. The floor holder is then prompted to Close Mine or Cancel the close.
Viewing the Floor Holder
In addition to being able to control the broadcasting of your own video image, you can also determine if you want to see other videos being broadcast by your floor holder or other session attendees. In the Floor Holder panel, you can turn on or off their video with the click of the camera icon.
Figure 18: Attendees Panel with Floor Holder video
Viewing Attendees
As a participant in a session, you may have the opportunity to see the other participants that have joined. The Attendee panel provides a list of all attendees, including the Leader and any Assistants, as well as Participants of the session. The Leader and Assistants are highlighted with a specific
icon,specific so you can quickly see the makeup of your session.
• Leader Icon:
• Assistant Icon:
If you undock the Attendee panel, you may be able to view video being broadcast by other attendees. Click the undock icon and a field of pictures opens above the Tab area showing all attendees. If any attendees are broadcasting video, you can click their camera icon to turn on their video. Click the camera again to turn it off.
Responding to Feedback Questions
Feedback is a polling application that a session leader can use to solicit feedback from participants. When a question is asked, either verbally or in Chat, you may select an answer in the Feedback area.
Figure 19: Feedback Panel
When participants have shared their response, the leader can then share out the answers using either a pie chart (pictured) or a bar graph.
Communicating Through Chat
Chat is an instant messaging tool for quick and easy text discussions. Depending on the setup of your session, you may be able to chat with the leader, assistant(s) or other participants in the session. Clicking the Private tab will provide you a list of those attendees with which you can directly chat.
Figure 20: Chat Panel Sending a Private Message
You can send a private message to the session leader(s) and assistant(s), or to designated
participants by selecting the user’s name from the Private tab. If you want to send to a selected group of users, choose them from the same list. Your available groups may include: Leaders, Assistants, Leaders and Assistants, Floor Holder, or Everyone.
Figure 21: Private Chat list Receiving a Private Message
If someone sends you a private chat, you will see a tab open with the attendee’s name. You can maintain multiple private chats along with the public chat.
Figure 22: Receiving a Private Chat Changing the Chat Font Size
By default, your chat text displays in a small font size. To show text in a larger font select the Menu button on the Chat panel or from the main menu choose Session > Chat > Font Size, and select Small, Medium or Large.
Saving the Chat Transcript
During your session, you and other attendees may discuss items for which you would like to save the transcript for future use. Be sure to save your chat before you leave the session. To save the chat, simply click the File menu item, click Save and then choose Chat. Using your computer navigation, select an appropriate place on either your local machine or any network drives to which you may have access. If you use the private chat functionality described above, you will be prompted to save each private chat upon closing that tab.
Using Emoticons
Chat supports the use of many popular emotion icons (emoticons) when communicating with other session attendees. Typing certain sets of letters and/or characters will replace the text with a graphic image when it is sent to all other attendees. Examples of emoticons you can use with Chat are listed in the table below.
Emoticon Key Strokes
smile :) or :-) wink ;) or ;-) laugh :d or :-d sad :( or :-( straight face :| or :-| surprise :o or :-o cool (cool), 8), 8-), B), B-)
Viewing Session Content
Types of Content
An NHWC session may have content that appears “in session,” on a user’s home page, and/or on the Public Sessions page.
• In-session content appears on the Content tab in a session. In-session content can also be
set to automatically launch when participants join a session.
• Content on the home page or Public Sessions page is available from a Content button on the
More Info window.
In-session content includes files such as PowerPoint presentations, video clips, URLs, Powerboard files, and NHWC recordings. Session content on the homepage can include Word documents, Excel
spreadsheets, and Flash Movies.
Launching Content
Leader-Launched ContentWhen the session leader double-clicks a content item in a session, the item launches for all
participants. The appropriate NHWC session application opens a new tab for each participant in which to launch the content (i.e., Sharing, Powerboard, WebSync, Polling, or Media Link). Refer to the next section, “Using Session Tools” for a description of each session application that is available in a session.
Participant-Launched Content
Participants can also launch content when they have the floor. To determine who has the floor, check the Floor Holder panel on the Tool Panel. When you have the floor, your image will appear as the floor holder image.
The session leader may pass the floor to a participant when that participant needs to launch content or run an NHWC application or, if available, anyone may take the floor at anytime. There are three ways to pass the floor to another attendee. The three ways are:
1. Attendee can click the Take Floor icon in the My Controls panel, when enabled 2. Leader or Assistant can double-click the user’s name in the attendee panel
3. Leader or Assistant can select the user from the attendees panel and from the Session Æ
Attendees menu, choose the Give Floor to Selected item.
4. Leader or Assistant can right-click the attendee and choose “Give Floor”.
Using Session Tools
NHWC includes a full set of flexible, easy-to-use session tools that participants and session leaders can use to present content and collaborate during a session. Each tool is described in the following
sections.
Powerboard
What is it?Powerboard is a powerful presentation and white boarding tool that the session leader or floor holder can use to easily present PowerPoint presentations. Powerboard also contains markup tools that can be used to highlight or draw on the slide, without changing the original material. Powerboard can also be launched as your own workspace. Powerboard files can be saved for use outside of an NHWC session.
How is it launched?
If this feature has been enabled for you, click the Powerboard icon in the icon bar located to the right of the Tabs.
Figure 23: Powerboard Tab
Synchronized Web Browser
What is it?The Synchronized Web Browser allows the current floor holder (usually the session leader) to drive the entire group to any web-based content.
How is it launched?
If the feature has been enabled for you, click the Synchronized Web Browser icon in the icon bar located to the right of the Tabs.
Do we need to add information on the role of an assistant within Powerboard and the Synchronized Web Browser within this document?
Figure 24: Synchronized Web Browser Tab
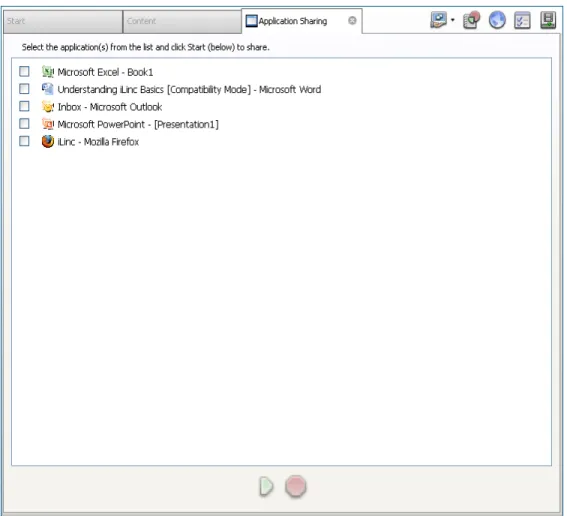
Sharing
What is it?Sharing enables the floor holder to share any file or application running on their PC during a session. The person sharing the application can pass the floor to another participant and the new floor holder can control the software, without needing the application installed on their machine. Sharing also includes mark-up tools for highlighting the shared application or desktop.
How is it launched?
If you are the floor holder, click the icon’s drop down arrow and select the Sharing type: Desktop, Region or Application. Sharing includes controls to pause, resume, stop or markup the shared item.
Figure 25: Sharing Controls
Desktop: Immediately share out your entire desktop area to all attendees. Any window currently open underneath the NHWC application will display, including e-mail or instant messaging clients. Region: Define a portion of your desktop to share to all attendees. A blue-outlined box will appear on your desktop and any portion of your desktop contained within the blue outline will be shared with attendees. You can move or adjust the size of this box at any time to change the shared portion of your desktop. Click the Start Sharing button on the Sharing Controls Panel to begin sharing this region.
Application: Display a list of current open (including minimized) applications on your computer. You can select one or more applications by selecting the check box next to the name of the item. When you have selected the item(s), click the Start Sharing button at the bottom to display these to your attendees.
Figure 26: Application Sharing Tab
Streaming Audio/Video
What is it?The streaming tool provides synchronized streaming of video or audio clips compatible with Windows Media Player to all participants.
How is it launched?
If this feature is enabled for you, click the MediaLink icon in the icon bar located to the right of the Tabs. Enter the URL for the clip and click the Go Icon.
Figure 27: Streaming Audio or Video Tab
Polling
What is it?Polling, NHWC’s question and answer application, is a powerful communication tool that can be used to gather information from participants. When a question file is presented during a session by the session leader or current floor holder, you will see the Polling Tab. When the leader or floor holder asks a question, you will see the question and answer selections.
Select an answer for the question. If you need to change your answer, simply select another answer. After gathering all the answers, the leader or floor holder may also choose to share answer statistics. When the leader or floor holder is finished gathering results, they may withdraw the question which will remove it from your Polling Tab.
How is it launched?
If this feature is available to you, click the Polling icon in the icon bar located to the right of the tabs.
Figure 28: Polling tab
Working in Breakout Groups
What Is a Breakout Group?A breakout group is a meeting room to which the session leader sends a group of participants to work collaboratively for a set period of time. In the breakout group, you can do anything you can do in the main session, including sharing content, applications, whiteboard files, and web navigation. You can also poll fellow participants using Feedback or introduce Polling questions to the group. When the breakout group time limit elapses, you and all participants in your group automatically return to the main session where you can share your group work with the rest of the session participants.
Working with Your Group
When you are added to a group by your leader, your Attendee panel will update and display only the other participants that are in your group. You can then chat with them or, if your session is set up with Internet Audio (VoIP) audio, you will be able to talk with your group members. If specific content items are assigned to your group, you can view the list and launch any item from the Content tab. Time Limits for Breakout Groups
Your leader may set a restricted time limit for the group breakout. If a time limit is used, you will be returned back to the full session with all participants automatically. Your session will then proceed with the leader or floor holder continuing the presentation or discussion.
Figure 29: Breakout Group Panel
To view the time left in the group, look to the timer in the Breakout panel. To leave the group before the time has run out, click the exit icon. You will be returned to the main session.
Understanding Floor Control in a Breakout Group
In a Breakout Group, each attendee is given equal control over the session. Participants can take or pass the floor at any time to gain control of audio and session content. To take the floor, simply click the icon in the My Controls panel or double-click your name in the Attendee panel.
To avoid interrupting each other, you may want to click the Raise Hand icon to indicate that you would like to take the floor. The current floor holder can then wrap up whatever he or she is doing before you take the floor. If groups use the raised hand approach, the floor holder can click the participant's name and then click the Give Floor icon to pass the floor, or just wait until the hand raiser takes the floor.
When participants have the floor, they can control any applications or content in use. They can also open new applications or content.
Leaving a Session
When you are ready to leave or exit the NHWC client, select File > Exit, at the top of the NHWC Tool Panel. Additionally, you can click the x in the upper most right corner of the application window. You will be prompted to confirm your desire to leave the meeting or session.
Delivering NHWC Sessions
This User Guide is designed for NHWC session leaders. It provides all the information you will need to set up and lead your session.
This User Guide will provide information on the tools in the Manage section of the menu on the Log In page of the NHWC Communications Center.
In this section:
• Chapter 4: Preparing for Your Session
• Chapter 5: Leading a Session
• Chapter 6: Internet Audio and Video
• Chapter 7: Assisting the Session Leader
• Chapter 8: Asking Multiple Choice Questions with Polling
• Chapter 9: Gathering Information with TestLinc and Surveys
• Chapter 10: Presenting and Collaborating with Powerboard
• Chapter 11: Sharing Application or Desktop
• Chapter 12: Presenting with WebSync
• Chapter 13: Playing Audio or Video Files
Preparing for Your Session
In this chapter:
• Understanding Understanding NHWC
• How Sessions Work
• Using Your Communications Center
• Finding Your Session
• Scheduling Your Session
• Adding Content to Your Session
• Inviting Participants
• Configuring the Session Room
• Testing Your Session
As a session leader, you may be bringing people together for a Meeting Room session, teaching a Training Room class, presenting in a Conference Room, or providing technical support in a Remote Support room. Even though the session type may differ, as a leader you need to be familiar with the process for scheduling your session and the different considerations you should make before leading your first session. This chapter will get you started.
Understanding NHWC
The Basics
If you are unfamiliar with NHWC, it may help to review the Participant User Guide, which provides general information about NHWC, including a description of the session Tool Panels, details on available session tools, and information on how to join and collaborate in a session.
Authority Levels and Roles
Authority Levels and session roles determine what tasks a user can perform in the NHWC
Communications Center. Your system administrator assigns Authority Levels when setting up a new user in NHWC.
Authority Levels
When your system administrator sets up a new person the Authority Level of “Standard User” is assigned. Any combination of the following default Authority Levels can also be assigned.
Authority Level What the User Can Do
Standard User Edit profile information and password, upload a user picture, join and lead classes, meetings, conferences, and support rooms User Administrator Add and edit users
Meeting Room Administrator Add and edit meetings
Training Room Administrator Add and edit Training Room activities Conference Room Administrator Add and edit Conference Room sessions Remote Support Administrator Add and edit Remote Support rooms TestLinc Administrator Add and edit TestLinc templates Survey Administrator Add and edit Survey templates
Site Administrator Customize the Communications Center
Communication Administrator Post announcements to the Communications Center Super Administrator Perform all functions without any restrictions
Note: Authority Levels can be added, deleted and modified to allow for detailed permissions and restrictions.
Session Roles
In a session, you are a “leader,” “assistant,” or a “participant.” When you are leading a session, the default authority levels allow you to perform the following tasks in the Communications Center for the session you are leading:
• Edit general information
• Add content
• Invite or un-invite participants
How Sessions Work
NHWC and Bandwidth Use
Bandwidth is a measure of the amount of data transmitted or received per unit of time, usually measured in seconds. Each user must have a certain amount of bandwidth available in his or her connection to the NHWC Server to participate in an NHWC session. The amount of bandwidth required depends on the type of activities taking place in the session and the type of conferencing that is in use. Refer to Appendix B, What Is Bandwidth?, for more information and a practical example.
NHWC Conferencing Options
Your organization may choose to add one of several conferencing options to your NHWC session rooms. The conferencing option chosen dictates how the leader and participants will communicate with each other during a session. Conference options include:
• Data Only
: When this option is selected,
sessions do not use Internet audioconferencing. These sessions can be supplemented with phone conferencing provided by NHWC or a third party. For more information on NHWC audio conferencing services, contact Mitel NetSolutions.
• Internet Audio (Voice over IP or VoIP): When this option is selected, you can use
speakers and a microphone, or a headset, to send live audio to your session. Session audio is two-way, so the session leader and the current floor holder can speak and the rest of the session participants can hear it.
• Video: When this option is selected, sessions use two-way video conferencing. This works
like VoIP, except that those participants with video cameras can transmit their video when they have the floor so that all participants can see them as they speak.
Using Your Communications Center
The Communications Center is a web site where all session management takes place. As a session leader, in the Communications Center you can:
• Add and edit session details
• Manage session content
• Administer participant registration
• View NHWC reports
Refer to Chapter 2, Using the NHWC Communications Center, for information on how to access your Communications Center and use it to perform basic user tasks, such as changing your password and adding a user picture.
Finding Your Session
All sessions that you are scheduled to lead are listed on your Communications Center home page. In some cases, a system administrator may schedule a session for you and all you will need to do is add content and invite participants. When this is the case, you will get started by finding your session on the home page. If you need to schedule a new session, refer to Scheduling your Session.
Scheduling Your Session.
1. Log in to your Communications Center. Your home page opens.
Figure 30: Communications Center Home Page
2. Find the name of the session that would like to launch of session. There are four types of sessions: Meeting Room , Training Room , Conference Room , or Remote Support . 3. Once you find your session, the following table outlines where to find information in this User
Guide, depending on what you want to do.
For information on ... Go to ...
joining and leading a session Leading a Session
adding content to your session Adding Content to Your Session inviting participants to your session Inviting Participants
Scheduling Your Session
If you are assigned an Authority Level that allows you to do so, you can schedule your own sessions from your Communications Center home page.
There are two ways to schedule a session:
1. Schedule a Standard Session: Use this method if you want to configure the details of the
session and send invitation e-mails. This gives you complete control over the session and attendees.
2. Schedule an Instant Session: Use this method if you want to create and join a meeting
on-the-fly. With minimal data input, the session is created and posted on the NHWC Instant Sessions page. The session is created with defaults preset by your system administrator. To Schedule a Standard Session
1. Log in to your Communications Center. Your home page opens.
2. Click the Add New Session button and find the session type (i.e., Meeting Room meeting, Training Room class activity, Conference Room webinar, and Remote Support room) that corresponds to the type of session that you would like to add.
Figure 31: Communications Center Home Page The Add New Session page opens.
Note: The available session types depend on the licensing options your organization has chosen.
3. Enter the required information for your session. The required information changes slightly depending on the type of session you are adding.
4. When you are finished adding your session information, click Submit. If you need to invite participants, refer to Inviting Participants for more information.
Generally, for each session required information includes:
Field Name Enter/Select
Owner Click Replace to search for and select a new session owner. By default, the person scheduling the session is added as the owner.
Title Type a title to appear on the home page and in the session emails.
Description Type information that will be revealed when a participant clicks the Description link next to the session on the home page.
Leader Click Replace to search for and select a new session leader. By default, the person scheduling the session is added as the leader.
Schedule Select the dates and times during which participants can join the session. You can also select a Time Zone for you session, if you would like invitations and scheduling information based on a time zone that is different than the site time zone. User time zones will be used over the session time zone.
Attendees Select participants, specify assistants, and compose e-mails that can contain a Join link that is automatically sent to invite users.
E-mail Compose invitation, reminder, follow-up e-mail, and specify to whom and when they should be sent.
Communication
Type Select the way you would like to communicate in the session. Content Add supporting content for your session. This can include items such as PowerPoint presentations, video clips, website URLs, NHWC recordings, etc. Items can be added so that they are only available in a session or so that they are available in the Communications Center as well. Refer to Adding Content to Your Session for more information.
Copy Permissions Specify who is allowed to make copies of your session. To Create and Join an Instant Session
1. Log in to your NHWC Communications Center.
2. On your home page, click the Instant Sessions link on the Navigation frame. The Add Instant Session page opens.
Figure 32: Add Instant Session 3. Select the type of session you would like to create.
4. Type a session title and, to password protect the session, type and verify a password. 5. Click Submit. You automatically join the new session and the session is listed on the Instant
Sessions page for other users.
6. Give the Communications Center URL and the session title to the people you want to attend the session. Anyone who has this information (and the password if you set one) can join the session. See the next section for adding content to a session.
Adding Content to Your Session
You can add supporting content to your session that will be available during the session, in the Communications Center on the participant home pages, on the Public page and/or in e-mails. Content can be added before the session begins or on-the-fly during the session. You can also reorder, delete, and hide content. Each task is described in the sections that follow.
To Add Content before the Session Begins
1. Log in to your Communications Center. Your home page opens.
2. Find the session to which you would like to add content, and click the Edit button for the session.
3. On the Edit [session type] page, go to the Content section.
Figure 33: Upload Content
4. For new content, select the type of content you would like to add from the drop-down list. Content type of File cannot be added as “in session.”
a. Click Add. The Add Content window opens. The required information (described the in tables below) differs depending on the type of content you are adding. Skip to Step 8. 5. For existing content, click Libraries. The Libraries window opens.
6. Select one or more content items.
7. Specify if the item(s) should be available In Session, on the Home page, on the Public page, and/or in the e-mails. Note: The availability options differ depending on the type of content you are adding.
8. Click Next to specify a title and description specific to this session or go to Step 9. 9. Click Save. The content appears in the content list on the Edit [session type] page. Add Content Information
Field Name Enter/Select
Title Type a title for the content item. This will appear on the View Materials page that participant’s access when they click the Materials link for the session on their home page.
Description Type a description of the content. Users can access this information on the View Materials page.
File (must be a .zip file) Click Browse and find and select the .zip file you want to upload. Click Open to bring the file name and path into File field.
Also Available as a Material
Item Select this option if you want the item also added to the session Materials list. Note: This option is only available when adding an Agenda item. Hide Agenda Item from
Participants
Select this option to have the item not display on the Agenda for participants. The leader and assistants will still see the item. Note: This option is only available when adding an Agenda item. Allow this item to be
available from the Public Sessions page
Select this option if you want the item also added to the Public Sessions page.
available from the E-mail
link the e-mail invite sent to your participants.
To Add Content On-the-Fly
You can also add content on-the-fly during your session. Refer to the Adding Content On-the-Fly section of Chapter 5, Leading a Session for information.
To Delete Content
1. On the Edit [session type] page, select the content items you would like to delete. 2. Click Remove.
To Hide Content from Participants
You can add content to the session but set it so that it does not appear in participants’ Content windows. You and your assistants will still be able to see and launch the Content item.
1. To hide a content item, click the Edit link for that item and select the check box: Hide from participants.
2. Click Submit. The file is hidden from participants on the View Materials page, but is still available for use during the session.
Figure 34: Edit Content page - Hide Content Inviting Participants
You can invite participants to sessions using an invitation e-mail. How you invite participants differs depending on the session type:
Session Type How to Invite Attendees
All Sessions Send a Quick Invitation e-mail from your home page. This will generate a blank e-mail that contains a join link. See To Send Quick Invites below OR
You can direct participants to the Public Sessions page, where they can join or register for sessions. After they register, an e-mail invitation is automatically sent. See
To Use the Public Sessions Page below. Training Room, Meeting
Room, Conference Room
Send a system-generated invitation e-mail from the Add New [session type] or Edit [session type] page. Refer to Chapter 16, Scheduling Sessions in NHWC, for more information.
To Send Quick Invites
1. Log in to your Communications Center. Your home page opens.
2. Find the session to which you would like to invite participants and click the Invite Button link located in the ACTIONS column.
Figure 35: Session Invite The Send Invite page opens.
Figure 36: Send Invite
3. There are three options for sending an invite. In the appropriate section, click one of the following links. Then proceed to Step 5.
Send Options
If you want to ... Then ...
send a Join Link to a user so they can join your session without being registered for the session
refer to the Join Link section
send a Registration Link, which will register the user and allow them to join the session (session appears on participant’s home page)
refer to the Registration Link section
Note: Does not apply to Remote Support.
send the system-generated invitation email Enter the users contact information in the Send Invitation E-mail section and go to Step 5
Note: Does not apply to Remote Support.
Link Options
Click Select it to ...
E-mail Link Create an e-mail containing nothing but a Join link that participants can click to join the class. You will need to add the e-mail address of the participants you want to invite and any explanatory text.