Linux 1.0.14 Implementation
Guide
Chapter 1
Introducing Symantec AntiVirus for Linux
... 7About Symantec Antivirus for Linux ... 7
About this document ... 8
Chapter 2
Installing Symantec AntiVirus for Linux
... 9System requirements for Symantec AntiVirus for Linux ... 9
Supported distributions and kernel versions ... 10
Unsupported kernel versions ... 14
Installation scenarios for installation client packages ... 14
Client installation packages for Symantec AntiVirus for Linux ... 16
Installation package folders for Symantec AntiVirus for Linux ... 17
Installing Symantec AntiVirus for Linux locally ... 18
Installing Symantec AntiVirus for Linux from a remote server ... 18
Repackaging the Symantec AntiVirus for Linux client installation package ... 19
Uninstalling Symantec AntiVirus for Linux ... 20
Listing all Symantec AntiVirus packages ... 20
About removing Symantec AntiVirus completely ... 20
Chapter 3
Using Symantec AntiVirus for Linux
... 23When to use the command-line interfaces, services, and tools ... 23
About the sav command-line interface ... 25
About the sav command-line syntax ... 26
Using the sav CLI to interact with Symantec AntiVirus ... 33
Enabling and disabling Auto-Protect ... 33
Using Java LiveUpdate ... 34
Starting and stopping manual scans ... 35
Creating and managing scheduled scans ... 36
Managing the local Quarantine ... 38
Managing virus definitions ... 39
Displaying product information ... 40
About the symcfg command-line syntax ... 41
Using the symcfg CLI to interact with the Symantec AntiVirus configuration database ... 43
Listing the keys in the database ... 43
Adding a key to the database ... 43
Deleting a key from the database ... 44
About the symcfgd service ... 44
symcfgd service configuration parameters ... 45
About the symcfgd files ... 46
Using the symcfgd service parameters ... 46
Verifying that the symcfgd service is running ... 47
Stopping and starting the symcfgd service ... 47
Specifying the log facility to use and filtering log messages based on severity ... 47
About customizing symcfgd ... 48
About the rtvscand service ... 48
About the rtvscand service configuration parameters ... 48
About the rtvscand files ... 50
Using the rtvscand service parameters ... 50
Verifying that the rtvscand service is running ... 51
Stopping the rtvscand service ... 51
Starting the rtvscand service ... 51
Specifying the log facility to use and filtering log messages based on severity ... 52
About customizing the rtvscand service ... 52
About the savtray program ... 52
About savtray command-line syntax ... 53
About savtray parameters ... 53
About event notifications ... 54
Chapter 4
Updating virus definitions on Linux
... 57About updating virus definitions on Linux ... 57
About the LiveUpdate Administration utility ... 58
About LuAdmin files ... 59
About Java LiveUpdate ... 59
About the Java LiveUpdate configuration file ... 60
Sample liveupdate.conf file ... 62
About configuring proxy settings in Java LiveUpdate ... 63
Configuring Java LiveUpdate to use a Central LiveUpdate server ... 63
Wrapping aliveupdate.conffile in an rpm package ... 64
Enabling Java LiveUpdate logging on Linux servers ... 65
Configuring startup options ... 66 Contents
Updating definitions by using Intelligent Updater ... 68
Downloading and running the Intelligent Updater script ... 69
Chapter 5
Configuring Symantec AntiVirus for Linux
... 71About configuring Linux clients using aGRC.DATfile ... 71
About the Configuration Editor tool ... 72
Opening the Configuration Editor ... 72
Creating a configuration file ... 73
Modifying an existing configuration file ... 73
Returning settings to their default configuration ... 74
About the settings in theGRC.DATfile ... 74
About file extension exclusions ... 78
DeployingGRC.DATfiles to Linux client computers ... 79
Wrapping aGRC.DATfile in an rpm package ... 80
Copying aGRC.DATfile ... 80
Chapter 6
Using the Symantec AntiVirus for Linux
Reporter
... 83About the Symantec AntiVirus for Linux Reporter ... 83
Installing the Symantec AntiVirus for Linux Reporter ... 84
Configuring the Symantec AntiVirus for Linux Reporter ... 85
Man pages for the Symantec AntiVirus for Linux Reporter ... 86
Known issues for the Symantec AntiVirus for Linux Reporter ... 86
Appendix A
Troubleshooting and error messages
... 89Summary of material from MR1 to MR14 ... 90
Files in the/etc/symantecdirectory are not removed when you uninstall Symantec AntiVirus ... 90
Default logging level of daemons has been changed fromdebugto info... 90
Gjc interferes with Java LiveUpdate ... 91
Java Cryptography Extensions ... 91
HTTP port 80 should be opened for Java LiveUpdate (e.g., ESX3.5) ... 91
New SAV command line options ... 91
Registry key root change ... 92
Customized installation path support for rpm packages ... 92
Debian and Ubuntu users should usesudo... 92
You must install the i686-based dependent packages on the 64-bit computers that run Debian or Ubuntu Linux before you install
SAV for Linux ... 92
Auto Protect is not enabled on remote disk partitions by default ... 93
The Auto-Protect kernel modules source has been partially opened ... 93
Symantec AntiVirus for Linux Implementation Guide -- change in LiveUpdate behavior ... 93
Symantec AntiVirus for Linux installation by GUI rpm manager may display a warning message ... 93
Auto-Protect is not supported for use on SUSE Linux Enterprise Server 11 (x86_64) with the kernel version 2.6.27.19-5 ... 94
Error messages may appear after you install the SAVUI installation package ... 94
English date format appears in the user interface if the Yet another Setup Tool (YaST) installation program is used to install Symantec AntiVirus for Linux on computers that run non-English language operating systems ... 94
You must install the i686-based dependent packages on 64-bit computers that run Fedora, RedHat ES 6.x Linux or Oracle Linux before you install Symantec AntiVirus for Linux ... 95
Unity Panel Icon missing in Ubuntu 11.x (and later) desktop ... 95
rpm -Udoes not work for upgrading the savjlu package ... 96
Index
... 97 ContentsIntroducing Symantec
AntiVirus for Linux
This chapter includes the following topics: ■ About Symantec Antivirus for Linux
■ About this document
About Symantec Antivirus for Linux
Symantec AntiVirus for Linux includes real-time antivirus file protection through Auto-Protect scanning, and file system scanning through manual and scheduled scans. You can schedule periodic definitions file updates by using thesav command-line interface or by using the LiveUpdate Administration Utility and having your client computers retrieve the updates from a local server.
Note:Scanning for security risks is not enabled by default in Symantec AntiVirus for Linux, but may be enabled by using theGRC.DATfile. If enabled, security risks can be detected and logged, but Symantec AntiVirus cannot take any actions on them.
Symantec AntiVirus supports Linux client distribution with the RPM Package Manager tools and configuration updates withGRC.DATfiles.
On Linux distributions, Auto-Protect protects the files that are located on the following types of media:
■ Hard drives
■ Removable media, such as DVD drives ■ Network file servers
1
Chapter
All events that are generated are logged to the standard system log through syslog. See“About the settings in theGRC.DATfile”on page 74.
About this document
To use this guide effectively, you should already understand the following information:
■ The basics of how to administer Linux computers, including tasks such as setting your PATH and environment variables.
■ How to use the RPM Package Manager application.
■ How to download and install the Java Runtime Environment (JRE) on your computers, if it is not already installed.
■ If you want to use the client user interface, how to download and install X11, as well as a KDE or Gnome desktop environment, if this software is not already installed.
See“System requirements for Symantec AntiVirus for Linux”on page 9. Introducing Symantec AntiVirus for Linux
About this document 8
Installing Symantec
AntiVirus for Linux
This chapter includes the following topics:
■ System requirements for Symantec AntiVirus for Linux
■ Installing Symantec AntiVirus for Linux locally
■ Installing Symantec AntiVirus for Linux from a remote server
■ Repackaging the Symantec AntiVirus for Linux client installation package
■ Uninstalling Symantec AntiVirus for Linux
System requirements for Symantec AntiVirus for
Linux
Symantec AntiVirus requires specific kernels, software, and hardware to run on the Linux operating system. All requirements for Symantec AntiVirus components are designed to work with the hardware and the software recommendations for the supported computers. All Linux computers on which you install Symantec AntiVirus should meet or exceed the recommended system requirements for the operating system.
2
Chapter
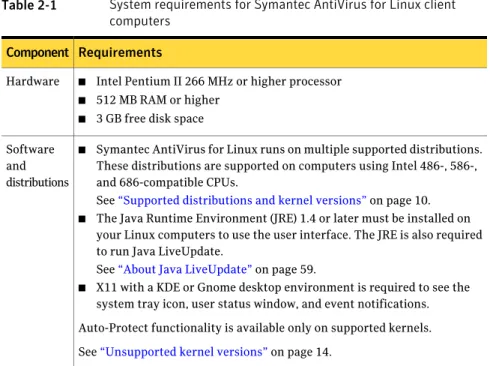
Table 2-1 System requirements for Symantec AntiVirus for Linux client computers
Requirements Component
■ Intel Pentium II 266 MHz or higher processor
■ 512 MB RAM or higher
■ 3 GB free disk space Hardware
■ Symantec AntiVirus for Linux runs on multiple supported distributions. These distributions are supported on computers using Intel 486-, 586-, and 686-compatible CPUs.
See“Supported distributions and kernel versions”on page 10.
■ The Java Runtime Environment (JRE) 1.4 or later must be installed on your Linux computers to use the user interface. The JRE is also required to run Java LiveUpdate.
See“About Java LiveUpdate”on page 59.
■ X11 with a KDE or Gnome desktop environment is required to see the system tray icon, user status window, and event notifications. Auto-Protect functionality is available only on supported kernels. See“Unsupported kernel versions”on page 14.
Software and distributions
See“Client installation packages for Symantec AntiVirus for Linux”on page 16. See“Installation package folders for Symantec AntiVirus for Linux”on page 17.
Supported distributions and kernel versions
The material in this section is up to date as of MR14, September 2012. For future information, see the System requirements for Symantec AntiVirus for Linux 1.0, at the following URL:
http://www.symantec.com/docs/TECH101598
and the Release notes for Symantec AntiVirus for Linux 1.0x at the following URL:
http://www.symantec.com/docs/TECH103599
Symantec AntiVirus for Linux 1.0.14 supports the following distributions: ■ Red Hat Enterprise Linux 5.7, kernel 2.6.18-274.18.1.el5
■ Red Hat Enterprise Linux 5.8, kernel 2.6.18-308.4.1.el5 ■ Red Hat Enterprise Linux 6.2, kernel 2.6.32-220.13.1.el6 ■ Red Hat Enterprise Linux 6.3, kernel 2.6.32-279.el6
■ Novell Open Enterprise Server/Linux 2 (OES2), kernel 2.6.16.60-0.83.2 Installing Symantec AntiVirus for Linux
System requirements for Symantec AntiVirus for Linux 10
■ Novell Open Enterprise Server/Linux 11 (OES11), kernel 2.6.32.59-0.3.1 ■ Novell Open Enterprise Server/Linux 11 SP1 (OES11SP1), kernel 3.0.26-0.7 ■ SuSE Linux Enterprise 10 with Service Pack 3, kernel 2.6.16.60-0.83.2 ■ SuSE Linux Enterprise 10 with Service Pack 4, kernel 2.6.16.60-0.93.1 ■ SuSE Linux Enterprise 11 with Service Pack 1, kernel 2.6.32.59-0.3.1 ■ SuSE Linux Enterprise 11 with Service Pack 2, kernel 3.0.26-0.7 [Note: SuSE
Linux Enterprise 10/11 includes both Server (SLES10/11) and Desktop (SLED10/11) versions.]
■ Ubuntu 11.10, kernel 3.0.0-19-generic, 3.0.0-19-server ■ Ubuntu 12.04, kernel 3.2.0-24-generic
■ Debian 60r5, kernel 2.6.32-5 ■ Fedora 16, kernel 3.4.2-1.fc16 ■ Fedora 17, kernel 3.4.4-3.fc17
■ Oracle Linux Server 5.8 2.6.32-300.27.1.el5uek, 2.6.18-308.4.1.0.1.el5 ■ Oracle Linux Server 6.2 2.6.39-200.24.1.el6uek
Specifically, the following kernel versions are supported (on i386/i686 architecture only):
■ Red Hat Enterprise Linux 5.7 default 2.6.18-274.18.1.el5 ■ Red Hat Enterprise Linux 5.7 PAE 2.6.18-274.18.1.el5PAE ■ Red Hat Enterprise Linux 5.7 Xen 2.6.18-274.18.1.el5xen ■ Red Hat Enterprise Linux 5.8 default 2.6.18-308.4.1.el5 ■ Red Hat Enterprise Linux 5.8 PAE 2.6.18-308.4.1.el5PAE ■ Red Hat Enterprise Linux 5.8 Xen 2.6.18-308.4.1.el5xen ■ Red Hat Enterprise Linux 6.2 default 2.6.32-220.13.1.el6 ■ Red Hat Enterprise Linux 6.3 default 2.6.32-279.el6 ■ SuSE Linux Enterprise 10.3 default 2.6.16.60-0.83.2-default ■ SuSE Linux Enterprise 10.3 smp 2.6.16.60-0.83.2-smp ■ SuSE Linux Enterprise 10.3 bigsmp 2.6.16.60-0.83.2-bigsmp ■ SuSE Linux Enterprise 10.4 default 2.6.16.60-0.93.1-default ■ SuSE Linux Enterprise 10.4 smp 2.6.16.60-0.93.1-smp ■ SuSE Linux Enterprise 10.4 bigsmp 2.6.16.60-0.93.1-bigsmp
■ SuSE Linux Desktop 10.3 default 2.6.16.60-0.83.2-default ■ SuSE Linux Desktop 10.3 smp 2.6.16.60-0.83.2-smp ■ SuSE Linux Desktop 10.3 bigsmp 2.6.16.60-0.83.2-bigsmp ■ SuSE Linux Desktop 10.4 default 2.6.16.60-0.93.1-default ■ SuSE Linux Desktop 10.4 smp 2.6.16.60-0.93.1-smp ■ SuSE Linux Desktop 10.4 bigsmp 2.6.16.60-0.93.1-bigsmp ■ SuSE Linux Enterprise 11.1 default 2.6.32.59-0.3.1-default ■ SuSE Linux Enterprise 11.1 pae 2.6.32.59-0.3.1-pae ■ SuSE Linux Enterprise 11.1 xen 2.6.32.59-0.3.1-xen ■ SuSE Linux Enterprise 11.2 default 3.0.26-0.7-default ■ SuSE Linux Enterprise 11.2 pae 3.0.26-0.7-pae ■ SuSE Linux Enterprise 11.2 xen 3.0.26-0.7-xen
■ SuSE Linux Desktop 11.1 default 2.6.32.59-0.3.1-default ■ SuSE Linux Desktop 11.1 pae 2.6.32.59-0.3.1-pae ■ SuSE Linux Desktop 11.1 xen 2.6.32.59-0.3.1-xen ■ SuSE Linux Desktop 11.2 default 3.0.26-0.7-default ■ SuSE Linux Desktop 11.2 pae 3.0.26-0.7-pae ■ SuSE Linux Desktop 11.2 xen 3.0.26-0.7-xen
■ Open Enterprise Server 2 sp2 default 2.6.16.60-0.83.2-default ■ Open Enterprise Server 2 sp2 smp 2.6.16.60-0.83.2-smp ■ Open Enterprise Server 2 sp2 bigsmp 2.6.16.60-0.83.2-bigsmp ■ Open Enterprise Server 2 sp3 default 2.6.16.60-0.83.2-default ■ Open Enterprise Server 2 sp3 smp 2.6.16.60-0.83.2-smp ■ Open Enterprise Server 2 sp3 bigsmp 2.6.16.60-0.83.2-bigsmp ■ Debian 60r5 default 2.6.32-5-686
■ Debian 60r5 bigmem 2.6.32-5-686-bigmem ■ Fedora 16 default 3.4.2-1.fc16.i686 ■ Fedora 16 PAE 3.4.2-1.fc16.i686.PAE ■ Fedora 17 default 3.4.4-3.fc17.i686 ■ Fedora 17 PAE 3.4.4-3.fc17.i686.PAE Installing Symantec AntiVirus for Linux
System requirements for Symantec AntiVirus for Linux 12
Additionally, the following kernel versions are supported on x86-64 (both EM64T/AMD64) architectures:
■ Red Hat Enterprise Linux 5.7 default 2.6.18-274.18.1.el5 ■ Red Hat Enterprise Linux 5.7 Xen 2.6.18-274.18.1.el5xen ■ Red Hat Enterprise Linux 5.8 default 2.6.18-308.4.1.el5 ■ Red Hat Enterprise Linux 5.8 Xen 2.6.18-308.4.1.el5xen ■ Red Hat Enterprise Linux 6.2 default 2.6.32-220.13.1.el6 ■ Red Hat Enterprise Linux 6.3 default 2.6.32-279.el6 ■ SuSE Linux Enterprise 10.3 default 2.6.16.60-0.83.2-default ■ SuSE Linux Enterprise 10.3 smp 2.6.16.60-0.83.2-smp ■ SuSE Linux Enterprise 10.4 default 2.6.16.60-0.93.1-default ■ SuSE Linux Enterprise 10.4 smp 2.6.16.60-0.93.1-smp ■ SuSE Linux Desktop 10.3 default 2.6.16.60-0.83.2-default ■ SuSE Linux Desktop 10.3 smp 2.6.16.60-0.83.2-smp ■ SuSE Linux Desktop 10.4 default 2.6.16.60-0.93.1-default ■ SuSE Linux Desktop 10.4 smp 2.6.16.60-0.93.1-smp ■ SuSE Linux Enterprise 11.1 default 2.6.32.46-0.3.1-default ■ SuSE Linux Enterprise 11.1 xen 2.6.32.46-0.3.1-xen ■ SuSE Linux Enterprise 11.2 default 3.0.13-0.27-default ■ SuSE Linux Enterprise 11.2 xen 3.0.13-0.27-xen ■ SuSE Linux Desktop 11.1 default 2.6.32.59-0.3.1-default ■ SuSE Linux Desktop 11.1 xen 2.6.32.59-0.3.1-xen ■ SuSE Linux Desktop 11.2 default 3.0.26-0.7-default ■ SuSE Linux Desktop 11.2 xen 3.0.26-0.7-xen
■ Open Enterprise Server 2 sp2 smp 2.6.16.60-0.83.2-smp ■ Open Enterprise Server 2 sp3 default 2.6.16.60-0.83.2-default ■ Open Enterprise Server 2 sp3 smp 2.6.16.60-0.83.2-smp ■ Open Enterprise Server 11 default 2.6.32.59-0.3.1-default ■ Open Enterprise Server 11 xen 2.6.32.59-0.3.1-xen ■ Open Enterprise Server 11 sp1 default 3.0.26-0.7-default
■ Open Enterprise Server 11 sP1 xen 3.0.26-0.7-xen ■ Debian 60r5 default 2.6.32-5-amd64
■ Fedora 16 default 3.4.2-1.fc16 ■ Fedora 17 default 3.4.4-3.fc17 ■ Ubuntu 11.10 generic 3.0.0-19 ■ Ubuntu 11.10 server 3.0.0-19 ■ Ubuntu 12.04 generic 3.2.0-24 ■ Ubuntu 12.04 generic 3.2.0-24
■ Oracle Linux Server release 5.8 u.K. 2.6.32-300.27.1 ■ Oracle Linux Server release 5.8 el5 2.6.18-308.4.1.0.1 ■ Oracle Linux Server release 6.2 uek 2.6.39-200.24.1
Running Symantec AntiVirus for Linux 1.0.14 on any other combination of distributions and kernel versions is not supported.
See“Unsupported kernel versions”on page 14.
See“Client installation packages for Symantec AntiVirus for Linux”on page 16.
Unsupported kernel versions
All the kernels that are listed in the SAVFL MR14 Legacy Kernels page of the Kernel_Checklist_MR14.xlsfile are no longer supported for maintenance in 1.0.14. This file appears as a table that is located at the following URL:
http://www.symantec.com/docs/TECH101598
If you want to real-time protection for one of these kernels, use the legacyrpm packages or thedebpackages that can be found in the\unsupportedfolder. See“Supported distributions and kernel versions”on page 10.
Installation scenarios for installation client packages
Based on your company’s environment and needs, you may not want to install all Symantec AntiVirus for Linux packages. This section describes some typical installation scenarios.
Installing Symantec AntiVirus for Linux
System requirements for Symantec AntiVirus for Linux 14
Table 2-2 Supported distributions with supported and unsupported kernels
Supported and unsupported feature Distribution type
You can install all files and use all the features, which include manual and scheduled scanning, Auto-Protect, the X11-based graphical user interface, and Java LiveUpdate. Your Linux computers must use supported Linux distributions and supported kernel versions, and have X11 and JRE 1.4 or later installed.
The files can be installed in any order, as long as the sav package is installed before the savui package. If you install all files at once, the files are automatically installed in the appropriate order.
Supported distribution and a supported kernel version
In this scenario, the Auto-Protect functionality is not available. You can still use the Symantec AntiVirus manual and scheduled scanning capabilities and Java LiveUpdate to protect the computer.
If you use an unsupported kernel version, Auto-Protect does not function. However, if you install the savap package on a computer and then later load a supported kernel, Auto-Protect does function.
You should install the following packages:
■ sav ■ savap Supported distribution, but an unsupported kernel version
In this scenario, you cannot use Java LiveUpdate to update definitions. You must use an alternative method.
You should install the following packages:
■ sav
■ savap Supported distribution
and a supported kernel version, but do not use Java
In this scenario, the Symantec AntiVirus user interface is not available on your Linux computers. You can use the sav command line tool to update definitions. You can use sav command line tool and the computer’s syslog to access status and alert messages. You should install the following packages:
■ sav
■ savap Supported distribution
and a supported kernel version, but do not use X11
In this scenario, you run a supported distribution and want a minimal footprint that provides only manual and scheduled scanning. You can do this whether you are running a supported or an unsupported version of the kernel.
You must use the sav command line tool and the computer’s syslog to access status and alert messages, and to update definitions without using Java LiveUpdate.
You should install only the base sav package. Supported
distribution, but have a minimum amount of computing resources
See“Unsupported kernel versions”on page 14.
See“Installation package folders for Symantec AntiVirus for Linux”on page 17. See“About Java LiveUpdate”on page 59.
Client installation packages for Symantec AntiVirus for Linux
Symantec AntiVirus uses the rpm Package Manager format for installation. Symantec AntiVirus consists of several installation files, which use the following name format:
<package name>-<major version>.<minor version>.<crt release>-<build number>.<architecture>.rpm
For example, a typical file name might be sav-1.0.0-94.i386.rpm. Table 2-3 Symantec AntiVirus for Linux client installation packages
Description Dependencies
Package
The main Symantec AntiVirus program, which implements scanning capabilities.
None sav
(mandatory)
Symantec AntiVirus Auto-Protect features. Only specific kernel versions are supported.
Note:If you use an unsupported kernel version, Auto-Protect does not function. However, if you install the savap package on a computer and then later load a supported kernel, Auto-Protect does function.
See“Supported distributions and kernel versions”on page 10. kernel version
savap (optional)
The Symantec AntiVirus graphical user interface. X11 must already be installed. sav
X11
JRE 1.4 or later savui
(optional)
The Java LiveUpdate features. If this package is not installed, alternative methods must be used to update definitions.
See“About updating virus definitions on Linux”on page 57. See“About Java LiveUpdate”on page 59.
sav
JRE 1.4 or later savjlu
(optional)
See“Installation package folders for Symantec AntiVirus for Linux”on page 17. Installing Symantec AntiVirus for Linux
System requirements for Symantec AntiVirus for Linux 16
Installation package folders for Symantec AntiVirus for Linux
Table 2-4lists the different installation package folders for Symantec AntiVirus for Linux.
Table 2-4 Client installation package folders
Package contents and notes Package folder
/deb/contains the deb packages for both Debian distributions and Ubuntu distributions. Make sure that the user is in thesudo-erslist.
For Debian or Ubuntu 32bit architectures, execute'sudo dpkg -i sav-*.i386.deb savap-*.i386.deb savjlu-*.i386.deb savui-*.i386.deb.
For Debian or Ubuntu 64bit architectures, executesudo dpkg -i sav-*.amd64.deb savap-*.amd64.deb savjlu-*.amd64.deb savui-*.amd64.deb.
/deb/
/rpm/contains the rpm packages for most of the Linux distributions that support the Red Hat Package Manager.
For i386/i686 32bit architectures, executerpm -I sav-*.i386.rpm savap-*.i386.rpm savjlu-*.i386.rpm savui-*.i386.rpm.
For x86-64 EM64T/AMD64 architectures, execute'rpm -I sav-*.i386.rpm savap-x64-*.x86_64.rpm savjlu-*.i386.rpm savui-*.i386.rpm. /rpm/
/unsupported/contains the legacy rpm and deb packages that new fixes no longer support, starting with 1.0.14.
For the legacy kernels on i386/i686 32bit architectures, type the following command:rpm -I ../rpm/sav-*.i386.rpm savap-legacy-*.i386.rpm ../rpm/savjlu-*.i386.rpm ../rpm/savui-*.i386.rpm.
For the legacy kernels on x86-64 EM64T/AMD64 architectures, type the following command:
rpm -I ../rpm/sav-*.i386.rpm savap-x64-legacy-*.x86_64.rpm ../rpm/savjlu-*.i386.rpm ../rpm/savui-*.i386.rpm.
For the legacy kernels on i386/i686 32bit architectures for Debian or Ubuntu, type the following command:sudo dpkg -i ../deb/sav-*.i386.deb savap-legacy-*.i386.deb ../deb/savjlu-*.i386.deb ../deb/savui-*.i386.deb.
For the legacy kernels on x86-64 EM64T/AMD64 architectures for Debian, type the following command:sudo dpkg -i ../deb/sav-*.amd64.deb savap-x64-legacy-*.amd64.deb ../deb/savjlu-*.amd64.deb ../deb/savui-*.amd64.deb.
/unsupported/
You can use a customized installation path for rpm packages only. To customize the path, ensure that all rpm packages use the same path, as follows:rpm -I --prefix <custom path> sav*.rpm. If the installation displays the message "Relocation not supported for this configuration, please use --prefix
<foldername>," then the <foldername> should be used as the --prefix value, as this indicates that there are other Symantec applications on the machine using that value. Alternatively, if there are no other Symantec products on the machine, modify theBaseDirvalue to the desired custom path, and then rerun the installation.
See“Supported distributions and kernel versions”on page 10. See“Unsupported kernel versions”on page 14.
See“Client installation packages for Symantec AntiVirus for Linux”on page 16.
Installing Symantec AntiVirus for Linux locally
The installation of Symantec AntiVirus for Linux is silent. You can use the rpm command-line parameter,-Uhv, to display the current percentage of the installation that is complete. You do not need to restart the Linux client after installation.
Therpm -Ucommand-line argument can be used to perform an initial installation
or to update an existing installation of Symantec AntiVirus for Linux. Although you can also use therpm -Icommand to install, Symantec recommends that you
use-U. The-Icommand results in an error if a previous version of Symantec AntiVirus for Linux is already present.
You can install the packages separately or all at once, using wildcard characters, and they install in the correct order.
To install each file separately
◆ On the command line, type the following command:
rpm –Uhv <file_name>.rpm
See“System requirements for Symantec AntiVirus for Linux”on page 9. See“Installing Symantec AntiVirus for Linux from a remote server”on page 18.
Installing Symantec AntiVirus for Linux from a remote
server
With rpm, you can install packages for the first time from a remote FTP or HTTP server. To do this, you need to supply the name of the remote server on the command line. You can install from an HTTP server by replacing FTP in the following examples with HTTP, and replacing the <someserver.com> with an HTTP server instead of an FTP server.
Installing Symantec AntiVirus for Linux Installing Symantec AntiVirus for Linux locally 18
To install Symantec AntiVirus for Linux from a remote server ◆ On the command line, type the following command:
rpm –I ftp://<someserver.com/someshare/file name>.rpm
If you need to use login credentials for the remote server, type the following command:
rpm –I ftp://<user name:[email protected]/someshare/file name>.rpm
See“System requirements for Symantec AntiVirus for Linux”on page 9. See“Installing Symantec AntiVirus for Linux locally”on page 18. See“Uninstalling Symantec AntiVirus for Linux”on page 20.
Repackaging the Symantec AntiVirus for Linux client
installation package
Therepackage.shscript file is provided so that you do not have to manually edit the configuration file. This script repackages the client installation package to contain your custom configurations for distribution to clients.
To repackage the Symantec AntiVirus for Linux client installation package
1
Install the related utilities for repacking: ■ GNU core utilities■ VI (or VIM) editor ■ sed
■ grep ■ which
■ cpio(only needed for rpm package) ■ rpm2cpio(only needed for rpm package) ■ rpmbuild(only needed for rpm package) ■ dpkg-deb(only needed for DEB package)
2
Run therepackage.shscript:Uninstalling Symantec AntiVirus for Linux
Uninstalling Symantec AntiVirus removes installed files from the computer and unregisters the package from the rpm database. If you try to uninstall a package that is not currently installed, Symantec AntiVirus displays a message that a package is not installed. However, the uninstallation of the other packages still succeeds.
To uninstall Symantec AntiVirus for Linux
1
If you have all packages installed, on the command line, type the following:rpm –e sav savap savui savjlu
2
Restart the computer to remove the Auto-Protect support. See“About removing Symantec AntiVirus completely”on page 20.Listing all Symantec AntiVirus packages
If you don’t remember the package names or which packages are installed, you can use therpm -qacommand to list the installed Symantec AntiVirus packages. To list all Symantec AntiVirus packages
◆ On the command line, type the following command:
rpm –qa | grep sav
About removing Symantec AntiVirus completely
After using therpm -ecommand to uninstall Symantec AntiVirus, some directories and files still remain. If you need to completely remove Symantec AntiVirus from a computer, you can delete the following directories:
alert logs and quarantined files /var/symantec
technical support log files /opt/Symantec/symantec_antivirus
the configuration database /etc/symantec
You can also safely delete any empty directories that are located under /opt/Symantec.
The following directories may also remain. You should only delete the directories if you are sure that there is no Symantec product on the computer that currently uses LiveUpdate:
■ /opt/Symantec/virusdefs Installing Symantec AntiVirus for Linux
Uninstalling Symantec AntiVirus for Linux 20
■ /opt/Symantec/LiveUpdate
The/etc/symantec.conf file may remain. You should only delete the file if you are sure that there are no other Symantec products installed on the computer.
Installing Symantec AntiVirus for Linux Uninstalling Symantec AntiVirus for Linux 22
Using Symantec AntiVirus
for Linux
This chapter includes the following topics:
■ When to use the command-line interfaces, services, and tools
■ About the sav command-line interface
■ Using the sav CLI to interact with Symantec AntiVirus
■ About the symcfg command-line interface
■ Using the symcfg CLI to interact with the Symantec AntiVirus configuration database
■ About the symcfgd service
■ Using the symcfgd service parameters
■ About the rtvscand service
■ Using the rtvscand service parameters
■ About the savtray program
When to use the command-line interfaces, services,
and tools
Symantec AntiVirus provides several command-line interfaces (CLIs), services, and tools for configuring and interacting with Symantec AntiVirus when running on Linux.
3
Chapter
Note:You must have root privileges to use most of the Symantec AntiVirus for Linux service and command-line interface commands. The exceptions are thesav liveupdate -uandinfo -a,-d,-e,-p, and-scommands.
Table 3-1 Symantec AntiVirus interfaces, services, and tools
Function Interface or tool
This interface provides the primary method of interacting with the Symantec AntiVirus service. You should use this interface for the following tasks:
■ Enabling and disabling Auto-Protect
■ Starting and scheduling LiveUpdates and viewing the current LiveUpdate schedule
■ Starting and stopping manual scans
■ Creating, deleting, enabling, and disabling scheduled scans
■ Viewing a list of scheduled scans and detailed information about each scan
■ Displaying items and acting on items in the local Quarantine
■ Rolling back to a previous version of virus and security risk definitions
■ Using the latest version of local of virus and security risk definitions
■ Displaying general product information sav command-line
interface
This interface provides client applications with access to a computer-specific, local configuration database that is used to store configuration data for Symantec AntiVirus for Linux.
Note:You should use this interface when you need to access Symantec AntiVirus configuration settings that are not accessible through the sav CLI.
You should use this interface for the following tasks:
■ Displaying data in the configuration database
■ Adding data to the configuration database
■ Removing data from the configuration database symcfg
command-line interface
This service typically runs as a daemon process. This daemon is not typically run from the command line. It is started automatically by the system initialization scripts.
If necessary, you can use the parameters that are associated with this service for the following tasks:
■ Specifying the log facility to use when logging to syslog
■ Filtering events that are logged based on severity
■ Stopping the symcfgd daemon
■ Checking to see if the symcfgd service is currently running
■ Changing the working directory for symcfgd
■ Changing the file that holds the PID of the currently running copy of symcfgd symcfgd service
Using Symantec AntiVirus for Linux
When to use the command-line interfaces, services, and tools 24
Table 3-1 Symantec AntiVirus interfaces, services, and tools (continued)
Function Interface or tool
This service is the interface to rtvscan, the Symantec AntiVirus service that protects Linux client computers from viruses and other security risks. This daemon is not typically run from the command line. It is started automatically by the system initialization scripts.
If necessary, you can use the parameters that are associated with this service for the following tasks:
■ Specifying the log facility to use when logging to syslog
■ Filtering the events that are logged based on severity
■ Stopping the rtvscand daemon
■ Displaying help information
■ Checking to see if the rtvscand service is currently running
■ Changing the working directory for rtvscand
■ Changing the file that holds the PID of the currently running copy of rtvscand rtvscand service
This interface runs the Symantec AntiVirus graphical user interface for Symantec AntiVirus for Linux client computers. You should use this interface for the following tasks:
■ Launching the graphical interface with parameters for session management
■ Launching the graphical interface with parameters for controlling the appearance and graphical behavior of Symantec AntiVirus
savtray command-line interface
About the sav command-line interface
Symantec AntiVirus for Linux provides a command-line interface for interacting with sav, the basic Symantec AntiVirus service. You can use the sav command-line interface to perform the following tasks:
■ enable and disable Auto-Protect, use LiveUpdate ■ start and stop manual scans
■ list information about scheduled scans ■ create and delete scheduled scans ■ enable and disable scheduled scans ■ manage the local Quarantine ■ manage virus definitions ■ display product information
The sav commands that produce output produce it in a format that can be parsed by third-party tools. There is no header information for the columns in this output.
About the sav command-line syntax
The general syntax for the sav command line is as follows: sav [--quiet] command parameter(s)
The--quietparameter is the only global parameter for the sav command line. sav itself does not take wildcard characters, so any wildcard characters that are used on the sav command line are interpreted by the shell that you are using. You can perform only one action per command line invocation. For example, you cannot turn on Auto-Protect and initiate a LiveUpdate on the same command line. By default, sav is located in/opt/Symantec/symantec_antivirus.
Note:You must have root privileges to use all of the sav CLI commands except sav liveupdate -uandsav info -a,-d,-e, -p, and -s.
Table 3-2 sav commands and parameters
Description Parameters
Command
Display only the information that is requested; do not display all available information, including status and error messages. This is the only global parameter. This parameter is particularly useful in scripts where you do not want textual error or status messages to appear when the script runs.
-q|--quiet sav Enable Auto-Protect. -e|--enable sav autoprotect Disable Auto-Protect. -d|--disable sav autoprotect
Perform a LiveUpdate immediately. -u|--update
sav liveupdate
Display the current LiveUpdate schedule. -v| --view
sav liveupdate
Using Symantec AntiVirus for Linux About the sav command-line interface 26
Table 3-2 sav commands and parameters (continued)
Description Parameters
Command
Create a new schedule for an automatic LiveUpdate. The following parameters are used to set the schedule:
■ –f <daily|weekly|monthly>|--frequency <daily|weekly|monthly>Mandatory. Specifies the frequency.
■ -i <HH[:]MM|DDD|D>|--interval
<HH[:]MM|DDD|D>Mandatory. Identifies the interval of the schedule. If frequency is daily, the interval must be hh[:]mm, where hh is the hour (00-23) and mm is the minute. If frequency is weekly, DDD must be one of the following: Sun, Mon, Tue, Wed, Thu, Fri, Sat. If frequency is monthly, D is any value between 1 and 31.
■ –t hh[:]mm|--time hh[:]mmwhere hh is the hour (00-23) and mm is the minute (00-59). If no time is specified, this parameter defaults to midnight of the designated interval. Not used for daily frequency. -s|--schedule
<parameters> sav liveupdate
Table 3-2 sav commands and parameters (continued)
Description Parameters
Command
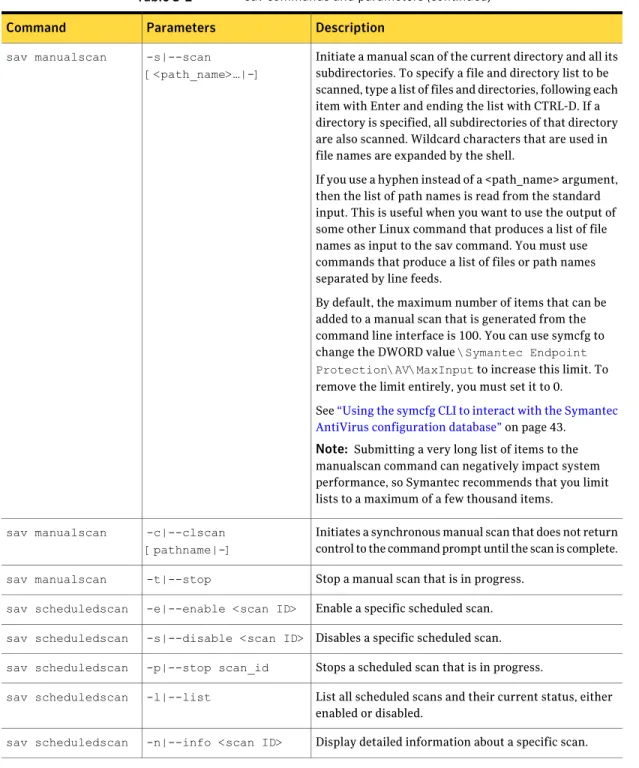
Initiate a manual scan of the current directory and all its subdirectories. To specify a file and directory list to be scanned, type a list of files and directories, following each item with Enter and ending the list with CTRL-D. If a directory is specified, all subdirectories of that directory are also scanned. Wildcard characters that are used in file names are expanded by the shell.
If you use a hyphen instead of a <path_name> argument, then the list of path names is read from the standard input. This is useful when you want to use the output of some other Linux command that produces a list of file names as input to the sav command. You must use commands that produce a list of files or path names separated by line feeds.
By default, the maximum number of items that can be added to a manual scan that is generated from the command line interface is 100. You can use symcfg to change the DWORD value\Symantec Endpoint Protection\AV\MaxInputto increase this limit. To remove the limit entirely, you must set it to 0.
See“Using the symcfg CLI to interact with the Symantec AntiVirus configuration database”on page 43.
Note: Submitting a very long list of items to the manualscan command can negatively impact system performance, so Symantec recommends that you limit lists to a maximum of a few thousand items.
-s|--scan [<path_name>…|-] sav manualscan
Initiates a synchronous manual scan that does not return control to the command prompt until the scan is complete. -c|--clscan
[pathname|-] sav manualscan
Stop a manual scan that is in progress. -t|--stop
sav manualscan
Enable a specific scheduled scan. -e|--enable <scan ID>
sav scheduledscan
Disables a specific scheduled scan. -s|--disable <scan ID>
sav scheduledscan
Stops a scheduled scan that is in progress. -p|--stop scan_id
sav scheduledscan
List all scheduled scans and their current status, either enabled or disabled.
-l|--list sav scheduledscan
Display detailed information about a specific scan. -n|--info <scan ID>
sav scheduledscan
Using Symantec AntiVirus for Linux About the sav command-line interface 28
Table 3-2 sav commands and parameters (continued)
Description Parameters
Command
Delete a specific scheduled scan. -d|--delete <scan ID>
Table 3-2 sav commands and parameters (continued)
Description Parameters
Command
-c|--create <scan ID> <parameters>
[<path_name>…|-] sav scheduledscan
Using Symantec AntiVirus for Linux About the sav command-line interface 30
Table 3-2 sav commands and parameters (continued)
Description Parameters
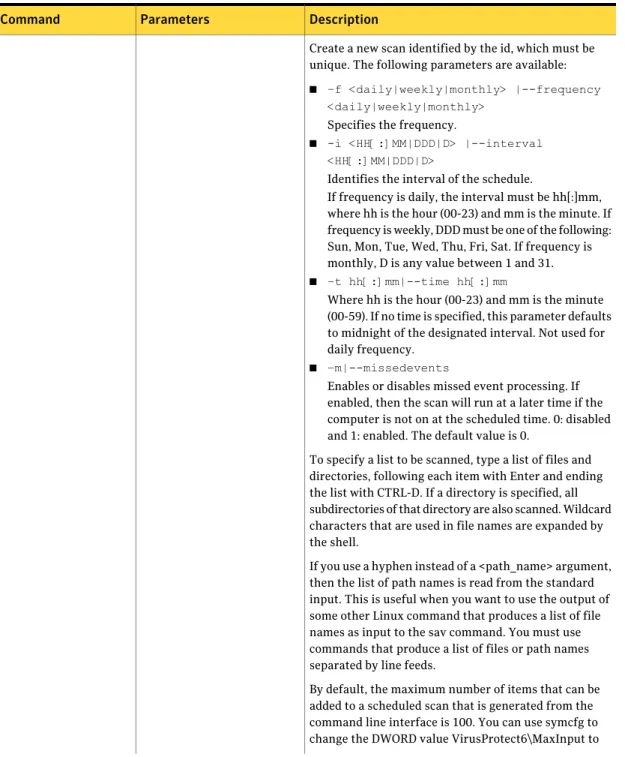
Command
Create a new scan identified by the id, which must be unique. The following parameters are available:
■ –f <daily|weekly|monthly> |--frequency <daily|weekly|monthly>
Specifies the frequency.
■ -i <HH[:]MM|DDD|D> |--interval <HH[:]MM|DDD|D>
Identifies the interval of the schedule.
If frequency is daily, the interval must be hh[:]mm, where hh is the hour (00-23) and mm is the minute. If frequency is weekly, DDD must be one of the following: Sun, Mon, Tue, Wed, Thu, Fri, Sat. If frequency is monthly, D is any value between 1 and 31.
■ –t hh[:]mm|--time hh[:]mm
Where hh is the hour (00-23) and mm is the minute (00-59). If no time is specified, this parameter defaults to midnight of the designated interval. Not used for daily frequency.
■ –m|--missedevents
Enables or disables missed event processing. If enabled, then the scan will run at a later time if the computer is not on at the scheduled time. 0: disabled and 1: enabled. The default value is 0.
To specify a list to be scanned, type a list of files and directories, following each item with Enter and ending the list with CTRL-D. If a directory is specified, all subdirectories of that directory are also scanned. Wildcard characters that are used in file names are expanded by the shell.
If you use a hyphen instead of a <path_name> argument, then the list of path names is read from the standard input. This is useful when you want to use the output of some other Linux command that produces a list of file names as input to the sav command. You must use commands that produce a list of files or path names separated by line feeds.
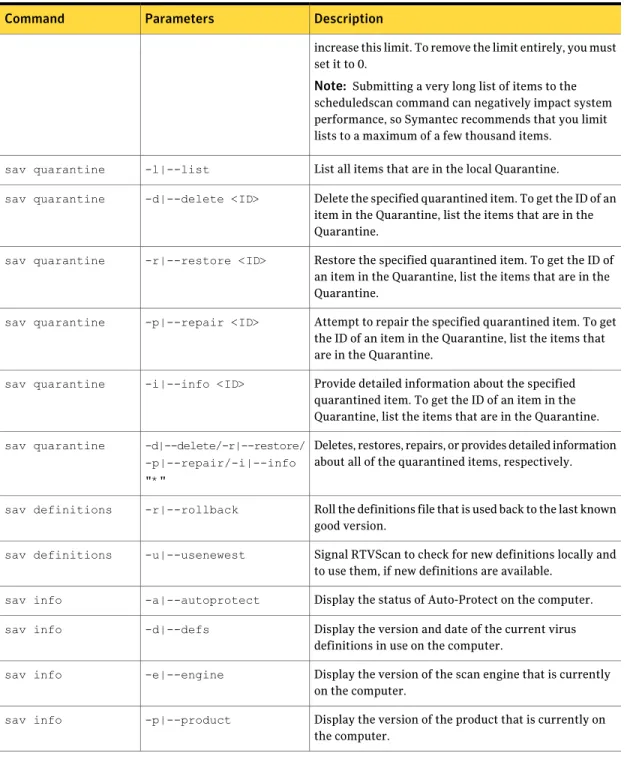
By default, the maximum number of items that can be added to a scheduled scan that is generated from the command line interface is 100. You can use symcfg to change the DWORD value VirusProtect6\MaxInput to
Table 3-2 sav commands and parameters (continued)
Description Parameters
Command
increase this limit. To remove the limit entirely, you must set it to 0.
Note: Submitting a very long list of items to the scheduledscan command can negatively impact system performance, so Symantec recommends that you limit lists to a maximum of a few thousand items.
List all items that are in the local Quarantine. -l|--list
sav quarantine
Delete the specified quarantined item. To get the ID of an item in the Quarantine, list the items that are in the Quarantine.
-d|--delete <ID> sav quarantine
Restore the specified quarantined item. To get the ID of an item in the Quarantine, list the items that are in the Quarantine.
-r|--restore <ID> sav quarantine
Attempt to repair the specified quarantined item. To get the ID of an item in the Quarantine, list the items that are in the Quarantine.
-p|--repair <ID> sav quarantine
Provide detailed information about the specified quarantined item. To get the ID of an item in the Quarantine, list the items that are in the Quarantine. -i|--info <ID>
sav quarantine
Deletes, restores, repairs, or provides detailed information about all of the quarantined items, respectively. -d|--delete/-r|--restore/
-p|--repair/-i|--info "*"
sav quarantine
Roll the definitions file that is used back to the last known good version.
-r|--rollback sav definitions
Signal RTVScan to check for new definitions locally and to use them, if new definitions are available.
-u|--usenewest sav definitions
Display the status of Auto-Protect on the computer. -a|--autoprotect
sav info
Display the version and date of the current virus definitions in use on the computer.
-d|--defs sav info
Display the version of the scan engine that is currently on the computer.
-e|--engine sav info
Display the version of the product that is currently on the computer.
-p|--product sav info
Using Symantec AntiVirus for Linux About the sav command-line interface 32
Table 3-2 sav commands and parameters (continued)
Description Parameters
Command
Display whether or not a scan is in progress on the computer.
-s|--scanner sav info
Display the list of threats and security risks that the computer is currently protected against.
Note:A user must have root privileges to use this parameter.
-t|--threats sav info
Using the sav CLI to interact with Symantec AntiVirus
You can use the sav CLI to perform the following tasks: ■ enable and disable Auto-Protect
■ start and schedule LiveUpdates and view the current LiveUpdate schedule ■ start and stop manual scans
■ create, delete, enable, and disable scheduled scans
■ view a list of scheduled scans and detailed information about each scan ■ display items and act on items in the local Quarantine
■ roll back to a previous version of virus and security risk definitions ■ use the latest version of local virus and security risk definitions ■ display general product information
Note:You must have root privileges to use all of the sav CLI commands except liveupdate -u andinfo -a,-d,-e, -p,and-s.
Enabling and disabling Auto-Protect
You can use thesav autoprotectcommand to enable and disable Auto-Protect on a specific computer.
To enable Auto-Protect
◆ From the command line, type the following:
To disable Auto-Protect
◆ From the command line, type the following:
sav autoprotect --disable
Using Java LiveUpdate
You can use the sav liveupdate command to initiate an update using Java LiveUpdate on a specific computer, to view the computer’s current LiveUpdate schedule, and to schedule automatic updates using Java LiveUpdate.
There is no managed process for distributing new definitions to clients from a central computer. However, you can do the following tasks:
■ Use the Intelligent Updater shell script from
http://securityresponse.symantec.com/to update multiple computers. ■ Use the LiveUpdate Administration Utility to set up a Central LiveUpdate
server on your network and configure Java LiveUpdate to point your clients to pick up definitions updates from that server.
To start an immediate LiveUpdate
◆ From the command line, type the following:
sav liveupdate --update
To view the current LiveUpdate schedule ◆ From the command line, type the following:
sav liveupdate --view
To schedule an automatic LiveUpdate
◆ From the command line, type the following:
sav liveupdate --schedule -f <frequency> -i <interval> -t <time>
For example, to schedule an automatic LiveUpdate that runs every Friday at 11:30 P.M., type the following:
sav liveupdate --schedule -f weekly -i Fri -t 23:30
For example, to schedule an automatic LiveUpdate that runs only on the second day of the month at 3 A.M., type the following:
sav liveupdate --schedule -f monthly -i 2 -t 3:00
See“Updating definitions by using Intelligent Updater”on page 68. See“About the LiveUpdate Administration utility”on page 58.
See“Configuring Java LiveUpdate to use a Central LiveUpdate server”on page 63. Using Symantec AntiVirus for Linux
Using the sav CLI to interact with Symantec AntiVirus 34
Starting and stopping manual scans
You can use thesav manualscancommand to start and to stop a manual scan on a specific computer.
If you use a hyphen (-) as the <path_names> argument when starting a manual scan, the list of <path_names> is read from the standard input. This is useful if you want to use the output of another Linux command that produces a list of file names as input to sav. Use commands that produce a list with a line feed between each item.
By default, the maximum number of items that can be added to a manual scan that is generated from the command line interface is 100. You can use symcfg to change the DWORD value \Symantec Endpoint Protection\AV\MaxInput to increase this limit. To remove the limit entirely, you must set it to 0.
See“Using the symcfg CLI to interact with the Symantec AntiVirus configuration database”on page 43.
Note: Submitting a very long list of files to the manualscan command can negatively impact system performance, so Symantec recommends that you limit file lists to a maximum of a few thousand items.
To start a manual scan of a directory and its subdirectories ◆ From the command line, type the following:
sav manualscan --scan <path_name>
For example, to start a manual scan of user John’s directory in the /home directory, type the following:
sav manualscan --scan /home/john
To start a manual scan with input from another command ◆ From the command line, type the following:
<other command> | sav manualscan scan
-Use commands that produce a list of items separated by line feeds. For example, to start scan of all files that have been modified within the last hour in or below a user's home directory, type the following:
-To type a list of files and directories to be scanned ◆ From the command line, type the following:
sav manualscan scan -<file name> ENTER <path name> ENTER <path name> ENTER <filename> CTRL-D
To stop a manual scan that is in progress ◆ From the command line, type the following:
sav manualscan --stop
Creating and managing scheduled scans
You can create, enable and disable, list, and display detailed information about a particular scheduled scan from the command line.
By default, the maximum number of items that can be added to a scheduled scan that is generated from the command line interface is 100. You can use symcfg to change the DWORD value \Symantec Endpoint Protection\AV\MaxInput to increase this limit. To remove the limit entirely, you must set it to 0.
Note: Submitting a very long list of files to the scheduledscan command when creating a scheduled scan can negatively impact system performance, so Symantec recommends that you limit lists to a maximum of a few thousand items.
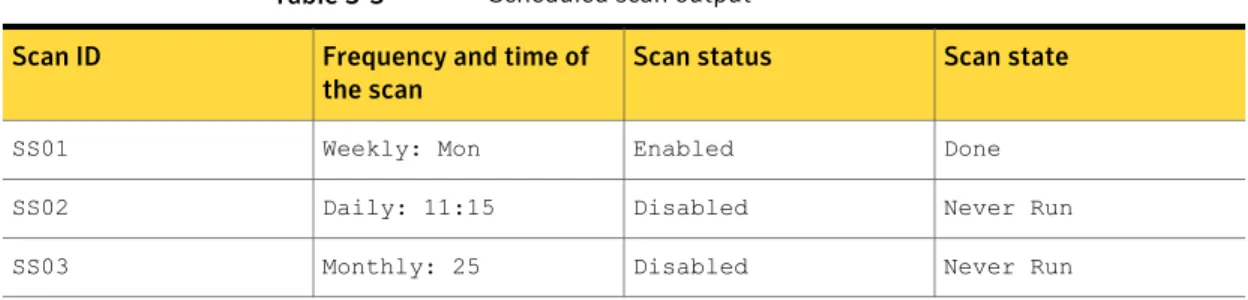
Listing information about scheduled scans
Table 3-3lists the fields that the scheduled scans output. Table 3-3 Scheduled scan output
Scan state Scan status
Frequency and time of the scan Scan ID Done Enabled Weekly: Mon SS01 Never Run Disabled Daily: 11:15 SS02 Never Run Disabled Monthly: 25 SS03
Using Symantec AntiVirus for Linux
Using the sav CLI to interact with Symantec AntiVirus 36
To list the scheduled scans on a computer ◆ From the command line, type the following:
sav scheduledscan --list
To list detailed information about a particular scan ◆ From the command line, type the following:
sav scheduledscan --info <scan ID>
Creating and deleting a scheduled scan
You can use thesav scheduledscancommand to create and delete a scheduled scan on a specific computer.
To create a scheduled scan
◆ From the command line, type the following:
sav scheduledscan --create <scan ID> -f <frequency> -i <interval> -t <time> -m <missed event processing value> <path name>...
For example, suppose you want to create a scheduled scan named myschedscan that scans the /usr directory, runs every Saturday at 11:01 P.M., and will not run when the computer is next turned on, if the computer is not on at the scheduled time. To create this scan, from the command line, type the following:
sav scheduledscan --create myschedscan -f weekly -i Sat -t 23:01 -m 0 /usr
To create a scheduled scan by using input from another command ◆ From the command line, type the following:
<other command> | sav scheduledscan --create <scan ID> -f <frequency> -i <interval> -t <time> -m <missed event processing value>
-Use commands that produce a list of items separated by line feeds. For example, to schedule a daily scan of all files that have been modified within the last eight hours in or below Steve's home directory, type the following:
find ~steve -mmin -480 -type f -print | sav scheduledscan --create stevescan f daily i 17:01 m 0
-To delete a scheduled scan
◆ From the command line, type the following:
sav scheduledscan --delete <scan ID>
where<scan ID>is the name you gave to the scan when you created it.
Enabling and disabling a scheduled scan
You can use thesav scheduledscancommand to enable and disable a scheduled scan.
To enable a scheduled scan
◆ From the command line, type the following:
sav scheduledscan --enable <scan ID>
where<scan ID>is the name you gave to the scan when you created it. To disable a scheduled scan
◆ From the command line, type the following:
sav scheduledscan --disable <scan ID>
where<scan ID>is the name that you gave to the scan when you created it.
Managing the local Quarantine
You can use thesav quarantinecommand to do the following: ■ list the items in the Quarantine
■ display detailed information about an item in the Quarantine on a specific computer
■ delete and restore items from the Quarantine ■ attempt to repair an item in the Quarantine To list the files in the local Quarantine
◆ From the command line, type the following:
sav quarantine --list
Using Symantec AntiVirus for Linux
Using the sav CLI to interact with Symantec AntiVirus 38
To display detailed information about a file in the local Quarantine ◆ From the command line, type the following:
sav quarantine --info <ID>
where<ID>is the ID of the item. Obtain the ID of an item by listing the items that are in the local Quarantine.
To delete a file in the local Quarantine
◆ From the command line, type the following:
sav quarantine --delete <ID>
where<ID>is the ID of the item. Obtain the ID of an item by listing the items that are in the local Quarantine.
To restore a file in the local Quarantine
◆ From the command line, type the following:
sav quarantine --restore <ID>
where<ID>is the ID of the item. Obtain the ID of an item by listing the items that are in the local Quarantine.
To repair a file in the local Quarantine
◆ From the command line, type the following:
sav quarantine --repair <ID>
where<ID>is the ID of the item. Obtain the ID of an item by listing the items that are in the local Quarantine.
Managing virus definitions
You can use thesav definitionscommand to roll back the virus and security risk definitions to the last known good version or to have the computer check for and use the latest local version of definitions on a specific computer.
To roll back to the last known good version of definitions ◆ From the command line, type the following:
sav definitions --rollback
To use the latest local version of definitions ◆ From the command line, type the following:
Displaying product information
You can use thesav infocommand to display general product information about a specific computer, including the following items:
■ The status of Auto-Protect
■ The version and date of the current virus definitions ■ The product version that is in use
■ The version of the scan engine that is in use ■ Whether or not a scan is in progress
■ The list of threats and security risks that the computer is currently protected against
To display the status of Auto-Protect
◆ From the command line, type the following:
sav info --autoprotect
To display the virus definitions version
◆ From the command line, type the following:
sav info --defs
To display the current product version
◆ From the command line, type the following:
sav info --product
To display the current scan engine version ◆ From the command line, type the following:
sav info --engine
To determine if a scan is in progress
◆ From the command line, type the following:
sav info --scanner
To display the list of threats that the computer is protected from ◆ From the command line, type the following:
sav info --threats
Using Symantec AntiVirus for Linux
Using the sav CLI to interact with Symantec AntiVirus 40
About the symcfg command-line interface
symcfg is a command-line tool that provides client applications with access to a
computer-specific, local configuration database that is used to store configuration data for Symantec AntiVirus. Configuration settings are stored in a data file in binary format, not as text. The symcfg tool can be used to display, create, remove, and change the value of data that is stored in this database.
About the symcfg command-line syntax
You cannot use multiplesymcfgcommands and their parameters as part of the same command line.
You must use the following syntax for thesymcfgcommand lines: symcfg [-q|--quiet] [-r|--recursive]
symcfg [-q|--quiet] [-r|--recursive] add -k|--key key [-v|--value value -d|--data data -t|--type type]
symcfg [-q|--quiet] [-r|--recursive] delete -k|--key key [-v|--value value]
symcfg [-q|--quiet] [-r|--recursive] list -k|--key [key|*] [-v|--value value]
Note:You must have root privileges to use symcfg.
By default, symcfg is located in/opt/Symantec/symantec_antivirus.
Note:You may need to enclose key names in single quotes to prevent the backslash from being interpreted as an escape character by the shell.
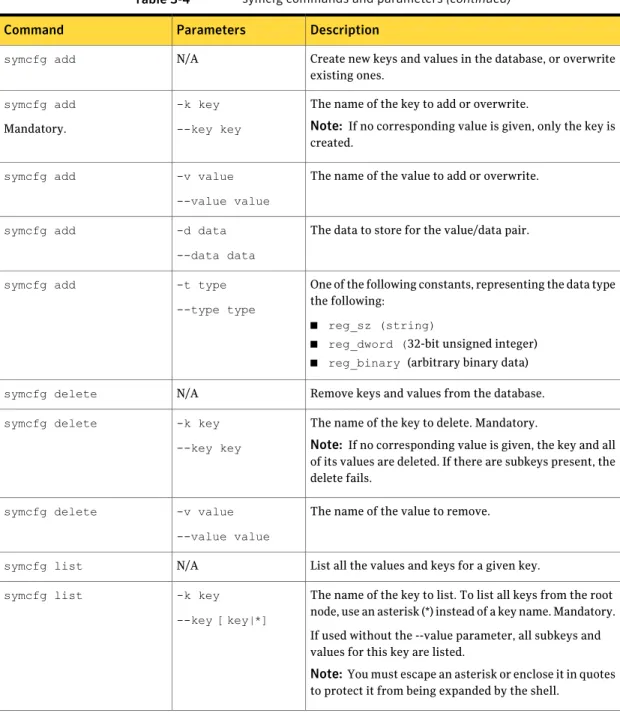
Table 3-4 symcfg commands and parameters
Description Parameters
Command
Display only the information that is being requested; suppress error messages.
-q [command] --quiet [command] symcfg
Apply the command that follows recursively. -r
--recursive symcfg
Table 3-4 symcfg commands and parameters (continued)
Description Parameters
Command
Create new keys and values in the database, or overwrite existing ones.
N/A symcfg add
The name of the key to add or overwrite.
Note: If no corresponding value is given, only the key is created.
-k key --key key symcfg add
Mandatory.
The name of the value to add or overwrite. -v value
--value value symcfg add
The data to store for the value/data pair. -d data
--data data symcfg add
One of the following constants, representing the data type the following:
■ reg_sz (string)
■ reg_dword (32-bit unsigned integer)
■ reg_binary (arbitrary binary data) -t type
--type type symcfg add
Remove keys and values from the database. N/A
symcfg delete
The name of the key to delete. Mandatory.
Note: If no corresponding value is given, the key and all of its values are deleted. If there are subkeys present, the delete fails.
-k key --key key symcfg delete
The name of the value to remove. -v value
--value value symcfg delete
List all the values and keys for a given key. N/A
symcfg list
The name of the key to list. To list all keys from the root node, use an asterisk (*) instead of a key name. Mandatory. If used without the --value parameter, all subkeys and values for this key are listed.
Note:You must escape an asterisk or enclose it in quotes to protect it from being expanded by the shell.
-k key
--key [key|*] symcfg list
Using Symantec AntiVirus for Linux About the symcfg command-line interface 42
Table 3-4 symcfg commands and parameters (continued)
Description Parameters
Command
The name of the value to list. The value is displayed in the following format:\<key>\<subkey>\<value name> <value data> <value type>.
For example: \Symantec Endpoint Protection\AV\Storages\FileSystem\ServiceStatus 1 REG_DWORD -v value --value value symcfg list
Using the symcfg CLI to interact with the Symantec
AntiVirus configuration database
The symcfg CLI provides access to some configuration settings that are stored in the local configuration database that are not accessible through the sav CLI.
Note:You must have root privileges to use the symcfg command-line interface.
Listing the keys in the database
You can list all of the keys that are stored in the database. To list the keys in the database
◆ From the command line, type the following:
symcfg list -k <key> [-v <value>]
For example, to list all keys under the Storages node, you would type the following:
symcfg -r list -k ‘\Symantec Endpoint Protection\AV\Storages’
Adding a key to the database
You can add keys and their corresponding values to the database to configure Symantec AntiVirus.
To add a key to the database
◆ From the command line, type the following:
symcfg add -k <key> [-v <value>] [-d <data>] [-t <type>]
For example, to add a key to the database to exclude the/tmp/no_scan directory from Auto-Protect scans, you would type the following:
symcfg add --key
VirusProtect6\Storages\Filesystem\RealTimeScan\NoScanDir --value /tmp/no_scan --data 1 --type REG_DWORD
Deleting a key from the database
You can delete keys and their corresponding values from the database to configure Symantec AntiVirus.
To delete a key from the database
◆ From the command line, type the following:
symcfg delete -k <key> [-v <value>] [-d <data>] [-t <type>]
For example, to delete the scan1 from the database, you would type the following:
symcfg delete -k "VirusProtect6\Custom Tasks\scan1"
About the symcfgd service
symcfgd is the Symantec configuration service, which runs as a daemon process.
This service is typically started automatically by the system initialization scripts. No changes to the default values should be required.
Note:This implementation uses a small number of kernel semaphores, which are shared among applications. Although unlikely, it is possible that Auto-Protect could experience problems if the operating system has an insufficient number of semaphores allocated for the computer. If the allocation of a semaphore fails, an event appears in the syslog. If necessary, you can increase the number of semaphores that are allocated for the operating system to alleviate the problem. Using Symantec AntiVirus for Linux
About the symcfgd service 44
symcfgd service configuration parameters
The parameters available for interacting with the symcfgd are used by the /etc/sysconfig/symcfgdfile, but can also be used from the command line if special handling is required.
Table 3-5 symcfgd service configuration parameters
Description Parameter
Specifies the log facility to use when logging to syslog. Possible values are as follows:
■ daemon (default)
■ user
■ local0 through local7
To set this up, you must also configure your/etc/syslog.conf file to specify handling for the facility.
-f <log_facility>
Displays help information. -h
Sends a specified signal to the running copy of symcfgd, and then exits. The running copy is identified as the process that has the pid that matches the pid stored in the pid file. This parameter has the following arguments:
■ Shutdown sends a signal to shut down the running copy. The process attempts to perform a graceful shutdown.
■ Check determines if symcfgd is currently running, and then prints out a message. If there is a running copy, the command returns a 0. If there is no running copy, the command returns a 1.
Note: When specifying the-kparameter and using a nondefault pid file, the-p parameter must also be given to ensure that the signal is sent to the correct symcfgd instance, even if there is only a single symcfgd instance running.
-k shutdown | check
Logs all messages up to and including the specified severity level. Severity must be one of the following:none,emerg,alert,crit,error,warning,notice,info, debug.
-l severity
Specifies to use the given process ID (pid) file instead of the default
/var/run/symantec/symcfgd.pidfile. You should always use absolute path names when configuring symcfgd.
By default,/var/run/symantec/symcfgd.pidstores the process ID (pid) of the currently running copy of symcfgd. When symcfgd is terminated, this file is deleted. -p <absolute_path>
Table 3-5 symcfgd service configuration parameters (continued)
Description Parameter
Sets the working directory that the service runs in. You should always use absolute path names when configuring symcfgd.
Note: This option typically does not need to be changed from the default value, which is the root directory (/).
-s <absolute_path>
Note:If you are using a nondefault pid file, you must give the-p parameter when using the-k parameter, to send the signal to the correct symcfgd instance, even if there is only a single instance running.
About the symcfgd files
Table 3-6 Description of the symcfgd service files
Description Service file
This configuration file specifies command-line parameters that are passed to the symcfgd program when it is started with the init.d script. To use this file, you must set the parameters to symcfgd between the quotes in the following line:
SYMCFGD_OPTS=""
For example, to log to the local0 facility and only log up to the error level of severity, you would use the following:
SYMCFGD_OPTS="-f local0 -l error" /etc/sysconfig/symcfgd
This file is the symcfgd startup and shutdown script. This script supports the expected init.d commands, such asstart,stop,restart, and so on. The chkconfig command is used to enable or disable the automatic startup of the symcfgd daemon.
/usr/etc/rc.d/init.d/symcfgd
This file stores the process ID (pid) of the currently running symcfgd. When the currently running symcfgd service is terminated, this file is deleted.
/var/run/symantec/symcfgd.pid
Using the symcfgd service parameters
You can check to see if symcfgd is running, stop symcfgd gracefully, and start it up again.
Note:You must have root privileges to use symcfgd. Using Symantec AntiVirus for Linux
Using the symcfgd service parameters 46
You should typically use the/etc/init.d/symcfgdinitialization script to perform most tasks that involve the symcfgd service. Using the initialization script ensures that any parameters you have set are picked up when you interact with the service.
Note:Different Linux distributions may have slightly different paths to the startup script directory, but for interoperability, the path/etc/init.d/should always resolve to the correct startup script directory.
Verifying that the symcfgd service is running
You can use the/etc/init.d/symcfgdinitialization script to verify that the rtvscand service is running. Be sure to specify the absolute path to the script. To verify that the symcfgd service is running
◆ From the command line, type the following:
/etc/init.d/symcfgd status
Stopping and starting the symcfgd service
You may want to stop the symcfgd service temporarily. When using the /etc/init.d/symcfgdinitialization script, be sure to specify the absolute path to the script.
To stop the symcfgd service
◆ From the command line, type the following command:
/etc/init.d/symcfgd stop
To start the symcfgd service
◆ From the command line, type the following command:
/etc/init.d/symcfgd start
Specifying the log facility to use and filtering log messages based on
severity
You can use thesymcfgd -fparameter to log messages using any of the general purpose Linux syslog facilities. To set this up, you must also configure your /etc/syslog.conf file to specify handling for the facility.
You can use the following facilities:daemon, user, local0, local1, local2, local3, local4, local5, local6, andlocal7. The default facility isdaemon.