ESET
Remote
Administrator
we protect your digital worlds ©
Installation Manual
and User Guide
Contents
1. Introduction ... 4
2. ERA – client/server architecture ... 5
2.1 ERA Server (ERAS) ...5
2.1.1 Requirements ...5
2.1.2 ERAS hierarchy at large networks ...6
2.1.3 Installation ... 7
2.1.4 Logs ... 7
2.1.5 Configuration ... 7
2.1.6 License keys ... 7
2.1.7 Database & information storage ...8
2.2 ERA Console (ERAC) ...8
3. Other ESET components in network environment ... 9
3.1 ESET client solutions ...9
3.2 ESET Configuration Editor ...9
3.2.1 Configuration layering ... 10
3.2.2 Key configuration entries ... 10
3.3 LAN Update Server -Mirror ... 11
3.3.1 Operation of Mirror server ...12
3.3.2 Types of updates ...12
3.3.3 How to enable and configure Mirror ...13
4. ESET Remote Administrator Console in detail 15 4.1 Connecting to ERAS ...15
4.2 ERAC – main screen ...15
4.3 Information filtering ...16
4.3.1 Groups ...16
4.3.2 Filter ...16
4.3.3 Context menu... 17
4.3.4 Views ...18
4.4 Tabs in ERAC...18
4.4.1 General description of tabs and clients ...18
4.4.2 Replication & information in individual tabs ...18
4.4.3 Clients tab ...19
4.4.4 Threat Log tab ... 22
4.4.5 Firewall Log tab ... 22
4.4.6 Event Log tab ... 22
4.4.7 The Scan Log tab ... 23
4.4.8 Tasks tab ... 23
4.4.9 Reports tab ... 23
4.4.10 Remote Install tab ... 25
4.5 ERA Console setup ... 25
4.5.1 Connection tab ... 25
4.5.2 Columns – Show / Hide tab ... 25
4.5.3 Colors tab ... 25
4.5.4 Paths tab ... 25
4.5.5 Date / Time tab ... 25
4.5.6 Other Settings tab ... 25
4.6 Configuring ERA Server using the Console ... 26
4.6.1 General tab ... 26
4.6.2 Security tab ... 26
4.6.3 Server Maintenance tab ... 27
4.6.4 Logging tab ... 27
4.6.5 Replication tab ... 27
contents
ESET Remote Administrator
Copyright © 2008 by ESET, spol. s r.o.
ESET Remote Administrator was developed by ESET, spol. s r. o. For more information visit www.eset.com.
All rights reserved. No part of this documentation may be reproduced, stored in a retrieval system or transmitted in any form or by any means, electronic, mechanical, photocopying, recording, scanning, or otherwise without permission in writing from the author.
ESET, spol. s r. o., reserves the right to change any of the described application software without prior notice.
Customer Care Worldwide: www.eset.eu/support Customer Care North America: www.eset.com/support REV.20080214-004
4.6.6 Updates ... 29
4.6.7 Other Settings tab ... 29
5. Tasks ...30
5.1 Configuration Task ... 30
5.2 On-Demand Scan task ...31
5.3 Update Now task ...31
6. Installation of ESET’s client solutions ... 32
6.1 Command line parameters for direct installation of client solutions ... 32
6.2 Installation methods ... 32
6.2.1 Direct installation with predefined XML configuration ... 32
6.2.2 Remote installation in general ... 33
6.2.3 Remote push install ... 34
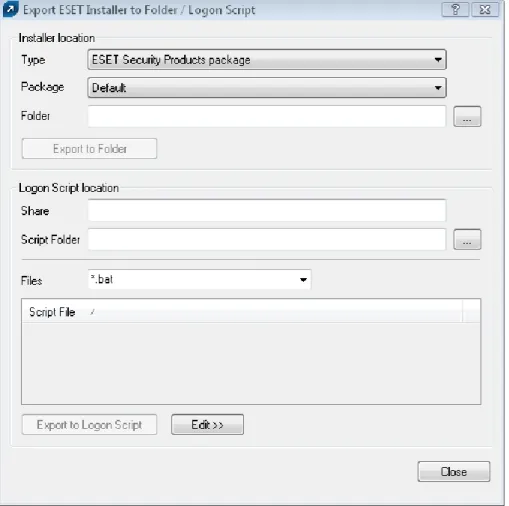
6.2.4 Logon / email remote install ... 37
6.2.5 Custom remote install ... 39
6.3 The einstaller.exe agent in detail ... 39
6.4 Avoiding repeated installations ...40
6.5 Installation process – error messages ...40
6.5.1 Remote Install Diagnostics ...41
7. Deployment scenarios for ESET Remote Administrator, Mirror server and ESET client solutions ...42
7.1 Small network – 1x ERAS, 1x Mirror server... 42
7.1.1 Installation of HTTP Mirror server ... 42
7.1.2 Installation of ERA Server ... 43
7.1.3 Installation of ERA Console ... 43
7.1.4 Remote install on workstations present in the network ... 43
7.1.5 Remote install on notebooks currently not present in the network ...44
7.2 Company with a remote subsidiary – 2x ERAS, 2x Mirror server ... 46
7.2.1 Installations at headquarters ...46
7.2.2 Subsidiary: installation of ERA Server ... 47
7.2.3 Subsidiary: Installation of HTTP Mirror server ... 47
7.2.4 Subsidiary: Remote installation to clients... 47
8. Hints & tips ...48
8.1 Export and other features of client XML configuration ... 48
8.2 Combined update for notebooks and mobile devices ... 48
8.3 Removing existing profiles ... 49
8.4 Scheduler setup ...50
1. Introduction
ESET Remote Administrator is an application which allows you to manage ESET‘s products in a networked environment. ESET Remote Administrator (ERA) is a solution which allows you to administer ESET products, including workstations and servers – from one central location. Thanks to ESET Remote Administrator‘s built-in task management system, you can quickly respond to new problems threats, and - last but not least – install ESET solutions on remote computers.
ESET Remote Administrator itself does not provide any other form of protection against malicious code, such as viruses and worms. ERA depends on the presence of an ESET solution on workstations or servers, such as ESET NOD32 Antivirus or ESET Smart Security.
To perform a complete deployment of ESET security solutions portfolio, the following steps must be taken:
• Installation of ERA Server (ERAS), • Installation of ERA Console (ERAC), • Installation of Mirror server,
• Installation of client computers (ESET NOD32 Antivirus, ESET Smart Security, ESET Server Edition, etc...).
NOTE: Some parts of this document will use system variables, which refer to an exact location of folders and files: %ProgramFiles% = typically C:\Program Files
%ALLUSERSPROFILE% = typically C:\Documents and Settings\All Users
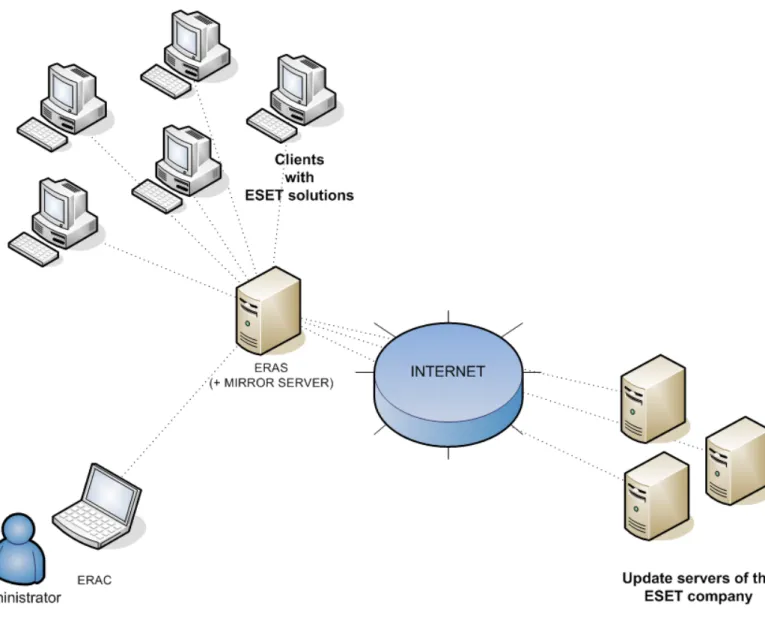
Figure 1 Simplified model of deployment: ESET for Windows clients, ESET Remote Administrator. ERAS and MIRROR SERVER can, but do not have to be installed on the same system.
2. ERA – client/server architecture
Technically, ESET Remote Administrator consists of two separate components: ERA Server (ERAS) and ERA Console (ERAC). You can run an unlimited number of ERA Servers and clients on your network as there are no limitations in the license agreement for their use. The only limitation is the total number of clients your installation of ERA can administer (see section 2.1.6 , “License keys”).
2.1 ERA Server (ERAS)
The server component of ERA runs as a service under the following Microsoft Windows© NT-based operating systems: NT4, 2000, XP, 2003 and Vista. The main task of this service is to collect information from clients and to send various requests to them. These requests, including configuration tasks, remote installation requests, etc., are created through the ERA Console (ERAC).
ERAS is a meeting point between ERAC and client computers – a place where all information is processed, maintained or modified before being transferred to clients or to ERAC.
2.1.1 Requirements
ERAS requires a Microsoft Windows NT-based operating system (NT4, 2000, XP, 2003, Vista). The Microsoft Windows Server Edition is not necessary for ERAS to work. A computer with ERAS should be always online and accessible via computer network by:
• Clients (usually workstations) • PC with ERA Console
• Other instances of ERAS (if replicated)
The chart below lists the possible network communications used when ERAS is installed. The process era.exe listens on TCP ports 2222, 2223, 2224 and 2846. Other communications occur using native operating system processes (for example “NetBIOS over TCP/IP”).
Protocol Port Description
TCP 2222 (ERAS listening) Communication between clients and ERAS
TCP 2223 (ERAS listening) Communication between ERAC and ERAS
TCP 2221 (ERAS listening)
By default, this port offers
update packages using the Mirror feature integrated in ERAS (HTTP communication)
If using all features of the program, the following network ports need to be open:
Protocol Port Description
TCP 2224 (ERAS listening) Communication between the agent einstaller.exe and ERAS during remote install
TCP 2846 (ERAS listening) ERAS replication
TCP 139 (target port from the point of view of ERAS) Copying of the agent einstaller.exe from ERAS to a client using the share admin$ during push install UDP 137 (target port from the point of view of ERAS) “Name resolving” during remote install UDP 138 (target port from the point of view of ERAS) “Browsing“ during remote install TCP 445 (target port from the point of view of ERAS) Direct access to shared resources using TCP/IP during remote install
(an alternative to TCP 139) The minimum hardware configuration for the deployment of ERAS is also the minimum recommended configuration for the Microsoft Windows operating system used on the machine.
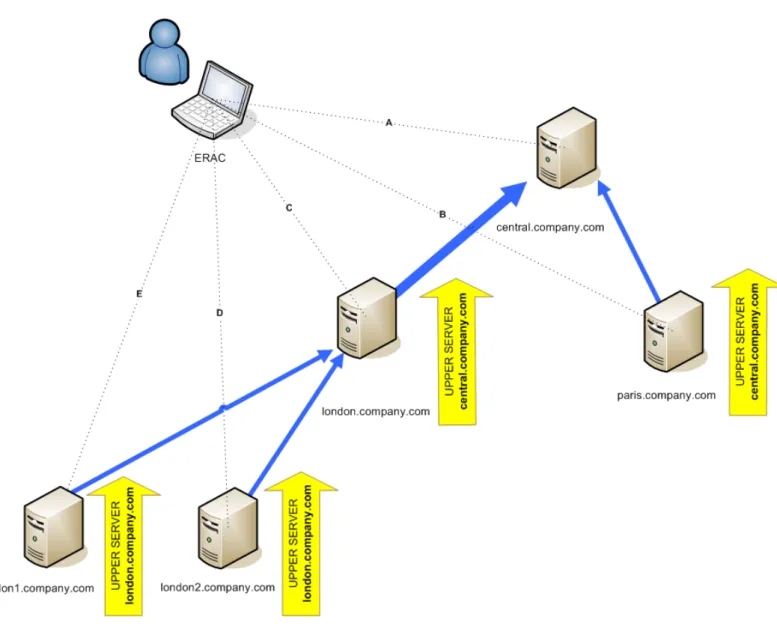
2.1.2 ERAS hierarchy at large networks
In larger networks multiple ERA Servers can be installed to perform future remote installs of client computers from servers which are more accessible. For this purpose, ERA Server offers “replication“, which allows stored information to be forwarded to a superior ERA Server (“upper server”). Replication can be configured using ERAC.
The replication feature is very useful for companies with multiple branches or remote offices. The model deployment scenario would be as follows: Install ERAS in each office and have each replicate to a central ERA Server. The advantage of this configuration is especially apparent in private networks which are connected via VPN, which is usually slower – the administrator will only need to connect to a central ERAS (the communication marked by the letter A in the figure below). He will not need to use the VPN tunnel to access individual departments (the communications B, C, D and E) allowing him to bypass a slower communication channel through the use of ERA Server replication.
The replication setup allows an administrator to define which information will be transferred to upper servers automatically at a preset interval, and which will be sent upon request from the upper server administrator. Replication makes ERA more user-friendly and also minimizes network traffic.
Another advantage to replication is that multiple users can log in with various permission levels. The administrator accessing the ERAS london1.company.com with the console (communication E) will be able to administer only clients connecting to london1.company.com, london.company.com, paris.company.com. If you connect to the central company.com (A), you will be able to control all clients located at company headquarters and departments/ branches.
2.1.3 Installation
The installation process is initiated by running the installation package. During this process, you will be prompted to upload a license key, which is a file with the .lic extension. If the Expert installation mode is selected, several other parameters can be defined. They can be modified later in ERAC, but in most cases there is no need to do so. The only exception is the server name. The server name should be the same as in the DNS, or the Computer name value of your operating system (My Computer > Properties > Computer name tab). The IP address of the computer can also be used. This is the most essential piece of information for performing remote installation. If the name is not specified during installation, the installer will automatically supply the value of the system variable %COMPUTERNAME%, which is sufficient in most cases.
By default, the ERAS program components are installed to the following folder: %ProgramFiles%\Eset\Eset Remote Administrator\Server
and other data components such as logs, install packages, configuration, etc. are stored in: %ALLUSERSPROFILE%\Application Data\Eset\Eset Remote Administrator\Server
NOTE:On servers with ERAS, the ERA client should also be installed. ERAS uses the current virus signature database version number as a reference number for clients. Installation of a solution with the LAN Update Server (Mirror) is recommended.
2.1.4 Logs
ERAS does not generate any output for a log file. This file is located in the folder: %ALLUSERSPROFILE%\Application Data\Eset\Eset Remote Administrator\Server\logs
The log file titled “era.log” stores all events that take place during operation of ERAS, including error messages related to starting the ERAS service, such as a corrupt database error or license key error. The log file allows you to quickly determine the exact cause of ERAS failing to launch correctly.
NOTE:In the ERAS setup (accessible through ERAC) you can define several levels of logging including log rotation, to significantly reduce log file size and growth rate. Logging to the operating system application log can also be configured.
2.1.5 Configuration
To a certain extent, ERAS can be configured during installation (particularly in Advanced mode) or later using the ERA Console connected to the ERA Server. If need be, the .xml configuration files on the server can be modified. These files are located in the following directory:
%ALLUSERSPROFILE%\Application Data\Eset\Eset Remote Administrator\Server\configuration
NOTE: For security reasons, password setup is separated (into individual .xml files) from other setup options. Potential lost passwords (e.g. to access an ERA Server) can be resolved by deleting the era_private.xml file located in the Configuration folder
2.1.6 License keys
The license key is a file with the .lic extension, similar in structure to the .xml format, but protected by an electronic signature. This file is required to successfully configure ERAS. The file contains the following information:
• License owner
• Number of client machines (number of licenses) • License expiry date
Here are four common problem scenarios related to license key files:
• .lic file is not present
ERAS will run in a trial mode – it will be possible to administer only two clients (workstations) for an unlimited time period.
• .lic file is corrupt
The ERA Server service will not launch at all. The event will be logged to the era.log file.
• .lic file has expired
If the expiry date defined in a .lic file is older than a current date, it is not possible to establish connection between ERAC and ERAS. ERAS will continue to accept information from clients, but will not be able to administer them.
• The number of clients defined in a .lic file is exceeded
This status will be displayed by an error message in ERAC. It will be not possible to administer the extra clients communicating with the ERA Server.
License keys should be stored in the folder:
%ALLUSERSPROFILE%\Application Data\Eset\Eset Remote Administrator\Server\license
During the installation of ERAS, the license key is automatically copied to the above-mentioned folder. If the license is updated or upgraded, the license key must be manually updated. The folder may contain several license files, but ERAS will always choose and work with the most suitable file with the .lic extension. Every time a new license is installed, the ERAS service must be stopped and restarted.
There are several ways to upload a license key to ERAS:
• Copy it to the above-mentioned directory where ERA Server is installed; then restart the ERAS service.
• Use the ESET Configuration Editor in ERAC and import license keys to ERA Server remotely
• Use the Licenses feature in ESET Smart Security/ESET NOD32 Antivirus to import license keys
2.1.7 Database & information storage
ERAS uses the MDAC (Microsoft Data Access Components) database component, while larger entries are saved to individual files in the Storage folder.
ERAS has tools built in to allow administrators to automatically perform database and stored information maintenance. This can be configured during the installation (expert level) or later through ERAC. Database maintenance leads to faster responses on database queries from ERAS and also saves hard disk space.
We recommend using the default configuration, which automatically deletes all entries older than six months. Decrease this value only in the event that the system is overwhelmed by entries from a large amount of clients. The database is stored in the following directory:
%ALLUSERSPROFILE%\Application Data\Eset\Eset Remote Administrator\Server\database Files related to records in the database are stored in:
%ALLUSERSPROFILE%\Application Data\Eset\Eset Remote Administrator\Server\storage
Information about client communication with ERAS is stored in individual files. These files reside in the Storage folder, and contain the following information:
• Client details (.xml configuration, Protection Status, Protection Features, and System Information), • Log details (from Threat Log and Scan Log),
• Task details,
• Scheduled reports details (not directly related to the communication between a client and ERAS).
NOTE: If the Storage folder is located on a computer with an NTFS file system, you can use the NTFS compression feature to significantly decrease its size while storing a large volume of information.
2.2 ERA Console (ERAC)
ERAC is the client component of ERA and is usually installed on a workstation. This workstation is used by the administrator to remotely control ESET solutions on individual clients. Using ERAC, the administrator can connect to the server component of ERA – on TCP port 2223. The communication is controlled by the console program, which is usually located in the following directory:
%ProgramFiles%\Eset\Eset Remote Administrator\Console (You can also open ERA Console by clicking Start > All Programs > ESET > ESET Remote Administrator Console)
When installing ERAC, you may need to enter the name of an ERA Server. Upon startup, the console will automatically connect to this server. The ERA Console can also be configured after installation.
ERAC outputs graphical logs in HTML that are saved locally. All other information is sent from ERAS on TCP port 2223.
3. Other ESET components in network environment
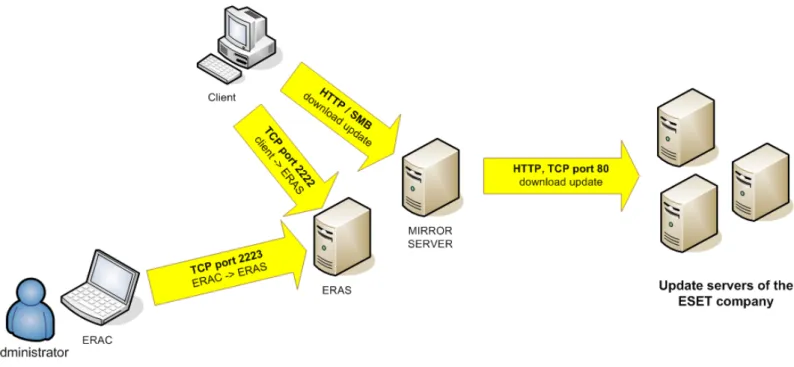
3.1 ESET client solutionsClient solutions are the security products which detect and block malicious code on workstations and servers. The primary client solutions are ESET NOD32 Antivirus 3.0 and ESET Smart Security.
Clients communicate through two main channels:
• ERA Server on TCP port 2222 in order to submit information such as logs, current configuration, threat alerts,
etc. and to execute any tasks and queries from ERAS which are queued up for the client (modify configuration, perform a scan, etc.).
• The update server on a defined port using the HTTP or SMB protocols. Later in this manual we will discuss a
method which allows an administrator to create a local update server or “Mirror” of the ESET update servers.
Figure 3 The most important communication channels connecting ERAS, ERAC and update servers. ERAS and MIRROR SERVER can be run on the same machine
3.2 ESET Configuration Editor
The ESET Configuration Editor is an important component of ERAC and is used for several purposes. One of the most important is the creation of the following:
• Predefined configurations for installation packages • Configurations sent as tasks to clients
• A general (.xml) configuration file
The Configuration Editor allows the administrator to remotely configure many of the parameters available in any ESET security solution, especially those installed on client workstations. It also allows the administrator to export configurations to .xml files which can later be used for multiple purposes, such as creating tasks in ERAC, importing a configuration locally in ESET Smart Security, etc.
The structure used by the Configuration Editor is an .xml template which stores the configuration in a tree-like structure. The template is stored in the cfgedit.exe file.
The Configuration Editor allows you to modify any .xml file. Please avoid modifying or rewriting the
cfgedit.xml source file! For the Configuration Editor to work, the following files must be available: eguiEpfw.dll, cfgeditLang.dll and eguiEpfwLang.dll.
To access the Configuration Editor, start the ERA Console and click Tools > ESET Configuration Editor.
3.2.1 Configuration layering
If a value is changed in the Configuration Editor, the change is marked by a blue symbol. Any entry with the grey icon has not been changed and will not be written to the .xml output configuration. When applying a configuration to clients, only those modifications which have been saved to the .xml output configuration file will be applied.
An example is shown below. In this configuration the user name and password are inserted and using a proxy server is prohibited.
The second configuration (shown below) sent to clients will ensure that previous modifications are preserved, including the user name EAV-12345678 and password, but will also allow the use of a proxy server, and defines its address and port.
3.2.2 Key configuration entries
In this section, we will explain several of the key configuration entries for ESET Smart Security available through the ESET Configuration Editor (Tools > ESET Configuration Editor ). To change specific settings, select the option in the tree structure on the left and change the corresponding Value on the right.
• Kernel > Setup > Remote administrator
Here you can enable communication between client computers and the ERA Server (Connect to Remote Administrator server). Enter the name or IP address of the ERA Server (Server address). The Interval between connections to server option should be left at the default value of five minutes. For testing purposes, this value can be decreased to 0, which will establish a connection every ten seconds. If a Password is set, use the one which was
specified in the ERA Server. For more information, see the chapter about the configuration of ERAS – the Password for Clients option). If a password is used, the communication between clients and the ERAS will be encrypted.
• Kernel > Setup > License keys
Client computers require no license keys to be added or managed. License keys are used only for server products.
• Kernel > Setup > ThreatSense.Net
This branch defines the behavior of the ThreatSense.Net Early Warning System, which allows submission of suspicious files for analysis to ESET’s labs. When deploying ESET solutions to a large network, the Submit suspicious files and Enable submission of anonymous statistical information options are particularly important: If these are set to Do not submit or No, respectively, the ThreatSense.Net System is completely disabled. To submit files automatically with no need for user interaction, select Submit without asking and Yes, respectively. If a proxy server is used with the Internet connection, specify the connection parameters under Kernel > Setup > Proxy server.
• Kernel > Setup > Protect setup parameters
Allows the administrator to password protect the setup parameters. If a password is established, it will be required in order to access the setup parameters on client workstations. However, the password will not affect any changes to the configuration made from ERAC.
• Kernel > Setup > Scheduler/Planner
This key contains the Scheduler/Planner options, which allow the administrator to schedule regular antivirus scans, virus signature updates, etc.
NOTE: By default, all ESET security solutions contain several predefined tasks. In most cases, it should not be necessary to edit or add new ones.
• Update
This branch of the Configuration Editor allows you to define how virus signature and program component updates are handled on client workstations. In most cases it is necessary only to modify the predefined profile My profile and change the Update server, User name and Password settings. If Update server is set to Choose Automatically, all updates will be downloaded from ESET’s update servers. In this case, please specify the User name and Password parameters which were provided at the time of purchase. For information on setting client workstations to receive updates from a local server (Mirror), please see section 3.3, “LAN Update Server - Mirror”. NOTE: On mobile devices, two profiles can be configured – one to provide updating from the Mirror server, and the other to download updates directly from ESET’s servers. For more information, see section 8.2 “Combined update for notebooks and mobile devices.”
3.3 LAN Update Server -Mirror
The Mirror feature allows a user to create a local update server. Client computers will not download virus signature updates from ESET’s servers on the Internet, but will instead connect to a local Mirror server on your network. The main advantages of this solution are to save Internet bandwidth and to minimize network traffic, since the mirror server connects to the Internet for updates, rather than hundreds of client machines. The only potential drawback is an outage of the Mirror server, which would prevent updates from being sent to client workstations (if it was the only server providing updates).
Warning! A Mirror server which performed a program component upgrade and has not been rebooted may cause an outage. In this scenario, the server would be unable to download ANY updates or distribute them to client workstations. DO NOT SET AUTOMATIC PROGRAM COMPONENT UPGRADES FOR ESET SERVER PRODUCTS! (see section 3.3.1 for more information on program component upgrades)
The Mirror feature is available in two locations:
• ESET Remote Administrator (Mirror physically running within ERAS, manageable from ERAC)
• ESET Smart Security Business Edition or ESET NOD32 Antivirus Business Edition (provided that the Business
Edition has been activated by a license key)
It is left to the administrator to select the method for activating the Mirror feature. Please beware that if both versions are used simultaneously, a conflict may occur as a result, on TCP port 2221.
In large networks it is possible to create multiple Mirror servers (e.g., for various company departments), and establish one of them as central (at company headquarters) in cascade-style – similar to an ERAS configuration with multiple clients.
3.3.1 Operation of Mirror server
The computer hosting the Mirror server should always be running, and connected to the Internet or to an upper Mirror server for replication. Mirror server update packages can be downloaded in two ways:
1. Using the HTTP protocol (recommended) 2. Using a shared network drive (SMB)
ESET‘s update servers use the HTTP protocol with authentication. A central Mirror server should access the update servers with a user name (usually in the following form: EAV-XXXXXXX) and password.
The Mirror server which is a part of ESET Smart Security/ESET NOD32 Antivirus has an integrated HTTP server which requires no authentication. This means that clients accessing the integrated HTTP server do not need a user name and password for authentication.
NOTE: If you decide to use the integrated HTTP server, please ensure that it will not be accessible from outside of your network (i.e. to clients not included in your license). The server must not be accessible from the Internet. By default, the integrated HTTP server listens at TCP port 2221. Please make sure that this port is not being used by any other application!
Any other type of HTTP server can also be used. ESET also supports additional authentication methods (user name / password access – on Apache Web Server the .htaccess method is used).
The second method (shared network folder) requires sharing (“read” rights) of the folder containing update packages. In this scenario, a user name and password of a user with “read” rights for the update folder must be entered into the client workstation.
NOTE: ESET client solutions use the SYSTEM user account and thus have different network access rights than a currently logged-in user. Authentication is required even if the network drive is accessible for “Everyone” and the current user can access them, too. Also, please use UNC paths to define the network path to the local server. Using the DISK:\ format is not recommended.
If you decide to use the shared network folder method, we recommend that you create a unique user name (e.g. NODUSER). This account would be used on all client machines for the sole purpose of downloading updates. The NODUSER account should have “read” rights to the shared network folder which contains the update packages. NOTE: For authentication to a network drive, please enter the authentication data in the full form: WORKGROUP\User, or DOMAIN\User.
In addition to authentication, you must also define the source of updates for ESET client solutions. The update source is either a URL address to a local server:
http://Mirror_server_name:port or UNC path to a network drive: \\Mirror_server_name\share_name
3.3.2 Types of updates
Aside from regular virus signature database updates, which can include ESET software kernel updates, program component upgrades can be downloaded on a far less frequent basis. Program upgrades usually add new features to ESET security solutions and require a reboot to finish installing. If there is a Mirror server installed in a network, program upgrades are downloaded from the Mirror server.
The Mirror server allows an administrator to disable automatic downloading of program upgrades from ESET‘s update servers (or from a upper Mirror server) and disable its distribution to clients. Distribution can later be triggered manually by the administrator (e.g. when he is sure there will be no conflict between the new version and other applications).
This feature is especially useful if the administrator wishes to download and use virus signature database updates even though there is also a new program version available to download. In this scenario, the new program version could be tested in a non-production environment before its implementation. If an older program version is used in conjunction with the most recent virus database version, the program will continue to provide the best protection available. Still, we recommend that you download and install the newest program version without too much delay, in order to gain access to new program features.
3.3.3 How to enable and configure Mirror
If the Mirror integrated directly into ESET Remote Administrator is used (a Business Edition component), connect to the ERAS using the ERA Console and follow these steps:
• From the ERA Console, click Tools > Server Options... and click the Updates tab.
• From the Update server: drop-down menu, select Choose Automatically (updates will be downloaded from ESET’s servers), or enter the URL/UNC path to a Mirror server.
• Set the interval (Update interval) for updates (we recommend sixty minutes).
• If you have selected Choose Automatically in the previous step, insert the user name (Update user name) and password (Update password) which was sent to you after purchase. If accessing an upper server, enter a valid domain user name and password to that server.
• Select the Create update mirror option and enter a path to the folder which will store the update files. By default this is a relative path to the Mirror folder, as long as the option Provide update files via internal HTTP server is selected and is available on the HTTP port defined in HTTP server port (by default 2221).
• Set Authentication to NONE.
• In the Advanced Setup, select the components to be downloaded. Components for all language versions to be
used in the network should be selected.
The Mirror feature is also available directly from the program interface in ESET Smart Security Business Edition and ESET NOD32 Antivirus Business Edition. It is left to the administrator’s discretion as to which is used to implement the Mirror server.
To activate and launch the Mirror server from ESET Smart Security Business Edition or ESET NOD32 Antivirus Business Edition, follow these steps:
• From the Advanced Setup window (F5), click Miscellaneous > License keys. Click the Add... button, browse for the nod32.lic file and click Open. This will install the license and allow configuration of the Mirror feature.
• From the Update branch click the Setup... button and select the Mirror tab.
• Select the Create update mirror and Provide update files via internal HTTP server option.
• Enter the full directory path to the folder (Mirror folder) where update files are to be stored (do not reference a
mapped network drive).
• The User name and Password serve as authentication data for client workstations attempting to gain access to the Mirror folder. In most cases, it is not required to populate these fields, as the authentication data will be entered at the client level.
• Click the Advanced setup button and set Authentication to NONE1.
• In the Advanced setup, select components to be downloaded (components for all language versions which will be
used in the network should be selected).
To maintain optimal functionality, we recommend that you enable downloading and mirroring of program components. If this option is disabled, only the virus signature database is updated, not program components. If the Mirror is used as a part of ESET Remote Administrator, this option can be configured in ERAC through Tools > Server Options... > Other Settings tab > Edit Advanced Settings... > ESET Remote Administrator > ERA Server > Setup > Mirror. Enable all program language versions present in your network.
4. ESET Remote Administrator Console in detail
4.1 Connecting to ERASMost features in the ERA Console are available only after connecting to an ERA Server. Before the first connection, first define the server by name or IP address:
Open the ERA Console, click File > Edit Connections... and click the Connection tab.
Click the Add/Remove... button to add new ERA Servers, or to modify currently listed servers. Click OK after adding or modifying servers and pick the desired server in the Select connection drop-down menu. Then, click the Connect button.
Other options in this window:
• Connect to selected server on the console startup
If this option is selected, the console will automatically connect to the selected ERAS on startup.
• Show message when connection fails
If there is a communication error between ERAC and ERAS, an alert is displayed.
Connections can be password protected. By default, there is no password to connect to an ERA Server, but we strongly recommend that one be established. To create a password to connect to an ERA Server:
Click File > Change Password... and then click the Change... button to the right of Password for Console. When entering a password, there is the option to Remember password. Please consider the possible security risk of using this option. To delete all remembered passwords, click File > Clear Cached Passwords...
At the moment communication is established, the program’s header will change to Connected [server_name]. 4.2 ERAC – main screen
Figure 4 The main screen of ESET Remote Administrator Console
A current status of communication between ERAC and ERAS is displayed in the status bar (1). All necessary data from ERAS is refreshed regularly (Default is every minute. See Tools > Console Options...). The refresh progress can also be seen in the status bar.
Information is divided into several tabs (2) in order of importance. In most cases data can be (5) sorted in ascending or in descending order by clicking on an attribute, while a drag-and-drop operation can be used for reorganization. If multiple data rows are to be processed, you can limit them by using the Items to show drop-down menu and the browse page by page buttons. Select a View mode to display attributes according to your need. For more information see section 4.3, “Information filtering”.
The Server section (4) is important if you replicate ERA Servers. Here you can find summary information about the Console to which your ERAS is connected, as well as information about child or “lower” ERA Servers. The Servers drop-down menu in section 4 will influence the scope of information displayed in section 5. Server menu options:
• Use All Servers
Displays information from all ERA Servers
• Use Only Checked Servers
Displays information from selected ERA Servers
• Exclude Checked Servers Excludes selected ERA Servers Columns in Section 4:
• Server Name
Displays name of server
• Clients
Total number of clients connecting to the selected ERAS
• Oldest Version
The oldest version of virus signature database among the clients of the selected ERAS
• Least Recent Connection
States the longest inactivity period (interval from the last connection) among the clients of the given ERAS
• Last Threat Alerts
Total number of virus alerts (see the attribute Last Threat Alert in section 5 of Figure 4)
• Last Firewall Alerts
Total number of firewall alerts (see the attribute Last Firewall Alert in section 5 of Figure 4)
• Last Event Warnings
Total number of system events (see the attribute Last Event Warning in section 5 of Figure 4)
If you are not currently connected, you can right-click in the Server section (4) and select Connect to This Server to connect to the chosen ERAS .
If replication is enabled, lower servers will automatically be displayed in the Server section (4). The most important features of ERAC are accessible from the menu or from the ERAC toolbar (3). The last section is Computer filter criteria(6) – see “Information filtering” in the next section. 4.3 Information filtering
ERAC offers several tools and features which provide user-friendly administration of clients and events.
4.3.1 Groups
Individual clients can be divided into groups by clicking Edit > Groups... in the ERA Console. Groups can later be used when applying filters or creating tasks, because those activities can be applied on whole groups of clients at the same time. Groups are independent for each ERAS and they are not replicated. The Synchronize with Active Directory feature allows the administrator to sort clients to groups, if the client name equals the object type “computer“ at the side of Active Directory (AD) and belongs to groups in the AD.
4.3.2 Filter
Filter allows the administrator to display only information related to specific servers or client workstations. To show the filter options, click View > Show/Hide Filter Pane from the ERAC menu.
To activate filtering, select the Use Filter option in the upper left side of the ERA Console and click the Apply Changes button. Any future modification to the filter criteria will automatically update displayed data, unless configured otherwise in the Tools > Console Options... > Other Settings tab.
In the Computer filter criteria section you can filter ERA Servers/clients, using the following criteria:
• Only clients (using whole word)
• Only clients beginning like
Output will list only clients with names beginning with the specified string.
• Only clients like
Output will list only clients with names containing the specified string
• Exclude clients (using whole word), Exclude clients beginning like, Exclude clients like These options will yield opposite results to the previous three
The Primary server, Computer name, Client name and MAC Address fields accept whole strings. If any of these are populated, a database query will be run and results will be filtered based on the populated fields.
The next section allows filtering of clients by groups:
• Clients in Groups
Displays only clients belonging to the specified group(s)
• Clients in other Groups or N/A
Output will include only clients belonging to other groups, or clients which are not a member of any group. If a client belongs to both specified and non-specified groups, it will be displayed.
• Clients in no Groups
Displays only clients which are not a part of any group
Filtering options change slightly according to the currently active tab (Clients, Threat Log, etc.).
4.3.3 Context menu
Use the right mouse button to invoke the context menu and adjust output in columns.
• Select by '...'
This option allows you to right-click on any attribute, and automatically select (highlight) all other workstations or servers with the same attribute.
• Inverse selection
Perform inverted selection of entries
• Hide selected
Hides selected entries
• Hide unselected
Hides all unselected entries in the list
The last two options are effective if further organization is needed after using previous filtering methods. To disable all filters set by the context menu, click View > Cropped View, or click the icon on the ERAC toolbar. You can also press F5 to refresh displayed information and disable filters.
Example:
• To display only those clients with threat alerts:
In the Clients tab, right-click on any empty pane with Last Virus Alert and choose Select by ‘...‘ from the context menu. Then again from the context menu, click Hide selected.
• To display threat alerts for clients “Joseph” and “Charles”:
Click the Threat Log tab and right-click on any attribute in the Client Name column with the value Joseph. From the context menu click Select by ‘Joseph’. Then, press and hold the CTRL key, right-click and use the context menu and Select by ‘Charles’. Last, right-click and select Hide unselected from the context menu. The CTRL key can now be released.
The CTRL key can be used to select/deselect specific entries, and the SHIFT key can be used to mark/unmark a group of entries.
NOTE: Filtering can also be used to facilitate the creation of new tasks for specific (highlighted) clients. There are many ways to use filtering effectively, please experiment with various combinations.
4.3.4 Views
In the Clients tab, the number of columns displayed can be adjusted by using the View mode: drop-down menu on the far right side of the Console. When the Full View Mode is active, all columns are displayed, while the Minimal View Mode shows only the most important columns. These modes are predefined and cannot be modified. To activate the Custom View, select Custom View Mode. The Custom View can be configured in Tools > Console Options... by clicking the Columns – Show/Hide tab.
4.4 Tabs in ERAC
4.4.1 General description of tabs and clients
Most of the information on tabs is related to the connected clients. Each client connected to ERAS is identified by the following attributes:
Computer Name (client name) + MAC Address + Primary Server2
The behavior of ERAS related to certain network operations (such as renaming a PC) can be defined in ERAS Advanced Setup (For more detail, see the “Other Settings“ section in Chapter 4). For example, if one of the
computers in the network has been renamed, but its MAC address remained unchanged, you can avoid creating a new entry in the Clients tab.
Clients (workstations and servers with a security solution from ESET installed) that connect for the first time to ERAS are designated by a Yes value in the New User column and are marked by a small asterisk in the upper right corner of the client’s icon. This feature allows an administrator to easily detect a newly connected computer. This attribute can have different meanings depending on the administrator’s operating procedures.
If a client has been configured and moved to a certain group, the New status can be disabled by right-clicking on the client and selecting Reset “New“ Flag. The icon of the respective client will change to the one shown in the example below (and the attribute New User will change to No).
NOTE: The Comment attribute is optional in all three tabs. The administrator may insert any description here (e.g. “Office No. 129”).
NOTE: Time values in ERAS can be displayed either in the relative mode (“2 days ago”), or in the absolute mode (20. 5. 2007). In most cases, data in tabs can be sorted in ascending or descending order by clicking on an attribute. The drag-and-drop method can be used to reorganize the columns.
Clicking on certain values activates other tabs in order to display more detailed information. For example, if you click on a value in the Last Threat Alert column, the program will move to the Threat Log tab and display Threat Log entries related to the given client. If you click on a value which contains too much information to be displayed in a tabbed view, a dialog window will open showing detailed information about the corresponding client.
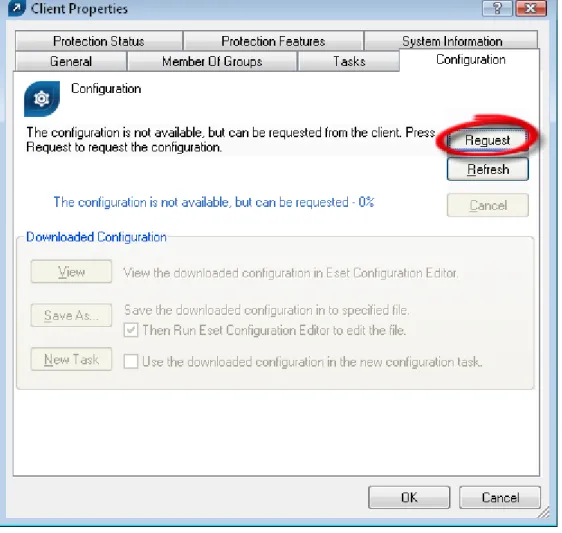
4.4.2 Replication & information in individual tabs
If an ERA Console is connected to an ERAS which is operating as an upper server, all information from lower servers will be displayed automatically, unless the lower server is not configured to allow this.
In such a scenario, the following information could be missing:
• Detailed alert logs (Threat Log tab)
• Detailed On-demand scanner logs (Scan Log tab)
• Detailed current client configurations in the .xml format (the Clients tab, the Configuration column, Protection Status, Protection Features, System Information)
In dialog windows where such information should otherwise be present, the Request button is available. Clicking this button downloads missing information from a lower ERA Server. Since replication is always initiated by a lower ERA Server, the missing information should be delivered within the preset replication interval.
2 In older versions of ESET Remote Administrator, identification was based on the attributes Computer Name + Primary Server.
Figure 5 Click Request to retrieve missing information from inferior ERA Servers.
4.4.3 Clients tab
This tab displays general information about individual clients.
Attribute Description
Client Name Name identifying a client computer in ERA. New clients use the value “Computer Name”. Client Name can be modified with no side effects. Computer Name Name of workstation / server (hostname)
MAC Address MAC address (network adapter)
Primary Server Name of ERA Server with which a client is communicating
Domain Domain / group name, to which a client belongs (these are not groups created in ERAS)
IP IP address
Product Name Name of product from ESET
Product Version Version of the above mentioned product
Last Connected Last connection of a client to its ERAS. All other data from a client have this timestamp, except for some data obtained by replication Protection Status
Text Current status of the ESET security solution installed on a client Threat DB Version Version of virus signature database
Last Threat Alert Last virus incident
Last Firewall Alert Last event detected by the firewall in ESET Smart Security Last Event Warning Last error message
Last Files Scanned Number of scanned files during the last On-demand scan Last Files Infected Number of infected files during the last On-demand scan
Last Files Cleaned Number of cleaned (or deleted) files during the last On-demand scan Last Scan Date Time of the last On-demand scan
Restart Request Is a restart required (e.g., after a program upgrade) Restart Request
Date Time of the first request for a restart
Product Last Started Shows when the client program was last launched Product Install Date Date of installation of the program
Mobile User Clients with this attribute will perform the task “update now” each time they establish connection with ERAS (it is suitable for notebooks) New User See more in general description of clients
OS Name Name of operating system
OS Platform Operating system platform (Windows / Linux...) HW Platform 32-bit / 64-bit
Configuration Client also submits the .xml format of its current configuration. The attribute includes time of configuration (if there is no replication activated, it equals to the time when it had been modified for the last time)
Protection Status General status statement. Similar in nature to the attribute Configuration Protection Features General status statement for program components. Similar to Configuration System Information Information about program component versions. Similar in nature to the attribute Configuration NOTE: Some values are for informational purposes only and may not be current when the administrator views them at the Console. For example, at 7:00 A.M. there may have been an update error, but at 8:00 A.M. it was performed successfully. If the administrator knows this information is obsolete, he can right-click the value and select Clear “Last Threat Alert” Info, or Clear “Last Event” Info. Information about the last virus incident or last system event will be deleted. This applies to values in the columns Last Threat Alert and Last Event.
Figure 7 Detailed information about a client workstation.
The Clients tab offers several options after double-clicking on a client:
• General tab
Contains similar information to that displayed in the Clients tab. Here you can specify the Client Name - the name under which this client is visible in ERA, plus an optional comment.
• Member Of Groups tab
This tab lists all groups to which the client belongs. For more information please see “Information filtering“ in section 4.3.
• Tasks tab
Tasks related to the given client. For more information see “Tasks“ in Chapter 5.
• Configuration tab
This tab allows you to view or export the current client configuration to an .xml file. Later in this manual, we will explain how .xml files can be used to create a configuration template for new/modified .xml configuration files. For more information see “Tasks“ in Chapter 5.
• the Protection Status tab
General status statement regarding all ESET programs. Some of the statements are interactive and it is possible to intervene immediately. This functionality is useful in that it prevents the need to manually define new tasks to solve the problem.
• the Protection Features tab
Component status for all ESET security features (Antispam, Personal firewall, etc.)
• the System Information tab
4.4.4 Threat Log tab
This tab contains detailed information about individual virus or threat incidents.
Attribute Description
Threat Id ID of the corresponding entry in the database tab Client Name Name of client reporting the threat alert
Computer Name Computer name of the client reporting the threat alert MAC Address MAC address of the client reporting the threat alert
Primary Server Name of the ERA Server with which a client is communicating Date Received Time at which the event was logged by ERAS
Date Occurred Time when the incident took place on the client
Level Alert level
Scanner Name of security feature which detected the threat
Object Object type
Name Folder where the infiltration is located Threat Name of the detected malicious code Action Action taken by the given security feature
User Name of the logged in user when the incident occurred Information User-defined
4.4.5 Firewall Log tab
This tab displays information related to client firewall activity.
Attribute Description
Firewall Id ID of the corresponding entry in the database tab Client Name Name of client reporting the event
Computer Name Computer name of the client reporting the event MAC Address MAC address of the client reporting the event
Primary Server Name of the ERA Server with which the client is communicating Date Received Time at which the event was logged by ERAS
Date Occurred Time when the incident took place on the client
Level Alert level
Event Description of the event
Source Source IP address
Target Target IP address
Protocol Protocol concerned
Rule Rule concerned
Application Application concerned
User Name of the logged in user when the incident occurred
4.4.6 Event Log tab
This tab shows a list of all system-related events.
Attribute Description
Event Id ID of the corresponding entry in the database tab Client Name Name of client reporting the event
Computer Name Computer name of client reporting the event MAC Address MAC address of client reporting the event
Primary Server Name of ERA Server with which a client is communicating Date Received Time event was logged by ERAS
Level Event level
Plugin Name of the program component reporting the event Event Description of the event
User Name of the user logged in when the event occurred
4.4.7 The Scan Log tab
This tab lists results of On-demand computer scans that were started remotely, locally on client computers, or as scheduled tasks.
Attribute Description
Scan Id ID of the corresponding entry in the database tab Client Name Name of client computer where the scan was performed
Computer Name Computer name of client computer where the scan was performed MAC Address MAC address of client computer where the scan was performed Primary Server Name of ERA Server with which the client is communicating Date Received Time at which the scan event was logged by ERAS
Date Occurred Time when the scan took place on client Scanned Targets Scanned files, folders and devices Scanned Number of checked files
Infected Number of infected files Cleaned Number of cleaned files
Status Status of the scan
User Name of the logged in user when the scan took place
Type Who started the task
Scanner Type of scan performed Details Any detailed information
4.4.8 Tasks tab
The meaning of this tab is described in Chapter 5, “Tasks”. The following attributes are available:
Attribute Description
Task Id ID of the corresponding entry in the database tab
State Task status (Active = being applied, Finished = task was delivered to clients)
Type Task type
Name Task name
Description Task description
Date Received Time event was logged by ERAS Comment Optional description
4.4.9 Reports tab
The Reports tab is used to create statistical information – reports – in the form of graphs or charts. These can be saved and processed later in the Comma Separated Value form (or CSV) by using the ERA tools to provide graphs and graphical outputs. By default, ERA saves output in the HTML format (images are in PNG format).
ERA provides several predefined templates for reports. To select a report, use the Report Type drop-down menu in the middle of the window, below the Generate Now button.
• Top Threats
List of the most frequently detected threats
• Top Clients with most Threats
Lists the most “active” client workstations (in number of detected threats)
• Threats Progress
Progress of malware events (number)
• Threats Comparative Progress
Progress of malware events by selected threats (using filter) compared with the total number of malware
• Threats By Scanner
Number of threat alerts from the individual program modules
• Threats By Object
Number of threat alerts according to the way they attempted to infiltrate (emails, files, boot sectors)
• Combined Top Clients / Top Threats Combination of the above mentioned types
• Combined Top Threats / Threats Progress Combination of the above mentioned types
• Combined Top Threats / Threats Comparative Progress Combination of the above mentioned types
• Clients Report, Threats Report, Events Report, Scans Report, Tasks Report
Typical reports that can be viewed in the Clients, Threat Log, Event Log, Scan Log or Tasks tab
• Comprehensive Report Summary of:
– Combined Top Clients / Top Threats
– Combined Top Threats / Threats Comparative Progress – Threats Progress
In the Filter section you can use the Target clients or Threat drop-down menus to select which clients or viruses will be included in the report.
Other details can be configured by clicking the Additional Settings... button. These settings apply mostly to data in the heading and in the types of graphical diagrams used. However, you can also filter data according to the status of chosen attributes (show only clients with a “Protection State“ problem), as well as choose which report format will be used (HTML, CSV).
Interval tab - This tab allows you to define an interval for which the report will be generated:
• Current
Only events which occurred in a chosen time period will be included in the report – e.g., if a report is created on Wednesday and the interval is set to Current Week, then the events from Sunday, Monday, Tuesday, and Wednesday will be included.
• Completed
Only events which occurred in a chosen, closed period will be included in the report (for example, the entire month of August, or a whole week – from Sunday to next Saturday). If the option Add also the current period is selected, the report will include events from the last completed period up till the moment of creation.
Example:
We want to create a report including events from the last calendar week, i.e. from Sunday to next Saturday. We want this report to be generated on the next Wednesday (after Saturday).
In the Interval tab, select Completed and 1 Weeks. In the Scheduler tab set Frequency to Weekly and select Wednesday. The other settings can be configured according to the administrator‘s discretion.
• From/To
Use this setting to define a period for which the report will be generated.
Scheduler tab - This tab allows you to define and configure an automatic report in chosen time or intervals (Using the Frequency section).
Using the Run at spin box and the Start drop-down menu, enter the time and date when the report is to be generated. Click the Select Target... button to specify where the report is to be saved. Reports can be saved to the ERA Server (default), sent via email to a chosen address, or exported to a folder. The latter option is useful if the report is sent to a shared folder on your organization‘s intranet where it can be can be viewed by other employees.
To send generated reports via email, you need to enter SMTP server and sender address information as described in the Chapter 4.6 , “Configuring ERA Server using the Console.”
the number of generated reports (End after), or a date that the report-generation process is not to exceed (End by). To save settings of defined reports to a template, click the Save or Save as... buttons. If you are creating a new template, click the Save as... button and give the template a name.
At the top of the Console window in the Report templates section, you can see names of templates that were already created. Next to the template names, there is information about time/intervals and when the reports are generated according to the preset templates. Click the Generate Now button (make sure the Options tab is selected) to generate a report at any moment regardless of the schedule.
Previously generated reports can be viewed in the Generated Reports tab. For more options, select individual (or multiple) reports and use the context menu (right-click) to copy reports to other locations, add report templates to the Favorites List, etc.
Templates placed in the Favorites List can be used later to immediately generate new reports. To move a template to Favorites, right-click on the report and click Add to Favorites from the context menu.
4.4.10 Remote Install tab
This tab provides options for several remote installation methods of ESET Smart Security or ESET NOD32 Antivirus on clients. For detailed information, please see the “Remote Installation“ section in Chapter 6, “Installation of ESET‘s client solutions.“
4.5 ERA Console setup
The ERA Console can be configured in the Tools / Console Options... menu.
4.5.1 Connection tab
This tab is related to communication between the ERA Console and ERA Server. For more details, see the beginning of Chapter 4, “ESET Remote Administrator Console in detail”.
4.5.2 Columns – Show / Hide tab
This tab allows you to specify which attributes (columns) are displayed in individual tabs. Changes will be reflected in the Custom View Mode. Other modes cannot be modified.
4.5.3 Colors tab
Here you can define which colors will be associated with which events. For example, clients with a slightly outdated virus signature database (Clients: Previous Version) could be distinguished from clients with an obsolete one (Clients: Older Versions or N/A).
4.5.4 Paths tab
Here you can specify the directory to which the ERA Console will save reports downloaded from ERAS. By default,reports are saved to:
%ALLUSERSPROFILE%\Application Data\Eset\Eset Remote Administrator\Console\reports
4.5.5 Date / Time tab
Appearance of the date / time columns:
• Absolute
Console will display absolute time (e.g., 14:30:00).
• Relative
Console will display relative time (e.g., 2 weeks ago).
• Regional
Console will display time according to regional settings (taken from the Windows settings).
• Recalculate UTC time to your local time (use local time)
Select this check box to recalculate to your local time. Otherwise, GMT – UTC time will be displayed.
4.5.6 Other Settings tab
• Auto Apply Changes
If enabled, filters in individual tabs will generate new outputs upon each modification of filter settings. Otherwise, filtering will take place only after clicking the Apply Changes button.
• Remote Administrator updates
This section allows you to enable checking for new versions of ESET Remote Administrator. We recommend that you leave the default value of Monthly. If a new version is available, the ERA Console displays a notification at program startup.
• Use automatic refresh
If selected, data in individual tabs is automatically refreshed according to the designated interval.
• Empty console recycle bins at application exit
Select this option to automatically empty items from the internal recycle bin of the Console after exiting. You can also empty items manually by right-clicking the Recycle Bin icon in the Reports tab.
• Show gridlines
Select this option to separate individual cells in all tabs by gridlines.
• Prefer showing Client as "Server/Name" instead of "Server/Computer/MAC" Affects the display mode for clients in some dialog windows (e.g., New task).
• Use systray icon
ERA Console will be represented by a Windows notification area icon.
• Show on taskbar when minimized
If the ERA Console window is minimized, it will be accessible from the Windows notification area.
• Use highlighted systray icon when problematic clients found
Use this option in conjunction with the Edit button to define events which will trigger a change in color to the ERAC icon in the notification area.
NOTE: If the ERA Console on the administrator’s PC is going to be connected at all times to an ERA Server, we recommend that you enable the Show on taskbar option when minimized and leave the Console minimized when inactive. If a problem occurs, the icon in the notification area will turn red – which is a signal for the administrator to intervene. We also recommend adjusting the option Use highlighted systray icon when problematic clients found in order to specify which events will trigger a color change of the ERAC icon.
• Show all groups in filter panes Changes the group filtration
• Tutorial messages
Disables (Disable All) or enables (Enable All) all informative messages
• Warn if the server license is about to expire in X days
If enabled, the program will display a notification X days before the license date
• Warn if there is only X% free clients left in the server license
If enabled, the Console will display a notification if there is less than X client slots free (each license is defined by the number of administered clients).
4.6 Configuring ERA Server using the Console
The ERA Server can be easily configured directly from ERA Console. From the Console menu, click Tools > Server Options...
4.6.1 General tab
The General tab stores general information about ERAS, license key information and statistical information about the operation of ERAS.
Click Renew License... to remotely install a license key to ERAS and avoid potential expiration of the license. License keys are described in detail in section 7.1.2, “Installation of ERA Server.”
4.6.2 Security tab
ESET security solutions in version 3.x (ESET Smart Security, etc.) offer password protection for communication between the client and ERAS (communication at the TCP protocol, port 2222), as this communication allows for decrypted communication.
The older versions (2.x) do not have this functionality. To provide backward compatibility for older versions, the Enable unauthenticated access for Clients mode must be activated.
The Security tab contains options to adjust simultaneous usage of the program generation 2.x and 3.x.
• Password for Console
Enables specifying a password to protect against unauthorized changes using the ERA Console
• Password for Clients (ESET Security Products) Sets password for clients accessing the ERAS
• Password for Replication
• Password for ESET Remote Installer (Agent)
Sets password for the installer agent to access the ERAS. Relevant for remote installations
• Enable unauthenticated access for Clients (ESET Security Products)
Enables access to ERAS for those clients which do not have a valid password specified (if current password is different from Password for Clients).
• Enable unauthenticated access for Replication
Enables access to ERAS for clients of lower ERA Servers which do not have a valid password for replication specified.
• Enable unauthenticated access for ESET Remote Installer (Agent)
Enables access to ERAS for those installer agents, which do not have a valid password for replication specified. NOTE: If authentication is enabled both in ERAS and on all [generation 3.x] clients, the option Enable unauthenticated access for Clients can be disabled.
4.6.3 Server Maintenance tab
If correctly configured in the Server Maintenance tab, the ERAS database will be automatically maintained and optimized, with no need for further configuration. By default, entries and logs older than six months are deleted, and the Compact & repair task is performed every fifteen days.
For more detailed configuration, the Server Maintenance tab offers the following options:
• Only keep the latest X threats for each client
Keeps only the specified number of virus incidents for each client
• Only keep the latest X firewall logs for each client
Keeps only the specified number of firewall logs for each client
• Only keep the latest X events for each client
Keeps only the specified number of system events for each client
• Only keep the latest X scan logs for each client
Keeps only the specified number of scanner logs for each client
• Delete clients not connected for the last X months (days)
Deletes all clients that have not connected to ERAS form more than the specified number of months (or days)
• Delete threat logs older than X months (days)
Deletes all virus incidents older than the specified number of months (or days)
• Delete firewall logs older than X months (days)
Deletes all firewall logs older than the specified number of months (or days)
• Delete event logs older than X months (days)
Deletes all system events older than the specified number of months (or days)
• Delete scan logs older than X months (days)
Deletes all scanner logs older than the specified number of months (or days)
4.6.4 Logging tab
During operation, ERAS creates a log (Log filename) about its activity which is configurable (Log verbosity). If the Log to text file option is selected, new log files will be created (Rotate when greater than X MB) and deleted on a daily basis (Delete rotated logs older than X days).
The Log to OS application log option allows information to be copied to the system event viewer log (accessible via Windows Control Panel > Administrative Tools > Event viewer).
The Debug Log option should be disabled under normal circumstances. By default, the text file output is saved to the following location:
%ALLUSERSPROFILE%\Application Data\Eset\Eset Remote Administrator\Server\logs\era.log
NOTE: We recommend leaving the Log verbosity set to Level 2 – Above + Session Errors. Change the log level only if you are experiencing problems, or if you are advised to do so by ESET’s Customer Care specialists.
4.6.5 Replication tab
The concept of “Replication” has been already mentioned in the section 2.1.2, “ERAS hierarchy at large networks.” Replication is used primarily in large networks where multiple ERA Servers are installed throughout an
organization, in various branches / departments.
• Replication “to“ settings
• Replication “from“ settings
The Replication “to“settings section is used to configure lower ERA Servers. The option Enable “to“ replication must be enabled and the IP address or the name of the master ERA Server (Upper server) entered. Data from the lower server is then replicated to the master server.
The Replication “from“ settings allow master “upper” ERA Servers to accept data from lower ERA Servers, or to transfer them to their master servers. The option Enable “from“ replication must be enabled and names of lower servers should be defined (delimited by a comma).
Both of these options must be enabled for ERA Servers located anywhere in the middle of the replication hierarchy (i.e., they have both upper and lower servers).
All of the previously mentioned scenarios are described by the figure below. The beige computers represent
individual ERA Servers. Each ERA Server is represented by its name (which should be the same as %Computer Name%, to avoid confusion) and the corresponding settings in the replication dialog window.
Other options which influence the replication behavior of servers:
• Replicate threat log, Replicate firewall log, Replicate event log, Replicate scan log
If these options are selected, all information displayed on the Clients, Threat Log, Firewall Log, Event Log, Scan Log, and Tasks tab is replicated in individual columns and lines. Information not stored directly in the database, but in individual files (i.e., .txt or .xml format), may not be replicated.
• Automatically replicate threat log details, Automatically replicate scan log details, Automatically replicate client details
These options enable automatic replication of the complementary information stored in individual files. They can also be downloaded on demand by clicking the Request button).