Table Of Contents
Welcome ...1
Publication Details ...3
What's New...5
PixelPoint POS Version 8.0 ...5
Employee Functions...7
Employee Functions Overview...7
Basic Order...8
Shift Operations... 11
Shift Operations Overview ... 11
Clocking In ... 12
Logging In and Out... 13
Breaks ... 15
Clocking Out ... 16
Authorizing Clock In/Out ... 17
Time & Attendance Only Users ... 18
Your Schedule ... 19
Internal Mail ... 21
Floats... 23
Pick Ups... 24
Pay In ... 25
Pay Out ... 26
Tender Balancing ... 27
Cashing Out... 29
Cash Out Report... 30
Till Assignment ... 33
Settle To Debit ... 45
Settle To Credit Card (Without Credit Authorization)... 46
Settle To Credit Card (With Credit Authorization)... 47
Settle To Member Account ... 48
Settle To Gift Card... 49
Settle To Multiple Tenders ... 50
Local Printing ... 51
Remote Printing... 54
Print Receipt ... 57
Member Screen... 59
Members... 62
Member Payments ... 64
Selling Gift Cards... 65
Bar Codes & PLU's ... 69
Custom Function Buttons... 70
Forced Questions ... 73
Price Levels ... 77
Product Types... 78
Rentals ... 81
Split Checks... 83
Tips... 85
Voids ... 88
Functions Menu... 90
How To Make Item ... 92
Charge Gratuity ... 93
Label... 94
Table Service... 95
Table Service Overview ... 95
Starting A Table... 96
Table Orders... 97
Bussing ... 102
Table Layout Screen ... 103
Your Settings Screen ... 105
Your Trans Screen ... 109
Billboard Screen ... 112
Functions Menu... 114
Set # Of Customers... 116
Transfer Check ... 117
Move Table ... 118
Join Tables... 119
Move Items ... 121
Create Splits By Seating ... 122
Detailed Order Info ... 123
Quick Service... 124
Quick Service Overview... 124
Quick Service... 125
Pick Up Orders ... 126
Drive-Thru Service... 128
Combos... 131
Size Up/Down... 131
Weighed Items... 132
Functions Menu... 133
Member/Delivery ... 135
Bar Service... 138
Bar Service Overview... 138
Transaction View Mode ... 139
Running A Tab... 141
Functions Menu... 143
Cashiers In Table Service... 148
Cashiers In Quick Service... 150
Delivery / Pick Up Service... 151
Delivery / Pick Up Overview... 151
Delivery Screens ... 152
Order Taker... 155
Driver... 157
Delivery Dispatch... 160
Delivery Scenarios... 161
Pick Up Orders ... 164
Delivery Features ... 165
Hostess Service... 169
Hostess Service Overview... 169
Host/Hostess Operations... 170
Seating Customers... 176
Reservation... 179
Manager Functions...183
Manager Functions Overview... 183
System Concept ... 184
Start Of Day Concept ... 187
End Of Day ... 188
End Of Day Concept ... 188
End Of Day Non-24 Hour Operation ... 190
End Of Day 24 Hour Operation ... 191
Manager Functions Menu... 192
Manager Functions... 192
Sales Functions ... 194
Set Weather... 197
Back Office... 198
Report Viewer... 199
Report Viewer Reports... 200
Transaction Viewer... 202
Employee Time Clock ... 205
Shift Rules... 206
Change Timeclock... 209
Authorization Manager... 211
Employee Functions... 214
View Scheduler... 217
Product Functions... 219
Special Functions ... 223
Printer Manager... 225
Reservation Functions ... 227
Show Delivery Status Form ... 228
General Functions... 229
Functions Menu... 229
Post Inventory Usage... 231
Easy Add New Item... 233
Void Entire Check... 234
Pre-Setting Gift Cards ... 235
Training Mode... 237
Security ... 238
Troubleshooting... 242
Correcting Mistakes... 242
Preventative Maintenance ... 246
System Problems ... 249
Glossary...251
Welcome
Thank you for using PixelPoint POS.
Within the contents of this manual you will find information on front-end operations pertaining to both service staff and management. Each has been separated so that the management functions are isolated from instructions pertaining to general service staff.
The first section (Employee Functions) addresses all features, functions and operations that general users would experience in all applicable types of establishments. Whereas the second section (Manager Functions) addresses all front-end functions that a manager would need to know.
If you are using the online help, please feel free to make use of the online search function. It will help you to find your information quickly without having to browse through numerous unrelated help screens. If you are using the printed help, refer to the table of contents and index to help you find what you need.
If you require further assistance, please consult your PixelPoint Dealer. They will be more than happy to assist you with your system needs. For further information on PixelPoint POS and the various add-on modules, feel free to visit www.pixelpointpos.com.
Publication Details
Documentation Details
This document was developed by PAR Technologies, PixelPoint Software Group. For content revisions, questions, or comments, contact the writers at
[email protected]. Copyright
(C) PAR Technology Corporation 2006. All rights reserved. This product and related documentation are protected by copyright and are distributed under licenses restricting their use, copying, distribution and decompilation. No part of this product or related documentation may be reproduced in any form by any means without prior written authorization of PAR Technology and its licensors, if any.
Version Version 8.0 April 2006 Printed in Canada Trademarks
PixelPoint,PAR, the PixelPoint Logo, the PAR Logo are all trademarks of PAR Technology Corporation.
PAR PixelPoint may have patents, patent applications, trademarks, copyrights, or other intellectual property rights covering subject matter in this document. Except as expressly provided rights covering subject matter in this document. Except as expressly provided in any written license agreement from PixelPoint, the furnishing of this document does not give you any license to these patents, trademarks, copyrights, or other intellectual property.
Other product names may be trademarks or registered trademarks of their respective companies and are hereby acknowledged.
Disclaimer
PAR PixelPoint has thoroughly reviewed this document, and is believed to be reliable. However, this document is provided for informational purposes only and PAR PixelPoint makes no warranties, either express or implied, in this document. Information in this document is subject to change without notice. The entire risk of the use or the results of the use of this document remains with the user.
Technical Support
Document Revisions
Revisions to this document are posted on the PixelPoint Partner Portal. Check with your PixelPoint Reseller for current PixelPoint product information. Further information can be acquired through the official web site: www.pixelpointpos.com
What's New
PixelPoint POS Version 8.0
This section summarizes pertinent changes to major features and functions in PixelPoint POS Version 8. Details of each are located in their respective sections throughout this manual.
Forced Questions
All At Once – This enhancement combines multiple forced questions into one screen display. For example, rather than display forced questions one at a time, they will be displayed all at once. This allows the user greater flexibility to apply answers and make changes prior to sending the item with all answers.
Further information regarding this enhancement can be found in the Table Orders section and Forced Questions section.
Break – If you use the Quantity button prior to ordering an item with an All At Once forced question, a Break button will display. This will allow you to apply different forced question answers to each item.
Further information regarding this enhancement can be found in the Table Orders section and Forced Questions section.
Member / Delivery Transactions
Member Screen - In a touch screen environment, you no longer have to select the member record field followed by the keyboard icon button to perform text entry. Simply select the desired field and the keyboard screen will appear automatically.
Pay Later - On future orders, a new [Pay Later] button appears on the Finish Screen. It is used to store non-credit payments until the processing date of the future order.
Further information regarding this enhancement can be found in the Delivery Scenarios section.
OK Button - When searching for a member, the OK button is disabled until a member record is selected.
Future Order Checks - Future orders are now closed when the driver returns from a delivery and has confirmed that the product was delivered. Pre-authorization credit
Driver In on Order Screen - A Driver In function is now available on the Ordering Screen which quick-closes the transaction to the Till. Bar code scanning is supported to close driver pre-authorizations.
Time & Attendance
Shift Status - A new button has been added to the Employee Time Clock function within the Manager Functions menu. This will allow management to monitor employee breaks and overtime.
Further information regarding this enhancement can be found in the Employee Time Clock section.
Employee Functions
Employee Functions Overview
This section addresses all features and functions that pertain to general employee operations. All staff are encouraged to review this section.
The sub-section Shift Operations will provide you general information on the operation of the system. These include the timeclock function, till-related functions and ordering functions.
The remaining sub-sections pertain to specific types of operations (table service, quick service, bar service and hostess service). In the event you are looking for a specific application and you cannot find it, look to the other sections as some functions could be applied to several types of operation.
Basic Order
Forced Questions
When you order an item, a window may automatically pop up asking you to select one of the options provided. This is referred to as a forced question (or forced modifier). PixelPoint is assisting you by requesting that you provide additional information that is required when ordering this specific item.
Whenever the menu offers "Your Choice Of...", this is usually a forced question because it requires that the customer select from the various choices. Some common examples of forced questions are as follows:
• Meat Temperature [rare, medium, well done]
• Salad Dressing [french, italian, ranch]
• Sauce [mild, medium, hot]
• Flavor [vanilla, chocolate, strawberry]
The forced question will also match the selection criteria for the item. For example, it may allow you to select only one item, like in the previous examples, or it may allow you to make multiple selections such as with toppings for burgers, sandwiches or pizzas. The previous image shows such a forced question in which you are prompted to select the toppings for a pizza. This particular question will allow you to select multiple toppings. It may also allow you to select the same item more than once.
In the event the number of selections were too numerous to fit on the screen, the question may be presented in a list format, allowing you to choose from a scrolling list of items rather than buttons for each item.
Split Forced Questions
Some forced questions may allow you to split the selection of items. You can tell that this option is available if you see a Split button on the forced question window (as shown in the previous image). This is useful for situations such as a Half & Half pizza where the toppings
on one half of the pizza are different from the toppings on the other half. The Split function may allow you to select more than just two splits.
When the items are selected, their quantity and price will be proportional to their split. For example, a split of 2 will apply half quantities and half prices of the toppings whereas a split of 3 would apply the quantities and prices in thirds.
All At Once
In situations where multiple questions would be asked when ordering an item, the questions may all be presented on the screen all at once. For example, you order a burger combo. It has several questions; choice of burger type, choice of toppings, choice of side item and flavor of beverage. Rather than display them one at a time, they will all be displayed at once. This allows the user the flexibility to apply the answers and make changes on the fly prior to submitting the item with all answers.
Note: Notice that priced modifiers show up with the price included on the button display.
Break
If you use the Quantity button to order an item that has an All At Once question a Break button will show up in the bottom left corner of the forced question window.
Selecting it, the bottom of the forced question window will change allowing you to separate the application of the forced question to each quantity item. For example, if a quantity of 3 was selected prior to ordering the Burger Combo, you could then select the Break button presenting the display below. This allows you to apply the All At Once question for each of the three combos.
Shift Operations
Shift Operations Overview
The Shift Operations section addresses the general operations of the POS system. Regardless of the type of operation being used, the contents of this section can apply.
The first sub-section (Time & Attendance) primarily covers topics that are related to the time management system. These include how to clock in and out, go on breaks and request time off.
This section covers everything employees designated as Time & Attendance Only (Clock In & Out Only) need to know.
The second sub-section (Till Functions) covers topics that are related to money management. These include cashing out, tender balancing, and pay ins/outs.
The third section (Order-Related Functions) covers topics that are related to the general use of the system. These include how to settle a check, apply members, printing and much more.
Time & Attendance
Clocking In
PixelPoint POS contains a built-in timeclock function which tracks employee time. This can be applied to all employees including those who would not use the system for any other function, such as kitchen staff.
1. From a station's login screen, swipe your employee access card through the station’s magnetic card reader.
• Employees without a card may clock in by touching the [Manual Login] button located in the top right corner of the login screen (if available). This will present a keypad display. Enter your access code and press the [OK] button.
• If you are set up with multiple job positions (for example you can clock in as a server or a bartender), the system will display each job position and ask you to select one for this shift.
2. A prompt will display asking you to confirm that you wish to clock in. Press [OK].
• The system may prompt for a manager to authorize your clock in. Ask your manager to swipe their card to authorize it.
3. Upon clocking in, you will also be logged in.
• If you are in table service mode, you may be taken to the Table Layout screen.
• If you are in quick service mode, you may be taken to a blank check or the quick check retrieval screen.
• If you are set for clock in and out only, you will not be logged in. Logging back into the system will present the Your Settings screen allowing you limited access to some pertinent functions such as viewing the Billboard function, reviewing your schedule and declaring cash tips.
Logging In and Out
In order to gain access to the system you must log in. This can be done one of two ways: You can log in using an employee swipe card or you can enter a manual access code. The method is exactly the same as clocking in. Once you have logged in, the system will take you to your designated screen (determined by your operational mode). This may be a Table Layout screen, a quick order check or other applicable screen.
Log In
1. From the station’s login screen, swipe your employee card through the magnetic card reader.
• If you are not using an employee swipe card, select [Manual Login] in the top right corner of the screen. Enter your manual access code and press [OK].
2. You are now logged into the point-of-sale system.
• If you are in table service mode, you may be taken to the Table Layout screen.
• If you are in quick service mode, you may be taken to a blank check or the quick check retrieval screen.
• If you are set for clock in and out only, you will be taken to the Your Settings screen.
functions in the system. Failure to log out may result in you being responsible for the next user’s guest checks.
Log Out
Select the PixelPoint [P.] logo button in the bottom left corner of the screen. The system may require that you complete the transaction prior to logging out. Close the check in order to log out. You are now at the login screen.
If the station is used only by one employee (such as a cashier or bartender), then there may be no need to log in and out every time. The employee could remain logged into the system for the entire duration of their shift. However, if the station is to be left unattended, it is advisable to log out to ensure proper security.
Breaks
When you go on a break, your timeclock will pause. Log back in to resume the timeclock.
Start Break
1. From the Table Layout screen, select [Your Settings]. 2. Select [Start Break].
• A window may appear asking for management authorization. If so, a manager will have to swipe their card to authorize the break.
End Break
1. Log in
2. The system will see that you were on a break and ask if you wish to end your break. Select [Yes].
Clocking Out
At the end of the shift, the employee clocks out. This stops the timeclock and tells the system that this person is no longer working.
1. From the Table Layout screen, select [Your Settings]. 2. Select [Clock Out Emp].
• The system may prompt for a manager to authorize you clocking out.
• The system may require that you cash out first. If so, perform an employee cash out then clock out.
• A window may appear stating ‘Employee Has Open Tables, Will Not Close’. This means you have tables still open that you must either close or transfer to another server.
• A window may appear stating ‘Employee Has Open Charges’. This means you have charge transactions which require a tip to be added. Apply all tips then attempt to clock out again.
3. The system will print a time chit indicating start time, end time and total hours worked. You are returned to the login screen.
Authorizing Clock In/Out
Scheduler Authorization
If using PixelPoint's employee scheduler module (StaffTime™), you may find some restriction as to when you can and cannot clock in and out. The establishment can dictate how long before and after your scheduled time you may clock in and out. If you attempt to clock in/out beyond this allowable grace period, the system will prevent you from doing it (see below).
[Override Schedule]
In the event it is essential that you clock out beyond the scheduled time, you can override the schedule using this button. Management authorization may be required in order to do this.
[Use Scheduled Time]
This will allow you clock out of the POS system but your time clock will show that you clocked out as per the scheduled time. You will not be credited with the additional time.
[Cancel]
Time & Attendance Only Users
PixelPoint's time clock function can be used by all staff including those not designated as POS users (such as kitchen and clean up staff). An employee requiring access to the system for clocking in and out only will also have the ability to perform some other related tasks on the POS.
Clocking In
When the employee clocks in, the system will immediately exit them back to the log in screen upon completion of clocking in.
Your Settings Functions
The next time the employee logs in (after having clocked in), they will be taken to the Your Settings screen (see below). Though not as comprehensive as the Your Settings screen for POS users, this screen will allow the time clock employee to perform numerous functions. Their system interface must be set to Clock In/Out Only. See "Your Settings" for further details.
Your Schedule
If the establishment is using PixelPoint's StaffTime™ (employee scheduler), you can view your schedule, print it and request time off all through this one screen.
1. From the Table Layout screen, select [Your Settings]. 2. Select [Schedule].
3. From this screen (see below) you can print your schedule for the next two weeks or you can request time off.
[Print Next 2 Weeks Schedule]
This function will print your scheduled times for the next two weeks. These times are dictated by the person using the employee scheduler program (StaffTime™). [Request Time Off]
Should you wish to submit a request to the scheduler for time off, you can do so using the [Request Time Off] button. The screen below allows you to select the day and indicate the time you wish off.
1. Select the day from the request calendar. 2. Select the start time that you would like off.
3. The date and time you are selecting will display under the calendar. Use the buttons below to change the hour and minutes.
4. Select [OK].
5. A window will display asking if you wish the whole day off.
• If you choose [No] you will then be allowed to enter the end time. 6. A confirmation window will display showing the requested time off you entered. 7. The request will display on your schedule calendar (note the highlighted date in first
image above) and applied to the scheduler program.
8. The scheduler will now see the request in the scheduler program and can determine whether to grant it or not.
Note: This information is also available to staff who use the time clock function only.
Internal Mail
PixelPoint POS has an internal mail function that is controlled by management in the back office.
A mail message can be sent to everyone, to all employees in a specific job position or to an individual person.
There are three types of mail messages you can receive:
Mail Message
This type of message is used for long messages that contain substantial and detailed information.
Broadcast Message
Response Mail
This type of message is used whenever management would like to ask a question to the recipient and receive a Yes or No answer.
Till Functions
Floats
A float is the amount of money you start out with at the beginning of your shift. The purpose of this money is to allow you to provide change to customers. PixelPoint is capable of automatically prompting you to enter your float amount upon clocking in. It is also capable of assuming a fixed float amount upon clocking in.
If neither of these options are programmed, then the process for conducting a float declaration is as follows:
1. Select [Your Settings]. 2. Select [Float].
3. A numeric keypad will display. Enter the amount of the float and press [OK]. 4. A confirmation window will display: You entered __ is this correct?
• If you select [No] you will return to the keypad. 5. Select [Yes].
6. A float chit will print providing all necessary information. It will require a manager’s signature for validation. Place this in the till to verify your initial float.
• Any adjustments performed prior to the float declaration will be included in the total balance on the float chit.
You are returned to the Your Settings screen. The adjustments box now displays the value of the float you entered. If the button displayed a value prior to the float, that value will now change to a new balance taking into account the float.
Pick Ups
A pickup occurs when your till becomes congested with cash. A manager will remove portions of this cash to place in the office safe. The pickup function is used to account for this removal of cash.
The process for conducting a pickup is as follows: 1. Select [Your Settings].
2. Select [Pickup].
3. A numeric keypad will display. Enter the amount of the pickup and press [OK]. 4. A confirmation window will display: You entered __ is this correct?
• If you select [No] you will return to the keypad. 5. Select [Yes].
6. A pickup chit will print providing all necessary information. It will require a manager’s signature for validation. Place this in the till to explain the lack of money.
• Any adjustments performed prior to the pickup will be included in the total balance on the pickup chit.
You are returned to the Your Settings screen. The adjustments box now displays the value of the pickup you entered. If the button displayed a value prior to the pickup, that value will now change to a new balance taking into account the pickup.
Pay In
A pay-in occurs when you need to put money into your till without associating it with a sale. An example of a pay-in would be when someone owes money to the establishment and has come to pay it off.
The process for conducting a pay-in is as follows: 1. Select [Your Settings].
2. Select [Pay In].
3. A numeric keypad will display. Enter the amount of the pay-in and press [OK]. 4. A confirmation window will display: You entered __ is this correct?
• If you select [No] you will return to the keypad. 5. Select [Yes].
6. A reasons window will display. Select the appropriate pay-in reason.
7. A keyboard will display. Type a brief description pertaining to this pay-in then press [OK].
8. A pay-in chit will print providing all necessary information. It will require a manager’s signature for validation. Place this in the till to explain the extra money.
• Any adjustments performed prior to the pay-in will be included in the total balance on the pay-in chit.
You are returned to the Your Settings screen. The adjustments box now displays the value of the pay-in you entered. If the button displayed a value prior to the pay-in, that value will now change to a new balance taking into account the pay-in.
Pay Out
A pay-out occurs when you need to remove money from your till without associating it to a sale. An example of a pay-out would be to pay someone for services such as a cleaning service or emergency supplies.
The process for conducting a pay-out is as follows: 1. Select [Your Settings].
2. Select [Pay Out].
3. A numeric keypad will display. Enter the amount of the pay-out and press [OK]. 4. A confirmation window will display: You entered __ is this correct?
• If you select [No] you will return to the keypad. 5. Select [Yes].
6. A reasons window will display. Select the appropriate pay-out reason.
7. A keyboard will display. Type a brief description pertaining to this pay-out then press [OK].
8. A pay-out chit will print providing all necessary information. It will require a
manager’s signature for validation. Place this in the till to explain the lack of money.
• Any adjustments performed prior to the pay-out will be included in the total balance on the pay-out chit.
You are returned to the Your Settings screen. The adjustments box now displays the value of the pay-out you entered. If the button displayed a value prior to the pay-out, that value will now change to a new balance taking into account the pay-out.
Tender Balancing
End Of Shift
It is the end of your shift. You count the cash, credit cards and other methods of payment in your till. When it comes time to do your cash out, you are presented with a Tender Balance screen which will ask you to enter those totals into the system. PixelPoint POS will then compare those totals to what it calculates you should have. If your numbers match those of the system, you have a balanced till. If any of those numbers are out, they are reflected as an over if you have more than the system calculates or a short if you have less than the system calculates.
1. At the end of your shift, count the money in your till. 2. Select [Your Settings].
3. Select [Cash Out].
4. The system will ask if you wish a detailed report. Select [Yes] or [No]. 5. The Tender Balance screen will display.
• The window at the top displays each method of payment you are required to enter totals for.
• In the lower left corner of the display is a numeric keypad. Enter your total for the highlighted method of payment. The number will display in the field
• Rather than calculating all totals before entering them in, you can use the [Add] button to add the numbers as you type them in (much like a calculator). This is particularly useful when adding up credit card slips. After entering the last one, the calculated total will display in the numeric field. Select [Enter] to accept it.
• The system will immediately compare your entered total to what it
calculates. Any difference in the numbers will be shown as an over or short (meaning that your balance is over or under what it should be).
• The Calculated column may not be visible. This is called a Blind Tender Balance. The establishment determines whether this column is shown or not.
• To move from one method of payment to another, use the arrow keys located on the right. You can re-enter totals simply by highlighting the method of payment and entering another number.
• Listed below is a window showing what the system has calculated for charge tips and adjustments. All of this information will be reported in your cash out report.
6. If you do not wish to continue with the cash out process, select the [Cancel] button. A confirmation window will display asking if you wish to cancel Tender Settlement. If you select [Yes] you will be returned to the Your Settings screen.
7. Select [OK] to print the Cash Out report.
Note: If you leave the Your Settings screen after performing a Cash Out, the [Transfer All Checks] and [Cash Out] buttons will be removed from that screen.
End Of Day
The tender balance function can be set to perform as part of the end of day routine rather than an end of shift process. If this applies to your establishment, tender balancing is performed by the shift manager. To access this function, do the following:
1. From the Floor Layout screen, select [Manager]. 2. Select [Sales Functions].
3. Select [Tender Balance].
4. Follow the directions as stated in the End Of Shift section (shown above). However, the numbers entered will be the sum totals from all employees' sales.
5. Upon completion of Tender Balance, perform the remainder of the end of day process.
Cashing Out
At the end of the shift, employees who have been closing checks may be required to cash out before clocking out. This process requires that all of the employee’s checks have either been closed or transferred to another server. At this time, it collates all sales data and generates an Employee Cash Out report. This report identifies transaction information such as how much it was, which method of payment was used and the tip received.
1. From the Table Layout screen, select [Your Settings]. 2. Select [Cash Out].
• A tender balance screen may display asking you to enter how much you have in your drawer for each method of payment. This actual amount is compared to what the system calculates to report whether your balance is over or short. Refer to Tender Balancing for further details.
• The system may request a manager’s authorization for you to do a cash out.
• A window may appear stating ‘Employee Has Open Tables, Will Not Close’. This means you have tables still open that you must either close or transfer to another server.
• A window may appear stating ‘Employee Has Open Charges’. This means you have charge transactions which require a tip to be added. Apply all tips then attempt to cash out again.
• You may be prompted to declare cash tips.
3. A display window will appear asking whether you wish a detailed report or not. [No] will generate a summarized version of the report. [Yes] will generate the same report but with more detailed information.
4. Present the report to management. At this point, you can also Clock Out.
The person who closes the check is responsible for the money collected (regardless of who started the check). Cashing out does not end your shift, therefore it is possible to run more than one cash out within a single shift.
Cash Out Report
The Employee Cash Out report provides information pertaining to the employee’s activities within the shift. This includes timeclock information, sales information, money collected and tip information. Listed below is a detailed breakdown of its contents.
1. This section pertains to timeclock activity. Each shift is given a unique index number called Punch Index. Under this is a breakdown of shift work. It shows when you clocked in, when you cashed out, and when you went on break. It calculates your total hours worked and compares that to your scheduled time (if applicable). 2. This section presents a breakdown of sales activity. Product represents item sales
by summary group (for example Food, Bar and Beverage). The number in the square brackets represents quantity and the number on the right represents the dollar amount sold. Under that are similar displays of coupons, refunds and returns that were applied.
3. This section provides pertinent statistical information based on your transaction activity. If cash tip declaration is applicable, it will show up at the bottom of this sections too. It is placed here to avoid confusion with charge tips which will be applied to summary calculations at the bottom of the report.
4. This is a breakdown of sales by method of payment. Each shows which
transactions used that method of payment, how much was tendered, how much tip was applied and the total of the two. Note: Where it shows cash tips, this
represents change. If reporting of cash tips is required, it will be reported in the previous section.
5. Till Adjustments represents floats and pick-ups. In this case, a float was declared and later a manager did a cash pick-up. POS Tendered represents the cash from sales that went into the till. Tip (Charge Card) is a breakdown of all charge tips that are owed to you. Till Pay in/out displays all pay-ins and payouts that were applied.
6. POS Calculated is the grand total for this method of payment. It takes into account all of the information listed above in this section. If you were taken to the tender balance screen prior to printing the cash out report, the numbers you declared in that screen are represented as Employee Declared. If there is a discrepancy between POS Calculated and Employee Declared, the difference will show as Over/Short.
7. This final section gives a summary of results:
• Cash = Sum of cash POS tendered + Pay-ins – Payouts
• Adjustments = Till adjustments + Pay-ins – Payouts
• Cash (w/adjustments) = Cash + Adjustments
• Charge (no tip) = Sum of charges POS tendered – Charge tips
• Charge Tip = Sum of charge tips
• Charge (w/tip) = Charge (no tip) + Charge tip
• Tendered (no tip) = Sum of POS tendered + Pay-ins – Payouts – Charge tips
• Tendered = sum of POS tendered + Pay-ins – Payouts
Till Assignment
The general rule for PixelPoint accountability is that the person who closes the check is the person responsible for the cash (or credit slip). This is sufficient in most cases but not necessarily in all situations. There are times for example when several people may require access to the same cash drawer or when a drawer insert may have to move between different cash drawers or stations. It is situations like these where till assignment may be required.
If till assignment has been set up on your system, you will see the [Assign Till] button located on the lower right corner of the login screen.
Prior to signing into a station, you must first assign a till to the station. A till is a cash drawer insert. Each insert is assigned its own swipe card. The till card should remain with the insert at all times. It is only required when assigning and unassigning the till to a station.
Upon assigning the till to the station, you will see the message ‘Till Not Assigned’ change to display the name of the assigned till (such as Till #2). From this point on, any employee who signs into that station will have their sales allocated to Till #2. At the time of cash out, the sales will show up in the till’s cash out report and not the employee’s cash out report.
Unassign A Till
1. Select [Unassign Till] located in the lower right corner of the login screen (this only appears after a till has been assigned).
2. Swipe the till card. You are returned to the login screen with the message ‘Till Not Assigned’ displayed in the white bar.
3. Place the swipe card in the drawer insert and take it with you.
Cash Outs With A Till
Because the sales are allocated to the till rather than the employee(s) using it, the individual servers are not required to perform a Cash Out for themselves. The till however, must be cashed out. To cash out a till, do the following:
1. From the log in screen, select [Unassign Till].
2. You will be prompted to select either a cash out or to unassign the till (see below).
• If you select [Cashout (X-Read)] the till will be unassigned and you will be cashed out.
• If you select [Cashout (Z-Read)] the till will be unassigned, you will be cashed out and clocked out.
• If you select [Unassign Till] you can then take the till insert to another station and re-assign it to another station.
The Employee Cash Out report for the till will include a Cashier Transactions section. Within here is the sales information for the individuals (see below).
Order-Related Functions
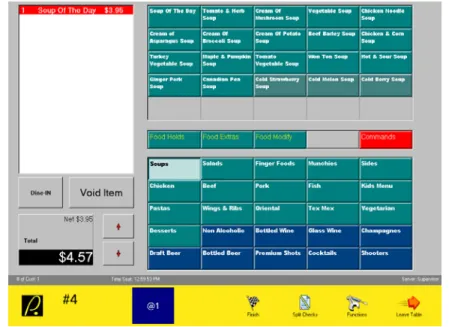
Menu Order Screen
The menu order screen is displayed when you open a check (be it quick service or table service). This screen is the focal point of your transaction. It is here that you place the order and send it off to the kitchen, bar or other destination to be made. It is also from here that you gain access to the Finish screen to accept payment.
Though the layout and content of your screen may be different from this example, the screen components and functions are still the same.
Order Receipt Window
The Order Receipt Window (1) shows the contents of the order. As items are selected, they are added to this display along with their quantity and price.
Product Grid
The Product Grid (2) contains all ordering products (being menu items, modifier items and command items). When you select a product, it will display in the Order Receipt section. The contents of the Modifier Grid will also change to display modifier pages appropriate to that product. For example, select [Small Milk] and the Order Receipt Window will display 1 Small Milk and its price. If you select [Small Milk] again, the quantity will change to a 2. If you order any other product prior to selecting [Small Milk] a second time, the second milk will show on its own separate line.
Modifier Grid
The Modifier Grid (3) contains the modifier pages. When you select a modifier page, the contents of the Product Grid will change to display modifier items appropriate to that button. For example, select [Food Holds] and the Product Grid will display all Hold modifiers. If the number of modifiers exceeds the number of buttons that can display on the screen, press the modify page button again to access the next group. For example, you select [Food Holds] and it shows the first 20 modifiers. To view the next 20 modifiers, select [Food Holds] again. Order Page Grid
The Order Page Grid (4) contains order pages. When you select an order page, the contents of the Product Grid will change to display ordering products appropriate to that button. For example, select [Salads] and the Product Grid will display salad products. If the number of products exceeds the number of buttons that can display on the screen, press the order page button again to access the next group. For example, you select [Cocktails] and it shows you the first 20 cocktails. To view the next 20 cocktails, select [Cocktails] again. Check Total Window
The Check Total Window (5) shows the net total and total after taxes for the check. This total changes as priced items are ordered or voided.
Functions Buttons
These are buttons that allow you to perform special functions directly from the order screen. There are two standard buttons: [Sale Type] which allows you to identify the type of sale to ensure the order is processed accordingly, and [Void Item] which allows you to remove an item that has been applied to the order. For a list of all custom function buttons, refer to the Custom Function Buttons page.
Arrow Buttons
These buttons scroll the Order Page Grid. Pressing the down arrow, the order page buttons will scroll down to the next set of rows containing order page buttons. These buttons are typically used for toggling between meal menus. For example, the establishment has a breakfast menu displayed in the Order Page Grid. When lunch time comes, you press the down arrow and it now displays the lunch menu. Your Order Page Grid will remain on the lunch menu until you press either of the arrows to move up to the breakfast menu or down to the dinner menu. You will automatically be returned to the top level menu on your next shift. Status Line
The status line is a dark gray bar dividing the Order Screen from the Order Operations Bar. From left to right, it displays the number of customers applied to the table/check. Next, in table service mode, it shows the seating time (when the table was opened). If in quick service mode, it displays the value of the previous order. The middle section displays the member name (if applicable) or the check label (if applicable). And finally on the right it
Order Operations Bar [P.]
The PixelPoint logo button will log you out of the system, returning the display back to the login screen. Just to the right of this button is a display that indicates the table number you are working on. If in quick service mode, the number will be lead by a Q, indicating quick service.
[@1]
This button identifies quantity. If you select this, a numeric keypad will display. Enter the number of items you wish to order then press the [OK] button. The Quantity button display will change to reflect the quantity you are ordering. For example, if you chose 5, the button will now display as [@5]. At this point, you select the desired product. The item displayed in the Order Receipt Window will now show a quantity of 5. If you select [>9] prior to entering the desired quantity, you can apply fractional quantities, such as 0.5 or 12.75. The quantity button can be applied to voids as well. See Voids for further details.
[Finish]
This icon takes you to the Finish Screen which will allow you to apply discounts, coupons and settle the check.
[Split Checks]
In Table Service mode, the next icon is [Split Checks]. This takes you to the Split Check screen which will allow you to split the check between customers. Refer to Split Checks for further information.
[Save Check]
In Quick Service mode, the split checks icon is replaced with either [Save Check] or [Get Check], depending on where you are within a transaction. If the check on the screen is blank, the icon will show [Get Check] allowing you to retrieve a saved check. Once you order something, the icon will change to [Save Check] allowing you to save the check for future retrieval.
These two functions are typically used for applying Tabs in a quick service environment. These functions can be removed from the screen if the establishment chooses.
[Functions]
This icon takes you to the Functions menu screen. From here you will be able to apply a wide variety of functions to the check. Refer for Functions for further information. [Leave Table]
This icon appears In Table Service mode. It will save and exit this check and return you to the Table Layout Screen.
[System]
This icon appears in Quick Service mode . If no action is performed on the blank check, this button will allow you to access the Table Layout Screen. Once something is ordered, this icon will not function until you close or save the quick order check.
Closing A Check
Settling A Table
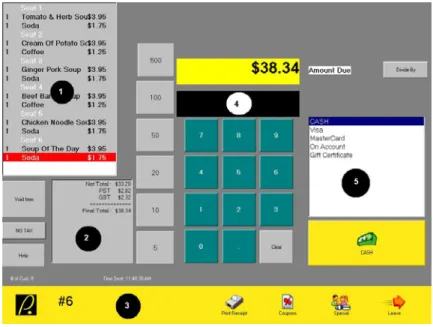
You have presented Table 4 with their check and have been given payment for the meal. It is now time to settle the check.
1. Log in.
2. Select the table [4] icon. The order screen displays. 3. Select [Finish].
Before settling the check, let us first examine the contents of the Finish Screen.
Order Receipt
This window (1) is the Order Receipt. This contains the items that were ordered, their quantities and prices.
Totals Window
The Totals Window (2) shows the net total of the check, all applicable taxes and gratuities, and the final total. Listed alongside this are several function buttons. [Void Item] allows you to remove an item from the guest check. [No Tax] will allow you to remove a tax from the guest check. [Help] will provide on-line help.
Table Number
This area (3) identifies the table number being worked on.
Amount Received
This field (4) identifies the amount received by the customer. You enter this amount using the keypad below.
Payment Options
This area (5) is the Payment Options Window containing a list of all possible methods of payment you could apply.
[CASH]
This is the Payment Button. Its name of Cash will change when you select one of the methods of payment from the Payment Options Window. Use this button to apply the payment.
[Print Receipt]
This button will print the guest check. [Coupons]
This button will display a list of all coupons and discounts which could be applied. [Special]
This button will display a list of all applicable member-related incentive programs. A member with accumulated points must be assigned to the check before this will offer anything. If no member is currently assigned to the check, you will be prompted to apply the member record (see below). Refer to Applying A Member for further details.
[Divide By]
This button will allow you to split the Final Total without splitting the check itself. Using this, you could inform the customers what their share of the total comes to.
Quick Tender Buttons
Settle To Cash
From the Finish screen;
1. Use the keypad to type in the amount of cash given to you.
2. Select the Payment Button (which shows Cash by default). The total in the Amount Due Window will change to show change owing.
• The cash drawer may open and a final receipt may print.
• Management authorization may be required.
3. Select either the Payment Button again or [Leave] to exit the Finish screen and return to either the Table Layout screen or a blank check (depending on whether you are in table service mode or quick service mode).
• Or press the [P.] logo button to log out.
• Though settled, the check will not be finalized until you complete Step 3. If you are given exact change, you do not need to enter the amount using the keypad. Simply press the Payment Button to assume exact change.
Cash refers to your local currency. If your establishment accepts multiple denominations, all foreign currencies will have their own payment titles.
Settle To Foreign Currency
From the Finish screen;
1. Select the desired currency from the Payment Options Window. The Payment Button will automatically change to that method of payment.
• Notice that the required amount for that denomination is shown next to its title in the Payment Options Window.
2. Use the keypad to type in the amount given to you (in that currency).
3. Select the Payment Button. The amount due will now show change owing in base currency. You will notice that it also shows change owing in the foreign currency next to its title in the Payment Options Window and on the Payment Button.
• The cash drawer may open and a final receipt may print.
• Management authorization may be required.
4. Select either the Payment Button again or [Leave] to exit the Finish screen and return to the Table Layout screen or a blank check (depending on whether you are in table service mode or quick service mode).
• Or press the [P.] logo button to log out.
• Though settled, the check will not be finalized until you complete Step 4.
Settle To Debit
Settlement to debit can be performed with and without PixelPoint's credit authorization system (CreditCheck™).
Debit Without CreditCheck™
A separate debit system will manage the actual bank settlement of the transaction. Swipe, enter and settle the transaction through this system as per the manufacturer's instructions.
However, you will still need to complete the transaction within PixelPoint. After settling the transaction through the separate debit system;
1. Retrieve the check and select [Finish].
2. Use the keypad to type in the final amount approved through the debit machine
• Some debit systems allow you to apply a debit tip. If this has been applied, over-tender the amount you enter on the Finish screen. This must
represent the final total including debit tip. 3. Select [Debit] from the Payment Options Window. 4. Select the Payment Button.
• The cash drawer may open and a final receipt may print.
• Management authorization may be required.
• By over-tendering, the debit tip will be displayed as change. This will be reflected in your Cash Out report.
5. Select either the Payment Button again or [Leave] to exit the Finish screen and return to the Table Layout screen or a blank check (depending on whether you are in table service mode or quick service mode).
• Or press the [P.] logo button to log out.
Debit With CreditCheck™
1. From the Finish screen;
2. Select [Debit] from the Payment Options Window. 3. Select the Payment button.
4. Swipe the debit card through the card reader when prompted.
• Management authorization may be required.
5. PixelPoint will interface with the debit card system at this point. Follow the prompts initiated by the debit system.
• If approved, the debit receipt will print and the system will close the check.
• If declined, the check will remain open. Inform the customer and seek another method of payment.
Settle To Credit Card (Without Credit Authorization)
It is assumed that if you are settling a credit transaction without using PixelPoint's credit authorization system (CreditCheck™), that you have a separate credit authorization system in place. In this situation, you would use the other system to manage the pre-authorization, application of charge tip and final settlement of the transaction. The steps listed below pertain to the recording of this within PixelPoint in order to settle the transaction.
After settling the transaction through the separate credit authorization system; 1. Retrieve the check and select [Finish].
2. Use the keypad to type in the amount signed for on the credit slip (this is the bottom-line total including charge tip).
3. Select the desired credit payment from the Payment Options Window. The Payment Button will automatically change to that method of payment. 4. Select the Payment Button.
• The cash drawer may open and a final receipt may print.
• Management authorization may be required.
• By over-tendering, the charge tip will be displayed as change. This will be reflected in your Cash Out report.
5. Select either the Payment Button again or [Leave] to exit the Finish screen and return to the Table Layout screen or a blank check (depending on whether you are in table service mode or quick service mode).
• Or press the [P.] logo button to log out.
• Though settled, the check will not be finalized until you complete Step 5.
Settle To Credit Card (With Credit Authorization)
Credit cards are processed directly through the PixelPoint POS system. PixelPoint's CreditCheck™ module is required for this function to work. Upon receiving the customer's credit card, you log into the station and retrieve the check.
From the Finish screen;
1. Select the desired credit card from the Payment Options Window. 2. Select the Payment button.
3. Swipe the credit card through the station's card reader when prompted.
• Management authorization may be required.
4. Once swiped, you will be brought out to the Table Layout screen or a blank check (depending on whether you are in table service mode or quick service mode) while the charge is being processed.
• If approved, the charge slip will print and the system will close the check.
• If declined, the check will remain open. Inform the customer and seek another method of payment.
5. Take the charge slip to the customer to be signed.
• There will be two copies. Depending on your printer, one dual-ply slip or two single-ply slips will print.
6. Retrieve your copy of the signed charge slip. 7. Apply the charge tip.
Note: The authorization approval slip may vary based on the method of payment. For example, a gift card approval slip may appear differently from a credit card approval slip.
Pre-Authorized Credit Void
Using CreditCheck™, you have closed a check to a credit card and wish to reverse that. It will be necessary for you to Void the pauthorization prior to retrieving the check for re-tendering. This will require a manager to do it. To accomplish this, do the following:
1. From the Table Layout screen, select [Manager]. 2. Select [Authorization Manager].
3. Highlight the pre-authorized transaction from the List Pre-Authorized display. 4. Select [Void].
5. Follow the prompts and choose [Unclose]. This will unclose the transaction allowing you to re-tender the transaction.
Settle To Member Account
Member accounts are member records with a credit limit that the establishment has granted. The establishment will bill the member who in turn will make payments toward that balance. Regardless of the member's balance, the member's account can still be used for collecting client retention points which can be applied to member promotions.
To pay by Member Account, do the following: 1. Select [Finish].
2. Select [On Account] from the Payment Options Window. 3. Select the Payment button.
4. Swipe the member card through the station's card reader when prompted.
• If no card, apply the member to the check by name or phone number using [Functions], [Member/Delivery]. You may also be able to use a custom function button on the order screen (if provided).
• Management authorization may be required.
5. Once swiped, you will be brought out to the Table Layout screen or a blank check (depending on whether you are in table service mode or quick service mode) while the charge is being processed.
• If approved, the charge slip will print and the system will close the check.
• If declined, the check will remain open. The allowable balance on the card will be shown (see below). Inform the customer and seek an additional method of payment to cover the remaining amount. You will have to close the check using multiple tendering if you wish to include the existing account balance.
6. Take the charge slip to the customer to be signed.
• There will be two copies. Depending on your printer, one dual-ply slip or two single-ply slips will print.
7. Retrieve your copy of the signed charge slip. 8. Apply the charge tip.
Settle To Gift Card
Gift Cards are member accounts that have a pre-paid credit balance. This balance can be replenished to any amount at any time. Should it reach a zero balance, the card can still be used for collecting client retention points which can be applied to member promotions.
To pay by Gift Card, do the following: 1. Select [Finish].
2. Select [Gift Certificate] from the Payment Options Window. 3. Select the Payment button.
4. Swipe the gift card through the station's card reader when prompted.
• Management authorization may be required.
• You will be prompted to confirm the identity of the member.
5. Once swiped, you will be brought out to the Table Layout screen or a blank check (depending on whether you are in table service mode or quick service mode) while the charge is being processed.
• If approved, a charge slip will print and the system will close the check.
• If declined, the check will remain open. The allowable balance on the card will be shown (see below). Inform the customer and seek an additional method of payment to cover the remaining amount. You will have to close the check using multiple tendering if you wish to include the existing card balance.
6. Take the charge slip to the customer to be signed.
• There will be two copies. Depending on your printer, one dual-ply slip or two single-ply slips will print.
7. Retrieve your copy of the signed charge slip. 8. Apply the charge tip.
Settle To Multiple Tenders
In this example, the amount of the check is $38.34. The customer gives you $10 cash and asks that $10 be put on Visa and the remainder be put to MasterCard. This is referred to as "split tendering". When doing split tendering, always begin with the amount of cash given to you, then apply the remaining methods of payment after that.
1. Select [Finish].
2. Enter the amount of cash given, in this case $10. 3. Select the Payment Button (it should show Cash).
• A blue window will appear showing that you entered $10 cash.
• The total owing will change, showing the amount still outstanding. 4. Enter the next amount of $10.00.
• If not using CreditCheck, pre-authorize the credit card and have the customer sign the charge slip first. If a charge tip was applied, you will over-tender the credit card portion. For example, the customer left a $5 tip, you would enter $15.00 rather than $10.00. The system will record that you are owed a $5 charge tip.
5. Select the desired credit card in the Payment Options Window. 6. Select the Payment Button.
7. When the charge slip prints, give it to the customer to sign. Keep your copy. 8. Repeat steps 2-7 for the MasterCard, except enter the remaining amount rather
than $10.
9. Apply the charge tip if applicable.
Printing
Local Printing
This term refers to the printing you do at the local printer (situated at the station).
Checks & Receipts
You can generate both a check and receipt by selecting [Finish] then [Print Receipt]. Among the various items shown on the receipt are the quantities, descriptions and prices of the items that were ordered. All food items are grouped together as are the bar items, non-alcoholic items and merchandise items. Though it is possible to change the layout and contents of the receipt, the example below shows a typical receipt.
Sample Check Sample Receipt
Charge Slips
Cash Out
The employee cash out report provides detailed information about the employee's activity during the shift. It provides sales related information, time clock information and statistical information pertaining to number of customers, transactions, voids, discounts and much more.
Clock Out
The clock out slip tells you when the employee clocked in, went on break and clocked out.
Management Reports
Management reports can be printed on the local printer, providing sales, time clock and operational information. To retrieve these, select [Manager], [Sales Functions] then one of the reports.
Employee Schedules
If using the scheduling module (PixelPoint StaffTime™) employees can print out their schedules for the upcoming week or two weeks. To do this, select [Your Settings] then [Print Next Week's Schedule].
How To Make
A description of every item on the menu can be provided. By selecting the item, [Functions] then [How To Make], you can print the description (if available).
Adjustments
Within [Your Settings] is an adjustments section for performing pay ins, pay outs, pick ups and declaring floats. A receipt slip will print on the local printer for each one.
Remote Printing
The term remote printing refers to printing performed at printers not next to the station you are working on. Remote printers are typically situated in the kitchen and at the bar. The function of remote printing is for preparation of the order.
At the top of the remote print is information identifying the order. The large number (1) in the above example is the transaction number. On the next line down is the date and time of the order along with the order number which is a sequential counter of your print jobs. The next line (2) displays the table number along with the number of guests (in brackets).
Sort By Seat
If seating is being applied at the establishment, the remote print can reflect this so that the person preparing the order will know which seat is getting which item(s).
Sort By Report Category
The remote print can be sorted by report category so all wines are together, all beers are together and so on.
Sort By Print Priority
The establishment selects it's own hierarchy of printing so Product X is first, Product Y is second and so on.
Sort By Course
If courses are being applied at the establishment, the remote print can reflect this so all appetizers will be together, all entrees are together and so on.
It will not matter what order the items were ordered in, the print will sort by course. In the case of applying courses (whether sorting by them or not), the line items may also be lead with a course prefix allowing you to identify which item is an appetizer, which is main course and which is dessert. This prefix could be a letter, number, symbol, word or combination of any of these.
Combined Sorts
You can combine any of the above sorts. For example, you can have the order print in the kitchen sorted by course then by seat.
The criteria listed above can be separated on the remote print by a dashed line or a page cut (depending on printer capability). For example, appetizers will print followed by a separator, then main course, separator, then desserts. It can also be set to perform a page cut separator after every item.
Print Consolidation
A large order prints in the kitchen. The chef needs to know what meats to put on the grill right away. A consolidation print can be added to the remote print which will summarize key products (such as grill items) at the bottom of the remote print.
The criteria for consolidated printing can be anything. Consolidation of an item is activated within its programming in System Setup.
Filter By Sale Type
Your establishment may have separate printers based on the type of sale. For example, one printer for Dine-In meals and one printer for Take-Out meals. If this is the case, the system is able to determine which printer to send the meal to based on the Sale Type selected when the order is placed. There will be a sale type button on the Order screen. Make sure it is set to the appropriate sale type to ensure that the order goes to the right printer. Otherwise a customer seated at a table may get their meal in a box instead of on a plate.
Print Receipt
To print a receipt, do the following:
1. Select [Finish] which presents the Finish Check screen. 2. Select [Print Receipt]. The guest check will print.
3. Select [P.] located in the lower left corner of the screen to log out. Present the check to the customer.
The receipt contains a header (containing the name and address of your establishment) and footer (containing a message of thanks from your establishment). It also contains
information regarding the table, server, time and date of service. The main body of the receipt contains all chargeable items, their quantities and prices. Under this is the total before taxes, each applicable tax and the final total. If other charges such as discounts or gratuities were applied, they will be shown as well.
The chargeable items are grouped so that all food is together as are all non-alcoholic beverages, alcoholic beverages and merchandise items.
Note: The receipt layout at your establishment may not match the example above. It is customizable.
Re-Print
To re-print the receipt for a check that has not been settled: 1. Open the check.
2. Select [Finish].
3. Select [Print Receipt]. The guest check will print. However the word REPRINT will also be on the check indicating that this check was printed earlier.
4. Select the closed check from the list above. 5. Select [Print Receipt].
• If you know the transaction number, you can skip steps 4-6 by selecting [Print Receipt By #] and entering the transaction number.
• Management authorization may be required to re-print a receipt.