Symantec Endpoint Encryption
Full Disk
Authenti-Check is a registered trademark of GuardianEdge Technologies Inc. Microsoft, Active Directory, Windows, and Windows XP are either registered trademarks or trademarks of Microsoft Corporation. Any other trademarks used herein are the property of their respective owners and are hereby acknowledged. Other product and company names mentioned herein may be the trademarks of their respective owners.
Contents
1. Introduction . . . 1
Overview. . . 1
Basic Concepts . . . 1
Registration . . . 1
Encryption . . . 1
Single Sign-On . . . 1
The Client Console . . . 1
Policy Administrators . . . 2
Client Administrators . . . 2
Best Practices . . . 2
Password/PIN Strength . . . 2
Password/PIN Secrecy . . . 2
Authenti-Check Questions and Answers . . . 2
Computer Shutdown . . . 2
Trusted Software . . . 3
Backups . . . 3
2. Registration & Re-Registration . . . 4
Overview. . . 4
Registration Prompts. . . 4
Grace Restarts Available . . . 4
Registration Mandate . . . 4
Multiple Users . . . 5
Registration Wizard . . . 5
Basics . . . 5
Registration Password . . . 5
Password Registration . . . 6
Token Registration . . . 11
Re-Registration . . . 16
Basics . . . 16
Re-Registration Notification . . . 16
Re-Registration Mandate . . . 16
3. Pre-Windows Authentication . . . 18
Overview. . . 18
Password-Based Authentication . . . 18
Getting Started . . . 18
Logging On . . . 19
Logon Delay . . . 19
Logon Assistance . . . 20
Token-Based Logon . . . 20
Basics . . . 20
Token Insertion at Startup Screen . . . 20
Logging On . . . 21
Forgotten Password or Token . . . 23
Basics . . . 23
Authenti-Check . . . 25
One-Time Password (OTP) . . . 28
Forgotten PIN . . . 31
Basics . . . 31
One-Time Password (OTP) . . . 32
5. The Client Console . . . 33
Overview. . . 33
Logon . . . 33
Single Sign-On Enabled . . . 33
Single Sign-On Not Enabled . . . 33
Welcome . . . 36
Navigation. . . 37
Password Change . . . 37
Basics . . . 37
Instructions . . . 37
Authenti-Check Change . . . 39
Computer Check-In. . . 40
User Account Viewing . . . 42
Encrypting. . . 42
How To . . . 42
View Status . . . 43
Decrypting . . . 43
How To . . . 43
View Status . . . 44
About . . . 45
Appendix A. Supported Character Sets . . . 46
SEE Passwords . . . 46
Authenti-Check Questions and Answers . . . 46
Appendix B. Token Error Messages . . . 48
Overview. . . 48
Registration or Re-Registration . . . 48
Pre-Windows Logon . . . 51
Client Console Logon . . . 53
Glossary . . . 56
Figures
Figure 2.1—Registration Prompt, Grace Restarts Available . . . 4
Figure 2.2—Registration Prompt, Mandate . . . 4
Figure 2.3—Registration Prompt, Multiple Users . . . 5
Figure 2.4—Registration, Registration Password . . . 6
Figure 2.5—Password Registration, SSO Enabled, Domain Account . . . 7
Figure 2.6—Password Registration, SSO Not Enabled . . . 8
Figure 2.7—Password Registration, Authenti-Check . . . 9
Figure 2.8—Password Registration, Account Is Active . . . 10
Figure 2.9—Token Registration, SSO Enabled . . . 11
Figure 2.10—Token Registration, SSO Not Enabled, Token Insertion . . . 12
Figure 2.11—Token Registration, PIN Entry . . . 13
Figure 2.12—Token Registration, Information Summary . . . 14
Figure 2.13—Select Certificate . . . 14
Figure 2.14—Token Registration, Account Is Active . . . 15
Figure 2.15—Re-Registration Notification . . . 16
Figure 2.16—Re-Registration Mandate . . . 17
Figure 3.1—Pre-Windows Startup, Default . . . 18
Figure 3.2—Pre-Windows Logon, Password . . . 19
Figure 3.3—Pre-Windows Logon, One-Minute Delay . . . 20
Figure 3.4—Pre-Windows Startup, Default . . . 21
Figure 3.5—Pre-Windows Logon, Token PIN Entry . . . 21
Figure 4.1—Pre-Windows Password Logon, Logon Assistance . . . 23
Figure 4.2—Pre-Windows Logon Assistance, No Methods Available . . . 24
Figure 4.3—Pre-Windows Logon Assistance, Default Message . . . 24
Figure 4.4—Pre-Windows Logon Assistance, Authenti-Check . . . 25
Figure 4.5—Pre-Windows Logon Assistance, Success . . . 26
Figure 4.6—Change Password, Windows . . . 26
Figure 4.7—Pre-Windows Logon Assistance, SEE Password Change . . . 27
Figure 4.8—SEE Password Change Success . . . 27
Figure 4.9—Pre-Windows Logon Assistance, Authenti-Check Incorrect, OTP Begins . . . 28
Figure 4.10—Pre-Windows Logon Assistance, OTP . . . 28
Figure 4.11—Change Password, Windows . . . 29
Figure 4.12—Password Change, SEE . . . 30
Figure 4.13—Pre-Windows Token Logon, Logon Assistance . . . 31
Figure 4.14—Pre-Windows Logon Assistance, Default Message . . . 31
Figure 4.15—Pre-Windows Logon Assistance, OTP . . . 32
Figure 5.1—Client Console Logon, Password . . . 34
Figure 5.2—Client Console Logon, Token . . . 35
Figure 5.3—Select Certificate . . . 35
Figure 5.4—Client Console Welcome . . . 36
Figure 5.5—Client Console User Interface Elements . . . 37
Figure 5.6—Client Console Password . . . 38
Figure 5.7—Client Console Authenti-Check . . . 39
Figure 5.8—Client Console Check-In, Check-In with No Enforcement . . . 40
Figure 5.9—Client Console Users . . . 42
Figure 5.10—Client Console Encryption . . . 43
Figure 5.11—Client Console Decryption . . . 44
1. Introduction
Overview
Symantec Endpoint Encryption Full Disk (SEE Full Disk) protects your data while it is at rest through pre-boot authentication and FIPS-validated encryption. As part of Symantec Endpoint Encryption (SEE), it accomplishes this from a central point of control.
This Guide is written for the registered user and includes chapters on registering for an account, authenticating in pre-Windows with a password or a token, using the Client console, and accessing logon assistance methods for forgotten passwords, PINs, or tokens.
This chapter provides you, the user, with an introduction to basic concepts such as registration, encryption,
authentication, and the Client console. The roles of Policy Administrator and Client Administrator are also described. In addition, this chapter includes Best Practices, which provide direction on how to secure the computer work environment.
The sections are as follows: “Basic Concepts” on page 1 “Best Practices” on page 2
Basic Concepts
Registration
SEE Full Disk protects the data stored on your hard disk by requiring you to authenticate before it allows Windows to load. This prevents unauthorized users from accessing your data.
You must register for an account before you can authenticate. The first user will be forced to register once their grace restarts expire, if they have any. Additional users are allowed to defer registration but must also register to be able to boot to Windows. If your Policy Administrator has pushed out a policy to upgrade you from a password to a token user, you will have to re-register.
During registration, you set your SEE password or identify your token and PIN.
Encryption
SEE Full Disk also protects the data stored on your hard disk by encrypting it so that unauthorized users cannot access it. Encryption is the process by which an algorithm renders data unreadable to anyone who does not have the proper credentials. Most likely the encryption was configured to happen immediately following the installation of SEE Full Disk. Encryption is transparent to you. You can continue to work normally during and after the encryption of your hard disk.
Single Sign-On
If Single Sign-On (SSO) is enabled, you will have to log on only once with your Windows user name and password or token. If SSO is not enabled, you will need to log on to SEE Full Disk and then to Windows. Though it requires an extra step, not having SSO enabled is the more secure configuration.
The Client Console
The Client console is available once Windows has loaded and allows you to: View the encryption status of your hard disk partitions.
View the last time your computer checked in with the Symantec Endpoint Encryption Server (SEE Server), if at all.
View product version information.
Encrypt hard disk partitions that are decrypted, if any. In addition, you might be able to:
Change your SEE password.
Change your Authenti-Check questions and answers. Decrypt hard disk partitions.
These additional functions may or may not have been enabled by your administrator.
Policy Administrators
The Policy Administrator performs centralized administration activities that include pushing out policy updates. An organization’s centralized point of control for SEE is one or more Policy Administrators. A Policy Administrator defines installation settings and policies that are pushed out to Client Computers through Active Directory.
Client Administrators
The Client Administrator is your primary SEE administrator contact. The administrator can help you if you get locked out of your computer, forget your password, or if your computer fails to boot.
Best Practices
Password/PIN Strength
Define a password or PIN that you can remember, so that you don’t have to write it down. Try to choose passwords and PINs that are closer to the maximum length allowed rather than to the minimum length allowed. Include a variety of characters, including upper and lowercase letters mixed with numbers and special characters, if allowed. When you create a password or PIN, think of one that is hard to guess; for example, don’t use a commonly known fact, such as your spouse’s name, or a fact that can be easily researched, such as your mother’s maiden name.
Password/PIN Secrecy
You are responsible for your password or PIN’s security. Change your password or request a new PIN if you feel that your password or PIN may have become compromised. Some situations to be mindful of are:
You wrote your password or PIN on a piece of paper but now you can’t find that paper. Someone looked over your shoulder and watched you type your password or PIN.
Authenti-Check Questions and Answers
If you have Authenti-Check available as a password-recovery method, you define up to three question-answer pairs during registration. Then if you forget your SEE password, you can authenticate to SEE Full Disk by correctly answering the questions. These questions and answers, therefore, are just as important as your password.
Follow similar guidelines for your questions and answers that you would for your password. That is, create pairs that do not contain commonly known information, that are longer rather than shorter, and that you can remember. Also, do not let others watch you enter them. Unlike passwords, the question-answer pairs are not displayed as asterisks or dots on your screen; they display in plain text. Therefore, be especially mindful of anyone looking over your shoulder. Also, even if only one question-answer pair is required, define all three. The more information that is required to authenticate you to SEE Full Disk, the more secure your access is.
a cafe. If you must step away, you should invoke the Windows screensaver that requires Windows credentials before it allows you to get back into Windows. To achieve the peace of mind that comes with SEE Full Disk protection, shut down your computer all the way.
Trusted Software
Be familiar with the software that is authorized to run on your computer. Be careful if you download software from the Internet. This software could contain spyware, viruses, malware, Trojan horses, or worms. Also use caution when opening email attachments.
Backups
If your organization does not perform automated backups, you should do so yourself on a regular basis. This will allow you to recover from theft or hard disk failure. Store your backups in a physically secure location, such as a locked cabinet.
2. Registration & Re-Registration
Overview
The registration of the first user greatly improves the ability of SEE Full Disk to protect your computer. Therefore, you should register as soon as you are prompted, even if you have the option to wait.
During registration your password or PIN is set. In addition, you may need to set your Authenti-Check
question-answer pairs. If your Policy Administrator has pushed out a policy to upgrade you from a password to a token user, you will have to re-register. Both registration and re-registration are accomplished by the same Registration wizard.
Registration Prompts
After SEE Full Disk is installed and your computer reboots, SEE Full Disk will prompt you to register for your SEE account.
Grace Restarts Available
Grace restarts are the number of times you can reboot without having to register. The following figure shows a sample of a message you may receive if your administrator has given you grace restarts.
Figure 2.1—Registration Prompt, Grace Restarts Available
The prompt informs you that you can restart a set number of times without having to register. While you can click
Cancel and continue working normally, it’s best to click Register Now and begin the registration process.
Registration Mandate
Once your grace restarts expire, or if your administrator did not give you any grace restarts, you will be forced to register. The following figure shows a sample of a message you will receive if your administrator has not given you grace restarts.
Registration takes only a few moments. Click Register to begin the registration process.
If you can’t complete registration now, click Log Off Windows. The next time you boot up, you will receive the same registration mandate.
Multiple Users
Your administrator may have set up your computer to allow more than one user to register to SEE. You can check to see if this is allowed by using the Client console (see Chapter 5 “User Account Viewing” on page 42).
As the first user, you will need to power the machine up from an off state and authenticate to SEE Full Disk before additional users can register. If you have Single Sign-On, log off Windows and have the additional user log on to Windows. If you do not have Single Sign-On, have the additional user log on at the Windows prompt.
Once Windows boots, a prompt similar to the following is shown:
Figure 2.3—Registration Prompt, Multiple Users
The additional user should click Register Now to begin the registration process.
The additional user will also have the option to click Ask Me Later or Don’t Ask me Again. If the user chooses not to register, then that user will be unable to authenticate in pre-Windows. This could be appropriate if the new user only needs to use the computer this one time or will never need to boot it up from a powered-off state.
Registration Wizard
Basics
The Registration wizard guides you through the registration process. This wizard is the same for both registration and re-registration. The steps in this process will vary according to how your computer has been configured.
Registration Password
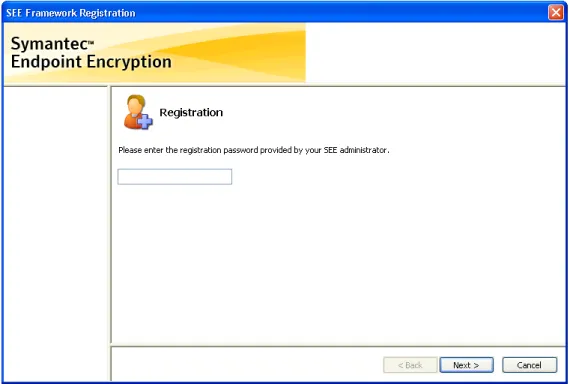
You may need a password to begin the registration process. If you don’t see the following window (Figure 2.4), you don’t need to enter a registration password. Skip to the section on “Password Registration” on page 6 or on “Token Registration” on page 11, as appropriate.
Figure 2.4—Registration, Registration Password
A registration password is a way for your administrator to identify ahead of time which users are intended to use SEE. The registration password is not your SEE password; the registration password admits you to the registration process. You should have received this password ahead of time. If the Registration password screen appears but you do not have the password, call your help desk or click Cancel.
Enter the password and click Next.
If the password is accepted, the next window in the registration process appears.
If the password is not accepted, a message appears and you will need to correct the password then click Next to resubmit it, or click Cancel. The Back button is not enabled; you can only click Next or Cancel. If you click Cancel, your SEE account will not be created. You will be prompted to confirm that you really want to cancel.
Password Registration
Single Sign-On Enabled
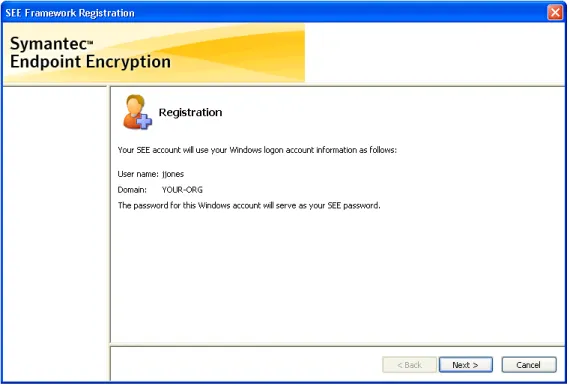
If Single Sign-On is enabled and you are using a domain account, you will see a window similar to the following. If you don’t see this window, skip to the next section “Single Sign-On Not Enabled” on page 7.
Figure 2.5—Password Registration, SSO Enabled, Domain Account
Your Windows name, domain, and password will be used for your SEE account. Click Next to continue.
If you click Cancel, your SEE account will not be created. You will be prompted to confirm that you really want to cancel.
Single Sign-On Not Enabled
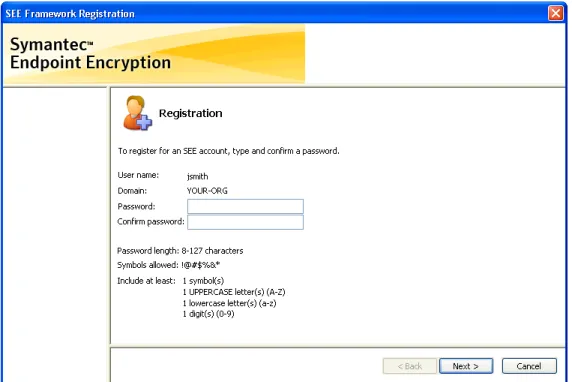
If Single Sign-On is not enabled, the registration window displays your Windows user name, and domain or computer name (Figure 2.6) and prompts you to enter and confirm an SEE password.
Figure 2.6—Password Registration, SSO Not Enabled
Define a password that you can remember, so that you don’t have to write it down. Try to choose passwords that are closer to the maximum length allowed rather than to the minimum length allowed. Include a variety of characters, including upper and lowercase letters mixed with numbers and special characters, if allowed. When you create a password, think of one that is hard to guess; for example, don’t use a commonly known fact, such as your spouse’s name, or a fact that can be easily researched, such as your mother’s maiden name.
Be sure to follow any guidelines shown below the Confirm password field. The password must be within the
Password length specified.
The Symbols allowed parameter identifies which of the symbols on your keyboard may be included in the password. The Include at least field identifies the number of required symbols, uppercase letters, lowercase letters, and/or digits that your password must contain, if any.
Refer to Appendix A “Supported Character Sets” on page 46 for the characters that these Include at least fields include, because not all of the supported characters are shown on the screen. Uppercase and lowercase accented characters, for example, are not shown.
Tab to or click on the Confirm password field and type your password again. Click Next.
If the password does not meet the requirements, the requirement that the password does not meet
—
such as the number of digits—
is displayed in red. If the Password field and Confirm password field do not match exactly, the password fields turn red.Authenti-Check
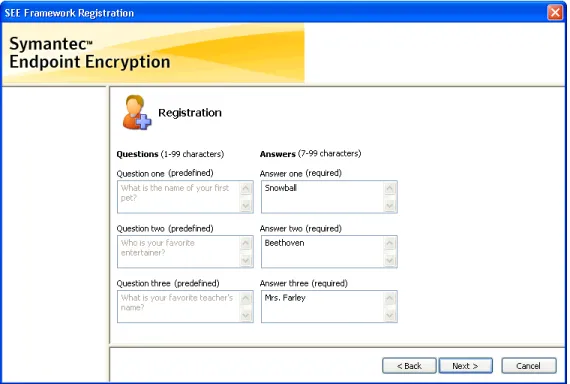
Authenti-Check is a self-help recovery method that allows you to get into your computer if you forget your password. The method is not available to token users. If you have Authenti-Check enabled, then you will see a window similar
Figure 2.7—Password Registration, Authenti-Check
One Authenti-Check question is always required. Up to three questions may be required, depending on how your system is configured.
Questions identified as required, must be entered and answered.
If a question is identified as optional, you are encouraged to enter a question and an answer. The more question-answer pairs you have, the more secure your SEE Full Disk access is. For maximum security, enter three questions and three answers.
Sometimes your administrator predefines questions for you. These questions you cannot change and you must provide answers for.
Try to choose answers that other people cannot guess easily, but that you can remember without writing down. See Table 2.1 for examples of secure and less secure questions.
See Appendix A “Supported Character Sets” on page 46 to see the characters that are allowed in your Authenti-Check questions and answers.
When you have entered all questions and answers, click the Next button to submit your information. If your questions and answers fall within established guidelines, your information will be accepted; otherwise, fields that contain errors Table 2.1—Authenti-Check Sample Questions
Secure Less Secure
Who was your favorite teacher? What is your social security number? Who was your childhood hero? Where were you born?
If you click Cancel, your SEE account will not be created. You will be prompted to confirm that you really want to cancel.
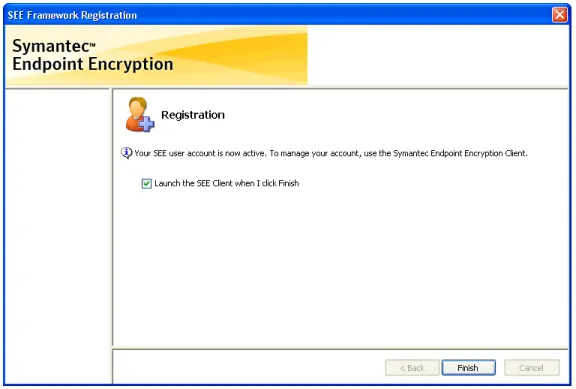
Completion
Once you complete the Registration wizard, the final window notifies you that your SEE user account is active (Figure 2.8).
Figure 2.8—Password Registration, Account Is Active
The Launch the SEE Client when I click Finish check box is selected by default to provide an easy means for you to access the primary control point for your SEE Full Disk protection. You should launch the Client console to view status and ensure that the encryption of your hard disk has begun or completed.
Click Finish to complete the wizard and dismiss the window. If you leave the check box selected, when you click Finish:
If you have Single Sign-On enabled, the Client console launches with the Welcome panel; you are already authenticated.
If you do not have Single Sign-On enabled, the Client console launches with the Logon panel. Log on using the password that you just created for your account.
Token Registration
Token and Reader General Usage
When the Registration wizard instructs you to insert your token:
If you are using an RSA token, connect the USB-connector end of your token to a USB port or into a USB extension cable attached to your computer. Wait until you see the RSA icon in your system tray change to include a plus sign .
If you are using a smart card, hold the card so that the side containing the gold chip is on top and the card end containing the chip is closest to the reader.
If your token has a light or the reader has a light, it blinks when information from your token is being read. If you are using an Axalto smart card, the icon’s computer screen changes from black to blue while the icon’s golden token blinks, then returns to black when the blinking stops . Wait until the blinking stops before taking the next action, such as clicking Next.
If you encounter token, certificate, or PIN errors during registration, refer to Appendix B “Token Error Messages” and check the section “Registration or Re-Registration” on page 48 for possible causes and resolution.
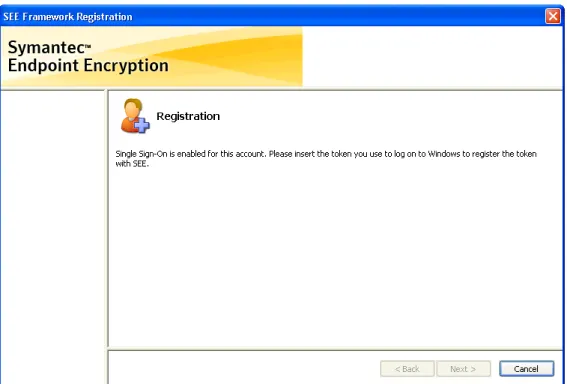
Single Sign-On Enabled
If Single Sign-On (SSO) is enabled, a window similar to the following will be shown. If you don’t see this window, skip to the next section “Single Sign-On Not Enabled” on page 12.
If your token is not yet inserted, your registration screen prompts you to insert your token (Figure 2.9). If you have already inserted your token, the window does not prompt you to insert it.
To register your token for your SEE account, insert the token that you use to log on to Windows. The Next button becomes enabled. The token or reader light should blink as the card is read.
When the token or reader light stops blinking, click Next. You continue to the next window in the Registration wizard. See “PIN Entry” on page 12.
If you click Cancel, your SEE account will not be created. You will be prompted to confirm that you really want to cancel.
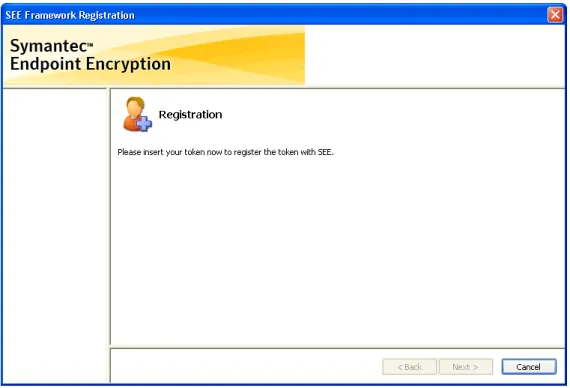
Single Sign-On Not Enabled
If Single Sign-On is not enabled, you will see the following window:
Figure 2.10—Token Registration, SSO Not Enabled, Token Insertion
When you insert your token, the token or reader light should blink as the card is read. When the light stops blinking— or if you have no light but several seconds have passed—click Next. You proceed to the next window in the
Registration wizard.
If you click Cancel, your SEE account will not be created. You will be prompted to confirm that you really want to cancel.
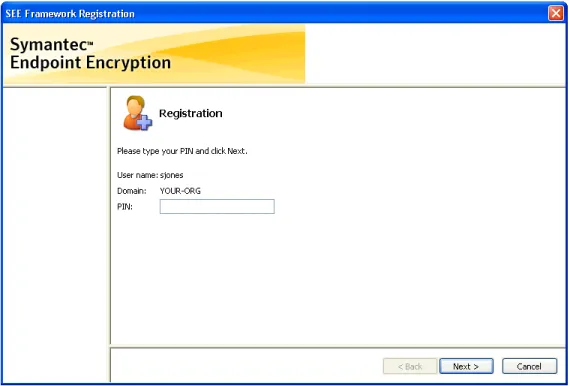
PIN Entry
A window similar to Figure 2.11 prompts you for your PIN. If you don’t see this window, either SSO is not enabled or the Registration wizard has accessed your PIN from your token; skip to the next section “Confirmation” on page 13.
Figure 2.11—Token Registration, PIN Entry
The User name and Domain fields are filled from the information stored on your token. If you are a local user, your computer name appears in the Domain field.
Type your PIN in the PIN field, then click Next.
If you click Cancel, your SEE account will not be created. You will be prompted to confirm that you really want to cancel.
If you click Back, you return to the previous window (Figure 2.10) in the Registration wizard.
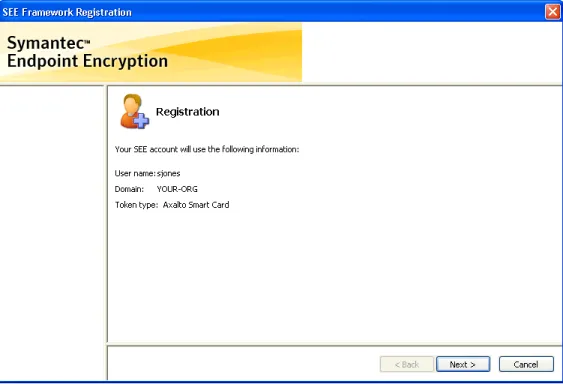
Confirmation
The next registration window confirms the token information that SEE Full Disk will use to authenticate you. Figure 2.12 shows an example.
Figure 2.12—Token Registration, Information Summary
Verify the information and click Next.
Certificate Selection
If the Select Certificate screen (Figure 2.13) does not appear, skip to the next section “Completion” on page 15.
Figure 2.13—Select Certificate
Your administrator probably set up your SEE certificate with the values listed immediately below. These are the values that the SEE software uses to identify your certificate automatically for authentication.
For RSA SID800:
DATA_ENCIPHERMENT and KEY_ENCIPHERMENT (Key Usage) EMAIL_PROTECTION (Enhanced Key Usage)
For Smart Card:
DATA_ENCIPHERMENT and KEY_ENCIPHERMENT (Key Usage) EMAIL_PROTECTION (Enhanced Key Usage)
For Common Access Card (CAC): KEY_ENCIPHERMENT (Key Usage)
However, if more than one certificate—or no certificate—exists with these values, the Select Certificate window (Figure 2.13) opens and you must manually identify your SEE certificate.
Select your SEE certificate by clicking on the appropriate row, then clicking OK. In the Figure 2.13 example, the administrator created two certificates with the expected Key Usage settings, so this user identifies their certificate based on Expiration Date.
If you don’t know which certificate to choose, contact your administrator. If you select a certificate that is not valid, you will receive an error message. Refer to Appendix B “Token Error Messages” and check the section “Registration or Re-Registration” on page 48 for possible resolution.
Completion
The final Registration window (Figure 2.14) notifies you that your SEE user account is active.
Figure 2.14—Token Registration, Account Is Active
The Launch the SEE Client when I click Finish check box is selected by default to provide an easy means for you to access the primary control point for your SEE Full Disk protection. You should launch the Client console to view status and ensure that the encryption of your hard disk has begun or completed.
If you leave the check box selected, when you click Finish:
If you have Single Sign-On enabled, the Client console launches with the Welcome panel; you are already authenticated.
If you do not have Single Sign-On enabled, the Client console launches with the Logon panel. Log on using the token and PIN that you just identified for your account.
See Chapter 5 “The Client Console” on page 33 for information about using the Client console.
Re-Registration
Basics
Your Policy Administrator may issue a policy requiring you to convert your SEE account authentication method, either from a password to a token, or from a token to a password. Should this occur, you will be prompted to re-register. This prompting can also happen if this authentication-conversion setting is in place following an upgrade of SEE Full Disk.
Re-Registration Notification
If your Policy Administrator requires that you convert your account, you will be notified. Your re-registration prompt message contains a date by which you must re-register. Figure 2.15 shows a sample notification prompt for users moving from password-based to token-based authentication.
Figure 2.15—Re-Registration Notification
You are encouraged to click Re-register Now to begin the re-registration process. If your prompt states, “You need to re-register for a token-based account,” follow the instructions under “Token Registration” on page 11.
If your prompt states, “You need to re-register for a password-based account,” follow the instructions under “Password Registration” on page 6.
Click Cancel to re-register later, but you must re-register prior to the date shown in the message or you will be locked out of Windows until you do re-register.
If you cancel for now and the enforcement date arrives, you will still be able to authenticate in pre-Windows with your current account; then when you authenticate to Windows, you will again be prompted to re-register. As long as the date has not yet arrived, you can delay re-registration and work normally.
Re-Registration Mandate
If you are converting to a token-based account, be sure you have been issued your token. You will need it for the re-registration process. If Single Sign-On is enabled, use the token that you use to log on to Windows.
Figure 2.16—Re-Registration Mandate
Click Re-register to launch the Registration wizard. If you need to re-register for a password-based account, follow the instructions under “Password Registration” on page 6. If you need to re-register for a token-based account and you have been issued your token, follow the instructions under “Token Registration” on page 11.
If you can’t complete re-registration, click Log Off Windows. This could occur if you receive the prompt before you receive your token. The next time you boot up, you can authenticate in pre-Windows with your existing SEE account, but when you try to log on to Windows, you will receive the same re-registration mandate.
3. Pre-Windows Authentication
Overview
Pre-Windows authentication ensures that only authorized users can access the encrypted disk. If you have Single Sign-On (SSO), you will only have to log on once with your Windows user name and password or token. If you do not have SSO, you will need to log on to SEE Full Disk and then to Windows. Though it requires an extra step, not having SSO enabled is the more secure configuration.
Authentication is accomplished with either a token or a password, according to how your administrator configured your account.
If you are a password-based user, proceed to read the next section. Token users skip to “Token-Based Logon” on page 20.
Password-Based Authentication
Getting Started
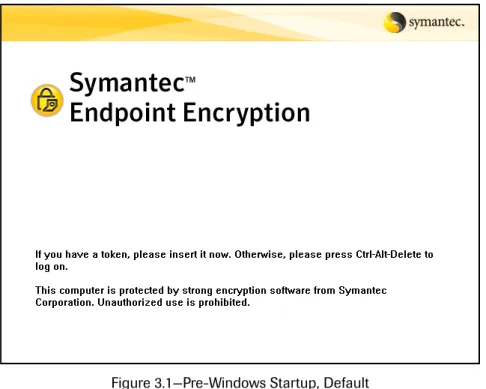
Once you have registered, each time you turn on your computer, you will be greeted by the Symantec Startup screen. The figure below shows the default Startup screen distributed with Symantec Endpoint Encryption.
Figure 3.1—Pre-Windows Startup, Default
The Symantec Startup screen and the pre-Windows logon screen may not be displayed if the Policy Administrator is running Autologon. Autologon allows the Administrator to install software without having users authenticate. If Autologon is running, you will skip the SEE Full Disk logon and log on to Windows only.
Your organization may have created a different screen altogether or they may have chosen to customize the text. At a minimum, the Startup screen should provide you with instructions on how to log on.
As a password user, press CTRL+ALT+DEL.
Logging On
Figure 3.2 shows an example of the pre-Windows Logon screen.
Figure 3.2—Pre-Windows Logon, Password
SEE Full Disk shows the active keyboard layout in a bar displayed in the lower right-hand corner of your computer screen, similar to this: . If your administrator defined multiple keyboards and you need a keyboard layout different than the one identified in the bar, you can press Left ALT+SHIFT or
CTRL+SHIFT—the key sequence depends on which sequence was defined to Windows—to toggle to another keyboard.
To log on to SEE Full Disk, type your user name or UPN into the User name field. The UPN syntax is
[email protected]; for example, [email protected]. Select your domain from the Domain
drop-down menu. If you used UPN syntax, no domain selection is necessary. Type your password into the Password field. Click OK.
Logon Delay
If you provide incorrect logon information, you may be forced to wait 60 seconds before trying again. Figure 3.3 shows an example of the message you see on the Logon screen, if logon delay is active.
Figure 3.3—Pre-Windows Logon, One-Minute Delay
This forced delay prevents unauthorized users from breaking in to your system with automated guessing tools.
Logon Assistance
If you continue to have trouble logging on and you need help, provide your user name and domain, then click Logon Assistance. See Chapter 4 “Logon Assistance” on page 23 for more information.
Token-Based Logon
Basics
If you are using an RSA token, connect the USB-connector end of your token to a USB port or into a USB extension cable attached to your computer. When you insert your token, hold the card so that the side containing the gold chip is on top and the card end containing the chip is closest to the reader.
If your token has a light or the reader has a light, it blinks when information from your token is being read. Wait until the blinking stops before taking the next action, such as clicking OK from the Logon screen. This wait time allows the system to recognize your token.
Token Insertion at Startup Screen
Once you have registered, each time you turn on your computer, you will be greeted by the Startup screen, if your token is not yet inserted. If your token is already inserted, the Startup screen will not appear or will appear only briefly. If you do not see this screen (Figure 3.4), skip to the next section “Logging On” on page 21.
Figure 3.4—Pre-Windows Startup, Default
The figure shows the default Startup screen distributed with Symantec Endpoint Encryption. Your administrator may have created a different screen altogether or may have chosen to customize the text. At a minimum, the Startup screen should provide you with instructions on how to log on.
If you have not inserted your token yet, insert it now. The pre-Windows Logon screen appears.
If you encounter token errors, refer to Appendix B “Token Error Messages” and check the section “Pre-Windows Logon” on page 51 for possible causes and resolution.
Logging On
Figure 3.5 shows an example of the pre-Windows token Logon screen.
SEE Full Disk defaults to the keyboard defined to Windows when the computer was set up. The active keyboard is identified on a bar in the lower right-hand corner of your screen, similar to this: . If your administrator defined multiple keyboards and you need a keyboard layout different than the one identified in the bar, you can press Left ALT+SHIFT or CTRL+SHIFT—the key sequence depends on which sequence was defined to Windows—to toggle to another keyboard.
To authenticate, type your PIN into the PIN field then click OK. Do not remove your token until processing completes.
Token Error Messages and Logon Assistance
If you encounter token, certificate, or PIN errors while trying to log on, refer to Appendix B “Token Error Messages” and check the section “Pre-Windows Logon” on page 51 for possible causes and resolution.
If you have forgotten your PIN and you need help authenticating, click Logon Assistance, then refer to Chapter 4 “Logon Assistance” on page 23.
The first time this pre-Windows Logon screen appears, it may display only the PIN field. Enter your PIN and click OK. Once you log on the first time, the next time you reboot, this Logon screen displays your
4. Logon Assistance
Overview
SEE Full Disk offers two automated methods of logon assistance for users who have forgotten their password or PIN. These methods may or may not have been enabled for you. If you are a token user, you will not have the Authenti-Check method available.
Both methods are available in pre-Windows and require either a token or a valid user and domain/computer name. If you successfully complete one of the methods and Single Sign-On is enabled, you are authenticated to Windows and prompted to change your password. If Single Sign-On is not enabled, you are prompted to change your SEE password, then you are prompted to enter your Windows credentials. If you are a token-based user, you will have to contact the appropriate administrator to change your PIN.
If you do not have either method available, ask your Client Administrator to assist you. If you are a token user with your token, go to “Forgotten PIN” on page 31. If you are a password user or a token user who has forgotten their token, proceed to the next section.
Forgotten Password or Token
Basics
Recover from a forgotten password or a forgotten token by invoking logon assistance from the pre-Windows Logon screen. If you are not already on that screen, press CTRL+ALT+DEL from the Symantec Startup screen; the Logon screen appears (Figure 4.1).
Figure 4.1—Pre-Windows Password Logon, Logon Assistance
SEE Full Disk shows the active keyboard layout in a bar displayed in the lower right-hand corner of your computer screen, similar to this: . If your administrator defined multiple keyboards and you need a keyboard layout different than the one identified in the bar, you can press Left ALT+SHIFT or
CTRL+SHIFT—the key sequence depends on which sequence was defined to Windows—to toggle to another keyboard.
To log on to SEE Full Disk, type your user name or UPN into the User name field. The UPN syntax is
[email protected]; for example, [email protected]. Select your domain from the Domain
drop-down menu. If you used UPN syntax, no domain selection is necessary. Type your password into the Password field.
Click Logon Assistance.
If you have no automated logon assistance methods available, contact your administrator or follow any customized directions on the screen. Figure 4.2 shows the default message. You can skip the rest of this chapter.
Figure 4.2—Pre-Windows Logon Assistance, No Methods Available
Otherwise, you do have one or more authentication assistance methods available and the Logon Assistance wizard begins. Figure 4.3 shows the default message, but your organization may have customized the message with a contact name and phone number. Write down the information before clicking Next. You may need this information later.
Click Next.
Authenti-Check
If you have Authenti-Check, you will see a screen similar to the screen in Figure 4.4. If you don’t see this screen, skip to the next section “One-Time Password (OTP)” on page 28.
Figure 4.4—Pre-Windows Logon Assistance, Authenti-Check
The Authenti-Check method involves up to three question-answer pairs, established during registration. If you forget your password, the questions are displayed and you are prompted to enter the answers. Correct answers authenticate you. You are then prompted to change your SEE password.
In each box that appears below a question, type the correct answer. Make sure that you enter the answer exactly as you entered it when you defined it. Note that punctuation matters. Spaces matter if they precede or end the question. The answers are not case-sensitive.
If an Authenti-Check answer is long (up to 99 characters may be allowed by policy), the characters that you type at the beginning of the answer may move out of view as you continue to type. You can press the arrow keys or HOME and END keys to scroll through your answer, or you can use SHIFT in combination with arrow keys to select text. If you need to delete some or all of the text of a long answer, use one of the methods below to ensure that the non-visible characters are deleted:
To delete the entire answer, press END, then SHIFT+HOME. All text becomes highlighted. Press DELETE. To delete part of the answer, use an arrow key to move to the right of the characters in question, then press
BACKSPACE until all of the characters that you intended to delete are removed. You could also move to the left of the characters, then press DELETE.
Replace any deleted text with correct information, as appropriate. Once you have entered your answers, click Next.
Success, SSO Enabled
If your Authenti-Check process ends successfully and SSO is enabled, Windows proceeds to load. A success message appears with instructions about changing your password (Figure 4.5).
Figure 4.5—Pre-Windows Logon Assistance, Success
If your computer is connected to the domain and you are using a domain account, the Windows Change Password dialog appears when Windows starts. If you are using a local account, connection to the domain is not required; you will be prompted to change your password whether you are connected or not.
Figure 4.6—Change Password, Windows
Enter your new password into the New Password field. Type your password again, in the Confirm New Password
field. Click OK.
If your password is not valid, Windows displays an error message. Correct your information and click OK again. If your password satisfies all Windows password requirements and if the new password and confirmed password match, your Windows password is changed and you gain access to Windows. The next time you log on in pre-Windows, use the new password.
If your Windows account is new or you changed your Windows password quite recently, Windows may stop you from changing your password again because of a minimum password-age restriction. If this happens, call your help desk. Your administrator will need to reset your Windows password.
If you are a domain user and not connected to the domain, you will not be able to change your password. You will need to connect to the domain and/or contact your administrator for assistance.
Success, SSO Not Enabled
Figure 4.7—Pre-Windows Logon Assistance, SEE Password Change
Enter a new password in the New password field. Follow any guidelines shown on the screen. In addition to password length and symbols allowed, your screen may also identify the number of required symbols, uppercase letters, lowercase letters, and/or digits that your password must contain. See also Appendix A “Supported Character Sets” on page 46 for the characters that are allowed in registered user passwords but do not appear in the user interface.
Type your new password again, in the Confirm new password field. Click Finish. Your password is submitted.
If the password meets the requirements and the confirmation matches, a Password Change success message appears (Figure 4.8).
Figure 4.8—SEE Password Change Success
Click OK to dismiss the message.
Once your password is changed, Windows loads. If your password is not valid, an error message appears. Re-enter the information and click Finish again.
Failure, OTP Not Enabled
If your Authenti-Check answers are not correct, a message box appears with a message stating this fact. Click OK to return to the pre-Windows Logon screen (Figure 4.1) where you can try to log on again, or call your Client
Administrator for help.
Failure, OTP Enabled
If your answers are not correct and the OTP recovery method is available, the following message box appears:
Figure 4.9—Pre-Windows Logon Assistance, Authenti-Check Incorrect, OTP Begins
Click Next.
One-Time Password (OTP)
If you have failed to recover using Authenti-Check, or do not have Authenti-Check enabled, the One-Time Password Program will launch.
The One-Time Password (OTP) Program allows you to recover from a forgotten password, PIN, or token with help desk assistance. This assistance provides you with a one-time password—known as a response key or secret recovery key—that allows you to temporarily authenticate. You then will be prompted to enter a new password.
When you click Next from the Logon Assistance wizard or from the Authenti-Check message box, the One-Time Password program launches (Figure 4.10).
Figure 4.10—Pre-Windows Logon Assistance, OTP
Secret Recovery
Key
Checksum Number
Your user Name, Domain, and Computer name are pre-filled and a Code is displayed. The response key (secret recovery key) fields are empty. Figure 4.10 shows the window with sample response key fields already filled in. Contact the person or organization whose name and number appeared in the Logon Assistance message screen. (If you did not write down the information, you can click Back to see the information again, then return to this window by clicking Next.) This person may be your Client Administrator. Let the Client Administrator know that you need assistance with the One-Time Password process.
Tell the Client Administrator the Name, Domain, Computer, and Code information displayed in your window. The Client Administrator will then read back to you a series of numbers (the response key).
Type the response key numbers into the blank fields on your screen. Enter the numbers in sequence, from left to right and top to bottom.
After you have entered the response key numbers, the Client Administrator may ask you to read the checksums that appear to the bottom-right of each data-entry field. These checksums confirm that you have entered the numbers correctly. Figure 4.10 shows an example with callouts that identify a response key (secret recovery key) number and a checksum number.
If the Client Administrator confirms that the numbers are correct, click Next.
Success, SSO Enabled for Token-Based User
If the OTP process ends successfully and SSO is enabled, Windows will proceed to load.
Success, SSO Enabled for Password-Based User
If the OTP process ends successfully and SSO is enabled, Windows proceeds to load.
This message appears, “You have successfully completed the Logon Assistance Wizard. When you are connected to your domain, you will be prompted to change your password after Windows starts.”
If your computer is connected to the domain and you are using a domain account, the Windows Change Password screen appears when Windows starts. If you are using a local account, connection to the domain is not required; you will be prompted to change your password whether you are connected or not.
Figure 4.11—Change Password, Windows
Enter your new password in the New Password field. Type your password again in the Confirm New Password
If your password satisfies all Windows password requirements and if the new password and confirmed password match, your Windows password is changed and you gain access to Windows. The next time you log on in pre-Windows, use the new password.
If your Windows account is new or you changed your Windows password quite recently, Windows may stop you from changing your password again because of a minimum password-age restriction. If this happens, call your help desk. Your system administrator will need to reset your Windows password.
If you are a domain user and not connected to the domain, you will not be able to change your password. You will need to connect to the domain and/or contact your administrator for assistance.
Success, SSO Not Enabled for Token-Based User
If your OTP process ends successfully and SSO is not enabled, you are authenticated to SEE Full Disk and are now prompted to authenticate to Windows.
Success, SSO Not Enabled for Password-Based User
If your OTP process ends successfully and SSO is not enabled, the SEE Password Change screen appears.
Figure 4.12—Password Change, SEE
Enter a new password in the New password field. Follow any guidelines shown on the screen. In addition to password length and symbols allowed, your screen may also identify the number of required symbols, uppercase letters, lowercase letters, and/or digits that your password must contain. See also Appendix A “Supported Character Sets” on page 46 for the characters that are allowed in passwords.
Type your new password again in the Confirm new password field. Click Finish. Your password is submitted.
If the password meets the requirements and the confirmation matches, a password-change success message appears. Once your password is changed, Windows loads. If your password is not valid, an error message appears. Re-enter the information and click Finish again.
Forgotten PIN
Basics
If you have forgotten your PIN, invoke logon assistance from the pre-Windows Logon screen (Figure 4.13). If you are not already on that screen, insert your token at the Symantec Startup screen; the Logon screen appears.
Figure 4.13—Pre-Windows Token Logon, Logon Assistance
Your user name and domain are pre-filled. Leave the PIN field blank. Click Logon Assistance. The Logon Assistance wizard begins with a message (Figure 4.14).
Figure 4.14—Pre-Windows Logon Assistance, Default Message
The figure shows the default message, but your organization may have customized the message with a contact name and phone number. Write down the information before clicking Next.
If your customized message states that no automated recovery methods are available, then call your Client
One-Time Password (OTP)
The One-Time Password (OTP) Program allows you to recover from a forgotten password, PIN, or token with help desk assistance. This assistance provides you with a one-time password—known as a response key or secret recovery key—that allows you to temporarily authenticate. You then will be prompted to enter a new password.
When you click Next from the Logon Assistance wizard, the One-Time Password program launches (Figure 4.15).
Figure 4.15—Pre-Windows Logon Assistance, OTP
Your user Name, Domain, and Computer name are pre-filled and a Code is displayed. The response key (secret recovery key) fields are empty. Figure 4.15 shows the window with sample response key fields already filled in. Contact the person or organization whose name and number appeared in the message screen. (If you did not write down the information, you can click Back to see the information again, then return to this window by clicking Next.) This person may be your Client Administrator. Let the Client Administrator know that you need assistance with the One-Time Password process.
Tell the Client Administrator the Name, Domain, Computer, and Code information displayed in your window. The Client Administrator will then read back to you a series of numbers (the response key).
Type the response key numbers into the blank fields in your window. Enter the numbers in sequence, from left to right and top to bottom.
After you have entered the response key numbers, the Client Administrator may ask you to read the checksums that appear to the bottom-right of each data-entry field. These checksums confirm that you have entered the numbers correctly. Figure 4.15 shows an example with callouts that identify a response key (secret recovery key) number and a checksum number.
If the Client Administrator confirms that the numbers are correct, click Next.
Success, SSO Enabled
If the OTP process ends successfully and SSO is enabled, Windows loads and you have Windows access. You will not be prompted to change your PIN. To recover your PIN or to be issued a new PIN, contact the person or organization that issued you your token.
Secret Recovery
Key
Checksum Number
5. The Client Console
Overview
The Client console is available once Windows has loaded and allows you to: View the encryption status of your hard disk partitions.
View the SEE registered user and Client Administrator accounts on your computer. View the last time your computer checked in with the SEE Server, if at all.
View product version information.
Encrypt hard disk partitions that are decrypted, if any. In addition, you might be able to:
Change your SEE password (only if SSO is off). Change your Authenti-Check questions and answers. Decrypt hard disk partitions.
These additional functions may or may not have been enabled by your administrator.
This chapter begins by describing how to start, log on to, and navigate the Client console. The chapter then describes step-by-step instructions for doing the tasks listed above.
To start the Client console select Symantec Endpoint Encryption Client from the Start menu.
Logon
Single Sign-On Enabled
If you have Single Sign-On enabled and you authenticate using a password, you do not need to log on to the Client console. You will be logged on automatically as soon as Windows loads. Skip to “Welcome” on page 36.
Single Sign-On Not Enabled
When the Client console launches, it prompts you for your credentials. Only the user currently logged on to Windows can log on to the Client console. If Single Sign-On is not enabled, you will be prompted to authenticate with your SEE token or password. For password authentication, continue to the next section. For token authentication, skip to “Token Logon Preparation” on page 34.
Password Logons
Figure 5.1—Client Console Logon, Password
To log on to the Client console with a password, type your SEE password in the Password field, then click Log On. If your password is not correct, the logon fails. Check your password and re-enter the information.
Your Policy Administrator may have implemented a logon delay to occur when one or more incorrect logon attempts are made. This delay helps protect the computer against unwanted password-guessing attacks. If such a setting or policy is in place and you trigger that restriction, a message appears informing you that the number of allowed logon attempts has been exceeded and that you can try again in 60 seconds.
If your password is correct, you are given access to the Client console. Skip to “Welcome” on page 36.
Token Logon Preparation
If you are using an RSA token, connect the USB-connector end of your token to a USB port or into a USB extension cable attached to your computer. Make sure that the RSA token software recognizes your token. You will see the RSA icon in your system tray change to include a plus sign .
When you insert a smart card, hold the card so that the side containing the gold chip is on top and the card end containing the chip is closest to the reader.
If your token has a light or the reader has a light, it blinks when information from your token is being read. If you are using an Axalto smart card, the icon’s computer screen changes from black to blue while the icon’s golden token blinks, then returns to black when the blinking stops . Wait until the blinking stops before taking the next action, such as clicking Next.
Token Logons
Figure 5.2—Client Console Logon, Token
Insert your token. Do not remove the token until authentication completes. In the PIN field, type your PIN, then click Log On.
If you encounter token, certificate, or PIN errors during logon, please refer to the section “Client Console Logon” on page 53 in Appendix B “Token Error Messages” for possible causes and resolution.
Your Policy Administrator may have implemented a logon delay to occur when one or more incorrect logon attempts are made. This delay helps protect the computer against unwanted attacks. If such a setting or policy is in place and you trigger that restriction, a message appears informing you that the number of allowed logon attempts has been exceeded and that you can try again in 60 seconds.
Certificate Selection
If the Select Certificate screen (Figure 5.3) does not appear, skip to the next section “Welcome” on page 36.
Figure 5.3—Select Certificate
Your administrator may have set up your SEE certificate with the values listed immediately below. These are the values that the Symantec software uses to identify your certificate automatically for authentication.
For RSA SID800:
For Smart Card:
DATA_ENCIPHERMENT and KEY_ENCIPHERMENT (Key Usage) EMAIL_PROTECTION (Enhanced Key Usage)
For Common Access Card (CAC): KEY_ENCIPHERMENT (Key Usage)
However, if more than one certificate—or no certificate—exists with these values, the Select Certificate window (Figure 5.3) opens and you must manually identify your SEE certificate.
Select your SEE certificate by clicking on the appropriate row, then clicking OK. In the Figure 5.3 example, the administrator created two certificates with the expected Key Usage settings, so this user identifies their certificate based on Expiration Date.
If you don’t know which certificate to choose, contact your administrator. If you select a certificate that is not valid, you will receive an error message. Refer to Appendix B “Token Error Messages” and check the section “Client Console Logon” on page 53 for possible causes and resolution.
Welcome
The Client console opens with the Welcome panel and an enabled navigation pane (Figure 5.4).
Navigation
The Client console is divided into several sections.
Figure 5.5—Client Console User Interface Elements
The elements are as follows:
The banner displays the product logo, the name of the currently logged on user, and the user’s domain or local computer name.
The navigation pane contains hyperlinks to all tasks. Each task has its own panel, which loads into the main pane when its link is clicked. The links are clustered under two main headings: Account Settings and Full Disk. The main pane changes in response to your clicking a link in the navigation pane. For example, if you click Users,
the main pane displays the Users panel.
The Quick Help pane appears when you click the help icon . It provides context-sensitive help based on the location of your mouse. To close the Quick Help pane, click the help icon again.
Password Change
Basics
If Single Sign-On is not enabled, you can change your SEE password using the Password panel. Changing your password periodically is a good practice, especially if you suspect that it may have been compromised.
Instructions
Banner
Navigation Pane
Quick Help
Pane
Main Pane
Figure 5.6—Client Console Password
If password management is enabled, the Password panel displays the required password length and the symbols that are allowed in your password, and any requirements for the number and type of allowed symbols, and the number of uppercase letters, lowercase letters, and/or digits that your password must contain. Your panel will also describe any overall requirements, such as, “Your new password must be different than the last 10.”
In the New Password field, enter your new SEE password.
Follow any requirements shown on the panel for Password length, Symbols allowed, and Include at least. You can refer to Appendix A “Supported Character Sets” on page 46 for the characters that these Include at least
fields include, because not all of the supported characters are shown on the screen. For example, upper and lowercase accented characters are not shown.
In the Confirm new password field type your new password again. Click OK.
If your password meets the requirements, your password is updated and the Welcome panel (Figure 5.4) replaces the Password panel.
If the password change is not allowed—for example, if not enough time has elapsed since you last changed your password—the fields and buttons become unavailable. An error message box will inform you of the nature of the problem. On the message box, click OK to dismiss the box. You can select another task from the navigation pane or click to quit the Client console.
If the password change is allowed but the password does not comply with the password requirements, then the requirement that the password does not satisfy is highlighted in red. Make the changes necessary to bring it into compliance, then click OK to resubmit the password.
Authenti-Check Change
From the navigation pane, click Authenti-Check. The Authenti-Check panel appears. If Authenti-Check is not enabled for you, the main pane will say so.
The following figure shows an example panel with Authenti-Check enabled and three questions predefined.
Figure 5.7—Client Console Authenti-Check
When you bring up the Authenti-Check panel, all answers and any questions that are required or optional are not displayed, even though they are on file, for security reasons.
When entering questions and answers, consider the following:
Answers are visible when typed, so be sure no one is watching you type them. These answers are as important as your password. Also, remember precisely how you enter the answers; if you must enter them later to recover from a forgotten password, they must match what you enter now. Note that when you enter the answers later, punctua-tion will matter as well as spaces that precede or follow the answers. The answers are not case-sensitive.
To see suggestions on creating effective questions, refer to Chapter 2 “Registration & Re-Registration” under the section “Authenti-Check” on page 8.
To see a list of characters that are allowed in your Authenti-Check questions and answers, refer to Appendix A “Authenti-Check Questions and Answers” on page 46.
Questions and answers marked required must be completed. Minimum character lengths are indicated in parentheses beside Questions and Answers. Even if a question or answer is marked optional, consider filling it in as it will increase the security of your data.
When you have entered all questions and answers, click OK to submit your information.
If your questions and/or answers are not accepted, the field that needs correcting turns red. Make your corrections. You may click the help icon to display Quick Help and read about what is incorrect. Click OK again.
If you click Cancel, your information is cleared and is not submitted.
Computer Check-In
SEE Client Computers can be configured to attempt to connect to the SEE Server at a designated interval. When your computer checks in, it sends important recovery, status, and account information.
The Policy Administrator can optionally add a policy to enforce check-in by locking out users when a computer is required to check in but doesn’t. If lockout occurs, no user can log on to the Client Computer in pre-Windows and a Client Administrator must log on to allow the user to boot into Windows.
Use the Check-In panel to see: What check-in policy is active;
The last communication date information;
The next communication date information, if check-in is enforced by lockout.
To access the panel, from the navigation pane click Check-In. The Check-In panel appears.
If the check-in policy is active without lockout enforcement, the panel displays the last date and time the Client Computer communicated with the SEE Server. Figure 5.8 shows an example.
Figure 5.8—Client Console Check-In, Check-In with No Enforcement
The panel would show different information if the computer had not yet communicated; the Last communication with the SEE Server field would display never connected. This scenario would be unlikely.
If the check-in policy with lockout enforcement is active, the panel displays the last date and time the Client Com-puter communicated with the SEE Server and the next date and time when communication must occur to prevent a lockout.
Table 5.1—Check-In Panel Information
If the information in the Client console indicates that a lockout is imminent, contact your Client Administrator as soon as possible. Your Client Administrator can extend the due date for you, and separately, resolve whatever is preventing your computer from making the required contact with the SEE Server.
About Lockouts
If lockouts are used for enforcement of check-in and the computer fails to check in, then the next time you boot, you will not be able to log on in pre-Windows and you will not have password-recovery methods available. Instead of the Startup screen appearing, you will see this message: “This computer has been locked. Only a Client Administrator can unlock this computer.” Your Client Administrator will need to log you on to bring you to the Windows prompt.
Lockout Prevention
There are three ways to determine that a lockout is probable:
On the Check-In panel, the Next communication due by date turns red and a warning icon appears next to the date. When you hover your mouse over the icon the message “Communication is overdue” appears. A lockout is imminent at the next reboot.
You realize that a communication due date is near and you know that the computer will not be checking in; for example, perhaps you are about to leave on vacation or will be on the road with your laptop.
You reboot your computer and before the Startup screen loads, you see this message: “Access to this computer will be locked in n days unless communication with the SEE server is re-established. Please contact a client administrator for assistance.” You can click OK to dismiss the message and gain access to the Startup screen, but be sure to follow up with one of the preventative actions described in the following bulleted list.
A lockout is prevented when:
You connect your computer to the network, triggering a check-in with the SEE Server before the next communication due date.
A Client Administrator logs on to the computer in pre-Windows. A Client Administrator extends the Next communication due by date.
Field Label Value Meaning
Last communication with the SEE Server
Date and time Communication with the SEE Server occurred on the specified date at the specified time.
never connected
This Client Computer has never connected to the SEE Server. You will not be able to use the OTP recovery method.
Next communication due by*
Future date and time
A lockout enforcement policy is in effect and this Client Computer must make contact with the SEE Server no later than the specified date and time. Past date and time in red with
a warning icon . Tooltip message, “Communication is overdue,” appears.
A lockout enforcement policy is in effect and this Client Computer has failed to connect within the mandatory interval. A lockout is imminent. *This field will not be shown if a lockout enforcement policy is not in effect.
Lockout Recovery
If your computer is already locked, ask a Client Administrator to log on to the computer in pre-Windows. This action unlocks the computer.
User Account Viewing
The Users panel provides a view of all SEE registered users on this computer and Client Administrator accounts set up on this computer.
From the navigation pane click Users. The Users panel appears, listing all current users. The figure shows an example.
Figure 5.9—Client Console Users
Encrypting
How To
The full encryption of the Client Computer is usually set up to begin immediately after installation. It is unlikely that you will need to use the Client console to start this process manually. Should you need to encrypt the disk, you should first connect to an uninterruptible power source. For example, if you are encrypting a laptop, plug in the laptop before you start.
To encrypt one or more partitions, from the navigation pane click Encryption. The Encryption panel appears. Figure 5.10 shows an example.
If Autologon is activated while a computer is in a lockout state, the Autologon policy preempts the lockout condition for as long as the Autologon policy is in effect. This functionality ensures that a communication lockout condition does not disrupt the completion of the Autologon process, which is used to allow software installations and upgrades to run without users authenticating in pre-Windows.