Getting Started with VMware
Workstation
VMware Workstation 9
This document supports the version of each product listed and
supports all subsequent versions until the document is replaced
by a new edition. To check for more recent editions of this
document, see http://www.vmware.com/support/pubs.
You can find the most up-to-date technical documentation on the VMware Web site at:
http://www.vmware.com/support/
The VMware Web site also provides the latest product updates.
If you have comments about this documentation, submit your feedback to:
Copyright © 2012 VMware, Inc. All rights reserved. This product is protected by U.S. and international copyright and intellectual property laws. VMware products are covered by one or more patents listed at http://www.vmware.com/go/patents. VMware is a registered trademark or trademark of VMware, Inc. in the United States and/or other jurisdictions. All other marks and names mentioned herein may be trademarks of their respective companies.
VMware, Inc.
3401 Hillview Ave. Palo Alto, CA 94304 www.vmware.com
Getting Started with VMware Workstation 5
1
Introduction and System Requirements 7
Host System Requirements 7
Virtual Machine Features and Specifications 10
2
Installing and Using Workstation 15
Obtaining the Workstation Software and License Key 15 Installing Workstation with Other VMware Products 16
Reinstalling Workstation When Upgrading a Windows Host Operating System 16 Installing the Integrated Virtual Debuggers for Eclipse and Visual Studio 16 Installing Workstation 16
Upgrading Workstation 21 Uninstalling Workstation 27 Start Workstation 28
Using the Workstation Window 28 Using the Workstation Online Help 32
3
Creating Virtual Machines 33
Understanding Virtual Machines 33 Features of a Typical Virtual Machine 34
Preparing to Create a Typical Virtual Machine 34 Create a Typical Virtual Machine 38
Use Easy Install to Install a Guest Operating System 39 Install a Guest Operating System Manually 40
Installing and Upgrading VMware Tools 41 Install New Software in a Virtual Machine 49
4
Using Virtual Machines 51
Start a Virtual Machine 51 Shut Down a Virtual Machine 52 Pause and Unpause a Virtual Machine 53 Suspend and Resume a Virtual Machine 54 Using the Drag-and-Drop Feature 55 Using the Copy and Paste Feature 55 Add a Host Printer to a Virtual Machine 56 Use a Removable Device in a Virtual Machine 56 Changing the Virtual Machine Display 58 Using Folders to Manage Virtual Machines 62 Taking Snapshots of Virtual Machines 64
Getting Started with VMware Workstation describes how to install and upgrade VMware® Workstation, create a typical virtual machine, and perform common virtual machine operations.
Intended Audience
This information is intended for anyone who wants to install Workstation and create a typical virtual machine. See Using VMware Workstation for complete information about Workstation, including how to use advanced Workstation features.
Where to Find Additional Information
See the following documents for additional information about using Workstation. All of the documents are available from the VMware Web site.
n Using VMware Workstation contains complete information about Workstation, including how to use
advanced Workstation features.
n Installing and Configuring VMware Tools contains complete information about using VMware Tools. n The VMware Guest Operating System Installation Guide contains information about installing specific guest
operating systems.
n The online VMware Compatibility Guide lists the supported host and guest operating systems for
Workstation.
The Workstation online help contains quick reference information about Workstation settings and common tasks. It is available from the Workstation Help menu and when you click Help on a Workstation dialog box.
Introduction and System
Requirements
1
Host computers that run Workstation must meet specific hardware and software requirements. Virtual machines that run in Workstation support specific devices and provide certain features.
This chapter includes the following topics:
n “Host System Requirements,” on page 7
n “Virtual Machine Features and Specifications,” on page 10
Host System Requirements
The physical computer on which you install Workstation is called the host system and its operating system is called the host operating system. To run Workstation, the host system and the host operating system must meet specific hardware and software requirements.
Processor Requirements for Host Systems
You must install Workstation on a host system that meets certain processor requirements.
Supported Processors
The host system must have a 64-bit x86 CPU that meets the following requirements.
n LAHF/SAHF support in long mode n 1.3GHz or faster core speed
Multiprocessor systems are supported.
When you install Workstation, the installer performs checks to make sure the host system has a supported processor. You cannot install Workstation if the host system does not meet the processor requirements.
Processor Requirements for 64-Bit Guest Operating Systems
The operating system that runs inside a virtual machine is called the guest operating system. To run 64-bit guest operating systems, the host system must have one of the following processors.
n An AMD CPU that has segment-limit support in long mode n An Intel CPU that has VT-x support
If you have an Intel CPU that has VT-x support, you must verify that VT-x support is enabled in the host system BIOS. The BIOS settings that must be enabled for VT-x support vary depending on the system vendor. See the VMware knowledge base article at http://kb.vmware.com/kb/1003944 for information about how to determine if VT-x support is enabled.
When you install a 64-bit operating system, Workstation performs checks to make sure the host system has a supported processor. You cannot install a 64-bit operating system if the host system does not meet the processor requirements.
Processor Requirements for Windows 7 Aero Graphics
To support Windows 7 Aero graphics, the host system should have either an Intel Dual Core 2.2GHz or later CPU or an AMD Athlon 4200+ or later CPU.
Supported Host Operating Systems
You can install Workstation on Windows and Linux host operating systems.
To see a list of the supported host operating systems, search the online VMware Compatibility Guide on the VMware Web site.
Memory Requirements for Host Systems
The host system must have enough memory to run the host operating system, the guest operating systems that run inside the virtual machines on the host system, and the applications that run in the host and guest operating systems.
The minimum memory required on the host system is 1GB. 2GB and above is recommended.
To support Windows 7 Aero graphics in a virtual machine, at least 3GB of host system memory is required. 1GB of memory is allocated to the guest operating system and 256MB is allocated to graphics memory. See your guest operating system and application documentation for more information on memory requirements.
Display Requirements for Host Systems
The host system must have a 16-bit or 32-bit display adapter. Use the latest graphics driver recommended for the host system.
To support Windows 7 Aero graphics, the host system should have either an NVIDIA GeForce 8800GT or later or an ATI Radeon HD 2600 or later graphics processor.
IMPORTANT 3D benchmarks, such as 3DMark '06, might not render correctly or at all when running Windows
Disk Drive Requirements for Host Systems
Host systems must meet certain disk drive requirements. Guest operating systems can reside on physical disk partitions or in virtual disk files.
Table 1-1. Disk Drive Requirements for Host Systems
Drive Type Requirements
Hard disk n IDE and SCSI hard drives are supported.
n At least 1GB free disk space is recommended for each guest operating system and the application software used with it. If you use a default setup, the actual disk space needs are approximately the same as those for installing and running the guest operating system and applications on a physical computer. n For basic installation, 1.5GB free disk space is required on Windows and Linux.
Delete the installer after the installation is finished to reclaim disk space. Optical CD-ROM and DVD n IDE and SCSI optical drives are supported.
n CD-ROM and DVD drives are supported. n ISO disk image files are supported.
Floppy Virtual machines can connect to disk drives on the host computer. Floppy disk image files are also supported.
Local Area Networking Requirements for Host Systems
You can use any Ethernet controller that the host operating system supports.Non-Ethernet networks are supported by using built-in network address translation (NAT) or by using a combination of host-only networking and routing software on the host operating system.
ALSA Requirements for Host Systems
To use ALSA in a virtual machine, the host system must meet certain requirements.
n The ALSA library version on the host system must be version 1.0.16 or later.
n The sound card on the host system must support ALSA. The ALSA project Web site maintains a current
listing of sound cards and chipsets that support ALSA.
n The sound device on the host system must not be muted.
n The current user must have the appropriate permissions to use the sound device.
Help System Requirements
You must have a supported Web browser installed on the host system to use the Workstation Help system The following Web browser versions are supported.
n Internet Explorer 6 or later n Mozilla Firefox 1.x or later n Netscape 7.x or later n Safari 1.x or later n Opera 7.54u2 or later
Because Chrome does not support JavaScript on local systems, you cannot display the Workstation Help system in Chrome.
Virtual Machine Features and Specifications
Workstation virtual machines support specific devices and provide certain features.
Supported Guest Operating Systems
A guest operating system can be Windows, Linux, and other commonly used operating systems.
To see a list of the supported guest operating systems, search the online VMware Compatibility Guide on the VMware Web site.
See the VMware Guest Operating System Installation Guide for information on installing the most common guest operating systems.
Virtual Machine Processor Support
Virtual machines support certain processor features.n The same as the processor on the host computer.
n One virtual processor on a host system that has one or more logical processors.
n Up to eight virtual processors (eight-way virtual symmetric multiprocessing, or Virtual SMP) on a host
system that has at least two logical processors.
NOTE Workstation considers multiprocessor hosts that have two or more physical CPUs, single-processor
hosts that have a multicore CPU, and single-processor hosts that have hyperthreading enabled, to have two logical processors.
Virtual Machine Chip Set and BIOS Support
Virtual machines support certain virtual machine chip set and BIOS features.
n Intel 440BX-based motherboard n NS338 SIO chip set
n 82093AA I/O Advanced Programmable Controller (I/O APIC) n Phoenix BIOS 4.0 Release 6 with VESA BIOS
Virtual Machine Memory Allocation
The total amount of memory that you can assign to all virtual machines running on a single host system is limited only by the amount of RAM on the host.
On 64-bit hosts, the maximum amount of memory for each virtual machine is 64GB. On 32-bit hosts, the maximum amount of memory for each virtual machine is 8GB. Workstation prevents powering on virtual machines that are configured to use more than 8GB of memory on 32-bit hosts. Memory management limitations on 32-bit operating systems cause virtual machine memory to overcommit, which severely affects system performance.
Virtual Machine Graphics and Keyboard Support
Virtual machines support certain graphics features and keyboards.n VGA and SVGA are supported.
n To use the GL_EXT_texture_compression_s3tc and GL_S3_s3tc Open Graphics Library (OpenGL)
extensions in a Windows XP or Windows 7 guest operating system, you must install Microsoft DirectX End-User Runtime in the guest operating system. OpenGL is an application program interface that is used to define 2D and 3D computer graphics. You can download Microsoft DirectX End-User Runtime from the Microsoft Download Center Web site.
Virtual Machine IDE Drive Support
Virtual machines support certain IDE drives and features.
n Up to four devices, including disk, CD-ROM, and DVD drives, are supported. n DVD drives can be used to read data DVD discs only.
n DVD video is not supported.
n Hard disks can be virtual disks or physical disks. n IDE virtual disks can be up to 2TB.
n CD-ROM drives can be physical devices or ISO image files.
Virtual Machine SCSI Device Support
Virtual machines support certain SCSI devices and features.
n Up to 60 devices are supported. n SCSI virtual disks can be up to 2TB.
n Hard disks can be virtual disks or physical disks.
n With Generic SCSI support, you can use devices in a virtual machine without installing drivers in the host
operating system. Generic SCSI support works with scanners, CD-ROM drives, DVD drives, tape drives, and other SCSI devices.
n The LSI Logic LSI53C10xx Ultra320 SCSI I/O controller is supported.
Virtual Machine Floppy Drive Support
Virtual machines can have floppy drives.n Up to two 2.88MB floppy devices are supported.
n Floppy drives can be physical drives or floppy image files.
Virtual Machine Serial and Parallel Port Support
Virtual machines support serial (COM) and parallel (LPT) ports.n Up to four serial (COM) ports are supported. Output can be sent to serial ports, Windows or Linux files,
or named pipes.
n Up to three bidirectional parallel (LPT) ports. Output can be sent to parallel ports or host operating system
files.
Virtual Machine USB Port Support
Virtual machines can have USB ports and can support certain USB devices.
n USB 1.1 UHCI (Universal Host Controller Interface) is supported for all virtual machine hardware
n USB 2.0 EHCI (Enhanced Host Controller Interface) controllers are supported if the virtual machine
hardware is compatible with Workstation 6 and later virtual machines.
n USB 3.0 xHCI (Extensible Host Controller Interface) support is available for Linux guests running kernel
version 2.6.35 or later and for Windows 8 guests. The virtual machine hardware must be compatible with Workstation 8 and later virtual machines.
n Support for USB 2.0 and 3.0 requires that you configure virtual machine settings to enable USB 2.0 and
3.0 support and that you have compatible guest operating systems and virtual machine hardware versions.
n Most USB devices are supported, including USB printers, scanners, PDAs, hard disk drives, memory card
readers, and digital cameras. Streaming devices, such as webcams, speakers, and microphones, are also supported.
Virtual Machine Mouse and Drawing Tablet Support
Virtual machines support certain types of mice and drawing tablets.n PS/2 and USB mouse types are supported. n Serial tablets are supported.
n USB tablets are supported.
Virtual Machine Ethernet Card Support
Virtual machines support certain types of Ethernet cards.n Up to 10 virtual Ethernet cards are supported.
n The AMD PCnet-PCI II Ethernet Adapter is supported. For 64-bit guests, the Intel Pro/1000 MT Server
Adapter is also supported.
Virtual Machine Networking Support
Virtual machines support certain Ethernet switches and networking protocols.
n Up to 10 virtual Ethernet switches are supported on Windows host operating systems. Up to 255 virtual
Ethernet switches are supported on Linux host operating systems.
n Three switches are configured by default for bridged, host-only, and NAT networking.
n Most Ethernet-based protocols are supported, including TCP/IP, NetBEUI, Microsoft Networking, Samba,
Novell NetWare, and Network File System (NFS).
n Built-in NAT networking supports client software that uses TCP/IP, FTP, DNS, HTTP, and Telnet. VPN
is supported for PPTP over NAT.
Virtual Machine Sound Support
Workstation provides a sound device that is compatible with the Sound Blaster AudioPCI and Intel High-Definition Audio Specification. The Workstation sound device is enabled by default.
Workstation supports sound in Windows 95, Windows 98, Windows Me, Windows NT, Windows XP, Windows Vista, Windows 7, Windows Server 2003, Windows Server 2008, and Linux guest operating systems. Sound support includes pulse code modulation (PCM) output and input. You can play .wav files, MP3 audio,
and Real Media audio. MIDI output from Windows guest operating systems is supported by the Windows software synthesizer. MIDI input is not supported, and no MIDI support is available for Linux guest operating systems.
Windows XP, Windows Vista, Windows 7 and most recent Linux distributions detect the sound device and install appropriate drivers for it.
Windows 95, Windows 98, Windows 98SE, and Windows NT 4.0 do not have drivers for the Sound Blaster AudioPCI adapter. To use sound in these guest operating systems, you must download the driver from the Creative Labs Web site and install it in the guest operating systems. Creative Labs has Web sites that serve different regions of the world. The adapter name varies, depending on the region, but usually includes PCI 128.
For Workstation 7.x and earlier virtual machines, the vmaudio driver in VMware Tools is installed in 64-bit Windows XP, Windows 2003, Windows Vista, Windows 2008, and Windows 7 guest operating systems and in 32-bit Windows 2003, Windows Vista, Windows 2008, and Windows 7 guest operating systems.
For Workstation 8.x and later virtual machines, the High-Definition Audio (HD Audio) device is presented by default for both 64-bit and 32-bit Windows Vista and Windows 7 guest operating systems and their server counterparts. Windows provides a driver for HD Audio that is not part of VMware Tools.
On Linux host systems, Workstation 7.x and later supports Advanced Linux Sound Architecture (ALSA). Earlier versions of Workstation use the Open Sound System (OSS) interface for sound playback and recording in virtual machines running on Linux host systems. Unlike OSS, ALSA does not require exclusive access to the sound device. The host system and multiple virtual machines can play sound at the same time.
Installing and Using Workstation
2
You can install Workstation on a Linux or Windows host system. Installing or upgrading Workstation typically involves running a standard GUI wizard.
This chapter includes the following topics:
n “Obtaining the Workstation Software and License Key,” on page 15 n “Installing Workstation with Other VMware Products,” on page 16
n “Reinstalling Workstation When Upgrading a Windows Host Operating System,” on page 16 n “Installing the Integrated Virtual Debuggers for Eclipse and Visual Studio,” on page 16 n “Installing Workstation,” on page 16
n “Upgrading Workstation,” on page 21 n “Uninstalling Workstation,” on page 27 n “Start Workstation,” on page 28
n “Using the Workstation Window,” on page 28 n “Using the Workstation Online Help,” on page 32
Obtaining the Workstation Software and License Key
If you have the packaged distribution of Workstation, the installation software is on the installation media in the package and the license key is on the registration card. If you have the electronic distribution, the installation software is in the file that you downloaded and the license key is sent to you in email.
The installation files for both host platforms are included in the packaged distribution. You can use the license key on both the Windows and Linux versions of Workstation. You need one license for each host system. If you do not enter the Workstation license key during installation, you can specify the license key later, in Workstation, select Help > Enter License Key and enter the license key on the Workstation Activation dialog box. You can also purchase a license key and view the status of an evaluation license from the Workstation Activation dialog box.
See the VMware Web site for information on obtaining an evaluation license.
NOTE If you have an invalid license, Workstation prompts you to enter a license key each time you attempt
Installing Workstation with Other VMware Products
The only VMware products that can share a host system with Workstation are VMware vSphere Client and VMware vCenter Converter Standalone. You cannot install Workstation on a host system that has any other VMware virtualization products installed.
If the host system has another VMware virtualization product installed, you must uninstall that product before you install Workstation.
Reinstalling Workstation When Upgrading a Windows Host Operating
System
Before you upgrade the operating system on a Microsoft Windows host, VMware recommends that you uninstall VMware Workstation.
The way Workstation is installed and configured depends partly on the version of Windows used. As a best practice, to ensure that Workstation is properly configured for a new operating system, you must remove the Workstation application before you perform the operating system upgrade. Uninstalling Workstation guarantees that legacy components that apply only to older versions of Windows are not left behind . For example, if you do not uninstall Workstation before upgrading the Windows operating system, some virtual network adapters might not function properly after the operating system upgrade. Before you uninstall Workstation, open the virtual network editor and note the settings used. You must configure these settings again after you reinstall Workstation.
When you uninstall Workstation, you need only uninstall the VMware Workstation application, not the virtual machines that you have created. When the operating system upgrade is complete, reinstall Workstation or, if you are also upgrading Workstation, install the new version of Workstation.
Installing the Integrated Virtual Debuggers for Eclipse and Visual Studio
If you plan to use the Integrated Virtual Debugger for Visual Studio or Eclipse, you should install it on the host system before you install Workstation.
If you must install the Integrated Virtual Debugger for Visual Studio or Eclipse after you install Workstation, run the Workstation installer again and select Modify/Change to install the associated Workstation plug-ins. See the Integrated Virtual Debugger for Eclipse Developer’s Guide and the Integrated Virtual Debugger for Visual
Studio Developer’s Guide for host system requirements and supported operating systems. Both guides are
available on the VMware Web site.
Installing Workstation
You can install Workstation on a Windows host system by running the installation wizard or by using the unattended installation feature of the Microsoft Windows Installer (MSI). The MSI unattended installation feature is useful if you are installing Workstation on several Windows hosts and do not want to respond to wizard prompts. You install Workstation on a Linux host system by running the Workstation bundle installer.
n Install Workstation on a Windows Host on page 17
You run the Windows setup program and installation wizard to install Workstation on a Windows host system.
n Run an Unattended Workstation Installation on a Windows Host on page 18
You can use the unattended installation feature of the Microsoft Windows Installer (MSI) to install Workstation on several Windows host systems without having to respond to wizard prompts. This feature is convenient in a large enterprise.
n Install Workstation on a Linux Host on page 20
You run the Linux bundle installer to install Workstation on a Linux host system. On most Linux distributions, the Linux bundle installer launches a GUI wizard. On some Linux distributions, including Red Hat Enterprise Linux 5.1, the bundle installer launches a command-line wizard instead of a GUI wizard. You can run the installer with the --console option to install Workstation in a terminal window.
Install Workstation on a Windows Host
You run the Windows setup program and installation wizard to install Workstation on a Windows host system. Remote connections and virtual machine sharing are enabled by default when you install Workstation. With remote connections, you can connect to remote hosts and run remote virtual machines. With virtual machine sharing, you can create virtual machines that other instances of Workstation can access remotely.
Shared virtual machines are stored in the shared virtual machines directory, where VMware Workstation Server (the VMware Workstation Server service) manages them. Remote users connect to VMware Workstation Server through HTTPS port 443 on the host system.
To change the shared virtual machines directory or select a different port during the installation process, you must select the Custom option. You can also change the shared virtual machines directory, select a different port, and disable remote connections and virtual machine sharing after Workstation is installed by modifying the Shared VMs Workstation preference setting. See Using VMware Workstation for more information.
Prerequisites
n Verify that the host system meets the host system requirements. See “Host System Requirements,” on
page 7.
n Verify that you have administrative privileges on the host system.
n Verify that no incompatible VMware products are installed on the host system. See “Installing Workstation with Other VMware Products,” on page 16.
n Obtain the Workstation software and license key. See “Obtaining the Workstation Software and License Key,” on page 15.
n If you plan to use the Integrated Virtual Debugger for Eclipse or Visual Studio, install it on the host system.
See “Installing the Integrated Virtual Debuggers for Eclipse and Visual Studio,” on page 16.
Procedure
1 Log in to the Windows host system as the Administrator user or as a user who is a member of the local Administrators group.
If you log in to a domain, the domain account must also be a local administrator.
2 If you are installing Workstation from a CD, insert the CD in the CD-ROM drive on the host system. If autorun is enabled, the installation program begins.
3 If autorun is not enabled, or if you downloaded the installation software, double-click the setup file.
Option Description If you are installing the software from
a CD The setup file is called
setup.exe.
If you downloaded the software The setup filename is similar to VMware-workstation-xxxx-xxxx.exe, where xxxx-xxxx is the version and build numbers.
4 Select a setup option.
Option Description
Typical Installs typical Workstation features. If the Integrated Virtual Debugger for Visual Studio or Eclipse is present on the host system, the associated Workstation plug-ins are installed.
Custom Lets you select which Workstation features to install and specify where to install them. Select this option if you need to change the shared virtual machines directory, modify the VMware Workstation Server port, or install the enhanced virtual keyboard driver. The enhanced virtual keyboard driver provides better handling of international keyboards and keyboards that have extra keys.
5 Follow the prompts to finish the installation.
Depending on your configuration, you might need to restart the host system to finish the installation. After Workstation is installed, the VMware Workstation Server service starts on the host system. The VMware Workstation Server service starts whenever you restart the host system.
Run an Unattended Workstation Installation on a Windows Host
You can use the unattended installation feature of the Microsoft Windows Installer (MSI) to install Workstation on several Windows host systems without having to respond to wizard prompts. This feature is convenient in a large enterprise.
Prerequisites
n Verify that the host system meets the host system requirements. See “Host System Requirements,” on
page 7.
n Verify that no incompatible VMware products are installed on the host system. See “Installing Workstation with Other VMware Products,” on page 16.
n Obtain the Workstation software and license key. See “Obtaining the Workstation Software and License Key,” on page 15.
n If you plan to use the Integrated Virtual Debugger for Eclipse or Visual Studio, install it on the host system.
See “Installing the Integrated Virtual Debuggers for Eclipse and Visual Studio,” on page 16.
n Verify that the host computer has version 2.0 or higher of the MSI runtime engine. This version of the
installer is available in versions of Windows beginning with Windows XP and is available from Microsoft. See the Microsoft Web site for more information.
n Familiarize yourself with the REMOVE property values. See “REMOVE Property Values,” on page 19. n Familiarize yourself with the installation properties. See “Installation Properties,” on page 19.
Procedure
1 Log in to the host system as the Administrator user or as a user who is a member of the local Administrators group.
If you log in to the domain, the domain account must also be a local administrator.
2 If you are installing Workstation from a CD, insert the CD in the CD-ROM drive on the host system. 3 Extract the administrative installation image from the setup file.
If you are installing Workstation from a CD, the setup file is called setup.exe. If you downloaded the
installation software, the setup filename is similar to VMware-workstation-xxxx-xxxx.exe where
xxxx-xxxx is the version and build number.
4 Type the installation command on one line. For example:
setup.exe /s /v "[INSTALLDIR=""path_to_program_directory""] ADDLOCAL=ALL [REMOVE=value,value] /qn"
You can use the optional INSTALLDIR property to specify a file path for the installation that is different from
the default location. The double quotes around the file path are important. All the MSI arguments are passed with the /v option. The outer quotes group the MSI arguments and the double quotes put a quote in that argument. You can use the optional REMOVE property to skip the installation of certain features.
REMOVE Property Values
When you perform an unattended installation of Workstation, you can skip the installation of certain features by specifying the REMOVE property in the installation command.
To specify a REMOVE property value in the installation command, use the format REMOVE=value. To skip multiple features, separate each value with a comma, for example, REMOVE=value,value.
Table 2-1. REMOVE Property Values
Value Skipped Feature
Authd The VMware authorization service, which is used to perform tasks when you are not running Workstation as an Administrator user.
Network Networking components, including the virtual bridge and the host adapters for host-only networking and NAT networking. Do not remove this component if you want to use NAT or DHCP.
DHCP The virtual DHCP server. NAT The virtual NAT device.
Installation Properties
When you perform an unattended installation of Workstation, you can customize the installation by specifying installation properties in the installation command.
To specify an installation property in the installation command, use the format property="value". A value of 1 means true and a value of 0 means false.
Table 2-2. Installation Properties
Property Description Default Value
DESKTOP_SHORTCUT Adds a shortcut on the desktop when Workstation is installed. 1
REMOVE_LICENSE Removes all stored licenses when Workstation is uninstalled. 0
SERIALNUMBER Lets you enter the license key when Workstation is installed. Enter the license key with hyphens, for example, xxxxx-xxxxx-xxxxx-xxxxx-xxxxx.
HOSTD_HTTPS_PORT Specifies the HTTPS port for VMware Workstation Server. 443
REMOVE_ACCOUNT_INFO Removes account information when Workstation is uninstalled. 1
REMOVE_SETTINGFILES Removes settings files when Workstation is uninstalled. 1
STARTMENU_SHORTCUT Adds a Start menu item when Workstation is installed. 1
Install Workstation on a Linux Host
You run the Linux bundle installer to install Workstation on a Linux host system. On most Linux distributions, the Linux bundle installer launches a GUI wizard. On some Linux distributions, including Red Hat Enterprise Linux 5.1, the bundle installer launches a command-line wizard instead of a GUI wizard. You can run the installer with the --console option to install Workstation in a terminal window.
Remote connections and virtual machine sharing are enabled by default when you install Workstation. With remote connections, you can connect to remote hosts and run remote virtual machines. With virtual machine sharing, you can create virtual machines that other instances of Workstation can access remotely.
Shared virtual machines are stored in the shared virtual machines directory, where VMware Workstation Server (vmware-workstation-server) manages them. Remote users connect to VMware Workstation Server
through HTTPS port 443 on the host system.
To change the shared virtual machines directory or select a different port during the installation process, you must specify the --custom option. You can also change the shared virtual machines directory, select a different port, and disable remote connections and virtual machine sharing after Workstation is installed by modifying the Shared VMs Workstation preference setting. See Using VMware Workstation for more information.
Prerequisites
n Verify that the host system meets the host system requirements. See “Host System Requirements,” on
page 7.
n Verify that no incompatible VMware products are installed on the host system. See “Installing Workstation with Other VMware Products,” on page 16.
n Obtain the Workstation software and license key. See “Obtaining the Workstation Software and License Key,” on page 15.
n If you plan to use the Integrated Virtual Debugger for Eclipse, install it on the host system. See “Installing the Integrated Virtual Debuggers for Eclipse and Visual Studio,” on page 16.
n Compile the real-time clock function into the Linux kernel.
n Verify that the parallel port PC-style hardware option (CONFIG_PARPORT_PC) is built and loaded as a kernel
module and that it is set to m when the kernel is compiled.
n Familiarize yourself with the Linux command-line installation options. You must use the --custom option
to specify certain configuration settings. See “Linux Command Line Installation Options,” on page 21.
n Verify that you have root access on the host system.
Procedure
1 Log in to the host system with the user name that you plan to use when you run Workstation. 2 Become root.
For example: su root
The command that you use depends on your Linux distribution and configuration.
3 If you are installing Workstation from the installation media, mount the Workstation installation media. 4 Change directories to the directory that contains the Workstation installer file.
Option Description If you are installing the software from
a CD
The installer file is in the Linux directory.
5 Run the appropriate Workstation installer for the host system.
For example: sh VMware-Workstation-xxxx-xxxx.architecture.bundle [--option]
xxxx-xxxx is the version and build numbers, architecture is i386 or x86_64, and option is a command line
option.
6 Accept the Open Virtualization Format (OVF) Tool license agreement.
If you are using the --console option or installing Workstation on a host system that does not support the GUI wizard, press Enter to scroll through and read the license agreement or type q to skip to the
[yes/no] prompt.
7 Follow the prompts to finish the installation.
After Workstation is installed, vmware-workstation-server starts on the host system. vmware-workstation-server starts whenever you restart the host system.
Linux Command Line Installation Options
You can use command line installation options to install Workstation on a Linux host system.
To use the installation options, you must be logged in as root. Exit from the root account after the installation is finished.
Table 2-3. Linux Command Line Installation Options
Option Description
--gtk Opens the GUI-based VMware installer, which is the default option.
--console Enables you to use the terminal for installation.
--custom Use this option to customize the following installation settings. n The locations of the installation directories.
n The user who will initially connect to VMware Workstation Server. This user can create and manage shared virtual machines.
n The hard limit for the number of open file descriptors. n The location of the shared virtual machines directory.
n The HTTPS port that VMware Workstation Server uses on the host system.
--regular Shows installation questions that have not been answered before or are required. This is the default option.
--required Shows the license agreement only and then proceeds to install Workstation.
--ignore-errors or -I Allows the installation to continue even if there is an error in one of the installer scripts. Because the section that has an error does not complete, the component might not be properly configured
Upgrading Workstation
You can upgrade from Workstation 4, 5.x, 6.x, or 7.x to the current version of Workstation by running the Workstation installation program.
When you upgrade Workstation, the installation program removes the previous version of Workstation before it installs the new version.
To use the latest features, virtual machines that were created in the previous versions of Workstation must be upgraded to the current version of Workstation.
n Prepare for an Upgrade on page 22
n Upgrade Workstation on a Windows Host on page 23
You can upgrade from Workstation version 4, 5.x, 6.x, or 7.x to the current version of Workstation on a Windows host system by running the Workstation setup program and installation wizard for Windows.
n Upgrade Workstation on a Linux Host on page 24
You can upgrade Workstation version 4, 5.x, 6.x, or 7.x to the current version of Workstation on a Linux host system by running the Linux bundle installer for Workstation. On most Linux distributions, the Linux bundle installer launches a GUI wizard. On some Linux distributions, including Red Hat Enterprise Linux 5.1, the bundle installer launches a command-line wizard instead of a GUI wizard. You can run the installer with the --console option to upgrade Workstation in a terminal window.
n Change the Hardware Compatibility of a Virtual Machine on page 25
You can change the hardware compatibility of a virtual machine. All virtual machines have a hardware version. The hardware version indicates which virtual hardware features that the virtual machine supports, such as BIOS or EFI, number of virtual slots, maximum number of CPUs, maximum memory configuration, and other hardware characteristics.
Prepare for an Upgrade
You must perform certain steps before you upgrade Workstation.
Procedure
n Verify that all virtual machines are Workstation 4, 5.x, 6.x, or 7.x virtual machines.
Direct upgrades from Workstation 2 and 3 virtual machines are not supported.
n Review the system requirements for the new version of Workstation.
n If a virtual machine was created with a version of Workstation earlier than Workstation 5.5 and it has a
snapshot, delete the snapshot.
n If you are upgrading from Workstation 4, 5.x, 6.x, or 7.x, and the previous version of Workstation used
bridged settings to map virtual networks to specific physical or virtual adapters, record those settings. You must recreate these mappings after you upgrade Workstation.
n Power off all running virtual machines in Workstation.
n If any virtual machines are suspended, resume them and power them off in Workstation.
n If any virtual machines are running in the background, start them in Workstation and power them off. n Back up all virtual machines by making backup copies of the files in the virtual machine directories and
storing them in different directories.
The files that you back up should include .vmdk or .dsk files, .vmx or .cfg files, and .nvram files. Depending
on the upgrade path, you might not be able to run virtual machines under both the current version of Workstation and the previous version of Workstation.
n If you are upgrading Workstation 6.x on Windows XP to the current version of Workstation on
Windows Vista or Windows 7, verify that Service Pack 2 is installed and then upgrade the host operating system to Windows Vista or Windows 7.
n If you are upgrading Workstation 5.x on Windows Vista to the current version of Workstation on Windows
Vista, select Programs > Programs and Features > Uninstall a program in the Windows control panel to manually uninstall Workstation 5.x.
n If you are upgrading Workstation 5.x on Windows XP to the current version of Workstation on
Windows Vista or Windows 7, select Add or Remove Programs in the Windows control panel to manually uninstall Workstation 5.x.
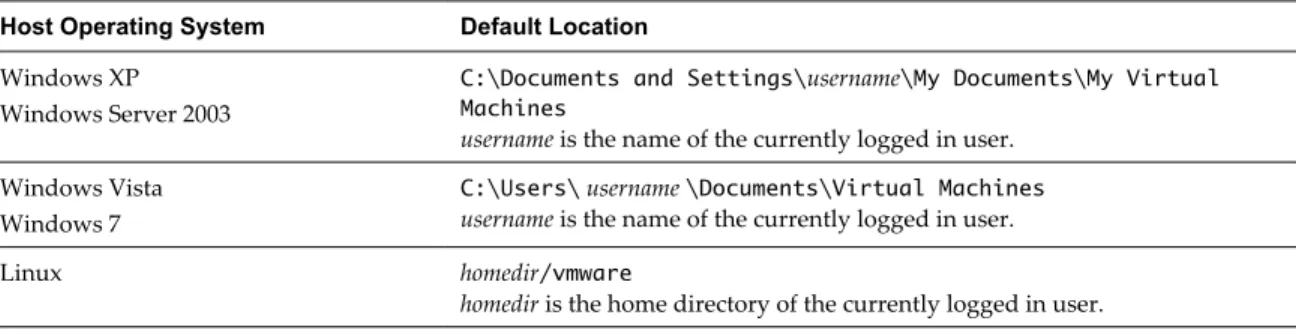
During an upgrade from Windows XP to Windows Vista or Windows 7, the location of virtual machines might change. The Windows Vista and Windows 7 upgrade use the registry to map the virtual machines to a new location. Before the upgrade, the default virtual machine location on Windows XP is
C:\Documents and Settings\username\My Documents\My Virtual Machines. After the upgrade, the default
virtual machine location on Windows Vista and Windows 7 is C:\Users\username\Documents\Virtual Machines\guestOSname.
Upgrade Workstation on a Windows Host
You can upgrade from Workstation version 4, 5.x, 6.x, or 7.x to the current version of Workstation on a Windows host system by running the Workstation setup program and installation wizard for Windows.
Remote connections and virtual machine sharing are enabled by default when you upgrade Workstation. With remote connections, you can connect to remote hosts and run remote virtual machines. With virtual machine sharing, you can create virtual machines that other instances of Workstation can access remotely.
Shared virtual machines are stored in the shared virtual machines directory, where VMware Workstation Server (the VMware Workstation Server service) manages them. Remote users connect to VMware Workstation Server through HTTPS port 443 on the host system.
To change the shared virtual machines directory or select a different port during the upgrade process, you must select the Custom option. You can also change the shared virtual machines directory, select a different port, and disable remote connections and virtual machine sharing after Workstation is upgraded by modifying the Shared VMs Workstation preference setting. See Using VMware Workstation for more information.
Prerequisites
n Verify that the host system meets the host system requirements. See “Host System Requirements,” on
page 7.
n Verify that you have a license key.
n Verify that you have administrative privileges on the host system. n Prepare for the upgrade. See “Prepare for an Upgrade,” on page 22.
Procedure
1 Log in to the Windows host system as the Administrator user or as a user who is a member of the local Administrators group.
If you log in to a domain, the domain account must also be a local administrator.
2 If you are upgrading Workstation from a CD, insert the CD in the CD-ROM drive on the host system. If autorun is enabled, the installation program begins.
3 If autorun is not enabled, or if you downloaded the installation software, double-click the setup file.
Option Description If you are installing the software from
a CD The setup file is called
setup.exe.
If you downloaded the software The setup filename is similar to VMware-workstation-xxxx-xxxx.exe, where xxxx-xxxx is the version and build numbers.
4 Click Uninstall to uninstall the previous version of Workstation.
5 After the host system restarts, log in as the Administrator user or as a user who is a member of the local Administrators group.
6 Select a setup option.
Option Description
Typical Installs typical Workstation features. If the Integrated Virtual Debugger for Visual Studio or Eclipse is present on the host system, the associated Workstation plug-ins are installed.
Custom Lets you select which Workstation features to install and specify where to install them. Select this option if you need to change the shared virtual machines directory, modify the VMware Workstation Server port, or install the enhanced virtual keyboard driver. The enhanced virtual keyboard driver provides better handling of international keyboards and keyboards that have extra keys.
7 Follow the prompts to finish the upgrade.
Depending on your configuration, you might need to restart the host system to finish the installation. After Workstation is upgraded and you restart the host system, the VMware Workstation Server service starts. The VMware Workstation Server service starts whenever you restart the host system.
What to do next
To use the latest features, upgrade existing virtual machines to the new version of Workstation. See “Change the Hardware Compatibility of a Virtual Machine,” on page 25.
If you used bridged settings to map virtual networks to specific physical or virtual adapters in the previous version of Workstation, recreate the mappings. If you created teams in the previous version of Workstation, convert the teams to use them in the new version of Workstation. See Using VMware Workstation for more information.
Upgrade Workstation on a Linux Host
You can upgrade Workstation version 4, 5.x, 6.x, or 7.x to the current version of Workstation on a Linux host system by running the Linux bundle installer for Workstation. On most Linux distributions, the Linux bundle installer launches a GUI wizard. On some Linux distributions, including Red Hat Enterprise Linux 5.1, the bundle installer launches a command-line wizard instead of a GUI wizard. You can run the installer with the
--console option to upgrade Workstation in a terminal window.
Remote connections and virtual machine sharing are enabled by default when you upgrade Workstation. With remote connections, you can connect to remote hosts and run remote virtual machines. With virtual machine sharing, you can create virtual machines that other instances of Workstation can access remotely.
Shared virtual machines are stored in the shared virtual machines directory, where VMware Workstation Server (vmware-workstation-server) manages them. Remote users connect to VMware Workstation Server
through HTTPS port 443 on the host system.
To change the shared virtual machines directory or select a different port during the upgrade process, you must specify the --custom option. You can also change the shared virtual machines directory, select a different port, and disable remote connections and virtual machine sharing after Workstation is upgraded by modifying the Shared VMs Workstation preference setting. See Using VMware Workstation for more information.
Prerequisites
n Verify that the host system meets the host system requirements. See “Host System Requirements,” on
page 7.
n Verify that you have a license key.
n Familiarize yourself with the Linux command-line installation options. You must use the --custom option
to specify certain configuration settings. See “Linux Command Line Installation Options,” on page 21.
n Verify that you have root access to the host system.
Procedure
1 Log in to the host system with the user name that you plan to use when you run Workstation. 2 Become root.
For example: su root
The command that you use depends on your Linux distribution and configuration.
3 If you are upgrading Workstation from the installation media, mount the Workstation installation media. 4 Change directories to the directory that contains the Workstation installer file.
Option Description If you are installing the software from
a CD The installer file is in the
Linux directory.
If you downloaded the software The installer file is in the download directory. 5 Run the appropriate Workstation installer for the host system.
For example: sh VMware-Workstation-xxxx-xxxx.architecture.bundle [--option]
xxxx-xxxx is the version and build numbers, architecture is i386 or x86_64, and option is a command line
option.
6 Accept the Open Virtualization Format (OVF) Tool license agreement.
If you are using the --console option or installing Workstation on a host system that does not support the GUI wizard, press Enter to scroll through and read the license agreement or type q to skip to the
[yes/no] prompt.
7 Follow the prompts to finish the installation.
After Workstation is upgraded, vmware-workstation-server starts on the host system. vmware-workstation-server starts whenever you restart the host system.
What to do next
To use the latest features, upgrade existing virtual machines to the new version of Workstation. See “Change the Hardware Compatibility of a Virtual Machine,” on page 25.
If you used bridged settings to map virtual networks to specific physical or virtual adapters in the previous version of Workstation, recreate the mappings. If you created teams in the previous version of Workstation, convert the teams to use them in the new version of Workstation. See Using VMware Workstation for more information.
Change the Hardware Compatibility of a Virtual Machine
You can change the hardware compatibility of a virtual machine. All virtual machines have a hardware version. The hardware version indicates which virtual hardware features that the virtual machine supports, such as BIOS or EFI, number of virtual slots, maximum number of CPUs, maximum memory configuration, and other hardware characteristics.
When you upgrade Workstation, you must change the hardware compatibility of virtual machines that were created in previous versions of Workstation so that they can use the new features in the new version of Workstation. You can run older versions of virtual machines in the new version of Workstation, but you will not have the benefits of the new features.
If you want a virtual machine to remain compatible with other VMware products that you are using, you might not want to change the hardware compatibility to the latest Workstation version.
NOTE If you decide not to change the hardware compatibility of a virtual machine, you should consider
upgrading to the latest version of VMware Tools to obtain the latest VMware Tools features.
Prerequisites
Familiarize yourself with the considerations and limitations of changing the hardware compatibility of a virtual machine. See “Considerations for Changing the Hardware Compatibility of a Virtual Machine,” on
page 26.
Procedure
1 Make backup copies of the virtual disk (.vmdk) files.
2 If you are upgrading from a Workstation 4 or 5.x virtual machine, or downgrading to a Workstation 4 or 5.x virtual machine, make a note of the NIC settings in the guest operating system.
If you specified a static IP address for the virtual machine, that setting might be changed to automatic assignment by DHCP after the upgrade.
3 Shut down the guest operating system and power off the virtual machine.
4 Select the virtual machine and select VM > Manage > Change Hardware Compatibility. 5 Follow the prompts in the wizard to change the hardware compatibility of the virtual machine.
When you select a hardware compatibility setting, a list of the VMware products that are compatible with that setting appears. For example, if you select Workstation 4, 5, or 6, a list of Workstation 6.5 and later features that are not supported for that Workstation version also appears.
6 Power on the virtual machine.
If you upgrade a virtual machine that contains a Windows 98 operating system to a Workstation 6.5 or later virtual machine, you must install a PCI-PCI bridge driver when you power on the virtual machine.
NOTE Because Workstation 6.5 and later versions have 32 more PCI-PCI bridges than Workstation 6, you
might need to respond to the prompt 32 or 33 times.
7 If the NIC settings in the guest operating system have changed, use the NIC settings that you recorded to change them back to their original settings.
8 If the virtual machine does not have the latest version of VMware Tools installed, update VMware Tools. You should update VMware Tools to the version included with the latest version of Workstation, even if you upgraded the virtual machine to an earlier version of Workstation. Do not remove the older version of VMware Tools before installing the new version.
NOTE If you are upgrading a virtual machine that runs from a physical disk, you can safely ignore this
message: Unable to upgrade drive_name. One of the supplied parameters is invalid.
Considerations for Changing the Hardware Compatibility of a Virtual Machine
Before you change the hardware compatibility of a virtual machine, you should be aware of certain considerations and limitations.
n For Workstation 5.x, 6, 6.5, 7.x, and later virtual machines, you can change the version of the original virtual
machine or create a full clone so that the original virtual machine remains unaltered. For Workstation 4 virtual machines, Workstation changes the original virtual machine.
n If you upgrade a Workstation 4 or 5.x virtual machine that is compatible with ESX Server to Workstation 6,
6.5, 7.x, or later, you cannot use the Change Hardware Compatibility wizard to later downgrade the virtual machine to an ESX-compatible virtual machine.
n When you upgrade a Windows XP, Windows Server 2003, Windows Vista, or Windows 7 virtual machine,
the Microsoft product activation feature might require you to reactivate the guest operating system.
n You cannot change the hardware compatibility of a shared or remote virtual machine.
Uninstalling Workstation
You uninstall Workstation on a Windows host by using the Windows setup program. On a Linux host, you uninstall Workstation by running the bundle installer.
IMPORTANT If you uninstall Workstation and do not save the configuration, then when you reinstall
Workstation, shared virtual machines will no longer appear in the Shared VMs list in the virtual machine library. To display virtual machines in the list again, you will need to share them again.
Uninstall Workstation from a Windows Host
You can run the Windows setup program to uninstall Workstation from a Windows host system.
Procedure
1 Log in to the Windows host system as the Administrator user or as a user who is a member of the local Administrators group.
If you log in to the domain, the domain account must also be a local administrator. 2 If you have a Workstation CD, insert the CD in the CD-ROM drive on the host system.
If autorun is enabled, the installation program begins.
3 If autorun is not enabled, or if you downloaded the installation software, double-click the setup file. If you have a Workstation CD, the setup file is called setup.exe. If you downloaded the installation
software, the setup filename is similar to VMware-workstation-xxxx-xxxx.exe, where xxxx-xxxx is the
version and build numbers.
4 Click Next on the Welcome screen and then click Remove.
5 (Optional) To save product license and Workstation configuration information, select the appropriate check boxes.
6 Click Next to begin uninstalling Workstation.
Uninstall Workstation from a Linux Host
You must run a command to uninstall Workstation from a Linux host.
Prerequisites
Verify that you have root access to the host system.
Procedure
1 Log in to the Linux host system with the username that you use when you run Workstation. 2 Become root.
For example: su root
3 In a terminal window, type vmware-installer -u vmware-workstation. 4 Click Next to begin uninstalling Workstation.
Start Workstation
How you start Workstation depends on the host system platform and the options that you selected during Workstation installation.
On Windows host systems, you might have a desktop shortcut, a quick launch shortcut, or a combination of these options in addition to a Start menu item.
On Linux host systems, you start Workstation from the command line. On some Linux distributions, including Red Hat Enterprise Linux 5.1, you can also start Workstation from the System Tools menu under
Applications.
Procedure
n To start Workstation on a Windows host system, select Start > Programs > VMware > VMware Workstation.
n To start Workstation on a Linux host system, type the vmware command in a terminal window.
Option Command /usr/bin is in your default path vmware &
/usr/bin is not in your default path /usr/bin/vmware &
The first time you start Workstation, Workstation prompts you to accept the End User License Agreement. After you start Workstation, the Workstation window opens.
Using the Workstation Window
A virtual machine is like a separate computer that runs in a window on the host system. Workstation displays more than the screen of another computer. From the Workstation window, you can interact with and run virtual machines. You can also switch easily from one virtual machine to another.
The best way to learn how to use Workstation is to use it. The Workstation window is designed to be intuitive and easy to use.
n Use Virtual Machines in the Workstation Window on page 29
You interact with virtual machines through the Workstation window.
n Use the Virtual Machine Library on page 29
The virtual machine library appears on the left side of the Workstation window. You use the library to view and select virtual machines, folders, and remote hosts in Workstation. The library appears by default.
n Use the Thumbnail Bar on page 30
The thumbnail bar appears along the bottom of the Workstation window.
n Use the Status Bar on page 30
The status bar appears at the bottom of the Workstation window. You can use the icons on the status bar to see Workstation messages and perform actions on devices such as hard disks, CD/DVD drives, floppy drives, and network adapters. The status bar appears by default.
n Use Workstation Tabs on page 31
Workstation creates a tab in the right pane of the Workstation window when you select an item in the library. Tabs appear by default.
n Customize the Workstation Window on page 31
You can customize the appearance of the Workstation window by selecting items from the View menu.
n Default Hot-Key Combinations on page 32
You can use keyboard shortcuts to interact with Workstation and with virtual machines. Most of the available keyboard shortcuts for Workstation are listed next to their associated commands in Workstation menus.
Use Virtual Machines in the Workstation Window
You interact with virtual machines through the Workstation window.Procedure
n Use the icons on the Home tab to create a new virtual machine, open an existing virtual machine, connect
to a remote server, or view the Workstation help system.
n Select a powered-off virtual machine in the library or click its tab to see the summary view for that virtual
machine.
The summary view shows a summary of configuration information and the virtual machine state. You can power on the virtual machine and edit virtual machine settings from the summary view.
n Select an active virtual machine in the library or click its tab to see the console view.
The console view is like the monitor display of a physical computer. You can click the console view button on the toolbar to switch between the console and summary views.
n Select a virtual machine in the library and use the VM menu on the menu bar at the top of the Workstation
window to perform all virtual machine operations for the selected virtual machine.
You can use the VM menu when a virtual machine is powered on or off. If an operation is not supported for the virtual machine in its current state, the menu item is not available.
n Select a virtual machine in the library and use the buttons on the toolbar at the top of the Workstation
window to perform common virtual machine operations and change the display for the selected virtual machine.
You can use the buttons on the toolbar to take and manage snapshots, enter full screen and Unity mode, cycle multiple monitors, and switch between the console and summary views.
n When a virtual machine is powered on, use the icons on the status bar at the bottom of the Workstation
window to see Workstation messages and perform actions on virtual devices such as hard disks, CD/DVD drives, floppy drives, and network adapters.
You can click or right-click on a removable device icon to connect or disconnect the device or edit its settings, and you can click the Message log icon to view the message log. Messages include warning information about the virtual machine. If the icon is dimmed, all messages have already been read.
n Select items in the library or use tabs to quickly switch between virtual machines, folders, and remote
hosts.
Use the Virtual Machine Library
The virtual machine library appears on the left side of the Workstation window. You use the library to view and select virtual machines, folders, and remote hosts in Workstation. The library appears by default.
Prerequisites
Procedure
n Right-click a virtual machine, folder, or remote host in the library to view the item's context menu and
perform common operations.
n To find a specific virtual machine in the library, type its name, part of its description, or the name of the
guest operating system in the search box.
For example, to find all of the virtual machines that have a Windows 7 guest operating system, type Windows 7. You can also search for folders and remote hosts.
n To mark a virtual machine or folder as a favorite in the library, right-click it and select Mark as Favorite
or click the star icon.
n Use the library drop-down menu to show only powered on virtual machines or favorite items.
By default, the library shows all items.
n To remove an item from the library, right-click it and select Remove.
Use the Thumbnail Bar
The thumbnail bar appears along the bottom of the Workstation window.
For active virtual machines, Workstation updates the thumbnail in real time to show the actual content of the virtual machine. When a virtual machine is suspended, the thumbnail is a screenshot of the virtual machine at the time that it was suspended.
Prerequisites
If the thumbnail bar is not visible, select View > Customize > Thumbnail Bar.
Procedure
n Click a thumbnail to show the summary or console view for a virtual machine. n Click thumbnails to quickly switch between virtual machines.
n To change the order of the thumbnails, change the order of the virtual machine tabs.
Thumbnails appear in the same order as the virtual machine tabs. To move a virtual machine tab, drag and drop it to a new location.
n To change the virtual machines that appear in the thumbnail bar, select Open Virtual Machines or Folder View Virtual Machines from the thumbnail bar drop-down menu.
The drop-down menu is a down-arrow on the thumbnail bar.
Use the Status Bar
The status bar appears at the bottom of the Workstation window. You can use the icons on the status bar to see Workstation messages and perform actions on devices such as hard disks, CD/DVD drives, floppy drives, and network adapters. The status bar appears by default.
Procedure
n Mouse over an icon on the status bar to see its name.
n Click or right-click on a removable device icon to connect or disconnect the device or edit its settings. n Click the message log icon to view the message log.
Messages include warning information about the virtual machine. If the icon is dimmed, all messages have already been read.
Use Workstation Tabs
Workstation creates a tab in the right pane of the Workstation window when you select an item in the library. Tabs appear by default.
Procedure
n Use the links on the Home tab to create a virtual machine, open a virtual machine, connect to a remote
server, virtualize a physical machine, use the virtual network editor, customize Workstation preferences, download software updates, and view the help system.
n Use the virtual machine tabs to view virtual machine configuration information, modify virtual machine
hardware and option settings, and create or modify the virtual machine description.
n Use the Shared VMs tab to see information about all of the shared virtual machines on the host system. n Use the tab for a remote host to see information about the remote host, including CPU, memory, and disk
usage, and the virtual machines and virtual machine tasks running on the remote host.
n Select File > Close Tab to close a tab.
Customize the Workstation Window
You can customize the appearance of the Workstation window by selecting items from the View menu.
Procedure
1 Select View > Customize and select a Workstation window view.
Option Description
Library The virtual machine library appears in the left side of the window. You can use the library to view and select virtual machines, folders, and remote hosts in Workstation. The library appears by default.
Thumbnail Bar A thumbnail bar appears at the bottom of the window. Depending on the thumbnail bar option that is selected, the thumbnail bar shows all open virtual machines or the virtual machines in the selected folder.
Toolbar A toolbar appears at the top of the window. You can use the icons on the toolbar to start and stop virtual machines, take snapshots, change the display, and perform other common tasks. The toolbar appears by default.
Status Bar A status bar appears at the bottom of the window when a virtual machine is selected. You can use the icons on the status bar to see Workstation messages and perform actions on virtual machine devices such as hard disks, CD/DVD drives, floppy drives, and network adapters. The status bar appears by default.
Tabs Workstation creates a tab in the right pane when you select an item in the library. Tabs appear by default.
2 To specify which virtual machines appear in the thumbnail bar, select View > Customize > Thumbnail
Bar Options.
Option Description
Open Virtual Machines The thumbnail bar shows thumbnails for all open virtual machines.
Folder View Virtual Machines The thumbnail bar shows thumbnails for virtual machines in the selected folder.
Default Hot-Key Combinations
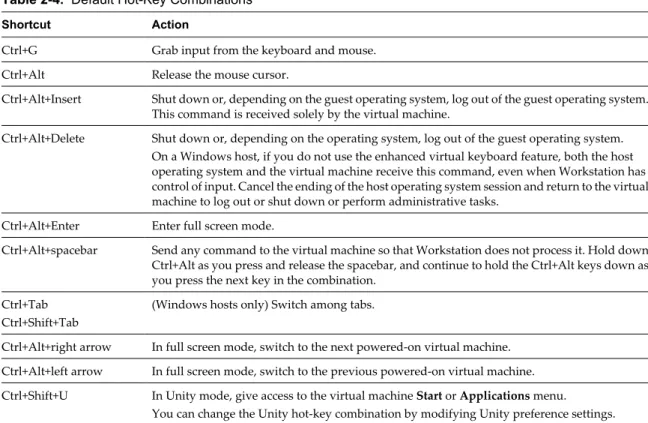
You can use keyboard shortcuts to interact with Workstation and with virtual machines. Most of the available keyboard shortcuts for Workstation are listed next to their associated commands in Workstation menus.
Table 2-4. Default Hot-Key Combinations
Shortcut Action
Ctrl+G Grab input from the keyboard and mouse. Ctrl+Alt Release the mouse cursor.
Ctrl+Alt+Insert Shut down or, depending on the guest operating system, log out of the guest operating system. This command is received solely by the virtual machine.
Ctrl+Alt+Delete Shut down or, depending on the operating system, log out of the guest operating system. On a Windows host, if you do not use the enhanced virtual keyboard feature, both the host operating system and the virtual machine receive this command, even when Workstation has control of input. Cancel the ending of the host operating system session and return to the virtual machine to log out or shut down or perform administrative tasks.
Ctrl+Alt+Enter Enter full screen mode.
Ctrl+Alt+spacebar Send any command to the virtual machine so that Workstation does not process it. Hold down Ctrl+Alt as you press and release the spacebar, and continue to hold the Ctrl+Alt keys down as you press the next key in the combination.
Ctrl+Tab Ctrl+Shift+Tab
(Windows hosts only) Switch among tabs.
Ctrl+Alt+right arrow In full screen mode, switch to the next powered-on virtual machine. Ctrl+Alt+left arrow In full screen mode, switch to the previous powered-on virtual machine. Ctrl+Shift+U In Unity mode, give access to the virtual machine Start or Applications menu.
You can change the Unity hot-key combination by modifying Unity preference settings. You can change the default hot-key combinations by modifying Workstation preference settings. If you change the key settings, substitute your new key combination for Ctrl+Alt. For example, if you change the hot-key combination for common virtual machine operations to Ctrl+Shift, you press Ctrl+Shift instead of Ctrl+Alt to release control from the current virtual machine.
See Using VMware Workstation for information on changing the default hot-key combinations.
Using the Workstation Online Help
The Workstation online help contains information about Workstation settings and common tasks. Use the online help when you need to quickly find information about Workstation preferences, virtual hardware settings, and virtual machine options.
For example, if you are configuring a virtual machine and you need information about a specific hardware setting, click Help on the dialog box that contains the setting. The Help window opens and a context-sensitive help topic appears in the right pane. To see the entire help system, select Help > Help Topics (Windows host) or Help > Contents (Linux host).