Chapter 8: Binary Trees
• Why Use Binary Trees? • Tree Terminology
• An Analogy
• How Do Binary Search Trees Work
• Finding a Node
• Inserting a Node
• Traversing the Tree
• Finding Maximum and Minimum Values
• Deleting a Node
• The Efficiency of Binary Trees
• Trees Represented as Arrays
• Duplicate Keys
• The Complete tree.javaProgram
• The Huffman Code
Table 1.1: Characteristics of Data Structures
Some algorithms are slow and complex. Models real-world situations.
Graph
Slow access to other items, access to largest item.
Fast insertion, deletion, Heap
Slow deletion, access slow if key not known, inefficient memory usage. Very fast access if key known. Fast
insertion. Hash table
Complex. Quick search, insertion, deletion. Tree
always balanced. Similar trees good for disk storage.
2-3-4 tree
Complex. Quick search, insertion, deletion. Tree
always balanced. Red-black tree
Deletion algorithm is complex. Quick search, insertion, deletion (if tree
remains balanced). Binary tree
Slow search. Quick insertion, quick deletion.
Linked list
Slow access to other items. Provides first-in, first-out access.
Queue
Slow access to other items. Provides last-in, first-out access.
Stack
Slow insertion and deletion, fixed size. Quicker search than unsorted array.
Ordered array
Slow search, slow deletion, fixed size. Quick insertion, very fast access if
index known Array Disadvantages Advantages Data Structure
Why Use Binary Trees?
• It combines the advantages of two other
structures: an ordered array and a linked
list.
• You can search a tree quickly, as you can
an ordered array,
• And you can also insert and delete items
quickly, as you can with a linked list.
Slow Insertion in an Ordered Array
• Imagine an array in which all the elements are
arranged in order; that is, an ordered array (see
Chapter 3)
– It's quick to search such an array for a particular value, using a binary search.
• You check in the center of the array;
– if the object you're looking for is greater than what you find there, you narrow your search to the top half of the array; – if it's less, you narrow your search to the bottom half.
– Applying this process repeatedly finds the object in O(logN) time.
– It's also quick to iterate through an ordered array, visiting each object in sorted order.
Slow Insertion in an Ordered Array
• On the other hand,
– if you want to insert a new object into an ordered array,
• you first need to find where the object will go,
• and then move all the objects with greater keys up one space in the array to make room for it.
• These multiple moves are time consuming, requiring, on the average, moving half the items (N/2 moves).
– Deletion involves the same multimove operation, and is thus equally slow.
• If you're going to be doing a lot of insertions and
deletions, an ordered array is a bad choice.
Slow Searching in a Linked List
• On the other hand, as we saw in Chapter
7, "Advanced Sorting,“
– insertions and deletions are quick to perform
on a linked list.
– They are accomplished simply by changing a
few references.
– These operations require O(1) time (the
fastest Big-O time).
Slow Searching in a Linked List
• Unfortunately, however,
–
finding
a specified element in a linked list is
not so easy.
• You must start at the beginning of the list and visit each element until you find the one you're looking for.
• Thus you will need to visit an average of N/2
objects, comparing each one's key with the desired value.
• This is slow, requiring O(N) time. (Notice that times considered fast for a sort are slow for data
structure operations.)
Slow Searching in a Linked List
• You might think you could speed things up
– by using an ordered linked list,
• in which the elements were arranged in order, • but this doesn't help.
– You still must start at the beginning and visit the elements in order,
» because there's no way to access a given element without following the chain of references to it. • (Of course, in an ordered list it's much quicker to
visit the nodes in order than it is in a non-ordered list, but that doesn't help to find an arbitrary object.)
Trees to the Rescue
What Is a Tree?
• A tree consists of nodes connected by edges. Figure 8.1 below shows a tree.
• In such a picture of a tree (or in our Workshop applet) – the nodes are represented as circles,
– the edges as lines connecting the circles.
• Trees have been studied extensively as abstract mathematical entities, so there's a large amount of theoretical knowledge about them.
• A tree is actually an instance of a more general category called a graph
– Chapters 13 “Graphs”
What Is a Tree?
• In computer programs, nodes often represent such entitiesas • people,
• car parts,
• airline reservations, and so on;
– in other words, the typical items we store in any kind of data structure. – In an OOP language such as Java, these real-world entities are
represented by objects.
• The lines (edges) between the nodes represent the way the nodes are related.
– Roughly speaking, the lines represent convenience:
• It's easy (and fast) for a program to get from one node to another if there is a line connecting them.
– In fact, the only way to get from node to node is to follow a path along the lines.
– Generally you are restricted to going in one direction along edges: from the root downward.
– Edges are likely to be represented in a program by references, if the program is written in Java (or by pointers if the program is written in C or C++).
Tree (example)
node
What Is a Tree?
• Typically there is one node in the top row of a
tree, with lines connecting to more nodes on the
second row, even more on the third, and so on.
• Thus trees are small on the top and large on the
bottom.
– This may seem upside-down compared with real trees, but generally a program starts an operation at the small end of the tree, and it's (arguably) more natural to think about going from top to bottom, as in reading text.
What Is a Tree?
• There are different kinds of trees.
– The tree shown in Figure 8.1 has more than two
childrenper node.
– Binary tree: Each node in a binary tree has a maximum of two children.
– More general trees, in which nodes can have more than two children, are called multiway trees.
• We'll see an example in Chapter 10, "2-3-4 Tables and External Storage," where we discuss 2-3-4 trees.
An Analogy
• One commonly encountered tree is the hierarchical file structure in a computer system.
– The root directory of a given device (designated with the backslash, as in C:\, on many systems) is the tree's root.
– The directories one level below the root directory are its children. – There may be many levels of subdirectories.
– Files represent leaves; they have no children of their own. • Clearly a hierarchical file structure is not a binary tree,
because a directory may have many children. – A complete pathname, such as
C:\SALES\EAST\NOVEMBER\SMITH.DAT, corresponds to the path from the root to the SMITH.DAT leaf.
– Terms used for the file structure, such as root and path, were borrowed from tree theory.
An Analogy
• A hierarchical file structure differs in a significant
way from the trees we'll be discussing here.
– In the file structure, subdirectories contain no data; only references to other subdirectories or to files. Only files contain data.
– In a tree, every node contains data (a personnel record, car-part specifications, or whatever). In addition to the data, all nodes except leaves contain references to other nodes.
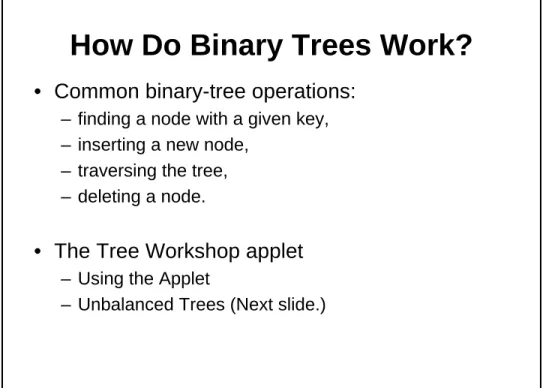
How Do Binary Trees Work?
• Common binary-tree operations:
– finding a node with a given key, – inserting a new node,
– traversing the tree, – deleting a node.
• The Tree Workshop applet
– Using the Applet
– Unbalanced Trees (Next slide.)
Unbalanced Trees
• Notice that some of the trees generated are
unbalanced
;
– that is, they have most of their nodes on one side of the root or the other, as shown in Figure 8.6.
– Individual subtrees may also be unbalanced.
Unbalanced Trees
• Trees become unbalanced because of the order in which the data items are inserted.
• If these key values are inserted randomly, the tree will be more or less balanced.
• However, if an ascending sequence (like 11, 18, 33, 42, 65, and so on) or a descending sequence is generated, all the values will be right children (if ascending) or left children (if descending) and the tree will be unbalanced. • The key values in the Workshop applet are generated
randomly, but of course some short ascending or
descending sequences will be created anyway, which will lead to local imbalances.
• When you learn how to insert items into the tree in the Workshop applet you can try building up a tree by inserting such an ordered sequence of items and see what happens.
Unbalanced Trees
• If you ask for a large number of nodes when you
use Fill to create a tree, you may not get as
many nodes as you requested.
• Depending on how unbalanced the tree
becomes, some branches may not be able to
hold a full number of nodes.
– This is because the depth of the applet's tree is limited to five;
Unbalanced Trees
• If a tree is created by data items whose key
values arrive in random order,
– the problem of unbalanced trees may not be too much of a problem for larger trees,
• because the chances of a long run of numbers in sequence is small.
• But key values can arrive in strict sequence;
– for example, when a data-entry person arranges a stack of personnel files into order of ascending employee number before entering the data.
• When this happens, tree efficiency can be seriously degraded.
• We'll discuss unbalanced trees and what to do
about them in Chapter 9, "Red-Black Trees."
Representing the Tree in Java Code
• There are several approaches to representing a
tree in the computer's memory.
– The most common (shown next):
• Store the nodes at unrelated locations in memory
• Connect them using references in each node that point to its children.
– It's also possible to represent a tree in memory as an array, with nodes in specific positions stored in
corresponding positions in the array (At the end of this chapter.)
Object with links
Btree Int data Btree left_chid Btree right_child Find() Insert() Delete() Btree Int data Btree left_chid Btree right_child Find() Insert() Delete() Btree Int data Btree left_chid Btree right_child Find() Insert() Delete() Btree Int data Btree left_chid Btree right_child Find() Insert() Delete()The
Node
Class
• A class of node objects:
– These objects contain the data representing the objects being stored (employees in an employee database, for example)
– And also references to each of the node's two children.
class Node {
int iData; // data used as key value float fData; // other data
node leftChild; // this node's left child node rightChild; // this node's right child
public void displayNode() {
// (see Listing 8.1 for method body) }
}
– Some programmers also include a reference to the node's parent.
• This simplifies some operations but complicates others, so we don't include it.
– We do include a method called displayNode()to display the node's data, but its code isn't relevant here.
The
Node
Class
• There are other approaches to designing class Node. – Instead of placing the data items directly into the node, use a
reference to an object representing the data item:
class Node {
person p1; // reference to person object node leftChild; // this node's left child node rightChild; // this node's right child } class person { int iData; float fData; }
• This makes it conceptually clearer that the node and the data item it holds aren't the same thing,
– but it results in somewhat more complicated code, – We'll stick to the first approach.
The
Tree
Class
• A class from which to instantiate the tree itself;
• The object that holds all the nodes.
• It has only one field: a
Node
variable that holds
the root.
• It doesn't need fields for the other nodes
because they are all accessed from the root.
• The Tree class has a number of methods:
– some for finding, inserting, and deleting nodes, several for different kinds of traverses, and one to display the tree.
The
Tree
Class
class Tree
{
private Node root; // the only data field in Tree public void find(int key)
{ }
public void insert(int id, double dd)
{ }
public void delete(int id)
{ }
// various other methods } // end class Tree
The
TreeApp
Class
• Finally, we need a way to perform operations on the tree:
class TreeApp {
public static void main(String[] args) {
Tree theTree = new Tree; // make a tree
theTree.insert(50, 1.5); // insert 3 nodes theTree.insert(25, 1.7);
theTree.insert(75, 1.9);
node found = theTree.find(25); // find node with key 25 if(found != null)
System.out.println("Found the node with key 25"); else
System.out.println("Could not find node with key 25"); } // end main()
} // end class TreeApp
• In Listing 8.1 the main()routine provides a primitive user interface so you can decide from the keyboard whether you want to insert, find, delete, or perform other operations.
• Next, individual tree operations: finding a node, inserting a node, traversing the tree, and deleting a node.
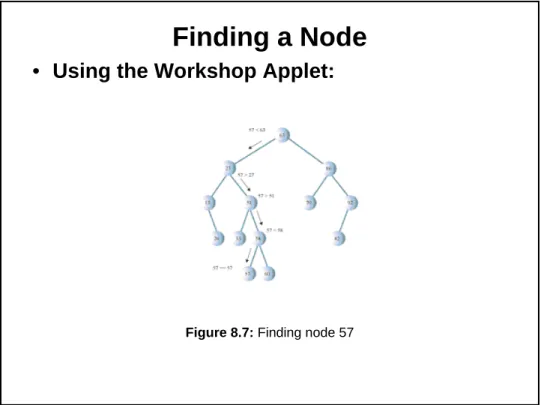
Finding a Node
•
Using the Workshop Applet:
Figure 8.7: Finding node 57
Java Code for Finding a Node
public Node find(int key) // find node with given key
{ // (assumes non-empty tree)
Node current = root; // start at root
while(current.iData != key) // while no match, {
if(key < current.iData) // go left? current = current.leftChild; else
current = current.rightChild; // or go right? if(current == null) // if no child,
return null; // didn't find it
}
return current; // found it }
Java Code for Finding a Node
• This routine uses a variable currentto hold the node it is currently examining.
• The argument keyis the value to be found.
• The routine starts at the root. (It has to; this is the only node it can access directly.) That is, it sets currentto the root.
• Then, in the whileloop, it compares the value to be found, key, with the value of the iDatafield (the key field) in the current node.
– If keyis less than this field, then currentis set to the node's left child. – If keyis greater than (or equal) to the node's iDatafield, then current is set to
the node's right child.
Can't Find It
• If currentbecomes equal to null, then we couldn't find the next child node in the sequence; we've reached the end of the line without finding the node we were looking for, so it can't exist.
• We return nullto indicate this fact.
Found It
• If the condition of the whileloop is not satisfied, so that we exit from the bottom of the loop, then the iDatafield of currentis equal to key; that is, we've found the node we want. We return the node, so that the routine that called find()can access any of the node's data.
Finding a Node: Efficiency
• How long it takes to find a node
– Depends on how many levels down it is situated. – In the Workshop applet there can be up to 31 nodes,
but no more than 5 levels
• so you can find any node using a maximum of only 5 comparisons.
– This is O(logN) time, or more specifically O(log2N) time; the logarithm to the base 2.
Inserting a Node
• First find the place to insert a node:
– Much the same process as trying to find a node that turns out not to exist, as described in the section on Find.
– We follow the path from the root to the appropriate node, which will be the parent of the new node.
• Once this parent is found, the new node is
connected as its left or right child,
– depending on whether the new node's key is less than or greater than that of the parent.
Inserting a Node
•
Using the Workshop Applet
Java Code for Inserting a Node
• The insert()function starts by creating the new node, using the data supplied as arguments.
• Next, insert()must determine where to insert the new node.
– This is done using roughly the same code as finding a node, described in the section above on find().
– The difference is that
• when you're simply trying to find a node and you encounter a null
(nonexistent) node, you know the node you're looking for doesn't exist so you return immediately.
• When you're trying to insert a node you insert it (creating it first, if necessary) before returning.
– The value to be searched for is the data item passed in the argument id. – The whileloop uses trueas its condition because it doesn't care if it
encounters a node with the same value as id;
• it treats another node with the same key value as if it were simply greater than the key value. (The subject of duplicate nodes: later in this chapter.) • A place to insert a new node will always be found (unless you run out
of memory);
– when it is, and the new node is attached, the whileloop exits with a
returnstatement.
Java Code for Inserting a Node
public void insert(int id, double dd){
Node newNode = new Node(); // make new node newNode.iData = id; // insert data newNode.dData = dd;
if(root==null) // no node in root root = newNode;
else // root occupied {
Node current = root; // start at root Node parent;
while(true) // (exits internally) {
parent = current;
if(id < current.iData) // go left? {
current = current.leftChild;
if(current == null) // if end of the line, { // insert on left parent.leftChild = newNode; return; } } // end if go left else // or go right? { current = current.rightChild;
if(current == null) // if end of the line { // insert on right
parent.rightChild = newNode; return;
}
} // end else go right } // end while
} // end else not root } // end insert()
Java Code for Inserting a Node
• We use a new variable, parent(the parent of current), to remember the last non-null node we encountered (50 in the figure).
– This is necessary because currentis set to nullin the process of discovering that its previous value did not have an appropriate child.
– If we didn't save parent, we'd lose track of where we were. • To insert the new node,
– change the appropriate child pointer in parent(the last non-null node you encountered) to point to the new node.
• If you were looking unsuccessfully for parent's left child, you attach the new node as parent's left child
• if you were looking for its right child, you attach the new node as its right child.
• In Figure 8.8, 45 is attached as the left child of 50.
Traversing the Tree
• Traversing a tree:
– visiting each node in a specified order.
• Not as commonly used as finding, inserting, and
deleting nodes.
• One reason: Traversal is not particularly fast.
• But traversing a tree is useful in some
circumstances and the algorithm is interesting.
• Three simple ways to traverse a tree:
– preorder, – inorder, – Postorder.
• The order most commonly used for binary search
trees is inorder.
Inorder Traversal
• An inorder traversal of a binary search tree will cause all the nodes to be visited in ascending order, based on their key values.
– If we want to create a sorted list of the data in a binary tree, this is one way to do it.
• The simplest way to carry out a traversal:
– Recursion
• A recursive method to traverse the entire tree is called with a node as an argument.
• Initially, this node is the root.
• The method needs to do only three things:
– 1. Call itself to traverse the node's left subtree – 2. Visit the node
– 3. Call itself to traverse the node's right subtree
• Visiting a node means doing something to it: displaying it, writing it to
a file, or whatever.
• Traversals work with any binary tree, not just with binary search trees.
• The traversal mechanism doesn't pay any attention to the key values of the nodes; it only concerns itself with whether a node has children.
Java Code for Traversing
• The routine, inOrder(), performs the three steps already described.
• The visit to the node consists of displaying the contents of the node. • Base case: When the node passed as an argument is null.
private void inOrder(node localRoot) { if(localRoot != null) { inOrder(localRoot.leftChild); localRoot.displayNode(); inOrder(localRoot.rightChild); } }
This method is initially called with the root as an argument:
inOrder(root);
After that, it's on its own, calling itself recursively until there are no more nodes to visit.
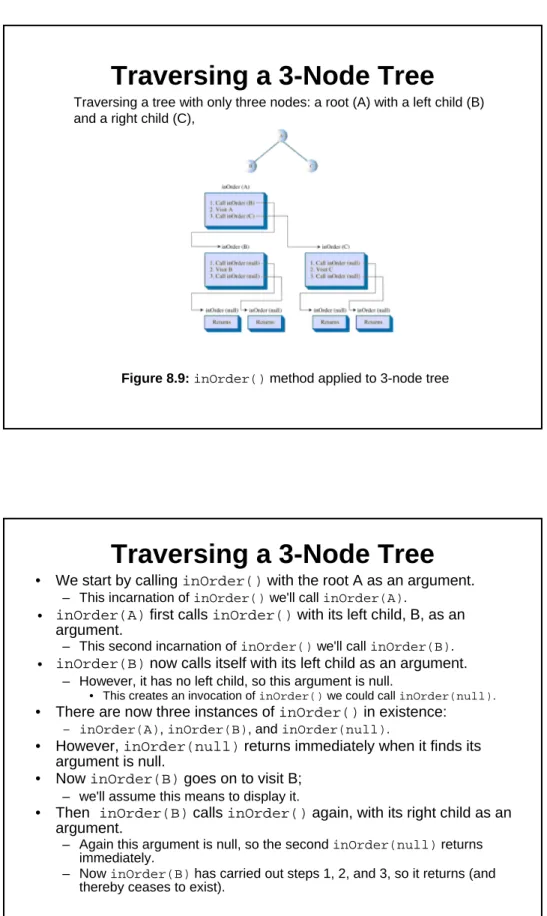
Traversing a 3-Node Tree
Figure 8.9: inOrder()method applied to 3-node tree Traversing a tree with only three nodes: a root (A) with a left child (B) and a right child (C),
Traversing a 3-Node Tree
• We start by calling inOrder()with the root A as an argument.
– This incarnation of inOrder()we'll call inOrder(A).
• inOrder(A)first calls inOrder()with its left child, B, as an argument.
– This second incarnation of inOrder()we'll call inOrder(B).
• inOrder(B)now calls itself with its left child as an argument.
– However, it has no left child, so this argument is null.
• This creates an invocation of inOrder()we could call inOrder(null). • There are now three instances of inOrder()in existence:
– inOrder(A), inOrder(B), and inOrder(null).
• However, inOrder(null)returns immediately when it finds its argument is null.
• Now inOrder(B)goes on to visit B;
– we'll assume this means to display it.
• Then inOrder(B)calls inOrder()again, with its right child as an argument.
– Again this argument is null, so the second inOrder(null)returns immediately.
– Now inOrder(B)has carried out steps 1, 2, and 3, so it returns (and thereby ceases to exist).
Traversing a 3-Node Tree
• Now we're back to inOrder(A), just returning from traversing A's left child.
• We visit A, and then call inOrder()again with C as an argument, creating inOrder(C).
• Like inOrder(B), inOrder(C)has no children, so
– step 1 returns with no action, – step 2 visits C,
– step 3 returns with no action.
– inOrder(B)now returns to inOrder(A).
• However, inOrder(A)is now done, so it returns and the entire traversal is complete.
• The order in which the nodes were visited is A, B, C; they have been visited inorder.
• In a binary search tree this would be the order of ascending keys. • More complex trees are handled similarly. The inOrder()function
calls itself for each node, until it has worked its way through the entire tree.
Traversing with the Workshop Applet
Figure 8.10: Traversing a tree inorder
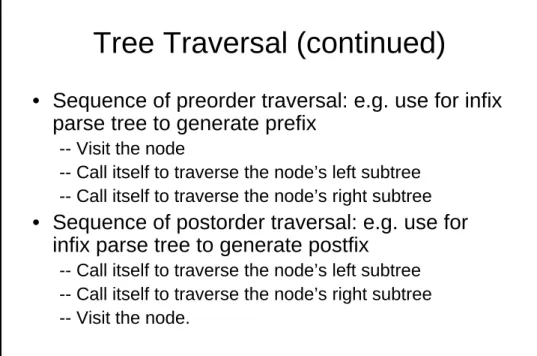
Tree Traversal (continued)
• Sequence of preorder traversal: e.g. use for infix
parse tree to generate prefix
-- Visit the node
-- Call itself to traverse the node’s left subtree -- Call itself to traverse the node’s right subtree
• Sequence of postorder traversal: e.g. use for
infix parse tree to generate postfix
-- Call itself to traverse the node’s left subtree -- Call itself to traverse the node’s right subtree -- Visit the node.
Preorder and Postorder Traversals
• A binary tree (not a binary search tree) can be used to represent an algebraic expression that involves the binary arithmetic operators +, -, /, and *. The root node holds an operator, and each of its subtrees represents either a variable name (like A, B, or C) or another expression.
• For example, the binary tree shown in Figure 8.11 represents the algebraic expression in infix notation
A*(B+C)
• Traversing the tree inorder will generate the correct inorder sequence A*B+C, but you'll need to insert the parentheses yourself.
What's All This Got To Do
With Preorder And Postorder Traversals?
•
For these other traversals the same three steps
are used as for inorder, but in a different
sequence.
•
Here's the sequence for a
preorder()
method:
1. Visit the node.
2. Call itself to traverse the node's left subtree. 3. Call itself to traverse the node's right subtree.
•
Traversing the tree shown in Figure 8.11 using
preorder would generate the expression in
prefix
notation.
*A+BC
Preorder Traversal
•
One of the nice things about
prefix
notation is
that parentheses are never required;
•
The expression is unambiguous without them.
•
It means “apply the operator * to the next two
things in the expression.”
– These two things are A and +BC.
•
The expression +BC means “apply + to the next
two things in the expression”
– which are B and C, so this last expression is B+C in inorder notation.
•
Inserting that into the original expression *A+BC
Postorder Traversal
1. Call itself to traverse the node's left subtree.
2. Call itself to traverse the node's right subtree.
3. Visit the node.
•
For the tree in Figure 8.11, visiting the nodes
with a postorder traversal would generate the
expression in
postfix
notation.
ABC+*
Postorder Traversal
ABC+*
•
As described in Chapter 4, “Stacks and
Queues,”
– it means “apply the last operator in the expression, *, to the first and second things.”
• The first thing is A, and the second thing is BC+.
•
BC+ means
– “apply the last operator in the expression, +, to the first and second things.”
• The first thing is B and the second thing is C, so this gives us (B+C) in infix.
•
Inserting this in the original expression ABC+*
Traversals
•
Listing 8.1 contains methods for preorder and
postorder traversals, as well as for inorder.
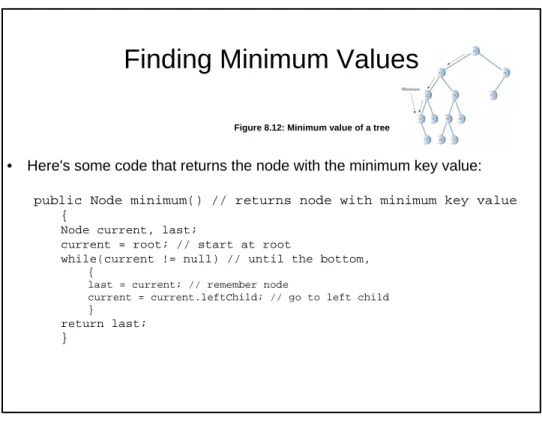
Finding Maximum and Minimum Values
• For the minimum,
– go to the left child of the root and keep going to the left child until you come to a leaf node. This node is the minimum.
• For the maximum,
– go to the right child of the root and keep going to the right child until you come to a leaf node. This node is the maximum.
Finding Minimum Values
• Here's some code that returns the node with the minimum key value:
public Node minimum() // returns node with minimum key value {
Node current, last;
current = root; // start at root
while(current != null) // until the bottom, {
last = current; // remember node
current = current.leftChild; // go to left child }
return last; }
Figure 8.12: Minimum value of a tree
Deleting a Node
•
Start by finding the node you want to
delete, using the same approach we saw
in
find()
and
insert()
•
Then there are three cases to consider:
1. The node to be deleted is a leaf (i.e., no
child)
2. The node to be deleted has one child
3. The node to be deleted has two children
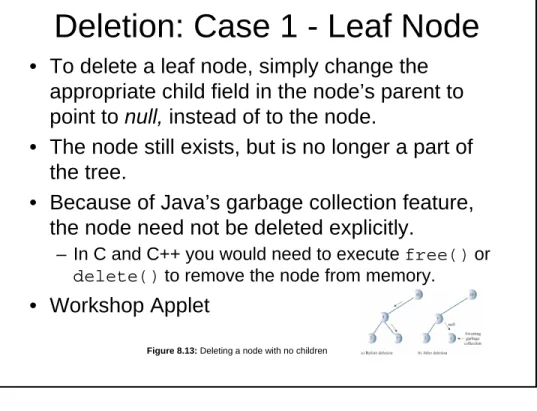
Deletion: Case 1 - Leaf Node
• To delete a leaf node, simply change the
appropriate child field in the node’s parent to
point to
null,
instead of to the node.
• The node still exists, but is no longer a part of
the tree.
• Because of Java’s garbage collection feature,
the node need not be deleted explicitly.
– In C and C++ you would need to execute free()or delete() to remove the node from memory.
• Workshop Applet
Figure 8.13: Deleting a node with no children
Java Code to Delete a Node With No Children
public boolean delete(int key) // delete node with given key
{ // (assumes non-empty list)
Node current = root; Node parent = root;
boolean isLeftChild = true;
while(current.iData != key) // search for node {
parent = current;
if(key < current.iData) // go left? { isLeftChild = true; current = current.leftChild; } else // or go right? { isLeftChild = false; current = current.rightChild; }
if(current == null) // end of the line, return false; // didn't find it } // end while
// found node to delete
// continues on the next slide...
Java Code to Delete a Node With No Children (continued) // delete() continued from last slide... // if no children, simply delete it
if(current.leftChild==null &&
current.rightChild==null)
{
if(current == root) // if root,
root = null; // tree is empty
else if(isLeftChild)
parent.leftChild = null; // disconnect
else // from parent
parent.rightChild = null;
}
// Click here to continue…
Deletion: Case 2 -
One Child
• The node to be deleted in this case has only two connections: to its parent and to its only child.
• Connect the child of the node to the node’s parent, thus cutting off the connection between the node and its child, and between the node and its parent.
• Using the Workshop Applet
Java Code to Delete a Node With One Child
// delete() continued... (Click here to go back to lines above.) // if no right child, replace with left subtree
else if(current.rightChild==null) if(current == root)
root = current.leftChild;
else if(isLeftChild) // left child of parent parent.leftChild = current.leftChild; else // right child of parent
parent.rightChild = current.leftChild;
// if no left child, replace with right subtree else if(current.leftChild==null)
if(current == root) root = current.rightChild;
else if(isLeftChild) // left child of parent parent.leftChild = current.rightChild; else // right child of parent
parent.rightChild = current.rightChild; // continued...
• Working with references makes it easy to move an entire subtree:
Simply disconnecting the old reference to the subtree and creating a new reference to it somewhere else.
Deletion: Case 3 - Two Children
• To delete a node with two children,
replace the node with its inorder
successor.
• For each node, the node with the
next-highest key (to the deleted node)
in the subtree is called its inorder
Deletion: Two Children
Figure 8.15: Can't replace with subtree
Delete a node with subtree (case 1)
Find Successor
Figure 8.17: Finding the successor
• To find the successor, start with the original (deleted) node’s right child.
• Then go to this node’s left child and then to its left child and so on, following down the path of left children.
• The last left child in this path is the successor of the original node.
Figure 8.18: The right child is the successor
Delete a Node with Two Children
• Using the Workshop Applet
Java Code to Find the Successor
// returns node with next-highest value after delNode // goes to right child, then right child's left descendants private node getSuccessor(node delNode)
{
Node successorParent = delNode; Node successor = delNode;
Node current = delNode.rightChild; // go to right child while(current != null) // until no more
{ // left children,
successorParent = successor; successor = current;
current = current.leftChild; // go to left child }
// if successor not
if(successor != delNode.rightChild) // right child, { // make connections
successorParent.leftChild = successor.rightChild; //case 3 step 1 successor.rightChild = delNode.rightChild; //case 3 step 2 }
return successor; }
Delete a node with subtree (case 2)
Figure 8.19: Deletion when successor is right child
successor
Is Right Child of
delNode
Here's the code in context (a continuation of the else-if ladder shown earlier):
// delete() continued
else // two children, so replace with inorder successor {
// get successor of node to delete (current) Node successor = getSuccessor(current);
// connect parent of current to successor instead if(current == root)
root = successor;
else if(isLeftChild) //case 3 step 3
parent.leftChild = successor; else
parent.rightChild = successor;
// connect successor to current's left child
successor.leftChild = current.leftChild; // case 3 step 4
} // end else two children
// (successor cannot have a left child)
return true; } // end delete()
Delete a node with subtree (case 3)
Figure 8.20: Deletion when successor is left child successorIs Left Descendant of Right Child of delNode
Delete a node with subtree (case 3)
Figure 8.20: Deletion when successor is left child successorIs Left Descendant of Right Child of delNode
1. Plug the right child of successorinto the leftChildfield of the successor's parent.
2. Plug the right child of the node to be deleted into the rightChild
field of successor.
3. Unplug currentfrom the rightChildfield of its parent, and set this field to point to successor.
4. Unplug current's left child from current, and plug it into the
leftChildfield of successor.
Here's the code for these four steps:
1. successorParent.leftChild = successor.rightChild; 2. successor.rightChild = delNode.rightChild; 3. parent.rightChild = successor;
4. successor.leftChild = current.leftChild;
Is Deletion Necessary?
• Deletion is fairly involved.
• In fact, it's so complicated that some
programmers try to sidestep it altogether.
– They add a new Booleanfield to the nodeclass, called something like isDeleted.
– To delete a node, they simply set this field to true. • Then other operations, like find(), check this field to be
sure the node isn't marked as deleted before working with it. • This way, deleting a node doesn't change the structure of the
tree.
• Of course, it also means that memory can fill up with "deleted" nodes.
– This approach is a bit of a cop-out, but it may be appropriate where there won't be many deletions in a tree.
• For example: If ex-employees remain in the personnel file forever
Efficiency
30 1,073,741,824 ... ... 25 33,554,432 ... ... 20 1,048,575 ... ... 15 32,767 ... ... 10 1,023 ... ... 5 31 4 15 3 7 2 3 1 1 Number of Levels Number of Nodes Table 8.2:NUMBER OF LEVELS FOR SPECIFIED NUMBER OF NODES
Efficiency
• Assume number of nodes N and number
of levels L.
N = 2L -1
N+1 = 2L
L = log2(N+1)
• The time needed to carry out the common
tree operations is proportional to the base
2 log of N
• O(log N) time is required for these
operations.
Trees Represented as Arrays
Figure 8.21: Tree represented by an array
• The nodes are stored in an array and are not linked by references. • The position of the
node in the array corresponds to its position in the tree. • The node at index 0 is
the root, the node at index 1 is the root's left child, and so on, progressing from left to right along each level of the tree.
Trees Represented as Arrays
• Every position in the tree, whether it represents an existing node or not, corresponds to a cell in the array. • Adding a node at a given position in the tree means
inserting the node into the equivalent cell in the array. • Cells representing tree positions with no nodes are filled
with zero or null.
• With this scheme, a node's children and parent can be found by applying some simple arithmetic to the node's index number in the array.
If a node's index number is index, then this node's left child is
2*index + 1
its right child is
2*index + 2
and its parent is
(index-1) / 2
(where the '/' character indicates integer division with no remainder).
Trees Represented as Arrays
• In most situations, representing a tree with an array isn't very efficient.
– Unfilled nodes and deleted nodes leave holes in the array, wasting memory.
– Even worse, when deletion of a node involves moving subtrees, every node in the subtree must be moved to its new location in the array, which is time-consuming in large trees.
• However,
– if deletions aren't allowed,
• then the array representation may be useful,
– especially if obtaining memory for each node dynamically is, for some reason, too time consuming.
• The array representation may also be useful in special situations.
– The tree in the Workshop applet, for example, is represented internally as an array to make it easy to map the nodes from the array to fixed locations on the screen display.
Duplicate Keys
• In the code shown for insert(), and in the Workshop applet, a node with a duplicate key will be inserted as the right child of its twin.
• The problem is that the find()routine will find only the first of two (or more) duplicate nodes.
– The find()routine could be modified to check an additional data item, to distinguish data items even when the keys were the same, but this would be (at least somewhat) time-consuming. • One option is to simply forbid duplicate keys.
– When duplicate keys are excluded by the nature of the data (employee ID numbers, for example) there's no problem. – Otherwise, you need to modify the insert()routine to check
for equality during the insertion process, and abort the insertion if a duplicate is found.
• The Fill routine in the Workshop applet excludes duplicates when generating the random keys.
The Complete
tree.java
Program
Huffman Code
• Binary tree is used to compress data.
• Data compression is used in many situations. E.g. sending data over internet.
• Character Code: Each character in a normal
uncompressed text file is represented in the computer by one byte or by two bytes.
• For text, the most common approach is to reduce the number of bits that represent the most-used characters. • E.g. E is the most common letter, so few bits can be
used to encode it.
• No code can be the prefix of any other code.
Decoding with Huffman Tree
• Huffman tree is kind of binary tree, used for
decoding character codes.
• The characters in the message appear in the
tree as leaf nodes. The higher their frequency in
the message, the higher up they appear in the
tree.
• The number outside each node is the frequency.
• The numbers outside non-leaf nodes are the
sums of the frequencies of their children.
Decoding (Contd.)
• For each character start at the root.
• If we see a 0 bit, go left to the next node,
and if we see a 1 bit, then go right.
Creating Huffman Tree
• Make a Node object for each character used in the message.
• Each node has two data items: the character and that character’s frequency in the message.
• Make a tree object for each of these nodes. • The node becomes the root of the tree. • Insert these trees in a priority queue.
• They are ordered by frequency, with the smallest frequency having the highest priority.
• Remove two trees from the priority queue, and make them into children of a new node.
• The new node has frequency that is the sum of the children’s frequencies.
• Insert this new three-node tree back into the priority queue.
• Keep repeating these two steps, till only one tree is left in the queue.