EMC
®
NetWorker
®
Version 9.0.xVirtual Edition Installation Guide
302-001-945Copyright © 1990-2016 EMC Corporation. All rights reserved. Published in the USA. Published June 2016
EMC believes the information in this publication is accurate as of its publication date. The information is subject to change without notice.
The information in this publication is provided as is. EMC Corporation makes no representations or warranties of any kind with respect to the information in this publication, and specifically disclaims implied warranties of merchantability or fitness for a particular purpose. Use, copying, and distribution of any EMC software described in this publication requires an applicable software license.
EMC², EMC, and the EMC logo are registered trademarks or trademarks of EMC Corporation in the United States and other countries. All other trademarks used herein are the property of their respective owners.
For the most up-to-date regulatory document for your product line, go to EMC Online Support (https://support.emc.com). EMC Corporation
Hopkinton, Massachusetts 01748-9103
1-508-435-1000 In North America 1-866-464-7381 www.EMC.com
5
7
Introduction 11
Overview of NetWorker Virtual Edition... 12
Installation and Update 13 Preinstallation requirements and best practices...14
System requirements... 14
Verifying the DNS configuration...14
NVE virtual disk requirements... 15
Network requirements...15
Virtual disk configuration best practices...15
Installation...15
Preparing the virtual machine...16
Setting up the NetWorker software on NVE... 17
Starting the NMC server GUI for the first time...19
Upgrading... 22
Maintenance 25 Password maintenance... 26
Reviewing password policies...26
Modifying passwords... 27
Figures
Preface
Chapter 1
Chapter 2
Chapter 3
CONTENTS
Associating a jnlp file with Java (TM) web Start Launcher for Mozilla Firefox... 21 1
FIGURES
Preface
As part of an effort to improve its product lines, EMC periodically releases revisions of its software and hardware. Therefore, some functions described in this document might not be supported by all versions of the software or hardware currently in use. The product release notes provide the most up-to-date information on product features.
Contact your EMC technical support professional if a product does not function properly or does not function as described in this document.
Note
This document was accurate at publication time. Go to EMC Online Support (https:// support.emc.com) to ensure that you are using the latest version of this document.
Purpose
This document describes how to set up NetWorker Virtual Edition in a NetWorker environment.
Audience
This guide is part of the NetWorker documentation set, and is intended for use by system administrators during the installation and setup of the NetWorker software.
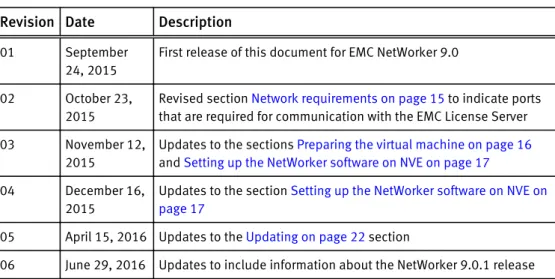
Revision history
The following table presents the revision history of this document. Table 1 Revision history
Revision Date Description
01 September 24, 2015
First release of this document for EMC NetWorker 9.0 02 October 23,
2015
Revised section Network requirements on page 15 to indicate ports that are required for communication with the EMC License Server 03 November 12,
2015
Updates to the sections Preparing the virtual machine on page 16
and Setting up the NetWorker software on NVE on page 17
04 December 16, 2015
Updates to the section Setting up the NetWorker software on NVE on page 17
05 April 15, 2016 Updates to the Updating on page 22 section
06 June 29, 2016 Updates to include information about the NetWorker 9.0.1 release
Related documentation
The NetWorker documentation set includes the following publications, available on EMC Online Support:
l EMC NetWorker Online Software Compatibility Guide
Provides a list of client, server, and storage node operating systems supported by the EMC information protection software versions. You can access the Online Software Compatibility Guide on the EMC Online Support site at https://support.emc.com. From the Support by Product pages, search for NetWorker using "Find a Product", and then select the Install, License, and Configure link.
l EMC NetWorker Administration Guide
Describes how to configure and maintain the NetWorker software.
l EMC NetWorker Network Data Management Protocol (NDMP) User Guide
Describes how to use the NetWorker software to provide data protection for NDMP filers.
l EMC NetWorker Cluster Integration Guide
Contains information related to configuring NetWorker software on cluster servers and clients.
l EMC NetWorker Installation Guide
Provides information on how to install, uninstall, and update the NetWorker software for clients, storage nodes, and servers on all supported operating systems.
l EMC NetWorker Updating from a Previous Release Guide
Describes how to update the NetWorker software from a previously installed release.
l EMC NetWorker Release Notes
Contains information on new features and changes, fixed problems, known
limitations, environment and system requirements for the latest NetWorker software release.
l EMC NetWorker Command Reference Guide
Provides reference information for NetWorker commands and options.
l EMC NetWorker Data Domain Boost Integration Guide
Provides planning and configuration information on the use of Data Domain devices for data deduplication backup and storage in a NetWorker environment.
l EMC NetWorker Performance Optimization Planning Guide
Contains basic performance tuning information for NetWorker.
l EMC NetWorker Server Disaster Recovery and Availability Best Practices Guide
Describes how to design and plan for a NetWorker disaster recovery. However, it does not provide detailed disaster recovery instructions. The Disaster Recovery section of the NetWorker Procedure Generator (NPG) provides step-by-step disaster recovery instructions.
l EMC NetWorker Snapshot Management Integration Guide
Describes the ability to catalog and manage snapshot copies of production data that are created by using mirror technologies on EMC storage arrays.
l EMC NetWorker Snapshot Management for NAS Devices Integration Guide
Describes how to catalog and manage snapshot copies of production data that are created by using replication technologies on NAS devices.
l EMC NetWorker VMware Integration Guide
Provides planning and configuration information on the use of VMware in a NetWorker environment.
l EMC NetWorker Error Message Guide
Provides information on common NetWorker error messages.
l EMC NetWorker Licensing Guide
Provides information about licensing NetWorker products and features.
l EMC NetWorker REST API Getting Started Guide
Describes how to configure and use the NetWorker REST API to create programmatic interfaces to the NetWorker server.
l EMC NetWorker REST API Reference Guide
Provides the NetWorker REST API specification used to create programmatic interfaces to the NetWorker server.
l EMC NetWorker Management Console Online Help
Describes the day-to-day administration tasks performed in the NetWorker
Management Console and the NetWorker Administration window. To view the online help, click Help in the main menu.
l EMC NetWorker User Online Help
The NetWorker User program is the Windows client interface. Describes how to use the NetWorker User program which is the Windows client interface connect to a NetWorker server to back up, recover, archive, and retrieve files over a network.
Special notice conventions that are used in this document
EMC uses the following conventions for special notices:
NOTICE
Identifies content that warns of potential business or data loss.
Note
Contains information that is incidental, but not essential, to the topic.
Typographical conventions
EMC uses the following type style conventions in this document: Table 2 Style conventions
Bold Used for names of interface elements, such as names of buttons, fields, tab names, and menu paths (what the user specifically selects or clicks)
Italic Used for full titles of publications that are referenced in text Monospace Used for:
l System code
l System output, such as an error message or script l Pathnames, file names, prompts, and syntax l Commands and options
Monospace italic Used for variables Monospace bold Used for user input
[ ] Square brackets enclose optional values
| Vertical bar indicates alternate selections - the bar means “or” { } Braces enclose content that the user must specify, such as x or y or z ... Ellipses indicate non-essential information that is omitted from the
example
Where to get help
EMC support, product, and licensing information can be obtained as follows:
Product information
For documentation, release notes, software updates, or information about EMC products, go to EMC Online Support at https://support.emc.com.
Technical support
Go to EMC Online Support and click Service Center. Several options for contacting EMC Technical Support appear on the site. Note that to open a service request, you must have
Preface
a valid support agreement. Contact your EMC sales representative for details about obtaining a valid support agreement or with questions about your account.
Online communities
Go to EMC Community Network at https://community.emc.com for peer contacts,
conversations, and content on product support and solutions. Interactively engage online with customers, partners, and certified professionals for all EMC products.
Your comments
Your suggestions help to improve the accuracy, organization, and overall quality of the user publications. Send your opinions of this document to
[email protected]. Preface
CHAPTER 1
Introduction
This chapter contains the following topic:
l Overview of NetWorker Virtual Edition... 12
Overview of NetWorker Virtual Edition
EMC® NetWorker® Virtual Edition (NVE) is a NetWorker server that runs as a virtual machine in a VMware environment. NVE integrates the latest version of the NetWorker software with SUSE Linux as a VMware virtual machine. NVE is available as a 250 GB virtual appliance.
Note
Only new installations of NetWorker 9.0.x can use NVE. If you upgrade to NetWorker 9.0.x from an 8.2.x or earlier NetWorker release, NVE will not be available.
CHAPTER 2
Installation and Update
This chapter contains the following topics:
l Preinstallation requirements and best practices...14 l Installation...15 l Upgrading... 22
Preinstallation requirements and best practices
Before you install an NVE virtual machine, follow the preinstallation requirements and review the best practices in the following sections.
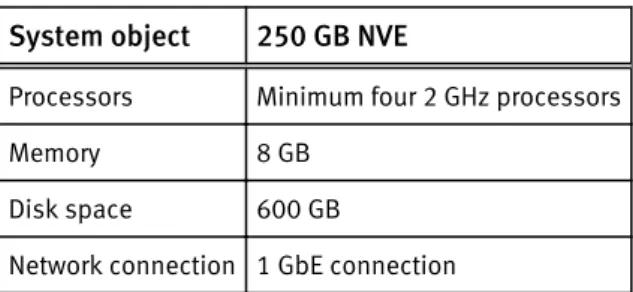
System requirements
Networker Virtual Edition (NVE) is supported on VMware ESXi 5.1/5.5/5.5u2/6.0. The following table defines the minimum system requirements for each size of NVE. Table 3 Minimum requirements for NVE
System object 250 GB NVE
Processors Minimum four 2 GHz processors Memory 8 GB
Disk space 600 GB
Network connection 1 GbE connection
Verifying the DNS configuration
Prior to installing NVE, DNS must be properly configured. Failure to have DNS set up properly can cause runtime or configuration issues.
Procedure
1. Open a command prompt on the vCenter Server and type the following command: nslookup NVE_IP_address DNS_Server_IP_address
The nslookup command will return the FQDN for NVE. 2. Type the following command:
nslookup NVE_FQDN DNS_Server_IP_address
The nslookup command will return the IP address for NVE. 3. Type the following command:
nslookup FQDN_of_vCenter DNS_Server_IP_address
The nslookup command returns the IP address of the vCenter Server.
4. If the nslookup commands returned the proper information, close the command prompt. If the nslookup commands do not return proper information, resolve the DNS configuration before you install NVE.
NVE virtual disk requirements
The NVE disk layout comprises one operating system disk (256 GB) and one storage partition (250 GB).
Network requirements
Before you install NVE, gather the following information:
l Hostnames and IP addresses for the NVE virtual machine and the DNS Server l Gateway, netmask, and domain of the NVE virtual machine
l Firewall openings, if applicable. NetWorker requires ports 27010 and 51000 to
communicate with the EMC License Server. Ensure that these ports remain open only for this purpose.
Note
The OVA package for NVE does not support dual stack and IPv6. Use IPv4 instead.
Virtual disk configuration best practices
ESXi supports multiple disk formats. For NVE virtual machines, the initial configuration is Thick Provision Lazy Zeroed.
Note
NVE does not support thin provisioning.
After the initial installation, if you configure the virtual disks for the Thick Provision Eager Zeroed, the customer will get better initial performance because the first write to the disk will require less operations.
Note
See the VMware documentation for information on converting Lazy zeroed virtual disks to Eager zeroed virtual disks. Converting a disk from Thick Provisioned Lazy Zeroed to Thick Provisioned Eager Zeroed is time consuming and can consume a significant number of storage I/O processes.
A virtual machine running NVE aggressively uses disk I/O and is almost never idle. VMware's recommendations for appropriate resources for high-performance database virtual machines are generally applicable to an NVE virtual machine. In particular, a storage pool allocated from a group of dedicated physical disks in a RAID 1 (mirror) or RAID 10 (combines RAID 0 with RAID 1) configuration provides the best performance.
Installation
The following sections describe how to install and set up an NVE virtual machine.
Note
NVE does not support migration of data from another instance of NetWorker.
Installation and Update
Preparing the virtual machine
The following instructions use vCenter Server 5.5. Other versions of vCenter Server might have different options.
Procedure
1. Download the NVE virtual appliance OVA file for the appropriate version of NVE you are installing.
2. Use the VMware vSphere Client application to connect to the vCenter Server that will host the NVE virtual machine.
3. Log in with administrative rights.
4. Select the ESXi server that will host the NVE virtual machine. 5. Select File > Deploy OVF Template.
The Source page appears.
6. In Deploy from a file or URL field, specify the path to the OVA file, or click Browse and then browse to the OVA file. Click Next.
The OVF Template Details page appears.
7. Review the details about the template, and then click Next. The End User License Agreement page appears.
8. If you agree to the license terms, click Accept and then click Next. The Name and Location page appears.
9. Type in the NVE name, select the inventory location, and then click Next. The Host / Cluster page appears.
10. Select the ESXi host or cluster on which to run the deployed template, and then click
Next.
11. If resource pools exist in the vCenter server, the Resource Pool page appears. Optionally, select the resource pool in which to deploy the template, and then click
Next.
The Storage page appears.
12. Select the storage for NVE and click Next. The Disk Format page appears.
13. Select Thick Provision Lazy Zeroed format and click Next. Thin provisioning is not supported with NVE.
The Network Mapping page appears.
14. Select the destination network and click Next. The Properties page appears.
15. Type the IP Address, Netmask, Default Gateway, and DNS, and then click Next. The Ready to Complete page appears.
16. Confirm the deployment settings are correct and click Finish.
The installation may take several minutes. A Deployment Completed Successfully message appears when the installation is complete.
17. Click Close. Installation and Update
When the status of the reconfigured Virtual Machine is complete, a Completed message appears in the Recent task section.
18. Right-click the virtual machine and select Power > Power On. This command boots the virtual machine.
19. Open the Virtual Console to monitor installation progress.
20. On the Summary tab, verify that the status forVMware Tools changes to Running or Unmanaged.
Setting up the NetWorker software on NVE
To set up the NetWorker software on a new NVE virtual machine, complete the following procedure:
Procedure
1. On a host that has access to the NVE virtual machine, open a web browser and type the following URL:
https://NVE_VM
where NVE_VM is the hostname or IP address of the NVE virtual machine. The EMC NetWorker Installation Manager login page appears.
2. When you use Internet Explorer, if any security messages appear, click Continue. When you use Firefox, if any connection warnings appear, select I understand the risks, and then add an exception for the website.
The EMC NetWorker Installation Manager dialog box appears. 3. In the User field, type root.
4. In the Password field, type changeme.
Note: The default password expiration policy on the NVE is once every 60 days. If the password that you specified has expired, a messages similar to the following appears:Error "Login failed. The password has already expired or is within the warning period. You must change and verify the password expiration date." To resolve this issue, change the passwords assigned to the root and admin users. Modifying passwords on page 27
provides more information. 5. Click Login.
6. On the SW Updates tab, click the Install button in the upper right corner of the dialog page, to install the NveConfig package.
7. On the Authc Settings tab, specify the following attributes:
a. In the Tomcat KeyStore password field, type a password for the keystore file that the NetWorker Authentication Service uses to store data.
Ensure that you specify a password that contains at least six characters and does not contain dictionary words.
b. In the Tomcat KeyStore password (confirm) field, type the password for the keystore file.
c. In the Authc Password field, type the a password the NetWorker Authentication Service administrator.
Ensure that you specify a password with the following minimum requirements: Installation and Update
l Nine characters in length l One uppercase letter l One lowercase letter l One special character l One numeric character
Note
You will use the administrator account to log in to the NMC server.
d. In the Authc Password (confirm) field, confirm and type the password for the NetWorker Authentication Service administrator.
e. Click Save.
8. Optionally, if you will use Data Domain devices in the NetWorker datazone, on the
Data Domain Settings tab, check the box in the Value column, and then specify the following configuration attributes:
a. In the Data Domain Address field, type the IP address or the FQDN of the Data Domain system.
b. In the Data Domain Administrator Name field, type the username for an Data Domain Administrator account.
c. In the Data Domain Administrator Password field, type the password for the Data Domain Administrator account.
d. In the Data Domain Storage Folder field, type a new existing name for a folder on the Data Domain system that you will use for DD Boost storage.
e. Optionally, select DDBoost create new login account to create a new DDBoost account.
f. In the Data Domain Login field, type the account for the DD Boost user.
g. In the DDBoost Login Password field, type the password for the DDBoost user that you specified in the Data Domain Login field.
h. In the DDBoost Login Password Confirm field, type the password for the DDBoost user that you specified in the Data Domain Login field.
i. Click Save.
9. On the Passwords tab, and specify the OS admin user and OS root user passwords, and then click Save.
Ensure that you specify a password that meets the following requirements:
l Between 9-40 characters in length l Contains one upper case letter l Contains one lower case letter l Contains one number
l Contains one special character
10. Optionally, on the Security Settings tab, select Show advanced settings, and then check the box in the Value column, to install or upgrade password hardening package. Click Save.
11. Optionally, on the NetWorker Settings tab, enable Show advanced settings and specify the following options:
a. From the Additional Language Pack drop-down, select the desired language pack to install on the NetWorker server.
b. For Data Domain systems only, in the SNMP Community String field, type the SNMP Community String used to monitor the Data Domain system,
12. On the Server Settings tab, select the appropriate time zone, and then click Save. 13. Click Continue.
The Installation Progress page appears and displays information about the status of the installation actions.
Results
The EMC NetWorker Installation Manager installs the NetWorker and NMC server software on the NVE appliance.
Starting the NMC server GUI for the first time
The NMC server is a Java web-based application that manages NetWorker server
operations. An NMC client is a host that connects to the NMC server through a supported web browser, to display the NMC server GUI.
The following sections outline how to prepare the NMC client and how to connect to the NMC server GUI.
Preparing to connect to the NMC server
NetWorker 9.0.1 does not support using a browser on the following operating systems to connect to the NMC GUI:
l AIX l HP-UX l Solaris
Before you try to connect to the NMC server from a supported host, ensure that JRE is correctly configured.
Enabling temporary internet file caching
Enable the Temporary internet file caching attribute in the Java Control Panel
of the Console client. When you do not enable this option in JRE, Java WebStart fails to start.
For Windows Console clients:
1. Browse to Control Panel > Java > General > Temporary Internet Files > Settings . 2. Ensure that the option Keep temporary files on my computer is selected. For UNIX Console clients:
1. Start the Java web Start Application Manager, javaws. 2. Select Enable temporary internet file caching.
Windows only, confirming JRE version
For Windows hosts only, ensure that you install the correct JRE program for the installed version of Microsoft Internet Explorer.
l For the 32-bit version of Microsoft Internet Explorer, install the 32-bit version of JRE. l For the 64-bit version of Microsoft Internet Explorer, install the 64-bit version of JRE.
Installation and Update
Use the following procedure to determine the Microsoft Internet Explorer version on the Windows Console client.
Procedure
1. Right click the Microsoft Internet Explorer shortcut and select Properties. 2. Review the Target Location field.
The Target Location is:
l C:\Program Files (x86)\Internet Explorer\ for the 32-bit version
of Microsoft Internet Explorer.
l C:\Program Files\Internet Explorer\ for the 64-bit version of
Microsoft Internet Explorer.
Adding the NMC server to Exception Site list
Java security settings block the NMC server application. Add the NMC server address to the JRE Exception site list. Procedure1. Open the Java Control Panel.
2. On the Security tab, select Edit Site list. 3. Click Add.
4. In the Location field, specify the URL to the NMC server in the format http:// server_name:9000
where server_name is the hostname of the NMC server.
Note
If you will connect to the NMC server by using the IP address of the NMC server, add an entry for the IP address in the format http://ip_address:9000
5. Click OK.
6. On the Security Warning window, click Continue. 7. Click OK.
Launching the Networker Console
Complete the following procedure to connect to the NMC server GUI from an NMC client. By default, the NetWorker Authentication Service uses the local user database for user authentication. Specify the NetWorker Authentication Service administrator account to log in to the NMC server. The EMC NetWorker Security Configuration Guide describes how to configure the NetWorker Authentication Service to use LDAP or AD for user
authentication. Procedure
1. From a supported web browser session, type the URL of the NMC server: http://server_name:http_service_port
where:
l server_name is the name of the NMC server.
l http_service_port is the port for the embedded HTTP server. The default HTTP port is
9000.
For example: http://houston:9000
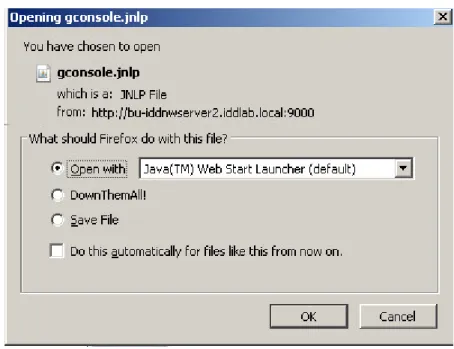
The gconsole.jnlp file downloads to the host. When the download completes, open the file.
2. When you use Mozilla Firefox on Windows, and the jnlp extension is not associated with Java, you are prompted to choose the program that opens the jnlp file. Select Java (TM) Web Start Launcher. If this application does not appear, browse to the Java 7 folder and select the javaws.exe file.
The following figure provides an example of the file association window that appears with the Mozilla Firefox browser.
Figure 1 Associating a jnlp file with Java (TM) web Start Launcher for Mozilla Firefox
3. On the Welcome window, click Start.
Note
If the Start button does not appear but you see a warning message, which states that Java Runtime Environment cannot be detected, click the here hyperlink.
4. For Internet Explorer only, if a security warning appears, select I accept the risks and want to run this application, then click Run.
5. On the Log in window, specify the NetWorker Authentication Service administrator username and password, and then click OK.
6. On the Licensing Agreement window, select Accept.
7. If you did not install a support version of JRE on the host, then a prompt to install JRE appears. Cancel the installation, install JRE, and then re-run the installation.
8. On the Welcome to the NMC Server Configuration Wizard window, click Next. 9. On the Specify a list of managed NetWorker servers window:
a. Specify the names of the NetWorker server that the NMC server will manage, one name per line.
Installation and Update
Note
If the NMC server is also the NetWorker server, specify the name of the NetWorker server.
b. Leave the default options Capture Events and Gather Reporting Data enabled.
Consider the following:
l Enable the Capture Events option to allow the NMC server to monitor and
record alerts for events that occur on the NetWorker server.
l Enable the Gather Reporting Data option to allow the NMC server to collect
data about the NetWorker server and generate reports.
10. Click Finish. The installation processes start the default web browser and connects to the NMC server. The NetWorker Management Console window and the Getting Started
window appear.
11. In the Enterprise window, right-click the NetWorker server, and then select Launch Application.
Note
If you do not specify any NetWorker servers in the Specify a list of managed NetWorker servers window, then the NMC Enterprise window does not display any NetWorker servers. To add a host, right-click Enterprise in the left navigation pane and select New > Host. The Add New Host wizard appears.
After you finish
After launching the NVE appliance, refer to the standard NetWorker documentation for any additional configuration.
Upgrading
The following sections describe how to upgrade an NVE virtual appliance. Procedure
1. Download the NVE virtual appliance upgrade file (NVEUpgrade*.avp) to a host that has access to the NVE virtual appliance.
2. Log in to the NVE virtual appliance as the root user.
3. Copy the AVP file to the /data01/avamar/repo/packages folder on the NVE virtual appliance.
For example, to use scp application to copy the file to the NVE virtual appliance, perform the following steps:
a. Start the ssh daemon: /etc/init.d/sshd.
b. Edit the /etc/ssh/sshd_config file and then uncomment the line: PermitRootLogin yes.
c. Use the scp application on the host that contains the AVP file, and connect to the NVE virtual appliance with the root account.
4. Open a web browser and type the following URL: https://NVE_address
Where NVE_address is the hostname or IP address of the NVE virtual appliance. The EMC NetWorker Installation Manager login page appears.
5. When you use Internet Explorer, if any security messages appear, click Continue. When you use Firefox, if any connection warnings appear, select I understand the risks, and then add an exception for the website.
The EMC NetWorker Installation Manager dialog box appears. 6. In the User field, type root.
7. In the Password field, type the password for the root account.
8. On the SW Updates tab, click the Install button in the upper right corner of the dialog page, to install the NveConfig package.
The Installation Setup page appears. 9. Click Continue.
10. When the upgrade completes, click Launch NMC to connect to the NMC server.
Installation and Update
CHAPTER 3
Maintenance
This chapter contains the following topics:
l Password maintenance... 26
Password maintenance
This section describes how to manage the root and admin passwords.
Reviewing password policies
Use the chage command to review password policy configuration for an OS user. Procedure
1. From a vSphere client, launch the console window for the NVE appliance. 2. Log in to the NVE as the root user.
3. Use the chage command to determine the password expiration policy and the scheduled expiration date for a user account.
For example, to determine the policy assigned to the root user account, and the password expiration date, type:
chage -l root
Output similar to the following appears: Minimum: 1
Maximum: 60 Warning: 7 Inactive: -1
Last Change: Dec 07, 2015 Password Expires: Feb 05, 2016 Password Inactive: Never
Account Expires: Never
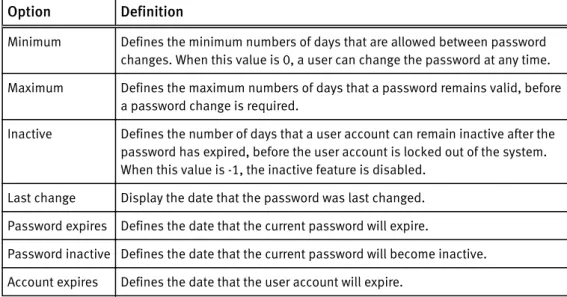
The following table provides more information about the chage output. Table 4 chage output
Option Definition
Minimum Defines the minimum numbers of days that are allowed between password changes. When this value is 0, a user can change the password at any time. Maximum Defines the maximum numbers of days that a password remains valid, before
a password change is required.
Inactive Defines the number of days that a user account can remain inactive after the password has expired, before the user account is locked out of the system. When this value is -1, the inactive feature is disabled.
Last change Display the date that the password was last changed. Password expires Defines the date that the current password will expire.
Password inactive Defines the date that the current password will become inactive. Account expires Defines the date that the user account will expire.
Modifying passwords
By default, the password expiration policy for the admin and root user accounts is every 60 days.
Perform the following steps to determine the password expiration policy, to determine the scheduled expiration date for a password, and to change passwords.
Procedure
1. From a vSphere client, launch the console window for the NVE appliance. 2. Log in to the NVE as the root user.
3. Use the passwd command to change the password for an OS user account. For example, to change the password for the root account, type:
passwd root
Maintenance