ITSM7.0.2.1 Patch Release Notes
Copyright 2011Copyright 2011 FrontRange Solutions USA Inc. All Rights Reserved. GoldMine, HEAT and other
Table of Contents
ITSM 7.0.2.1Patch issues ... 1
Installing ITSM 7.0.2.1 Patch ... 1
Known Issues with workaround ... 2
Silent Installation Instructions ... 3
Copyright 2011 FrontRange Solutions USA Inc. All Rights Reserved. GoldMine, HEAT and other FrontRange Solutions products, brands and trademarks are property of FrontRange Solutions USA Inc. and/or its affiliates in the United States and/or other countries. Other products, brands and trademarks are property of their respective owners/companies.
ITSM Release Version 7.0.2.1 Patch includes:
- German & French Translation updates for application resources
- Updated demo database with German & French translation updates (for new customers) - Critical issues raised by customers.
ITSM 7.0.2.1Patch issue fixes
Issue
Title
133364 Cannot drill into related object grid.
138603 Associated Item Selector on child tab is greyed out.
141485
Search with object matching returns poorly matched results. ie The results do not appear to return Most relevant matches, but first 10 matches.
142500 Cannot create "Compare" fud
142747 HTML formatting broken via workflow email 143988 Logical fields are not printed.
144070 Import Business Objects from CSV with Update requires valid RecID 144091 Internet Explorer Form action opens full screen
144389 Workflow not working where customer has deleted a schedule for which a scheduled workflow is configured 145272 Object matching does not work when record is created from a Template
145300 Cannot use scroll bar on CI tab grid from Customer object when there are many CI objects 145959 Attachments updated when record in final state.
146968 XML Importer keeps creating duplicate child records when using ad-hoc relationship
Installing ITSM 7.0.2.1 Patch
NOTE: ITSM7.0.2.1 Patch (version 7.0.2 Build 166) can be installed on top of: - ITSM 7.0.2 Gold (version 7.0.2 Build 127)
Installing patch on the application server
1. We highly recommend that customers take a backup image of current Applications Server before starting the patch upgrade process
Note: If you experience any unexpected interruptions or unexpected behavior during the install or upgrade process, we recommend that you restore the original image on the application server. Client machines must be uninstalled and reinstalled with the previous version.
2. Shut down the FrontRange Messaging Service. 3. Shut down the FrontRange Scheduler Service.
4. Shut down the FrontRange License Authentication Server. 5. Install “Server-ITSM-Enterprise-v7.0.2.1Patch.exe”.
6. During the server install of FrontRange Service Catalog, if a pop-up message occurs stating that “You must restart your system…”. Please click “No”, and the installation will continue normally. (This is not common, but can happen in certain circumstances.)
7. At the end of the installation, the installer will prompt user that System will need to be restarted.
8. Go into Services to make sure the following services are started and automatic (please start them if necessary): • Make sure FrontRange License Authentication Server is started
• Make sure FrontRange Solution Scheduler Service is started. • Make sure FrontRange Solution Escalation Engine is started. • Make sure FrontRange Solution Workflow Engine is started. • Make sure FrontRange Messaging Service is started.
Installing patch on client machines
Install “Client-ITSM-Enterprise-v7.0.2.1Patch.exe” on all the client machines that use Smart client For Click Once clients
The following folder will need to be deleted on each client pc using Click Once on Windows 7, and Vista.
' %UserProfile% \AppData\Local\IsolatedStorage’
'%UserProfile%\AppData\Local\Apps\2.0'
On Windows XPC:\Documents and Settings\USERNAME\Local Settings\Application Data\IsolatedStorage C:\Documents and Settings\USERNAME\Local Settings\Apps\2.0
Known Issues with workaround
Issue: (ITSM 7.0.0/7.0.1/7.0.2): Fusion Messaging service gets license errors after rebooting machine on virtual environment After installing 7.0.0 /7.0.1/7.0.2, rebooting the machine, and restarting Fusion Messaging service, you get license error for available server count error. This error only happens in Virtual environment.
Steps to reproduce:
1. After Installing the FRS Server, reboot the machine.
2. Once the machine is ready, restart the “FrontRange Fusion Messaging” service.
3. Check in the event log. There should be an error from License server about trying to exceed the available server count. Workaround steps:
1. Right click “FrontRange Fusion Messaging” Service and open up the properties page.
2. The startup type would be set to “Automatic” by default. Change this to “Automatic (Delayed)”. 3. Right click “FrontRange Job Scheduler” Service and open up the properties page.
4. The startup type would be set to “Automatic” by default. Change this to “Automatic (Delayed)”. 5. Reboot the machine.
Issue (7.0.0/7.0.1/7.0.2 Demo Database): State field does not populate correctly with File Listener.
The addressstate field is dependent on the country field to be set first. Even though the ordering of these fields is correct in the file listener xml, it gets processed differently. The workaround here is to remove the constraint related to country on the addressstate field
Issue (7.0.0/7.0.1/7.0.2 Demo Database): Localized fields CSV mapping error in “Import Business Objects from CSV” Quick Action. When editing the “Import Business Objects from CSV” Quick Action, mapping a field expression such as “[CSV:1]” onto a localized Business Object field, the error “Field Does Not Exist” occurs. The workaround is to create a new Definition Set, navigate to field properties and disable ‘Localized’ under the ‘Advanced’ tab for that field.
Copyright 2011 FrontRange Solutions USA Inc. All Rights Reserved. GoldMine, HEAT and other FrontRange Solutions products, brands and trademarks are property of FrontRange Solutions USA Inc. and/or its affiliates in the United States and/or other countries. Other products, brands and trademarks are property of their respective owners/companies.
When editing the “Import Business Objects from CSV” Quick Action, the “Key” field, if not specified by the User, is always set to “Yes”, when the correct default should be that it is always set to “No”. The workaround is to always use the dropdown in the “Key” field column to explicitly select “Yes” or “No” for Key (see below screen shot):
Silent Installation Instructions
The current setup for client and server consists of a setup launcher containing server msp and client msp files.
There are several ways to run a silent install. For users wanting to push the software or use other auto deploy methods, the best way is just to unpack the setup launcher and run the .msp files.
Unpacking the launcher. 1. Double click the setup.
2. Follow the installer steps until you get to the “Ready to Install” screen
3. On the Ready to Install screen, do NOT click next or OK. 4. Go to the directory it unpacked to
C:\%UserProfile%\AppData\Local\Temp\{28B75D7C-78C5-468E-AE66-9134B62325F0}\{4DED73E5-0A92-4BC1-9BE6-A300E59F971C} for server or
C:\ %UserProfile%\AppData\Local\Temp\{356BF3DB-194D-4E38-95D8-D60EB0239B48}\{C853DCFF-33AB-49E7-93F0-0E54EB399795}
NOTE : this directory will depend on your system
For example C:\ %UserProfile%\\AppData\Local\Temp\{28B75D7C-78C5-468E-AE66-9134B62325F0}\{4DED73E5-0A92-4BC1-9BE6-A300E59F971C}
For the server installer, you can see the multiple .msp files. This is what you will need Once you have files, cancel the setup
Running the .msp silently
Running windows installer packages silently is well documented. You can simply run the following command Msiexec /p [Path]\Client-ITSM701-Hotfix2.msp /qb if you want to see the installer or
Msiexec /p [Path]\Client-ITSM701-Hotfix2.msp /qn if you don’t want the user interface.
For example
msiexec /p C:\ %UserProfile%\Desktop\patch\FrontrangeServiceCatalog.msp /qb (or /qn) msiexec /p C:\ %UserProfile%\Desktop\patch\Server-ITSM701-Hotfix1.msp /qb (or /qn) msiexec /p C:\ %UserProfile%\Desktop\patch\Server-ITSM701-Hotfix2.msp /qb (or /qn) On the Client side:
Perform the same steps. There are 2 .msp files.
Copyright 2011 FrontRange Solutions USA Inc. All Rights Reserved. GoldMine, HEAT and other FrontRange Solutions products, brands and trademarks are property of FrontRange Solutions USA Inc. and/or its affiliates in the United States and/or other countries. Other products, brands and trademarks are property of their respective owners/companies.
Alternatives
1. Give the client the all 5 .msp files
2. Create a response file for the launcher, documented here
http://kb.flexerasoftware.com/doc/Helpnet/installshield12helplib/CreatetheResponseFile.htm Run the setup giving it the response file
Setup.exe /s /f1"C:\Temp\Setup.iss"
3. Use an unpacking tool to unpack the .msp for example the universal extractor at http://legroom.net/software/uniextract
Configuring ITSM Application to work with SSL
Overview
Out-of-the-box the ITSM application is configured to have its server side components (Application Server) hosted in the Internet Information Server (IIS), with client application connecting to the Application Server via HTTP protocol. The ITSM application can also be configured to use Secure Socket Layer (SSL), which allows client and Application Server
communicate using HTTPS protocol. This document describes the configuration changes that are required to run the ITSM over SSL.
Supported configuration for ITSM application
ITSM application can be setup to use one of the following configurations for client to server communication:
Configuration Description
1. HTTP Client and Application Server communicate using
HTTP protocol.
2. HTTP, HTTPS enabled Client and Application Server communicate using either HTTP or HTTPS protocol.
3. HTTPS required Client and Application Server communicate using only the HTTPS protocol.
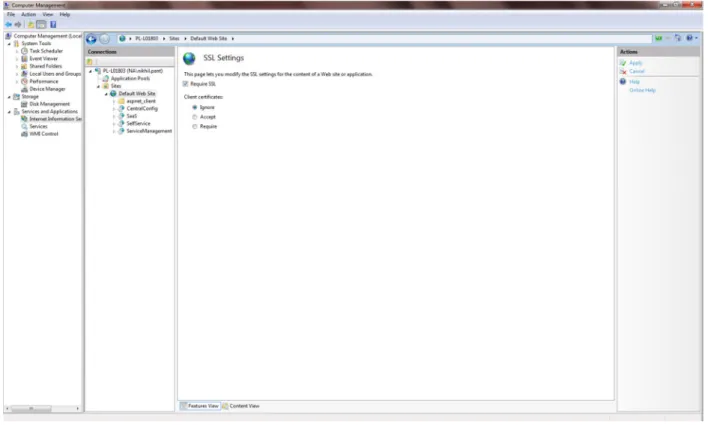
Note: SSL Certificate is required in order to set this up. Make SSL Required
IIS can be configured to require an SSL connection. Many organizations choose this configuration to ensure data is secured when in transport. See the screenshot below of the IIS management application. Please note that IIS provides the facility to require SSL at the virtual directory level or site wide. A site wide configuration is recommended to ensure all
Fig 1.0 “SSL required” configuration for ITSM Application Server Update Self Service URL in ITSM Administrator configuration file
When a definition set is committed ITSM Administrator has an option to convert the definition changes and update the Self-service definitions. A Web Service is used to communicate with SelfService to accomplish this task. Therefore the
configuration information about the web service needs to be updated in “AdminLoader.exe.config” file. Following two changes are required:
1. The <security> section needs to be updated from <securitymode="None"> To <securitymode="Transport">
2. The address entry in the <endpoint> section needs to use “https” instead of “http”, here is an example.
<endpointaddress=https:<servername>//SelfService/Maintenance/services/MetaDataConversionService.asmx > Update Service Catalog URL in the Application Server’s Web.Config (only if Service Catalog module is used)
When the ITSM application is configured to use Service Catalog module then following configuration changes are needed: 1. ITSM Application Server configuration needs to be updated. This configuration is maintained in a web.config file inside
the ServiceManagement directory. The Service Catalog module uses a web service which needs to be updated. The <SaaSServiceCatalogWSAddress > section needs to be updated to use “https” instead of “http”. Since SSL is bound to a domain name replace the “localhost” in the URL with a fully qualified server name/domain name. Here is an example.
<addkey="SaaSServiceCatalogWSAddress"value="https://<fully qualifield servername>/SelfService/ServiceCatalog/services/ServiceCatalogAPI.asmx"/>
Copyright 2011 FrontRange Solutions USA Inc. All Rights Reserved. GoldMine, HEAT and other FrontRange Solutions products, brands and trademarks are property of FrontRange Solutions USA Inc. and/or its affiliates in the United States and/or other countries. Other products, brands and trademarks are property of their respective owners/companies.
enabled out-of-the-box. The allowed IP address list is maintained in the web.config file, here is an example <addkey="AllowedIPs"value="
127.0.0.1,::1
" />Add the IPV4 and IPV6 addresses for the server hosting the ITSM Application to the list of allowed addresses. <addkey="AllowedIPs"value="
10.28.191.69
,127.0.0.1,::1,
fe80::64e3:61ac:efa5:bb01%11
" />Enabling SSL connection on the client side
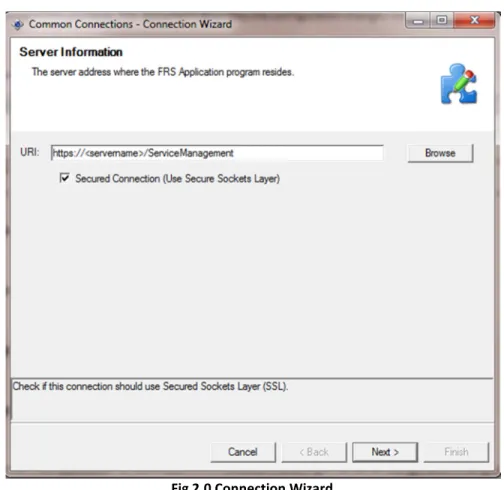
The client connection wizard provides an option to enable a SSL connection to the Application Sever. Selecting the “Secure Connection (Use Secure Socket Layer)” checkbox enables an SSL based connection between a Client and the Application Server. Refer Fig 2.0
Fig 2.0 Connection Wizard Click-Once over SSL
When users launch the Click-Once application from an HTTPS address, they will automatically be connected to the application server using SSL.