AUSTRALIAN JOURNAL OF BASIC AND APPLIED SCIENCES
ISSN:1991-8178 EISSN: 2309-8414 Journal home page: www.ajbasweb.com
Open Access Journal
Published BY AENSI Publication
© 2016 AENSI Publisher All rights reserved
This work is licensed under the Creative Commons Attribution International License (CC BY).
http://creativecommons.org/licenses/by/4.0/
To Cite This Article: Saravanan P., Review Article: Complete Reference on Remote Device Control through WebIOPi IoT Framework using BCM 2835 SOC. Aust. J. Basic & Appl. Sci., 10(1): 185-190, 2016
Review Article: Complete Reference on Remote Device Control through
WebIOPi IoT Framework using BCM 2835 SOC
Saravanan P.
Assistant Professor Department of Electronics and Communication Engineering Rajalakshmi Engineering College, Thandalam, Chennai
Address For Correspondence:
Saravanan P., Assistant Professor Department of Electronics and Communication Engineering Rajalakshmi Engineering College, Thandalam, Chennai.
E-mail: [email protected]
A R T I C L E I N F O A B S T R A C T Article history:
Received 10 December 2015 Accepted 28 January 2016 Available online 10 February 2016
Keywords:
Apache Web server, BCM2835 SOC's, HTTP, TCP/IP, WebIOPi)
The very purpose of this paper is to give a complete reference on controlling home and industrial devices using embedded controllers from remote places with the help of TCP/IP and HTTP based web servers. Here we have chosen Broadcom BCM2835 SOC's as the core since it’s been the core for all raspberry pi boards. These are credit card sized computers and the largest selling unit because six million boards were nearly sold with Apache web server and WebIOPi IoT Framework to control, debug and use the GPIO's in order to control the devices connected with the GPIOs. Using this user can easily get the status on the web page through the web browsers and control the devices by simply typing the IP of the device. With fine tweaking these frameworks it can be used for remote calibration of the devices.
INTRODUCTION
I. Protocols:
A. TCP/IP ProtocolL:
TCP/IP is responsible for full-fledged data connectivity within the network. It’s a combination of two protocols such as Transfer Control Protocol and Internet Protocol. Transfer Control Protocol (TCP) for Data Stream Push and Urgent Data Signaling and Internet Protocol is used to identify the devices in the network with a unique ID called IP Address with the help of these unique address devices are identified as server and client in a network.
B. HTTP Protocol:
HTTP Protocol is a stateless protocol, asymmetric request response client server application level protocol can be used for many application beyond its intended uses as hypertext.
II. System Design:
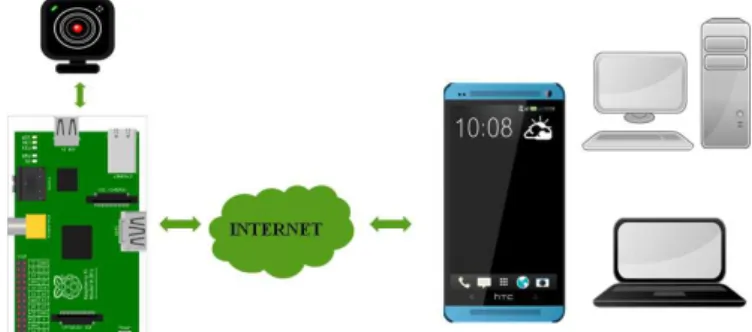
A system has to be a closed loop system in order to perform control applications. It will be in different states during the operation so for proper control the system has to get input parameter from the external environment through input devices like sensors or video camera. A processor serves as a control unit, it acts on the environment based on the input which is fed to the system. Here we have a camera as the input device from which we will have the input to process with, based on the video fed we can control the devices from the controlling device
A. Hardware Approach:
Raspberry Pi version 1 model B is based on broadcom BCM 2835 SOC which has 700 MHz of ARM1176JZF-S Processor, broadcom Video-core IV operates at the speed of 250 MHz and Open GL rendering application programming interface for 2D and 3D Graphics typically hardware accelerator which uses a graphical processing unit, MPEG-2 and VC1 with 1080p H.264 high profile decoders and encoders, 2 USB ports one is internally connected to Ethernet port, 15pin MIPI camera interface used for Raspberry pi camera interface, one HDMI via RCA jack video outputs. It has 26 GPIO pins we can access these pins through browsers for any control applications. We have used Logitech HD webcam C525 with HD video capture up to 1280 X 720 pixels with autofocus facility and its supports up to 8 megapixels for photos, and built-in mic with logitech right sound technology which USB 2.0 standard as an input device which is interfaced with our SBC thought one of its USB port.
Fig. 1: Overall System Design.
B. Software Approach:
The multimedia Abstraction layer framework provides a host side low level interface to multimedia components on VideoCore. It is very efficient and simple to use from client side Motion MMAL is an experimental version that adds supports Pi's CSI camera module via MMAL API. Motion MMAL can be installing using the following command sudo apt-get install motion or else you can download a pre compiled version of Motion MMAL from dropbox or GitHub. Once after installing a configuration file get generated and by editing this configuration file we can made our camera to work as our requirement.
under HTTP based control option control_port 8080 by default 8080 it can be reconfigured. Four threads are available under motion each can be configured for different camera inputs and each can be configured at different port number like 8080, 8081, 8082 etc.. after all the editing save the file and now the motion is get started using the following command motion start now after the issuing the command you can see the live streaming of camera under
http:// <your_ip_address>:8080.
1) WebIOPi Framework:
webiopi framework is designed specifically for raspberry pi IoT applications. It is used to control, debug and use the gpio's, sensors and converters from a web browsers or any other app. It’s based on the weaves IoT kit which gives power of software defined networking (SDN) to all devices from smart phones to Personal computers. It’s written using python language with the options of load and executes custom scripts using an extensive structure with the set-up and looping functions. This IoT framework supports around 30 different devices including analog converters, sensors and different I/O expander ports. The Web user Interface was achieved through JavaScript / HTML client library it can be controlled by both python and java users from the remote controlling devices.
It has HTTP Servers with both HTML resources and REST API to control the IoT devices. Here the browser load the HTML file at the initial stage and then the JavaScript will initiate the asynchronous call to REST API in order to control and update the status of the device to the user interface and it doesn't require to download the pages again and again on every refresh.
Fig. 2: WebIOPi Framework.
WebIOPi is specifically designed for raspberry pi before installation of framework as a prerequisite and python is required to set up the script , apt-get will automatically download the required dependencies and if raspian is not used as an operating system, the GCC compiler and python development headers have to be installed manually. $tar xvzf WebIOPi-x.y.z.tar.gz command will be issued to download the WebIOPi package and it is installed by using the following command $ sudo ./setup.sh to start the verbose output with default config file $ sudo webiopi -d -c /etc/webiopi/config running the webiopi is done by using the following command $ sudo /etc/init.d/webiopi start and it comes to halt when the following command is issued $ sudo /etc/init.d/webiopi stop or else if you want the framework to start at the booting process it can be done by the command $ sudo update-rc.d webiopi defaults it could be halted by $ sudo update-rc.d webiopi remove. For accessing the webiopi over local network the pi board is connected to the network. You can access the board by issuing http://<your_IP_address>:8000 once its issued there will be dialog box prompted for secure login, the default user is “webiopi” and password is “raspberry”. There are different pages available in default to access the GPIO headers through which we are going to control the devices by simply tapping the user interface.
Here a relay is connected at the “GPIO 14” now using the web browser we are going to control the relay through WebIOPi framework.
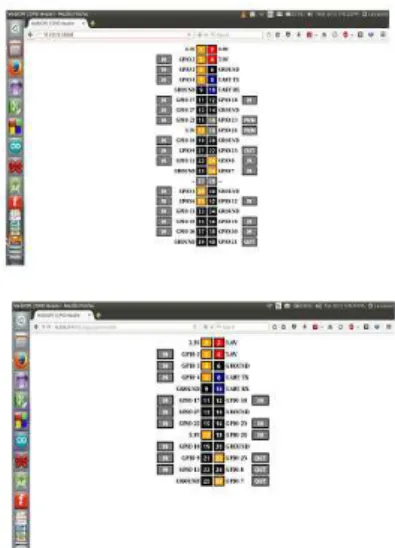
2) Tweaking WebIOPi framework:
As we know that we have used both HTML and Python in the designing of WebIOPi framework the tweaking of both files must be in same folder so that it can be configured in the framework's configuration file.
Fig. 3: WebIOPi Framework Raspberry Pi B+ b) Raspberry Pi V1.
<!DOCTYPE html PUBLIC "-//W3C//DTD HTML 4.01 Transitional//EN" "http://www.w3.org/TR/html4/loose.dtd">
<html> <head>
<meta http-equiv="Content-Type" content="text/html; charset=UTF-8"> <title>WebIOPi | Remote Device Control</title>
<script type="text/javascript" src="/webiopi.js"></script> <script type="text/javascript">
webiopi().ready(function() { webiopi().setFunction(7,”out”);
var content, button; content = $ (“#content”);
button = webiopi().createGPIOButton(7,”Relay”); content.append(button);
}); </script>
<style type="text/css"> button {
display: block;
margin: 5px 5px 5px 5px; width: 160px;
height: 45px; font-size: 24pt; font-weight: bold; color: white; }
#gpio14.LOW {
background-color: Brown; }
#gpio14.HIGH {
background-color: Red; }
</style> </head> <body>
<div id="controls" align="center"></div> </body>
</html>
now save the script under the file name relay.html. After tweaking the html script now we have to make some changes in the python script as well
RELAY = 7 # GPIO pin using BCM numbering
# setup function is automatically called at WebIOPi startup def setup():
# set the GPIO used by the light to output GPIO.setFunction(RELAY, GPIO.OUT) # loop function is repeatedly called by WebIOPi def loop():
# Now check the condition
if (GPIO.digitalRead(RELAY) == GPIO.HIGH): GPIO.digitalWrite(RELAY, GPIO.HIGH) else:
GPIO.digitalWrite(RELAY, GPIO.lOW) # gives CPU some time before looping again webiopi.sleep(1)
# destroy function is called at WebIOPi shutdown def destroy():
GPIO.digitalWrite(RELAY, GPIO.LOW)
Now save the above script as script.py. Now both the files are tweaked as per our application requirement and we have to make sure that both these files are saved under the same folder. Then the configuration file is edited to the path of the newly tweaked file's path. Now the config file can be edited by sudo nano /etc/webiopi/config command .It opens the config file for editing once it is opened under the section [SCRIPTS] myscript = /home/pi/remote_control/script.py. Once adding the path of script, the file moves to the section [HTTP] here we have to set the path of our folder in which we have saved our programming files as doc-root= /home/pi/remote_control. There is a facility to change the port address by default. Change port 8000 as port = 8080 as a result we can listen to webiopi framework on port 8080 then go for the option welcome file and set the name of the html file we tweaked welcome-file = relay.html. Here we are going to use only one pin on which our relay is connected so we can restrict the function under [REST] gpio-export = 7 it limits the GPIO exported to the REST API, post-value = true it allows to remotely change the GPIO values as HIGH/LOW, gpio-post-function = true it allows to remotely change the GPIO function as IN/OUT. Now a Compact web user interface is ready and it can be used for control applications.
Result:
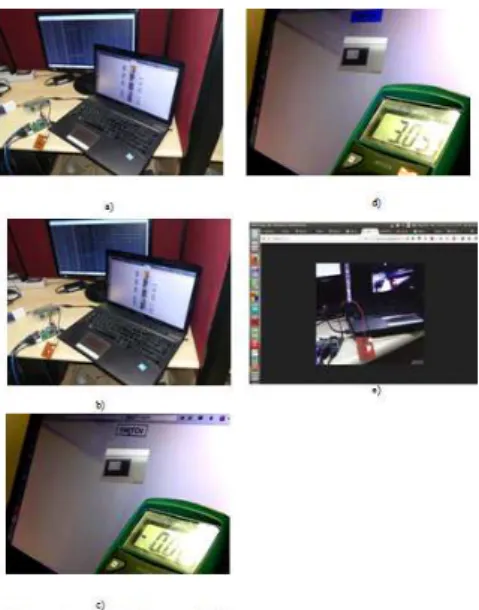
Now the customized buttons are used to control the remote device here relay, it has been tested with both the mobile phones and PC by typing the IP of Raspberry PI Board through web browsers.
Here in the above result an output device is connected and it’s controlled through a networked framework figure 4.a and 4.b shows the control through webiopi framework. In the figure 4.c and 4.d are shows that tweaked framework with singe control button and live streaming from camera below 4.e Figure shows that live streaming of video from perception input.
ACKNOWLEDGMENT
We like to thank lumisense technologies and its technical manager Mr. S. Satheesh for allowing us to utilize the lab facilities
REFERENCES
International Journal of Innovative Science, 2015. Engineering & Technology (IJISET) ISSN: 2348-7968, 2-8, “Android controlled Integrated Semi - Autonomous Fire Fighting Mobile Robot”.
International Journal of Recent Technology and Engineering (IJRTE), 2014. ISSN: 2277- 3878, 3-3 “Implementation of Embedded Web Server Based on ARM11 and Linux using Raspberry PI”.
International Journal of Emerging Research in Management & Technology ISSN: 2278-9359 Volume 4 Issue 8 August 2015 “WebIOPi - Remote Controlled Robot Cam Using Rest Framework”.