9.6
A
A
c
c
t
t
i
i
v
v
e
e
T
T
r
r
a
a
d
d
e
e
r
r
P
P
r
r
o
o
®
User Guide
Table of Contents
... 1
... 1
1 ... 1
Trading and Market Information ... 2
CONTACT INFORMATION ... RESOURCES ...
... 4
...4 ... 5 ... 5 ... 5 ... ... 6Step 4: Install Fidelity Active Trader Pro Software ... 6
... ... 2 Prompts ... 4 ... ... 5 ... 6 ... 6 ... 17
... 18
Chapter 1 – Introduction ... .
..
..
.. .. .. .. .... .... .... .... ... ... .... .... ......
PROGRAM OVERVIEW ...1 Account Management ... Portfolio Management... Investment Decision Support Tools... ..2..2
Chapter 2 – Getting Started... .
ELIGIBILITY ... . SYSTEM REQUIREMENTS ...4 DOWNLOAD ... . .. INSTALLATION ... . .. .. Step 1: Download the “Atsetup.msi” File ... . .. 6Step 2: Run Atsetup.msi to Verify Required System Requirements... . .. Step 3: Install Components, If Needed... . .. Step 5: Launch Active Trader Pro ... 7
LOGGING IN ... . 1 ..7
Floating Windows... . 1 GENERAL NAVIGATION TIPS... . 15
Windows ... .. 1
Menu & Toolbars... . 1
Mouse Over ... . 1 Right-Click... ..
Export... ... 2 .... .... .... ... .... ... .... .... ... ... .... .... USER AGREEMENT MENU ... .... .... .... .... ...
...
.... .... ... .... ... .... ... 2 ... 2 ... ... .. ... ... .. 6 ... 28 ... ... ... 9 9 ... ... ... ...31 ... ... Contents ... 3 ... Search ... 3 ... 36 ... 7... 38
... ... 0 Balances Tab ... 5 ... 7 ory T ... Margin Calls Tab ... ... 52Accounts Preferences ... ... REPORTS ...55
Chapter 5 – Investment Research & Education Tools... 56
General Information...56 QUOTES ...56 Backup/Restore Data... . 2 Backup/Restore Preferences... . 24 24 Software Upgrade ... . Purge... 25 25 Exit... .. EDIT MENU ... . 2 26 Layout... Toolbars... .. 29 Preferences ... . VIEW MENU ... . 2 29 Function Toolbar ... .. 2 Layout Toolbar... Ticker ... .. 30
Quick Balances Toolbar... . 30
TOOLS MENU ... . 30 . WINDOW MENU... . 31 HELP MENU... . 3 32 Index ... .. 35 6 Trading Knowledge Center... . About... .. 3
Chapter 4 – Account Management Tools ... .
ACCOUNTS... . 4 39 Summary Tab ... . 4 4 Positions Tab ... .. 50 Hist ab... Profit & Loss Tab... . 5152 Margin Debit Interest Tab ... . 53 FIDELITY.COM... . 54
Customizing Quotes... 5 .... ... .... .... .... ... .... .... .... .... .... .... ... ... .... .... .... ... ... ... ... ...
....
... ... ... ... ... ... 8 ... 9 ... 0 ... ...68 ... 0 ... 6 ... 6 ... 7 ... ... ... 0 ... 6 ... 7 ... ... ... ... ... 0 ... 1 ... 3Access News in ATP Tools... WATCH LIST ... ...103 104 ...1 ...111
... 112
...1 ...113 ...118 120 ...1 ...121 Level 2 Quotes... . 5 Option Chain... .. 6Time & Sales ... . 66
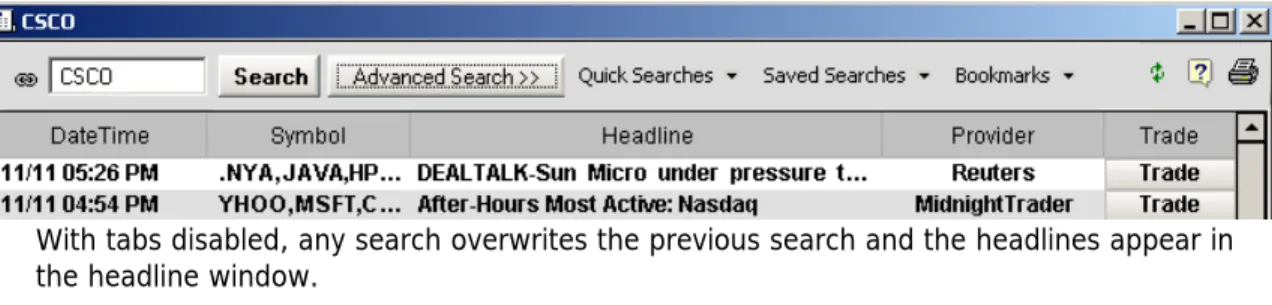
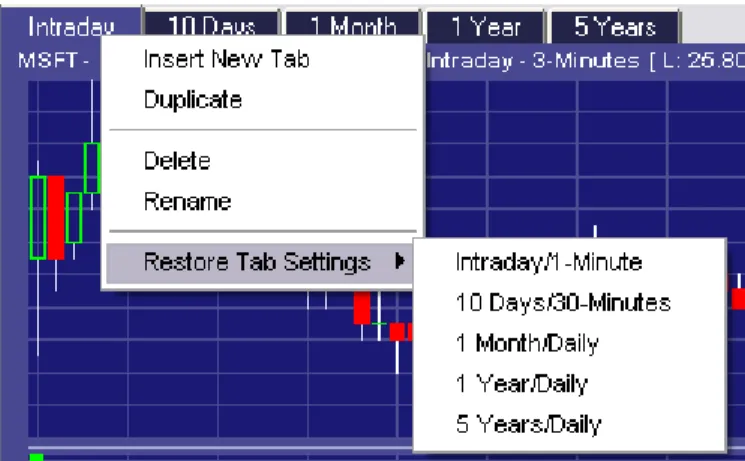
CHARTS... . 7 Working with Charts... . 7 Tab Charting... .. 7 Modifying Tabs ... . 7 Saving Changes and Multiple Charts ... . 78 Accessing Saved Charts ... . NEWS... . 8 78 Control Section ... . 8 Headline Section ... 8 . 88 Story section... .. 88 Searches ... .. 89 90 Create and Run a Search ... . 9 Saving the News Tool window settings... . 9 ATP News Pop-up Alerts ... . 9 Story... Floating quote window... .. 95 Preferences – News... . 98 RESEARCH ... . ALERTS ... FILTERS ... . 07 EDUCATION ... .
Chapter 6 – Trading Tools...
.
TRADE... . 12Stocks & Options... . Trading Features... . Mutual Funds... Conditional ... .. 21 Multi-Contingent Trades... .
Chapter 7 – Customizing Active Trader Pro ... 136
...136 ...136 ...143 ...1 ...147 ...148 149 ...151 ...153 ...154 ...155 Market Statistics...1 ...1 ...158 ...159Equities, Options, Indices, Mutual Funds, and Money Markets ...160
...161
Time and Sales ...162
...1 ...163 ...1 ...166 ...168 1 ...175
... 177
...177 SCREEN LAYOUTS...180Market Monitor Layout...182
Trade Layout ...184
Portfolio Monitor Layout...185
Custom Layouts ...186
CONCLUSION ... 189
Preferences....... ... ... ... .... ... ... ... ... .... ... .... ... ... ... ... ... ... ... .......
... General Preferences ... . ACCOUNTS... . TRADE... . 46 Stocks... .. Options ... .. Mutual Funds... ORDERS ... . WATCH LIST ... . Menu ... .. Index List ... .. 55 ALERTS ... . 57 Pop-ups... .. QUOTES ... . Option Chain... .. TICKER ... . 63 RESEARCH ... . FILTERS ... . 65 NEWS... . CHARTS... . Tab Charting... 74 Saving Changes and Multiple Charts ... .Chapter 8 – Pre-Set and Custom Screen Layouts ...
.
FUNCTION TOOLBAR ...Chapter 1 – Introduction
TP is an extremely powerful and versatile Microsoft Windows-based portfolio management and trading platform specifically designed to meet the
’s active traders.
orm, Active Trader Pro provides:
des to evaluating account performance, ATP presents active traders ount management tools, including:
istory
Loss Calculations ation
the active trader the power to manage an entire portfolio by ent tools, including:
Portfolio Summary
rt Tools
Formulating intelligent investment decisions requires that active traders have access to an entire spectrum of investment knowledge and information. Regardless of your decision-making style, Active Trader Pro offers the necessary decision-support tools, including:
Third-party Research and Screening Welcome to Fidelity Active Trader Pro. A
sophisticated needs of today
PROGRAM OVERVIEW
Within one integrated platf
Account Management
From tracking individual tra
with a comprehensive collection of acc
Account H
Account Balances Account Positions Profit and
Tax Inform
Margin Calculator and Margin Information Administration of Account Features
Portfolio Management
Active Trader Pro also offers
presenting an array of portfolio managem
Portfolio Analysis/Reports
Open and Closed Positions across accounts Online Statements
Viewing Positions across accounts
Money Movement
Trading and Market Information
anage your individual trading activity. atform includes:
Trading Capabilities, including Multi-Leg Option Orders Market Data including Level II Quotes and Time & Sales ble Watch Lists
Securities Alerts
For more information about Directed Trading, please refer to the Directed Trading User Guide (choose Help > Directed
ain Menu) or the ATP Help system (choose Help > Contents ected Trading topics under Trading).
If wing numbers:
g Active Trader Pro
7595
Eastern time Saturday 8 a.m. to 6:30 p.m. Eastern time
Product Support: For additional information on Active Trader Pro, such as
features and functionality, contact Product Support:
RESOURCES
ot used Active Trader Pro, we highly recommend reviewing the contents of this User ely . Please note that all screenshots provided in the User Guide are for illustrative purposes only and should not be deemed an offer or recommendation.
At the heart of Active Trader Pro is the ability for you to m Depending upon your level of trading, the trading pl
Streamlined Multiple Trade Order Entry Screen Specialized Option
Streaming
Customiza
Directed Trading
Note: Directed Trading will not be discussed in this user guide.
Trading User Guide from the M
from the Main Menu, then view the Dir
CONTACT INFORMATION
you need assistance, please contact us at one of the follo
Technical Support: If you are having difficulties downloadin
or logging in to the application, you can contact Technical Support:
800-544-Monday through Friday, 8 a.m. to 10 p.m.
877-907-4421
Monday though Friday, 8 a.m. to 5 p.m. Eastern time
If you have n
Guide. Since this Guide is stored online, it is always available to help you trade more effectiv with Active Trader Pro
For the first-time user, there is also an online demo of Active Trader Pro availab
Fidelity.com. le on
ram by clicking
You may also access additional, in-depth information available on Fidelity.com from the Education link located under Tools on the Main Menu or by enabling the Education button in the Function Toolbar preferences.
Fidelity utilizes the Active Trader Newsletter
A detailed searchable Help system is available within the Active Trader Pro prog
Help from the Main Menu.
to educate investors on the various functions and capabilities of the Active Trader Pro program. If you qualify for Fidelity Active Trader Services, you will automatically receive this monthly newsletter by email. You can also access archived editions online at Fidelity.com.
vidual alerts within the Active Trader Pro Alert Center, informing you of new enhancements to the program.
roducts, look for informative seminars and training classes scheduled at your local Investor Center.
Additionally, from time to time you will receive indi
Chapter 2 – Getting Started
Before you begin the download, installation, and setup process, please verify that you meet the lity and operating system requirements listed below:
To qua o, you must have a activity of 36 or more
trades in a rolling 12-month period. minimum eligibi
ELIGIBILITY
lify for Active Trader Pr nnual household trading
Number of Trades / Year Active Trader Pro Eligibility
0–35 Not eligible for ATP
36–71 Eligible for ATP, including Dow Jones news,
l-time charting, try and automatically real-time quotes, interactive rea
multi-trade order en updated watch lists
72–119 static Level II
s Eligible for all of the above, plus quotes, and streaming watch list
120+ Eligible for all of the above, plus streaming
news, streaming Level II quotes, streaming interactive charting, Time & Sales and Directed
tes from top market Trading with streaming quo
centers
SYSTEM REQUIREMENTS
In order to use Active Trader Pro, your com irements. To
m, open the Sta rol Panel >
system data is loc eneral tab.
puter must meet the following requ rt menu and choose Settings > Cont ated on the G
check your operating syste
System. The operating
Recommended for Recommended for Active Trader Pro with Wealt
Active Trader Pro
h-Lab Pro
gher dual processor. Quad mended for best
DSL, Cable, or T1 DSL, Cable, or T1
120 MB
200 MB recommended for install 120 MB 200 MB recommended for install
17" or larger monitor at 1024 x 768 19" or larger monitor at 1280 x 1024
32 bit color 32 bit color
Windows XP Home Service Pack 2, XP Professional Service Pack 2, Vista, or Windows 7 (we recommend a minimum of 2 GB RAM for Vista or Windows 7)
Windows XP Professional Service Pack 2, Vista, or Windows 7 (we recommend a minimum of 3 GB RAM for Vista or Windows 2.5 GHz dual processor or higher
1 GB RAM or higher
2.5 GHz or hi
processor system is recom performance.
and Microsoft .NET .0 2 7) and Microsoft .NET 2.0
mend that eligible users of streaming market data use a
If you are using a 56K modem, we recommend that you set your update interval to a If you are using a cellular modem or satellite connection to the internet, you may
lays in streaming data within Active Trader Pro.
DOWNLOAD
our servers. Several factors can affect the time it will take for ATP to download to your computer, most
importantly the speed connection. Th a 21 MB download
take into ac ur connection speed:
We strongly recom broadband connection. 2-minute automatic update. experience de
You will need to download the Active Trader Pro application to your computer from
of your internet
count only yo e following estimates for
Connection Download Time
T1 50 seconds
DSL or Cable Modem 3–20 minutes
56.6 Modem 1–2 hours
INSTALLATION
If you require assistance installing and setting up Active Trader Pro, please conta the resources identified in the Contact Information section of this manual.
Step 1: D
ct Fidelity using
ownload the “Atsetup.msi” File
Se rading > Active Trader
Select the download link from the Fidelity.com Investment Products > Trvices > Active Trader Pro page, or go to atp.fidelity.com and choose Downl
rader Pro. For Internet Explorer users, a dialog box opens asking if you would
, depending on the version you are using) the Atsetup.exe file from it
oad Active
T like to Run (or
n) will download the Atsetup.msi file and then prompt
you again to Run the software.
equirements
the file on your system and double-click it to run the installation process. At the beginning of the installation process, the program checks to ensure
to install Active Trader Pro. The progr
on of Windows, the rnet Explorer 5.5
ed. If the re installing stall the correct updated version of osoft’s web site at
.microsoft.com/windows/ie/default.asp
Choosing Run (or Ope
Step 2: Run Atsetup.msi to Verify Required System R
If you saved the Atsetup.msi file, locate the system is ready
am checks for:
Operating System: If you are not running a required versi
installation will not be complete.
Browser: Active Trader Pro requires a minimum version of Inte
with Service Pack (SP) 2, although IE 6.0 or IE 7.0 is recommend appropriate version of IE is not installed on your computer befo Active Trader Pro, the installation process will prompt you to in version, then run Atsetup.exe again. If you need to install an Microsoft’s Internet Explorer, you can download it from Micr
www .
s additional software from Microsoft. If that on your computer, you will be prompted to
n of Active
Step 3: Install Components, If Needed
ck Next and the Atsetup.msi process
You will now be prompted to
nt is displayed. As part of the installation process, you must accept the terms of the Fidelity Active Trader Pro Software License Agreement. Click I accept
f you do not
ere the Fidelity Active Trader Pro program files will be installed. You can modify the location by clicking Change, or click Next to accept the default
Another window opens displaying a default location for storing the Active Trader Pro data and log directories. Again, you can modify the location by clicking Change, or click Next to accept the default location and continue the installation.
Now click Install to begin the installation process.
Note: If additional Microsoft software components were installed as part of the installation process, you may be prompted to restart your computer depending upon the version of Microsoft
Software: Active Trader Pro use
software is not already installed
download additional Microsoft components during the installatio Trader Pro.
If you are prompted to install any of the Microsoft components, cli
program will install the required components. You cannot continue the installation without these components.
Step 4: Install Fidelity Active Trader Pro Software
The installation wizard guides you through the installation process. install Fidelity Active Trader Pro. Click Next.
The Software License Agreeme
the terms of the license agreement to continue the process, and then click Next. I wish to accept the terms of the license agreement, click Cancel to exit the install. A window opens with a default location wh
s. If a restart is required, the Fidelity Active Trader Pro installation will continue after restarting.
ctive Trader Pro. If you wish to clear the Launch check box and then Click Finish to exit the installation process. You may also double-click the
o icon on your desktop (or go to the Start Menu) to launch the application.
Name for
e and Password (PIN) that you use to access Fidelity.com. Next, choose an ATP Login Name that will be specific to the ATP application. The ATP Login Name can be any combination of letters or numbers. For your security, we recommend that you do not use your Social Security number.
Window
Step 5: Launch Active Trader Pro
When the installation is completed, a window displays notifying you that Fidelity A Pro has been successfully installed. Click Finish to launch Fidelity Active Trader to simply complete the installation without launching Active Trader Pro, click Active Trader Pr
LOGGING IN
Once you have installed Active Trader Pro, you will first need to create an ATP Login the Active Trader Pro application. Start by entering your UserNam
a password in ive Trader Pro. Its
nhanced ou will be required to enter it and your Fidelity.com Password each time you
Enhanced Security erent from your
anumeric Below your set up a password hint, which will be your only reminder, because Fidelity does not have access to this information. Once you have entered your Enhanced Security Password information, click OK.
You will now be presented with the Active Trader Pro User Agreement. In order to complete the login process and use the application, you must click the check box next to I accept the terms of the above agreement and then click I Agree.
In the Enhanced Security section, which is optional, you have the ability to add addition to your Fidelity.com Password (PIN). This password is unique to Act purpose is to protect information cached/stored locally on your PC. If you set an E Secuirity Password, y
log on.
If you choose to establish an Enhanced Security Password, enter it in the ATP Password field and then re-enter it for verification. Your password must be diff Fidelity.com UserName, Password (PIN), and ATP Login Name, must be 6–12 alph characters, and must contain at least one number and one letter (case sensitive). Enhanced Security Password, you will be able to
User ader Pro, you must
en click I Agree. Note: National Financial Services is the executing broker dealer for directed trading orders. If you are eligible for Directed Trading, you will be presented with the Directed Trading Agreement. In order to access the directed trading functionality in Active Tr
rting. After reviewing the details, simply click Close and your initial account download and login will continue.
A window now displays with important information regarding metrics repo
In the future, when launching Active Trader Pro, a log-in box will display with your ATP Login Name. Simply enter your Fidelity.com Password (PIN) and click OK to log in to Active Trader Pro. If you set up an Enhanced Security Password, you must enter your Fidelity.com Password (PIN) and Enhanced Security Password and click OK to log in to ATP.
Security Password and then later decide to remove it, click Remove
ATP Password in the login box.
If you set up an Enhanced
You will then need to enter your ATP Enhanced Security Password in order to remove it.
After entering your password correctly and clicking OK, you will receive a confirmation message that your password has been removed.
ables you to float each ATP tool outside of the ATP application frame ation frame and tors.
ur desktop. For example, if reaming outside the ATP frame, you can minimize the ATP u can dock and undock the toolbars the same as in Standard Mode.
Switch to Floating Windows Mode
Switch the display mode from Standard Mode to Floating Mode and vice versa from General – System Preferences.
Floating Windows
Floating Windows Mode en
and move it around on your Desktop. You can also:
Use a multi-monitor setup, moving ATP tools outside the ATP applic across multiple moni
Minimize ATP on your taskbar, and leave any tools open on yo you have a watch list st
application on the task bar.
ched for the first time, it will open all the tool windows defined by the default layout in cascaded style.
in the ATP cation Icon (when alerts are available) are also present. When the ticker is invoked, it will also show in the
Use the Navigator to launch additional components and arrange the components windows on your desktop as desired.
When ATP is switched to floating mode and laun
The Main Menu, Function Toolbar, and Quick Balance Toolbar are always docked Navigator. The Connection Status, Application Download Status, and Alerts Notifi ATP Navigator.
ows. tore all open ATP All open ATP components appear in the taskbar and will stack when necessary.
h between open ATP components via ALT – TAB on your keyboard.
an save your window configuration via the L
Navigating in Floating Mode
Minimizing the ATP Navigator will also minimize all open ATP component wind Restoring the ATP Navigator via left click from the taskbar will res
component windows.
You may switc
Layouts in Floating Mode
You cannot save more than one configuration/layout in floating mode. You c
ayout->Save menu item or Ctrl+S on your keyboard. Other layout menu items such as New…, Rename, Save As…, Delete and Set as Default are not available with floating windows.
Because you can drag the ATP tools to create your own layouts, the prebuilt
TP are not relevant in floating mode. All layout menu items and other options not available in layouts provided by d/or grayed out.
Important Note: you must save layout changes before closing. Changes will not be saved
le menu to the individual tool windows.
ing Mode
uotes, Charts l window can be minimized and restored on its own.
4) When tool windows are minimized they are grouped together in the taskbar. You can locate indow to view from the taskbar as in the figure below:
avigate to the the same as the r saved layout specifies
Prompts
In General - System Preferences, you can choose whether or not you want to be prompted before new versions of ATP are downloaded to your computer. The default option is not to be prompted before download, which allows new versions to download in the background without affecting system performance. When ATP is shut down, it checks if a newer version was downloaded. If yes, you will be prompted to begin the installation process and ATP will shut down. The next time you log in to ATP, the new version will be running.
A
floating mode are disabled an
automatically and you will not be promted to save changes.
Print Preview, Print, and Export
In floating Mode these features are moved from the Fi
ATP Tool Size, Position, and Navigation in Float
1) ATP Navigator window position and size will be saved when you shutdown. 2) Minimizing the ATP Navigator minimizes all the open tool windows such as Q
and Account Summary etc.
3) Each too
the w
5) Keyboard navigation – ALT + TAB shows all the open tool windows. You can n required tool window. The text shown on the ALT + TAB screen should be tool window title.
6) Tool windows will persist at the size you last set for them, unless you another size.
If you choose to be prompted before downloading a new version of ATP, you will receive a Pop-up alert notifying you that an ATP Pop-update is available. Clicking the Pop-Pop-up will present the Download Info screen, which lets you download now, or select a time to be reminded. Once a
e prompted to install the new version of Active Trader Pro. alert, ATP will continue as normal and the update
we begin to examine specific aspects of the Active Trader Pro program, it may be of value to discuss a few general navigational tips that can be utilized throughout the entire experience. new version is downloaded, you will b
Note: If you ignore or miss the pop-up
notification will be presented the next time you start ATP.
GENERAL NAVIGATION TIPS
Menu & Toolbars
ach of the Active ader Pro application windows. For example, the primary Active Trader Pro window looks like this:
These terms refer to the primary navigational bars displayed across the top of e Tr
Mouse Over
This term refers to moving your mouse so that the cursor on your screen is positioned over specific visible program text or program symbols revealing additional text or links. This functionality is available throughout Active Trader Pro. For example, if you open Active Trader Pro and begin to move your cursor across the various terms displayed in the Main Menu, additional drop-down menus will be displayed:
primarily utilize over that there oughout Active Trader Pro that have increased functionality if you move your cursor onto them and then click with the right mouse button. For example, let’s take a look at a typical watch list setup:
Right-Click
If you have your mouse traditionally programmed, the left button is the one you to position the cursor and click the action you would like. However, you will disc are many terms and functions thr
If you position your cursor over any one of the individual line entries, such as BP, and click with the right mouse button, a new drop-down menu will appear:
Chapter 3 – Main Menu
n the Login Box and have pressed Enter, the Fidelity Active Trader Pro program will start. The first view to appear is the default screen layout, Main Menu Toolbar, Function Toolbar, and Layout Toolbar.
Once you have entered the required information i
There are different ways to navigate through Active Trader Pro: the Main Menu, the Function Toolbar, and Screen Layouts. This chapter will focus on each of the various ele
Menu. Becoming familiar with this aspect of the program will provide you with a clearer ments of the Main understanding of how the program functions and will make the construction of your own
customized ATP platform substantially easier. Chapter 8 will discuss the Function Toolbar and screen layouts.
The Main Menu bar consists of several different menu items. Understanding and mastering the functions controlled by each of these menu items will greatly enhance your experience when using Active Trader Pro daily.
Clicking any one of these menu items opens a drop-down list of commands or program choices.
Clicking File opens a drop-down list of different clickable program commands.
FILE MENU
To choose any of the commands in this drop-down menu (or any of the other drop-down menus connected to the various Main Menu items), simply move your cursor over that command. Once it is highlighted, click that command to be redirected to its function.
User Info
or obtain This drop-down box appears with additional commands. Simply move your cursor over to this new box to make your selections.
This enables you to change your current ATP Login Name, delete an ATP Login Name, the hint you created to remember your Enhanced Security Password (if one was created). menu item has an arrow on the right-hand side. When you mouse over it, a new
Change User
the sign-in
When the program is operating online, it is constantly receiving account and market information from Fidelity. If you want to work off-line, click Disconnect to shut down the connection to Fidelity. This will enable you to review account information, including balances, positions, history, etc. You can also fill in the stock and option multi-trade ticket.
To re-establish your connection, return to this drop-down menu. The Disconnect command will have been replaced with a Connect command. Connecting will enable you to submit orders, review updated market data, and view updated account information.
If more than one User account has been created, you can click Change User and box will appear, enabling you to sign into a different User account.
Print Preview
hat you will be printing. The screen component you would like to print must be selected on your screen layout.
If your computer is connected to a printer, you can click Print to send information selected on en layout to this printer.
A whole collection of investment reports is available through Active Trader Pro. Clicking Reports opens the following window:
If you want to print a particular screen, click Print Preview to preview w
your scre
Reports
The Report window contains three distinct sections. Types of Reports lists the major report categories. Available Reports contains the menu of available reports for each of these major report categories. Selecting a particular report in the right-hand box will provide you with a brief description of the information provided in that particular report, in the Description section at the bottom. These individual reports can be viewed on the screen, printed, or the data can be exported to other computer programs (for example, Word, Excel, etc.). Click the box beside
Generate report with updated Quotes if you would like the most recent market information
Export
for use with . Select the t on your layout that you would like to Export, then click Export. The following choices will appear:
The export tool enables you to export Watch Lists, Positions, History, etc. to a file another program, such as Word or Excel, for viewing, modification, or to be saved componen
Choose the format (e.g., Excel) and the Destination where you want the information saved. Click pear that will ask you to name the file and its directory location on your computer.
ore account data. Simply click the function you would like to run (Backup or Restore). If you select Backup Data, you will need to determine whether you would like to be prompted to back up your data again, and if so, when you’d like to be prompted (one day, one week, or one month). In addition, you will need to determine the destination/file where you would like your data stored.
OK. A new window will ap
Backup/Restore Data
This function enables you to backup and rest
Once you have identified the file and its directory address has appeared in the window, click OK to start the backup/restore process. This procedure is extremely useful if you have imported
urces into Active Trader Pro and you want to ensure that you have a current backup copy of this data.
large amounts of data from outside so
If you select Restore data, you must determine whether you would like your data restored as a part of your profile, or into a new profile. Also, you must identify the file and its directory address to restore from and click OK to start the restore process.
Backup/Restore Preferences
This feature is sily enable you you would like to run (Backup or Restore), select your destination file, and click OK.
This function enables you to backup and restore layout and program preferences. important if you wish to use ATP on several different computers, because it will ea to apply preference settings on each PC. Simply click the function
Software Upgrade
At any time, you can click this function to determine whether you are running the most current version of Active Trader Pro. If the most current version is being used, the menu will simply disappear.
If a more current version is available, you will receive a prompt to download the newer program version.
Purge
a date range you u to either free up disk space or recover data for a specific period of time within the prior 90 days.
Selecting this file option enables you to purge history transactions according to select. This helps yo
Once you have made your selection, click OK. A warning will then appear:
Clicking Yes will permanently delete the data. Clicking No will cancel the process.
Exit
Clicking Exit will immediately log you out of the system and shut down the Active Trader Pro program.
EDIT MENU
Clicking Edit opens a drop-down menu with three clickable commands:
Layout
You can choose which tool components to have open for regular viewing and specify how these tool components should be arranged on the screen. (Particular directions on how to open and arrange tools and create specific screen layouts are discussed in the View and Tools sections of this chapter.)
New
The New command clears the main window of all open tools. Clicking New provides you with the blank original window and the Main Menu bar. From this point, you can begin to construct a new personalized layout.
Rename
The Rename command enables you to choose an existing screen layout and store it under a new name. If you click Rename, a new window appears:
selected in the Name field and clicking OK will permanently change the name of an existing layout.
permits you to make changes to an existing layout and then save these changes under the existing layout name. You can then open it in the future without having to
the changes again.
The Save As command is utilized when you have created a new layout and you would like to retain this layout for future use. If you click Save As, a new window will appear:
Typing the new name you have
Save
The Save command input
Save As
Simply type in the name you would like to use to identify the new layout, the
save the newly created layout under the new name you have chosen. n click OK. This will
Delete
The Delete command enables you to eliminate obsolete or unused layouts. The layout you would like to delete must be the layout currently displayed in the main window. When you click
Delete, a confirmation window will appear:
Clicking Yes will permanently delete the selected layout. Clicking No will terminate the request.
Set as Default
Toolbars
nces. (Choosing command on the Edit menu gives you the flexibility to select what commands you would like to view on each of these toolbars.
In addition to the Main Menu bar (which is always visible), Active Trader Pro includes other toolbars, which can be viewed or hidden depending upon your individual prefere
to view these toolbars will be discussed in the View section of this Guide.) The Toolbar
To customize the Function Toolbar, choose Edit > Toolbars > Function Toolb Main Menu (or click Preferences on the Function Toolbar, then select Functio
General in the list). The Function Toolbar Preferences screen opens. For detail
preference options, please see
ar from the n Toolbar under
s on your
Trader Pro Chapter 7 – Customizing Active .
To customize the Layout Toolbar, choo Edit > Toolbars > Layout Toolbar from the Main Menu (or click Preferences on the Function Toolbar, then select Layout Toolbar under
General in the list). The Layout Toolbar Preferences screen opens. For details on your
preference options, please see Chapter 7 – Customizing Active Trader Pro
se
Preferences
customize the developed and ings, both in formatting and at the level of each individual tool. While we will cover preferences in this section, preferences will also be covered in more detail in Chapter 7 –
tive Trader Pro.
The View Menu enables you to select which toolbars will be displayed. There are four available toolbar choices: Function, Layout, Ticker, and Quick Balances:
One of the strengths of the Active Trader Pro application is that it enables you to program. We have already touched on the fact that user-created layouts can be saved. The Preferences command opens the door to additional preference sett terms of overall program
Customizing Ac
VIEW MENU
Function Toolbar
To display the Function Toolbar, choose View > Function Toolbar from the Main Menu. A check mark appears beside the name of any enabled toolbar. If the Function Toolbar is displayed, the main window will appear as follows:
Layout Toolbar
To display the Layout Toolbar, choose View > Layout Toolbar from the Main Menu. A check mark appears beside the name of any enabled toolbar. If the Layout Toolbar is isplayed, the d
Ticker
check mark bar. If the Ticker is enabled, the streaming ticker will appear across the bottom left of the main window:
To display the Streaming Ticker, choose View > Ticker from the Main Menu. A appears beside the name of any enabled tool
Quick Balances Toolbar
To display the Quick Balances Toolbar, choose View > Quick Balances Toolbar from the Main Menu. A check mark appears beside the name of any enabled toolbar. If the Quick Balances Toolbar is displayed, the main window will appear as follows:
You can display o
only display those buttons you have chosen to exhibit. (To review choosing buttons, please refer ne, two, three, or all four toolbars at the same time. Each individual toolbar will
The Tools Menu contains direct links to every individual Active Trader Pro program tool. You can use this menu to access tools. Whether or not the Function Toolbar is displayed you can use this menu to launch each of the tools:
to the previous section about the Edit Menu).
ce, a detailed Chapter 4 – Account Management Tools and Chapter 5 – Investment Research & Education Tools.
The User Agreement Menu provides you with links to each of the various agreements between Fidelity and yourself, which are involved with the use of the Active Trader Pro program.
Because of the significant role the tools play in maximizing the customer experien explanation of each tool, how it works, and how it can be customized, is provided in
USER AGREEMENT MENU
To view any of these agreements, simply click the name of the document you would like to
WINDOW MENU
The Window Menu provides the user with a few quick and easy ways of managing the open program windows.
review.
By clicking any of the three menu commands, the user can execute traditional Windows-based functions either by minimizing all of the open windows, closing all of the open windows, or arranging all of the open windows into predetermined spatial arrangements.
HELP MENU
Help, you
, Index, or Search), a quick link to the online Trading Knowledge Center, User Guides, and more:
The Help Menu connects you to a wealth of detailed help and assistance. By clicking are offered three different methods of accessing the Help library (Contents
Contents
Contents tab, which displays a Help Table of Contents on the left and a content display box on the right.
ntries on the left displays the associated detailed information in the scrollable box on the right.
Index
ed listing of own the list. To try in the index list on the left and the details will populate in the main window on the right.
Clicking Index will open the ATP Help window to the Index tab, an alphabetiz keywords. Enter a keyword to search, or use the scroll bar to move up and d display a topic from the index list, double-click the en
Search
an enter a associated ord or phrase the box. These displayed topics are the program’s closest matches to your inquiry. By double clicking one of these topics, a detailed explanation is provided in the main window on the right-hand side.
Clicking Search will open the ATP Help window to the Search tab, where you c keyword or phrase and then search the entire Help Library to see if there is any information. Pressing the Enter key or clicking List Topics after typing in the w displays a list of possible topics in the lower left-hand corner of
Trading Knowledge Center
Clicking this link will take you to the Trading Knowledge Center on Fidelity.com, where you may access a host of educational material and videos covering a wide variety of topics including Active Trader Pro. The material in the Trading Knowledge Center is updated frequently, so be sure to check back periodically to see what’s new.
About
ew window that contains specific information about the Active Trader Pro program:
Clicking the final entry of the Help Menu will open a n
It is important to know how to access this window in case you need to contact a technical or product representative concerning the Active Trader Pro program and its performance. The representative may ask you what version you are using or what server you are connected to, and this window is where that information is located. Note: If you are not using streaming updates, you will not see a Streaming Server reference.
Chapter 4 – Account Management Tools
gram is the diversity, thoroughness, and customization of the individual tools available to today’s Active Trader. The next three chapters
ls can be accessed ruction relative trading and investment terms. Answers to those types of questions should be sought in other resource materials, including Fidelity’s web site One of the strengths of the Active Trader Pro pro
will provide detailed information about the tools available.
Note: Each of these three chapters will provide instruction on how these too and utilized from a computer program perspective. This guide will not provide inst to the definitions of fundamental
(www.Fidelity.com), the Active Trader Pro Help system available within th
discussion with Fidelity representatives. e program itself, and
You can view individual tools by choosing Tools from the Main Menu. The Tools menu will appear:
For discussion purposes, the tools will be grouped into three categories: Account Management (Chapter 4)
Investment Research & Education (Chapter 5) Trading and Order Status (Chapter 6)
In Chapter 4, we will explore these three tools: Accounts
Fidelity.com Reports
ACCOUNTS
unts from the Main Menu or clicking Accounts on the Function Toolbar
displays the Accounts menu: Choosing Tools > Acco
Summary Tab
Clicking Summary opens the Summary tab:
The Summary tab enables you to view critical investment detail at:
Portfolio level Group level
When the Summary tab is displayed, the top menu bar includes the following functions: Account level
Accounts List
f your various Fidelity Retail Brokerage Accounts, Groups, and Other Accounts. You can choose the account for which you would like to display information. This section is unavailable while viewing the Summary tab, because it is not applicable to the Summary tab (which displays information for all accounts), but it will be available when other tabs are displayed.
Reports
Reports will be discussed in detail later in this chapter. The drop-down menu at the left displays all o
es you to create “Groups” of securities. When you click My Groups, the My Groups window opens:
My Groups
This feature enabl
My Groups enables you to track a particular security (for example, Intel), sector
Tech stocks) or type of investment (for example, options) within an account or across accounts. (for example, ounts, including line includes a
bles you to ou to delete the
reate a new
p you have selected. The box on the left ount’s holdings
in the box to have
in k box for that
accoun another
The History tab in My groups also will display all transactions across selected acc open positions and those that do not have symbols associated with them. The top drop-down menu to choose which Group to view, a Rename function, which ena change the name of the Group being viewed, a Delete function which enables y currently viewed Group, and a Create function that gives you the opportunity to c Group.
The two main boxes enable you to customize the Grou
lists all available accounts. Selecting one of the accounts will display all of that acc on the right. You can then click the individual securities you would like cluded in the Group. To include all securities held in an account, select the chec
mmary window signify that the amount is not being included in the total net
up check box to
te in the future. check box to automatically add to this group any non-Fidelity accounts you create in the
al section of the Summary page enables you to add additional accounts (both Fidelity and non-Fidelity), and edit transaction history for these accounts. To add an account, click Add Account.
Su worth.
Select the Include all future Fidelity Accounts in this gro automatically add to this group any Fidelity accounts you crea Select the Include all future Other Accounts in this group
future.
The fin
The following window will open:
Within this window, you can name the account, identify the owner, the institution where it is located, the account number, and the account’s cash balance (if any). Do not include position valuations, as these should be entered separately. There is also a check box (Include in Net
Worth) that enables you to have the account value included in your total net worth calculations.
Once you have completed this information, clicking OK will add this account to your account listings. It is important to remember that any information you include from non-Fidelity accounts will not be automatically updated and will require manual updates.
given the additional options of clicking Registration, Delete, or Add Transaction. Clicking Registration
Once you have added an account, you are
opens the following window, which displays information for accounts you have already added:
Clicking Delete
will eliminate all information on the selected account and remove it from your ac Finally, clicking Add Transaction
n provide individual securities detail for each of the non-Fidelity accounts which you may have added:
Balances Tab
The next tab in the Accounts window displays Balances:
The Current column displays the most recent value available. For values in the current column, real-time balances are displayed wherever possible. If real-time balances are not available, intraday balances are displayed if available. If neither real-time nor intraday balances are available, prior close is displayed. The Change column displays the difference between Current and the Prior Close. Change is also highlighted in color for quick reference, with green denoting up movement and red denoting down movement. In order to refresh balance figures, simply click
nformation at the t you are viewing
the Account drop-down list in
view. Note: Accounts in these drop-down boxes are sorted by Owned Accounts, Other Accounts, and My Groups.
This tab (like all subsequent tabs under the Accounts section) provides balance i account level. The balances screen may vary depending on the type of accoun (for example, mutual funds versus brokerage or cash versus margin). Note that drop-down box is now available. To view a different account, simply click the the upper left corner of the window and choose which account you would like to
The Show All or Hide All button lets you show or hide all detailed balances with one click. Details may also be shown or hidden section by section by simply clicking the + or – buttons.
Positions Tab
The next tab in the Accounts Window shows Positions:
This tab provides a detailed listing of positions held within a particular account. As in the case of per left-hand ng activity will be
if you are ation.
ATP users can access the Option Summary page by clicking on the Option Summary radio button on the positons tab. This page gives customers the ability to view their option positions as Fidelity pairs them to calculate Margin Requirements. Customer positions, whenever possible, the Balances tab, to change accounts, click the Account drop-down list in the up
corner of the this screen. Changes to your positions intra-day based on tradi automatically updated and reflected in the positions tab. During market hours, connected to Fidelity, you can click Update Quotes to refresh the quote inform
Factored Securities
For factored securities, such as Mortgage-backed securities, Treasury-Inflation Protected
Securities (TIPS) and Certificates of Deposit Inflation-Protected securities (CDIPs), mousing over the Rcnt Value field will elicit a Tool-Tip.
For certain fixed income products that pay principal, such as a mortgage-backed security, a factor is used to determine the current face value of the position, because the face value of the position changes over time. As the product pays principal over its lifetime, most often, the face value of the product deteriorates over time, and therefore, typically, the factor is less than one. The current face value of a security is calculated by multiplying the original face value of the
curity is displayed in nt Value field for a factor priced
mer Price Index. cipal, whichever IPS pay interest every six months, based on a fixed rate applied to the adjusted principal. Each interest payment is calculated by multiplying the adjusted principal by one-half
e and Current on or all of the position is sold during the day, although the Value field will reflect the intraday change in Quantity, the Price and Factor of the security will continue to be based on the previous day's
From the Positions tab, you can also click Margin Requirements to open the Margin
Requirements window, which enables you to look up current margin requirements for securities that are not held in your account:
security by the current factor. The original face value for a fixed income se the Quantity column. If you hold your mouse over the Rc
security, a tool tip will appear that describes the calculation in detail.
For other fixed income securities, such as TIPS, the principal is tied to the Consu When the security matures, the U.S. Treasury pays the original or adjusted prin is greater. T
the interest rate.
For factored securities, as well as all fixed income securities, both the Recent Valu
Face use the price determined as of the previous day's close of business valuation. If a porti
close of business valuation.
The Margin Requirements for securities already held in your account are listed in the Margin column on the Positions tab.
History Tab
The next tab in the Accounts Window shows History:
You have a great deal of flexibility in how you sort and view this tab. When you Active Trader Pro, History will display the last 90 days of account activity. It will th accr
first log in to en begin uing account history each time you log in going forward. It is important to log in at least
s by
m in the drop-down box next to Date Range. This will activate the From and To
fields.
Symbol box. ctions (Buy, Sell, Dividend, etc.) by selecting the desired transaction type from the Transaction Type drop-down menu, then clicking Display.
Each column can provide the sorting criteria by clicking the column heading. For example, clicking the column labeled Symbol will sort the list alphabetically (A-Z) by symbol. Clicking the same column heading again will reverse the alphabetical sorting (Z-A).
once every 90 days to avoid a gap in the history.
You can also view all transactions for a particular time frame within the past three month clicking Custo
You can look at transactions for a particular security by entering its symbol in the You can also use a filter to view only specific types of transa
Profit & Loss Tab
The next tab in the Accounts Window shows Profit & Loss:
This tab provides four viewing options:
You can elect to view Today’s Summary, Today’s Detail, a Historical Summary, or
Historical Detail. Today’s Profit/Loss information is based on the market value of your
securities at the beginning of the day versus their real-time market value. Historical Profit/Loss information is based on the historical cost of the securities in your account. To choose a particular view, simply select the option you want to see. Note that you can also select the
Margin Calls Tab
The next tab in the Accounts Window displays Margin Calls:
This tab provides current informati account. If there was an existin
on regarding margin calls, which may exist for a particular g call, clicking one of the other two choices (Margin Call Details
information and instructions.
Margin Debit Interest Tab
The final tab in the Accounts Window shows Margin Debit Interest: or Day Trade Call Details) will provide more detailed
This tab displays current information concerning any margin interest either charged to or accrued for a particular account. It will also display the current margin interest rate being applied.
Accounts Preferences
ere is also the choose Edit > n Menu (or click Preferences on the Function Toolbar, then select Accounts from the list).
In addition to the customization available within each tab of the Accounts tool, th ability to set certain general Accounts Preferences. To set accounts preferences,
Preferences > Accounts from the Mai
Customize Accounts
The Account Preferences screen opens where you can set your preferences for Account Balances, History, and Positions. Please refer to the next chapter, Chapter 7 – Customizing Active Trader Pro - Accounts, for details on how to set these preferences to suit your account,
FIDELITY.COM
Fidelity.com. Choosing
Tools > Fidelity.com from the Main Menu opens the following drop-down menu:
The second tool to be discussed in this chapter is the ability to link to
Selecting any one of these menu items will enable you to access the Main Menu selections on
Fidelity.com, directly from the Active Trader Pro program. We will not take time within this
User Guide to provide detail on the various functions that can be discovered and utilized on Fidelity.com. However, it is important that you know that these links have been established, that you know where they are located, and that you know how to access them from within Active Trader Pro. Of course, we encourage you to explore the information that can be found on Fidelity.com.
REPORTS
ports. A whole o. reporting functionality by clicking Reports from the Function Toolbar. The Reports window will open:
The third and final tool to be discussed in this chapter is the ability to generate re
collection of portfolio and account investment reports is available through Active Trader Pr Access Active Trader Pro’s
The Reports window contains three distinct boxes. The Types of Reports sec
report categories. The Available Reports section contains the menu of availation lists the major ble reports for in the right-hand box
icular report in nted, or the data
o generate
es check box.
, you can click Settings to customize your reports. Customization includes changing the date range of the information presented on your reports, choosing to view certain security types, as well as functionality to view one or many accounts. You can also change the order of the columns and how the data is sorted. If you decide you do not need specific column(s) of information, you can easily remove a specific column from your report. After you customize your report, use the Save As option and create a unique name for your report for quick access at a later date.
each of these major report categories. Highlighting a particular report listed will provide you with a brief description of the information provided in that part
Description section. These individual reports can be viewed on the screen, pri
can be exported to other computer programs (for example, Word, Excel, etc.). T reports with updated quotes, select the Generate report with updated Quot Once you have selected View Reports
Chapter 5 – Investment Research & Education Tools
esearch and Education chapter we will examine seven different tools:
uotes s s atch List
reen features appear consistently across many of the tools, such as a Trade button p-down box labeled Go. Features that appear across tools will be addressed in Chapter
QUOTES
Choosing Tools > Quotes opens the Tools menu: In the Investment R Q Chart New W Research Alerts Filters
GENERAL INFORMATION
Certain sc and a droChoose Tools > Quotes > Quote to open the Quote window:
To request a quote for a particular security, simply type its trading symbol in the upper left-hand box and click Go (or press Enter).
Customizing Quotes
To customize the Quote window, choose Edit > Preferences > Quotes from the Main Menu:
Customize Quotes
The Quotes Preferences screen opens where you can set your preferences for Quotes including Equities, Options, Indices, Mutual Funds, Money Markets, Option Chain, and Time & Sales.
Please refer to Chapter 7 – Customizing Active Trader Pro - Quotes for details on how to set these preferences to suit your account, market monitoring, and trading needs.
Level 2 Quotes
Quotes > Level 2 opens the Level 2 Quote window, which displays Bids and
Asks by market maker: Choosing Tools >
Level 2 quotes are only available to individuals who trade more than 72 times a year. This screen ble on listed . The update update frequency you have established within your general preferences. This screen will refresh based on the update interval you have set up in preferences.
Note: If you have traded more than 120 times in the past year, you’re eligible for streaming updates. If you trade between 72 and 120 times a year and you select streaming updates, this screen will update in 2 minute intervals.
is unavailable for individuals trading less than this. Level 2 quotes are not availa equities. This screen is unavailable when a quote is requested for a listed equity frequency for this screen is directly tied to the
Option Chain
Option
cess the option chain via right-click from many of the ATP components, such as quotes, news and watch list.
If options are available for a particular security, then choosing Tools > Quotes >
Chain opens the Option Chain window. You can also ac
You can enter search criteria for single-leg or multi-leg option chains, and access advanced
athematical effect of various factors on options.
Link to Str
mic user interface changes dropdow sed symbol you enter. Columns
and dis d on gy you s
The option chain updates via automatic polling as follows: features including:
Set your preferences for Greek Analytics (single-leg only) – Greeks are m calculations used to determine the
Update on an automatic 2 minute basis
ategy Plot diagrams
The dyna n menus ba on the
hide play base the Strate elect.
General ATP Preference setting Tier
Streaming minutes Every 2 minutes Every 5 Manual
Tier 1 and 2 n/a 2 minute 5 minute Manual
Single-leg Option Strategies
ons for a particular security, the Option Chain tab provides
Puts, or both pdown enables you to narrow down the time frame you want to view.
nths, all), or a display for a ecific expiration month to the closest 5, 10, or 20, all, or a custom range of strike
round the at the oose From in the Strikes menu and choose the range you want to
imums
Bid Ask Links
Ask quotes link to the Stock & Option trade ticket with the option symbol filled in. nk was used. All
ote
using the “Show uote is: Last, ze, Bid, Ask, Ask Size.
tion displayed on the highlighted row is displayed in the Strategy Plots when the Bid Detail or Ask
.
ails
ences is Calls by Side display is n scroll bar and the put side has bar, the months and strikes always match across the row.
When you are looking to review opti the following filtering capabilities:
From the Strategy drop-down, you can choose to display only Calls, only calls and puts.
The Expiration dro
Choose a pre-set time frame (Next 3 Months, Next 9 Months, After 9 Mo specific expiration date.
The Strikes dropdown enables you to narrow the strike prices you wish to sp
prices. To view a narrowed range of strikes, or one that doesn’t center a money strike price, ch
view. T
he Show Options With dropdown lets you filter out options that don’t meet min for Volume or Open Interest.
The Bid and
Action fills in Sell to Open if the Bid link was used, and Buy to Open if the Ask li other fields default based on Trade Option preferences.
Underlying Qu
The underlying quote is off by default but may be shown in the option chain Quote” button on the Option Chain toolbar. The field order of the underlying q Change, Bid Si
Strategy Plots Links
You can link to the Strategy Plots using the buttons Bid Details and Ask Details. The op Details is selected
A tooltip is displayed when you move the mouse over the Bid Details button or the Ask Det button. The tool tip reads “View Bid Details for selected row” or “View Ask Details for selected row.”
Calls and Puts Display
Calls and Puts are the default Option Chain setting. The default setting in Prefer over Puts. You can select “Calls and Puts Side-by-Side” in preferences. The Side controlled by a single scroll bar. Currently the call side has its ow
its own scroll bar. By controlling with one scroll
y Write (comprised of equity and a call option) lar
Condor
s: menu, choose from a broader list of strategies, such as Buy
Diagonal, Iron Condor, Ratio, Straddle, Strangle, and Vertical.
Expiration dropdown, view the individual months available.
the Strikes dropdown, select from At the Money, Above the Money, Below the Money
Bid Ask Links
symbols filled in. ink was used. All
ote
ing the “Show e is: Last,
Strategy Plots Links
ls”. The option Detail or Ask tails is selected. For strategies with Call and Put choices on the MLO chain (Butterfly, Calendar,
s have a
A tooltip is displayed when you move your mouse over the “Bid Details” button or “Ask Details” ds “View Bid Details for selected row” or “View Ask Details for selected
that you selected are displayed.
Option Chain preferences are available for single-leg options only. Multi-leg option chains do not need preferences settings since the columns are set based on the strategy.
Navigate to Option Chain preferences through the preferences menu: Tools > Preferences >
Quotes > Option Chain
Calls over Puts is the default List Order. You can also display a column for Greek Analytics. Bu Col Combo Iron Straddle Strangle
The Option Chain tab provides you with the following filtering capabilities for Multi-Leg Option
In the Strategy dropdown
Write, Butterfly, Calendar, Collar, Combo, Condor,
In
In and All
The Bid and Ask quotes link to the Multi-Leg Option trade ticket with the option Action fills in Sell to Open if the Bid link was used, and Buy to Open if the Ask l other fields default based on Trade Option preferences.
Underlying Qu
The underlying quote is off by default but may be shown in the option chain us Quote” button on the Option Chain toolbar. The field order of the underlying quot Change, Bid Size, Bid, Ask, Ask Size.
You can link to the Strategy Plots using the buttons “Bid Details” and “Ask Detai displayed on the highlighted row is displayed in the Strategy Plots when the Bid De
Condor, Diagonal, Ratio, and Vertical), the “Bid Details” and “Ask Details” button dropdown for you to select “Call” or “Put”.
button. The tool tip rea row.”
When you choose an MLO strategy, only the expiration months Multiple MLO Chains can be open at one time.