Design of a Graphical User Interface for Audio
Data Acquisition and Stream Processing using
Matlab System Objects
Agostino Giorgio & Alessio MelibeoAbstract: In this paper we will describe how to build a MATLAB Graphical User Interface (GUI) for audio Data Acquisition and Stream Processing. The GUI allows data acquisition from audio devices connected to the PC sound card, stream processing (live visualization on virtual oscilloscope and storage into a text file), and playback over audio devices. The data exchange with audio devices was achieved using the Data Acquisition Toolbox™, the stream processing with the DSP System Toolbox™, and the creation of the Graphical User Interface with GUIDE™ toolbox.
Keywords: Audio, Data Acquisition, DSP System Toolbox, Graphical User Interface, GUI, MATLAB
I. INTRODUCTION
This Paper aims at describing a project developed using MATLAB® from The Mathworks, Inc, a software development environment used in many electronic fields (e.g. safety systems, motor vehicles, interplanetary spacecrafts, medical devices, robot control, data acquisition and processing).
The project consists in the creation of a GUI (Graphical User Interface) for:
a.data acquisition from audio devices;
b.data stream processing, especially:
- real-time plot visualization of the acquired data;
- storage of the acquired samples into a text file;
c.post-processing operations, such as:
- data transmission over audio devices;
- storage of the acquired data into an audio file.
There are three main toolboxes involved into the project:
a.Data Acquisition Toolbox™, for data exchange with external hardware;
b.DSP System Toolbox™, for stream processing;
c.GUIDE™, for the building of a Graphical User Interface (GUI).
Therefore, section II provides an overview about the above-mentioned toolboxes; section III deals with the description of the designed GUI; conclusions and final remarks are in section IV.
II. MATLAB TOOLBOXES USED IN THIS PROJECT
A. Data Acquisition ToolboxTM
The toolbox allows:
- data acquisition from Input devices;
- data transmission over Output devices.
To this aim, many steps are required, as summarized in the following.
1) Building of a session
The first step is to get a list of the acquisition hardware connected to the PC typing a daq.getDevices command [2]. The command returns a list of acquisition devices available on the PC and their parameters:
- index, the position occupied by the device into d;
- Vendor, the manufacturing company;
- Device ID, the name by which MATLAB® recognizes the device;
- Description, a short overview on the device.
The second step is to create a session linked to a specific Vendor [3]. For example, we may want to exchange data with DirectSound devices (the audio devices connected to the PC sound card1):
s=daq.createSession(‘directsound’)
Every property of a session has a default value, which can be shown by a get command that returns a list of parameters as follows:
UseStandardSampleRates: true
BitsPerSample: 24
StandardSampleRates: [1x15 double]
NumberOf Scans: 44100
DurationInSeconds: 1
Rate: 44100
IsContinuous: false
NotifyWhenDataAvailableExceeds: 44100
IsNotifyWhenDataAvailableExceedsAuto: true
The programmer can modify some of the previous parameters; for example, this is the syntax to manually set the duration and the sampling rate of the acquisition:
s.DurationInSeconds=5;
2) Add input channels for data acquisition
The first step to acquire data is to add input channels linked to the desired device. It is necessary to specify the device ID, the channel ID and the measurement type:
- to acquire analog data [4], it is necessary to specify the measurement type, choosing among ’Voltage’, ’IEPE’, ’Current’, ’RTD’, ’Bridge’, ’Thermocouple’, ’Accelerometer’, ’Microphone’:
addAnalogInputChannel(s,devID,chID,measureType)
- to acquire audio data [5]:
addAudioInputChannel(s,deviceID,channelID)
Consider the following examples:
addAnalogInputChannel(s,’cDAQ1Mod3’,1,’Current’);
addAudioInputChannel(s,’Audio1’,1:2);
- in the first case we can acquire current data from the National Instruments device NI 9234, using channel 1;
- in the other case we can acquire audio data from the DirectSound device Microfono (Realtek High Definition Audio) through channels 1 and 2.
3) Performing acquisition
After adding channels, we can really start the acquisition. We have 2 options:
- Foreground acquisition [6];
- Background acquisition [7].
a) Foreground acquisition
This is an exclusive priority task, which means that no other code line can be read in the meanwhile.
Consider the following example:
% Session setup
s=daq.createSession('directsound');
addAudioInputChannel(s,'Audio1',1:2);
s.DurationInSeconds=5;
% Warn the user about the start
disp('Starting');
% Acquisition starts
audio=startForeground(s);
% Warn the user about the end
In the previous example we acquired audio data for 5 seconds from a Microphone connected to the PC. The acquired data is stored into a matrix called ‘audio’. It is important to notice how the startForeground command deny the reading of the following code lines.
b) Background acquisition
However, the Foreground acquisition obviously doesn’t allow a real-time control. For example, it is not possible to show a live plot of the acquired data. Moreover, it exclusively occupies MATLAB®, which is a problem in case of a great amount of data.
So, we need to define a listener, which is a function that works in Background, while other operations can be done.
The syntax to define a listener is:
l=addlistener(sess_name,event_name,@funct_name)
We need to add a listener to the session (sess_name) which executes a function (funct_name) when an event occurs (event_name).
In case of acquisition, the event is called DataAvailable, which means that there actually is some incoming data [8]:
l=addlistener(session,’DataAvailable’,@f_name)
The function f_name must have 2 input variables:
a.src, the session which the listener is linked to;
b.event, a structure made by 3 fields:
- Data, MxN matrix (M number of samples, N number of channels) with the incoming data;
- TimeStamps, Mx1 array (M num. of samp.) with sampling instants;
- TriggerTime, the absolute trigger time of the acquisition.
We can define the previous function in 2 ways:
- anonymous function:
lis=addlistener(s,’DataAvailable’,...
@(src,event) % Operations)
- calling an existent function:
l=addlistener(s,’DataAvailable’,@function_name);
function function_name(src,event)
% Background Operations
end
lis=addlistener(s,'DataAvailable',...
@(src,event) plot(event.TimeStamps,event.Data));
After adding a listener, the acquisition can start in 2 ways:
- limited acquisition;
- continuous acquisition.
(1) Limited acquisition
We need to specify the acquisition duration; if we don’t, the session will run for the default duration (Fig. 2):
s.DurationInSeconds = 5
The following example code acquires data for 5 seconds from the Microphone and shows a real-time plot of the acquired data:
% Session setup
s=daq.createSession('directsound');
addAudioInputChannel(s,'Audio1',1:2);
s.DurationInSeconds=5;
% Listener setup
l=addlistener(s,'DataAvailable',...
@(src,event) plot(event.TimeStamps,event.Data));
% Warn the user about the start of the
acquisition
disp('Starting');
% Acquisition start
startBackground(s);
(2) Continuous acquisition
In real cases it is necessary to acquire and process data for a long (or even unknown) time and not just for a few seconds. Therefore, we need to run a continuous acquisition [9] setting the corresponding variable as true:
s.IsContinuous = true
The acquisition will run until a stop command is given:
The following example code, performs a continuous acquisition from the Microphone and a real-time plot visualization; now the user has to manually stop the acquisition typing 0:
% Session setup
s=daq.createSession('directsound');
addAudioInputChannel(s,'Audio1',1:2);
s.IsContinuous=true; % Continuous
% Listener definition
l=addlistener(s,'DataAvailable',...
@(src,event) plot(event.TimeStamps,event.Data));
disp('Starting');
% Acquisition starts
startBackground(s);
% ‘0’ stops the acquisition
i=input('Press 0 to stop\n');
if i==0
stop(s);
end
Having examined the steps necessary in order to perform data acquisition, they follow the steps in order to perform Data Transmission:
4) Add output channels for Data transmission
The first step is again to add channels over which we want to send data:
- for an analog data transmission [10] the command is:
addAnalogOutputChannel(s,devID,chID,measureType)
- for an audio data transmission [11] the command is:
addAudioOutputChannel(s,deviceID,channelID)
Consider the following examples:
addAnalogOutputChannel(s,'cDAQ1Mod2','a0','Voltage')
addAudioOutputChannel(s,'Audio4',1:2)
- in the first case we can send voltage data to the device NI 9263 through the channel named a0;
5) Performing Transmission
In order to start a transmission, we have to queue data (stored into a matrix) [12]. We need to use the following command:
s.queueOutputData(data);
We queued a matrix/array called data; it is important that the number of columns equals the number of channels.
We have 2 transmission ways:
- Foreground transmission [13];
- Background transmission [14].
a) Foreground Transmission
During a Foreground data transmission no other operation can be done.
In the following example, we queue a matrix called audio containing data, and we start a Foreground transmission over the PC Speakers:
% Session setup
s=daq.createSession('directsound');
addAudioOutputChannel(s,'Audio4',1:2);
disp('Starting');
s.queueOutputData(audio); % Queue data
startForeground(s);
disp('Done');
b) Background Transmission
If we should perform other operations in the meanwhile (e.g. stop the transmission) we need a Background transmission.
So, we should define a listener which queues data:
l=addlistener(sess_name,event_name,@funct_name)
In this case, the event_name is DataRequired, which means that there is data to send:
l=addlistener(s,'DataRequired',...
@(src,event) src.queueOutputData(audio));
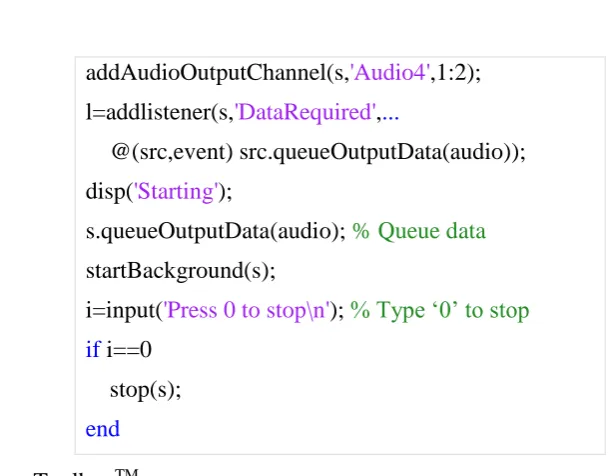
In the following example code, a matrix called audio is queued and sent in Background over the PC Speakers; we can stop the transmission typing 0:
% Session setup
addAudioOutputChannel(s,'Audio4',1:2);
l=addlistener(s,'DataRequired',...
@(src,event) src.queueOutputData(audio));
disp('Starting');
s.queueOutputData(audio); % Queue data
startBackground(s);
i=input('Press 0 to stop\n'); % Type ‘0’ to stop
if i==0
stop(s);
end
B. DSP System ToolboxTM
The DSP System Toolbox™ [16] is specialized in data Stream Processing [17].
In many applications, it is required a live monitoring of data, so we need the Stream Processing procedure, which means to:
- divide the incoming data into frames;
- acquire and store only a single frame at a time;
- process the acquired frame before the next one arrives.
Fig. 1 shows the main scheme of the Stream Processing.
The Stream Processing procedure allows a real-time control over the data, for example, we may want a real-time plot visualization of the ECG of a patient. We can do it by dividing the signal into packets and visualizing onto the screen one packet at a time.
In addition, there’s an advantage in the memory usage: in fact only a single frame is acquired and it is fully processed before the next one arrives. In this way, only a small amount of data has to be handled at a time.
Stream Processing is made possible by using System Objects™ [18], specialized functions included in the DSP System Toolbox™ which allow many frame-by-frame operations, such as storage/reading of samples into/from a text/audio file, or turning MATLAB® into a virtual oscilloscope for a real-time plot or a spectrum visualization.
1) Overview about System Objects
The following syntax allows the creation of a System Object™ (H) which executes a special DSP System Toolbox function (FunctionName):
H = dsp.FunctionName(function_properties);
Every System Object™ has some methods [19]:
step
Syntax 2 step(H,data); data=step(H);
Description
It executes the function: Executes H with data as Input; Executes H with data as Output. release
Syntax release(H)
Description
It releases all the variables, files, etc. used by H in order to allow the usage in other operations.
isDone
Syntax isDone(H)
Description
It is a propositional parameter: - true means that step is finished; - false means that step is still
running. Default
Value
false
2) Focus on the most significant System Objects™ a) dspdemo.TextFileWriter
TxtWrt=dspdemo.TextFileWriter(‘Property’,Value)
It allows the storage of the acquired samples into a text file. It has the following properties:
Filename
Description Name of the generated file (here file.txt). Syntax ‘Filename’,’file.txt’
Default value
‘tempfile.txt’
Header
Description It is a custom description written on the top of the text file, before the samples can be stored.
Syntax ‘Header’,header Default
value
‘\n\n\n\n’ (4 blank lines)
Example code
Storage of sinusoid samples into a text file:
2 Since R2016b MATLAB® we can call the step method in other ways:
a)H(data)
% Sampling rate
fs=1000;
% Array Nx1 with the sampling instants
t=(0:(1/fs):(0.1-1/fs))';
N=length(t);
% 50Hz sinusoid
sinwave=sin(2*pi*50*t);
% Header
head='Sinusoide di 50Hz e durata 0.1 secondi.\n\n';
% Creation of the System Object
TxtWrt=dspdemo.TextFileWriter('Filename','file.txt',
'Header',head);
% Storage into a file.txt
for k=1:N
% Executes the S.O. with ‘sinwave’ as Input
step(TxtWrt,sinwave);
end
b) dspdemo.TextFileReader
TxtRd=dspdemo.TextFileReader(‘Property’,Value)
It allows the reading of the samples stored into a text file.
Its properties are:
Filename
Description Name of the file we want to read (here file.txt). Syntax ‘Filename’,’file.txt’
Default value
‘tempfile.txt’
HeaderLines
Description Number of header lines. The reading starts from the following line.
Syntax ‘HeaderLines’,n Default
value
4
SamplesPerFrame
Description Number of samples stored into a single frame. Syntax ‘SamplesPerFrame’,frameLength
Default value
Example code
Reading samples from file.txt and storage into a matrix called temp:
% S.O. creation
TxtRd=dspdemo.TextFileReader('Filename','file.txt',
'HeaderLines',2,...
'SamplesPerFrame',20);
% Matrix initialization
temp=[];
% Reading of the file frame-by-frame
while (~isDone(TxtRd))
% Reading and storage into ‘data’
data=step(Txtd);
% Update the final matrix
temp=[temp;data];
end
c) dsp.AudioFileReader
AudioReader=dsp.AudioFileReader(‘Property’,Value)
It allows the importing of an audio file into a matrix in the workspace [20]. Its main properties are:
Filename
Description Name of the audio file to be imported (here audio.mp3). Syntax ‘Filename’,’audio.mp3’
Default value
‘speech_dft.mp3’
SamplesPerFrame
Description Number of samples stored into a single frame. Syntax ‘SamplesPerFrame’,frameLength
Default value
1024
Example code
Importing of an audio.mp3 file and storage into a matrix:
% Creation of the S.O.
AudioRd=dsp.AudioFileReader('Filename','audio.mp3');
% Matrix initialization
temp=[];
% Frame-by-frame reading
while (~isDone(AudioRd))
data=step(AudioRd);
% Update the final matrix
temp=[temp;data];
end
d) dsp.AudioFileWriter
AudioWriter=dsp.AudioFileWriter(‘Property’,Value)
It allows the data storage into an audio file [21].
Its main properties are:
Filename
Description Name of the generated file (here audio.wav). Syntax ‘Filename’,’audio.wav’
Default value
‘output.wav’
FileFormat
Description Codec, choosing among AVI, WMA, WAV, OGG, MPEG-4, FLAC. Syntax ‘FileFormat’,Format
Default value
‘WAV’
SampleRate
Description Writing sampling rate. Syntax ‘SampleRate’,sRate Default
value
44100
Example code
Conversion from matrix to audio file:
% S.O. creation
AudioWt=dsp.AudioFileWriter('Filename','audio.wav',
'FileFormat','WAV','SampleRate',44100);
% Generation of the file
step(AudioWriter,temp);
% S.O. releasing
release(AudioWriter);
e) dsp.TimeScope
TimeScope = dsp.TimeScope(‘Property’,Value)
For the whole list of its properties check on the official website [22]; here we will describe the most important ones:
TimeSpan
Description Dimension (in seconds) of the time-axis of the plot. Syntax ‘TimeSpan’,t
Default value
10 s
SampleRate
Description Sampling rate (Hz).
Syntax ‘SampleRate’,sRate
Default value
1 Hz
BufferLength
Description Amount of data to be cached. For a correct visualization use this buffer: buffer = Num. of Channels * TimeSpan * SampleRate
Syntax ‘BufferLength’,buffer Default
value
5000
NumInputPorts
Description Number of inputs to be shown. Syntax ‘NumInputPorts’,num
Default value
1
Ylimits
Description Data range to be shown. Syntax ‘YLimits’,Limits
Default value
[-10,10]
Example code
Sinusoid generation (duration 1 s, frequency 5 Hz) and real-time visualization on virtual oscilloscope (Fig. 2):
% Sinusoid settings
fs=1000; tmax=1; t=(0:(1/fs):(tmax-1/fs))'; N=length(t);
fLength=50;
% Sinusoid creation (frequency 5Hz,duration 'tmax')
sinwave=sin(2*pi*5*t);
% Creation of the TimeScope
TimeScope=dsp.TimeScope('TimeSpan',tmax,'YLimits',
[-1,1],'BufferLength',tmax*fs,'SampleRate',fs);
for k=1:(N/fLength)
step(TimeScope,sinwave);
end
It is also possible to make some measurements, for example using manual cursors (Fig. 2):
3) Example code
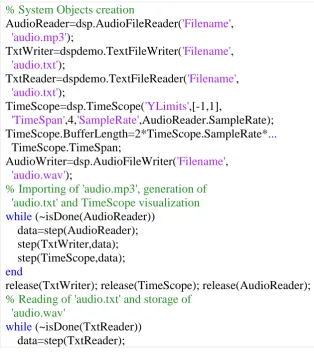
The following example code contains every System Object™ discussed in this section. In particular, it imports an audio.mp3 file into a matrix called data, it stores the acquired data into an audio.txt file and shows a real-time plot on a virtual oscilloscope. Then, it reads the samples from the audio.txt file and generates an audio.wav file:
% System Objects creation
AudioReader=dsp.AudioFileReader('Filename', 'audio.mp3');
TxtWriter=dspdemo.TextFileWriter('Filename', 'audio.txt');
TxtReader=dspdemo.TextFileReader('Filename', 'audio.txt');
TimeScope=dsp.TimeScope('YLimits',[-1,1],
'TimeSpan',4,'SampleRate',AudioReader.SampleRate); TimeScope.BufferLength=2*TimeScope.SampleRate*...
TimeScope.TimeSpan;
AudioWriter=dsp.AudioFileWriter('Filename', 'audio.wav');
% Importing of 'audio.mp3', generation of 'audio.txt' and TimeScope visualization
while (~isDone(AudioReader)) data=step(AudioReader); step(TxtWriter,data); step(TimeScope,data);
end
release(TxtWriter); release(TimeScope); release(AudioReader);
% Reading of 'audio.txt' and storage of 'audio.wav'
while (~isDone(TxtReader)) data=step(TxtReader);
step(AudioWriter,data);
end
release(TxtReader); release(AudioWriter);
C. GUIDE™ Toolbox Overview
In many applications, it may be required to build a Graphical User Interface (GUI). To this aim, it is very useful the Matlab GUIDE™ toolbox, to make the product easily accessible to the final user [25].
The first step is to open GUIDE™ typing guide on the Command Window. Now we have to choose among various templates:
Blank GUI
GUI with Uicontrolos
GUI with Axes and Menu
Modal Question Dialog
For example if we choose a Blank template, we will get the screen in fig. 3:
In Fig. 3 we can see on the left all the items that can be used to build a GUI. In this section general features of a GUI and its items are provided.
D. General features
Each item included in GUIDE™ has a list of properties, accessible by a double-click on it. We can notice in particular:
- String, the text written into/next to the selected item;
- Style, the type (pushbutton, checkbox, editable text box, etc);
- Tag, a name by wich MATLAB™ finds the item into the source code.
Clicking on the Save button, the source code is automatically generated. This code is divided into many functions:
- a GUI automatically generated function; do not edit:
function varargout = Example_GUI(varargin)
% Begin initialization code - DO NOT EDIT
- opening function, usually where variables and System Objects™ are defined:
% Executes just before Example_GUI is made visible.
function Example_GUI_OpeningFcn(hObject,
eventdata, handles, varargin)
handles.output = hObject;
% handles update
guidata(hObject, handles);
- output function:
% Outputs
function varargout=Example_GUI_OutputFcn(hObject,
eventdata, handles)
varargout{1} = handles.output;
- functions associated to the GUI items (here we can see a pushbutton function):
% --- Executes on button press in pushbutton1.
function pushbutton1_Callback(hObject, eventdata, handles)
1) Focus on hObject and handles
a) hObject
Every GUI item has an associated function in the source code; we will use the hObject syntax to refer to the selected object into its own function.
We need 2 commands to achieve a bi-directional interaction with an object: get and set. For example let’s consider the syntax to get or set the content of an editable text box:
get, acquires the object’s state
Duration
get(hObject,’String’) ans =
Duration set, defines a custom state for the object set(hObject,’String’,’Ciao’) Ciao
b) handles
With the handles structure it is possible to share data among callbacks.
Let’s suppose to be into a pushbutton function; we may want to get or set the state of an editable text box (tag edit1) [26]:
get, acquires the object’s state
Duration
get(handles.edit1, ’String’)
ans = Duration set, defines a custom state for the object
set(handles.edit1,’String’,
’Ciao’) Ciao
The handles structure has another important application. In fact, when we define a new variable into a function, we cannot use it in other callbacks. In order to share variables (or even System Objects™ and sessions) among callbacks it is necessary to store them into the handles structure:
handles.a=5
handles.s=daq.createSession(‘ni’)
handles.TimeScope=dsp.TimeScope
Storage of a variable, an acquisition session or a System Object™ into the handles structure.
guidata(hObject,handles)
Update of the handles structure, in order to use the stored data into other callbacks.
function
pushbutton1_Callback(hObject, eventdata,handles)
handles.rand1=10*rand;
a = handles.rand1
guidata(hObject,handles);
function
pushbutton2_Callback(hObject, eventdata,handles)
b = (handles.rand1)*2
a =
9.0579
b =
18.1158
2) Pop-up Menu
A Pop-up Menu is used when the user has to choose something among various options. The automatically generated code consists into two functions:
a) popupmenu1_CreateFcn: list initialization;
we can define the the various choices typing a set command. The following example code shows how to generate a list with two options, Choice1 and Choice2
function popupmenu1_CreateFcn(hObject, eventdata,
handles)
if ispc &&
isequal(get(hObject,'BackgroundColor'),...
get(0,'defaultUicontrolBackgroundColor'))
set(hObject,'BackgroundColor','white');
end
% List generation
set(hObject,'String',{'Choice1','Choice2'});
b) popupmenu1_Callback: this function addreses operations done after a choice has been made; cellstr and contents commands together allow to get the choice made by the user and store it into a variable choice; the following if defines a specific function associated to each choice:
function popupmenu1_Callback(hObject, eventdata, handles)
% Get the choice made and store into 'choice'
contents = cellstr(get(hObject,'String'));
choice=contents{get(hObject,'Value')};
% Operations for Choice1
elseif (strcmp(choice,'Choice2'))
% Operations for Choice2
end
3) Editable Text Box
An editable Text Box allows the user to manually set some parameters:
- if we are into the edit1 associated function;
get, acquires the object’s state
Duration
get(hObject,’String’) ans =
Duration set, defines a custom state for the object
set(hObject,’String’,’Ciao’) Ciao
- if we are into another callback;
get, acquires the object’s state
Duration
get(handles.edit1,
’String’) ans = Duration set, defines a custom state for the object set(handles.edit1,’String’,
’Ciao’) Ciao
4) Static Text
A static text box cannot be modified by the user on the GUI. Its state can only be defined into the .m source code:
get, acquires the object’s state
Static Text
get(handles.txt1,
’String’) ans =
Static Text set, defines a custom state for the object
set(handles.txt1,’String’,
’Ciao’) Ciao
5) Axes
It simply reserves a GUI section for a plot visualization:
6) Checkbox
Checkboxes allow different operations depending on which they are selected or not. A checkbox (box1) has two properties, Value and String:
get(handles.box1,’Value’)
ans = 0 (not selected)
ans = 1
(selected) get → String, acquires the text shown next to the checkbox get(handles.box1,’String’)
ans = Check Box set → Value, defines a custom logic state for the object (selected or not)
set(handles.box1,’Value’,0) set(handles.box1,’Value’,1)
set → String, defines a custom text to be shown next to the checkbox
set(handles.box1,’String’,’Ciao’)
7) Pushbutton
The callback of a pushbutton is executed when the user clicks on it. In this example, Button 1 generates a random number between 0 and 10:
function pushbutton1_Callback(hObject, eventdata, handles)
n=10*rand
Having described the main features of the Matlab toolboxes involved in the new project, in the next section the new designed GUI is described.
III. MATLAB®GUIFORAUDIODATAACQUISITIONANDSTREAMPROCESSING
This project deals with the creation of a GUI for:
a.Audio data acquisition from AudioInput devices;
b.Data Stream Processing, especially:
- real-time plot visualization on virtual oscilloscope;
- storage of the acquired samples into a text file;
c.Post-Processing:
- transmission of the acquired data over AudioOutput devices;
- data storage into an audio file.
A. GUI Overview
It is divided into 4 sections:
1.Acquisition SETUP, where the session’s features are initialized:
- Pop-Up Menu (automatically generated), for the selection of the desired AudioInput device;
- Checkboxes, to choose the acquisition mode between:
continuous (runs until the user stops it);
limited (runs for a fixed time specified by the user);
- Editable Text Box, in which the user has to specify the duration of the limited acquisition;
2.Acquisition, basically the acquisition’s control section: - Pushbutton Start, to begin the acquisition;
- Pushbutton Stop, to stop the continuous acquisition (it is meaningless in case of a limited acquisition);
3.Post-Processing, where the acquired data can be processed in various ways:
- Pop-Up Menu (automatically generated), for the selection of an AudioOutput device over which we want to send the acquired data;
- Pushbutton Play, to start the transmission;
- Pushbutton Save WAV, to store the acquired data into an audio file called Audio.wav;
- Pushbutton Time Scope, to visualize a time-domain plot of the whole acquired data on a virtual oscilloscope;
4.Pushbutton Reset, to restart the GUI in order to fix some issues (e.g. wrong device lists). We are going to fully analyze each section, describing all the items and their associated functions.
B. Preliminary phase
1) Opening function
Here many variables (numeric, propositional, System Objects™) are defined. They will be stored into the handles structure to be available in other callbacks:
a.positioning the GUI:
movegui(gcf,'northwest');
set(0,'units','pixel');
res=get(0,'screensize');
the movegui(gcf,’northwest’) command moves the GUI to northwest (top-left). Then, we acquire the resolution of the monitor on which MATLAB® is running, in order to position the TimeScope window accordingly (on some PC the TimeScope window may overlap the GUI).
The result is an array:
[1 1 resHor resVert] (e.g.[1 1 1366 768]).
b.System Objects™ creation code:
handles.TimeScope=dsp.TimeScope('YLimits',[-1,1],
'SampleRate',44100,'ShowGrid',true,...
'Position',[res(3)/2,res(4)/3,res(3)/2.5,res(4)/2]);
handles.TxtWt=dspdemo.TextFileWriter('Filename', 'camp.txt');
handles.TxtRd=dspdemo.TextFileReader('Filename', 'camp.txt','SamplesPerFrame',44100);
handles.SaveWav=dsp.AudioFileWriter('Filename', 'Audio.wav','SampleRate',44100);
-TimeScope, for a real-time plot visualization. The property Position moves the TimeScope window according to the screen resolution (previously acquired). It is important that the property SampleRate corresponds to the SampleRate of an audio session;
-TxtWt e TxtRd, to store (and read) samples into (from) a text file called camp.txt. To make things work, we have to set a proper frame dimension;
-SaveWav, to store the acquired data into an audio file called Audio.wav (setting a proper SampleRate);
c.initialization of some auxiliary variables (described later) and setting of their default values:
handles.in='Nothing';
handles.out='Nothing';
handles.venin='directsound';
handles.venout='directsound';
d.update of the handles structure:
handles.output = hObject;
guidata(hObject, handles);
% Operations executed while the GUI is opening.
functionDAQ_and_StreamProcessing_OpeningFcn(hObject,
eventdata, handles, varargin)
% Move the GUI on top-left corner
movegui(gcf, 'northwest');
% Acquire screen resolution
set(0,'units','pixel');
res=get(0,'screensize'); %Array [1 1 resH resV]
% System Objects initialization
handles.TimeScope=dsp.TimeScope('YLimits',[-1,1],
'SampleRate',44100,'ShowGrid',true,...
'Position',[res(3)/2,res(4)/3,res(3)/2.5,res(4)/2]);
handles.TxtWt=dspdemo.TextFileWriter('Filename',
'camp.txt');
handles.TxtRd=dspdemo.TextFileReader('Filename',
'camp.txt','SamplesPerFrame',44100);
handles.SaveWav=dsp.AudioFileWriter('Filename',
'Audio.wav','SampleRate',44100);
% Auxiliary variables
handles.in='Nothing';
handles.out='Nothing';
handles.venin='directsound';
handles.venout='directsound';
% Update of the handles structure
handles.output = hObject;
guidata(hObject, handles);
end
2) Pop-Up Menus generation a) AudioInput device list
It is necessary that the program automatically scans all the connected devices and finds out which of them is an audio-acquisition device.
A short description of the device can be found into the Model field:
In order to generate a proper AudioInput device list, we need some steps:
a.storage of all the acquisition devices available into a structure called d:
global d;
d=daq.getDevices;
b.initialization of a matrix inp, which at the end of the loop will contain all the AudioInput devices found; we manually define the first list item:
inp=[{'Select Input Device'}];
c.scanning loop; we check if a device’s SubsystemType property is AudioInput; in this case we store its Model field into the inp matrix:
% Auxiliary variable: number of AudioInput devices found
i=0;
for (k=1:(length(d)))
f=d(k).Subsystems.SubsystemType; if (isequal(f,'AudioInput'))
inp=[inp,{d(k).Model}]; i=i+1;
end end
d.list generation; if we found at least one AudioInput device (i>0), each cell of the matrix inp becomes a list item:
if(i>0)
set(hObject, 'string', inp(1:end));
end
The whole code for the AudioInput device list generation is as follows:
% Automatic AudioInput device list generation
function Input_CreateFcn(hObject, eventdata, handles)
get(0,'defaultUicontrolBackgroundColor')) set(hObject,'BackgroundColor','white');
end
% 'd' contains all the available acquisition devices
global d;
d=daq.getDevices;
% 'inp' is a matrix with all the AudioInput devices. The first % cell is manually defined
inp=[{'Select Input Device'}];
% Number of AudioInput Devices found
i=0;
% Scanning loop
for (k=1:(length(d)))
% 'SubsystemType' check and update of 'inp'
f=d(k).Subsystems.SubsystemType; if (isequal(f,'AudioInput'))
inp=[inp,{d(k).Model}]; i=i+1;
end end
% List generation
if(i>0)
set(hObject, 'string', inp(1:end));
end end
The output menu provided by the GUI lists audio input devices if found.
b) AudioOutput device list
The code to find and show the list of audio output deviced connected to the personal computer is basically equal to the previous; in this case we obviously need to check if Subsystems.SubsystemType = AudioOutput.
The code is:
% Automatic AudioOutput device list generation
function Output_CreateFcn(hObject, eventdata, handles)
if ispc && isequal(get(hObject,'BackgroundColor'),...
get(0,'defaultUicontrolBackgroundColor')) set(hObject,'BackgroundColor','white');
end
% 'g' contains all the available devices
global g;
g=daq.getDevices;
% 'out' is a matrix with all the AudioOutput devices. The first % cell is manually defined
inp=[{'Select Output Device'}];
for (k=1:(length(g)))
% 'SubsystemType' check and update of 'out'
f=g(k).Subsystems.SubsystemType; if (isequal(f,'AudioOutput'))
inp=[inp,{g(k).Model}]; i=i+1;
end end
% List generation
if(i>0)
set(hObject, 'string', out(1:end));
end end
The menu provided by the GUI lists output audio devices if found.
The next operation the GUI has to allow is the acquisition setup.
C. Acquisition SETUP
1) Device selection a) Input
The first step is the selection of the desired AudioInput device:
a.storage into the variable choice of the text of the item. The code is:
global d;
% Storage into 'choice' of the selected device
contents = cellstr(get(hObject,'String')); choice=contents{get(hObject,'Value')};
b.comparison loop between choice and the Model field stored into d. When the device is recognized, two variables are generated:
- handles.in, with the ID (e.g. Audio1);
- handles.venin, with the vendor (e.g. directsound).
If no choice has been made (the selected item is ‘Select Input Device’), handles.in = ‘Nothing’:
for (k=1:(length(d))) % Comparison Loop
if (strcmp(choice,d(k).Model)) handles.in=d(k).ID;
handles.venin=d(k).Vendor.ID;
elseif (strcmp(choice,'Select Input Device')) handles.in='Nothing';
end end
% Update handles
guidata(gcbo,handles);
Thus the entire code is:
function Input_Callback(hObject, eventdata, handles)
global d;
% Storage into 'choice' of the selected device
contents = cellstr(get(hObject,'String')); choice=contents{get(hObject,'Value')};
% Comparison loop
for (k=1:(length(d)))
if (strcmp(choice,d(k).Model)) handles.in=d(k).ID;
handles.venin=d(k).Vendor.ID;
elseif (strcmp(choice,'Select Input Device')) handles.in='Nothing';
end end
% Update handles
guidata(gcbo,handles);
end
b) Output
In case of the selection of an Output device, we will generate two auxiliary variables:
- handles.out, with the device ID;
- handles.venout, with the vendor.
% Operations executed when an item is selected
function Output_Callback(hObject, eventdata, handles)
global g;
% Storage into 'choice' of the selected device
contents = cellstr(get(hObject,'String')); choice=contents{get(hObject,'Value')};
% Comparison loop
for (k=1:(length(g)))
if (strcmp(choice,g(k).Model)) handles.out=g(k).ID;
handles.venout=g(k).Vendor.ID;
elseif (strcmp(choice,'Select Output Device')) handles.out='Nothing';
end end
% Update handles
guidata(gcbo,handles);
end
2) Acquisition Mode
The user can choose between two different acquisition modes, as in the left hand of figure 4:
- limited acquisition, which runs for a fixed time, specified by the user into an editable text box.
D. Acquisition
1) Preliminary phase and error checking
The Start pushbutton’s code is divided into many parts:
a.initialization of an empty matrix temp, in which the whole acquired data will be stored and inizialization of a variable y which will be the effective duration of the acquisition, using the following code:
global temp;
temp=[];
global y;
b.at this point it is necessary to check if the user made some setting mistakes, for example if no input and/or output device was selected:
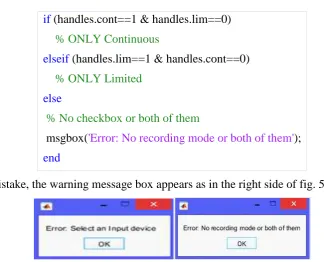
So we have to check if handles.in = ‘Nothing’. In this case, a warning message box will appears on screen, as in the left side of fig. 5. The code is:
if (strcmp(handles.in,'Nothing'))
% No Input device has been selected
msgbox('Error: Select an Input device');
c.if a device was actually selected an acquisition session can be initialized (vendor = handles.venin) and Input channels can be added (deviceID = handles.in). The code is as follows:
else
handles.s=daq.createSession(handles.venin);
handles.s.addAudioInputChannel(handles.in,1:2);
d.at this point another setting error may happen dealing with the choice of the acquisition mode.
In fact, there will be three possible cases:
- only Continuous checkbox was selected;
- only Limited checkbox was selected;
- no checkbox or both of them selected.
The code to manage the acquisition selection errors is as follows:
% 2 variables in which the state of the
ckeckboxes is stored
handles.cont=get(handles.Continuous,'Value');
if (handles.cont==1 & handles.lim==0)
% ONLY Continuous
elseif (handles.lim==1 & handles.cont==0)
% ONLY Limited
else
% No checkbox or both of them
msgbox('Error: No recording mode or both of them');
end
In case of mistake, the warning message box appears as in the right side of fig. 5:
Fig. 21. Error messages boxes appearing if any mistake occurs in the settings and acquisition mode selection
2) Continuous Acquisition
The continuous acquisition consists in:
- background audio data acquisition;
- live plot visualization on virtual oscilloscope;
- sample storage into a text file (camp.txt);
- storage of the whole data into a matrix (temp).
The steps we need to make are:
a.setting the propositional property IsContinuous to true, and setting of the TimeScope System Object™ (BufferLength and TimeSpan). The code is as follows:
handles.s.IsContinuous=true; handles.TimeScope.TimeSpan=5; handles.TimeScope.BufferLength=2*...
(handles.TimeScope.SampleRate)*...
(handles.TimeScope.TimeSpan);
b.initialization of the listener which stores data into a matrix (temp), stores the effective acquisition duration into variable y, stores samples into a text file (camp.txt) and shows a live plot on a virtual oscilloscope.
The code is:
handles.lis=addlistener(handles.s,'DataAvailable', @(src,event) rec_c(src,event,handles));
function rec_c(src,event,handles)
% Update ‘temp’ with the incoming data temp=[temp;event.Data];
% Storage of the duration
y=(event.TimeStamps(end));
% Generation of 'camp.txt' and live plot
step(handles.TxtWt,event.Data); step(handles.TimeScope,event.Data);
end
c.startBackground command starts the acquisition and a message box appears confirming the acquisition is started:
The code is:
% The acquisition starts and the user is warned
handles.h=msgbox('Acquisition started...');
startBackground(handles.s);
% Message box disappears after 0.5 seconds
pause(0.5); delete(handles.h)
Therefore, the complete code is as follows:
if (handles.cont==1 & handles.lim==0) handles.s.IsContinuous=true; handles.TimeScope.TimeSpan=5; handles.TimeScope.BufferLength=2*...
(handles.TimeScope.SampleRate)*...
(handles.TimeScope.TimeSpan); handles.lis=addlistener(handles.s, 'DataAvailable',@(src,event)
rec_c(src,event,handles)); handles.h=msgbox('Acquisition started...');
startBackground(handles.s); pause(0.5); delete(handles.h) % % % % % % %
end
% Continuous acquisition in background
function rec_c(src,event,handles) temp=[temp;event.Data]; y=(event.TimeStamps(end)); step(handles.TxtWt,event.Data); step(handles.TimeScope,event.Data);
d. Stop acquisition
The Stop button is needed only in case of a continuous acquisition, so it is necessary a preliminar control of the state of the checkboxes. After that, the session is stopped, the user is warned and all the resources are released.
The code is:
function Stop_Callback(hObject, eventdata, handles)
%Checkbox control
if ((handles.cont)==1&(handles.lim)==0) stop(handles.s);
h=msgbox('Stopped'); release(handles.TxtWt); release(handles.TimeScope); release(handles.s);
delete(handles.lis); clear handles.s; pause(1); delete(h);
end end
3) Limited Acquisition a) Error checking
If the user wants the acquisition in a limited time interval, he has to specify the desired duration. So, it is necessary to check if the user typed any non numeric character using the isnan(x) function, which is true in case x is not a number. In case of error a warning message box appears. To achieve this behaviour, the code is:
% Get the duration inserted by the user
x=str2double(get(handles.Duration,'string'));
% Check if it is not a number
if (isnan(x))
msgbox('Error: Invalid duration'); clear handles.s;
else
%%%%%%%
b) Acquisition
a.If x is a number, it is set as the session’s duration (rounding it to the first decimal) and as the TimeSpan of the TimeScope, using the following code:
% Setting of the duration (rounded to the first decimal)
y=(ceil(x*10))/10;
handles.s.DurationInSeconds=y;
% TimeSpan and BufferLength setting
handles.TimeScope.BufferLength=2*...
(handles.TimeScope.SampleRate)*...
(handles.TimeScope.TimeSpan);
b.listener definition, which stores the acquired data into a matrix (temp), shows a real-time plot and stores the samples into a text file (camp.txt). The code is:
lis=addlistener(handles.s,'DataAvailable',...
@(src,event) rec_l(src,event,handles));
% Limited Acquisition in Background
function rec_l(src,event,handles) % Data storage into ‘temp’ temp=[temp;event.Data];
% Generation of 'camp.txt' and real-time visualization
step(handles.TxtWt,event.Data); step(handles.TimeScope,event.Data);
end
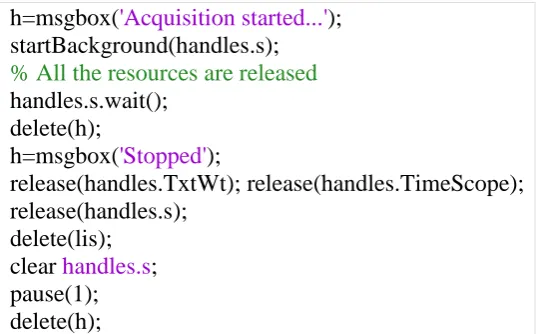
c.now the acquisition can start; at the end all the resources are released. The code is:
h=msgbox('Acquisition started...'); startBackground(handles.s);
% All the resources are released
handles.s.wait(); delete(h);
h=msgbox('Stopped');
release(handles.TxtWt); release(handles.TimeScope); release(handles.s);
delete(lis); clear handles.s; pause(1); delete(h);
The user is also warned about the start and the end of the acquisition, as in boxes in fig. 6:
Fig. 6. Boxes provided by the designed GUI to inform the user about the start and stop acquisition
The complete code is:
elseif (handles.lim==1 & handles.cont==0)
% Get the duration inserted by the user
x=str2double(get(handles.Duration,'string')); % Check if it is not a number
if (isnan(x))
msgbox('Error: Invalid duration');
clear handles.s; else
% If ‘x’ is a number, setting of the
duration (rounded to the first decimal)
y=(ceil(x*10))/10;
handles.s.DurationInSeconds=y; % TimeScope settings
handles.TimeScope.TimeSpan=ceil(y); handles.TimeScope.BufferLength=2*...
(handles.TimeScope.SampleRate)*...
(handles.TimeScope.TimeSpan); % listener definition
lis=addlistener(handles.s,'DataAvailable', @(src,event) rec_l(src,event,handles)); % The acquisition starts
h=msgbox('Acquisition started...'); startBackground(handles.s); % Release all the resources
handles.s.wait();
delete(h); h=msgbox('Stopped'); release(handles.TxtWt);
release(handles.TimeScope); release(handles.s);
delete(lis); clear handles.s; pause(1); delete(h);
end end
E. Post-Processing
Once the acquisition is complete, the user can:
- send the acquired data over an AudioOutput device;
- store data into an audio file;
- visualise the whole acquired data on a virtual oscilloscope.
The code relevant to each option is described in the following subsections.
1) Playback
a.First we need to check if the user really chose a device; so if handles.out = Nothing (it was selected ‘Select Output Device’) a warning message box should appear:
if (strcmp(handles.out, 'Nothing')) msgbox('Error: Select an Output device');
else
% Playback
b.if the user selected a proper device a session is created (vendor = handles.venout) and output channels are added (ID = handles.venout); it is also disabled the minimum number of scans to be queued:
handles.s=daq.createSession(handles.venout);
handles.s.addAudioOutputChannel(handles.out,1:2);
% Minimum number of scans is disabled
handles.s.IsNotifyWhenScansQueuedBelowAuto=false;
c.at this point we need a listener which queues data in Background:
lis=addlistener(handles.s,'DataRequired',...
@(src,event) src.queueOutputData(temp));
d.data is queued and the transmission starts; at the end of the process, all the resources are released:
handles.s.queueOutputData(temp);
handles.s.startBackground();
handles.s.wait();
release(handles.s); delete(lis);
clear handles.s;
So the entire code is:
function Play_Callback(hObject, eventdata, handles)
global temp;
% Device selection check
if (strcmp(handles.out,'Nothing'))
msgbox('Error: Select an Output device');
else
% Session setup
handles.s=daq.createSession(handles.venout); handles.s.addAudioOutputChannel(handles.out,1:2); % Minimum number of scans is disabled
handles.s.IsNotifyWhenScansQueuedBelowAuto=false; % listener to queue data
lis=addlistener(handles.s,'DataRequired',...
@(src,event) src.queueOutputData(temp)); % queue data and start playback
handles.s.queueOutputData(temp); handles.s.startBackground();
% At the end, the resources are released
handles.s.wait();
clear handles.s;
end end
2) Audio file Generation
Clicking on the pushbutton Save WAV into the designed GUI, we can store the acquired data into an audio file (Audio.wav). The loop reads samples from camp.txt (generated during the acquisition) and stores them into Audio.wav.
Then the user is warned about the end of the process, as in boxes in fig. 7, and all the resources are released.
The entire code is:
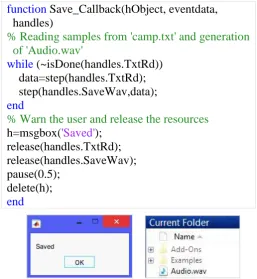
function Save_Callback(hObject, eventdata, handles)
% Reading samples from 'camp.txt' and generation of 'Audio.wav'
while (~isDone(handles.TxtRd)) data=step(handles.TxtRd); step(handles.SaveWav,data);
end
% Warn the user and release the resources
h=msgbox('Saved'); release(handles.TxtRd); release(handles.SaveWav); pause(0.5);
delete(h);
end
Fig. 7. Boxes provided by the designed GUI to warn about the end of the audio file saving
3) TimeScope
This pushbutton is very useful in case of a continuous acquisition. In fact, the acquisition may last longer than the TimeSpan of the TimeScope window. In these cases, the plot we can see at the end of the acquisition is partial, so that the user cannot work with all the acquired data (for example we may want to make measurements).
The pushbutton Time Scope solves this issue, defining a proper TimeSpan for the TimeScope window (Fig. 8):
- the new TimeSpan is the variable y generated during the acquisition;
- we read samples from camp.txt;
Fig. 8. TimeSpan has been correctly defined
The code is:
function TimeScope_Callback(hObject, eventdata, handles)
global y; % 'y' is the effective duration
% Defining BufferLength and a proper TimeSpan
handles.TimeScope.TimeSpan=ceil(y); handles.TimeScope.BufferLength=2*...
(handles.TimeScope.SampleRate)*...
(handles.TimeScope.TimeSpan);
% Reading from 'camp.txt' and live visualization
while (~isDone(handles.TxtRd)) data=step(handles.TxtRd); step(handles.TimeScope,data);
end
% Release the resources
release(handles.TimeScope); release(handles.TxtRd);
end
F. Reset
When we type a daq.getDevices command, its result is hold in memory until MATLAB® is restarted. So, if we connect/disconnect a device, a new daq.getDevices command still gives the same result as before.
For example, at the opening of the GUI there is a certain device enabled. Let’s now suppose that we want to disable that device (e.g. Missaggio Stereo). In order to visualize the correct list, we need to clear MATLAB® cache with a clear all command. Pushbutton Reset clears cache and restarts the GUI:
function Reset_Callback(hObject, eventdata, handles)
close; clear all;
h=msgbox('Restarting, please wait...'); DAQ_and_StreamProcessing;
delete(h);
end
G. Summary
a.Opening function:
% Operations executed during the GUI opening
functionDAQ_and_StreamProcessing_OpeningFcn(hObject, eventdata, handles, varargin)
% Positioning the items
movegui(gcf, 'northwest'); set(0,'units','pixel'); res=get(0,'screensize');
% System Objects™ % Time Scope
handles.TimeScope=dsp.TimeScope('YLimits',[-1,1], 'SampleRate',44100,...
'ShowGrid',true,...
'Position',[res(3)/2,res(4)/3,res(3)/2.5,res(4)/2]);
% Txt Writer and Reader
handles.TxtWt=dspdemo.TextFileWriter('Filename', 'camp.txt');
handles.TxtRd=dspdemo.TextFileReader('Filename', 'camp.txt',...
'SamplesPerFrame',44100);
% Audio Writer
handles.SaveWav=dsp.AudioFileWriter('Filename', 'Audio.wav','SampleRate',44100);
% Auxiliary variables % Dev ID
handles.in='Nothing'; handles.out='Nothing';
% Vendor
handles.venin='directsound'; handles.venout='directsound'; handles.output = hObject;
% Update handles
guidata(hObject, handles);
end
b.AudioInput device list generation:
% Automatic generation of the Input device list
function Input_CreateFcn(hObject, eventdata, handles)
if ispc && isequal(get(hObject,'BackgroundColor'),...
get(0,'defaultUicontrolBackgroundColor')) set(hObject,'BackgroundColor','white');
end global d;
d=daq.getDevices;
% First list item
% Scanning loop
for (k=1:(length(d)))
f=d(k).Subsystems.SubsystemType; if (isequal(f,'AudioInput'))
inp=[inp,{d(k).Model}]; i=i+1;
end end if(i>0)
% List generation
set(hObject, 'string', inp(1:end));
end end
c.AudioOutput device list generation:
% Automatic generation of the Output device list
function Output_CreateFcn(hObject, eventdata, handles)
if ispc && isequal(get(hObject,'BackgroundColor'),...
get(0,'defaultUicontrolBackgroundColor')) set(hObject,'BackgroundColor','white');
end global g;
g=daq.getDevices;
% First list item
out=[{'Select Output Device'}]; i=0;
% Scanning loop
for (k=1:(length(g)))
f=g(k).Subsystems.SubsystemType; if (isequal(f,'AudioOutput'))
out=[out,{g(k).Model}]; i=i+1;
end end if(i>0)
% List generation
set(hObject, 'string', out(1:end));
end end
d.callback executed at the selection of an Input device:
% Callback executed at the selection of an item
function Input_Callback(hObject, eventdata, handles)
global d;
contents = cellstr(get(hObject,'String')); choice=contents{get(hObject,'Value')};
% Scanning loop
if (strcmp(choice,d(k).Model)) handles.in=d(k).ID;
handles.venin=d(k).Vendor.ID;
elseif (strcmp(choice,'Select Input Device')) % Error
handles.in='Nothing'; end
end
guidata(gcbo,handles);
end
e.callback executed at the selection of an Output device:
% Callback executed at the selection of an item
function Output_Callback(hObject, eventdata, handles)
global g;
contents = cellstr(get(hObject,'String')); choice=contents{get(hObject,'Value')};
% Scanning loop
for (k=1:(length(g)))
if (strcmp(choice,g(k).Model)) handles.out=g(k).ID;
handles.venout=g(k).Vendor.ID;
% Error
elseif (strcmp(choice,'Select Output Device')) handles.out='Nothing';
end end
guidata(gcbo,handles);
end
f.pushbutton Start:
function Start_Callback(hObject, eventdata, handles)
global temp; temp=[]; global y;
if (strcmp(handles.in,'Nothing')) % No device
msgbox('Error: Select an Input device');
else % Session setup
handles.s=daq.createSession(handles.venin); handles.s.addAudioInputChannel(handles.in,1:2); handles.cont=get(handles.Continuous,'Value'); handles.lim=get(handles.Limited,'Value'); if (handles.cont==1 & handles.lim==0) % Contin
handles.s.IsContinuous=true; handles.TimeScope.TimeSpan=5; handles.TimeScope.BufferLength=2*...
handles.TimeScope.SampleRate)*...
handles.TimeScope.TimeSpan);
@(src,event) rec_c(src,event,handles)); handles.h=msgbox('Acquisition started...'); startBackground(handles.s); pause(0.5); delete(handles.h)
elseif (handles.lim==1 & handles.cont==0) % Lim
x=str2double(get(handles.Duration,'string')); if (isnan(x)) % Wrong duration
msgbox('Error: Invalid duration'); clear handles.s;
else % Limited acquisition
y=(ceil(x*10))/10;
handles.s.DurationInSeconds=y; handles.TimeScope.TimeSpan=ceil(y); handles.TimeScope.BufferLength=2*...
handles.TimeScope.SampleRate)*...
(handles.TimeScope.TimeSpan); lis=addlistener(handles.s,'DataAvailable',
@(src,event) rec_l(src,event,handles)); h=msgbox('Acquisition started...'); startBackground(handles.s); handles.s.wait();
delete(h);
h=msgbox('Stopped'); release(handles.TxtWt); release(handles.TimeScope); release(handles.s); delete(lis); clear handles.s;
pause(1); delete(h); end
else % No recording mode
clear handles.s;
msgbox('Error: No recording mode or both of them');
end end
function rec_c(src,event,handles) % Continuous
temp=[temp;event.Data]; y=(event.TimeStamps(end)); step(handles.TxtWt,event.Data); step(handles.TimeScope,event.Data);
end
function rec_l(src,event,handles) % Limited temp=[temp;event.Data];
step(handles.TxtWt,event.Data); step(handles.TimeScope,event.Data);
end
guidata(hObject,handles);
g.pushbutton Stop:
function Stop_Callback(hObject, eventdata, handles)
if ((handles.cont)==1&(handles.lim)==0) stop(handles.s); % Stop acquisition h=msgbox('Stopped');
release(handles.TxtWt); release(handles.TimeScope);
release(handles.s); delete(handles.lis); clear handles.s; pause(1); delete(h);
end end
h.pushbutton Play:
function Play_Callback(hObject, eventdata, handles)
global temp;
if (strcmp(handles.out,'Nothing')) % Error
msgbox('Error: Select an Output device');
else % Playback
handles.s=daq.createSession(handles.venout); handles.s.addAudioOutputChannel(handles.out,1:2); handles.s.IsNotifyWhenScansQueuedBelowAuto=false; lis=addlistener(handles.s,'DataRequired',...
@(src,event) src.queueOutputData(temp)); handles.s.queueOutputData(temp);
handles.s.startBackground(); handles.s.wait();
release(handles.s); delete(lis); clear handles.s;
end end
i.pushbutton Save WAV:
function Save_Callback(hObject, eventdata, handles)
while (~isDone(handles.TxtRd))
data=step(handles.TxtRd); % Read from txt
step(handles.SaveWav,data); % Write on WAV
end
h=msgbox('Saved'); release(handles.TxtRd); release(handles.SaveWav); pause(0.5); delete(h);
end
j.pushbutton TimeScope:
function TimeScope_Callback(hObject, eventdata, handles)
global y;
handles.TimeScope.BufferLength=2*...
(handles.TimeScope.SampleRate)*...
(handles.TimeScope.TimeSpan);
while (~isDone(handles.TxtRd))
data=step(handles.TxtRd); % Read from txt
step(handles.TimeScope,data); % Plot
end
release(handles.TimeScope); release(handles.TxtRd);
end
k.pushbutton Reset:
function Reset_Callback(hObject, eventdata, handles)
close; clear all; % Clear cache
h=msgbox('Restarting, please wait...'); DAQ_and_StreamProcessing; delete(h);
end
III. CONCLUSIONS
In this paper, the detail of design of a GUI in Matlab environment in order to perform audio data acquisition and stream processing has been presented. The toolboxes involved are Data Acquisition, DSP and GUIDE, using the so-called System Objects, a very useful facility provided by Matlab. The GUI allows also to manage errors and warnings and a lot of tests demonstrate it works very well. The next step is to apply this design for a specific application, in particular for biological sounds acquisition and processing.
Conflict of interest: The authors declare that they have no conflict of interest.
Ethical statement: The authors declare that they have followed ethical responsibilities.
REFERENCES
[1] https://www.mathworks.com/products/daq.html
[2] https://it.mathworks.com/help/daq/ref/daq.getdevices.html [3] https://it.mathworks.com/help/daq/ref/daq.createsession.html [4] https://it.mathworks.com/help/daq/ref/addanaloginputchannel.html [5] https://it.mathworks.com/help/daq/ref/addaudioinputchannel.html [6] https://it.mathworks.com/help/daq/ref/startforeground.html#bt960af-2 [7] https://it.mathworks.com/help/daq/ref/startbackground.html#bt9z7gd-3 [8] https://it.mathworks.com/help/daq/ref/dataavailable.html
[9] https://it.mathworks.com/help/daq/ref/iscontinuous.html
[10]https://it.mathworks.com/help/daq/ref/addanalogoutputchannel.html [11]http://it.mathworks.com/help/daq/ref/addaudiooutputchannel.html [12] https://it.mathworks.com/help/daq/ref/queueoutputdata.html
[13]https://it.mathworks.com/help/daq/ref/startforeground.html#bt960af-3 [14] https://it.mathworks.com/help/daq/ref/startbackground.html#bt9z7gd-4
[15]https://it.mathworks.com/help/daq/examples/acquire-continuous-and-background-data-using-ni-devices.html
[16] https://it.mathworks.com/products/dsp-system.html
[17] https://it.mathworks.com/discovery/stream-processing.html
[19] https://it.mathworks.com/help/dsp/gs/system-objects-methods.html [20] https://it.mathworks.com/help/dsp/ref/dsp.audiofilereader-class.html [21] https://it.mathworks.com/help/dsp/ref/dsp.audiofilewriter-class.html
[22] https://it.mathworks.com/help/dsp/ref/dsp.timescope-class.html#zmw57dd0e292591 [23] https://it.mathworks.com/help/dsp/ref/dsp.sinewave-class.html
[24]https://it.mathworks.com/help/dsp/examples/creating-new-kinds-of-system-objects-for-file-input-and-output.html#zmw57dd0e386
[25] https://it.mathworks.com/discovery/matlab-gui.html