R
AILROAD
&
C
O
.
™
TrainController
™
Silver and Gold
Version 8
Change Description
R
AILROAD
&
C
O
.
™
TrainController
™
Silver and Gold
Version 8
Change Description
May 2013
Contact: Freiwald Software Kreuzberg 16 B
D-85658 Egmating, Germany e-mail: [email protected] http://www.freiwald.com All rights reserved.
The content of this manual is furnished for informational use only, it is subject to change without notice. The author assumes no responsibility or liability for any errors or inaccuracies that may appear in this book.
No part of this publication may be reproduced, stored in a retrieval system, or transmit-ted, in any form or by any means, electronic, mechanical, recording, or otherwise, with-out the prior written permission of the author.
Table of Contents
About this Document ... 5
The Editions of TrainController™ ... 5
RAILROAD &CO. TrainController™ 8 Change Description ... 6
The new Functions at a Glance ... 6
New Features of TrainController™ Gold ... 8
1 Introduction ... 15
1.2 Variants of Train Control ... 15
Comparison Chart ... 15
1.3 Fundamentals of Use ... 17
User Interface Design ... 17
3 Train Control ... 18
3.2 Engines ... 18
5 The Dispatcher I ... 20
5.5 Train Identification and Train Tracking ... 20
Train Identification ... 20
Tracking of Back and Forth Shunting ... 20
5.8 Arranging Indicators and Markers in a Block ... 21
Variable Stop Locations in a Block – Stopping for Coupling ... 21
5.12 Execution of Schedules ... 25
Waiting Time ... 25
Additional Actions ... 25
8 The Message Window ... 26
Dr. Railroad ... 26
9 The Simulator ... 27
Saving and Restoring of Train Positions ... 27
11 Advanced Train Control ... 28
11.2 Cars and Train Sets ... 28
Control Cars ... 28
11.3 Approved Trains ... 28
Vehicle Groups ... 29
Use of Vehicle Groups in TrainController™ Silver ... 29
Vehicle Groups in TrainController™Gold ... 29
Exclusion of Vehicles from Vehicle Groups ... 30
Vehicle Groups and Train Descriptions in TrainController™Gold ... 30
Simple Train Descriptions ... 31
Train Descriptions as independent Objects ... 33
Directional Train Descriptions ... 39
14 Extended Control and Monitoring Functions ... 41
14.3 Protection and Locking with Conditions ... 41
Combined Groups ... 41
14.4 Operations ... 42
System Operations ... 43
Control Flow Operations ... 43
Train Operations ... 45
14.6 Counter ... 46
14.10Decommissioning of Objects ... 47
14.11Turnout Position Control ... 47
14.12Extended Accessories, Cranes and Functional Models ... 47
Use of extended Accessories ... 48
Creation of extended Accessories ... 48
Arranging the look of an extended Accessory ... 49
Operations ... 50
Triggers ... 51
Conditions ... 52
Use in Operations, Triggers and Conditions ... 52
15 The Dispatcher II ... 53
15.3 Controlling the traffic flow in Schedules ... 53
Limiting the Reservation of Blocks and Routes in certain Schedules ... 53
Detection of lost Cars ... 53
Overview of all Schedule Rules ... 54
15.4 Examples ... 62
Example: Optimal Length Control for Hidden Yards ... 62
17 Turntables and Transfer Tables ... 64
17.1 Introduction ... 64
Arranging the Turntable Symbol in the Switchboard ... 64
17.7 Segment Turntables ... 65
Appendix ... 68
Migrating Existing Data Files from TrainController™ 7 ... 68
Vehicle Groups and Train Descriptions ... 68
Control of Trains with LocoNet and Digitrax Central Units ... 69
Turntables ... 70
List of Examples ... 71
About this Document
RAILROAD &CO. is the leading product line of computer programs for digitally or conventionally controlled model railroads. It contains the following members:
• TrainController™ is the world's leading software for model railroad computer control.
• TrainProgrammer™ is the program, which makes programming of DCC decoders as simple as a few clicks with your mouse.
• +Net™ is a module, that allows to control your layout with a network of several computers running TrainController™.
• +4DSound™ is a module, that recreates realistic spatial sound effects for each model railroad layout controlled by TrainController™ without the need to install on-board sound into each decoder.
• +Street™ is a module for control of car systems with TrainController™.
• +SmartHand™ is the world's premium handheld railroad control system designed for computer controlled model railroads.
The Editions of TrainController™
TrainController™ is offered in three variants:
• TrainController™ Bronze provides a low-cost entry into computer controlled model railroads. It is primarily designed for users with small and medium size lay-outs and average requirements. Novice users, who do not know TrainController™,
may consider doing their first steps with TrainController™ Bronze. The reduced functionality of this variant makes it easier to identify and to learn the basic func-tions of TrainController™.
• TrainController™ Silver is the successor of the established and well-known ver-sion TrainController™ 5. It addresses users with high demands and also users, who are not reluctant to puzzle to accomplish individual goals.
• TrainController™ Gold is the flagship of the TrainController™ family and in a class of its own. TrainController™ Gold is primarily designed for users with su-preme requirements, who want to operate their layout like the real professionals. While TrainController™ Silver is already able to operate even very large layouts,
TrainController™ Gold provides much more convenience, efficiency and security for design and operation – especially for larger layouts.
RAILROAD &CO. TrainController™8 Change Description
This document provides an overview of the features, which are unique in
TrainController™ 8 and which distinguish TrainController™ 8 from
TrainController™ 7. It is mainly intended for users, who know TrainController™ 7, and who want to learn about the differences between TrainController™8 and 7. It is assumed, that the reader is familiar with TrainController™ 7 and the
TrainController™ 7 Users Guide. New users of TrainController™8 should focus on the TrainController™ 8 Users Guide rather than this document.
The numbers of the particular chapters and sections of this document are inherited from the concerning chapters and sections of the TrainController™ 7 Users Guide. This al-lows readers, who are familiar with that Users Guide, to implicate the contents of both documents. This is also the reason for the gaps occurring in the numbering.
All text sections, that describe features of TrainController™ 8Gold, which are not provided by TrainController™ 8Silver, are marked with a specific marking on the left side of the text in the same way as this section. Contents marked in this way do not apply to TrainController™ 8 Silver. Users of this program version or readers only in-terested in TrainController™ 8 Silver can safely ignore these contents.
All text sections, that describe characteristics of TrainController™ Silver, which do not apply to TrainController™ Gold, are marked with a specific marking on the left side of the text in the same way as this section. Users of this program version or readers only interested in TrainController™ Gold can safely ignore these contents.
Unless otherwise indicated all screen shots show the user interface of
TrainController™ Gold. This means in particular, that user interface options may be visible, which are not available in TrainController™ Silver.
The new Functions at a Glance
In the following all new functions are listed, that apply to TrainController™ 8 Silver and Gold:
Misc:
1. The user interface has been modernized. Among others five further user interface designs are integrated (several designs for Office 2010 and Visual Studio 2010). In total there are now 16 different designs available.
2. If the END key of your keyboard is pressed and held at the start of a session or when a file is being loaded, then the session will start in offline mode. This is use-ful if the most recently used digital systems are currently off or not connected. In this case, a failing connection with possibly subsequent errors is avoided. Moreo-ver, all the settings of the digital systems (e.g. COM port numbers) remain un-changed for later online operation.
3. In the built-in image editor one color can now be exchanged for another in the highlighted area with a single click. This is in particular useful, when a certain col-or of an image is to be displayed invisible.
4. In the built-in image editor, the selected image can now be rotated and flipped. 5. It is now possible to specify, whether the status of all engine functions will be
transmitted to the digital system at the beginning of a session (like in Version 7), or whether only those functions are transmitted, which are turned on, or whether no functions are transmitted. The transmission is done to synchronize the status of en-gine functions between the digital system and the software. In certain cases, how-ever, it is useful to reduce or to avoid this transmission, e.g. when the digital sys-tem is overloaded.
Switchboard:
6. The switchboard window can be scrolled by clicking and dragging with the middle mouse button.
7. The symbols of all signals, accessories, indicators, routes and self-drawn symbols can now be rotated in the switchboard. Previously this was only possible for certain signals and route symbols.
Train Control:
8. Auxiliary functions in the train window can now also be operated when the vehicle is controlled by a schedule under control of the computer.
9. When a train is performing a scheduled wait in a schedule, then an appropriate marking is displayed in the status column of the Engines & Trains window. The remaining time can then be queried using a tool tip.
Train Management:
10. Train groups are now called vehicle groups.
Dispatcher and Automatic Operation:
13. After start of the program all train runs (schedules etc.), which were active at the end of the previous session, can be started again on demand. This works even if the user missed to finish the previous session in a frozen state.
14. The block diagram can be scrolled by clicking and dragging with the middle mouse button.
15. A new schedule rule for spontaneous runs causes trains to reverse automatically af-ter a certain holding time. This allows to automatically resolve blockades caused by opposing trains (see page 53).
16. Markers in the block editor can now not only be arranged in the direction of the block (e.g. to the left or right in horizontal blocks), but also perpendicular to the di-rection of travel (e.g. up or down in horizontal blocks). This provides more clarity, if a block includes a plurality of markers. Corresponding markers can thus be ar-ranged side by side or one above the other in the same row or column of the block editor.
Turntables:
17. When querying the position of a turntable bridge in triggers and conditions of other objects the position of the small house is now taken into account. This allows spe-cific directional functions for the bridge (e.g. operation of the signal on the right side of the bridge - see page 69).
Message Window:
18. In the message window the time of the message is logged in a separate column. 19. When the display in the message window is cleared the internal memory of all
messages for the detail mode is cleared, too.
New Features of TrainController™ Gold
The following differences only apply to TrainController™ 8Gold:
Misc:
20. The properties of certain objects (e.g. turnouts, routes, blocks, schedules, engines and cars) can now be modified outside of edit mode. The prerequisite is that these objects are previously decommissioned (see section 14.10).
21. It is now also possible to change the name or digital address of several objects at the same time. The change of the name of several objects at once is useful when these names use wildcards with similar construction. In such a case the names of a plurality of objects can be changed in a single step.
Furthermore, it is also possible to modify the digital addresses of multiple objects at one time. Possible changes include the assignment to another digital system or the block-wise shift of digital addresses.
To edit multiple objects at once, it is typically most useful to select them in the Ex-plorer window.
22. In the name of objects, a new wildcard %N can be used. This wildcard is always associated with another object. The name of the other object is then inserted at the location of the wildcard, when the object name is displayed. For example, if the name of a turnout contains a wildcard %N with a link to an adjacent block, then the name of the block is used in the name of the turnout. If the name of the block is changed, then the name of the turnout adjusts automatically. (For more information about wildcards, see the Help menu).
23. The current positions of the trains in the blocks as well as the status of train sets can be stored in a separate file and loaded from there. This is also possible if the project data is not stored at the same time. So it is e.g. no longer necessary, to re-vert manually the positions of all trains to the current state of the layout after a test with the simulator without connection to the layout (see page 27).
Switchboard:
24. A new switchboard symbol supports the frog polarization of crossings. These crossings may have no tongues. For these crossings, however, the polarity of the frog must be switched according to the set route. For this purpose, there are now specific symbols for polarized crossings, which are operated similar to turnouts. 25. With the operations of a route it is possible to set turnouts, signals and other objects
to a protective position. As long as the route is active, the objects cannot change their position. But they can be used in other routes, provided that these routes use the object in the corresponding position (see page 42).
26. With self-made extensions arbitrary accessories can now be operated in the switch-board and integrated into automatic operations. Examples of such equipment are cranes, machinery and other working models, signals with more than four terms, accessories, which are controlled by more than two turnout addresses and / or lo-comotive addresses; Selectrix products, which are controlled by several addresses or where more than one bit of a bus address must be changed simultaneously (see the section 14.12).
27. For turnout position control of turnouts with two drives (e.g. double slip switches or three-way turnouts) it is now possible to specify two feedback addresses for
Train Control:
28. For convenient programming of locomotive decoders, a switching command can be specified. With this command and an appropriate relay a selected section of track on the layout can automatically by connected to the programming track output of the central unit whenever functions for the programming track are invoked from
TrainController™ (see page 18).
29. When setting up locomotives with a DCC decoder, the digital address of the loco-motive can be read directly from the programming track into the record of the lo-comotive. Conversely, the digital address stored in the program can be pro-grammed into the decoder (see page 18).
30. With a new system operation, locomotive functions (e.g. light) on all vehicles can be turned on or off at the same time (see page 42).
31. With a new system operation, all running locomotives can be stopped gently with an adjustable delay (see page 42).
32. Train operations (such as switching light or coupling certain locomotives) can now be triggered by buttons or switches in the switchboard (see page 45).
33. With a new train operation, trains can be run from their current location automati-cally to any destination block via AutoTrain (see page 45).
34. With a new train operation, an arbitrary schedule can be started with the concern-ing train (e.g. as engine function from the train window) (see page 45).
35. A braking ramp can be specified for temporary speed restrictions.
Train Management:
36. Cars can now be marked as a control car (see page 28).
37. The management of vehicle groups can be accessed directly from the Train menu. 38. Predefined vehicle groups (e.g. for steam locomotives, diesel locomotives,
passen-ger cars, all locomotives, etc.) support the effective creation and maintenance of extensive vehicle groups and the association with other objects such as blocks, routes, schedules, turntable tracks, COMBI-groups, etc. (see Section 11.3).
39. Individual vehicles or vehicle groups can be excluded from vehicle groups. Using the predefined vehicle groups customized groups can be arranged very quickly, such as the group of all diesel locomotives without rail buses.
40. With the assignment of trains to other objects, the minimum and maximum length of trains can now be specified (see section 11.3). This allows, for example, to ar-range specific schedules for trains with a certain length.
41. Also, with the assignment of trains to other objects, the minimum and maximum weight of trains can be specified (see section 11.3). Thus, for example the speed of heavy trains on a slope can be reduced dependent on the current weight of the train, even if the weight of trains is changed during operation train by loading and
un-42. Furthermore, with the assignment of trains to other objects, the speed of trains can be specified (see section 11.3). Thus, for example it is possible to evaluate in trig-gers or conditions, whether a train is moving or how fast it goes.
43. The assignment of trains to other objects can now be made dependent on a condi-tion (see seccondi-tion 11.3). This allows for example to lock or release certain blocks temporarily for certain trains with a switch in the switchboard.
44. With the assignment of trains to other objects, the arrangement and orientation of each vehicle in a train set can be specified (see section 11.3).
Dispatcher and Automatic Operation:
45. For AutoTrain by Drag & Drop and each section (block or route) it is now possible to specify the request of the yellow signal, speed limits, actions and conditions (see page 25 and 53). If, for example, an on/off switch is added to the schedule specific settings of a block for AutoTrain, then the block can be locked or released for AutoTrain at any time during operation.
46. For spontaneous runs and each section (block or route) it is now possible to specify the request of the yellow signal, speed limits, actions and conditions (see page 25 and 53). If, for example, a wait time is specified in the schedule specific settings of a block for spontaneous runs, then all trains under control of spontaneous runs will stop here.
47. Beside displaying a message in the message window with a system operation it is now an alternative to display a message as a temporarily well visible tool tip on the computer screen (see page 42).
48. With new system operations, it is possible to automatically select an object at the user interface and/or to execute any menu command (see page 42).
49. With a new type of operations, the control flow can be controlled within the pro-cessing of operations. For example, the execution may be made dependent on pre-conditions. In addition, also jumps and loops within operations are possible (see page 43).
50. During the execution of operations it is possible to insert delay operations with random duration (see page 43).
51. The execution of operations can also be made dependent on probabilities (see page 43).
52. Optionally, operations can be performed in random order (see page 43).
53. With counters it is possible to count the number of certain processes or events and to evaluate such numbers in conditions or triggers of other objects (see page 46). 54. Concatenation of AutoTrain runs: if an AutoTrain run starts in a block in which no
train is located and this block is currently destination of an active AutoTrain run, then the new run be linked as a successor to the already active run. Since the direc-tion of travel can be changed during the transidirec-tion to successor runs, it is now
pos-55. Rules for spontaneous runs can now be applied to all trains in one step.
56. A new schedule rule allows for the release of blocks, already, when a train has completely entered a subsequent block and before it reaches a stop marker in that block. Thus, even without the use of conductive axles on the rear end and addition-al occupancy sensors in the turnouts, speed limits can be lifted earlier and a higher succession of trains can be accomplished, thus resulting in more prototypical op-erations (see page 53).
57. With a new schedule rule for train length control, entry into blocks that are too short for the train to fit into, can be prevented (see page 53).
58. With a new schedule rule, scheduled waits can be limited to those trains which fit in the block (see page 53).
59. With a new schedule rule, the destination block of the schedule must already be re-served at the start of the train (see page 53).
60. With a new schedule rule, the entire path to the destination block of the schedule must be already reserved at the start of the schedule. All blocks on the path to the destination are treated like ‚critical' blocks (see page 53).
61. With another schedule rule, it can be specified that in any case, only the shortest appropriate destination block is used, even if there are longer destination blocks, which can be reached easier or faster (see page 53). This allows, for example, the optimum use of hidden yard tracks, even if the tracks are not located side by side. 62. With a new schedule rule, the evaluation of distances to the destination block or the
next obstacle can be turned off for calculation of the optimal path (see page 53). 63. With four other schedule rules, the inclusion of sections of track that are currently
occupied, used by other trains, locked, or for which a condition is not met, can be disabled. Such sections are then treated as if they were not contained in the sched-ule at all (see page 53).
64. With further schedule rules for coupling to vehicles, waiting in the destination block of the schedule, it can be specified, that there must be at least one vehicle in the destination block or that only cars are waiting there but no engine (see page 53).
65. With another schedule rule for the coupling to vehicles, which are waiting in the destination block of the schedule, it can be specified, whether the entering train is joined to the waiting vehicles or whether it remains separated from them (see page 53).
66. With another schedule rule, it can be specified that the end of trains must not stop in critical blocks. A long train must proceed behind a critical section until it com-pletely fits into the blocks that lie beyond the critical section (see page 53). 67. Another schedule rule allows multiple trains running in the same direction of
trav-el, to share the same critical section (see page 53).
68. Train tracking of manually driven trains is now able, on demand, to track trains, which reverse in a turnout area (‘zigzag’ movement) (see page 20).
69. Distances and ramps of markers can now be specified as formulas. This allows, for example, to vary stop locations in a block, that depend on the length of vehicles al-ready waiting therein. It is also possible to position on the gap between any vehicle of the train (see page 21).
70. With a new system operation, all blocks can be locked or unlocked at the same time. (see page 42).
71. With a new system operation, all schedules can be locked or unlocked at the same time (see page 42).
72. With buttons or switches in the switchboard, schedules can now be started with a certain engine or they can be started from a given starting block (see page 42). 73. For each block in a COMBI-group it is possible to specify, whether this block must
be a current block of a train (as in version 7), or whether it is sufficient if the block is reserved, but not the current block (see page 41).
74. In addition to blocks, it is also possible to add routes to COMBI groups (see page 41).
75. Spontaneous runs can now be started as operations of blocks. In this way, for ex-ample, they can also be started with a push button in the switchboard.
76. For each block in a schedule, it is possible to specify a scheduled stop only for spe-cific trains. This also applies to AutoTrain or spontaneous runs (see page 25).
Timetable / Clock:
77. With a new system operation the clock can be set to a specific time (see page 42).
Turntable:
78. The inside of the turntable symbol in the switchboard can now optionally show the block (as in version 7), or a thumbnail image of the turntable as in the turntable window, or both (see page (see page 64).
79. Segment turntables (see section 17.7). 80. Support of the new NOCH segment turntable.
81. The newly introduced train descriptions (see section 11.3) can also be assigned to the tracks of a turntable for the control of forward and backward tracks.
Message Window:
82. It is possible to specify a message for Dr. Railroad in the properties of each object (see page 26).
Simulator:
83. The simulator now simulates all feedback events, that are used by turnout position control for all turnouts, that are operated while the simulator is running.
1
Introduction
1.2
Variants of Train Control
Comparison Chart
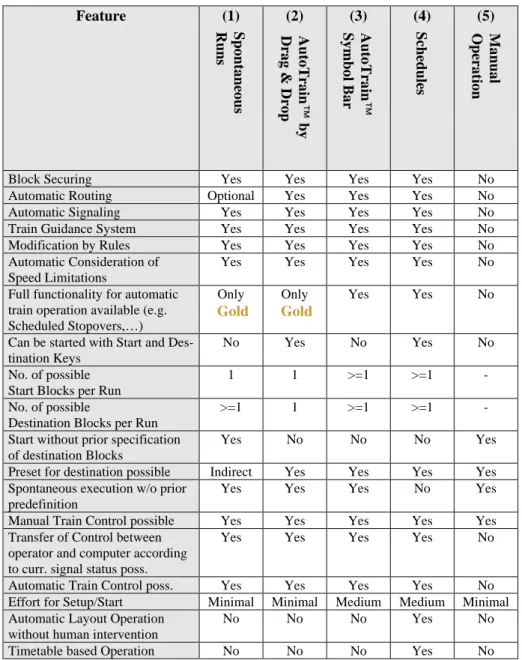
The following chart compares the possibilities of the particular methods and their suita-bility for certain purposes:
Feature (1) (2) (3) (4) (5)
Block Securing Yes Yes Yes Yes No Automatic Routing Optional Yes Yes Yes No Automatic Signaling Yes Yes Yes Yes No Train Guidance System Yes Yes Yes Yes No Modification by Rules Yes Yes Yes Yes No Automatic Consideration of
Speed Limitations
Yes Yes Yes Yes No
Full functionality for automatic train operation available (e.g. Scheduled Stopovers,…) Only Gold Only Gold Yes Yes No
Can be started with Start and Des-tination Keys
No Yes No Yes No
No. of possible Start Blocks per Run
1 1 >=1 >=1 -
No. of possible
Destination Blocks per Run
>=1 1 >=1 >=1 -
Start without prior specification of destination Blocks
Yes No No No Yes
Preset for destination possible Indirect Yes Yes Yes Yes Spontaneous execution w/o prior
predefinition
Yes Yes Yes No Yes
Manual Train Control possible Yes Yes Yes Yes Yes Transfer of Control between
operator and computer according to curr. signal status poss.
Yes Yes Yes Yes No
Automatic Train Control poss. Yes Yes Yes Yes No Effort for Setup/Start Minimal Minimal Medium Medium Minimal Automatic Layout Operation
without human intervention
No No No Yes No
Timetable based Operation No No No Yes No
Table 1: Variants of Train Control
Spo nt a ne o us R uns Aut o Tr a in ™ by D ra g & D ro p A ut o Tr a in ™ S ym b ol B ar M a nua l O p era tio n Sc he dul es
1.3
Fundamentals of Use
User Interface Design
In TrainController™ 8 the following user interface designs have been added:: • Office 2010 (four Variants: Release1, Black, Silver, Blue)
3
Train Control
3.2
Engines
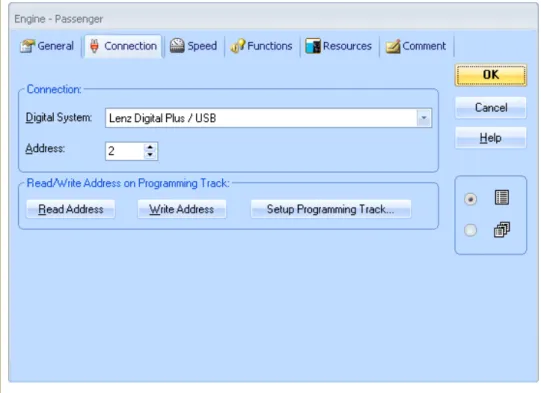
TrainController™ Gold provides the additional possibility for programming the ad-dresses of locomotives with DCC decoders on the programming track. It is possible to directly read the address from the decoder and to store it in TrainController™ or vice versa to program the address stored in the program into the decoder. Writing to the de-coder, however, requires a license for TrainProgrammer™. During programming long addresses, that are stored in several CVs, are automatically converted and pro-cessed accordingly, and the concerning bit of CV29 is automatically evaluated or set correctly.
Furthermore, there is the possibility of arranging an appropriate track section of the layout as a temporary programming track. This is done by storing a solenoid address in the software. Through this address a relay or something similar can be operated to con-nect the track section alternately to the normal main track output of the central unit or the output for the programming track. Whenever TrainController™Gold sends a pro-gramming command to the central unit, it previously operates the relay in order to con-nect the track section automatically to the programming track output and afterwards it reverts the section back to normal track power.
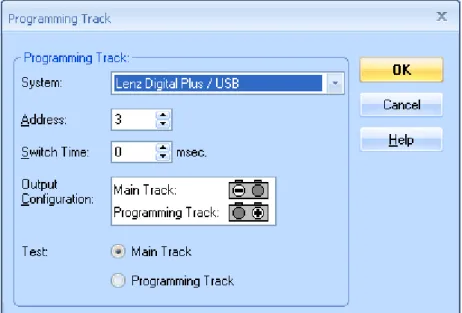
Diagram 2: Arranging the programming Track
This automatic switching of the programming track is also available for the program-ming functions of the advanced speed profile.
5
The Dispatcher I
5.5
Train Identification and Train Tracking
Train Identification
In TrainController™ 8 train detection has been renamed in train identification. The function itself did not significantly change. However, it is now necessary to activate the option Use Train Identification in the Setup Digital Systems dialog for that digital system, where your train identification devices (readers, detectors, etc.) are connected. If this is not done, the options to arrange train identification are not available on the us-er intus-erface.
Tracking of Back and Forth Shunting
During normal train tracking train movements are only tracked from a block to another block when the two blocks are adjacent, i.e. if they are connected directly by a route. In TrainController™Gold , there is also the possibility to track trains from one block to another, when the train changes its direction in a turnout area during a shunting movement (‘zigzag’). If, for example, an engine moves from a track in a station to a parallel track, then it can be tracked to the parallel track even if it changes its direction in the turnout area between the blocks. In this case, both blocks are not connected di-rectly by a route.
Tracking of such movements is enabled with the Track Zigzag Moves between Blocks
command in the Block menu.
Only simple zigzag moves can be tracked, however. That means, if the engine changes the direction of travel more than once after leaving the first block and before it enters into the second block, this movement cannot be tracked. After a change of direction in the turnout area, a shunting locomotive should therefore re-enter into a block, to be lo-cated again. From here it can then start, if required, the next stage of the zigzag move and so on.
5.8
Arranging Indicators and Markers in a Block
Variable Stop Locations in a Block – Stopping for Coupling
Using the settings Head, Middle or Tail of Train, it is possible to stop trains at a fixed location such as stop at a signal or in the center of a platform. For shunting and ex-change of locomotives, it is often necessary to let the train stop at a certain point with a particular vehicle, or to take into account the length and position of the vehicles already waiting in a block, when the train enters the block.
For this purpose it is possible in TrainController™ Gold, to specify a formula for each marker in a block for the calculation of variable distances for markers and variable braking ramps.
Such a formula is set up according to the usual rules of mathematics. It can contain numbers and the operators +, -, * and /. As usually multiplication and division first, then addition and subtraction. But it is also possible, with the help of brackets ( and ) to give priority to certain operators. The numbers may also contain decimal points, in order to specify even a fraction of the basic units of centimeters or inches.
Distances without unit are interpreted as centimeters. If you want to specify distances in inches, use the unit "in". The interpretation of a distance specified as inches or centime-ters, is not affected by the setting of the units in the View menu. Regardless of these settings the distance 100 denotes always 100cm. 100in are always 100 inches.
In addition, each formula can contain wildcards. Thus, the length of the train entering into the block or the length of the vehicles already located there can be considered. It is also possible that a wildcard refers only to a part of a train or to individual vehicles. Such a wildcard begins with a % character.
Next follows the letter B (for block) if the wildcard refers to vehicles, which are already located in the block. If the character B is not specified, then the wildcard refers to the train currently entering the block.
Next is a type code that determines the vehicles, which the wildcard refers to. The fol-lowing types exist:
• A: All vehicles of the train • L: pulling locomotives
• H: pushing locomotives (‘helpers’). These are all locomotives in a train set, which are separated from the pulling locomotives by at least one car. If there are no cars in a train, then there are no pushing locomotives. If there are only cars in front of the first locomo-tive (seen in the current direction of travel), then there are only pushing, but no pulling locomotives. %L is thus always 0 for pushed trains.
• C: car
If the type code is followed by the letter R, then the wildcard refers to the last vehicles of the specified type (seen in the direction of the entering train). If R is not specified, then the wildcard refers to the first vehicles in driving direction.
At the end of the wildcard an optional number can follow. This number indicates how many vehicles the wildcard refers to. If no number is specified, all vehicles of that type are meant.
Examples:
• 100 or 100in:
This formula works in the same way as the standard option 100 cm/inches with
Head of Train. The result of a formula is namely always applied to the head of the train entering into the block.
• 100+%A/2:
This formula can e.g. be used to stop a train in centered at 100 cm. This formula works in the same way as the standard option 100 cm with Middle of Train.
• 100+%L+%C/2:
This formula can e.g. be used to stop the cars of a train centered at 100 cm. It does not matter how long the pulling locomotive or locomotives are.
• 100-%BC/2:
If the cars of a train were stopped centered at 100 cm with the formula specified in the preceding example, then you can use this formula to stop with a locomotive at the other end of the parked cars.
• 100in-%L-%BA:
This formula is useful when moving a locomotive to the opposite end of the train. If the incoming train was stopped with its head at 100 inches with a normal stop mark-er, then the locomotive can be stopped with this formula at the other end of the cars. • 100in+%L
100in-%BC:
These formulas are useful for the change of locomotives, when the new locomotive will stop at the rear of the waiting cars and the lengths of the locomotives involved in the exchange may be different. With the first formula, the first car of the entering train is stopped at 100 inches. With the second formula, the new locomotive is moved to the other side at the end of the waiting cars. This works even if the origi-nal locomotive remains in the block.
• 100+%L+%C1:
Using this formula, a train can be separated with an uncoupling track located at 100 cm behind the first car.
• 100+%A-%CR1:
Using this formula, a train can be separated with an uncoupling track located at 100 cm before the last car.
In order to understand a formula with plus and minus signs, it is helpful first to men-tally move the train forward according to the positive part of the formula and then back according to the negative part. In the above example you mentally move the train initially to the right according to its total length. The rear of the train is then (mentally) located at the red mark. Then you move the train back by the length of the last car.
• 100in+%A-%H-%CR1:
Using this formula, a pushed train can be separated with an uncoupling track located at 100 inches before the first car.
• 100+%A-%AR2:
Using this formula, a train can be separated with an uncoupling track located at 100 cm before the last two vehicles, regardless, whether these vehicles are locomotives or cars.
5.12
Execution of Schedules
Waiting Time
You can specify awaiting time for each block contained in a schedule in order to per-form scheduled stops in certain blocks of a schedule.
In TrainController™ 8 Gold it is additionally possible to specify the trains, which are affected by the waiting time. In this way it can be specified, for example, that passenger trains are stopped during execution of the schedule while freight trains go by. The defi-nition is done with a train description (see section 11.3, “Approved Trains”).
In TrainController™ 8 Gold a waiting time for each block can be specified for AutoTrain runs and spontaneous runs, too.
Additional Actions
Finally it is possible, to assign operations to each block of a schedule. Possible opera-tions are turning on or off an engine function, execution of certain train operaopera-tions or execution of a list of operations in order to perform a sequence of actions.
In TrainController™ 8 Gold such operations can also be specified for AutoTrain runs and spontaneous runs.
8
The Message Window
Dr. Railroad
In TrainController™Gold it is possible to store a Dr. Railroad message with own text in the properties of each object. When calling Dr. Railroad this message is then dis-played together with the name of the object in the message window.
In this way you can for example mark objects, which must be still edited. With the help of Dr. Railroad these objects are displayed in the message window and their properties can be accessed directly from here.
9
The Simulator
Saving and Restoring of Train Positions
In connection with the simulator, but not only here, it is useful to be able to save and re-store the current positions of all trains in the blocks as well as the compositions of train sets in separate files.
TrainController™Gold supports this with special menu commands.
At the end of a session even the current train positions and configurations of train sets are stored and reloaded at the beginning of the next session. This works here only be-cause the layout data does usually not change between sessions.
Additional efforts, however, may be seen in the following cases:
• If the connection to the layout is closed for testing purposes, to try out new settings with the simulator, the positions of trains or composition of train sets in the program may change in the simulation. After reconnecting with the layout it may happen, that the new train positions stored in the program do no longer match the actual po-sitions of the trains on the layout. Rather than updating all train popo-sitions and possi-bly all compositions of train sets by hand, it is now possible in TrainController™ Gold to save the status of trains in a separate file with a special menu command be-fore starting the test, and to restore the train status after the test and bebe-fore the oper-ation with the real layout is continued.
• However, this feature is not only useful when testing with the simulator. Sometimes new settings are first entered into the project on a trial basis and their test is per-formed with the layout connected. Here, the actual positions of trains on the layout are changed, of course. If the new settings are later discarded for some reason, the last saved state of the project is simply loaded. Here, however, also the old train po-sitions and composition of train sets are restored from the previous project state, too. The changes of the train positions on the layout made through the test should there-fore be updated again by hand. Instead it is also possible to save the new train posi-tions in a separate file just before going back to the original project status. After loading the original project data, the current train positions are then restored from that file.
11
Advanced Train Control
11.2
Cars and Train Sets
Control Cars
In TrainController™ 8 Gold cars can also be characterized as control cars. Control cars differ from normal cars in the following characteristics:
• They can also send direction commands to an associated decoder. In this way it is possible to operate direction-dependent functions (e.g. headlights or tail light) also on a car.
• When they are included in a train set, they can be selected in the train window just like locomotives to control the speed and direction of the entire train set.
11.3
Approved Trains
The use of blocks, routes, schedules, etc., as well as performing other functions can be limited to certain locomotives, cars or train sets. In this manner it can be e.g. ensured that certain schedules will be carried out with passenger trains or that electrical engines do not enter track sections without overhead line.
If you want e.g. to open blocks in the staging yard only for certain trains, then enter the-se trains in the properties of the corresponding blocks. As a result, only thethe-se trains will enter these blocks, while other trains are directed elsewhere.
Among others, each block, route, schedule, brake or stop marker, or certain tracks of a turntable can be associated with trains. Depending on the type of object this assignment serves different purposes. In the case of blocks, routes and schedules it controls, which train may use the block, the route or the schedule. In the case of brake or stop markers it is determined thereby, to which train the marker applies. In conjunction with turntable bridges this can be used to turn locomotives to a certain direction.
Vehicle Groups
Vehicle groups can help to save a lot of time for the specification of approved trains. In a vehicle group similar vehicles are concentrated. If e.g. multiple schedules are to be executed only by freight locomotives, then it is more efficient, to include all freight lo-comotives together in a group first and then to assign this single group to the schedules, than to assign all freight locomotives individually to each schedule. If a new freight lo-comotive is added to the layout, then it is sufficient to add this lolo-comotive to the vehicle group. The new locomotive is then automatically approved for all schedules, which this vehicle group is assigned to.
Use of Vehicle Groups in TrainController™ Silver
For all blocks, routes and schedules in TrainController™ Silver it is possible to speci-fy, which engines or trains may use the concerning object. To open one block only for certain trains, for example, the concerning engines and trains are added to a list in the properties of the block. Such list may also contain vehicle groups.
Such a vehicle group can locomotives, trains and other vehicle groups. The following rules apply in TrainController™ Silver:
• An engine or train is included in a vehicle group when the engine or train is entered directly in the vehicle group, or if the vehicle group contains another vehicle group, in which in the engine or train is included
• The list of approved trains stored in the properties of an object applies to an engine or train, if the engine or train is contained in the list, or if a vehicle group is con-tained in the list in which the engine or train is included.
• An empty list is valid for all engines and trains. This is the default for each object. Each block, route or schedule may be used by all engines and trains by default. In TrainController™ Silver a list of approved trains is valid for an engine or train, if the list is empty, or if the engine or train is directly or indirectly contained in the list.
Vehicle Groups in TrainController™Gold
In TrainController™Gold there are several predefined vehicle groups. Each locomo-tive or train is automatically assigned to the appropriate groups according to its type.
• Group of all steam engines • Group of all diesel engines • Group of all electric engines
• Group of all engines (= steam engines + diesel engines + electric engines) • Group of all freight cars
• Group of all passenger cars
• Group of all cars (= freight cars + passenger cars) • Group of all vehicles (= engines + cars)
Exclusion of Vehicles from Vehicle Groups
In TrainController™Gold it is also possible, to exclude vehicles from a group. To form, for example, a new vehicle group of all diesel engines, which does not contain the rail busses, the predefined group of all diesel engines is added to this new group as well as all rail busses. The entries for the rail busses in this new group are additionally marked as excluded.
Of course it is also possible to exclude an entire group of vehicles from another group. In the above example it is also possible to form a group with all rail busses, to enter this group to the new group instead of the individual rail busses and to mark the entry for the group of rail busses as excluded.
Vehicle Groups and Train Descriptions in TrainController™Gold
In TrainController™Gold it is not only possible for blocks, routes and schedules, but also for many other objects and functions to specify those engines, cars or train sets, that are allowed to use the object in question or for which the function in question is valid.
• Which trains are allowed to use certain blocks and routes. This can be used to direct certain types of trains to specific tracks.
• With which trains certain schedules may be executed.
• Which trains specific markers in a block apply to. This allows for example certain actions to be carried out by selected trains or to specify different stop points in the same block for different types of trains.
• With which trains the successor schedules of certain schedules are executed. • Which trains a waiting time in a block of a schedule applies to.
• Which locomotives are rotated to a certain direction, when they leave the bridge of a turntable via a certain track.
These specifications are not limited, however, to simple lists of vehicles. In particular when train sets are used it is also possible, to describe the characteristics and composi-tion of the train set accurately. This is done with train descripcomposi-tions.
Simple Train Descriptions
A simple train description consists of a list of engines and cars. This list may also in-clude vehicle groups, where other engines, cars or again vehicle groups are inin-cluded. For a simple train description it is also possible to specify, whether at least one vehicle or whether all vehicles in a train set must be included in this list. If a train consists of a single locomotive, this information plays no role. But when it comes to a train set, it can thus be determined, whether the train set may contain vehicles, which are not contained in the list, or whether all the vehicles in the train set must be covered by this list. If, for example, all train sets on the layout do not contain more than one engine, and the non-electrified branch line is only open for steam and diesel engines, then this can be covered with a simple train description, which contains only steam and diesel engines and which prescribes, that at least one of these vehicles must be included in the train set. Train sets with additional cars are then also covered by this description. For a train with an electric locomotive, but without steam and diesel engine on the other hand, the description does not apply.
If you want to create a train description for a train set with a certain diesel engine X with several cars of type Y, for example, which does not apply, when the diesel engine X pulls other cars than Y, then enter X and all cars of type Y to the train description and specify, that all vehicles of the train set must match the list.
The train description for the blocks of the non-electrified branch line can alternatively contain the group of all engines and an excluding entry for the group of all electric en-gines.
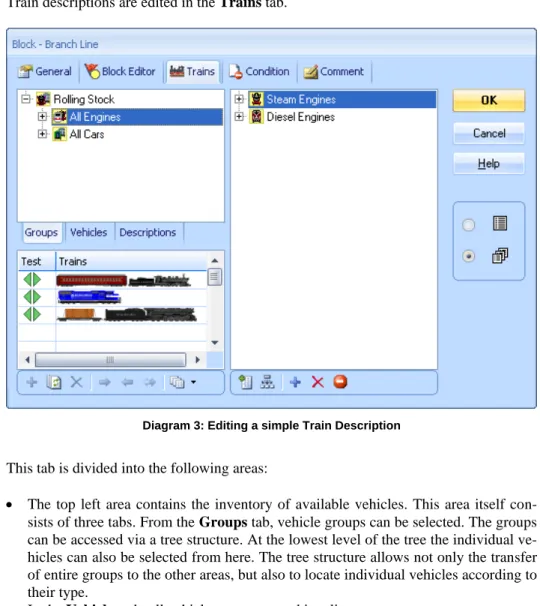
Train descriptions are edited in the Trains tab.
Diagram 3: Editing a simple Train Description
This tab is divided into the following areas:
• The top left area contains the inventory of available vehicles. This area itself con-sists of three tabs. From the Groups tab, vehicle groups can be selected. The groups can be accessed via a tree structure. At the lowest level of the tree the individual ve-hicles can also be selected from here. The tree structure allows not only the transfer of entire groups to the other areas, but also to locate individual vehicles according to their type.
In the Vehicles tab, all vehicles are presented in a list.
• The area to the right contains the vehicles and vehicle groups, which are assigned to the train description.
• In the lower left area it is possible to compose virtual train sets for testing purposes. Green and red markings indicate if the train description applies to this train or not. In this way, the validity of a train description can be tested very comfortable. Diagram 4 shows three train sets in the test area. The first train is a steam locomotive with a passenger car. The second train consists of a single diesel locomotive. The third train consists of a steam engine with a freight car. The train description prescribes that every train must have at least a steam or diesel locomotive. Since this is valid for all three train sets, everywhere green markers appear.
Train Descriptions as independent Objects
Train descriptions can also be created as independent objects, if for some reason the same train description is to be used several times. In order to assign the steam and diesel locomotives to all blocks of the branch line, a simple train description, which contains the steam and diesel locomotives, is created first as an independent object. Then in the settings of the blocks this separate train description is entered. If this description is changed at a later time, then this change automatically affects all blocks in which this train description has been used.
Train descriptions, that are created as separate objects, offer additional possibilities to specify the following characteristics of the affected trains:
• the minimum and maximum length • the minimum and maximum weight • the range for the current speed of trains
This allows for example to selectively enable or disable certain blocks for trains that fall below or exceed a predetermined length.
It is also conceivable to create a train description for heavy freight trains by specifying a minimum weight. By assigning this train description to an action marker, which in turn belongs to a block in a slope, heavy trains can then prototypically decelerate in this slop. This also functions adequately if the arrangement of a train set is not changed, but its weight is changed by the operations for loading and unloading.
Furthermore, specific actions can be triggered when a passing train falls below or ex-ceeds a certain speed range.
Conditional Train Descriptions
For train descriptions, that are created as separate objects (see previous section), a con-dition can also be specified. If this concon-dition is not fulfilled, no train fits the train de-scription. So even a train, that meets all other criteria of the train description, will not fit the train description, if the condition is not satisfied.
In this way it is for example possible, to disable or enable certain blocks, routes, etc. for specific trains with a condition. Assume separate train descriptions for freight and pas-senger trains. Assume furthermore, that a certain toggle switch in the switchboard is contained in the conditions of the train description for freight trains. If both train de-scriptions are assigned to a block, then the block can be either enabled for passenger trains only or for both types of trains. This depends on the position of the toggle switch. This results in additional interesting opportunities to intervene in the ongoing operation of the layout.
Extended Train Descriptions
In the Train tab it is also possible to specify, whether the train description is a simple description, as described in the previous section, or whether it is extended train descrip-tion, which offers further possibilities discussed in this section.
Extended train descriptions are e.g. used to specify references to separately created train descriptions as described above. In the example of the previous section, the separately created train description is assigned to a block by activating the extended train descrip-tion in the Train tab of the block first and then entering the reference to the external train description.
Extended train descriptions also allow you to determine the arrangement of train sets to the last detail.
If train sets are not used on a layout or not modified during the operation, then all nec-essary requirements are already met by the simple train descriptions outlined above. A study of possibilities explained below is then not required.
An extended train description consists of one or several lines. Each of these lines repre-sents a pattern for the composition of a train set. This pattern in turn consists of a string of positions, which represents the string of vehicles in the train set. Each position in a pattern is in turn associated with a list of vehicles (consisting of locomotives, cars or vehicle groups) and the number of times the specified vehicles will occur at that posi-tion.
It is also possible, to enter the reference to a separately created train description in one line of a train description instead of a pattern string. Hence a train description is a col-lection of patterns and references to other train descriptions.
If a train description includes more than one line, then the whole train description matches a train, if at least one row fits this train.
Extended train descriptions are also edited in the Trains tab. After switching to an ex-tended description the tab has the following structure:
Diagram 4: Editing an extended Train Description
This tab is divided into four areas:
• The top left area contains the inventory of available vehicles. This area itself con-sists of three tabs. From the Groups tab, vehicle groups can be selected. In the Ve-hicles tab, all vehicles are presented in a list.
• To enter an item from this area in another area, select it here and click the option to add it in the target area, or drag the symbol with the mouse there.
• The upper right area contains the vehicles and vehicle groups, which are assigned to one position of the extended train description.
• The lower right contains the individual lines of the train description. If a position is selected in a line of this description, then the vehicles belonging to this position are listed above.
• In the lower left area it is possible to compose virtual train sets for testing purposes. Green and red markings indicate if the train description applies to this train or not. In this way, the validity of a train description can be tested very comfortable. Only the pure train compositions are tested here; train lengths and weights remain disregarded.
After this survey the features will now be discussed in more detail.
The individual positions of a train are depicted by a symbol, which includes a picture of a vehicle as well as a number indication.
The train description in the above diagram contains two lines. The first line consists of two positions, the second entry of three positions. The lines are read from right to left in each case, and the rightmost position corresponds to the head of the train set as seen in the forward direction of travel.
In the above example the front, rightmost position of the first line is selected. The list of vehicles belonging to this position consists of the predefined vehicle group of all steam locomotives.
The image in a position always tries to represent the vehicles contained in the associat-ed list. The software always tries to find a symbol for each position, which reflects the contents of this position as accurately as possible. If a predefined vehicle group is used, then one of the images displayed in the following table is used.
Symbol Predefined Vehicle Group All Steam Engines All Diesel Engines All Electric Engines All Engines All Freight Cars All Passenger Cars All Cars
All Vehicles
Table 2: Symbols for predefined Vehicle Groups used in Train descriptions
If individual vehicles or self-defined vehicle groups are used instead of predefined ve-hicle groups, then the program will show the picture of any assigned veve-hicle. This is e.g. the case at the rightmost position of the second line in the above diagram. Here a locomotive with the symbol has been assigned.
The numbers displayed at a position indicate how often you want the associated vehi-cles to appear at the corresponding position.
Symbol Meaning
Exactly 1 steam engine
At least 1 and at most 3 diesel engines Exactly 5 cars
At least 2 freight cars At most 5 passenger cars (no passenger cars possible, too) Any number of vehicles (no vehicle possible, too)
Table 3: Numerical Data in Train Descriptions
From the positions the descriptions of matching train sets are composed:
Symbol Meaning
Passenger train with 1 engine and at least 1 passenger car
Freight train with 1 or 2 diesel engines Arbitrary train pulled by electric engines Freight train with double heading and helper
Train with 2 steam engines but without cars
Table 4: Sample Train Descriptions
At the bottom left of the Trains tab virtual train sets are assembled to see if the created train descriptions fit as desired or not on certain trains.
A green check mark indicates, that the description fits to the train concerned, while a red marker indicates that the description does not fit. A green-white flag indicates that one of the lines of the description fits on the train, but that line is different from the
cur-rently selected line in the right pane. With the help of the different green markers it can be determined, if necessary, which line in particular fits on a train.
In Diagram 4 in the test area, three train sets were arranged. The first train is a steam locomotive with two freight cars. This description fits exactly on the first line of the train description. Since this line is currently selected, a green marker appears.
The second train being tested is a single steam locomotive. The description always re-quires at least one car. Therefore, here a red mark appears.
The third train matches the second line of the train description. This line contains pas-senger cars in the center position, but because the minimum number of paspas-senger cars at this position is 0 and therefore passenger cars may be missing, the entry fits on this train.
Directional Train Descriptions
Very advanced users also have the following options:
• By default, all lines of a train description are not directional. This means the direc-tion of travel of the train in quesdirec-tion does not matter, i.e. whether the locomotive pulls or pushes the train. It does not matter whether a train matches the positions of the entry from right to left or from left to right. If you want to distinguish this as well, so there is the possibility to define the train description as directional. A direc-tional train description considers the positions of the vehicles in a train set only in the order of the positions shown on the screen. With directional train description pulled and pushed trains can be distinguished. This direction specification is only evaluated when the train actually moves. A directional train description does not fit on a train, when the train is moving in the wrong direction. For a stopped train, it does not matter whether the train description is directional or not. It is enough if it applies to one of two possible directions.
• By default, all positions within a line of a train description are not directional. It does not matter whether the locomotive operates the train with the funnel or the ten-der first. If you want to distinguish this, too, then you can set each position individ-ually as well as forwards or backwards. Using this information it is for example possible to specify that a train description applies only to a train if it is pulled by a steam locomotive with funnel ahead. If a train set includes directional positions, then the orientation of the individual vehicles also plays a role in a stopped train. The colored markers in the test window consist of arrowheads, which represent the
tion both markers always show the same color, because the direction is of no im-portance here. With a directional train description you can use this to check whether the relation to the direction has been set correctly.
In a non-directional line of a train description the icon is displayed on the left side of the line. When this icon is clicked with the mouse, the order of the positions of this line is reversed. This does not change the effect of the train description, however.
In a directional line of a train description the icon is displayed on the left side of the line. When this icon is clicked with the mouse, the order of the positions of this line is reversed. This also changes the effect of the train description for running trains. For directional train descriptions the direction of the train plays only a role when the train actually moves.
If individual positions within the train description are directional, then the orientation of the vehicles within the train set is also effective when the train stops.
Note that extended train descriptions are only needed in very specific cases. In the ma-jority of cases it is sufficient to use simple train descriptions, which are also much easi-er to set up.
14
Extended Control and Monitoring Functions
14.3
Protection and Locking with Conditions
Combined Groups
Using numerical or logical groups in conditions or triggers it can e.g. be checked whether any train is currently in a block, but it is not possible to determine which train it is. This is made possible in TrainController™ Gold with COMBI groups.
A COMBI group consists of a list of blocks, routes or schedules and is always associat-ed with a train description (see section 11.3, “Approvassociat-ed Trains”)).
With COMBI groups it can be checked whether certain trains are in certain blocks, whether certain sections (blocks or routes) are reserved for those trains and / or whether certain schedules are executed with these trains. It can also be determined whether cer-tain sections are being used by cercer-tain schedules.
• A COMBI group satisfies the condition, when a train for which the train description of the COMBI group applies, reserves at least one of the specified sections (blocks or routes), and when this train is controlled by one of the specified schedules. A COMBI group applies to a train when the train description, that is associated with the COMBI group, applies on the train.
• If no block and route is specified, then the COMBI group meets the condition if a train to which the COMBI-group applies, is controlled by one of the specified schedules.
• If no schedule is entered, then the COMBI group meets the condition if a train to which the COMBI-group applies, reserves at least one of the specified sections (blocks or routes).
• If no train description was given, then the COMBI group applies to all trains. In this case the COMBI group meets the condition, if at least one of the specified sections will be used by at least one of the specified schedules.
• For a block it is additionally possible to specify whether the block needs to be the current block of the corresponding train or whether it is sufficient when the block is reserved, but not the current block.
This may sound more complicated than it actually is. The following examples help you to understand:
Examples:
• A COMBI group, that is valid for freight trains and which contains the block “Main-line East” and the schedule “Local Freight”, meets the condition, if a freight train is located in block “Mainline East” and
• A COMBI group, that is valid for the engine “Big Boy” and which contains the block “Northville Branch” as reserved block, meets the condition, if the “Big Boy” reserves the block “Northville Branch”.
if this train is currently executing the schedule “Local Freight”.
• A COMBI group, that is valid for the car “Passenger Car” and the schedule “Rheingold”, meets the condition, if “Passenger Car” is currently executing the schedule “Rheingold”.
• A COMBI group, that contains the route “Southtown Branch” and the schedule “Southtown - Northville”, meets the condition, if the route is reserved by a train, which is currently executing the schedule “Southtown - Northville”.
The following features and limitations apply to COMBI-groups:
• COMBI-groups can be included in other groups (such as AND-groups or OR-groups). COMBI-groups are the only type of groups, which are associated with train descriptions. In addition to the associated train description COMBI-groups may only contain blocks, routes or schedules. Other entries, including other logical groups, contained in COMBI-groups are ignored.
14.4
Operations
A specialty known from Version 7 is the assignment of operations to routes. Turnouts, signals and other objects that are contained in the operations of the route can be locked together with the route until the route is deactivated. As long as they are locked with the route the affected objects cannot change their state or be used in other routes. Locked objects are thus also treated as turnouts, which lie on the path of the route.
TrainController™ 8Gold provides the additional option to set other objects via op-erations of a route in a protective position, which yet allows the use of the objects in other routes. The safety position remains active until the route will be deactivated. Ob-jects cannot change their state, but they can be used in other routes, provided that the