SG
™
Appliance
Volume 2: Proxies and Proxy Services
Contact Information
Blue Coat Systems Inc.420 North Mary Ave Sunnyvale, CA 94085-4121
http://www.bluecoat.com/support/contact.html bcs.info@bluecoat.com
http://www.bluecoat.com
For concerns or feedback about the documentation: documentation@bluecoat.com
Copyright© 1999-2007 Blue Coat Systems, Inc. All rights reserved worldwide. No part of this document may be reproduced by any means nor modified, decompiled, disassembled, published or distributed, in whole or in part, or translated to any electronic medium or other means without the written consent of Blue Coat Systems, Inc. All right, title and interest in and to the Software and documentation are and shall remain the exclusive property of Blue Coat Systems, Inc. and its licensors. ProxyAV™, CacheOS™, SGOS™, SG™, Spyware Interceptor™, Scope™, RA Connector™, RA Manager™, Remote Access™ and MACH5™ are trademarks of Blue Coat Systems, Inc. and CacheFlow®, Blue Coat®, Accelerating The Internet®, ProxySG®, WinProxy®, AccessNow®, Ositis®, Powering Internet Management®, The Ultimate Internet Sharing Solution®, Cerberian®, Permeo®, Permeo Technologies, Inc.®, and the Cerberian and Permeo logos are registered trademarks of Blue Coat Systems, Inc. All other trademarks contained in this document and in the Software are the property of their respective owners.
BLUE COAT SYSTEMS, INC. DISCLAIMS ALL WARRANTIES, CONDITIONS OR OTHER TERMS, EXPRESS OR IMPLIED, STATUTORY OR OTHERWISE, ON SOFTWARE AND DOCUMENTATION FURNISHED HEREUNDER INCLUDING WITHOUT LIMITATION THE WARRANTIES OF DESIGN, MERCHANTABILITY OR FITNESS FOR A PARTICULAR PURPOSE AND NONINFRINGEMENT. IN NO EVENT SHALL BLUE COAT SYSTEMS, INC., ITS SUPPLIERS OR ITS LICENSORS BE LIABLE FOR ANY DAMAGES, WHETHER ARISING IN TORT, CONTRACT OR ANY OTHER LEGAL THEORY EVEN IF BLUE COAT SYSTEMS, INC. HAS BEEN ADVISED OF THE POSSIBILITY OF SUCH DAMAGES.
Document Number: 231-02839
Contact Information
Chapter 1: About Proxies and Proxy Services
Creating or Enabling a Proxy Service...9
Configuring Proxies ...10
About This Book ...10
Document Conventions...10
About Procedures...11
Illustrations ...11
Chapter 2: About Console Services About Console Services ...13
Notes on Managing the HTTP Console ...15
Managing the HTTPS Console (Secure Console)...15
Selecting a Keyring ...15
Selecting an IP Address...16
Enabling the HTTPS Console Service ...16
Managing the SSH Console ...17
Managing the SSH Host ...18
Managing SSH Client Keys...18
Notes on Managing the Telnet Console ...21
Chapter 3: About Proxy Services About Proxy Listeners ...23
Section A: Proxy Services About Multiple Listeners ...26
About Service Attributes ...27
About Access Logging with Proxy Services...28
Creating or Editing a Proxy Service...28
Viewing Proxy Services ...30
Section B: Bypass List Adding Static Bypass Entries...31
Using Policy to Configure Dynamic Bypass ...32
Notes ...32
Configuring Dynamic Bypass ...33
Section D: Configuring General Options for Proxy Services
Trusting the Destination IP Address Provided by the Client... 37
Enabling the SG Appliance to Trust the Client-Provided Destination IP Address ... 37
Tip ... 38
Managing User Limits ... 38
Determining Behavior if User Limits are Exceeded ... 39
Setting User Limits Notifications... 39
Viewing Concurrent Users ... 41
Configuring General Options... 41
Chapter 4: Managing the CIFS Proxy About CIFS... 43
About the Blue Coat CIFS Proxy Solution... 43
Caching Behavior... 44
Authentication... 44
Policy Support ... 45
Access Logging... 45
WCCP Support ... 45
Configuring the SG CIFS Proxy ... 45
About Windows Security Signatures... 45
Configuring CIFS Proxy Services ... 47
Configuring the CIFS Proxy ... 49
Enabling CIFS Access Logging ... 50
Reviewing CIFS Protocol Statistics... 51
Reference: Equivalent CIFS Proxy CLI Commands... 53
Reference: Access Log Fields... 54
Reference: CPL Triggers, Properties, and Actions ... 57
Triggers... 57
Properties and Actions:... 57
Chapter 5: Managing the DNS Proxy Creating or Editing a DNS Proxy Service... 59
Creating a Resolving Name List ... 61
Chapter 6: Managing the Endpoint Mapper and MAPI Proxies Section A: The Endpoint Mapper Proxy Service About RPC ... 64
About the Blue Coat Endpoint Mapper Proxy Solution... 64
Policy Support ... 65
Access Logging... 65
Configuring the SG Appliance Endpoint Mapper Service ... 65
Reviewing Endpoint Mapper Proxy Statistics ... 67
Reference: Equivalent Endpoint Mapper Proxy CLI Commands... 67
Reference: CPL Triggers, Properties, and Actions ... 68
TCP Tunneling Triggers... 69
Properties and Actions... 69
Section B: The MAPI Proxy About MAPI... 70
About the Blue Coat MAPI Solution ... 70
Batching... 71
Keep-Alive ... 71
Supported Servers... 72
Access Logging... 72
More Conceptual Reference ... 72
Configuring the SG MAPI Proxy ... 72
About the MAPI Service ... 72
Configuring the MAPI Proxy ... 72
Reviewing MAPI Statistics ... 73
Reference: Equivalent MAPI Proxy CLI Commands... 74
Reference: Access Log Fields... 74
Chapter 7: Managing the FTP Proxy Understanding FTP... 77
Passive Mode Data Connections ... 77
Understanding IP Reflection for FTP... 78
Configuring the SG Appliance for Native FTP Proxy ... 79
Creating or Editing the FTP Service... 79
Configuring the FTP Proxy ... 81
Configuring FTP Clients ... 82
Configuring FTP Connection Welcome Banners... 83
Viewing FTP Statistics ... 84
Chapter 8: Managing the HTTP Proxy Section A: Creating an HTTP Proxy Service Section B: Overview: Configuring HTTP Proxy Performance Understanding Default HTTP Proxy Policy ... 91
HTTP Proxy Acceleration Profiles... 91
Byte-Range Support... 91
Refresh Bandwidth ... 92
Section C: Configuring the HTTP Proxy Setting Default HTTP Proxy Policy ... 94
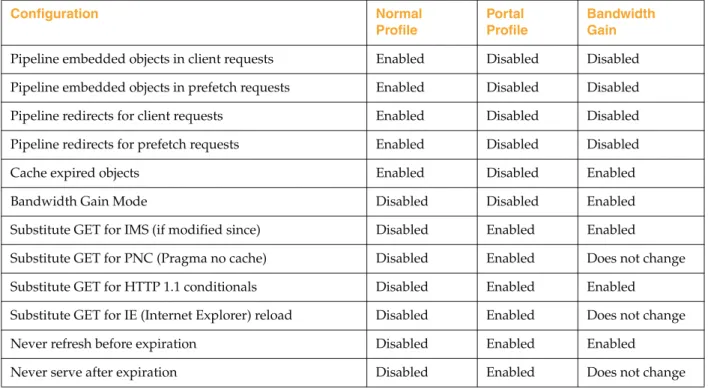
Customizing the HTTP Proxy Profile ... 96
Using the Normal Profile... 97
Using the Portal Profile... 97
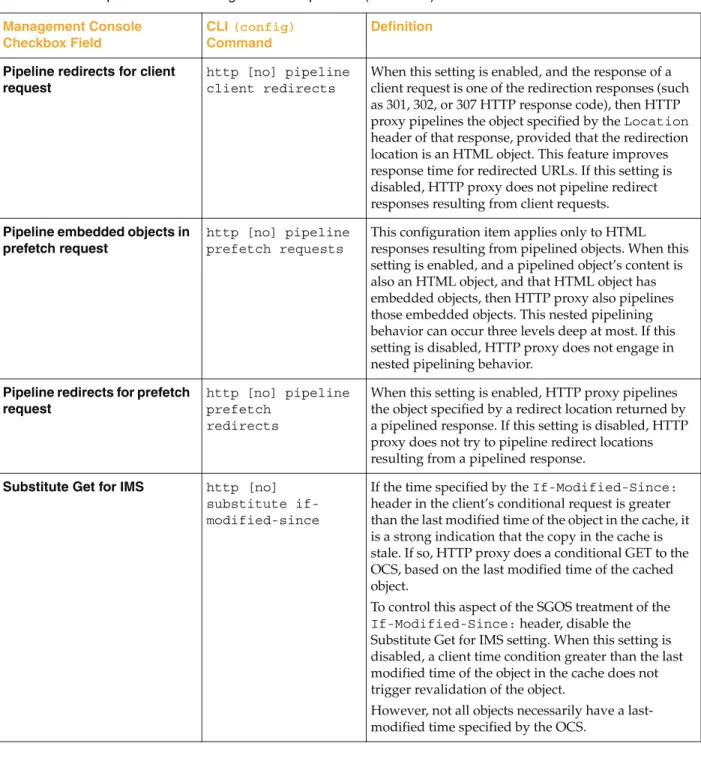
Understanding HTTP Proxy Profile Configuration Components ... 97
Configuring the HTTP Proxy Profile ... 100
Configuring HTTP for Bandwidth Gain... 101
Understanding Byte-Range Support... 102
Understanding Revalidate Pragma-No-Cache... 103
Configuring Refresh Bandwidth for the HTTP Proxy... 103
Understanding Tolerant HTTP Request Parsing... 104
Proxy Edition Behavior ... 104
Understanding HTTP Object Types ... 105
Section D: Viewing HTTP/FTP Statistics HTTP/FTP History Statistics ... 106
Section E: Using Explicit HTTP Proxy with Internet Explorer Disabling the Proxy-Support Header... 110
Using Web FTP... 111
Chapter 9: Creating and Editing an HTTPS Reverse Proxy Service Section A: Configuring the HTTPS Reverse Proxy Section B: Configuring HTTP or HTTPS Origination to the Origin Content Server Creating Policy for HTTP and HTTPS Origination ... 127
Chapter 10: Managing Shell Proxies Customizing Policy Settings for Shell Proxies ... 129
Conditions... 130
Properties ... 130
Actions... 130
Boundary Conditions for Shell Proxies ... 130
Understanding Telnet Shell Proxies... 131
Shell History Statistics ... 135
Viewing Shell History Statistics... 136
Chapter 11: Managing a SOCKS Proxy Creating or Editing a SOCKS Proxy Service ... 137
Configuring the SOCKS Proxy... 139
Using Policy to Control the SOCKS Proxy ... 140
Using the Permeo PA SOCKS Client with the Blue Coat SOCKS Server ... 140
Viewing SOCKS History Statistics ... 142
Viewing SOCKS Clients... 142
Viewing SOCKS Connections ... 143
Viewing SOCKS Client and Server Compression Gain Statistics ... 143
Chapter 12: Managing the SSL Proxy Understanding the SSL Proxy ... 145
Managing Decrypted Traffic ... 146
Section A: Intercepting HTTPS Traffic
Setting Up the SSL Proxy in Transparent Proxy Mode ... 148
Setting Up the SSL Proxy in Explicit Proxy Mode ... 151
Creating an Issuer Keyring for SSL Interception ... 151
Using Client Consent Certificates... 152
Downloading an Issuer Certificate... 152
Section B: Configuring SSL Rules through Policy Using the SSL Intercept Layer... 156
Using the SSL Access Layer... 157
CPL in the SSL Intercept Layer ... 159
CPL in the SSL Layer ... 160
Notes ... 161
Section C: Viewing SSL Statistics SSL History Statistics ... 162
Unintercepted SSL Data... 162
Unintercepted SSL Clients... 163
Unintercepted SSL Bytes... 163
Section D: Advanced Topics Creating an Intermediate CA using OpenSSL ... 165
Installing OpenSSL ... 165
Creating a Root Certificate ... 165
Modifying the OpenSSL.cnf File... 166
Signing the SG CSR... 166
Importing the Certificate into the SG Appliance... 167
Creating an Intermediate CA using Microsoft Server 2003 (Active Directory) ... 167
Chapter 13: Managing the TCP Tunneling Proxy TCP-Tunnel Proxy Services Supported ... 171
Creating or Editing a TCP-Tunnel Proxy Service... 171
Appendix A: Glossary Appendix B: Explicit and Transparent Proxy About the Explicit Proxy... 191
About the Transparent Proxy... 191
Creating an Explicit Proxy Server... 192
Using the SG Appliance as an Explicit Proxy... 192
Transparent Proxies ... 193
Configuring Transparent Proxy Hardware ... 193
Configuring a Layer-4 Switch ... 194
Configuring a WCCP-Capable Router... 195
Configuring IP Forwarding ... 195
A proxy filters traffic, monitors Internet and intranet resource usage, blocks specific Internet and intranet resources for individuals or groups, and enhances the quality of Internet or intranet user experiences.
A proxy serves as an intermediary between a Web client and a Web server and can require authentication to allow identity-based policy and logging for the client, as discussed in Volume 4: Securing the Blue Coat SG Appliance.
Proxies have two major components:
❐ The proxy service needs to be created or enabled and various attributes set, such as whether you want the proxy to use explicit or transparent mode
❐ The proxy itself needs to be configured to intercept the traffic desired. You can configure it in reverse or forward mode.
Creating or Enabling a Proxy Service
Services are created through the Configuration > Services menu. Blue Coat has two types of services: console services, used to communicate with the SG appliance, and proxy services, used to communicate with other systems.
Console services are discussed further in Chapter 2: "About Console Services" on page 13.
For a list of available proxy services and proxies, see Chapter 3: "About Proxy Services" on page 23.
One of the first decisions you make when configuring a proxy is whether the proxy or proxy service will use explicit or transparent attributes.
Explicit/Transparent proxy specifies the mode the client requests get to the proxy.
❐ Explicit—The default, requiring software configuration for both browser and service. This service attribute sends requests explicitly to a proxy instead of to the origin content servers.
❐ Transparent—Requires a bridge, such as that available in the SG appliance; a Layer-4 switch, or a WCCP-compliant router. You can also transparently redirect requests through an SG appliance by setting the workstation’s gateway to the appliance IP address. This service attribute sends requests to the proxy without the client or server being aware of it.
Some software configuration on the SG appliance is also required to allow the appliance to know what traffic to intercept.
You might configure both proxy types, depending on the services you require. For information on understanding explicit and transparent proxies and the configuration requirements, see Appendix B: "Explicit and Transparent Proxy" on page 191.
Configuring Proxies
After you have created or enabled the proxy services you need, the next step is to configure the proxy that will use that service. Some proxy services require little configuration; others, such as the SSL proxy, require configuration depending on what you want to do and also require policy to be configured to work effectively.
About This Book
This book deals with the following topics:
❐ Chapter 2: "About Console Services" on page 13
❐ Chapter 3: "About Proxy Services" on page 23
❐ Chapter 4: "Managing the CIFS Proxy" on page 43
❐ Chapter 5: "Managing the DNS Proxy" on page 59
❐ Chapter 6: "Managing the Endpoint Mapper and MAPI Proxies" on page 63
❐ Chapter 7: "Managing the FTP Proxy" on page 77
❐ Chapter 8: "Managing the HTTP Proxy" on page 85
❐ Chapter 9: "Creating and Editing an HTTPS Reverse Proxy Service" on page 121
❐ Chapter 10: "Managing Shell Proxies" on page 129
❐ Chapter 11: "Managing a SOCKS Proxy" on page 137
❐ Chapter 12: "Managing the SSL Proxy" on page 145
❐ Chapter 13: "Managing the TCP Tunneling Proxy" on page 171
❐ Appendix A: "Glossary" on page 175
❐ Appendix B: "Explicit and Transparent Proxy" on page 191
Document Conventions
The following table lists the typographical and Command Line Interface (CLI) syntax conventions used in this manual.
Table 1-1. Document Conventions
Conventions Definition
Italics The first use of a new or Blue Coat-proprietary term.
Courier font Command line text that appears on your administrator workstation.
Courier Italics A command line variable that is to be substituted with a literal name or value pertaining to the appropriate facet of your network system. Courier Boldface A Blue Coat literal to be entered as shown.
{ } One of the parameters enclosed within the braces must be supplied
[ ] An optional parameter or parameters.
| Either the parameter before or after the pipe character can or must be selected, but not both.
About Procedures
Many of the procedures in this volume begin:
❐ Select Configuration > Services, if you are working in the Management Console, or
❐ From the (config) prompt, if you are working in the command line interface (CLI). Blue Coat assumes that you already logged into the first page of the Management Console or entered into configuration mode in the CLI.
Illustrations
To save space, screen shots illustrating a procedure often have the bottom portion removed, along with the blank space.
Figure 1-1. Configuration > General Pane with Bottom Buttons
The SG appliance ships with four consoles designed to manage communication with the system:
❐ HTTP and HTTPS Consoles: These consoles are designed to allow you access to the Management Console. The HTTPS Console is created and enabled by default; the HTTP Console is created by default but not enabled because it is less secure than HTTPS.
❐ SSH Console: This console is created and enabled by default, allowing you access to the CLI using an SSH client.
❐ Telnet Console: This console not created because the passwords are sent
unencrypted from the client to the SG appliance. You must create and enable the console before you can access the appliance through a Telnet client (not
recommended).
About Console Services
Console services are used to manage the SG appliance. As such, bypass entries are ignored for connections to console services.
The basic procedure for creating or editing a console service is shown below.
To edit or create a console service:
1. Select Configuration > Services > Console Services.
Table 2-1. Console Services
Console Service Default Port Status Configuration Discussed
HTTP-Console 8081 Disabled “Notes on Managing the HTTP Console” on page 15.
HTTPS-Console 8082 Enabled “Managing the HTTPS Console (Secure Console)” on page 15.
SSH-Console 22 Enabled “Managing the SSH Console” on page 17.
Telnet-Console — Not Created “Notes on Managing the Telnet Console” on page 21.
2. To enable or disable a service, select or de-select the Enable checkbox.
3. To change other settings on a specific console, highlight the service and click Edit. 4. To create a new console service, click New.
a. Give the console service a name, using the Name field. b. Select the console that is used for this service.
c. Click New to view the New Listener dialog. A listener defines the fields where the console service will listen for traffic. <All> indicates the service listens on all addresses; IP address indicates that only destination addresses matching the IP address .Fill in the fields appropriate for your environment and the console service you want to create.
5. Click OK. 4a
4b
Relevant CLI Syntax to Create/Edit a Console Service: ❐ To enter configuration mode for the service:
SGOS(config) console-services
SGOS(config console-services) create {https-console | http-console |
ssh-console | telnet-console} console_name
SGOS(config console-services) edit console_name ❐ The following subcommands are available:
SGOS (config name) add {all | proxy-ip_address} port_number {enable |
disable}
SGOS (config console_name) disable {all | proxy-ip_address}
port_number
SGOS (config console_name) enable {all | proxy-ip_address} port_number
SGOS (config console_name) exit
SGOS (config console_name) remove{all | proxy-ip_address} port_number
SGOS (config console_name) view
Notes on Managing the HTTP Console
The default HTTP Console is already configured; you only need to enable it.
You can create and use more than one HTTP Console as long as the IP address and the port do not match the existing HTTP Console settings.
To create a new HTTP Console service or edit an existing one, see “About Console Services” on page 13.
Managing the HTTPS Console (Secure Console)
The HTTPS Console provides secure access to the Management Console through the HTTPS protocol.
You can create multiple management HTTPS consoles, allowing you to simultaneously access the Management Console using any IP address belonging to the SG appliance as well as any of the appliance’s virtual IP (VIP) addresses. The default is HTTPS over port 8082.
Creating a new HTTPS Console port requires three steps, discussed in the following sections:
❐ Selecting a keyring (a keypair and a certificate that are stored together)
❐ Selecting an IP address and port on the system that the service will use, including virtual IP addresses
❐ Enabling the HTTPS Console Service
Selecting a Keyring
The SG appliance ships with a default keyring that can be reused with each console that you create. You can also create your own keyrings.
To use the default keyring, accept the default keyring through the Management Console. If using the CLI, the default keyring is automatically used for each new HTTPS Console that is created.To use a different keyring you must edit the console service and select a new keyring using the attribute keyring command.
For information on creating a keypair and a certificate to make a keyring, see Chapter 9: "Creating and Editing an HTTPS Reverse Proxy Service" on page 121.
Selecting an IP Address
You can use any IP address on the SG appliance for the HTTPS Console service, including virtual IP addresses. To create a virtual IP address, refer to Volume 5: Advanced Networking.
Enabling the HTTPS Console Service
The final step in editing or creating an HTTPS Console service is to select a port and enable the service.
To create or edit an HTTPS Console port service:
1. Select Configuration > Services > Console Services. 2. Do one of the following:
• To create a new HTTPS Console service, see “About Console Services” on page 13. • To edit the configuration of an existing HTTPS Console service, highlight the
HTTPS Console and click Edit.
Note: When using certificates for the HTTPS Console or for HTTPS termination services that are issued by Certificate Signing Authorities that are not well-known, see Chapter 9: "Creating and Editing an HTTPS Reverse Proxy Service" on page 121.
If you get “host mismatch” errors or if the security certificate is called out as invalid, create a different certificate and use it for the HTTPS Console.
3. In the Keyring drop-down list, which displays a list of already-created keyrings on the system, select the keyring you want to use. The system ships with a default keyring that is reusable for each HTPPS service.
4. (Optional) Select the appropriate checkboxes to determine the SSL version used for this console.
5. Click New to add a new listener to the HTTPS console; click Edit to change the current settings.
The default IP address value is <All>. To limit the service to a specific IP address, select an IP address from the drop-down list that contains all IP addresses assigned to the SG appliance.
6. Identify the port you want this service to listen on. 7. Click OK.
Managing the SSH Console
By default, the SG appliance uses Secure Shell (SSH) and password authentication so administrators can access the CLI or Management Console securely. SSH is a protocol for secure remote logon over an insecure network. No action is required unless you want to change the existing SSH host key, disable a version of SSH, or import RSA host keys.
Note: Two keyrings: configuration-passwords-key keyring an application-key keyring cannot be used for console services.
3
4
To create a new SSH Console service or edit an existing one, see “About Console Services” on page 13.
Managing the SSH Host
You can manage the SSH host connection through either the Management Console or the CLI.
To manage the SSH host:
1. Select Configuration > Authentication > Console Access > SSH Host.
2. To delete either SSHv1 or SSHv2 support on the SG appliance, click the appropriate
Delete button.
The change is made on the appliance without confirmation. The SSH host tab redisplays with the designated host key deleted.
3. To add SSHv1 or SSHv2 support, select the Create checkbox for the version you want. 4. The SSH host key displays in the appropriate pane.
Managing SSH Client Keys
You can import multiple RSA client keys on the SG appliance to allow for actions such as logging on to the appliance from different hosts. An RSA client key can only be created by an SSH client and then imported onto the SG appliance. Many SSH clients are
commercially available for UNIX and Windows.
Once you create an RSA client key following the instructions of your SSH client, you can import the key onto the SG appliance using either the Management Console or the CLI. (For information on importing an RSA key, see“To import RSA client keys:” on page 19.)
Note: By default, SSHv2 is enabled and assigned to port 22. You do not need to create a new host key unless you want to change the existing configuration.
Understanding OpenSSH.pub Format
Blue Coat supports the OpenSSH.pub format. Keys created in other formats will not work. An OpenSSH.pub public key is similar to the following:
ssh-rsa AAAAB3NzaC1yc2EAAAABIwAAAIEAwFI78MKyvL8DrFgcVxpNRHMFKJrBMeBn 2PKcv5oAJ2qz+uZ7hiv7Zn43A6hXwY+DekhtNLOk3HCWmgsrDBE/NOOEnDpLQjBC6t/ T3cSQKZjh3NmBbpE4U49rPduiiufvWkuoEiHUb5ylzRGdXRSNJHxxmg5LiGEiKaoELJfsD Mc= user@machine
One of the public key format examples (this one created by the SSH client) is similar to the following:
BEGIN SSH2 PUBLIC KEY
----Comment: “[1024-bit rsa, user.name@machine, Wed Feb 19 2003 19:2\8:09]”
AAAAB3NzaC1yc2EAAAADAQABAAAAgQCw52JeWr6Fv4kLkzbPZePvapCpaTadPYQwqsGnCI Ydf1We7/8336EmzV918G1jbVT1SI1tM1Ku1BTal7uWAi+aUBGKLl YuyhCTo03
IZFMnsQC7QYzY1y3jufUP3H0be52fg7n7p7gNZR11yzWhVei1vIKiyVKpjqiq6hxCbMb2Q ==
END SSH2 PUBLIC KEY
----The OpenSSH.pub format appends a space and a user ID to the end of the client key. The user ID used for each key must be unique.
Other caveats:
❐ 1024 bits is the maximum supported key size.
❐ An ssh-rsa prefix must be present.
❐ Trailing newline characters must be removed from the key before it is imported.
To import RSA client keys:
1. From your SSH client, create a client key and copy it to the clipboard.
Note: The above step must be done with your SSH client. The SG appliance cannot create client keys.
2. Select Configuration > Authentication > Console Access > SSH Client.
4. Specify whether the client key is associated with an existing user or a new user, and enter the name.
5. Paste the RSA key that you previously created with an SSH client into the Client key
field. Ensure that a key ID is included at the end. Otherwise, the import fails. 6. Click OK.
The SSH Client tab reappears, with the fingerprint (a unique ID) of the imported key displayed.
7. Click Apply to commit the changes to the SG appliance.
Relevant CLI Syntax to Manage the SSH Host and Client SGOS (config) ssh-console
❐ The following subcommands are available:
SGOS (config ssh-console) create host-keypair {sshv1| sshv2 | <Enter>} SGOS (config ssh-console) delete {client-key username key_id | legacy-client-keykey_id | director-client-keykey_id | host-keypair {sshv1 |
sshv2 | <Enter>}}
SGOS (config ssh-console) inline {client-key <eof> | director-client-key <eof>}
SGOS (config ssh-console) view {client-key | director-client-key |
Notes on Managing the Telnet Console
The Telnet console allows you to connect to and manage the SG appliance using the Telnet protocol. Remember that Telnet is an insecure protocol and therefore should be used only in very secure environments. By default, the Telnet Console is not created. Blue Coat Systems recommends against using Telnet because of the security hole it creates.
By default a Telnet shell proxy service exists on the default Telnet port (23). Since only one service can use a specific port, you must delete the shell service if you want to create a Telnet console. Be sure to apply any changes before continuing. If you want a Telnet shell proxy service in addition to the Telnet console, you can re-create it later on a different port. For information on the Telnet service, see Chapter 10: "Managing Shell Proxies" on page 129.
To create a new Telnet console service or edit an existing one, see “About Console Services” on page 13.
Note: If you do enable the Telnet console, be aware that you cannot use Telnet everywhere in the CLI. Some modules, such as SSL, respond with the error message:
Telnet sessions are not allowed access to ssl commands.
Note: To use the Telnet shell proxy (to communicate with off-proxy systems) and
retain the Telnet Console, you must either change the Telnet shell proxy to use a transparent Destination IP address, or change the destination port on either the Telnet Console or Telnet shell proxy. Only one service is permitted on a port. For more information on the Telnet shell proxy, see Chapter 10: "Managing Shell Proxies" on page 129.
Proxy services define the ports and addresses where the SG appliance listens for incoming requests. A variety of attributes for each service can be defined. Each service can be applied to all IP addresses or limited to a specific set of addresses and port combinations. A number of default services are predefined. Additional services can be defined on other ports.
After setting up and enabling the proxy service, the next step is to configure the proxy for your environment. If necessary, you can configure bypass lists for transparent proxy environments. Alternatively, you can specify a list of systems that you do want
intercepted.
This chapter discusses:
❐ Section A: "Proxy Services" on page 24
❐ Section B: "Bypass List" on page 31
❐ Section C: "Using Restricted Intercept" on page 35
❐ Section D: "Configuring General Options for Proxy Services" on page 37
About Proxy Listeners
A proxy listener is the location where the SG appliance listens for traffic for a specific service. A proxy listener can be identified by any destination IP/subnet and port range, and multiple listeners can be added for each service.
Four settings are available (some settings are not available for some proxy listeners):
❐ <All>: All IP addresses are intercepted.
❐ <Transparent>: Only connections to destination addresses that do not belong to the SG appliance are intercepted
❐ <Explicit>: Only destinations addresses that match one of the IP addresses on the SG appliance are intercepted.
❐ Specific IP address or subnet: Only destination addresses matching the IP address and subnet are intercepted.
Note: A proxy listener should not be confused with the default proxy listener, a service that intercepts all traffic not otherwise intercepted by other listeners.
Section A: Proxy Services
Section A: Proxy Services
Defaults:
❐ Proxy Edition: Table 3-1, “Proxy Name and Listeners,” on page 24 lists the default SG appliance services and their default listeners. If you have an upgraded appliance, all services existing before the upgrade are preserved.
❐ MACH5 Edition:
• A transparent TCP tunnel connection listening on port 23 is created in place of the default Telnet service.
• Instant messaging, HTTPS reverse proxy, SOCKS, and Telnet services are not created on the MACH5 Edition SG appliance and are not included in trend data.
Note: Console services, used to manage the SG appliance, are not discussed in this chapter. For information about the four console services—HTTP, HTTPS, SSH, and Telnet—see Chapter 2: "About Console Services" on page 13.
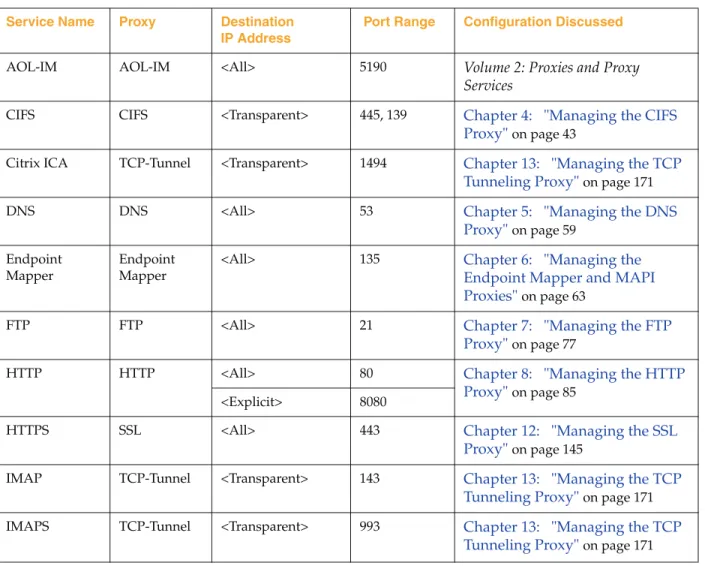
Table 3-1. Proxy Name and Listeners
Service Name Proxy Destination IP Address
Port Range Configuration Discussed
AOL-IM AOL-IM <All> 5190 Volume 2: Proxies and Proxy Services
CIFS CIFS <Transparent> 445, 139 Chapter 4: "Managing the CIFS Proxy" on page 43
Citrix ICA TCP-Tunnel <Transparent> 1494 Chapter 13: "Managing the TCP Tunneling Proxy" on page 171 DNS DNS <All> 53 Chapter 5: "Managing the DNS
Proxy" on page 59 Endpoint
Mapper
Endpoint Mapper
<All> 135 Chapter 6: "Managing the Endpoint Mapper and MAPI Proxies" on page 63
FTP FTP <All> 21 Chapter 7: "Managing the FTP Proxy" on page 77
HTTP HTTP <All> 80 Chapter 8: "Managing the HTTP Proxy" on page 85
<Explicit> 8080
HTTPS SSL <All> 443 Chapter 12: "Managing the SSL Proxy" on page 145
IMAP TCP-Tunnel <Transparent> 143 Chapter 13: "Managing the TCP Tunneling Proxy" on page 171 IMAPS TCP-Tunnel <Transparent> 993 Chapter 13: "Managing the TCP
Section A: Proxy Services
Kerberos TCP-Tunnel <Transparent> 88 Chapter 13: "Managing the TCP Tunneling Proxy" on page 171 LDAP TCP-Tunnel <Transparent> 389 Chapter 13: "Managing the TCP
Tunneling Proxy" on page 171 LPD TCP-Tunnel <Transparent> 515 Chapter 13: "Managing the TCP
Tunneling Proxy" on page 171 Lotus Notes TCP-Tunnel <Transparent> 1352 Chapter 13: "Managing the TCP
Tunneling Proxy" on page 171 MMS MMS <All> 1755 Volume 3: Web Communication
Proxies
MS SQL Server TCP-Tunnel <Transparent> 1433 Chapter 13: "Managing the TCP Tunneling Proxy" on page 171 MS Terminal
Services
TCP-Tunnel <Transparent> 3389 Chapter 13: "Managing the TCP Tunneling Proxy" on page 171 MSN-IM MSN-IM <All> 1863, 6891 Volume 3: Web Communication
Proxies
MySQL TCP-Tunnel <Transparent> 3306 Chapter 13: "Managing the TCP Tunneling Proxy" on page 171 NFS TCP-Tunnel <Transparent> 2049 Chapter 13: "Managing the TCP
Tunneling Proxy" on page 171 Novell
GroupWise
TCP-Tunnel <Transparent> 1677 Chapter 13: "Managing the TCP Tunneling Proxy" on page 171 Novell NCP TCP-Tunnel <Transparent> 524 Chapter 13: "Managing the TCP
Tunneling Proxy" on page 171 Oracle TCP-Tunnel <Transparent> 1521, 1525 Chapter 13: "Managing the TCP
Tunneling Proxy" on page 171 POP3 TCP-Tunnel <Transparent> 110 Chapter 13: "Managing the TCP
Tunneling Proxy" on page 171 POP3S TCP-Tunnel <Transparent> 995 Chapter 13: "Managing the TCP
Tunneling Proxy" on page 171 RTSP RTSP <All> 554 Volume 3: Web Communication
Proxies
Shell TCP-Tunnel <Transparent> 514 Chapter 10: "Managing Shell Proxies" on page 129
SMTP TCP-Tunnel <Transparent> 25 Chapter 13: "Managing the TCP Tunneling Proxy" on page 171
Table 3-1. Proxy Name and Listeners (Continued)
Service Name Proxy Destination IP Address
Section A: Proxy Services
The HTTPS Reverse Proxy service is also available but not created by default. When created, it defaults to an <Explicit> destination IP address on port 443. For information about configuring the HTTPS Reverse Proxy, see Chapter 9: "Creating and Editing an HTTPS Reverse Proxy Service" on page 121.
About Multiple Listeners
A listener identifies network traffic based on a destination IP address criterion, a destination port or port range and an action to perform on that traffic. Multiple listeners can be defined for a proxy service or console service. Each service has a set of default actions to apply to the traffic identified by the listeners it owns.
The destination IP address of a connection can match multiple proxy service listeners. Multiple matches are resolved using the most-specific match algorithm used by routing devices. A listener is more specific if it has a larger Destination IP subnet prefix. For example, the subnet 10.0.0.0/24 is more specific than 10.0.0.0/16, which is more specific than 10.0.0.0/8.
When a new connection is established, the SG appliance first finds the most specific listener Destination IP. If a match is found, and the destination Port also matches, the connection is then handled by that listener. If the destination Port of the listener with the most specific Destination IP does not match, the next most-specific Destination IP is found; this process continues until either a complete match is found or no more matching addresses are found.
For example, assume the following services were defined:
SOCKS <Explicit> 1080 Chapter 11: "Managing a SOCKS Proxy" on page 137
SSH TCP-Tunnel <Transparent> 22 Chapter 13: "Managing the TCP Tunneling Proxy" on page 171 Sybase SQL TCP-Tunnel <Transparent> 1498 Chapter 13: "Managing the TCP
Tunneling Proxy" on page 171 Telnet Telnet <All> 23 Chapter 10: "Managing Shell
Proxies" on page 129
VNC TCP-Tunnel <Transparent> 5900 Chapter 13: "Managing the TCP Tunneling Proxy" on page 171 XWindows TCP-Tunnel <Transparent> 6000-6002 Chapter 13: "Managing the TCP
Tunneling Proxy" on page 171 Yahoo-IM Yahoo-IM <All> 5050, 5101 Volume 3: Web Communication
Proxies
Default (Listens on all
unattended ports)
TCP-Tunnel <Transparent> <All> Chapter 13: "Managing the TCP Tunneling Proxy" on page 171
Table 3-1. Proxy Name and Listeners (Continued)
Service Name Proxy Destination IP Address
Section A: Proxy Services
An HTTP connection initiated to server 10.167.10.2 could match any of the three listeners in the above table. The most specific match algorithm finds that a listener in the New York CRM service is the most specific and since the destination port of the connection and the listener match, the connection is handled by this service.
The advantage of the most specific match algorithm becomes evident when at some later point another server is added in the New York Data Center subnet. If that server needs to be handled by a different service than the New York Data Center service, a new service with a listener specific to the new server would be added. The administrator does not need to be concerned about rule order in order to intercept traffic to this particular server using the new, most specific service listener.
About Service Attributes
The service attributes define the default parameters the SG appliance uses for a particular service.
The following table describes the attributes for a proxy service; however, depending on the protocol, not all attributes are available for each proxy type.
Table 3-2. Example Configuration for Most Specific Match Algorithm
Proxy Service Listener
Service Name Proxy Destination IP Address Port Range
New York Data Center HTTP 10.167.10.0/24 80
New York CRM HTTP 10.167.10.2/32 80
HTTP Service HTTP <Transparent> 80
Table 3-3. Service Attributes
Attribute Description
Authenticate-401 All transparent and explicit requests received on the port always use transparent authentication (cookie or IP, depending on the configuration). This is especially useful to force transparent proxy authentication in some proxy-chaining scenarios.
CA-Cert List CA Certificate List used for verifying client certificates.
Detect Protocol Detects the protocol being used. Protocols that can be detected include:
HTTP, P2P (eDonkey, BitTorrent, FastTrack, Gnutella), SSL, and Endpoint Mapper. Early Intercept Controls whether the proxy responds to client TCP connection requests before
connecting to the upstream server. When early intercept is disabled, the proxy delays responding to the client until after it has attempted to contact the server. If you enable the Detect Protocol attribute, the Early Intercept attribute is selected automatically. Use ADN Controls whether ADN is enabled for a specific service. Enabling ADN does not
guarantee the connections are accelerated by ADN. The actual enable decision is determined by ADN routing (for explicit deployment) and network setup (for transparent deployment).
Section A: Proxy Services
About Access Logging with Proxy Services
The access log has one field that contains the service name.
❐ x-service-name (ELFF token) service.name (CPL token) The name of the service used to intercept this connection.
Creating or Editing a Proxy Service
The basic procedure for creating or editing a proxy service is shown below. For additional information about managing a specific proxy, including the proxy service and the proxy configuration, see:
❐ Chapter 4: "Managing the CIFS Proxy" on page 43
❐ Chapter 5: "Managing the DNS Proxy" on page 59
❐ Chapter 6: "Managing the Endpoint Mapper and MAPI Proxies" on page 63
❐ Chapter 7: "Managing the FTP Proxy" on page 77
❐ Chapter 8: "Managing the HTTP Proxy" on page 85
❐ Chapter 9: "Creating and Editing an HTTPS Reverse Proxy Service" on page 121
❐ Chapter 10: "Managing Shell Proxies" on page 129
❐ Chapter 11: "Managing a SOCKS Proxy" on page 137
❐ Chapter 12: "Managing the SSL Proxy" on page 145
Forward Client Cert When used with the verify-client attribute, puts the extracted client certificate information into a header that is included in the request when it is forwarded to the OCS. The name of the header is Client-Cert. The header contains the certificate serial number, subject, validity dates and issuer (all as name=value pairs). The actual certificate itself is not forwarded.
Optimize Bandwidth Controls whether to optimize bandwidth usage when connecting upstream using an ADN tunnel.
Reflect Client IP Enables the sending of the client's IP address instead of the SG appliance's IP address to the upstream server. If you are using an Application Delivery Network (ADN), this setting is enforced on the concentrator proxy through the Configuration > App. Delivery Network > Tunneling tab. For more information, refer to Volume 5: Advanced Networking.
SSL Versions Allows you to select which versions of SSL you want to support. The default is to support SSL v2, v3, and TLS. This attribute is available for HTTPS Reverse Proxy. Verify Client Requests and validates the SSL client certificate. This attribute is available for HTTPS
Reverse Proxy.
Table 3-3. Service Attributes (Continued)
Attribute Description
Note: The x-service-name field replaces the s-sitename field. The s-sitename field
can still be used for backward compatibility with squid log formats, but it has no CPL equivalent.
Section A: Proxy Services
❐ Chapter 13: "Managing the TCP Tunneling Proxy" on page 171
To edit or create a proxy service:
1. Click Configuration > Services > Proxy Services.
2. To edit a specific proxy service, highlight the service and click Edit. 3. To create a new proxy service, click New.
Note: If you only want to change the proxy’s behavior from bypass (the default) to intercept, go to the Action column of the Proxy Services pane, select the service whose behavior you want to change, and Click Intercept from the drop-down list. You do not need to enter New/Edit mode to change this setting.
4 5 6 7 8 9 10
Section A: Proxy Services
4. In the Name field, choose a meaningful name for the new proxy service.
5. In the Proxy Settings field, select the type of proxy service. The settings below the Proxy field change depending on the kind of proxy you select. (This example is using the TCP-Tunnel proxy.)
6. Enable or clear the check boxes, as appropriate, for the service being set up. (For information about the various attributes, see Table 3-3, “Service Attributes,” on page 27.)
7. To create a new listener, click New.
8. Click a Destination IP address from the radio buttons.
9. In the Port Range field, enter the ports on which the service should listen. The default ports for each service are discussed in the chapter for each proxy.
10. Select the default action for the service: Bypass tells the service to ignore any traffic matching this listener. Intercept configures the service to intercept and proxy the associated traffic.
11. Click OK; click Apply.
Relevant CLI Syntax to Create/Edit a Proxy Service: ❐ To enter configuration mode for the service:
SGOS#(config) proxy-services
SGOS#(config proxy-services) create service-type service-name
SGOS#(config proxy-services) edit service-name ❐ The following subcommands are available:
SGOS#(config service-name) add {transparent | explicit | all |
ip_address | ip_address/subnet-mask} {port | first_port-last_port} [intercept | bypass]
SGOS#(config service-name) attribute {authenticate-401 | adn-optimize
| ccl | cipher-suite | detect-protocol | early-intercept | forward-client-cert | keyring | reflect-client-ip | ssl-versions | use-adn |
verify-client}
SGOS#(config service-name) bypass {transparent | explicit | all |
ip_address | ip_address/subnet-mask} {port | first_port-last_port} SGOS#(config service-name) intercept {transparent | explicit | all |
ip_address | ip_address/subnet-mask} {port | first_port-last_port} SGOS#(config service-name) remove {transparent | explicit | all |
ip_address | ip_address/subnet-mask} {port | first_port-last_port}
Viewing Proxy Services
The Proxy Services pane in the Configuration > Services tab contains the list of all services created on the appliance. You can sort the list several ways:
❐ Using the Display Filter at the top of the pane. The drop-down list contains the various proxy names and the bypass/intercept actions. You can select the item you want to filter on.
❐ Clicking the appropriate column title at the top of the table to sort on the column you want.
Section B: Bypass List
Section B: Bypass List
The bypass list contains IP addresses/subnet masks of client and server workstations. Used only in a transparent proxy environment, the bypass list allows the SG appliance to skip processing requests sent from specific clients to specific servers. The list allows traffic between protocol incompliant clients and servers to pass through the SG appliance without a disruption in service.
Adding Static Bypass Entries
You can add entries to prevent the requests from specified systems from being intercepted by the SG appliance.
1. Click Configuration > Services > Proxy Services > Bypass List.
2. Click New to create a new list entry; click Edit to modify a list entry.
3. Fill in the fields:
a. Select a source IP address from the drop-down list or choose <All>. Add the subnet mask.
b. Select a destination IP address from the drop-down list or choose <All>. Add the subnet mask.
4. Click OK; click Apply.
Relevant CLI Syntax to Manage Static Bypass Entries ❐ To configure the service:
SGOS#(config) proxy-services
SGOS#(config proxy-services) static-bypass
❐ The following subcommands are available:
Note: This prevents the appliance from enforcing any policy on these requests and disables any caching of the corresponding responses. Because bypass entries bypass Blue Coat policy, use bypass sparingly and only for specific situations.
Note: Dynamic bypass cannot be configured through the Management Console. It can only be configured through policy or the CLI. For more information, see “ Using Policy to Configure Dynamic Bypass” on page 32.
Section B: Bypass List
SGOS#(config static-bypass) add {all | client_ip_address |
client_ip_address/subnet-mask} {all | server_ip_address |
server_ip_address/subnet-mask}
SGOS#(config static-bypass) remove {all | client_ip_address |
client_ip_address/subnet-mask} {all | server_ip_address |
server_ip_address/subnet-mask}
SGOS#(config static-bypass) view {filter {* | all | client_ip_address
| client_ip_address/subnet-mask} {* | all | server_ip_address |
server_ip_address/subnet-mask} | <Enter>}
Using Policy to Configure Dynamic Bypass
Dynamic bypass, available through policy, can automatically compile a list of response URLs that return various kinds of errors.
Dynamic bypass keeps its own (dynamic) list of which connections to bypass, where connections are identified by both source and destination. Dynamic bypass can be based on any combination of policy triggers. In addition, some global settings can be used to selectively enable dynamic bypass based on specific HTTP response codes. After an entry exists in the dynamic bypass table for a specific source/destination IP pair, all connections from that source IP to that destination IP are bypassed in the same way as connections that match against the static bypass list.
For a configured period of time, further requests for the error-causing URLs are sent immediately to the origin content server (OCS), bypassing the SG appliance. The amount of time a dynamic bypass entry stays in the list and the types of errors that cause the SG appliance to add a site to the list, as well as several other settings, are configurable from the CLI.
Once the dynamic bypass timeout for a client and server IP address entry has ended, the SG appliance removes the entry from the bypass list. On the next client request for the client and server IP address, the SG appliance attempts to contact the OCS. If the OCS still returns an error, the entry is once again added to the local bypass list for the configured dynamic bypass timeout. If the entry does not return an error, the request is handled in the normal manner.
Notes
❐ Dynamic bypass entries are lost when the SG appliance is restarted.
❐ No policy enforcement occurs on client requests that match entries in the dynamic or static bypass list.
❐ If a site that requires forwarding policy to reach its destination is entered into the bypass list, the site is inaccessible.
Note: Because bypass entries bypass Blue Coat policy, the feature should be used sparingly and only for specific situations.
Section B: Bypass List
Configuring Dynamic Bypass
Dynamic bypass is disabled by default. Enabling and fine-tuning dynamic bypass is a two-step process:
❐ Set the desired dynamic bypass timeout and threshold parameters.
❐ Use policy (recommended) or the CLI to enable dynamic bypass and set the types of errors that cause dynamic bypass to add an entry to the bypass list.
Adding Dynamic Bypass Parameters to the Local Bypass List
The first step in configuring dynamic bypass is to set the server-threshold, max-entries, or timeout values.
❐ The server-threshold value defines the maximum number of client entries before the SG appliance consolidates client–server pair entries into a single server entry that then applies to all clients connecting to that server. The range is 1 to 256. The default is 16. When a consolidation occurs, the lifetime of the consolidated entry is set to the value of timeout.
❐ The max-entries defines the maximum number of total dynamic bypass entries. The range is 100 to 50,000. The default value is 10,000. When the number of entries exceeds the max-entries value, the oldest entry is replaced by the newest entry.
❐ The timeout value defines the number of minutes a dynamic bypass entry can remain unreferenced before it is deleted from the bypass list. The range is 1 to 86400. The default value is 60.
Enabling Dynamic Bypass and Specifying Triggers
Enabling dynamic bypass and specifying the types of errors that causes a URL to be added to the local bypass list are done with the CLI. You cannot use the Management Console.
Using policy to enable dynamic bypass and specify trigger events is better than using the CLI, because the CLI has only a limited set of responses. For information about available CLI triggers, refer to the Volume 11: Blue Coat SG Appliance Command Line Reference. For information about using policy to configure dynamic bypass, refer to the Volume 10: Blue Coat SG Appliance Content Policy Language Guide.
Bypassing Connection and Receiving Errors
In addition to setting HTTP code triggers, you can enable connection and receive errors for dynamic bypass.
If connect-error is enabled, any connection failure to the origin content server (OCS), including timeouts, inserts the OCS destination IP address into the dynamic bypass list. If receive-error is enabled, when the cache does not receive an HTTP response on a successful TCP connection to the OCS, the OCS destination IP address is inserted into the dynamic bypass list. Server timeouts can also trigger receive-error. The default timeout value is 180 seconds, which can be changed (refer to Volume 1: Getting Started).
Note: This step is optional because the SG appliance uses default configurations if you do not specify them. Use the default values unless you have specific reasons for changing them. Contact Blue Coat Technical Support for detailed advice on customizing these settings.
Section B: Bypass List
Related CLI Syntax to Enable Dynamic Bypass and Trigger Events ❐ To enter configuration mode for the service:
SGOS#(config) proxy-services
SGOS#(config proxy-services) dynamic-bypass
❐ The following subcommands are available:
SGOS#(config dynamic-bypass) {enable | disable} SGOS#(config dynamic-bypass) max-entries number
SGOS#(config dynamic-bypass) server-threshold number
SGOS#(config dynamic-bypass) trigger {all | connect-error | non-http |
receive-error | 400 | 403 | 405 | 406 | 500 | 502 | 503 | 504}
SGOS#(config dynamic-bypass) timeout minutes
#(config dynamic-bypass) no trigger {all | connect-error | non-http |
receive-error | 400 | 403 | 405 | 406 | 500 | 502 | 503 | 504}
SGOS#(config dynamic-bypass)clear
Section C: Using Restricted Intercept
Section C: Using Restricted Intercept
By default, all clients and servers evaluate the entries in Proxy Services (Configuration > Services > Proxy Services) where the decision is made to intercept or bypass a connection. To restrict or reduce the clients and servers that can be intercepted by proxy services, use the Restricted Intercept List. The Restricted Intercept List is useful in a rollout, prior to full production, where you only want to intercept a subset of the clients. After you are in full production mode, you can disable the Restricted Intercept List.
The Restricted Intercept List is also useful when troubleshooting an issue, because you can reduce the set of systems that are intercepted. If the restrict interception radio button (Configuration > Services > Proxy Services> Restricted Intercept List) is selected, any systems not on the list are bypassed.
If restricted intercept is disabled, the traffic behavior reverts to the previous behavior (before the Restricted Intercept List was enabled). If restricted intercept is enabled, traffic not in the list of systems is bypassed.
Note: An entry can exist in both the Static Bypass List and the Restricted Intercept List. However, the Static Bypass List overrides the entries in the Restricted Intercept List.
To configure a Restricted Intercept List:
1. Click Configuration > Services > Proxy Services > Restricted Intercept List.
2. Click Restrict Interception to the servers and clients listed below-- all other connections are bypassed.
Section C: Using Restricted Intercept
4. To select a specific client to be intercepted, click Client host or subnet and enter the IP Address and Subnet Mask. To select all clients using a specific server, click All clients, then enter the server IP Address and Subnet Mask in the Server address section. 5. Click OK.
6. Click Apply to commit the changes to the SG appliance.
Related CLI Syntax to Configure Restricted Intercept Lists ❐ To enter configuration mode for the service:
SGOS#(config) proxy-services
SGOS#(config proxy-services) restricted-intercept
❐ The following subcommands are available:
SGOS#(config restricted-intercept) {enable | disable}
SGOS#(config restricted-intercept) add {all | client_ip | client_ip/
subnet-mask} | {all| server_ip | server_ip/subnet-mask} SGOS#(config restricted-intercept) remove {all | client_ip |
client_ip/subnet-mask} | all| server_ip | server_ip/subnet-mask} SGOS#(config restricted-intercept) view {<Enter> | filter {all |
client_ip | client_ip/subnet-mask} | {all| server_ip | server_ip/
Section D: Configuring General Options for Proxy Services
Section D: Configuring General Options for Proxy Services
Blue Coat provides two general settings for proxy services:
❐ Trusting the Destination IP Address Provided by the Client
If, in your environment, a client sometimes provides a destination IP address that the SG appliance cannot determine, you can configure the SG appliance to allow that IP address and not do a DNS lookup. This can improve performance (but potentially cause a security issue).
❐ Managing User Limits
If you have more users going through the system than is allowed by the model license, you can configure overflow behavior to be queued or to bypass the SG appliance.
This section includes the following topics
❐ “Trusting the Destination IP Address Provided by the Client” on page 37
❐ “Managing User Limits” on page 38
❐ “Configuring General Options” on page 41
Trusting the Destination IP Address Provided by the Client
You can configure the SG appliance to trust a client-provided destination IP address in transparent proxy deployments where:
❐ The DNS configuration on the client is correct, but is not correct on the SG appliance.
❐ The client obtains the destination IP address using WINS or DNS imputing on the SG appliance is not configured correctly. In these cases, the SG appliance cannot obtain the destination IP address to serve the client request.
You can use the client-provided destination IP address with transparent proxy environments that use HTTP, native FTP, WebFTP, HTTPS, or streaming.
The SG appliance cannot trust the client-provided destination IP address in the following situations:
❐ The SG appliance receives the client requests in an explicit proxy deployment.
❐ The SG appliance has a forwarding rule configured for the request.
❐ The SG appliance has a SOCKS gateway rule configured for the request.
❐ The SG appliance has ICP enabled for the request.
❐ The SG appliance has policy that rewrites the server URL.
Enabling the SG Appliance to Trust the Client-Provided Destination IP
Address
Defaults:
❐ Proxy Edition: the SG appliance does not trust a client-provided destination IP address.
Section D: Configuring General Options for Proxy Services
You can change this default through the Management Console, the CLI, or through policy. If you use policy, be aware that it overrides any other configuration. For information about using the trust_destination_ip(yes|no) property, refer to Volume 10: Blue Coat SG Appliance Content Policy Language Guide.
Note: If you use the MACH5 edition, the SG appliance allows the client-provided destination IP address by default.
For information about enabling the SG appliance to allow the client-provided destination IP address, see “Configuring General Options” on page 41.
Tip
If a client gives the destination address of a blocked site but the hostname of a non-blocked site, the SG appliance connects to the destination address. This might allow clients to bypass the configured SG appliance security policy.
Managing User Limits
If your SG appliance is in demo or trial mode, an unlimited number of users can have connections processed by the system at the same time. .
After a permanent model license has been applied to the system, the license controls the number of active users who can have connections processed by the system at the same time The number of users depends on whether ADN is enabled and on the hardware model.
Only unique IP addresses of connections intercepted by proxy services are counted toward the user limit. The number of permitted users is illustrated in the table below.
Table 3-4. Hardware Models and Licensed Users
Hardware Model Number of Users (Without ADN Enabled)
Number of Users (With ADN Enabled)
210-5 30 10
210-10 150 50
210-25 Not License Limited Not License Limited
510-5 200 50
510-10 500 125
510-20 1200 300
510-25 Not License Limited Not License Limited
810-5 2500 500
810-10 3500 700
810-20 5000 1000
810-25 Not License Limited Not License Limited 8100-5 Not License Limited Not License Limited
Section D: Configuring General Options for Proxy Services
Determining Behavior if User Limits are Exceeded
If you have more user connections going through the system simultaneously than is allowed by the model license, you can configure overflow behavior in the following ways:
❐ Bypassing the system: All connections exceeding the maximum are passed through the system without processing.
❐ Queuing connections: All connections exceeding the maximum are queued, waiting for another connection to drop off.
❐ Not enforcing the licensed-user limit: This is the default value for SGOS 5.2.2 and higher.
Note: SGOS 5.2.1 has two options only: Queue and Bypass. Queue is the default.
To set the preferred behavior, see “Configuring General Options” on page 41.
Setting User Limits Notifications
You can set and monitor user limits of the model license through the Maintenance > Health Monitoring > Licensing tab, including setting thresholds (in percentages) to be notified if the user limits are nearing the upper user limits.
Note: You can use the Statistics > Health Monitoring > Licensing tab to view licensing metrics, but you cannot make changes to the threshold values from that tab. To change the thresholds, use the Maintenance > Health Monitoring > Licensing tab.
To view licensing metrics and set user limits notifications:
1. Click Maintenance > Health Monitoring > Licensing.
8100-10 Not License Limited Not License Limited 8100-20, 8100-20-DC Not License Limited Not License Limited
Table 3-4. Hardware Models and Licensed Users (Continued)
Hardware Model Number of Users (Without ADN Enabled)
Number of Users (With ADN Enabled)
Section D: Configuring General Options for Proxy Services
2. Select the license to edit. 3. Click Edit.
4. Modify the threshold values. Note that the thresholds represent the percentage of license utilization.
a. To change the critical threshold, enter a new value in the Critical Threshold field.
b. To change the critical interval, enter a new value in the Critical Interval field. c. To change the warning threshold, enter a new value in the Warning Threshold
field.
d. To change the warning interval, enter a new value in the Warning Interval field.
5. Select the notification settings.
• Log adds an entry to the Event log.
• Trap sends an SNMP trap to all configured management stations. • Email sends an e-mail to the addresses listed in the Event log properties. 6. Click OK.
7. Click Apply to commit the changes to the SG appliance.
Note: For information about licensing metrics, refer to Volume 9: Managing the Blue Coat SG Appliance.
Related CLI Syntax to Manage User Limits
SGOS#(config) alert notification license-utilization users {email |
log | trap | none}
SGOS#(config) alert threshold license-utilization users warn-threshold warn-interval crit-threshold crit-interval
Section D: Configuring General Options for Proxy Services
Viewing Concurrent Users
View a snapshot of intercepted, concurrent users by selecting the Statistics > System > Resources > Concurrent Users tab. The tab shows user connections going through the SG appliance for the last 60 minutes, day, week, month, and year. Only unique IP addresses of connections intercepted by proxy services are counted toward the user limit.
Configuring General Options
You can configure both the trusted destination IP address and the behavior if user limits are exceeded on the Configuration > Proxy Settings > General tab. (For detailed information on these options, see Section D: "Configuring General Options for Proxy Services" on page 37
To configure General options:
Section D: Configuring General Options for Proxy Services
2. Select or clear the Trust client-provided destination IP when connecting to servers check box.
3. Click the radio button for the User Overflow Action you prefer when the licensed-user limits are exceeded. By default, for SGOS 5.2.2 and later, none is the default.
Note: If you set the User Overflow Action to none and exceed the licensed-user limits, the SG appliance health changes to CRITICAL.
4. Click Apply to commit the changes to the SG appliance.
Related CLI Syntax to Manage User Limit Notifications SGOS#(config) general
SGOS#(config general) trust-destination-ip {enable | disable} SGOS#(config general) user-overflow-action {bypass | none | queue}
This chapter discusses the Common Internet File System (CIFS) protocol and describes how to configure the services and proxy on the SG appliance.
About CIFS
CIFS allows computers to share files and printers, supports authentication, and is popular in enterprises because it supports all Microsoft operating systems, clients, and servers.
File servers make file systems and other resources (printers, mailslots, named pipes, APIs) available to clients on the network. Clients have their own hard disks, but they can also access shared file systems and printers on the servers.
Clients connect to servers using TCP/IP. After establishing a connection, clients can send commands (SMBs) to the server that allows them to access shares, open files, read and write files— the same tasks as with any file system, but over the network.
CIFS is beneficial because it is generic and compatible with the way applications already share data on local disks and file servers. More than one client can access and update the same file, while not compromising file-sharing and locking schemes. However, the challenge for an enterprise is that CIFS communications are inefficient over low bandwidth lines or lines with high latency, such as in enterprise branch offices. This is because CIFS transmissions are broken into blocks of data (typically close to 64 KB). The client must stop and wait for each block to arrive before requesting the next block. Each stop represents time lost instead of data sent. Therefore, users attempting to access, move, or modify documents experience substantial, work-prohibiting delays.
About the Blue Coat CIFS Proxy Solution
The CIFS proxy on the SG appliance combines the benefits of the CIFS protocol with the abilities of the SG appliance to improve performance, reduce bandwidth, and apply basic policy checks. This solution is designed for branch office deployments because network administrators can consolidate their Windows file servers (at the core office) instead of spreading them across the network.
Note: The CIFS protocol is based on the Server Message Block (SMB) protocol used for file sharing, printers, serial ports, and other communications. It is a client-server, request-response protocol.
Figure 4-1. CIFS Proxy Traffic and Flow Diagram
Caching Behavior
The CIFS proxy caches the regions of files that are read or written by the client (partial caching) and applies to both read and write file activities. Also, the caching process respects file locking.
Authentication
The CIFS proxy supports both server and proxy authentication in the following contexts.