TM
IMPORTANT: Read and understand this manual before
assembling or operating this tiller. Improper use of tiller can
cause severe injury. Keep this manual for future reference.
MODEL 109312-01
GARDEN WIZARD™
ELECTRIC TILLER
For more information, visit www.desatech.com 2 109363
ELECTRIC TILLER
®
SAFETY
WARNINGS
READ ALL INSTRUCTIONS
BEFORE OPERATING TILLER
1. Do not operate tiller near underground electric cables, telephone lines, pipes, or hoses. If in doubt contact your util-ity company to locate underground ser-vices. You may also contact the Na-tional One Call referral number, 1-888-258-0808, for local contact information concerning underground utilities. 2. Watch what you are doing. Usecom-mon sense. Do not operate tiller when you are tired.
3. Only well-instructed adults should erate tiller. Never allow children to op-erate tiller.
4. Do not use the tiller for any job except that for which it is intended.
5. Use only electrical voltage noted on model plate of tiller.
rect size to use depending on cord length and nameplate ampere rating. If in doubt, use the next heavier gage. The smaller the gage number, the heavier the cord. To reduce the risk of disconnection of tiller cord from the extension cord dur-ing operation use the cord hitch and belt clip described in this manual.
7. Ground Fault Circuit Interrupter (GFCI) protection should be provided on the circuit(s) for use with this tiller. Receptacles are available with built-in GFCI protection and may be used for additional measure of safety.
8. Avoid Dangerous Environments. Do not operate tiller
• while under the influence of alcohol, medication, or drugs.
• in rain or in damp or wet areas. • where highly flammable liquids or
gases are present.
• if tiller is damaged, or not fully and securely assembled.
9. Always wear eye protection which meets or exceeds the requirements of ANSI Z87.1.
10. Always use face or dust mask if oper-ating tiller in dusty conditions. 11. Always dress properly. Wear the
fol-lowing clothing while using tiller: • Use of rubber gloves and substantial
footwear is recommended.
• Wear protective hair covering to con-tain long hair.
• Avoid wearing loose clothing or jew-elry that could get caught in the ro-tating tines.
12. Thoroughly inspect area where the tiller is to be used and remove all foreign objects.
WARNING: When using elec-tric gardening appliances, basic safety precautions should always be followed to reduce the risk of fire, electric shock, and personal injury.
6. Extension Cord - Make sure your exten-sion cord is in good condition. When us-ing an extension cord, be sure to use one heavy enough to carry the current your product will draw. An undersized exten-sion cord will cause a drop in line volt-age resulting in loss of power and over-heating. The table below shows the
WARNING: To reduce the risk of electric shock, use only with an extension cord intended for out-door use, such as an extension cord of cord type SW-A, SOW-A, STW-A, STOW-A, SJW-A, SJOW-A, SJTW-A, or SJTOW-A.
Total Length of Cord
Volts in Feet
120 25 50 100 150
Ampere
Rating AWG
10-12 16 16 14 12
WHILE OPERATING TILLER
1. Stay alert. Use common sense whileoperating tiller.
2. Be aware of extension cord while oper-ating tiller. Be careful not to trip over cord. Keep cord away from tines at all times. 3. Keep all children, animals, and
by-standers away from tiller and extension cord. Keep the area of operation clear of all persons and pets.
4. Grip handlebar firmly with both hands. Never operate tiller with one hand. 5. Be aware that tiller may unexpectedly
bounce upward or jump forward if the tines should strike extremely hard, packed soil, frozen ground, or buried obstacles such as large stones, roots, or stumps. 6. Do not over reach. Maintain proper
footing and balance at all times. 7. Do not operate tiller on a slope that is
too steep for safe operation. When on slopes, slow down and make sure you have good footing.
8. IMPORTANT: you can stop the tines by releasing the trigger lever.
9. Before starting tiller, make sure tines are not touching foreign objects. 10. Do not allow hands or any body part or
clothing near the rotating tines. 11. Move tiller from one place to another
• with tiller stopped and unplugged. • by rolling on attached wheel
assem-bly in the down “transport” position. • by holding carrying handle. Never use handlebars, tines, tine shaft, or fender to carry tiller.
12. Do not abuse power cord. Never carry tiller by power cord or yank it to dis-connect from receptacle. Keep power cord from heat, oil, and sharp edges. 13. Do not force tiller. It will do the job
better and with less likelihood of a risk of injury at the rate for which it was designed.
3
109363
OWNER’S MANUAL
For more information, visit www.desatech.com
SAFETY
WARNINGS
Continued
MAINTENANCE AND
STORAGE OF TILLER
1. Unplug tiller from power source• when not in use.
• before moving from one place to an-other.
• before servicing.
• before assembling or removing tines or other attachments.
2. Inspect tiller before and after each use. Check for any damage that may affect operator safety or operation of tiller. Check for broken or damaged parts. Do not use tiller if damage affects safety or operation. Have damage repaired by authorized service center.
3. Maintain tiller with care. • Never expose to rain or water. • Keep handlebar dry, clean, and free
of oil or grease.
• Keep all screws and nuts tight. • Inspect power cord often. If
dam-aged, have repaired by authorized service center.
• Inspect extension cords often and replace if damaged.
4. When servicing, use only identical re-placement parts.
5. To reduce the risk of electric shock, this tiller has a polarized plug (one blade is wider than the other) and will require the use of a polarized extension cord. The tiller plug will fit into a polarized exten-sion cord only one way. If the plug does not fit fully into the extension cord, re-verse the plug. If the plug still does not fit, obtain a correct polarized extension cord. A polarized extension cord will re-quire the use of a polarized wall outlet. This plug will fit into the polarized wall outlet only one way. If the plug does not fit fully into the wall outlet, reverse the plug. If the plug still does not fit, contact a qualified electrician to install the proper wall outlet. Do not change the tiller plug, extension cord receptacle, or extension cord plug in any way.
For more information, visit www.desatech.com 4 109363
ELECTRIC TILLER
®
Figure 1 - Electric Tiller
PRODUCT
IDENTIFICATION
UNPACKING
1. Remove all items from carton. 2. Check all items for any shipping
dam-age. If you find any damage or if any parts are missing, promptly inform dealer where you bought tiller or call 1-800-858-8501.
Handle Grip Trigger
Lever
Handlebar
Handlebar Adjustment Knob
Carrying Handle
Retaining Clip
Wheel Mounting Bracket
Wheel Assembly Rear
Housing
Front Housing
Fender
Tines Transmission Tine
Shaft Lower Handlebar Support Circuit
Breaker
Cord Hitch
Power Cord
Lock-off Lever
Switch Housing
5
109363
OWNER’S MANUAL
For more information, visit www.desatech.com
ASSEMBLY
UNFOLDING AND
ADJUSTING HANDLEBAR
Unfolding Handlebar
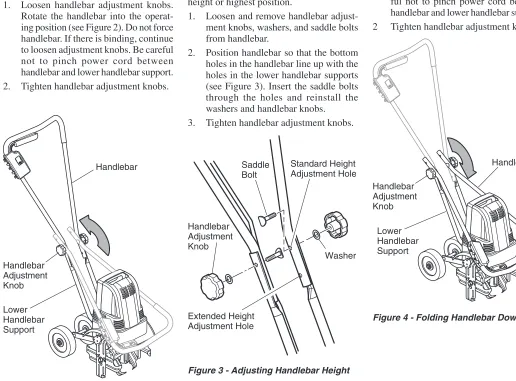
1. Loosen handlebar adjustment knobs. Rotate the handlebar into the operat-ing position (see Figure 2). Do not force handlebar. If there is binding, continue to loosen adjustment knobs. Be careful not to pinch power cord between handlebar and lower handlebar support. 2. Tighten handlebar adjustment knobs.
Folding Handlebar For Storage
1 Loosen handlebar adjustment knobs. Rotate the handlebar forward and down over the tiller housing (see Figure 4). Do not force handlebar. If there is bind-ing, continue to loosen knobs. Be care-ful not to pinch power cord between handlebar and lower handlebar support. 2 Tighten handlebar adjustment knobs.
Adjusting Height of Handlebar
The handlebar has two possible height set-tings. The tiller is shipped with the handle-bar mounted in the standard height or lowest position. If this height is too short, adjust the height of the handlebar to the extended height or highest position.
1. Loosen and remove handlebar adjust-ment knobs, washers, and saddle bolts from handlebar.
2. Position handlebar so that the bottom holes in the handlebar line up with the holes in the lower handlebar supports (see Figure 3). Insert the saddle bolts through the holes and reinstall the washers and handlebar knobs. 3. Tighten handlebar adjustment knobs.
Handlebar Adjustment Knob
Extended Height Adjustment Hole
Standard Height Adjustment Hole
Figure 2 - Unfolding Handlebar
Figure 3 - Adjusting Handlebar Height
Figure 4 - Folding Handlebar Down Handlebar
Handlebar Adjustment Knob
Lower Handlebar Support Saddle
Bolt Handlebar
Handlebar Adjustment Knob
Lower Handlebar Support
Washer
For more information, visit www.desatech.com 6 109363
ELECTRIC TILLER
®
ADJUSTING WHEEL
ASSEMBLY
Adjusting the Wheel Assembly for Transport
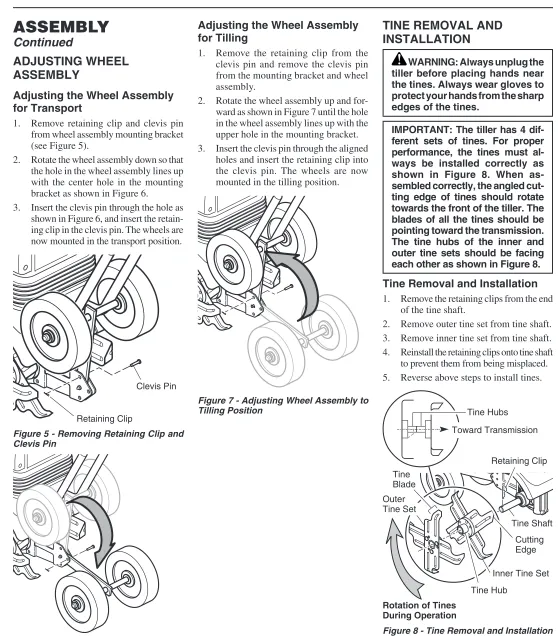
1. Remove retaining clip and clevis pin from wheel assembly mounting bracket (see Figure 5).
2. Rotate the wheel assembly down so that the hole in the wheel assembly lines up with the center hole in the mounting bracket as shown in Figure 6.
3. Insert the clevis pin through the hole as shown in Figure 6, and insert the retain-ing clip in the clevis pin. The wheels are now mounted in the transport position.
Adjusting the Wheel Assembly for Tilling
1. Remove the retaining clip from the clevis pin and remove the clevis pin from the mounting bracket and wheel assembly.
2. Rotate the wheel assembly up and for-ward as shown in Figure 7 until the hole in the wheel assembly lines up with the upper hole in the mounting bracket. 3. Insert the clevis pin through the aligned
holes and insert the retaining clip into the clevis pin. The wheels are now mounted in the tilling position.
TINE REMOVAL AND
INSTALLATION
Tine Removal and Installation
1. Remove the retaining clips from the end of the tine shaft.
2. Remove outer tine set from tine shaft. 3. Remove inner tine set from tine shaft. 4. Reinstall the retaining clips onto tine shaft to prevent them from being misplaced. 5. Reverse above steps to install tines.
IMPORTANT: The tiller has 4 dif-ferent sets of tines. For proper performance, the tines must al-ways be installed correctly as shown in Figure 8. When as-sembled correctly, the angled cut-ting edge of tines should rotate towards the front of the tiller. The blades of all the tines should be pointing toward the transmission. The tine hubs of the inner and outer tine sets should be facing each other as shown in Figure 8.
WARNING: Always unplug the tiller before placing hands near the tines. Always wear gloves to protect your hands from the sharp edges of the tines.
Tine Shaft
Inner Tine Set Retaining Clip
Figure 8 - Tine Removal and Installation Clevis Pin
Figure 5 - Removing Retaining Clip and Clevis Pin
Figure 6 - Adjusting Wheel Assembly to Transport Position
Figure 7 - Adjusting Wheel Assembly to Tilling Position
Retaining Clip
ASSEMBLY
Continued
Rotation of Tines During Operation
Cutting Edge
Tine Hub Tine
Blade
Outer Tine Set
Tine Hubs
7
109363
OWNER’S MANUAL
For more information, visit www.desatech.com
CIRCUIT BREAKER
PROTECTION
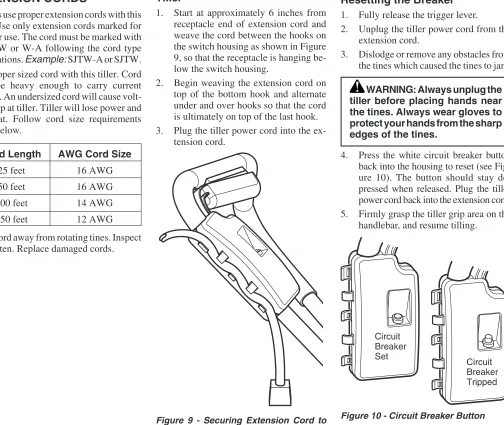
This tiller is equipped with a circuit breaker located in the top of the switch housing (see Figure 10). The circuit breaker provides over-current protection to the tiller motor should the tines become jammed or locked by a stone, root, or other obstruction. If the circuit breaker should trip during use, the white circuit breaker button will pop up out of the case and the electric motor and the tines will stop rotating.
Resetting the Breaker
1. Fully release the trigger lever. 2. Unplug the tiller power cord from the
extension cord.
3. Dislodge or remove any obstacles from the tines which caused the tines to jam.
WARNING: Always unplug the tiller before placing hands near the tines. Always wear gloves to protect your hands from the sharp edges of the tines.
4. Press the white circuit breaker button back into the housing to reset (see Fig-ure 10). The button should stay de-pressed when released. Plug the tiller power cord back into the extension cord. 5. Firmly grasp the tiller grip area on the
handlebar, and resume tilling.
Figure 10 - Circuit Breaker Button Circuit
Breaker Set
Circuit Breaker Tripped
WARNING: Read and under-stand this owners manual before operating this tiller. Make certain you read and understand all Safety Warnings on pages 2 and 3. Improper use of this tiller can result in severe injury or death from fire, electrical shock, or body contact with moving parts.
OPERATING TILLER
EXTENSION CORDS
Always use proper extension cords with this tiller. Use only extension cords marked for outdoor use. The cord must be marked with suffix W or W-A following the cord type designations. Example: SJTW-A or SJTW. Use proper sized cord with this tiller. Cord must be heavy enough to carry current needed. An undersized cord will cause volt-age drop at tiller. Tiller will lose power and overheat. Follow cord size requirements listed below.
Cord Length AWG Cord Size
25 feet 16 AWG
50 feet 16 AWG
100 feet 14 AWG
150 feet 12 AWG
Keep cord away from rotating tines. Inspect cord often. Replace damaged cords.
RETAINING EXTENSION
CORD
The switch housing has an extension cord hitch made from a series of alternating hooks (see Figure 9). This feature can be used to secure the receptacle end of the extension cord to the tiller handle to prevent accidental disconnection from the power cord. A belt clip is also included to help manage the cord by keeping it at the users side and away from the tiller tines.
Securing Extension Cord to Tiller
1. Start at approximately 6 inches from receptacle end of extension cord and weave the cord between the hooks on the switch housing as shown in Figure 9, so that the receptacle is hanging be-low the switch housing.
2. Begin weaving the extension cord on top of the bottom hook and alternate under and over hooks so that the cord is ultimately on top of the last hook. 3. Plug the tiller power cord into the
ex-tension cord.
Figure 9 - Securing Extension Cord to Tiller
For more information, visit www.desatech.com 8 109363
ELECTRIC TILLER
®
STARTING TILLER
1. Grasp grip area on handlebar firmly with both hands.
2. Use your thumb to slide the lock-off lever all the way to the right (see Fig-ure 11). This releases the trigger lever. 3. Squeeze the trigger lever all the way in (see Figure 11). The motor will start and the tines will begin to rotate. Once the tiller is started, the lock-off lever can be released.
4. IMPORTANT:To stop the tiller, release the trigger lever. The motor will shut off and the tines will stop rotating. The trigger lever is now locked off again.
BASIC TILLER OPERATION
Use the tiller for breaking sod, preparing seed beds, and for cultivating gardens and flower beds. The tiller can also dig small holes for planting saplings or potted plants. Let the tiller do most of the work. The tines will pull the tiller forward during operation. By pulling tiller back towards yourself, the tines will dig deeper and more aggressively. For breaking sod or deep tilling, allow the tines to pull the tiller forward to the end of your arm’s reach, then firmly pull the tiller back towards you. By repeatedly allowing the tiller to move forward and then pulling the tiller back to you, the tiller will be most effective. If the tiller digs deep enough to stay in one spot, gently rock the tiller side to side to start the tiller moving forward again.For preparing seed beds, we recommend using one of the tilling patterns shown in Figure 12.
Figure 11 - Lock-off Lever and Trigger Lever
Figure 12 - Suggested Tilling Patterns
2
1
Lock-off Lever
Trigger Lever
Tilling Pattern One - Make two passes over area to be tilled, the second at a right angle to the first.
Tilling Pattern Two - Make two passes over area to be tilled, the second overlapping the first.
OPERATING TILLER
Continued
EXTENSION CORD
MANAGEMENT
As with any electric lawn and garden appli-ance, you will develop a common sense ap-proach to keeping the extension cord in a safe and logical location as you are using the tiller. A convenient belt clip is included with the tiller to enable you to attach the extension cord to your waist and ease cord manage-ment (see Figure 13). It is recommended that the belt clip and extension cord be attached to your right side. Maintain enough slack between the tiller and the belt clip for easy maneuvering.
Figure 13 - Extension Cord Belt Clip
WARNING: Be aware of exten-sion cord while operating tiller. Be careful not to trip over cord. Keep cord away from tines at all times.
Outer Hook Belt
9
109363
OWNER’S MANUAL
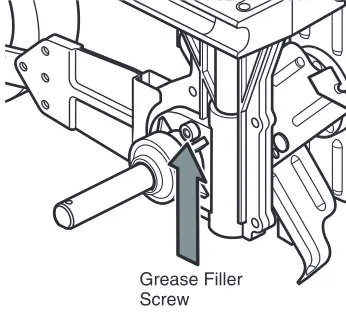
For more information, visit www.desatech.com Figure 14 - Grease Filler Screw
Grease Filler Screw
CHECKING TRANSMISSION
LUBRICANT
1. Unplug tiller from power source. 2. Locate the grease filler screw located
above the tine shaft on the right side of the transmission (see Figure 14). 3. Lay the tiller on its left side. Remove
the right side tine sets for easy access to grease filler screw. See Tine Removal and Installation, page 6.
4. Clean the transmission to prevent dirt and debris from entering the transmission. 5. Using a Phillips head screwdriver,
re-move the grease filler screw from the transmission case.
6. If grease is not visible in the hole, add a high-quality, automotive-grade, petro-leum-based grease using standard grease gun. Place the nozzle of the grease gun firmly against the rim of the hole and add grease until it begins to seep out around the edge of the nozzle. 7. Reinstall the grease filler screw and
wipe away any excess grease. 8. Reassemble the tine sets. See Tine
Re-moval and Installation, page 6.
CLEARING TINES OF
FOREIGN OBJECTS
During use, a stone or root could become lodged in the tines, or tall grass or weeds may become wrapped around the tine shaft. To clear the tines, release the trigger lever. Unplug the tiller, and dislodge or remove any obstacles from the tines or tine shaft.
CLEANING TILLER
1. To clean front and rear cover and fender, use a soft cloth dampened with a mild soap and water mixture. Do not spray or pour water directly onto the front or rear cover. Wipe the front and rear covers and fender with the damp-ened cloth.
2. To remove soil and debris from the tines and transmission, use a stiff brush or a dampened cloth. Do not spray or pour water directly onto tiller.
3. For easier cleaning, remove the tines from the tine shaft. See Tine Removal and Installation, page 6.
4. Once cleaned, wipe the tine shaft dry and apply a light coat of oil to the shaft before reinstalling the tines.
WARNING: When cleaning tiller:
• Do not submerge tiller in any liquids.
• Do not use products that contain ammonia, chlorine, or abrasives.
• Do not use chlorinated clean-ing solvents, carbon tetrachlo-ride, kerosene, or gasoline.
WARNING: Unplug tiller from power source before cleaning or servicing. Severe injury or death could occur from fire, electrical shock, or body contact with mov-ing tines.
CLEANING AND
MAINTENANCE
WARNING: Always unplug the tiller before placing hands near the tines. Always wear gloves to protect your hands from the sharp edges of the tines.
To ease removal of tall grass or weeds that are wrapped around the tine shaft, remove one or more of the tines from the tine shaft. See Tine Removal and Installation, page 6. When you have cleared the tines, reinstall tines onto tine shaft. Plug the tiller power cord into the extension cord. Firmly grasp the grip area of the handlebar with both hands and resume normal tilling operation.
OPERATING TILLER
Continued
OTHER SUGGESTED
LUBRICATION POINTS
Handlebar Adjustment Knobs: Occa-sionally spray a silicone type lubricant around the saddle bolts.
For more information, visit www.desatech.com 10 109363
ELECTRIC TILLER
®
ILLUSTRATED PARTS BREAKDOWN
ELECTRIC TILLER
Model 109312-01
1
7 4
5
7 6
6
3 2
40 42
41
4042 29
34 45
8 9
15
13 51
50
49 35
11
30 31
33
16 17
18
32
32
48
14
10 48 52
53 30
27
44
39 43 37
46
38 47 28
26 19
48
22
23
21 20
25
48 24
31
12 36
47 47
11
109363
OWNER’S MANUAL
For more information, visit www.desatech.com 28 109352-01 Lower Trigger Housing 1 29 109347-01 Power Cord 1 30 109367-01 Bolt, Saddle Head .312-18 x 1.5" 2 31 109366-01 Handle Knob 2 32 WLE-5 External Tooth Lock Washer 2 33 108444-02 Handle Support, Right 1 34 H5C4-40C Bolt, Hex Head .25-20 x 5" 2 35 109344-01 Rear Housing 1
36 109341-01 Foam 1
37 109368-01 Clevis Pin .25 x 1" 1 38 109369-01 Retaining Clip 1 39 109356-01 Wheel Assembly Bracket 1
40 109374-01 Wheel 2
41 109358-01 Axle Assembly 1
42 109377-01 Nut Cap 2
43 109365-01 Retaining Clip 2 44 109364-01 Cord Clip 4 45 109361-01 Belt Clip 1 46 H5C4-8C Bolt, Hex Head .25-20 x 1" 1 47 NEC-4C Nut, Hex Lock .25-20 7 48 107708-01 Screw, Tap Pan Head 16 49 109336-01 Sprocket Gear 1
50 059606 Drive Gear 1
51 075676 Sprocket Roller Bearing 1 52 109350-01 Fender Plate 1 53 103708-01 Screw, PPH TPG "B" 2
PARTS LIST
ELECTRIC TILLER
Model 109312-01
This list contains replaceable parts used in your tiller. When ordering parts, be sure to provide the correct model number, then the part number and description of the desired part.
KEY PART
NO. NO. DESCRIPTION QTY. 1 109384-01 Transmission Assembly 1 2 109342-01 Tine Assembly 1 3 109342-04 Tine Assembly 1 4 109342-02 Tine Assembly 1 5 109342-03 Tine Assembly 1 6 109349-01 Felt Washer 2 7 109339-01 Dust Cap 2
8 109332-01 Fender 1
9 109333-01 Bearing Plate Assembly 1 10 H5C4-20C Bolt, Hex Head .25-20 x 2.5" 4 11 109385-01 Motor Assembly 1 12 076014 Motor Can Assembly 1 13 059045 Screw, Tap Pan Head 4 14 109343-01 Front Housing 1 15 109345-01 Air Dam 1 16 108444-01 Handle Support, Left 1 17 108443-01 Upper Handle Tube Assembly 1 18 099829-05 Shrouded Cord 1 19 107729-01 Micro Switch 1 20 109360-01 Lock Off Side Cover 1 21 109355-01 Lock Off Slide 1 22 109354-01 Stop Block 1 23 107694-01 Lock Off Spring 1 24 109357-01 Trigger Spring 1 25 109353-01 Trigger Lever 1 26 22616013 Circuit Breaker 1 27 109351-01 Upper Trigger Housing 1
KEY PART
For more information, visit www.desatech.com 12 109363
ELECTRIC TILLER
®
REPAIR SERVICE
Note: Only use original replacement parts. This will protect your warranty coverage for parts replaced under warranty.
Each authorized service center is indepen-dently owned and operated. For additional service center or warranty information, call 1-800-858-8501 or visit our technical ser-vice web site at www.desatech.com.
REPLACEMENT PARTS
For original replacement parts, contact au-thorized dealers of this product or your nearest parts central listed below.
TECHNICAL
SERVICE
You may have further questions about as-sembling, operating, or maintaining this tiller. If so, contact our Technical Service Department at 1-800-858-8501.
You can also visit our technical service web site at www.desatech.com.
TROUBLESHOOTING
OBSERVED FAULT
Motor does not run when you squeeze trig-ger lever
Motor runs, but tines do not move
Tiller smokes
POSSIBLE CAUSE
1. Lock-off lever not pressed to release trig-ger lever
2. Extension cord connection is loose 3. Circuit breaker is tripped on tiller
4. Household circuit breaker is tripped on open line fuse
5. Bad motor brushes 6. Open wiring on tiller
Gear train failure
Tiller damaged. Do not use tiller
REMEDY
1. Fully depress lock-off lever before squeezing trigger lever (see Starting Tiller, page 8)
2. Check cord connections
3. Check circuit breaker on tiller (see Cir-cuit Breaker Protection, page 7) 4. Check circuit breaker or line fuse (see
Circuit Breaker Protection, page 7) 5. See authorized service center 6. See authorized service center
See authorized service center
See authorized service center Note: For additional help, visit our
tech-nical service web site at
www.desatech.com.
WARNING: Unplug tiller from power source before servicing. Severe injury or death could occur from fire, electrical shock, or body contact with moving tines.
WARRANTY SERVICE
If tiller requires warranty service, return it to nearest authorized service center. You must show proof of purchase. If faulty materials or workmanship caused damage, we will repair or replace tiller without charge. Note: Nor-mal wear, misuse, abuse, neglect, or acciden-tal damage is not covered under warranty.
13
109363
OWNER’S MANUAL
For more information, visit www.desatech.com Master Part Distributors
1251 Mound Avenue NW Grand Rapids, MI 49504-2672 616-791-0505
1-800-446-1446 www.masterparts.net Hance Distributors, Inc. 12795 16th Avenue North Plymouth, MN 55441-4556 763-559-2299
www.hanceco.com
Automotive Equipment Service 3117 Holmes
Kansas City, MO 64109-1716 816-531-9144
1-800-843-3546 www.aes-lawnparts.com
Bowden Electric Motor Service 1681 S. Wesleyan Blvd.
Rocky Mount, NC 27803 252-446-4203
East Coast Energy 10 East Route 36
West Long Branch, NJ 07764-1501 1-800-755-8809
Forrest Lytle and Sons, Inc. 740 West Galbraith Road Cincinnati, OH 45231-6002 513-521-1464
Bortz Chain Saw Shop Road #2, Box 64A Oley, PA 19547-9412 610-987-6452
21st Century
2950 Fretz Valley Road Perkasie, PA 18944-4034 215-795-0400
1-800-325-4828
Laportes 2444 N 5th Street
Hartsville, SC 29550-7704 843-332-0191
MTA Distributors 555 Hickory Hills Blvd. Nashville, TN 37189-9244 615-299-8777
1-800-264-0225
Webbs Appliance Center 1519 Church Street Nashville, TN 37203-3004 615-329-4079
1-800-899-4079 Industrial Hardware 4109 Bainbridge Blvd. Chesapeake, VA 23324-1403 804-543-2232
1-800-788-0008 [email protected] Mills Lawn and Garden 928 Commonwealth Place Virginia Beach, VA 23464 757-361-9293
www.mills-parts.com Tuco Industrial Products 5223 180th Street SW Suite 4A-1
Lynnwood, WA 98037-4506 425-743-9533
1-800-735-1268 www.tucoheat.com Ray’s Portable Heater Service
3191 Myers Road Camino, CA 95709-9550 530-644-7716
Baltimore Electric 5 Manila Drive
Hamden, CT 06514-0322 203-248-7553
1-800-397-7553 Eckley’s Small Engine 31617 Spruce Drive Eustis, FL 32726-9592 352-357-6764
Parts Company of America 1657 Shermer Road
Northbrook, IL 60062-5362 708-498-5900
1-800-323-0620 www.grainger.com Portable Heater Parts
342 North County Road 400 East Valparaiso, IN 46383-9704 219-462-7441
1-800-362-6951
www.portableheaterparts.com [email protected] [email protected] FBD
1349 Adams Street
Bowling Green, KY 42103-3414 270-846-1199
1-800-654-8534 [email protected]
Lyons & Lyons Sales Co. Inc. Glen Arm Road
Glen Arm, MD 21057-9454 410-665-6500
1-800-333-5966 [email protected]
PARTS DEALERS
ELECTRIC TILLER LIMITED WARRANTY
Always specify model number when writing the factory.
We reserve the right to amend these specifications at any time without notice. The only warranty applicable is our standard written warranty. We make no other warranty, expressed or implied.
DESA Specialty Products™ warrants this electric tiller and any parts thereof, to be free from defects in material and workmanship for two years (90 days for reconditioned unit) from the date of first purchase from an authorized dealer, provided that the product has been properly maintained and operated in accordance with all applicable instructions. This warranty is valid for 90 Days from the date of purchase from an authorized dealer if the tiller is used for commercial, industrial, or rental use. The bill of sale or proof of purchase must be presented at the time a claim is made under this warranty.
This warranty is extended only to the original retail purchaser. This warranty covers only the parts and labor required to restore this tiller to its proper operating condition. Warranty parts must be obtained through factory authorized dealers and service centers for this product. These dealers and service centers will provide original factory replacement parts. Failure to use original factory replacement parts voids this warranty.
This warranty does not apply to parts that are not in original condition because of normal wear and tear, or parts that fail or become damaged as a result of misuse, accident, lack of proper maintenance, tampering, or alteration. Travel, handling, transportation, and incidental costs associated with warranty repairs are not reimbursable under this warranty and are the responsibility of the owner.
To the full extent allowed by the law of the jurisdiction that governs the sale of the product, this express warranty excludes any and all other expressed warranties and limits the duration of any and all implied warranties, including warranties of merchantability and fitness for a particular purpose to two years from the date of first purchase, and DESA Specialty Products’™ liability is hereby limited to the purchase price of the product and DESA Specialty Products™ shall not be liable for any other damages whatsoever including indirect, incidental, or consequential damages.
Some states do not allow limitation of how long an implied warranty lasts or an exclusion or limitation of incidental or consequential damages, so the above limitation of damages may not apply to you.
This warranty provides the original purchaser with specific rights. For information regarding those rights, please consult the applicable state laws.
P.O. Box 90004
Bowling Green, KY 42102-9004 www.desatech.com
Industries of Canada, Inc.
2220 Argentia Road Unit #4
Mississauga, Ontario L5N 2K7
TM
IMPORTANTE: Antes de ensamblar y operar este cultivador
lea y entienda este manual. El uso inadecuado de este
cultivador puede ocasionar lesiones graves. Guarde este
manual para futuras referencias.
MODELO 109312-01
GARDEN WIZARD™
16
Para más información, visite www.desatech.com 109363
CULTIVADOR ELÉCTRICO
®
ADVERTENCIAS
SOBRE
SEGURIDAD
LEA TODAS LAS
INSTRUCCIONES ANTES DE
OPERAR EL CULTIVADOR
1. No opere el cultivador cerca deelemen-tos subterráneos como cables eléctricos, líneas telefónicas, tuberías o mangueras. Si tiene duda sobre la ubicación de es-tos elemenes-tos, póngase en contacto con su compañía de servicios. Para obtener información local de los servicios sub-terráneos puede también ponerse en con-tacto con el número de consulta Llama-da Nacional Unica al 1-888-258-0808. 2. Observe lo que está haciendo. Use el
sentido común. No opere el cultivador cuando esté cansado(a).
3. El cultivador debe ser manejado solamen-te por adultos bien instruidos. No deje que los niños manejen el cultivador. 4. No use el cultivador para ningún otro
tra-bajo excepto para el que fue destinado. 5. Use solamente el voltaje eléctrico
indica-do en la placa del modelo del cultivaindica-dor.
6. Cordón de extensión _ Asegúrese que su cordón de extensión esté en buenas condiciones. Cuando lo use, esté segu-ro de utilizar uno suficientemente grue-so para que transporte la corriente ab-sorbida por su máquina. Un cordón de extensión subdimensionado ocasiona-rá caídas de voltaje en la línea lo cual producirá pérdidas de potencia y sobrecalentamiento. La tabla a conti-nuación le indica el tamaño correcto de cordón que debe usar de acuerdo a la longitud de la extensión y a la capaci-dad nominal de corriente indicada en la placa. Si tiene duda use el calibre mayor siguiente. A menor número de calibre, más grueso es el cordón. Para reducir, mientras funciona, el riesgo de desconexión del cordón del cultivador, use el gancho del cordón y la presilla de la correa descritas en este manual.
7. El circuito a usarse con el cultivador debe tener, como protección, cortacircuitos de falla a tierra (GFCI). Se disponen de tomacorrientes con protección GFCI in-corporada que pueden utilizarse como medida adicional de seguridad.
8. Evite ambientes peligrosos. No opere el cultivador:
• Cuando se halle bajo la influencia del alcohol, medicamentos o drogas. • En la lluvia o en áreas húmedas o
mojadas.
• En sitios donde están presentes líqui-dos o gases altamente inflamables. • Si el cultivador está dañado o no está
ensamblado completamente y bien. 9. Use siempre protección visual que
cumpla o exceda los requerimientos de ANSI Z 87.1
10. Si opera el cultivador en condiciones de polvo, use siempre máscara facial o para polvo.
11. Vístase siempre adecuadamente. Mien-tras utilice el cultivador se recomienda usar lo siguiente:
• Guantes de caucho y calzado robusto.
ADVERTENCIA: Cuando use electrodomésticos para jardine-ría, deben acatarse las precau-ciones básicas sobre seguridad para reducir el riesgo de incen-dio, sacudida eléctrica, o lesión al personal.
ADVERTENCIA: Para reducir el riesgo de sacudida eléctrica, use solamente cordón de exten-sión destinado para uso exterior, por ejemplo cordón de extensión del tipo SW-A, SOW-A, STW-A, STOW-A, SJW-A, SJOW-A, SJTW-A ó SJTOW-A.
Longitud total del
Voltaje cordón en pies
120 25 50 100 150
Capacidad
en amperios AWG
10-12 16 16 14 12
• Para sostener cabellos largos use un cobertor y protector de cabellos. • Evite usar ropas flojas o joyas que
podrían quedar atrapadas en las púas giratorias.
12. Inspeccione completamente el área en donde va a usarse el cultivador y retire cualquier objeto extraño.
MIENTRAS OPERA EL
CULTIVADOR
1. Manténgase alerta. Use el sentido co-mún mientras opera el cultivador. 2. Esté atento al cordón de extensión
mientras opera el cultivador. Tenga cui-dado de no tropezarse con el cable. Mantenga siempre al cordón de exten-sión lejos de las púas.
3. Mantenga lejos del cultivador y del cordón de extensión a todos los niños(as), animales y curiosos. Manten-ga el área de operación libre de perso-nas y mascotas.
4. Agarre firmemente el manubrio con ambas manos. Nunca opere el cultiva-dor con una mano.
5. Esté alerta ya que el cultivador puede rebotar inesperadamente hacia arriba o saltar hacia adelante si las púas golpean un suelo extremadamente duro, compactado, congelado o con obstácu-los enterrados como piedras grandes, raíces o tocones.
6. No sostenga la máquina extendiendo mucho los brazos. Mantenga siempre el equilibrio y la estabilidad en los pies. 7. Por seguridad no opere el cultivador en una pendiente demasiado empinada. Cuando esté en pendientes, disminuya la velocidad y asegúrese que sus pies estén bien estables.
8. IMPORTANTE: Las púas pueden de-tenerse soltando la palanca de accionamiento.
9. Antes de arrancar el cultivador, asegú-rese que las púas no estén tocando ob-jetos extraños.
10. Tenga cuidado en no acercar las ma-nos, cualquier parte del cuerpo o la ropa a las púas giratorias.
17
109363
MANUAL DEL PROPIETARIO
Para más información, visite www.desatech.com
ADVERTENCIAS
SOBRE
SEGURIDAD
Continuación
11. Para mover el cultivador de un lugar a otro:
• Apáguelo y desenchúfelo.
• Hágalo rodar utilizando el conjunto de ruedas acopladas y en posición hacia abajo o de “transporte”. • Sostenga el mango de transporte.
Nunca use los manubrios, púas, eje de las púas o guardabarros para trans-portar el cultivador.
12. No maltrate el cordón de alimentación. Nunca transporte el cultivador halándolo de este cable ni tampoco lo hale para desconectarlo del tomacorriente. Mantenga el cordón de alimentación lejos del calor, aceites o de bordes cortantes.
13. No fuerce al cultivador. Este hará me-jor el trabajo y con menor probabili-dad de riesgo de una lesión si lo usa a la velocidad para la que fue diseñada.
4. Cuando realice servicio, use solamen-te parsolamen-tes de repuesto idénticas. 5. Para reducir el riesgo de sacudida
eléc-trica, este cultivador tiene un enchufe polarizado (una hoja es más ancha que la otra) por lo que se requerirá el uso de un cordón de extensión polarizado. El enchufe del cultivador se adaptará al cable de extensión polarizado sola-mente de una forma. Si el enchufe no se acopla completamente en el cable de extensión, invierta el enchufe. Si el en-chufe aún no se adapta, consiga el co-rrecto. Un cordón de extensión polari-zado requerirá el uso de un tomacorriente de pared polarizado. Esta clavija se adaptará al tomacorriente polarizado solamente de una forma. Si el enchufe no se adapta completamen-te al tomacorriencompletamen-te de pared invierta el enchufe. Si aún así el enchufe no se adapta, póngase en contacto con un electricista calificado para instalar el tomacorriente de pared apropiado. No cambie de ninguna forma el enchufe del cultivador, la toma o el enchufe del cor-dón de extensión.
6. Guarde el cultivador inactivo bajo techo.-cuando no lo use, el cultivador debe ser almacenado en un lugar seco y bajo lla-ve- fuera del alcance de los niños. Este manual es su guía para una operación segura y apropiada de este cultivador. Guar-de estas instrucciones.
MANTENIMIENTO Y
ALMACENAMIENTO DEL
CULTIVADOR
1. Desenchufe el cultivador de la fuente de alimentación
• Cuando no se lo use.
• Antes de moverlo de un lugar a otro. • Antes de darle servicio.
• Antes de ensamblarlo, o antes de retirar las púas giratorias u otros aditamentos. 2. Inspeccione el cultivador antes y después de cada uso. Revise cualquier daño que pueda afectar la seguridad del operador o el funcionamiento del cultivador. Re-vise partes rotas o dañadas. No use el cultivador si el daño afecta a la seguridad o a la operación. Haga reparar el daño en un centro de servicio autorizado. 3. Mantenga cuidadosamente al cultivador
• Nunca lo exponga a la lluvia o al agua.
• Mantenga el manubrio seco, limpio y libre de aceite o grasa.
• Mantenga todos los tornillos y tuercas ajustadas.
• Inspeccione a menudo el cordón de alimentación. Si está dañado hágalo reparar en un centro de servicio au-torizado.
18
Para más información, visite www.desatech.com 109363
CULTIVADOR ELÉCTRICO
®
Figura 1 – Cultivador eléctrico
IDENTIFICACIÓN
DEL PRODUCTO
DESEMPAQUE
1. Retire todos los elementos del cartón. 2. Revise cualquier daño que en el
trans-porte pudo ocasionar a estos elemen-tos. Si encuentra algún daño o si falta alguna parte, informe con prontitud al distribuidor en donde compró su culti-vador o llame al 1-800-858-8501. Agarradera
del mango Palanca de
accionamiento
Manubrio
Perilla de regulación del manubrio
Mango de transporte
Presilla de retención
Consola de montaje de la rueda
Conjunto rueda Caja posterior
Caja frontal
Guardabarros
Púas
Transmisión Eje de la púa
Soporte del manubrio inferior Disyuntor
Gancho del cordón
Cordón de alimentación
Palanca de traba en apagado
Caja del interruptor
19
109363
MANUAL DEL PROPIETARIO
Para más información, visite www.desatech.com
ENSAMBLE
DESDOBLAMIENTO Y
REGULACIÓN DEL
MANUBRIO
Desdoblamiento del manubrio
1. Afloje las perillas de regulación del ma-nubrio. Gire el manubrio a la posición de operación (vea la figura 2). No fuerce el manubrio. Si se nota un endurecimiento, continúe aflojando las perillas de regula-ción. Tenga cuidado que el cordón de ali-mentación no quede apretado entre el manubrio y su soporte inferior.
2. Apriete las perillas de regulación del manubrio.
Doblamiento del manubrio para almacenarlo
1. Afloje las perillas de regulación del manubrio. Gire el manubrio hacia ade-lante y hacia abajo por sobre la caja del cultivador (Vea la figura 4). No fuerce el manubrio. Si se nota un endurecimien-to, continúe aflojando las perillas de re-gulación. Tenga cuidado que el cordón de alimentación no quede apretado en-tre el manubrio y su soporte inferior. 2. Apriete las perillas de regulación del
manubrio.
Regulación de la altura del manubrio
El manubrio tiene dos ajustes disponibles para la altura. El cultivador es transportado con el manubrio colocado en la posición estándar o de menor altura. Si la altura es demasiado corta, regule la altura del manu-brio a su posición extendida o más alta. 1. Afloje y retire del manubrio las
peri-llas de regulación, arandelas y pernos tipo montura.
2. Coloque el manubrio de modo que sus orificios inferiores alineen con los ori-ficios de los soportes inferiores del manubrio (Vea la figura 3). Inserte los pernos tipo montura por los orificios y vuelva a instalar las arandelas y peri-llas del manubrio.
3. Apriete las perillas de regulación del manubrio.
Perilla de regulación del manubrio
Orificio de regulación de la altura extendida
Orificio de regulación de la altura estándar
Figura 2 – Desdoblamiento del manubrio
Figura 3 – Regulación de la altura del manubrio
Figura 4 – Doblamiento hacia abajo del manubrio
Manubrio
Perilla de regulación del manubrio
Soporte inferior del manubrio Perno tipo
montura Manubrio
Perilla de regulación del manubrio
Soporte inferior del manubrio
Arandela
20
Para más información, visite www.desatech.com 109363
CULTIVADOR ELÉCTRICO
®
REGULACIÓN DEL
CONJUNTO RUEDA
Regulación del conjunto rueda para el transporte
1. Retire la presilla de retención y el eje pasador de la consola de montaje del conjunto ruedas (vea la figura 5). 2. Gire hacia abajo al conjunto rueda de modo
que, como se muestra en la figura 6, el orificio del conjunto rueda alinee con el orificio central de la consola de montaje. 3. Como se muestra en la figura 6, inserte
el eje pasador por el orificio e inserte la presilla de retención en el eje pasa-dor. Las ruedas están ahora montadas en la posición de transporte.
Regulación del conjunto rueda para cultivar
1. Retire la presilla de retención del eje pasador y retire el eje pasador de la con-sola de montaje y del conjunto ruedas. 2. Gire el conjunto ruedas hacia arriba y
hacia adelante como se muestra en la figura 7 hasta que el orificio del con-junto rueda alinee con el orificio supe-rior de la consola de montaje.
3. Inserte el eje pasador por los orificios ali-neados y coloque la presilla de retención en el eje pasador. Las ruedas están ahora montadas en la posición de cultivo.
RETIRO E INSTALACIÓN DE
LA PÚA
Retiro e instalación de la púa
1. Retire la presilla de retención del ex-tremo del eje de las púas.
2. Retire el juego exterior de púas de su eje. 3. Retire el juego interior de púas de su eje. 4. Vuelva a instalar las presillas de reten-ción en el eje de las púas para evitar que estas se coloquen mal.
5. Para instalar las púas invierta los pasos arriba indicados.
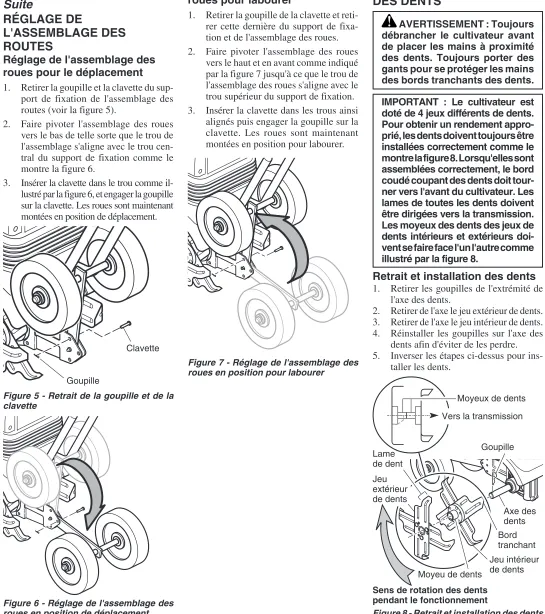
IMPORTANTE: El cultivador tiene cuatro juegos diferentes de púas. Para un desempeño apropiado, las púas deben estar siempre instala-das correctamente como se mues-tra en la figura 8. Cuando están ensambladas correctamente, el borde cortante en ángulo de las púas debería girar hacia la parte frontal del cultivador. Las cuchillas de todas las púas deberían apuntar hacia la transmisión. Los cubos de los juegos interior y exterior de las púas deberían estar el uno frente al otro como se muestra en la figura 8.
ADVERTENCIA: Desenchufe siempre el cultivador antes de colocar las manos cerca de las púas. Use siempre guantes para proteger sus manos de los bordes cortantes de las púas.
Eje de las púas
Juego de púas interiores Presilla de retención
Figura 8 – Retiro e instalación de las púas Eje pasador
Figura 5 – Retiro de la presilla de retención y el eje pasador
Figura 6 – Regulación del conjunto rueda a la posición de transporte
Figura 7 – Regulación del conjunto ruedas a la posición de cultivo
Presilla de retención
ENSAMBLE
Continuación
Rotación de las púas durante la operación
Cubo de las púas Cuchilla
de la púa
Juego de púas exteriores
Cubos de las púas
Hacia la transmisión
21
109363
MANUAL DEL PROPIETARIO
Para más información, visite www.desatech.com
PROTECCIÓN CON
DISYUNTOR
Este cultivador está equipado con un disyun-tor ubicado en la parte superior de la caja del interruptor (vea la figura 10). El disyuntor protege al motor del cultivador contra sobrecorriente en caso que las púas llegaran a atascarse o bloquearse en una piedra, raíz u otra obstrucción.
Si el disyuntor se desconectara durante el uso, el botón del disyuntor blanco saltará fuera de la caja y el motor eléctrico y las horquillas dejarán de girar.
Reposición del disyuntor
1. Suelte completamente la palanca de accionamiento.
2. Desenchufe del cordón de extensión el cordón de alimentación del cultivador. 3. Desaloje y retire cualquier obstáculo que ocasionó el atascamiento de las púas.
ADVERTENCIA: Desenchufe siempre el cultivador antes de colocar las manos cerca de las púas. Use siempre guantes para proteger sus manos de los bordes cortantes de las púas.
Figura 10 – Botón del disyuntor Disyuntor
calibrado
Disyuntor disparado
ADVERTENCIA: Antes de operar este cultivador lea y entienda este manual del propietario. Asegúrese de leer y entender todas las advertencias sobre seguridad de las páginas 18 y 19. El uso inadecuado de este cultivador puede ocasionar lesiones graves o la muerte sea por incendio, sacudida eléctrica o por contacto del cuerpo con partes móviles.
OPERACIÓN DEL
CULTIVADOR
CORDONES DE EXTENSIÓN
Use siempre los cordones de extensión apro-piados para este cultivador. Use solamente cordones de extensión marcados para uso exterior. El cordón debe estar marcado con el subfijo W o W-A seguido de la designación del tipo de cordón. Ejemplo: SJTW-A ó SJTW. Use el tamaño de cordón apropiado para este cultivador. El cordón debe ser lo suficiente-mente grueso para que transporte la corriente necesaria. Un cordón subdimensionado oca-sionará caída de voltaje en el cultivador. El cultivador perderá potencia y se calentará excesivamente. Siga los requisitos listados más abajo referentes al tamaño del cordón.Longitud del Calibre AWG
cordón del cordón
25 pies 16 AWG
50 pies 16 AWG
100 pies 14 AWG
150 pies 12 AWG
Mantenga el cordón lejos de las púas girato-rias. Inspeccione a menudo el cordón. Re-emplace los cordones dañados.
SUJECIÓN DEL CORDÓN DE
EXTENSIÓN
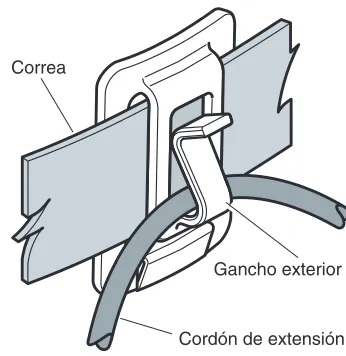
La caja del interruptor tiene un enganche para el cordón de extensión hecho de una serie de ganchos alternativos (vea la figura 9). Esta característica puede ser usada para asegurar al manubrio del cultivador el extre-mo del cordón de extensión que tiene tomacorriente evitando que el cordón de alimentación se desconecte accidentalmen-te. Para ayudar a manejar el cable se incluye también una presilla de la correa la cual mantiene el cable en el lado del usuario y lejos de las púas del cultivador.
Para asegurar el cordón de extensión al cultivador
1. Empiece aproximadamente a 6 pulga-das del extremo del cordón de exten-sión que tiene tomacorriente y entrela-ce el cordón por entre los ganchos de la caja del interruptor como se muestra en la figura 9, de modo que el tomacorriente quede colgado por deba-jo de la caja del interruptor.
2. Empiece entrelazando el cordón de ex-tensión por la parte superior del gan-cho inferior y alterne por debajo y en-cima de los ganchos de modo que el cordón quede por último en la parte su-perior del último gancho.
3. Enchufe el cordón de alimentación del cultivador en el cordón de extensión.
Figura 9 – Aseguramiento del cordón de extensión
4. Pulse el botón del disyuntor blanco ponién-dolo de nuevo en la caja para reconectarlo (vea la figura 10). El botón debería quedar presionado cuando se lo suelta. Enchufe de nuevo el cordón de alimentación del cul-tivador en el cordón de extensión. 5. Sujete firmemente el área de agarre del
manubrio y continúe cultivando.
22
Para más información, visite www.desatech.com 109363
CULTIVADOR ELÉCTRICO
®
2
1
ARRANQUE DEL
CULTIVADOR
1. Sujete firmemente y con ambas manos el área de agarre del manubrio. 2. Use su pulgar para deslizar
completa-mente a la derecha la palanca de traba en apagado (vea la figura 11). Esto suel-ta la palanca de accionamiento. 3. Apriete completamente la palanca de
accionamiento (vea la figura 11). El motor arrancará y las púas empezarán a girar. Una vez que arranca el cultiva-dor, puede soltarse la palanca de traba en apagado.
4. IMPORTANTE: Para detener el culti-vador, suelte la palanca de accionamiento. El motor se apagará y las púas dejarán de girar. Ahora la pa-lanca de accionamiento está de nuevo trabada en apagado.
OPERACIÓN BÁSICA DEL
CULTIVADOR
Use el cultivador para romper el césped, pre-parar el semillero y para el cultivo de jardines y cuadros de flores. El cultivador puede tam-bién cavar pequeños huecos para la plantación de árboles tiernos y plantas de maceta. Deje que el cultivador haga la mayor parte del trabajo. Durante la operación las púas halarán al cultivador hacia adelante. Al halar el culti-vador hacia atrás donde usted se halla, las púas cavarán más profunda y agresivamente. Para romper el césped o cultivar a profundi-dad, deje que las púas halen al cultivador hacia adelante hasta el extremo del alcance de sus brazos, luego vuelva a halar al culti-vador hacia usted. El culticulti-vador será lo más eficiente si permitimos repetidamente que se mueva hacia adelante y luego halarlo hacia atrás donde usted se halla.
Si el cultivador ya cavó lo suficiente en un sitio, muévalo suavemente de un lado a otro para que empiece de nuevo a moverse hacia adelante. Para preparar el semillero, recomendamos usar uno de los modelos de cultivo que se muestra en la figura 12.
Figura 11 – Palanca de traba en apagado y palanca de accionamiento
Figura 12 – Modelos de cultivo recomendados
Palanca de traba en apagado
Palanca de accionamiento
Modelo de cultivo uno – Realice dos pasadas sobre el área a ser cultivada, la segunda a un ángulo recto respecto a la primera.
Modelo de cultivo dos – Haga dos pasadas sobre el área a ser cultivada, la segunda traslapa a la primera.
OPERACIÓN DEL
CULTIVADOR
Continuación
MANEJO DEL CORDÓN DE
EXTENSIÓN
Igual que con cualquier podadora eléctrica o electrodoméstico para jardín, mientras use el cultivador aplique su sentido común para mantener el cordón de extensión en una ubicación segura y lógica.
Con el cultivador se incluye una presilla de la correa que es útil y que le permite asegu-rar el cordón de extensión a su cintura lo cual facilita el manejo del cordón (vea la figura 13). Es recomendable que la presilla de la correa y el cordón de extensión estén asegurados a su lado derecho. Para fácil maniobra mantenga una holgura suficiente entre el cultivador y la presilla de la correa.
Figure 13 – Presilla de la correa para el cordón de extensión
ADVERTENCIA: Mientras op-era el cultivador esté alerta al cordón de extensión. Asegúrese de no tropezarse con el cordón. Mantenga siempre el cordón lejos de las púas.
Gancho exterior Correa
23
109363
MANUAL DEL PROPIETARIO
Para más información, visite www.desatech.com Figura 14 – Tornillo de engrase
Tornillo de engrase
REVISIÓN DEL LUBRICANTE
DE LA TRANSMISIÓN
1. Desenchufe el cultivador de la fuente de alimentación.
2. Localice el tornillo de engrase ubicado arriba del eje de las púas al lado dere-cho de la transmisión (vea la figura 14).
RETIRO DE OBJETOS
EXTRAÑOS DE LAS PÚAS
Mientras se usa, una piedra o una raíz podría alojarse en las púas o el césped alto o maleza podrían envolverse alrededor del eje de las púas.Para limpiar las púas suelte la palanca de accionamiento. Desenchufe el cultivador y desaloje o retire cualquier obstáculo de las púas o del eje de las púas.
LIMPIEZA DEL CULTIVADOR
1. Para limpiar la tapa frontal y posterior yel guardabarros, use un paño suave hu-medecido con una mezcla de agua y ja-bón suave. No rocíe ni vierta el agua directamente en las tapas frontal o pos-terior. Pase con un paño húmedo las ta-pas frontal y posterior y el guardabarros. 2. Retire la tierra y desechos de las púas y de la transmisión, use un cepillo de cer-das duras o un paño húmedo. No rocíe ni vierta agua directamente en el cultivador. 3. Para una limpieza más fácil, retire las púas del eje. Vea en la página 20, Reti-ro e instalación de las púas.
4. Una vez limpio, seque con un paño el eje de las púas y antes de volver a ins-talar las púas aplique una ligera capa de aceite al eje.
ADVERTENCIA: Cuando limpie el cultivador:
• No lo sumerja en ningún líquido. • No use productos que contie-nen amoníaco, cloro o abrasivos.
• No use solventes de limpieza con cloro, tetracloruro de car-bono, kerosene o gasolina.
ADVERTENCIA: Antes de limpiar o dar servicio al cultivador desenchúfelo de la fuente de alimentación. Podrían ocurrir lesiones graves o la muerte sea por incendio, sacudida eléctrica o por contacto del cuerpo con partes móviles.
LIMPIEZA Y
MANTENIMIENTO
ADVERTENCIA: Desenchufe siempre el cultivador antes de colocar las manos cerca de las púas. Use siempre guantes para proteger sus manos de los bordes cortantes de las púas.
OPERACIÓN DEL
CULTIVADOR
Continuación
OTROS PUNTOS DE
LUBRICACIÓN
RECOMENDADOS
Perillas de regulación del manubrio:
Rocíe de vez en cuando un lubricante tipo silicona alrededor de los pernos tipo montura.
Eje de las púas: Luego de cada uso, retire las púas, limpie el eje de las púas usando papel lija fino y aplique una ligera capa de aceite al eje. Esto facilitará futuras instala-ciones o retiros de las púas.
Para retirar con facilidad el césped alto o malezas que estén envueltas alrededor del eje de las púas, retire una o más púas del eje. Vea en la página 20, Retiro e instalación de las púas.
Cuando usted ha despejado las púas de obstáculos, vuelva a instalarlas en el eje. Enchufe el cordón de alimentación del cul-tivador en el cordón de extensión. Sujete firmemente con ambas manos el área de agarre del manubrio y reanude la operación normal de cultivo.
3. Apoye al cultivador sobre su lado iz-quierdo. Retire el juego de púas del lado derecho para tener fácil acceso al tor-nillo de engrase. Vea en la página 20,
Retiro e instalación de las púas.
4. Limpie la transmisión para evitar que el polvo y los desechos entren en ella. 5. Usando un destornillador cabeza Philips (estrella), retire el tornillo de engrase de la caja de transmisión. 6. Si la grasa no está visible en el orificio,
usando una pistola de engrase estándar, añada grasa a base de petróleo, de alta calidad y con clasificación para automo-tores. Coloque firmemente la boquilla de la pistola de engrase contra el borde del orificio y añada grasa hasta que esta empiece lentamente a fluir hacia afuera y alrededor del borde de la boquilla. 7. Vuelva a instalar el tornillo de engrase
y con un paño retire cualquier exceso de grasa.
24
Para más información, visite www.desatech.com 109363
CULTIVADOR ELÉCTRICO
®
DESARME ILUSTRADO DE PARTES
CULTIVADOR ELÉCTRICO
Modelo 109312-01
1
7 4
5
7 6
6
3 2
40 42
41
4042 29
34 45
8 9
15
13 51
50
49 35
11
30 31
33
16 17
18
32
32
48
14
10 48 52
53 30
27
44
39 43 37
46
38 47 28
26 19
48
22
23
21 20
25
48 24
31
12 36
47 47
25
109363
MANUAL DEL PROPIETARIO
Para más información, visite www.desatech.com No. No. de
Clave Parte Descripción Cantidad 29 109347-01 Cordón de alimentación 1 30 109367-01 Perno con cabeza tipo montura
0,312-18 x 1,5 pulgadas 2 31 109366-01 Perilla del manubrio 2 32 WLE-5 Arandela de presión del diente
exterior 2
33 108444-02 Soporte derecho del manubrio 1 34 H5C4-40C Perno cabeza hexagonal
0,25-20 x 5 pulgadas 2 35 109344-01 Caja posterior 1 36 109341-01 Espuma aislante 1 37 109368-01 Eje pasador 0,25 x 1 pulgadas 1 38 109369-01 Presilla de retención 1 39 109356-01 Consola del conjunto rueda 1
40 109374-01 Rueda 2
41 109358-01 Conjunto eje 1 42 109377-01 Tapa de la tuerca 2 43 109365-01 Presilla de retención 2 44 109364-01 Presilla del cordón 4 45 109361-01 Presilla de la correa 1 46 H5C4-8C Perno cabeza hexagonal
0,25-20 x 1 pulgadas 1 47 NEC-4C Contra tuerca hexagonal 0,25-20 7 48 107708-01 Tornillo autorroscante cabeza
redondeada 16
49 109336-01 Rueda dentada 1 50 059606 Engranaje impulsor 1 51 075676 Rodamiento de rodillos de la
rueda dentada 1 52 109350-01 Placa del guardabarros 1 53 103708-01 Tornillo, PPH TPG "B" 2
LISTA DE PARTES
CULTIVADOR ELÉCTRICO
Modelo 109312-01
Esta lista contiene las partes de repuestos usadas en su cultivador. Cuando solicite partes, asegúrese de dar el número correcto del modelo, luego el número de parte y la descripción de la parte deseada.
No. No. de
Clave Parte Descripción Cantidad 1 109384-01 Conjunto Transmisión 1 2 109342-01 Conjunto púas 1 3 109342-04 Conjunto púas 1 4 109342-02 Conjunto púas 1 5 109342-03 Conjunto púas 1 6 109349-01 Arandela de felpa 2 7 109339-01 Tapa contra el polvo 2 8 109332-01 Guardabarros 1 9 109333-01 Conjunto plancha del rodamiento 1 10 H5C4-20C Perno cabeza hexagonal
0,25-20 x 2,5 pulgadas 4 11 109385-01 Conjunto motor 1 12 076014 Conjunto carcaza del motor 1 13 059045 Tornillo autorroscante cabeza
redondeada 4
14 109343-01 Caja frontal 1 15 109345-01 Reductor de la resistencia de aire 1 16 108444-01 Soporte izquierdo del manubrio 1 17 108443-01 Conjunto tubo del manubrio
superior 1
18 099829-05 Cordón con vaina 1 19 107729-01 Micro interruptor 1 20 109360-01 Tapa lateral de la traba en
apagado 1
26
Para más información, visite www.desatech.com 109363
CULTIVADOR ELÉCTRICO
®
SERVICIO DE
REPARACIÓN
Nota: Use solamente partes de repuesto originales. Esto protegerá la cobertura de su garantía en repuestos reemplazados bajo esta garantía.
Cada centro de servicio autorizado opera independientemente y tiene diferente pro-pietario. Para mayor información sobre ser-vicios adicionales o sobre la garantía llame al 1-800-858-8501 o visite nuestro sitio web de servicio técnico www.desatech.com.
PARTES DE REPUESTO
Para conseguir partes de repuesto origina-les, póngase en contacto con distribuidores autorizados de este producto o con su cen-tral más cercana de repuestos que se listan más abajo.SERVICIO
TÉCNICO
Pueda que usted tenga preguntas adiciona-les acerca del ensamble, operación o man-tenimiento de este cultivador. De ser así, póngase en contacto con el Departamento de Servicio Técnico al 1-800-858-8501. Usted puede también visitar nuestro sitio web de servicio técnico
www.desatech.com.
ANÁLISIS DE
AVERÍAS
PROBLEMA
El motor no funciona cuando se aprieta la palanca de accionamiento
El motor funciona, pero las púas no se mueven
Sale humo del cultivador
CAUSA PROBABLE
1. La palanca de traba en apagado no está presionada para que suelte la palanca de accionamiento
2. La conexión del cordón de extensión está floja
3. El disyuntor del cultivador está disparado
4. El disyuntor de la casa está disparado o un fusible de línea está abierto
5. Escobillas deterioradas del motor 6. Cableado abierto en el cultivador
Falla del tren de engranaje
Cultivador dañado. No lo use
ACCIÓN CORRECTIVA
1. Presione completamente la palanca de traba en apagado antes de apretar la pa-lanca de accionamiento (vea en la pági-na 22, Arranque del cultivador) 2. Revise las conexiones del cordón
3. Revise el disyuntor del cultivador. (Vea
Protección con disyuntor, página 21) 4. Revise el disyuntor o el fusible de línea (Vea
en la página 21, Protección con disyuntor) 5. Visite un centro de servicio autorizado 6. Visite un centro de servicio autorizado
Visite un centro de servicio autorizado
Visite un centro de servicio autorizado Nota: Para ayuda adicional visite nuestro
sitio web de servicio técnico
www.desatech.com.
ADVERTENCIA: Antes de dar servicio al cultivador desconéctelo de la fuente de alimentación. Podrían ocurrir lesiones graves o la muerte sea por incendio, sacudida eléctrica o por contacto del cuerpo con partes móviles.
SERVICIO DE GARANTÍA
Si el cultivador requiere servicio de garan-tía, devuélvalo al centro de servicio autori-zado más cercano. Debe mostrar la prueba de compra. Si se produjo un daño por mano de obra o materiales defectuosos, nosotros sin ningún costo repararemos o reemplaza-remos el cultivador. Nota: No está cubierto bajo la garantía el uso normal, mal uso, abuso, negligencia o daño accidental.SERVICIO FUERA DE LA
GARANTÍA
27
109363
MANUAL DEL PROPIETARIO
Para más información, visite www.desatech.com
DISTRIBUIDORES DE REPUESTOS
Continuación
Master Part Distributors 1251 Mound Avenue NW Grand Rapids, MI 49504-2672 616-791-0505
1-800-446-1446 www.masterparts.net Hance Distributors, Inc. 12795 16th Avenue North Plymouth, MN 55441-4556 763-559-2299
www.hanceco.com
Automotive Equipment Service 3117 Holmes
Kansas City, MO 64109-1716 816-531-9144
1-800-843-3546 www.aes-lawnparts.com
Bowden Electric Motor Service 1681 S. Wesleyan Blvd.
Rocky Mount, NC 27803 252-446-4203
East Coast Energy 10 East Route 36
West Long Branch, NJ 07764-1501 1-800-755-8809
Forrest Lytle and Sons, Inc. 740 West Galbraith Road Cincinnati, OH 45231-6002 513-521-1464
Bortz Chain Saw Shop Road #2, Box 64A Oley, PA 19547-9412 610-987-6452
21st Century
2950 Fretz Valley Road Perkasie, PA 18944-4034 215-795-0400
1-800-325-4828
Laportes 2444 N 5th Street
Hartsville, SC 29550-7704 843-332-0191
MTA Distributors 555 Hickory Hills Blvd. Nashville, TN 37189-9244 615-299-8777
1-800-264-0225
Webbs Appliance Center 1519 Church Street Nashville, TN 37203-3004 615-329-4079
1-800-899-4079 Industrial Hardware 4109 Bainbridge Blvd. Chesapeake, VA 23324-1403 804-543-2232
1-800-788-0008 [email protected] Mills Lawn and Garden 928 Commonwealth Place Virginia Beach, VA 23464 757-361-9293
www.mills-parts.com Tuco Industrial Products 5223 180th Street SW Suite 4A-1
Lynnwood, WA 98037-4506 425-743-9533
1-800-735-1268 www.tucoheat.com Ray’s Portable Heater Service
3191 Myers Road Camino, CA 95709-9550 530-644-7716
Baltimore Electric 5 Manila Drive
Hamden, CT 06514-0322 203-248-7553
1-800-397-7553 Eckley’s Small Engine 31617 Spruce Drive Eustis, FL 32726-9592 352-357-6764
Parts Company of America 1657 Shermer Road
Northbrook, IL 60062-5362 708-498-5900
1-800-323-0620 www.grainger.com Portable Heater Parts
342 North County Road 400 East Valparaiso, IN 46383-9704 219-462-7441
1-800-362-6951
www.portableheaterparts.com [email protected] [email protected] FBD
1349 Adams Street
Bowling Green, KY 42103-3414 270-846-1199
1-800-654-8534 [email protected]
Lyons & Lyons Sales Co. Inc. Glen Arm Road
Glen Arm, MD 21057-9454 410-665-6500