Sprint
®Digital Voice
Models DVP – 203
& DVP – 403
System
Administrator’s
Guide
Nothing contained in this guide shall be deemed to be, and this guide does not constitute,
a warranty of, or representation with respect to, any of the equipment covered. This guide
is subject to change without notice, and the Voice Mail manufacturer has no obligation to
provide any updates or corrections to this guide. Further, the Voice Mail Manufacturer
also reserves the right, without prior notice, to make changes in equipment design or
components as it deems appropriate. No representation is made that this guide is
complete or accurate in all respects, and the Voice Mail manufacturer shall not be liable
for any errors or omissions. In no event shall the Voice Mail manufacturer be held liable
for any incidental or consequential damages in connection with the use of this guide.
SPRINT AND THE DIAMOND LOGO ARE REGISTERED TRADEMARKS OF SPRINT
COMMUNICATIONS COMPANY L.P., USED UNDER LICENSE.
Protegé
®is a registered trademark of Sprint Products Group, Inc.
Table of Contents
Table of Contents
Table of Contents
Table of Contents
Chapter 1
Introducing Sprint Digital Voice
About Sprint Digital Voice ... 1
About the Automated Attendant ... 1
Sprint Digital Voice Specifications ... 1
About the Documents ... 2
Chapter 2
Understanding and Changing the Default Setup
Programming Sprint Digital Voice ... 3The Default Automated Attendant Setup ... 3
The Default Mailbox Types and Numbering... 5
The Default Subscriber Mailbox Features ... 6
Installation on Phone Systems other than the Protégé... 7
Chapter 3
Customizing Automated Attendant Features
Setting Up Schedules for the Main Greetings ... 8Recording the Main Greetings... 10
Temporarily Overriding All Main Greetings ... 12
Setting Up a Dialing Options Menu ... 14
Recording an Announcement Message ... 22
Setting Up UCD Overflow Announcement/Reroute ... 23
Chapter 4
Customizing Subscriber Mailbox Features
Creating a System Administrator Programming Extension...24Enabling or Disabling a Message Lamp ... 25
Blocking Automated Attendant Calls ... 26
Using Forced Unscreened Transfer ... 27
Assigning a Mailbox Name... 28
Re-Routing a Subscriber’s Callers... 29
Setting the Message Limit for a Subscriber’s Mailbox ... 31
Chapter 5
Using Administrative and Maintenance Features
Removing an Extension... 33Deleting a Subscriber Mailbox Security Code... 34
Erasing All Subscriber Messages ... 35
Recording a Subscriber Mailbox Name ... 36
Changing the FAX Extension ... 37
Setting the System Time... 38
Setting the System Date ... 39
Getting the System Version Number... 40
Initializing (Erasing) All System Messages ... 41
Restoring the Initial (Default) System Settings ... 42
Changing the Phone System Integration and Starting Extension Number... 43
Changing Ranges of Mailboxes in the Numbering Plan ... 44
Monitoring Future Delivery Mailboxes ... 46
Appendixes
Appendix A, User Menu Tree... 47Appendix B, System Administrator Menu Tree ... 48
Appendix C, Database Management Menu Tree... 49
Appendix D, Default Numbering Plan... 52
Appendix E, Call Routing Mailboxes Numbering Plan ... 54
Table of Contents
Table of Contents
Table of Contents
Table of Contents
ii iiii
Chapter 1: Introducing Sprint Digital Voice
Chapter 1: Introducing Sprint Digital Voice
Chapter 1: Introducing Sprint Digital Voice
Chapter 1: Introducing Sprint Digital Voice
About Sprint Digital Voice
Sprint Digital provides an Automated Attendant and Sprint Digital Voice for your phone system.
Sprint Digital Voice does the following:
• Lets an Automated Attendant caller leave a recorded message at an extension when it is busy, unanswered, or in the Do Not Disturb mode. If callers do not wish to leave a message, they can return to the Automated Attendant Main Greeting.
• Provides a subscriber (Voice) mailbox for each extension in the phone system. The subscriber mailbox holds the
recorded messages, lets the extension users record and send messages to each other, plus more.
About the Automated Attendant
Sprint Digital Voice Automated Attendant does the following:
• Answers your incoming calls.
• Provides dialing instructions to callers and enables them to direct their own calls to a desired extension, department or company operator by dialing digits on their touch-tone telephone.
When the Automated Attendant answers, the caller hears a recorded Main Greeting (also called an Instruction Menu). The Main Greeting typically begins with Thank you for calling ABC Thank you for calling ABC Thank you for calling ABC Thank you for calling ABC Company
Company Company
Company followed by a listing of dialing options. The following message illustrates the use of dialing options: If you know the If you know the If you know the If you know the extension number you wish to reach, please enter it now. extension number you wish to reach, please enter it now. extension number you wish to reach, please enter it now. extension number you wish to reach, please enter it now. For For For For sales, press one. For customer service, press two,
sales, press one. For customer service, press two, sales, press one. For customer service, press two, sales, press one. For customer service, press two, etc.
Sprint Digital Voice Specifications
Number of Ports: DVP – 203 has two ports
DVP – 403 has four ports
Voice Storage Capacity: 3.5 hours
Subscriber Mailboxes: Up to 50 subscriber mailboxes
Trunk Mailboxes Unused
Telephone System A Phone System Single Line Programming Interface: Extension
Electrical Requirements: 120V, 60 Hz
Chapter 1: Introducing Sprint Digital Voice
Chapter 1: Introducing Sprint Digital Voice
Chapter 1: Introducing Sprint Digital Voice
Chapter 1: Introducing Sprint Digital Voice
2 22
2 – ◆◆◆ –◆––– Introducing Sprin Introducing Sprint Digital Voice System Introducing Sprin Introducing Sprint Digital Voice Systemt Digital Voice Systemt Digital Voice System Issue Issue 1.6Issue 1.6Issue 1.61.6
About the Documents
• User’s Guide
This guide explains how to use Sprint Digital Voice subscriber mailboxes. It is for the extension users. (The subscriber mailboxes are referred to as voice mailboxes in the User’s Guide.)
• Quick Start Guide
This guide explains how to get Sprint Digital Voice up and running with your phone system. When the installer is done with the setup procedure, each System Administrator extension will have a subscriber mailbox and the Automated Attendant will answer calls, using the default Main Greeting and dialing options. To customize Sprint Digital Voice, see the System Administrator’s Guide.
• System Administrator’s Guide
This is a detailed explanation of Sprint Digital Voice programmable features. These features customize the subscriber mailboxes, the Automated Attendant, and Sprint Digital Voice-wide features. In addition, the appendixes at the end of this guide contain menu trees for quick reference to programming and using the system. This guide is intended for the installer and/or the person who maintains the voice mail on a daily basis.
• Laptop Programming Guide
This document details how to connect a laptop computer to Sprint Digital Voice. An installer uses the laptop to perform advanced programming options that are not available through a System Administrator Mailbox. These programming options should not be used unless Sprint Products Group Technical Services request changes be made. Changing any default settings may alter the operation of the voice mail system.
• Integration Guide
This document details the programming you must perform on your phone system when integrating with the Sprint Digital Voice system. Use this guide if using a phone system other than Protégé.
• Release Notes from Software Versions
Chapter 2: Understanding and Changing the Default Setup
Chapter 2: Understanding and Changing the Default Setup
Chapter 2: Understanding and Changing the Default Setup
Chapter 2: Understanding and Changing the Default Setup
Programming Sprint Digital Voice
Programming will change or customize the default settings for the voice mail features described in Chapters 3 to 5 in this guide. To program these features, you must use a Sprint Digital Voice Administrator mailbox. The lowest numbered extension is a permanent System Administrator extension. You can convert any Subscriber extension to that of a System Administrator as explained in Chapter 3.
For easy reference, the tables on the following pages list the voice mail features that you can change. The tables provide the default values and a document reference (including a chapter number and a feature title), so that you can find the
information/instructions you need to change these default values. (The feature descriptions in Chapters 3 to 5 also provide the default values for Sprint Digital Voice features.)
The Default Automated Attendant Setup
TABLE 1: Default Automated Attendant Setup at a Glance
Feature Default Value Where To Find Instructions to Change the Default ValuesUse this Document: Chapter # Feature Title in Chapter
Main Greeting
Schedules for Playing Main Greeting (s)
Thank you for calling. If you are calling from a Touch Tone phone, please dial the extension number you wish to reach or dial 0 for assistance. If you are calling from a rotary dial phone, please stay on the line for assistance.
Sched 1: Mon-Fri, starting at 9 AM, using Call Routing Mailbox 802 (with DAT 1) ✝
Sched 2: Mon-Fri, starting at 5 PM, using Call Routing Mailbox 803 (with DAT 2) ✝
Programming Guide:
- to record Main Greetings
- to set up schedules (20 max) for Main Greetings - to override Main Greetings
3
3
- Recording the Main Greetings
- Setting Up Schedules for the Main Greetings
- Temporarily Overriding All Main Greetings
Dialing Options Menu [Dial Action (DAT)] 1, 4, 5
Automated Attendant callers can: - Press 0 to reach the lowest numbered extension in the system.
- Dial extension to transfer to it. - Press 9 to hang up call. - Press * & extension to leave a message.
- Press # and extension to log onto that mailbox.
Also note that:
- Actions for Keys1 - 8 depend on the phone system.
- The Time-out function automatically transfers a call to the lowest numbered extension a caller does notdial anything after the MainGreeting finishes.
Programming Guide:
- to change the Dialing Options Menu
- to record Announcement Message (if you want callers to be able to press a number to listen to a pre-recorded announcement)
3
3
- Setting Up a Dialing Options Menu
- Recording an Announcement Message
✝ The Protegé® XTX uses four digit extension numbers, so the Call Routing mailboxes are numbered
Chapter 2: Understanding and Changing the Default Setup
Chapter 2: Understanding and Changing the Default Setup
Chapter 2: Understanding and Changing the Default Setup
Chapter 2: Understanding and Changing the Default Setup
4 44
4 – ◆◆◆◆ –––– Understanding and Changing the Default Setup Understanding and Changing the Default Setup Understanding and Changing the Default Setup Issue Understanding and Changing the Default Setup Issue 1.6Issue 1.6Issue 1.61.6
TABLE 1: Default Automated Attendant Setup at a Glance
(cont’d)
Feature Default Value Where To Find Instructions to Change the Default Values
Use this Document: Chapter # Feature Title in Chapter
Dialing Options Menu [Dial Action Tables (DATs)] 2, 3
Automated Attendant callers can: - Press 0 to leave a message for the lowest numbered extension. - Dial extension to transfer to it. - Press 9 to hang up call. - Press * & extension to leave a message.
- Press # and extension to log onto that mailbox.
Also note that:
- Actions for Keys 1 - 8 depend on the phone system.
- The Time-out function automatically gives the option to record a message for the lowest numbered extension if a caller does notdial anything after the Main Greeting finishes.
Programming Guide:
- to change the Dialing Options Menu
- to record Announcement Message (if you want callers to be able to press a number to listen to a pre-recorded announcement)
3
3
- Setting Up a Dialing Options Menu
Chapter 2: Understanding and Changing the Default Setup
Chapter 2: Understanding and Changing the Default Setup
Chapter 2: Understanding and Changing the Default Setup
Chapter 2: Understanding and Changing the Default Setup
The Default Mailbox Types and Numbering
TABLE 2: Default Mailbox Types and Numbering at a Glance
Mailbox Type What It Does Default Numbers/Number
Available
Where to Find Instructions to Change Features
Use this Document: Chapter # Feature Title in Chapter Subscriber Holds messages
for an extension user and provides access to voice mail features.
50 Subscriber Mailboxes (49 if you connect a FAX machine to an extension)
Numbering of the Mailboxes depends on the phone system.
Programming Guide: - to change all features
User Guide:
- to change user features from a Subscriber’s extension
4
N/A
All features apply
All features apply
Announcement Plays an announcement message (e.g., travel info) to Auto Attendant callers.
800,801, 808 (use 808 if you have UCD Overflow set up) (8000, 8002, 8008 in Protegé®
XTX)
Programming Guide:
- to record the announcement
3 - Recording an Announcement Message Call Routing (Automated Attendant) Answers calls and lets callers press numbers on their phones to process calls.
802, 803, 804, 807, 809 (use 809 for UCD Re-Route if this feature is in phone system) (8002, 8003, 8004, 8007 and 8009 in Protegé XTX)
Programming Guide:
- to work with Call Routing Mailboxes
4 All features apply (except Recording an Announcement Message)
Distribution Distributes a single message to all subscriber mailboxes.
805 (8005 in Protegé XTX)
User’s Guide:
- to distribute message to all subscriber mailboxes
Programming Guide
- to erase messages distributed to Subscriber Mailboxes that do not have users/extensions
N/A
5
- Recording and Sending a Message & Future Delivery Message
- Erasing All Subscriber Messages
Future Delivery Stores Future Delivery Message until date and time of delivery.
806 (8006 in Protegé XTX)
User’s Guide:
- to delete a Future Delivery message from Future Delivery Mailbox
N/A - Recording and Sending a Future Delivery Message
Trunk (future) 8 Maximum. The total and
numbering of trunk mailboxes depends on the phone system. The voice mail uses trunk mailboxes for information sent from some phone systems. You cannot program any options for these mailboxes. You can only program the starting extension number.
Programming Guide:
- to change starting number of trunk mailboxes
Using a Laptop with Sprint
Digital Voice
- to change ranges of trunk mailboxes numbers
5
2 (in section4)
- Changing the Phone System Integration and Numbering Plan
Chapter 2: Understanding and Changing the Default Setup
Chapter 2: Understanding and Changing the Default Setup
Chapter 2: Understanding and Changing the Default Setup
Chapter 2: Understanding and Changing the Default Setup
6 66
6 – ◆◆◆◆ –––– Understanding and Changing the Default Setup Understanding and Changing the Default Setup Understanding and Changing the Default Setup Issue Understanding and Changing the Default Setup Issue 1.6Issue 1.6Issue 1.61.6
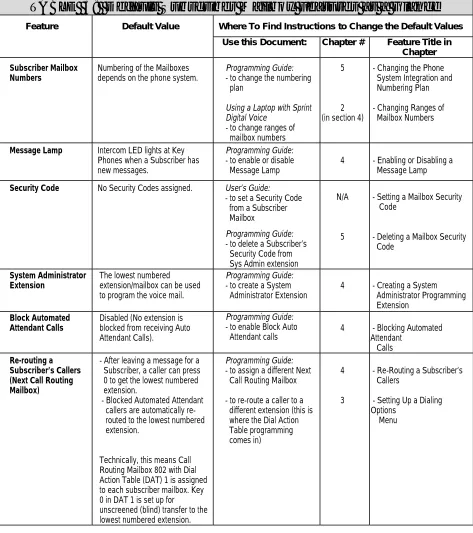
The Default Subscriber Mailbox Features
TABLE 3: Default Subscriber Mailbox Features at a Glance
Feature Default Value Where To Find Instructions to Change the Default Values
Use this Document: Chapter # Feature Title in Chapter
Subscriber Mailbox Numbers
Numbering of the Mailboxes depends on the phone system.
Programming Guide:
- to change the numbering plan
Using a Laptop with Sprint
Digital Voice
- to change ranges of mailbox numbers
5
2 (in section 4)
- Changing the Phone System Integration and Numbering Plan
- Changing Ranges of Mailbox Numbers
Message Lamp Intercom LED lights at Key Phones when a Subscriber has new messages.
Programming Guide:
- to enable or disable Message Lamp
4 - Enabling or Disabling a Message Lamp
Security Code No Security Codes assigned. User’s Guide:
- to set a Security Code from a Subscriber Mailbox
Programming Guide:
- to delete a Subscriber’s Security Code from Sys Admin extension
N/A
5
- Setting a Mailbox Security Code
- Deleting a Mailbox Security Code
System Administrator Extension
The lowest numbered extension/mailbox can be used to program the voice mail.
Programming Guide:
- to create a System Administrator Extension
4 - Creating a System Administrator Programming Extension
Block Automated Attendant Calls
Disabled (No extension is blocked from receiving Auto Attendant Calls).
Programming Guide:
- to enable Block Auto Attendant calls
4 - Blocking Automated Attendant
Calls Re-routing a
Subscriber’s Callers (Next Call Routing Mailbox)
- After leaving a message for a Subscriber, a caller can press 0 to get the lowest numbered extension.
- Blocked Automated Attendant callers are automatically re- routed to the lowest numbered extension.
Technically, this means Call Routing Mailbox 802 with Dial Action Table (DAT) 1 is assigned to each subscriber mailbox. Key 0 in DAT 1 is set up for unscreened (blind) transfer to the lowest numbered extension.
Programming Guide:
- to assign a different Next Call Routing Mailbox
- to re-route a caller to a different extension (this is where the Dial Action Table programming comes in)
4
3
- Re-Routing a Subscriber’s Callers
- Setting Up a Dialing Options
Chapter 2: Understanding and Changing the Default Setup
Chapter 2: Understanding and Changing the Default Setup
Chapter 2: Understanding and Changing the Default Setup
Chapter 2: Understanding and Changing the Default Setup
TABLE 3: Default Subscriber Mailbox Features at a Glance (cont’d)
Feature Default Value Where To Find Instructions to Change the Default Values
Use this Document: Chapter # Feature Title in Chapter Mailbox Name No Mailbox Names are
programmed (assigned) or recorded.
Programming Guide:
- to program a name - for Administrators to record names
User’s Guide:
- for users to record names
4 5
N/A
- Assigning a Mailbox Name - Recording a Subscriber’s Mailbox Name
- Recording a Mailbox Name
Setting the Message Limit
25 Messages. The System Administrator can set the maximum number of messages allowed in a subscriber mailbox (0-300 is the range.)
Programming Guide
- for System
Administrators to change the number of messages in a subscriber mailbox
4 - Setting the Message Storage Limit for a Subscriber’s Mailbox
Message Notification No Message Notification is set up. Message Notification allows users to set up their mailboxes so that the voice mail notifies them when they have new messages. They specify the type of number that they want the voice mail to call: outside, extension or digital pager.
User’s Guide
- for Users to set up Message Notification at their phones
N/A N/A
Forced Unscreened (blind) Transfer
Disabled. (Extensions receive screened transfers and the voice Mail handles incomplete transfers.)
System Guide:
- To force unscreened transfers
4 - Using Forced Unscreened Transfer
Installation on Phone Systems other than the Protégé
For specific information on installing and programming the Sprint Digital voice for use on phone systems other than the Protégé, refer to the Integration Guide and the Release Notes for Software Versions documents.
If you are installing the Sprint Digital Voice on a phone system other than the Protégé, you should use this document as a reference manual.
Chapter 3: Customizing Automated Attenda
Chapter 3: Customizing Automated Attenda
Chapter 3: Customizing Automated Attenda
Chapter 3: Customizing Automated Attendant Features
nt Features
nt Features
nt Features
8 88
8 – ◆◆◆◆ –––– Customizing Automated Attendant Features Customizing Automated Attendant Features Customizing Automated Attendant Features Issue Customizing Automated Attendant Features Issue 1.6Issue 1.6Issue 1.61.6
Setting Up Schedules for the Main Greetings
Description
The Automated Attendant can answer calls with different recorded Main Greetings. Each Main Greeting is programmed through the phone using an Instruction Menu. You can have one Main Greeting for business hours and another Main Greeting for off-hours. However, you have to set up schedules for the Main Greetings so that they will play when you want them to play.
When you program an Answering Schedule, the voice mail will want you to enter the following four items:
• A schedule number (1-20). Sprint Digital Voice allows you to set up 20 different schedules.
• Day, date, or range of days when the desired Main Greeting should play (for example, Monday through Friday).
• Time of day when the Main Greeting should start playing (for example, 8:30 a.m.)
• Call Routing Mailbox number (802, 803, 804, 807, 809 for the Protegé® CTX/MTX/LTX or 8002, 8003, 8004, 8007, 8009 in XTX) that should answer the call. Remember, a Call Routing Mailbox is essentially Sprint Digital Voice Automated Attendant Mailbox. It answers an outside call and lets callers press numbers on their touchtone phone to send (route) their own call to the desired extension (or other pre-programmed destination).
Default
• Schedule 1: Monday to Friday, Starting at 9:00 a.m., using Call Routing Mailbox 802.
• Schedule 2: Monday to Friday, Starting at 5:00 p.m., using Call Routing Mailbox 803. (Saturday and Sunday follow Schedule 2 since another schedule has not taken over. A new schedule will not take over until Monday at 9:00 a.m.)
Example
For example, suppose your company is on a four-day work week schedule.
• Schedule 1 can be for Monday-Thursday, starting at 8 a.m., using Call Routing Mailbox 802.
• Schedule 2 can be for Thursday, starting at 5 p.m., using Call Routing Mailbox 803.
Notes
• To record a Main Greeting (Instruction Menu) for a schedule, you have to enter the Call Routing Mailbox number that you assigned to the schedule.
Chapter 3: Customizing Automated Attendant Features
Chapter 3: Customizing Automated Attendant Features
Chapter 3: Customizing Automated Attendant Features
Chapter 3: Customizing Automated Attendant Features
Setting Up Schedules for the Main Greetings (cont’d)
Programming Instructions
To set up Answering Schedules:
1. Log onto System Administrator Mailbox (lowest numbered extension) as follows:
Dial Sprint Digital Voice outside number or extension number. 2. If you hear Main Greeting, dial # (or other logon code). Otherwise,
go to step three.
3. If requested, dial mailbox number. 4. If requested, dial Security Code.
5. Press DM (3 6) for Database Management Menu. 6. Press AN (2 6) for Answering Schedules. 7. Follow the voice prompts.
Related Programming
To ………… See…………later in this chapter
record a Main Greeting (Instruction Menu) Recording the Main Greetings
temporarily override all Main Greetings and play a different one
Chapter 3: Customizing Automated Attenda
Chapter 3: Customizing Automated Attenda
Chapter 3: Customizing Automated Attenda
Chapter 3: Customizing Automated Attendant Features
nt Features
nt Features
nt Features
10 10 10
10 – ◆◆◆ –◆–– Customizing Automated Attendant Features– Customizing Automated Attendant Features Customizing Automated Attendant Features Customizing Automated Attendant Features Issue Issue 1.6Issue 1.6Issue 1.61.6
Recording the Main Greetings
Description
A Main Greeting is the recorded message that plays when the Automated Attendant answers a call. The Main Greeting should do the following:
• Welcome the caller (Thank you for calling).
• List the available dialing options (Press four for sales. Press Press four for sales. Press Press four for sales. Press Press four for sales. Press five for technical support
five for technical support five for technical support five for technical support).
Default
Thank you for calling. If you are calling from a touchtone Thank you for calling. If you are calling from a touchtone Thank you for calling. If you are calling from a touchtone Thank you for calling. If you are calling from a touchtone phone please dial
phone please dial phone please dial
phone please dial the extension number you wish to reach or the extension number you wish to reach or the extension number you wish to reach or the extension number you wish to reach or dial zero for assistance. If you are calling from a rotary dial dial zero for assistance. If you are calling from a rotary dial dial zero for assistance. If you are calling from a rotary dial dial zero for assistance. If you are calling from a rotary dial phone, please stay on the line for assistance.
phone, please stay on the line for assistance. phone, please stay on the line for assistance. phone, please stay on the line for assistance.
Example
Thank you for calling ACME Auto Parts. If you are calling from Thank you for calling ACME Auto Parts. If you are calling from Thank you for calling ACME Auto Parts. If you are calling from Thank you for calling ACME Auto Parts. If you are calling from a touchtone phone and know th
a touchtone phone and know th a touchtone phone and know th
a touchtone phone and know the extension number you wish e extension number you wish e extension number you wish e extension number you wish to reach, please enter it now.
to reach, please enter it now. to reach, please enter it now.
to reach, please enter it now. For sales, press fourFor sales, press fourFor sales, press fourFor sales, press four. For technical For technical For technical For technical service, press five. If you are calling from a rotary dial phone, service, press five. If you are calling from a rotary dial phone, service, press five. If you are calling from a rotary dial phone, service, press five. If you are calling from a rotary dial phone, please stay on the line for assistance.
please stay on the line for assistance. please stay on the line for assistance. please stay on the line for assistance.
Notes
• Sprint Digital Voice can accommodate more than one Main Greeting, but you must set up (or check) the Answering Schedules before you record the Main Greeting (see Setting Up Answering Schedules For the Main Greetings) in this chapter. This is because the Answering Schedule includes a Call Routing Mailbox number, and you must enter that number when you record a Main Greeting (Instruction Menu).
• The recorded dialing options that belong in a Main Greeting come from the Dial Action Table that is assigned to the Call Routing Mailbox (see the Note above).
For your convenience, the Call Routing Mailbox numbers and their Dial Action Table assignments are shown below: Call Routing Mailbox 802 (8002 in Protegé® XTX) has Dial Action Table 1.
Call Routing Mailbox 803 (8003 in Protegé XTX) has Dial Action Table 2.
Call Routing Mailbox 804 (8004 in Protegé XTX) has Dial Action Table 3.
Call Routing Mailbox 807 (8007 in Protegé XTX) has Dial Action Table 4.
Call Routing Mailbox 809 (8009 in Protegé XTX) has Dial Action Table 5.
Chapter 3: Customizing Automated Attendant Features
Chapter 3: Customizing Automated Attendant Features
Chapter 3: Customizing Automated Attendant Features
Chapter 3: Customizing Automated Attendant Features
Recording the Main Greetings (cont’d)
Programming Instructions
To record a Main Greeting (Instruction Menu):
1. Log onto System Administrator Mailbox (the lowest numbered extension) as follows:
Dial Sprint Digital Voice outside number or extension number. 2. If you hear Main Greeting, dial # (or other logon code). Otherwise,
go to step three.
3. If requested, dial mailbox number. 4. If requested, dial Security Code.
5. Press S A (7 2) for System Administrator Menu. 6. Press I (4) for Instruction Menu.
7. Follow the voice prompts.
Related Programming
To ………… See…………later in this chapter
let the voice mail know when you want the Main Greeting to play (day/date and time)
Setting Up Schedules For the Main Greetings
Chapter 3: Customizing Automated Attenda
Chapter 3: Customizing Automated Attenda
Chapter 3: Customizing Automated Attenda
Chapter 3: Customizing Automated Attendant Features
nt Features
nt Features
nt Features
12 12 12
12 – ◆◆◆ –◆–– Customizing Automated Attendant Features– Customizing Automated Attendant Features Customizing Automated Attendant Features Customizing Automated Attendant Features Issue Issue 1.6Issue 1.6Issue 1.61.6
Temporarily Overriding All Main Greetings
Description
This feature lets you temporarily override all answering
schedules and have the Automated Attendant answer calls with a substitute Main Greeting (Instruction Menu). Technically this feature is called Answering Schedule Override. This is how it works:
1. Select one of the voice mail’s Call Routing Mailbox numbers (802, 803,804, 807 or 809) to be the “override” mailbox. Keep in mind that a Call Routing Mailbox (“Automated Attendant Mailbox”) is the actual Sprint Digital Voice mailbox that answers a call. These Call Routing Mailboxes may already be part of the existing Answering Schedules, but you must pick one anyway. Ideally, you are currently using only two of the Call Routing Mailboxes in the Answering Schedules and there is an unused Call Routing Mailbox.
2. Record the substitute Main Greeting for the override Call Routing Mailbox number.
3. Turn on Answering Schedule Override.
Default
Answering Schedule Override is off.
Example
Suppose there was a violent storm and you had to close your business in the middle of the afternoon. You could pick a Call Routing number and record an Instruction Menu something like this: Thank you for calling XYZ company. Due to the storm we Thank you for calling XYZ company. Due to the storm we Thank you for calling XYZ company. Due to the storm we Thank you for calling XYZ company. Due to the storm we will be closed for the rest of the day.
will be closed for the rest of the day. will be closed for the rest of the day.
will be closed for the rest of the day. You simply turn on Answering Schedule Override.
Notes
• The override Call Routing Mailbox (with its substitute Instruction Menu) will answer calls every day and around the clock UNTIL YOU TURN OFF Answering Schedule Override. When you do, programming will return to the original Call Routing Mailbox.
• If your phone system supports and you are using UCD Overflow, you should use Call Routing Mailbox 809 for UCD Overflow
• Protegé® XTX has four digit extension numbers (Call Routing Mailboxes are 8002, 8003, 8004 and 8007).
Programming Instructions
To use Answering Schedule Override:
1. Log onto System Administrator Mailbox (Extension 10) as follows:
Chapter 3: Customizing Automated Attendant Features
Chapter 3: Customizing Automated Attendant Features
Chapter 3: Customizing Automated Attendant Features
Chapter 3: Customizing Automated Attendant Features
Temporarily Overriding All Main Greetings (cont’d)
2. If you hear Main Greeting, dial # (or other logon code). Otherwise, go to step three.
3. If requested, dial mailbox number. 4. If requested, dial Security Code.
5. Press SA (7 2) for System Administrator Menu. 6. Press SO (7 6) for Answering Schedule Override. 7. Follow the voice prompts.
Related Programming
To ………… See…………in this chapter
record a Main Greeting (Instruction Menu) Recording the Main Greetings
find more information about answering schedules and set them up
Chapter 3: Customizing Automated Attenda
Chapter 3: Customizing Automated Attenda
Chapter 3: Customizing Automated Attenda
Chapter 3: Customizing Automated Attendant Features
nt Features
nt Features
nt Features
14 14 14
14 – ◆◆◆ –◆–– Customizing Automated Attendant Features– Customizing Automated Attendant Features Customizing Automated Attendant Features Customizing Automated Attendant Features Issue Issue 1.6Issue 1.6Issue 1.61.6
Setting Up a Dialing Options Menu
Description
Sprint Digital Voice lets you set up a dialing options menu for Automated Attendant callers who are using touchtone phones. They simply press a touchtone key (during the recorded Main Greeting) to direct their own call to a pre-programmed destination. For example, callers could hear and follow the voice prompt “Press two for John Smith,Press two for John Smith,Press two for John Smith,Press two for John Smith,” and Sprint Digital Voice will then transfer the call to John Smith’s extension.
You program the dialing options in a Dial Action Table. In this table, you assign an action and number to each touchtone key (0-8). When the caller dials or presses the key, the Automated Attendant performs the programmed action. The available actions and their associated numbers are listed below.
Example
You direct callers to press Key 5 to hear recorded directions to your company. First, you record an Announcement Message for Announcement Mailbox 800 (or 801, 808). The message is simply the directions to your company. Second, in the Dial Action Table, you assign the MG action (Go to a Pre-Defined Mailbox) and the number 800 (or 801, 808) to Key 5.
A Dial Action Table also lets you assign an action and number to the Time-out function. The Time-out function determines how the voice mail handles a call when the caller does not press a valid touchtone digit within seven seconds of the end of the Main Greeting. The Time-out function is primarily for callers who are using rotary dial phones. It also is used when a FAX machine is connected to an extension. Seven seconds is required to give the voice mail enough time to detect the FAX calling tone (CNG 1100 Hz).
Sprint Digital Voice provides five Dial Action Tables. They are numbered 1, 2, 3, 4, and 5. Dial Action Tables are associated with Call Routing (Automated Attendant) Mailboxes 802, 803, 804, 807, and 809 respectively. So if Call Routing Mailbox 802 is answering calls, the voice mail will let callers use the options in Dial Action Table 1. To let callers know which actions you have selected, include them in the Main Greeting that you record for Call Routing Mailbox 802. For more information about how a Call Routing (Automated Attendant) Mailbox answers calls, see
Setting Up Schedules for the Main Greetings in this chapter. For more information about Recording Main, see Recording the Main Greetings in this chapter.
Use Call Routing Mailbox 809 for UCD Re-Route message. Use Announcement Mailbox 808 for the UCD Overflow message (such as All Agents are currently on a call, please hold. The All Agents are currently on a call, please hold. The All Agents are currently on a call, please hold. The All Agents are currently on a call, please hold. The next available agent will be you shortly
Chapter 3: Customizing Automated Attendant Features
Chapter 3: Customizing Automated Attendant Features
Chapter 3: Customizing Automated Attendant Features
Chapter 3: Customizing Automated Attendant Features
Setting Up a Dialing Options Menu (cont’d)
Actions and Numbers for Touch Tone Keys
The bold letters in parentheses next to the action’s name are programming codes. You must enter these codes to assign the action to a key when you program a Dial Action Table. In addition, at the end of this list are special codes that you can enter if you need them.
Hear Current Parameters For Keys (HP)
This feature plays the current Dial Action Table assignments for the touchtone keys. (This is not an action for a key.)
Go to a Pre-Defined Mailbox (MG, 64)
This feature lets the caller press a key to go to a pre-defined mailbox. You can enter the following mailbox numbers:
• Announcement Mailbox (800, 801, 808) (8000, 8001, 8008 in Protegé®
XTX). Sprint Digital Voice plays the
Announcement that you record for the Announcement Mailbox. Using the example on the previous page: you want callers to press Key 5 to listen to recorded directions to your company. First, you record the directions in a Announcement Message for Announcement Mailbox
800,801 or 808. Second, in the Dial Action Table, you assign the MG action (Go to a Pre-Defined Mailbox) and the number 800, 801 or 808 to Key 5.
• Call Routing Mailbox (802, 803, 804, 807, 809) (8002, 8003, 8004, 8007, and 8009 in the Protegé XTX). The voice mail plays the Main Greeting that you record for the Call Routing Mailbox, then lets the caller use the dialing options in the associated Dial Action Table. Keep in mind that Call Routing Mailboxes 802, 803, 804, 807, and 809 have Dial Action Tables 1, 2 3, 4, and 5 respectively.
• Distribution Mailbox (805) (8005 in the Protegé XTX). The voice mail lets the caller record a message that will be automatically distributed to all subscriber mailboxes.
Caller-Dialed Go to a Mailbox (CG, 24)
This feature lets the caller dial mailbox numbers to go to those mailboxes. Assign CG to Key 8, which is the first digit of the available mailbox numbers in the system. There is no need to assign a number to the CG action. See action MG (above) for the types of mailboxes that the caller can dial.
Chapter 3: Customizing Automated Attenda
Chapter 3: Customizing Automated Attenda
Chapter 3: Customizing Automated Attenda
Chapter 3: Customizing Automated Attendant Features
nt Features
nt Features
nt Features
16 16 16
16 – ◆◆◆ –◆–– Customizing Automated Attendant Features– Customizing Automated Attendant Features Customizing Automated Attendant Features Customizing Automated Attendant Features Issue Issue 1.6Issue 1.6Issue 1.61.6
Setting Up a Dialing Options Menu (cont’d)
The difference between screened and unscreened transfers is in how an incomplete transfer is handled. An incomplete transfer is the transfer of an incoming call to an extension that does not pick it up. The phone system handles an incomplete
unscreened transfer, such as an unanswered transfer. Sprint Digital Voice handles an incomplete screened transfer.
Pre-Defined Extension Transfer [Screened] (ET, 38) This feature lets the caller press one key to make a screened transfer to a pre-defined Subscriber extension.
If the transfer is incomplete, the voice mail will retrieve the call after approximately three rings and lets the caller leave a message or return to the Automated Attendant Main Greeting Menu. A screened transfer will not ring an extension at all if:
• The extension’s subscriber mailbox has Auto Attendant Do Not Disturb on. To turn it off, see Recording a Mailbox Greeting in the User’s Guide.
• The Subscriber extension blocks Automated Attendant Transfers. To block these transfers, see Blocking Automated Attendant Calls in this guide.
• The extension is busy, not installed or in Do Not Disturb. If the extension is busy, the voice mail says Extension XXXExtension XXXExtension XXXExtension XXX (or recorded mailbox name) is busyis busyis busyis busy. To leave a message, To leave a message, To leave a message, To leave a message, press one. For other options, press two.
press one. For other options, press two. press one. For other options, press two.
press one. For other options, press two. If the extension is in Do Not Disturb, the voice mail says Extension XXX is not Extension XXX is not Extension XXX is not Extension XXX is not available.
available. available.
available. To leave a message, press one. For other options, To leave a message, press one. For other options, To leave a message, press one. For other options, To leave a message, press one. For other options, press two
press two press two
press two (plays the Automated Attendant Main Greeting).
Caller-Dialed Extension Transfer [Screened] (CT, 28) This feature lets the caller dial the extension number to which to transfer the call. You can assign CT to the key that
corresponds to the first digit of the phone system extension numbers. There is no need to assign a number to the CT action. For example, assigning CT to Key 3 lets a caller dial 3XX to make a screened transfer to extensions 3XX.
If the transfer is incomplete, the voice mail retrieves the call after approximately three rings and lets the caller leave a message or return to the Main Menu. A screened transfer will not ring an extension at all if:
• The extension has Auto Attendant Do Not Disturb on. To turn it off, see Recording a Mailbox Greeting in the User’s Guide.
• The Subscriber extension blocks Automated Attendant Calls. See Blocking Automated Attendant Calls For An Extension
in this guide.
The extension is busy, not installed, or in Do Not Disturb. If the extension is busy, the voice mail says Extension XXXExtension XXXExtension XXXExtension XXX (or
recorded mailbox name) is busy. is busy. is busy. is busy. To leave a message, press one. To leave a message, press one. To leave a message, press one. To leave a message, press one. For other options, press two.
For other options, press two. For other options, press two.
Chapter 3: Customizing Automated Attendant Features
Chapter 3: Customizing Automated Attendant Features
Chapter 3: Customizing Automated Attendant Features
Chapter 3: Customizing Automated Attendant Features
Setting Up a Dialing Options Menu (cont’d)
available. To leave a message, press one. For other options, available. To leave a message, press one. For other options, available. To leave a message, press one. For other options, available. To leave a message, press one. For other options, press two
press two press two press two.
Unscreened (Blind) Transfer to a Pre-Defined Extension (UX, 89)
This feature lets the caller press one key to make an
unscreened transfer to a specific Subscriber extension. If the transfer is incomplete, the phone system will handle the call.
Unscreened Transfers to Caller-Dialed Extensions (UC, 82) This feature lets the caller dial extension numbers to make unscreened transfers to those extensions. Assign UC to the first digit of the extension numbers. There is no need to assign a number to the UC action. If the transfer is incomplete, the phone system will handle the call.
Message Recording For a Pre-Defined Subscriber Mailbox (MR, 67)
This feature lets the caller press one key to leave a message in a specific subscriber mailbox. The voice prompt for assigning this key action is Record a message for a preRecord a message for a preRecord a message for a pre----defined Record a message for a predefined defined mailboxdefined mailboxmailbox. The mailbox number for this action is simply the desired subscriber mailbox number.
After pressing a key with this assignment, a caller hears At the At the At the At the tone, you can leave a message for extension XXX
tone, you can leave a message for extension XXX tone, you can leave a message for extension XXX tone, you can leave a message for extension XXX.
Message Recording 2 For a Pre-Defined Subscriber Mailbox (CR, 27)
This feature lets the caller press one key to leave a message in a specific subscriber mailbox. You will not not not not hear a voice prompt for assigning this key action. The number for this action is simply the desired subscriber mailbox number.
After pressing a key with this assignment, a caller hears Recording
Recording Recording
Recording followed by a beep.
Directory Dialing Using First Names (DF, 33) or Last Name (DL, 35)
This feature lets the caller press one key to access Directory Dialing eithereithereithereither by First Names ororor by Last Names. There is no or need to assign a number to the DF or DL action. After pressing the key, the voice mail lets the caller dial the first few letters of a Subscriber’s first name or last name to transfer to the
Subscriber’s extension. The voice mail’s voice prompts guide the caller through the name-dialing process. Only one Directory Dialing scheme is available per system, so that you can select Direct Dialing eithereithereithereither by First orororor by Last Names, but you cannot use both.
The voice mail makes the type of transfer (screened or unscreened) that you have selected in the Dial Action Table.
Make sure that you assign (program) a name for each
subscriber mailbox. Otherwise Directory Dialing simply will not work.
Chapter 3: Customizing Automated Attenda
Chapter 3: Customizing Automated Attenda
Chapter 3: Customizing Automated Attenda
Chapter 3: Customizing Automated Attendant Features
nt Features
nt Features
nt Features
18 18 18
18 – ◆◆◆ –◆–– Customizing Automated Attendant Features– Customizing Automated Attendant Features Customizing Automated Attendant Features Customizing Automated Attendant Features Issue Issue 1.6Issue 1.6Issue 1.61.6
Setting Up a Dialing Options Menu (cont’d)
the voice mail will say For person A, dialFor person A, dialFor person A, dialFor person A, dial ___, For person B, dialFor person B, dialFor person B, dial For person B, dial
___, where person Aperson Aperson Aperson A and person B person B person B are the recorded names for person B each Subscriber’s Mailbox.
Hang up (HU, 48)
This feature allows a caller to press one key to terminate the call. You do not assign a number to the HU action.
You will not not not hear voice prompt for assigning this key action. not
Undefined Key (UK, 85)
This feature removes the action and number assigned to a key.
Restore Default Parameters (RD, 73)
This feature restores the default actions to the keys. See default settings on the next page.
Enter these codes For this special entry:
*F Flash
*S Wait for any type of sound
*P Non-monitored pause (the voice mail pauses two seconds, dials next digit.)
** * (star key) *# # (pound key) *1 [ (open bracket) *5 ] (close bracket)
Chapter 3: Customizing Automated Attendant Features
Chapter 3: Customizing Automated Attendant Features
Chapter 3: Customizing Automated Attendant Features
Chapter 3: Customizing Automated Attendant Features
Setting Up a Dialing Options Menu (cont’d)
Default
The actual defaults for Keys 1-8 depends on the phone system that you integrate with Sprint Digital Voice.
Key 0 (UX) Unscreened transfer to the lowest numbered extension (for Dialing Options Menu 1,4, and 5) (MR) Message Record for lowest numbered extension (for Dialing Options Menu 2 and 3).
Key 1-8
Either Unscreened transfer (UX) or Undefined (UK) to any extension the caller dials. Unscreened Transfer is assigned only to the keys that match the first digit of the extension numbers. For example, if the extensions are 10-26, Unscreened transfer is assigned to Keys 1 and 2. Keys 3-8 are assigned with Undefined (UK). Key 9 Hang up call.
Key * Leave “Quick Message” in caller-dialed mailbox. That is, the caller dials * (star), then a subscriber mailbox number to leave a message in that mailbox. The call goes directly to the Subscriber’s greeting.
Key # Log onto a subscriber mailbox. That is, the caller dials #, then a subscriber mailbox number to log onto that mailbox and listen to their messages and/or use other voice mail User Features.
Time-out
(UX) Unscreened transfer to the lowest numbered extension (for Dialing Options Menu 1, 4, and 5). (CR2) Message Record for the lowest numbered extension (for Dialing Options Menu 2 and 3). This means that after Time-Out, an Automated Attendant caller hears, RecordingRecordingRecordingRecording, followed by a beep.
Example
Extension 22 is for your Sales person, and you want callers to be able to press 1 to make a transfer to that extension. To set this up in Dial Action Table programming, you would do the following:
1. Select the action UX. The code UX is for Unscreened Unscreened Unscreened Unscreened (Blind) Transfer to a Pre
(Blind) Transfer to a Pre (Blind) Transfer to a Pre
(Blind) Transfer to a Pre----Defined ExtensionDefined ExtensionDefined ExtensionDefined Extension. 2. Select the number: 22.
3. Press the key for the action: one
Chapter 3: Customizing Automated Attenda
Chapter 3: Customizing Automated Attenda
Chapter 3: Customizing Automated Attenda
Chapter 3: Customizing Automated Attendant Features
nt Features
nt Features
nt Features
20 20 20
20 – ◆◆◆ –◆–– Customizing Automated Attendant Features– Customizing Automated Attendant Features Customizing Automated Attendant Features Customizing Automated Attendant Features Issue Issue 1.6Issue 1.6Issue 1.61.6
Setting Up a Dialing Options Menu (cont’d)
Notes
• The actions for Keys 9, * and # cannot be changed.
• To assign an action and number to the Time-out function, you must press the * key when the voice mail asks you to Please press the key for this action.
Please press the key for this action. Please press the key for this action. Please press the key for this action.
• If a caller records a message using a Distribution Mailbox, the message goes into each subscriber mailbox whether or not there is an associated extension. You should set the Message Storage Limit to zero (0) for subscriber mailboxes that do not have extensions.
• The default actions for Key 0 and Time-Out are different in Dial Action Tables 1, 4, and 5 than in Dial Action Tables 2 and 3. In Dial Action Tables 1, 4, and 5, Key 0 is set up so that when callers press Key 0, they are transferred to the lowest numbered extension. The Time-Out function is set up so that if callers do not press a touchtone digit at the end of the Main Greeting, they are transferred to the lowest numbered extension.
Dialing Options Menus 2 and 3 are used with Call Routing Mailboxes 803 and 804. The schedule for playing the Main Greeting for these Call Routing Mailboxes is Monday-Friday, starting at 5 p.m. This is after regular business hours for many companies. As a result, an operator may not be present to answer the phone. For this reason, in Dial Action Tables 2 and 3, Key 0 is set up so that when callers press the key, they can record a message for the lowest
numbered extension. They hear either the recorded greeting for that the Subscriber or, the default prompt, At At At At the tone
the tone the tone
Chapter 3: Customizing Automated Attendant Features
Chapter 3: Customizing Automated Attendant Features
Chapter 3: Customizing Automated Attendant Features
Chapter 3: Customizing Automated Attendant Features
Setting Up a Dialing Options Menu (cont’d)
Programming Instructions
To set up the dialing options in a Dial Action Table:
1. Log onto System Administrator Mailbox (lowest numbered extension) as follows:
Dial voice mail outside number or extension number. 2. If you hear Main Greeting, dial # (or other logon code).
Otherwise, go to step three. 3. If requested, dial mailbox number. 4. If requested, dial Security Code.
5. Press DM (3 6) for Database Management Menu.
6. Press DA (3 2) for Automated Attendant Dial Action Tables. 7. Select a Dial Action Table number (1, 2, 3, 4 or 5).
8. Follow the voice prompts.
Related Programming
• To record the Announcement Message for an
Announcement Mailbox (that is part of the CM or CG action), see Recording an Announcement Message in this chapter.
• For Directory Dialing, make sure that you have assigned either a first or a last name to each Subscribers Mailbox. For instructions, see Assigning a Mailbox Name in this guide. For Directory Dialing by First Names, assign to each mailbox the firstfirstfirst namefirstnamenamename of the Subscriber to whom it belongs. For Directory Dialing by Last Names, assign to each mailbox the last namelast namelast namelast name of the Subscriber to whom it belongs. If you assign the same name to two or more mailboxes, record a name for each subscriber mailbox. For instructions, see Recording a Subscriber’s Mailbox Name in this guide.
• To let callers know about the options in a Dial Action Table, you must record a Main Greeting for the
corresponding Call Routing Mailbox. For instructions, see
Chapter 3: Customizing Automated Attenda
Chapter 3: Customizing Automated Attenda
Chapter 3: Customizing Automated Attenda
Chapter 3: Customizing Automated Attendant Features
nt Features
nt Features
nt Features
22 22 22
22 – ◆◆◆ –◆–– Customizing Automated Attendant Features– Customizing Automated Attendant Features Customizing Automated Attendant Features Customizing Automated Attendant Features Issue Issue 1.6Issue 1.6Issue 1.61.6
Recording an Announcement Message
Description
An Announcement Message is recorded for an Announcement Mailbox or the UCD Overflow Announcement Mailbox. An Announcement Message typically plays some type of
information (movie schedules, sales promos, insurance rates, directions) for Automated Attendant callers. When the Announcement finishes playing, the caller goes back to the Automated Attendant Instruction Menu.
Default
No Announcement Messages
Example
It is common to record your business hours or directions to your business in an Announcement Message.
Notes
• There are three Announcement Mailboxes in the system: 800, 801, and 808. However, Announcement Mailbox 808 is intended for UCD Overflow. Therefore, after the Therefore, after the Therefore, after the Therefore, after the
announcement recorded for Mailbox 808 play announcement recorded for Mailbox 808 play announcement recorded for Mailbox 808 play
announcement recorded for Mailbox 808 plays, the voice s, the voice s, the voice s, the voice mail hangs up.
mail hangs up. mail hangs up.
mail hangs up. The caller remains in the UCD group.
• If your phone system supports and you have set up UCD Overflow, use 808 for that feature.
• The Announcement Message can be up to five minutes long.
• Protegé®
XTX has four digit extension numbers (Announcement Mailboxes are 8000, 8001, and 8008).
Programming Instructions
To record an Announcement Message:
1. Log onto System Administrator Mailbox (lowest numbered extension) as follows:
Dial Sprint Digital Voice outside number or extension number.
2. If you hear Main Greeting, dial # (or other logon code). Otherwise, go to step three.
3. If requested, dial mailbox number. 4. If requested, dial Security Code.
5. Press SA (7 2) for System Administrator menu. 6. Press AN (2 6) for Announcement Message. 7. Follow voice prompts.
Related Programming
Chapter 3: Customizing Automated Attendant Features
Chapter 3: Customizing Automated Attendant Features
Chapter 3: Customizing Automated Attendant Features
Chapter 3: Customizing Automated Attendant Features
Setting Up UCD Overflow Announcement/Reroute
You can customize Sprint Digital Voice for UCD.
If you program the Protegé® system for UCD Overflow to the voice mail, callers waiting in a UCD group hear an
announcement (such as, All agents are currently busy. Please All agents are currently busy. Please All agents are currently busy. Please All agents are currently busy. Please stay on the line and the
stay on the line and the stay on the line and the
stay on the line and the first available agent will be with you first available agent will be with you first available agent will be with you first available agent will be with you shortly
shortly shortly
shortly). After the announcement is played, the voice mail hangs up, and the caller remains in the group.
If you program the Protegé system with the voice mail as the UCD rerouting destination, callers in a UCD group are then re-routed to a voice mail Call Routing Mailbox. The Dial Options Menu (Dial Action Table or DAT) that corresponds to the Call Routing Mailbox can be set up so that callers can press a key to leave a message for a specific mailbox, transfer to a specific mailbox, or transfer to another group.
Default
UCD Overflow is not set up.
Notes
• Program your Protegé system with the voice mail hunt group as the overflow destination
• Use Announcement Mailbox 808 for the UCD Overflow Announcement Message.
• The Announcement Message can be up to five minutes long.
• Use Call Routing Mailbox 809 for the UCD Re-Route.
• The Dial Action Table 5 is used with Call Route Mailbox 809 (8009 for XTX).
• Protegé XTX has four digit extension numbers (the Announcement Mailbox is 8008 and the Call Routing Mailbox is 8009).
Programming Instructions
To set up the UCD Overflow Announcement
1. Set up your phone system for UCD hunting. The voice mail should be set up as the overflow.
2. Record an announcement message for Announcement Mailbox 808 (8008 in the Protegé XTX). See page 22 for instructions.
To set up the UCD Rerouting
1. Set up your phone system for UCD hunting. The voice mail should be set up as the rerouting destination.
Chapter 4: Customizing Subscriber Mailbox Features
Chapter 4: Customizing Subscriber Mailbox Features
Chapter 4: Customizing Subscriber Mailbox Features
Chapter 4: Customizing Subscriber Mailbox Features
24 24 24
24 – ◆◆◆ –◆–– Customizing Subscriber Mailbox Features– Customizing Subscriber Mailbox Features Customizing Subscriber Mailbox Features Customizing Subscriber Mailbox Features Issue Issue 1.6Issue 1.6Issue 1.61.6
Creating a System Administrator Programming Extension
Description
Sprint Digital Voice lets you convert any Subscriber extension into a Sprint Digital Voice Administrator extension. A System Administrator extension can be used to program all the voice mail system features in this guide. In addition, a System Administrator extension has access to all features of a subscriber mailbox.
Default
The lowest numbered extension is automatically set up as a permanent System Administrator extension.
Example
Suppose it is more convenient to program Sprint Digital Voice from Extension 11 than Extension 10. Simply use the
programming instructions below to make Extension 11 into a System Administrator extension. Then you can log onto subscriber mailbox 11 (in the normal way), and use the instructions in this guide to access the programming menus. These menus let you record Main Greetings, assign names to mailboxes, set up dialing menus for callers, etc.
Notes
• You cannot remove the System Administrator capabilities from the lowest numbered extension.
• System Administrators should program their mailboxes with security codes.
• Set up a System Administrator mailbox for use by your vendor for emergency purposes.
Programming Instructions
To set up another System Administrator extension from the lowest numbered extension:
1. Log onto System Administrator Mailbox (the lowest numbered extension) as follows:
Dial voice mail outside number or extension number. 2. If you hear Main Greeting, dial # (or other logon code).
Otherwise, go to step three. 3. If requested, dial mailbox number. 4. If requested, dial Security Code.
5. Press DM (3 6) for Database Management menu. 6. Press MP (6 7) for subscriber Mailbox Programming. 7. Press SA (7 2) for System Administrator.
8. Follow the voice prompts.
Related Programming
Chapter 4: Customizing Subscriber Mailbox Features
Chapter 4: Customizing Subscriber Mailbox Features
Chapter 4: Customizing Subscriber Mailbox Features
Chapter 4: Customizing Subscriber Mailbox Features
Enabling or Disabling a Message Lamp
Description
The Message Lamp feature determines whether or not the voice mail will inform Subscribers that they have received new messages in their mailboxes. Sprint Digital Voice may light the Message Lamp on key phones.
Default
Message Lamp is enabled for all Subscriber extensions.
Example
If you disable the Message Lamp at an extension, that extension user will not know that the mailbox has new messages. Instead, extension users will have to periodically log onto their mailbox to check their messages.
Notes
In order for the Message Lamp to light, a port from the Phone System must be connected to voice mail port two on Sprint Digital Voice cabinet. See the Quick Start Guide for details.
Programming Instructions
To enable or disable the Message Lamp:
1. Log onto System Administrator Mailbox (the lowest numbered extension) as follows:
Dial voice mail outside number or extension number. 2. If you hear Main Greeting, dial # (or other logon code).
Otherwise, go to step three. 3. If requested, dial mailbox number. 4. If requested, dial Security Code.
5. Press DM (3 6) for Database Management menu. 6. Press MP (6 7) for subscriber Mailbox Programming. 7. Press MW (6 9) for Message Wait lamp.
8. Follow the voice prompts.
Related Programming
Chapter 4: Customizing Subscriber Mailbox Features
Chapter 4: Customizing Subscriber Mailbox Features
Chapter 4: Customizing Subscriber Mailbox Features
Chapter 4: Customizing Subscriber Mailbox Features
26 26 26
26 – ◆◆◆ –◆–– Customizing Subscriber Mailbox Features– Customizing Subscriber Mailbox Features Customizing Subscriber Mailbox Features Customizing Subscriber Mailbox Features Issue Issue 1.6Issue 1.6Issue 1.61.6
Blocking Automated Attendant Calls
Description
This feature prevents an Automated Attendant caller from reaching the Subscriber extension. Sprint Digital Voice lets the caller leave a message. Or, voice mail can automatically re-route the blocked caller to another extension.
Default
Automated Attendant calls are not blocked.
Example
You may want to block Automated Attendant calls to the company president’s extension and re-route them to an assistant’s phone.
Notes
• The voice mail will re-route the blocked caller only if you assign a Next Call Routing Mailbox to the Subscriber extension. See Related Programming below.
• When a Next Call Routing Mailbox is set up for the Subscriber extension, the voice mail re-routes the caller using the Key zero (0) assignment in the Next Call Routing Mailbox’s Dial Action Table. See Related Programming
below.
• You should block Automated Attendant calls for any subscriber mailbox that does not have a physical extension or for any extension that does not have a Subscriber mailbox connected to it.
Programming Instructions
To Block Auto Attendant calls for an extension:
1. Log onto System Administrator Mailbox (lowest numbered extension) as follows:
Dial voice mail outside number or extension number. 2. If you hear Main Greeting, dial # (or other logon code).
Otherwise, go to step three. 3. If requested, dial mailbox number. 4. If requested, dial Security Code.
5. Press DM (3 6) for Database Management menu. 6. Press MP (6 7) for subscriber Mailbox programming. 7. Press BA (2 2) for Block Auto attendant calls. 8. Follow the voice prompts.
Related Programming
To ………… See………… in this guide
assign a Next Call Routing mailbox to a subscriber extension
Re-routing a Subscriber’s Callers
assign Key 0 to reach another extension Setting Up a Dialing Options Menu
set the Message Limit to 0 for subscriber mailboxes that will not have access to voice mail.
Chapter 4: Customizing Subscriber Mailbox Features
Chapter 4: Customizing Subscriber Mailbox Features
Chapter 4: Customizing Subscriber Mailbox Features
Chapter 4: Customizing Subscriber Mailbox Features
Using Forced Unscreened Transfer
Description
In Sprint Digital Voice when it is set up for screened Automated Attendant transfers to all extensions, you can use the Forced Unscreened Transfer feature to force an extension to receive unscreened (blind) Automated Attendant transfers instead of screened ones.
Default
Forced Unscreened Transfers are disabled.
Example
You may want to assign Forced Unscreened Transfers to the receptionist’s extension or to an extension that is connected to a fax machine.
Notes
• An incomplete transfer is the transfer of an incoming call to an extension that does not pick it up. The difference between screened and unscreened transfers is in how an incomplete transfer is handled. The phone system handles an incomplete unscreened transfer. The voice mail handles an incomplete screened transfer. In a voice mail screened transfer, the caller hears the voice prompts, To leave a To leave a To leave a To leave a message, press one. For other options, press two. message, press one. For other options, press two. message, press one. For other options, press two. message, press one. For other options, press two.
• At default, Protegé® does not perform screened transfers. The phone system, through its programming, determines how a call is transferred. If there is an application that would use Forced Unscreened Transfer, then this feature is available.
Programming Instructions
To enable or disable Forced Unscreened Transfer for an extension:
1. Log onto System Administrator Mailbox (lowest numbered extension) as follows:
Dial voice mail outside number or extension number. 2. If you hear Main Greeting, dial # (or other logon code).
Otherwise, go to step three. 3. If requested, dial mailbox number. 4. If requested, dial Security Code.
5. Press DM (3 6) for Database Management menu. 6. Press MP (6 7) for subscriber Mailbox Programming. 7. Press UX (8 9) for forced Unscreened Transfer. 8. Follow the voice prompts.
Related Programming
To ………… See………… in this guide
set up unscreened or screened Automated Attendant transfers on a system-wide basis