AN
OPEN APPLICATION INTERFACE
OPERATIONS MANUAL
NEC America, Inc.
NEC America reserves the right to change the specifications, functions, or features in this document at any time without notice. NEC America has prepared this document for use by its employees and customers. The information contained herein is the property of NEC America and shall not be reproduced without prior written approval from NEC America.
TABLE OF CONTENTS
Page
Chapter 1 - General Information . . . 1
System Overview . . . 1
Security . . . 2
User Procedure. . . 3
Database Organization . . . 4
Menu Organization . . . 5
Chapter 2 - Installation Introduction . . . 7
Software Installation . . . 9
Step 1: Software Installation . . . 9
Step 2: Login ID . . . 9
Step 3: Protected Databases Updated . . . 10
Application Configuration . . . 11
Setting up Multiple Tenants . . . 11
Step 1: Application Characteristics . . . 12
Step 2: Primary Configuration Parameters . . . 12
Step 3: OAI Facilities . . . 13
Step 4: Secondary OAI Configuration Parameters . . . 13
Step 5: User-Defined Parameters . . . 14
Database Requirements . . . 16
Instructions. . . 16
Group Database Information . . . 17
Field Definitions . . . 17
Authorization Code and ID Database Information . . . 18
Field Definitions . . . 19
Extension Database Information . . . 20
Field Definitions . . . 20
Time Interval Database Information . . . 20
Field Definitions . . . 21
NEAX Command Assignments . . . 22
NEAX2400 Commands . . . 22
AMND: Assignment of Maximum Necessary Digits . . . 22
ARSC Command: Assignment of Route Restriction Class . . . 22
ASDT Command: Assignment of Station Data . . . 23
ASFC Command: Assignment of Service Feature Class . . . 23
ASPA Command: Assignment of Special Access Code . . . 23
ASYD Command: Assignment of System Data . . . 24
AATC Command: Assignment of Authorization Code Data . . . 24
NEAX2000 Commands . . . 24
CM20: (Assignment of Access Code) . . . 24
CM42: (Assignment of Maximum Digits for Authorization Code) . . . 24
CMD79: (Assignment of Internet Address) . . . 25
CM08: (Checking ID Codes Using AP01) . . . 25
CMD53: (Handling of ID Codes When the IP is Down) . . . 25
CMD7B: (Number of ID Code Digits When IP down). . . 26
Page
Step 3: Regular Entry to Guardian. . . 26
Chapter 3 - Administration . . . 27
Overview . . . 27
Notes . . . 28
Procedure . . . 29
Set OAI Application Logical Name . . . 30
Notes . . . 30
Procedure . . . 31
Modify Status . . . 32
Overview . . . 32
Notes. . . 32
Procedure . . . 33
Group . . . 34
Notes. . . 34
Procedure . . . 35
Authorization Code . . . 36
Notes. . . 36
Procedure . . . 37
Extension . . . 38
Notes. . . 38
Procedure . . . 39
Query Database . . . 40
Overview . . . 40
Notes. . . 40
Procedure . . . 41
Group Database. . . 42
Notes. . . 42
Procedure . . . 43
Authorization Code Database . . . 44
Notes. . . 44
Procedure . . . 45
Extension Database. . . 46
Notes. . . 46
Procedure . . . 47
Time Interval Database . . . 48
Notes. . . 48
Procedure . . . 49
ID Database . . . 50
Notes. . . 50
Procedure . . . 50
Initialize Batch Control . . . 51
Notes . . . 52
Procedure . . . 53
Initialize Record File . . . 54
Notes . . . 54
Procedure . . . 54
Generate Reports . . . 55
Overview . . . 55
Page
Procedure . . . 56
Call Attempts . . . 57
Notes. . . 57
Procedure . . . 58
Database Status . . . 59
Notes. . . 60
Procedure . . . 61
Database History . . . 62
Notes. . . 62
Procedure . . . 63
Maintain Password . . . 64
Notes . . . 64
Procedure . . . 65
Clear Status Values . . . 66
Notes . . . 66
Procedure . . . 66
Appendix A - Report Formats . . . 67
Introduction . . . 67
Call Attempt Reports. . . 67
Current State Reports . . . 72
Figure Title Page
1-1 Guardian Dual System . . . 1
1-2 Main Menu Organization . . . 5
3-1 Main Menu. . . 27
3-2 Set Logical Name . . . 30
3-3 Modify Status. . . 32
3-4 Modify Group. . . 34
3-5 Modify Authorization Code . . . 36
3-6 Modify Extension . . . 38
3-7 Query Database . . . 40
3-8 Query Group Database . . . 42
3-9 Query Authorization Code Database. . . 44
3-10 Query Extension Database . . . 46
3-11 Query Time Interval Database . . . 48
3-12 Query ID Database . . . 50
3-13 Initialize Batch Control. . . 51
3-14 Initialize Record File . . . 54
3-15 Reports Menu . . . 55
3-16 Call Attempts Reports . . . 57
3-17 Current Database Status Reports . . . 59
3-18 Database History Reports . . . 62
3-19 Password Security. . . 64
LIST OF TABLES
Table Title Page
2-1 Application Characteristic Entries . . . 12
2-2 Primary Configuration Parameter Entries . . . 12
2-3 Secondary Configuration Parameter Entries. . . 13
2-4 User-Defined Parameter Entries . . . 14
2-5 Group Database Field Entries . . . 17
2-6 Authorization Code Database Field Entries . . . 18
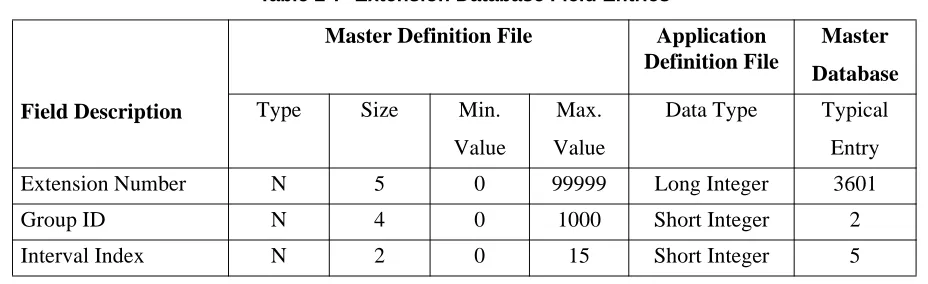
2-7 Extension Database Field Entries . . . 20
Chapter 1
General Information
System Overview
Guardian, an Open Application Interface (OAI) application, supports both the telephone user and those who administer the telephone system within an organization or institution. As an OAI application, Guardian is supported by the Applications Manager (APM), particularly in the area of database administration and application configuration.
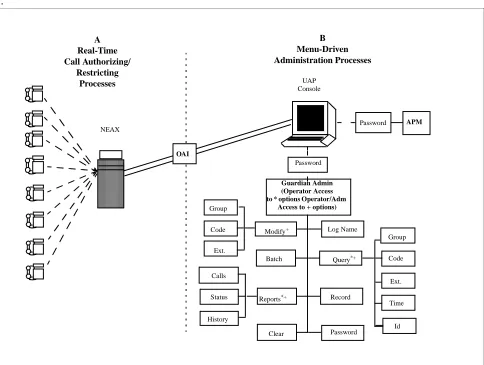
Guardian is a two-pronged system that provides continuous control of real-time call processing functions as well as a menu-driven terminal interface for system administration. This dual design is illustrated in Figure 1-1 below.
.
Figure 1-1 Guardian Dual System
The system is designed to support the management of multiple tenants (e.g., a university with four separate campuses or a business housed in several buildings). Each tenant has its own real-time call processing, configuration, and databases, but
Password Password Password APM Guardian Admin (Operator Access to * options Operator/Adm
Access to + options)
System Overview (Continued)
The Guardian system monitors access to telephone extensions in the system, detects invalid attempts to place calls, and restricts service, when necessary. In the Guardian system, each telephone user is assigned an authorization code that corresponds to an individual extension or to a whole group of extensions, as in a college dormitory or a corporate department. Authorization codes, extensions, and groups are administratively assigned defined time periods during which access is prohibited (e.g., weekends or daily after 6:00 p.m.). Any calls attempted during prohibited periods are considered invalid and are not processed. If an extension has an excessive number of invalid calls, Guardian restricts or disables the extension. Calls that are attempted on extensions or with authorization codes that are already disabled are also considered invalid.
Guardian uses one of the following methods to restrict or disable telephone access: • System Disable – Guardian monitors real-time call processing for a frequency of invalid call attempts on any extension that exceeds the designated maximum frequency (e.g., 7 invalid call attempts within a 15-minute period). When an extension exceeds the maximum number of invalid calls, Guardian
automatically disables the extension temporarily. Both the maximum frequency and the length of time that the extension is temporarily disabled are configured limits specified by extension group. However, the administrator can override a System Disable at any time.
• Admin Disable – Guardian enables the administrator to disable any extension, authorization code, or group of extensions in one of the following ways: • Routinely – The disablement of any or all extensions, authorization codes,
or groups of extensions during specified, regularly occurring time periods, such as weekends or the late night hours
• Unconditionally – The disablement of an extension, authorization code, or group at any time, for as long as desired
Guardian logs information about invalid call attempts and modifications to the status of extensions, authorization codes, and groups. From this log and the databases, Guardian provides a variety of reports in support of system management.
Security
User Procedure
You can use one of the following procedures to place a call from an extension using an authorization code, depending upon the NEAX features that are available and the data assignments that are configured on the NEAX System. During call processing, Guardian verifies the disable status of the code and the extension and either restricts the call or permits it with the routing and service feature privileges assigned to the code.
Procedure No. 1: (Using a Service Access Code)
Step 1: The caller enters the service access code to initiate Guardian. Step 2: At the tone, the caller enters an authorization code.
Step 3: When the dial tone sounds, the caller enters the destination telephone number.
Step 4: If the authorization code and the extension are valid and enabled, the call is placed, and the caller hears the telephone ringing at the destination. If the authorization code is disabled or unknown to the system, or if the extension is disabled, the call is not be placed, and the caller hears a busy tone.
Procedure No. 2:
Step 1: The caller enters the destination telephone number.
Step 2: If the special dial tone sounds, the call is restricted and requires an authorization code.
Step 3: The caller enters the authorization code.
Database Organization
Guardian requires the five databases described below for each tenant:
• Group – Contains definitions for up to 1,000 groups of extensions such as corporate departments or student dormitories. Each group is assigned information that is used to detect and prevent access violation on any of its extensions by group members. If all extensions in the organization are assigned to only one group, that group is assigned the default value of zero in the application configuration during installation. However, if there is more than one group, group 0 is defined in the application configuration, and all other groups are defined in this group database. Groups 1-9 have access to all extensions and authorization codes. Groups 10-1000 have access only to those extensions and authorization codes assigned to them.
• Extension – Contains extension numbers that are up to five digits in length with information relating to their verification. Each extension is mutually cross-referenced with its group definition. If an extension used in a call attempt does not appear in this database, the system assumes that it belongs to the default group 0, and the extension is marked as unknown for reporting purposes. • Authorization Code – Contains user-defined authorization codes that are up to
ten digits in length with information necessary for their verification. Forced account codes may be substituted for authorization codes. Guardian can work with either forced account or authorization codes but not with both at the same time. Each authorization code is assigned Route Restriction Class (RSC) and Service Feature Class (SFC) values that indicate levels of privileges granted to the code holder.
• Time Interval – Contains up to 15 predetermined time intervals used to specify periods during which authorization codes, extensions, and groups can be turned off by the system administrator. These intervals are user-defined and might include weekends, holidays, or evenings.
• ID – Contains telephone user identification numbers and the authorization codes that are assigned to them. The ID numbers may consist of seven to ten characters. Guardian initially creates this database from the authorization code database. You can access the database by ID number through the Guardian System Administrator Query Database option and modify it by authorization code through the APM Database Administration option.
These databases are created and maintained through the Database Administration option in the Applications Manager (APM). The Guardian system administrator must have access to the APM at the system administrator security level in order to create the databases. The Applications Manager Operations Manual provides step-by-step procedures for creating and changing the database definitions and records.
Database Organization (Continued)
Once a database is created or changes are made to it in the APM, it is installed for active use by Guardian. While this installation is taking place, Guardian briefly suspends its real-time control and restriction of PBX call processing. During this period, the PBX reverts to its internal tables that do not reflect the status of extensions, groups, and authorization codes in the databases. The amount of time required to load the database(s) is brief enough that it should not significantly affect the level of control exercised by Guardian.
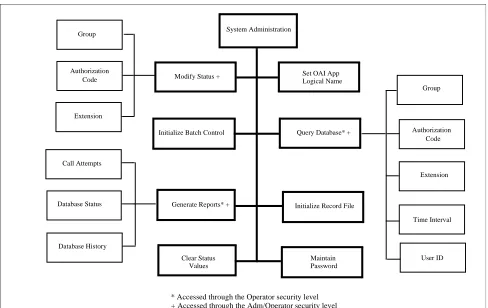
Menu Organization
The system administrator interacts with Guardian through a series of menu-driven screens. The organization of these screens is illustrated in Figure 1-2. Boldfaced options appear on the Administration Main Menu, the asterisked options (*) appear on the Operator Main Menu and the options indicated by a ‘+’ appear on the Adm/ Operator Menu. Chapter 3, “Administration” on page 27 of this manual describes the use of these options and their data entry screens in detail.
Figure 1-2 Main Menu Organization
System Administration
Modify Status + Group
Authorization
Extension
Query Database* +
Group
Authorization
Extension
Time Interval Initialize Batch Control
Initialize Record File Generate Reports* +
Maintain Call Attempts
Database Status
Database History
Set OAI App
Clear Status User ID
* Accessed through the Operator security level Logical Name
Values Password
Code Code
Chapter 2
Installation Introduction
This chapter provides you with specific information and field entries that you need to install and configure Guardian. In addition to this chapter, use the following manuals for installation information:
• Applications Manager (APM) Installation Manual – Contains step-by-step
instructions for installing the software from the release media.
• Applications Manager (APM) Operations Manual – Explains how applications
like Guardian are configured in the APM environment and how Guardian’s databases are created, using the entries and values provided in this chapter. • NEAX System Manuals - Give very detailed explanations about the
assignments that need to be made with the NEAX2400 Maintenance Administration Terminal (MAT) commands, the NEAX2000 Customer Administration Terminal (CAT), or the NEAX2000 Maintenance Operations Console (MOC).
The installation and set up of Guardian involves the following steps. Each of these steps is described in more detail within this chapter:
• Software Installation – Load the Guardian software from the release media using the instructions provided in the APM Installation Manual. After you install the software, you must assign the Guardian login name, guardadm so that users can log in to Guardian from the UNIX prompt. For more information, refer to this section on page 9.
• Application Configuration – Guardian is internally supported by the APM and must be configured in the APM environment. This section that begins on page 11 provides the information that must be entered into this APM configuration file. Use the instructions provided in the APM Operations Manual for the entries contained in this section.
• Database Requirements – Guardian uses five databases which are constructed through the APM Database Administration option. To build the databases, the system creates master definition files and their related master databases. Then, the system creates the application definition files to enable the processing of the master files into application databases. This section defines the information that you must enter to these definition and database files. Use the instructions provided in the APM Operations Manual for the entries contained in this section.
• NEAX Command Assignments – Before Guardian will function, specific data settings must be assigned at the NEAX2400 Maintenance Administration Terminal (MAT), the NEAX2000 Customer Administration Terminal (CAT), or the NEAX2000 Maintenance Operations Console (MOC). “NEAX Command Assignments” on page 22 specifies the necessary commands and the values at which they are to be set. Use the instructions provided in the appropriate NEAX System Manuals to make the entries contained in this section.
The installation process, including its presentation in this manual and reference to other manuals, is illustrated below:
Software Installation Software
Login ID
Protected Databases Update
Application Configuration Application Characteristics Primary Parameter Configuration OAI Facilities (Optional)
OAI Configuration Parameters (Optional) User-Defined Parameters
Database Requirements Master Definition File
Master Database File Application Definition File
Application Database
Initialization
APM Initialization Password Assignment NEAX2400 MAT Commands
NEAX2000 CAT/MOC Commands GUARDIAN
INSTALLATION REQUIREMENTS
Software Installation
Initialization NEAX Command Assignments
Database Requirements Application Configuration
Discussed in section: Instructions in:
APM Installation
Manual
APM Operations
Manual NEAX2400 IMS
System Manuals
NEAX2000 IVS System Manuals APM Installation
Manual APM Installation
Software Installation
Use the following steps to complete software installation.
Step 1: Software
Installation
To load the Guardian software from the release media, log on to the APM Platform Management Menu, select the Installation of Applications/Packages option, and follow the instructions provided in the APM Installation Manual.
Step 2: Login ID
If the Guardian login ID, guardadm, already has a password, this software installation is considered an upgrade, and the cursor returns to the APM Platform Management Menu so that you can complete the steps detailed in sectionApplication Configuration on page 11 through section Initialization on page 26. If the Guardian login ID, guardadm, does not already have a password, respond to the following series of prompts that are displayed on the screen:
Prompt: To ensure correct installation, all administrative type files should be closed – – please ensure that all such files are closed at this time. Response: Make sure that no one is currently performing administrative
functions in the UNIX root files. Type y to continue the installation.
Prompt: If you know the root password and wish to continue, enter ‘y’; otherwise enter ‘n’ to abort the installation.
Response: To continue, type y and press Enter.
To cancel the installation, type n and press Enter. The installation is cancelled, and the prompt returns to the APM Platform Management Menu.
Prompt: Please Enter the su/root Password: Response: Enter the root password and press Enter.
Step 3: Protected
Databases
Updated
Because a new user (i.e., guardadm) has just been installed, you need to execute two commands from the command line under super-user status. The first command (authck) updates the protected database files to incorporate user guardadm, and the second command (passwd) removes any password that user guardadm may have inherited during the installation process.
1. From the UNIX login prompt, log on as super user.
2. From the command line, type /tcb/bin/authck -s and press Enter. The following message appears:
“The following users have entries in the default user file but not in the protected password database: guardadm
There are discrepancies between the databases. Fix them? (y/n)”
3. Enter y and press RETURN.
4. Type /bin/passwd -d guardadm at the command line and press Enter.
Application Configuration
Guardian is configured into the APM system using the Add function of the Application Configuration option on the APM System Administration menu. 1. Enter the APM option from the APM Platform Management Menu. 2. Enter the system administrator password at the APM password screen. 3. Enter the Application Configuration option from the System Administration
menu.
This section contains the information that you should enter into the configuration file for Guardian. For specific instructions on what these parameters mean and how to make these entries, use the APM Operations Manual.
Setting up Multiple
Tenants
A tenant is defined as a group of users that may represent a campus, a corporate department, or an entire organization. Using Guardian, you can have one or multiple tenants. For instance, a university may be configured as one tenant, or each of its campuses or academic departments may be configured as a tenant, depending upon the needs of the university. Each tenant is associated with an application name. This name must then be specified before any action can be taken through the Administration menu. Multiple tenants can be handled in either of two ways:
• Each tenant can be configured individually and identified by a unique application name (e.g., Guardian1 or Guardian2). In configuring each tenant, only the application name and the tenant number (through OAI-Conf command) must be changed. Once the tenants are configured, the Guardian system administrator can specify a specific tenant’s application name so that all actions taken through the menu options affect only the indicated tenant rather than all of the tenants.
• Guardian can be configured once for tenant No. 0, which means all tenants. The single configured application name is then used to gain access to the
Administration menus, and all actions taken thereafter through those menu options affect every tenant served by Guardian.
If there is more than one switch in a network, Guardian will work with all the PBX’s and maintain its reports and database no differently than a single switch environment.
There should be a separate application configuration in the APM for each Guardian switch. All parameters should be identical except for the destination link, standard out file and Guardian ID (UDP #14).
Step 1: Application
Characteristics
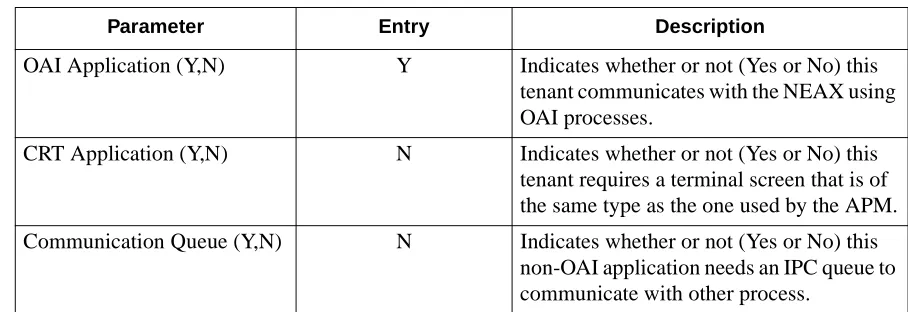
In adding Guardian to the APM Application Configuration file, define it as an OAI application that does not need a CRT or a communication queue, as follows:
Step 2: Primary
Configuration
Parameters
On the Configuration Entry screen, make the entries shown below to the parameters indicated:
Table 2-1 Application Characteristic Entries
Parameter Entry Description
OAI Application (Y,N) Y Indicates whether or not (Yes or No) this tenant communicates with the NEAX using OAI processes.
CRT Application (Y,N) N Indicates whether or not (Yes or No) this tenant requires a terminal screen that is of the same type as the one used by the APM. Communication Queue (Y,N) N Indicates whether or not (Yes or No) this
non-OAI application needs an IPC queue to communicate with other process.
Table 2-2 Primary Configuration Parameter Entries
Parameter Entry Description
Application Name Guardian The unique logical name of this application. Executable Filename /oai/app/guard/grdrt The path name of the executable file. Group (no entry) (Guardian is not a member of a group of
applications.)
Response Mode I This is a default value since Guardian does not belong to a group.
Initialization Batch Y Guardian is set to initialize automatically when the OAI system is initialized. Termination Mode M Guardian is set to receive a termination
message from the APM when it is to terminate, rather than a kill or termination signal.
Standard Output /oai/log/dbg/grd.dbg Guardian’s output is sent to this file. Number of Restarts 5 Guardian may be restarted by the APM up
Step 3: OAI
Facilities
According to instructions in the APM Operations Manual, designate the following PBX facility for Guardian using the Facilities command on the Configuration Entry screen:
Authorization Code Facility (ACF)
Step 4: Secondary
OAI Configuration
Parameters
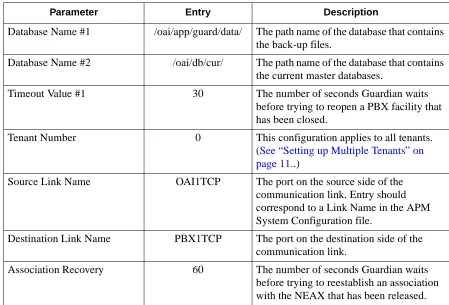
Using the OAI-Conf command on the Configuration Entry screen, make the entry shown for each of the following parameters required by Guardian. Use the instructions provided for this option in the APM Operations Manual:
Table 2-3 Secondary Configuration Parameter Entries
Parameter Entry Description
Database Name #1 /oai/app/guard/data/ The path name of the database that contains the back-up files.
Database Name #2 /oai/db/cur/ The path name of the database that contains the current master databases.
Timeout Value #1 30 The number of seconds Guardian waits before trying to reopen a PBX facility that has been closed.
Tenant Number 0 This configuration applies to all tenants. (See “Setting up Multiple Tenants” on page 11..)
Source Link Name OAI1TCP The port on the source side of the communication link. Entry should correspond to a Link Name in the APM System Configuration file.
Destination Link Name PBX1TCP The port on the destination side of the communication link.
Step 5:
User-Defined
Parameters
Make the following additional parameter entries through the UserDefined command on the APM Configuration Entry screen.
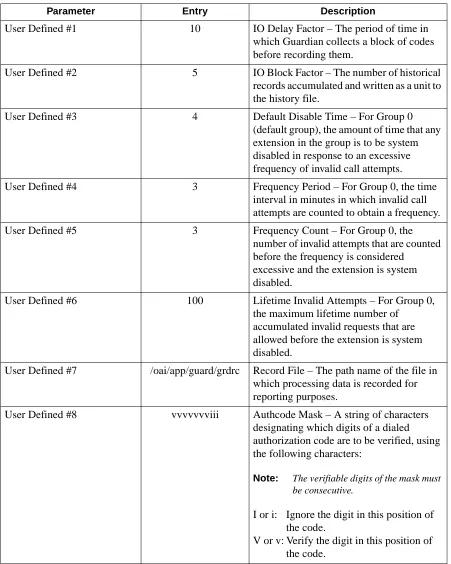
Table 2-4 User-Defined Parameter Entries
Parameter Entry Description
User Defined #1 10 IO Delay Factor – The period of time in which Guardian collects a block of codes before recording them.
User Defined #2 5 IO Block Factor – The number of historical records accumulated and written as a unit to the history file.
User Defined #3 4 Default Disable Time – For Group 0 (default group), the amount of time that any extension in the group is to be system disabled in response to an excessive frequency of invalid call attempts.
User Defined #4 3 Frequency Period – For Group 0, the time interval in minutes in which invalid call attempts are counted to obtain a frequency. User Defined #5 3 Frequency Count – For Group 0, the
number of invalid attempts that are counted before the frequency is considered
excessive and the extension is system disabled.
User Defined #6 100 Lifetime Invalid Attempts – For Group 0, the maximum lifetime number of
accumulated invalid requests that are allowed before the extension is system disabled.
User Defined #7 /oai/app/guard/grdrc Record File – The path name of the file in which processing data is recorded for reporting purposes.
User Defined #8 vvvvvvviii Authcode Mask – A string of characters designating which digits of a dialed authorization code are to be verified, using the following characters:
Note: The verifiable digits of the mask must be consecutive.
I or i: Ignore the digit in this position of the code.
This completes the configuration of Guardian in the APM. See “Database Requirements” on page 16. to create its databases.
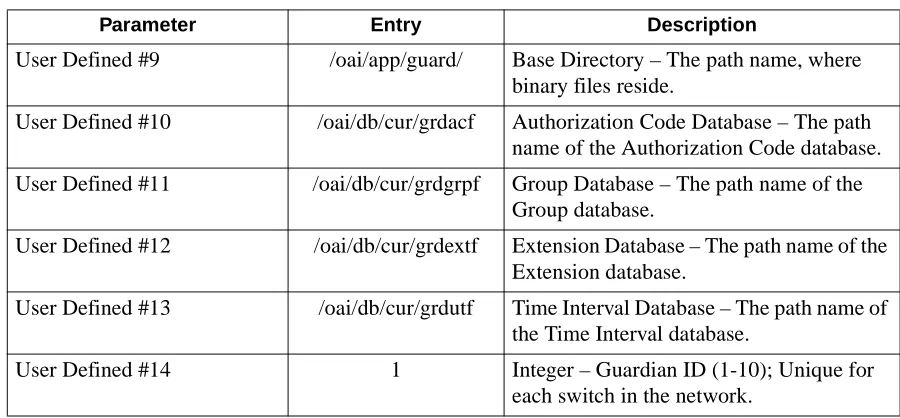
User Defined #9 /oai/app/guard/ Base Directory – The path name, where binary files reside.
User Defined #10 /oai/db/cur/grdacf Authorization Code Database – The path name of the Authorization Code database. User Defined #11 /oai/db/cur/grdgrpf Group Database – The path name of the
Group database.
User Defined #12 /oai/db/cur/grdextf Extension Database – The path name of the Extension database.
User Defined #13 /oai/db/cur/grdutf Time Interval Database – The path name of the Time Interval database.
User Defined #14 1 Integer – Guardian ID (1-10); Unique for each switch in the network.
Table 2-4 User-Defined Parameter Entries
Database Requirements
Each configured Guardian tenant requires five working databases (Group, Authorization Code, Extension, Time Interval, and ID). Each database is created through the Database Administration option on the APM System Administration Menu. Database creation involves the following four-step process for each required database:
1. Create a Master Definition File: This step involves creating the master defini-tion file that defines the fields in the master database file. Four master definidefini-tion files must be created for Guardian the following databases: Group, Authoriza-tion Code, Extension, and Time Interval. The AuthorizaAuthoriza-tion Code master defi-nition file supports both the Authorization Code and the ID databases. When more than one tenant has been configured for Guardian, one master definition file and master database file can support the database required for each tenant. That is, for example, if three tenants have been configured, one Group master definition file and one Group master database file can support three Group da-tabases, one for each tenant.
2. Build a Master Database File: This step involves entering tenant-specific data (e.g., extensions, group definitions, authorization codes, student IDs, or time in-tervals) into the master database fields that were just defined in the four master definition files in Step 1.
3. Create an Application Definition File: In this step, a definition file is created for each of the Guardian databases for each tenant. This file defines the formats by which data from the corresponding master file is to be converted to meet the needs of Guardian.
4. Process the Application Database: In this step, the Process/Install Application Databases option on the APM Database Administration menu creates the file that will be used by Guardian. When the Process command is activated, data is drawn from the master database and converted to the formats specified in the corresponding application definition file. The Install command on the Process/ Install Application Databases option is activated to enable the Guardian tenant to copy its database into a working file.
Instructions
The information required in all four steps for each Guardian database is provided in table form on the following pages. Using this information with the procedural instructions provided in the APM Operations Manual, enter the Database Administration option on the APM System Administration Menu, and build the Guardian databases, one at a time. Any messages displayed during these steps are addressed in the Process and Error Messages chapter of the APM OperationsManual.
Note: Complete Step 4, Process the Application Database, for each database after en-tering the information on the following pages.
Step 1 - Create
Master Definition File
Step 2 - Build
Master Database File
Step 3 - Create
Application Definition File
Step 4 - Process
Group Database
Information
The Group database field entries are shown in the table below and defined in “Field Definitions” on page 17. Name the master definition file grdgrpf_m and the
application definition file grdgrpf.
Field Definitions
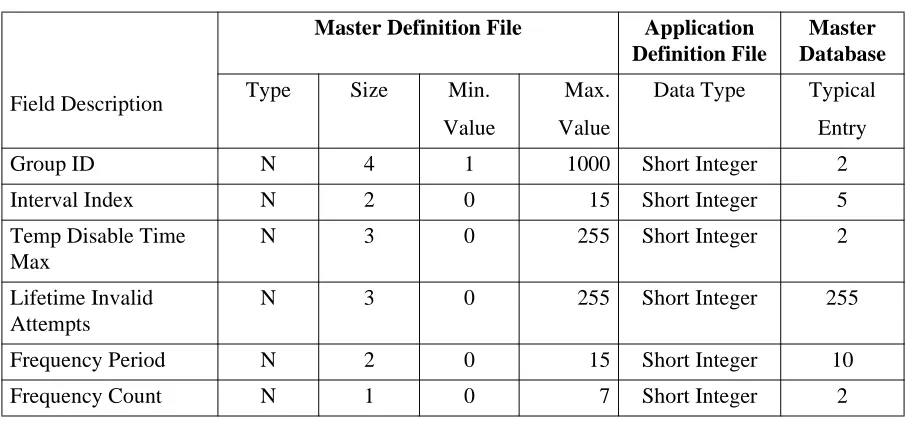
• Group ID – A number that identifies a group, lying within the range from 1 to 1000. This is the key field for database sorting, so entries must be arranged in ascending order.
Note: Groups 1-9 have access to all authorization codes and extensions; groups 10-1000 have access to only the codes and extensions assigned to them.
• Interval Index – The index to the specific interval of time in the Time Interval Database during which the group extensions are routinely, administratively turned off. The index uses the following values:
0: Constantly off.
1-15: Index that corresponds to the desired time interval in the Time Interval Database.
• Temp Disable Time Max – Number of 15-minute periods that extensions in the group will be automatically, temporarily turned off by the system in response to an excess frequency of invalid call attempts; maximum 255 periods.
• Lifetime Invalid Attempts – The maximum lifetime number of accumulated invalid requests that are allowed before the extensions in the group are turned off by the system; maximum 255 requests.
• Frequency Period – The time interval in minutes in which invalid call attempts are counted to obtain a frequency; maximum 15 minutes.
• Frequency Count – The number of invalid call attempts that are counted before Table 2-5 Group Database Field Entries
Field Description
Master Definition File Application
Definition File
Master Database
Type Size Min.
Value
Max. Value
Data Type Typical Entry
Group ID N 4 1 1000 Short Integer 2
Interval Index N 2 0 15 Short Integer 5
Temp Disable Time Max
N 3 0 255 Short Integer 2
Lifetime Invalid Attempts
N 3 0 255 Short Integer 255
Frequency Period N 2 0 15 Short Integer 10
Authorization
Code and ID
Database
Information
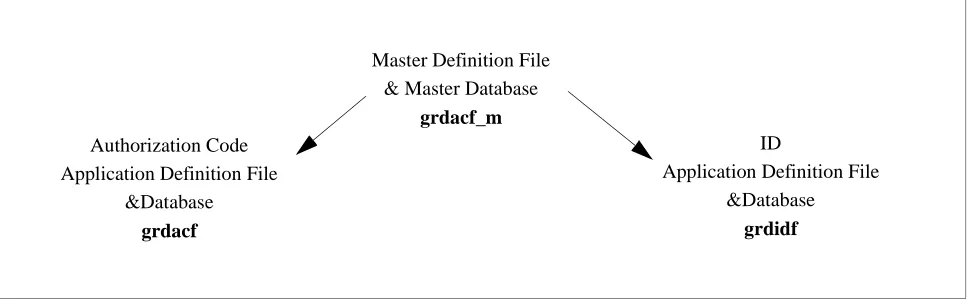
The Authorization Code master definition file and master database file support both the Authorization Code database and the ID database. Create separate Authorization Code and ID application definition files to process the master database into the two separate databases. Name the master definition file grdacf_m, name the Authorization Code application definition file grdacf, and
name the ID application definition file grdidf, as shown below:
The Authorization Code database field entries are shown in the table below and defined in Field Definitions on page 19:
†Use these values for the NEAX2400. Authorization Code
Application Definition File &Database
grdacf
Master Definition File & Master Database
grdacf_m
ID
Application Definition File &Database
grdidf
Table 2-6 Authorization Code Database Field Entries
Field Description
Master Definition File Application
Definition File*
Master
Database
Type Size Min.
Value
Max. Value
Data Type Typical Entry
Authorization Code* A 10 ASCII 1246247
Assigned A 1 ASCII Y
ID* A 10 ASCII 585241398
Interval Index N 2 0 15 Short Integer 5
Extension or Group Flag
A 1 ASCII G
Extension/Group Value
N 5 0 99999 Long Integer 2
Route Restriction Class
N 2 0† 15† Short Integer 5
1‡ 8‡
Service Feature Class N 2 0† 15† Short Integer 1
1‡ 8‡
‡Use these values for the NEAX2000.
*The fields of the two application definition files (Authorization Code and ID) that are derived from the authorization code master database must be entered in the following sequence:
Order Authcode Definition File ID Definition File
#1 Authorization Code ID
#2 Interval Index Authorization Code
#3 Extension/Group Value #4 Route Restriction Class #5 Service Feature Class #6 Extension or Group Flag
#7 Assigned
#8 Reserved
Field Definitions
• Authorization Code – Key field of the Authorization Code Database consisting of ten digits. Codes must be arranged in ascending order. The authorization code is also the second field in the ID Database.
• Assigned – Indicates whether or not (Yes or No) this authorization code has been assigned to a telephone user.
• ID – The telephone user identification number assigned to this authorization code.
• Interval Index – The index to the specific interval of time in the Time Interval Database during which the authorization code is routinely disabled. The index uses the following values:
0: Constantly off.
1-15: Index to an interval in the Time Interval Database.
• Extension or Group – The assignment of the authorization code to a single extension or to a group of extensions. Possible field entries are as follows: Ext: Extension
Grp: Group
• Extension/Group Value – The actual extension or group to which the authorization code is assigned, corresponding to the Extension or Group assignment:
If assignment is Ext: An extension number of up to 5 digits in length. If assignment is Grp: A group ID ranging from 1 to 1000.
• Route Restriction Class – A value from 0 to 15 on the NEAX2400 or a value from 1 to 8 on the NEAX 2000 that represents different combinations of distance and routing privileges available to code holders.
Extension
Database
Information
The Extension database field entries are shown in the table below and defined in
“Field Definitions” on page 20. Name the Extension master definition file grdextf_m and the application definition file grdextf.
Field Definitions
• Extension No. – The extension number of up to 5-digits in length. This is the key field of the database, and entries must be arranged in ascending order. • Group ID – The identification number of the group to which the extension is
assigned. This number must lie within the range from 1 to 1000.
• Interval Index – The index to the specific interval of time in the Time Interval database during which the extension is routinely, administratively turned off. The index uses the following values:
0: Constantly off.
1-15: Index of the Time Interval database corresponding to the desired time interval.
Time Interval
Database
Information
The Time Interval database field entries are shown in the table below and defined in Field Definitions on page 21. Name the Time Interval master definition file grdutf_m and the application definition file grdutf.
Table 2-7 Extension Database Field Entries
Field Description
Master Definition File Application
Definition File
Master
Database
Type Size Min.
Value
Max. Value
Data Type Typical Entry
Extension Number N 5 0 99999 Long Integer 3601
Group ID N 4 0 1000 Short Integer 2
Interval Index N 2 0 15 Short Integer 5
Table 2-8 Time Interval Database Field Entries
Field Description
Master Definition File Application
Definition File
Master
Database
Type Size Min.
Value
Max. Value
Data Type Typical Entry
Interval Index N 2 0 15 Short Integer 5
Begin Day of Week N 1 0 6 Short Integer 5
Begin Hour N 2 0 23 Short Integer 22
Begin Minute N 2 0 59 Short Integer 0
End Day of Week N 1 0 6 Short Integer 1
Field Definitions
• Interval Index – The number by which the following time interval is indexed in the database and referred to by the group, extension, and authorization code databases. This number must lie within the range from 1 to 15.
• Begin Day of Week – The day of the week on which the interval begins and the group, authorization code, or extension is administratively turned off. The day of week can be one of the following values:
0: Sunday 4: Thursday
1: Monday 5: Friday
2: Tuesday 6: Saturday 3: Wednesday
• Begin Hour – The hour in which the interval begins and the group,
authorization code, or extension is administratively turned off. The begin hour is a value between 0 and 23.
• Begin Min. – The minute at which the interval begins and the group, authorization code, or extension is administratively turned off. The begin minute is a value between 0 and 59.
• End Day of Week – The day of the week on which the interval ends and the group, authorization code, or extension is turned back on. The day of week can be one of the following values:
0: Sunday 4: Thursday
1: Monday 5: Friday
2: Tuesday 6: Saturday 3: Wednesday
• End Hour – The hour in which the interval ends and the group, authorization code, or extension is turned back on. The hour is a value between 0 and 23. • End Minute – The minute at which the interval ends and the group,
authorization code, or extension is turned back on. The minute is a value between 0 and 59.
This completes creation of Guardian’s database support. See “NEAX Command Assignments” on page 22. to make the necessary command assignments at the NEAX2400 MAT or NEAX2000 MOC (or CAT).
End Minute N 2 0 59 Short Integer 30
NEAX Command Assignments
This guide assumes that data settings that affect the operation of all OAI software on a system-wide basis have already been assigned on the NEAX2400
Maintenance Administration Terminal (MAT) commands, the NEAX2000 Customer Administration Terminal (CAT), or the NEAX2000 Maintenance Operations Console (MOC). Such settings include, for instance, system index values and assignment of Interface I/O Port Data in the Interface Processor (IP). For more information about the system data settings and about the Guardian settings discussed in this section, refer to the OAI System Manual and the Command Manual for the specific NEAX system in use:
Guardian is only effective if the Authorization Code or Forced Account Code service feature is engaged, and the station has been assigned to use the feature. The following data assignments set up this configuration on the NEAX MAT.MAT Assignments.
NEAX2400
Commands
AMND: Assignment of Maximum Necessary Digits
This command assigns the maximum number of digits to be read for the authorization code and the destination code.
(a) When this command is used for forced account codes or authorization codes, the tenant number (TN) must be assigned as 0, regardless of what tenant number was configured in the application configuration.
(b) Enter other information as requested by prompts, with the MND assigned to 10 digits.
(c) The number of digits in the authorization code or forced account code must agree with the number of digits specified in the application configuration and in the database creation process.
(d) Use the AATC command to provide the PBX with a backup database of au-thorization codes, in case the OAI application is not operating.
ARSC Command: Assignment of Route Restriction Class
This command assigns and displays route restriction information for a tenant and route number. This command actually activates the RSC. (Use the ASDTcommand to associate both the tenant and the service feature class assigned above to a specific station.)
(a) Use the same tenant number that was configured for the application through the APM.
ASDT Command: Assignment of Station Data
Use this command to associate both the tenant and the route restriction class assigned above to a specific station and to specify the telephone class of the station.
(a) Use the same tenant number that was configured for the application through the APM.
(b) Make sure that the station number and route restriction class entered to this command are the same that are entered to the ARSC command (and/or the ASFC command).
ASFC Command: Assignment of Service Feature Class
This command assigns the combinations of PBX call processing features to SFC values from 0 to 15, by tenant. Use of this command activates the specified feature. (Use the ASDT command to associate both the tenant and the service feature class assigned above to a specific station.)
(a) Use the same tenant number that was configured for Guardian through the APM, Tenant #0.
(b) Ensure that the SFI for the desired class(es) is enabled.
(c) Enter other necessary information as requested by prompts, making sure that the service feature class assignment made through this command corre-sponds to the SFC as it is configured for the application through the APM.
ASPA Command: Assignment of Special Access Code
This command associates the authorization code to the access code. When the access code is dialed, it indicates that an authorization code follows and indicates the number of digits to be read.
(a) Use the same tenant number that was configured for Guardian in its configuration in the APM and enter an access code (ACC) between 1 and 6 digits in length.
(b) Enter the following data as requested by prompts: SRV (Kind of Service) = SSC (Service Code) CI (Connection Status Index) = N (Normal Service)
SID (Service Feature Index) = 42 (Authorization Code and Forced Account Code)
ASYD Command: Assignment of System Data
(a) System Data 1:
Index 43, bit 0 -- For remote access to PBX, is authorization code required after ring back tone (RBT)? 0 = Yes, 1 = No.
Index 43, bit 2 -- Will SST be sent after dialing access code? 0 = No, 1 = Yes
(b) System Data 2:
Index 3, bit 5 -- 0 = Authorization Code 1 = Forced Account Code
AATC Command: Assignment of Authorization Code Data
This command should be used to provide the PBX with a backup database of authorization codes, in case the OAI application is not operating.NEAX2000
Commands
Use the NEAX2000 Customer Administration Terminal (CAT), or the NEAX2000 Maintenance Operations Console (MOC) to enter these commands. (Refer to the
NEAX2000 System Manuals for more information.)
CM20: (Assignment of Access Code)
Y=Tenant Group: Access Code for ID code class change. 1st data Access Code (1-3 digits)
2nd data Service Type
:086: Authorization code
Use A57 for the first digit of the authorization code :087: Forced Account code
CM42: (Assignment of Maximum Digits for Authorization Code)
Sets ID code digits.
1st data :11: Authorization code :12: Forced Account Code
:13: Remote Access to System ID code
CMD79: (Assignment of Internet Address)
Assigns the Internet Address of TCP/IP-Ethernet. 1st data 00–03: Division No. of Internet Address
2nd data 0–255: Address Data (1–3 digits)
The Internet Address must be assigned to the 1st data 00–03 as follows:
CM08: (Checking ID Codes Using AP01)
Basic Functions
1st data: 217 Check ID code 2nd data::0: Check through MP
:1: Check through AP01 package when using ACF. (Set checking through AP01 package when using ACF.)
CMD53: (Handling of ID Codes When the IP is Down)
Registers ID codes and temporary class data. 1st data: ID code
2nd data :a b b c c d d e e: Temporary class data :a: 0–2,9: Temporary class type
:b b: 01–08: Temporary connection restriction class :c c: 01–15: Temporary service restriction class – A :d d: 01–15: Temporary service restriction class – B :e e: 01–15: Temporary service restriction class – C :NONE (Initial value)
Note: This data uses PBX internal class change data when ACF is in operation and the AP is stopped. The number of digits is set through CMD7B
1st data (1) 00 01 02 03
Internet Address: XXX • XXX • XXX [XXX: 2nd data (2)]
CMD7B: (Number of ID Code Digits When IP down)
ACF
1st data: 00: Number of ID code digits when AP stops during ACF operation
2nd data :1–3: Number of ID code digits when AP stops :0 (Initial Value):No ACF operation
Initialization
Follow steps 1-3 below to complete initialization.
Step 1:
Initialization in
APM
Enter the APM Operations Menu and initialize Guardian through the Non-CRT Application option, according to instructions provided in the APM Operations Manual.
Step 2: Login
Password
The first time you initialize Guardian and you enter guardadm at the login prompt, you must identify the password that is to be associated with that login ID. To assign a null password, enter the responses indicated for the following prompts:
Prompt: UNIX login prompt
Response: Enter guardadm and press Enter.
Prompt: You do not have a password. 1. Select your own password
2. UNIX will select a password for you. Response: Select option 1 and press Enter.
Prompt: A prompt asks for the new password, and another prompt requests verification of the password.
Response: Press Enter at both prompts. This process assigns a null password.
Step 3: Regular
Entry to Guardian
Chapter 3
Administration
Overview
The Guardian main menu provides tools which you can use to manage and generate reports from the record file, assign or alter passwords, and change or view the status of groups, authorization codes, and extensions.
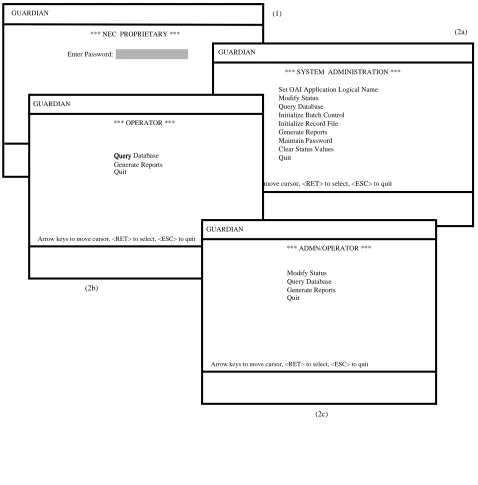
GUARDIAN
Enter Password:
*** NEC PROPRIETARY ***
<RET> to accept password, <ESC> to quit
(1)
(2a)
GUARDIAN
*** SYSTEM ADMINISTRATION ***
Arrow keys to move cursor, <RET> to select, <ESC> to quit Set OAI Application Logical Name Modify Status
Query Database Initialize Batch Control Initialize Record File Generate Reports Maintain Password Clear Status Values Quit
GUARDIAN
*** OPERATOR ***
Arrow keys to move cursor, <RET> to select, <ESC> to quit Query
Generate Reports Query Database
Quit
GUARDIAN
Modify Status
*** ADMN/OPERATOR ***
Arrow keys to move cursor, <RET> to select, <ESC> to quit Query Database
Generate Reports Quit
(2b)
Notes
Guardian menus are password protected. You can enter Guardian at one of the following levels by entering the appropriate password:• Administrator level – Provides access to every menu option. The default password (guardadm) can be changed through the Administrator main menu • Operator level – Allows you to view database information or to generate reports.
You must assign this password through the Administrator main menu. • Admn/Operator level - Provides access to all Operator level menus plus the
modify status menu.
All Guardian menu options are described briefly below. Each option is described in more detail in the remaining sections of this chapter:
• Set OAI Application Name – Allows you to specify a tenant by logical application name. The work you perform while working at the Administrator level applies only to the specified tenant.
• Modify Status – Use this menu option to modify the enable/disable status of a single group, authorization code, or extension. The System Administrator can also use this option to override the System Disable of an extension, if necessary.
Note: The ID database can only be modified through the APM Database Administration menu.
• Query Database – Use this menu option to check a working database without making changes to it. This option enables the System Administrator to review the disable status of a group, authorization code, ID, or extension and the parameters by which it is defined in the database.
Note: This menu option displays after you enter the Operator password.
• Initialize Batch Control – Initiates the Guardian control of batch modifications to the status of a large number of groups, authorization codes, or extensions. Data entry for this batch control is user-defined and provided.
• Initialize Record File – Reinitializes the record file in which data is collected about invalid call attempts and the ongoing status of groups, authorization codes, and extensions.
• Generate Reports – Generates various management and control reports about invalid call attempts; the status of groups, authorization codes, and extensions; and the history of processing activities logged in the record file.
Note: This menu option displays after you enter the Operator password.
• Maintain Password – Allows you to change the password required for entry into the Guardian main menu. Administrators use this option to assign operator password(s).
Notes (Continued)
The System Administrator also requires access to the APM Data Entry menu in order to maintain the Guardian databases.Note: Changes to the databases (i.e., adding, deleting, or modifying records) can only be made through the APM. The changes are processed into the Guardian working databases.
Caution: If 80% of disk space has been used on the system, the following message
appears immediately after you logon: “Disk free space warning.” When this message displays, you must free up disk space before performing other activities in the system. You can free up disk space by generating reports and then initializing the record file. If you do not generate the reports before you reinitialize the file, all of the data logged into the record file is lost when it is reinitialized. If you do not free up disk space when you receive this message, you may run out of disk space completely. When no disk space remains in the system, you must initialize the record file without generating the reports. The data logged into the record file is lost.
Procedure
Action Result
At the login prompt, enter the Administrator, Operator or Admn/ Operator password and press Enter.
The main menu displays.
Using the arrow keys to position the cursor, select the desired menu option and press Enter.
The desired option displays.
To exit the main menu, select the Quit option and press Enter, or press ESC.
Set OAI Application Logical Name
Guardian can serve multiple tenants (e.g., different departments, different campuses, etc.). Each tenant is identified by a unique logical name that is
configured in the APM during installation. When you enter a logical name on this screen, all functions performed are implemented with the tenant associated to that logical name until the logical name is reset.
One tenant could serve more than one switch. Logical names for each switch for that tenant must be entered. Up to ten logical names are permitted.
Use the Set OAI Application Logical Name option on the main menu set or change the name of the tenant. This option can be accessed only under the Administrator password.
Figure 3-2 Set Logical Name
Notes
The first time entering the System Administration menu, access is denied access to other options until the logical name is entered. Once this application logical name is set, it remains in effect until changed again through this option, and access to other menu options is no longer restricted.If your system accommodates one tenant, you only need to enter the tenant name once. If your system accommodates more than one tenant, you will need to identify the tenant each time it changes before you use any other menu options. When you enter a new logical name, the system pauses for approximately 3 seconds while Guardian searches for the corresponding tenant.
(1)
(2) GUARDIAN
*** SYSTEM ADMINISTRATION ***
Arrow keys to move cursor, <RET> to select, <ESC> to quit
> Set OAI Application Logical Name
Modify Status Query Database Initialize Batch Control Initialize Record File Generate Reports Maintain Password Clear Status Values Quit
GUARDIAN
Logical Name 1:
<RET> to accept, <ESC> to quit *** SET LOGICAL NAME ***
Procedure
Action Result
On the main menu, select the Set OAI Application Logical Name option and press Enter. (1)
The Logical Name prompt highlights. (2)
Type the Logical Name of the desired tenant from the configuration file and press Enter.
Following a 3-second delay, the message Set Logical Name Successful appears.
Note: If the name you entered is not in the configuration data or corre-sponds to a tenant that is not ini-tialized, the error message Error
Setting Logical Name appears,
and the field highlights again for re-entry.
Modify Status
Overview
The Modify Status option on the main menu allows Administrators to modify the disable status of a single group, authorization code, or extension. This option can only be accessed under the Administrator password.Figure 3-3 Modify Status
Notes
The Modify Status option allows the Administrator to disable a group of extensions, an authorization code, or a single extension in the following ways: • Unconditionally – Disabled constantly and indefinitely, until enabled again by
the Administrator.
• Routinely – Disabled during the time interval associated with the group, authorization code, or extension in the database, as illustrated in the following example:
In the Group database, Group 2 is assigned an Interval Index of 5. In the Time Interval database, Interval Index 5 is a period that starts Friday at 10:00 p.m. and ends Monday at 5:30 a.m. When the System Administrator uses the Modify Status option to indicate YES in the Routinely Disable: field for Group 2, all of the extensions in this group are turned off during the Friday to Monday time period until either this same field is again changed or the Interval Index is changed.
(1)
(2) GUARDIAN
*** SYSTEM ADMINISTRATION ***
Arrow keys to move cursor, <RET> to select, <ESC> to quit Set OAI Application Logical Name
> Modify Status
Query Database Initialize Batch Control Initialize Record File Generate Reports Maintain Password Clear Status Values Quit
GUARDIAN
*** MODIFY STATUS ***
Group Authorization
Arrow keys to move cursor, <RET> to select, <ESC> to quit Code Extension
Notes (Continued)
The System Administrator can also override the System Disable of an extension using this option. When Guardian has temporarily turned off an extension that has been used in an excessive number of invalid call attempts, the administrator can use this option to turn on the extension without altering the System Disable parameters in the Extension database. The next time the number of invalid call attempts on that extension exceeds the tolerated frequency, Guardian disables the extension again. The ID database can only be modified through the Database Administration option in the APM. The Guardian Modify Status option cannot access the ID database. There are two kinds of errors that may occur in the Modify Status option: • Database Record Not Found: If the system cannot find the record for the
number you enter (group ID, authorization code, or extension number), this error message appears. Press ESC and re-enter the number. If the error message appears again, check the record through the APM master database and use the Process/Install command to reinstate the working database. If the error persists, call the system distributor.
• Error Processing Modification to Database: If the record has been retrieved and the status modification has been entered, this message appears. If this occurs, call the system distributor.
Procedure
Action Result
On the main menu, select the Modify Status option and press Enter. (1)
The Modify Status menu displays. (2)
Using the arrow keys to move the cursor, select the desired menu option and press Enter.
A selection screen for the option displays.
To exit the Modify Status menu, select the Quit option and press Enter, or press ESC.
Group
The Group option on the Modify Status menu allows Administrators to alter the disable status of all the extensions in a group simultaneously.When you select the Group option, the Modify Group screen displays.Figure 3-4 Modify Group
Notes
If the group is set to be unconditionally disabled (Yes), all of its extensions are disabled indefinitely as soon as this procedure is completed. If the group is set to be routinely disabled (Yes), all of its extensions are regularly disabled during the time interval that is designated by the Interval Index in the group database record. (You can review the database record using the Query Database option on the System Administration menu or by entering the APM Database Administration option.)
(1) GUARDIAN
*** MODIFY STATUS ***
> Group
Arrow keys to move cursor, <RET> to select, <ESC> to quit Authorization Code
Extension Quit
GUARDIAN
*** MODIFY GROUP ***
Group ID:
<RET> to accept, <ESC> to quit 1 Unconditionally Disable:
Routinely Disable: Yes No
Procedure
Action Result
On the Modify Status screen, select the Group option and press Enter. (1)
The Group Selection screen displays with a prompt for the Group ID. Type the ID of the group and press
Enter.
Note: Press ESC to exit the screen and redisplay the Modify Status menu.
The Modify Group screen displays showing the current status of the group in the second field (Yes or No). (2)
Note: If the system does not recognize the Group ID you entered, the message Error Database Record
Not Found appears. Press ESC
and try again, or exit and query the database.
Enter the desired status to each field (Yes or No), pressing Enter after each entry.
The message Modify Group Status Successful appears.
Note: If you enter anything other than Yes or No in the disable fields, the message Error Processing
Sta-tus Modification appears. Either
press ESC to return to the Modify Status menu or re-enter the cor-rect status and press Enter.
Press ESC to exit the screen. The Group Selection screen reappears for entry of another Group ID.
Press ESC again to exit the Selection screen.
Authorization
Code
Administrators can use the Authorization Code option on the Modify Status menu to change the disable status of the designated authorization code.When you select this option, the Modify Authorization Code screen displays.
Figure 3-5 Modify Authorization Code
Notes
If the authorization code is set to be unconditionally disabled (Yes), it is disabled indefinitely as soon as this procedure is completed. If the authorization code is set to be routinely disabled (Yes), the authorization code is regularly disabled during the time interval that is designated by the Interval Index in the authorization code database record. (You can review the database record using the Query Database option on the System Administration menu or by entering the APM Database Administration option.)
(1)
(2) GUARDIAN
*** MODIFY STATUS ***
Group
Arrow keys to move cursor, <RET> to select, <ESC> to quit
> Authorization Code
Extension Quit
GUARDIAN
*** MODIFY AUTHORIZATION CODE ***
Authorization Code:
<RET> to accept, <ESC> to quit 0987654 Unconditionally Disable:
Routinely Disable:
Procedure
Action Result
On the Modify Status screen, select the Authorization Code option and press Enter. (1)
The Authorization Code Selection screen displays with a prompt for the authorization code.
Enter the authorization code and press Enter.
Note: Press ESC to exit the screen and redisplay the Modify Status menu.
The Modify Authorization Code screen displays showing the current status of the code in the second and third fields (Yes or No). (2)
Note: If the system does not recognize the Authorization Code you en-tered, the message Error
Data-base Record Not Found appears.
Press ESC and try again or exit and query the database.
Enter the desired status to each field (Yes or No), pressing Enter after each entry.
The message Modify AuthCode Status Successful appears.
Note: If you enter a value other than Yes or No in either of the disable fields, the message Error
Pro-cessing Status Modification
ap-pears. Either press ESC to return to the Modify Status menu or re-enter the correct status and press Enter.
Press ESC to exit the screen. The Authorization Code Selection screen reappears for entry of another authorization code.
Press ESC again to exit the Selection screen.
Extension
Administrators can use the Extension option on the Modify Status menu to change the disable status of an extension. When you select this option, the Modify Extension screen displays.Figure 3-6 Modify Extension
Notes
If the extension is set to be unconditionally disabled (Yes), it is disabled indefinitely as soon as this procedure is completed. If the extension is set to be routinely disabled (Yes), the extension is regularly disabled during the time interval that is designated by the Interval Index in the authorization code database record. (You can review the database record using the Query Database option on the System Administration menu or by entering the APM Database Administration option.)
The Administrator can override the system disable setting of any extension. If the Administrator needs to turn on an extension after it has been turned off by the system, the Administrator may set the override field to Yes. This override affects only the current system disabling of the extension; it does not protect the extension from being disabled after another episode excessive invalid call attempts. (‘No’ is the default setting in this field.)
(2) (1)
GUARDIAN
*** MODIFY STATUS ***
Group
Arrow keys to move cursor, <RET> to select, <ESC> to quit Authorization Code
> Extension
Quit
<RET> to accept, <ESC> to quit GUARDIAN
*** MODIFY EXTENSION ***
Extension No: 3201 Unconditionally Disable:
Routinely Disable: Override System Disable:
Procedure
Action Result
On the Modify Status screen, select the Extension option and press Enter. (1)
The Extension Selection screen displays with a prompt for the extension.
Enter the extension and press Enter.
Note: Press ESC to exit the screen and redisplay the Modify Status menu.
The Modify Extension screen displays showing the three disable statuses for the indicated extension. (2)
Note: If the system does not recognize the Extension you entered, the message Error Database Record
Not Found appears. Press ESC
and try again or exit and query the database.
Enter the desired status to each field (Yes or No), pressing Enter after each entry.
The message Modify Extension Status Successful appears.
Note: If you enter a value other than Yes or No in any of the disable fields, the message Error
Pro-cessing Status Modification
ap-pears. Either press ESC to return to the Modify Status menu or re-enter the correct status and press Enter.
Press ESC to exit the screen. The Extension Selection screen reappears for entry of another extension.
Press ESC again to exit the Selection screen.