CONVERGENT TECHNOLOGIES RELEASE NOTICE FOR 11.3 / 11.4 Standard Software
(SAA-3100)
Revised January 30, 1989
SECTION TITLE PAGE
1.0 Changes from Prior Versions... 3
1.1 Description of Programs... 3
1.2 SPRs Closed in This Release... 11
1.3 Problems closed in Standard Software 11.4 ... 11
1.4 SPRs Closed in Std Software 11.3... 11
1.5 Changes from Std Software 11.0... 14
1.6 Changes from Std Software 11.2... 14
2.0 Contents of Distribution Diskettes... 21
3.0 System Software Compatibility... 29
3.1 Workstation Environment... 29
4.0 Hardware Information ... 30
4.1 Hardware Configurations Supported.... 30
5.0 Software Installation ... 32
5.1 Required Hardware... 32
5.2 Theory of Installation... 32
5.3 Installation Procedures... 35
5.3.1 Initialization... 35
5.3.2 IVolume... 36
5.3.3 SRP Initialization From QIC... 45
5.3.4 Installation of Packages... 49
5.3.5 Restore... 56
5.4 Operating System Installation... 57
6.0 Supplementary Information... 58
6.1 Internationalization ... 58
7.0 Documentation Updates... 59
NOTE
This Release Notice is for Standard Software. Detailed Operating System information is contained in a separate Release Notice for the CTOS/VM and CTOS/SRP Operating Systems.
Read the entire contents of this release notice before you begin installation.
This specification assumes prior knowledge of the following documents:
11.2 Standard Software Release Notice Executive Manual, Fourth Edition CTOS System Administrator's Guide CTOS/VM Concepts Manual
1.0 CHANGES FROM PRIOR VERSIONS
1.1 DESCRIPTION OF PROGRAMS
This Release Notice describes Standard Software version 11.3 / 11.4. This section and the sections that follow provide a description of the product, a list of the contents of the Distribution Diskettes, installation procedures, and other information pertinent to this release of Standard Software.
Standard Software version 11.3 / 11.4 is intended for use with CTOS/VM version 2.0 or later and CTOS/SRP. However, Standard Software version 11.3 / 11.4 is backward compatible for use on all workstations (NGEN's, IWS's, and AWS's). To work correctly in these environments, the system must be running the following minimum versions of CTOS:
IWS 9.1
AWS 9.11
NGEN Series 186 9.1 or later
NGEN Series 286 9.7 or VM 2.0 or later NGEN Series 286i VM 2.0 or later
NGEN Series 386 9.8 or VM 2.0 or later NGEN Series 386i VM 2.2 or later
SRP CTOS/SRP 1.0 or later (also known as CTOS II) Standard Software 11.3 / 11.4 must be used on workstations on which you intend to run CTOS/VM. The release chronology of Standard Software numbering is as follows:
10.x (with CTOS 9.4 thru 9.x) II 1.0 (with CTOS II 1.0)
11.0 (with CTOS/VM 2.0) 11.1 (with CTOS/SRP 1.4)
11.2 (with CTOS/VM 2.2)
Version 11.3 / 11.4 Standard Software distribution package consists of:
o 5 NGEN Initialization diskettes o 6 Workstation Utilities diskettes o 2 Software Development diskettes
o 1 Master Workstation Utilities diskette o 1 Standard Software Update diskette o 3 Tape Utilities diskettes
o 3 SRP Utilities diskettes o 1 SRP Initialization QIC tape
Version 11.3 / 11.4 Standard Software consists of the following programs.
An asterisk (*) designates those run files that have functions provided in the Executive. They are provided only so the user can execute them on the SRP boards using MCLI or MCDTIO.
Append.run *Appends files together
Assembler.run Assembles source programs
ATE.run Emulates an
Asynchronous Terminal BackupVolume.run Archives disk volumes BadSpotReport.run Reports bad spots on a
disk
Batch.run Processes batch files Bootstrap.run Bootstraps a
workstation
ChgVolName.run Changes the name of a volume
ChgVolNamei.run Changes the name of a volume (used on SRP boot tapes only)
CLI.run Interprets system
commands for the SRP ClusterStatus.run Shows information
about the workstations on the cluster
CmdFileEditor.run Edits a command file Command.run Adds and removes
commands
Copy.run *Copies files
CreateConfig.run Creates serial and parallel port configuration files CreateDirectory.run *Creates directories CreateMsgFile.run Converts text message
files into binary message files
CreatePartition.run Creates SRP memory partitions
DeInstallQicServer.run Deinstalls the NGEN QIC system service DeInstallQMgr.run Deinstalls the Queue
Manager
Delete.run *Deletes files DeviceName.run Allows multiple
installations of servers on SRP boards DisableCluster.run Disables cluster
operations
Dump.run Dumps a file in hexadecimal
Editor.run Edits text
Exec.run Interprets interactive system commands
ExtCrashDump.run Dumps high memory (above 1 MB) after a system crash
Files.run Lists files
FloppyCopy.run Copies floppy disks Format.run Formats files for
printing
InstallQMgr.run Installs the Queue Manager
InstallSpl.run Spools files for printing on the workstation
InstallVDM.run Installs system video at boot-time
IVolume.run Initializes volumes
LCopy.run Copies files
Librarian.run Creates libraries of object modules
Linker.run Links object files and libraries into run files
LInstall.run Installs software ListRqSet.run Creates a text file
for loadable requests (used later by
MakeRqSet)
MakeBootTape.run Creates a tape from which an SRP can be booted
MakeRqSet.run Creates loadable request files (e.g. Request.sys)
MaintainFile.run Deletes corrupt records from RSAM files
Menu.run Interprets commands for SRP bootable tapes MfAdminAgent.run Communicates with the
workstation WsAdminAgent
MHisto.run Reports histogramming information for the SRP
MHistProc.run Supplies histogramming information to mHisto. run
MInstallSecondary.run Installs system services into a
secondary partition on an SRP
MInstallServer.run Loads system services written for the SRP which do not issue a call to ConvertToSys MIvolume.run Initializes volumes
(SRP)
MIvolumei.run Initializes volumes (used on SRP boot tapes only)
MPartitionStatus.run Reports information about memory on the SRP
MSpoolerMgr.run Spools files for printing on the SRP MTapeServer.run Serves tape requests
for half inch tape on the SRP
NGenQicServer.run Serves tape requests for quarter inch tape on the workstation NLSServer.run Provides Native
Language Support for CTOS 9.x
PartitionStatus.run Reports information about memory on workstations
PLog.run Reports system error/ status log
PMake.run Creates CTOS/VM image files
Print.run Prints files to a queue
QicErase.run Erases a QIC tape QicErasei.run Erases a QIC tape
(used on SRP boot tapes only)
QueueMgr.run Provides queueing services
RemoveDirectory.run *Removes directories RemovePartition.run Removes partitions
from memory on the SRP Rename.run *Renames files
Restore.run Restores previously archived files
SelectiveBackup.run Selectively archives files
SetDirectoryProtection.run
Sets the protection level of a directory SetFileProtection.run *Sets the protection
level of a file SetTime.run Sets the time
SignOn.run Allows the user to log in to the system
SpoolerStatus.run Reports status of the Spooler
SubCmd.run Processes submit files as commands
Submit.run Processes submit files Sync.run Allows an SRP JCL file
to be synchronized on different boards
SyncStatus.run Allows monitoring the synchronization of the boards on an SRP
SysInit.run Provides for the automatic running of program(s) at system initialization
TapeBackupVolumei.run Archives an entire disk to tape (for SRP bootable tapes only) TapeBackupVolume.run Archives an entire
disk to tape TapeCopy.run Copies tapes
TapeInstall.run Provides tape services for IWS workstations TapeRestore.run Restores archived
TapeRestorei.run Restores archived files from tape to disk (for SRP boot tapes only)
TapeSelectiveBackup.run
Selectively archives files to tape
UserFileEditor.run Edits user files VacatePartition.run Removes a task image
from a partition (SRP) VDM_BM.run Drives the video for a
bit-mapped monitor VDM_CH.run Drives the video for a
character-mapped monitor
Version.run Displays/modifies run file information
VolumeStatus.run Displays information about a disk
Wrap.run Wraps data into an
object file
WsAdminAgent.run Gets information from a workstation user and passes it to the MfAdminAgent on the SRP
XBif.run Serves the NGEN X-Bus XC002Server.run Serves the NGEN
port expander
1.2 SPRs CLOSED IN THIS RELEASE
1.3 Problems closed in Standard Software 11.4
The Restore command reverted to internal English messages when restoring FileUtilMsg.Bin and the parameter [Overwrite Ok?] was set to No.
New Command returned Erc 219 on a password protected volume even if the password was entered at SignOn.
The Files command returned Erc 219 if Mfd.Sys was protected.
The Queue Manager would GP Fault if two simultaneous AddQueueEntry calls were made. Make Request Set did not set the protection level of Request. Sys to the previous protection level.
Disable Cluster and Resume Cluster have been modified to function correctly on 2.3 CTOS/VM.
1.4 SPRs Closed in Standard Software 11.3
Disk byte streams: Executing a writebyte after the bytestream was closed caused a crash erc 28.
ListRqSet: Constants (e.g the 100 in c(100,22)) were truncated to two digits. Queue Manager: Caching was broken.
Spooler Status: Selecting a parallel printer on another node crashed with erc 3. 12428 ATE: The "WaitFor" function used in script
12737 Floppy Copy: when the target floppy is bad (erc 301), attempting to retry with a good floppy exits with erc 400 or 402.
12745 Ctos.lib: FillBufferAsyncC faults under VM when either a remote system or modem is powered off.
12831 Ctos.lib: Comm Byte Stream routine OpenByteStreamC, would return an erc 60 when accessing the 8251 ports on an SRP.
12915, 12917, 12918
Ctos.lib: GetServerMsg, OpenServerMsgFile, and CloseServerMsgFile always returned erc 13505, 'Message file corrupt', for any error condition. They have been modified to return the same errors as the related Ctos.lib routines OpenMsgFile, GetMsg, and CloseMsgFile.
12916 Ctos.lib: If NlsVerifySignatures was supplied with a string of signatures which was longer than the number of tables to verify against, it returned ercOK. It now returns ercNoSuchTable.
12919 Ctos.lib: If you supplied invalid input to GetNlsKey (for example key values of 0 or 25), the routine would not return an error message and sometimes caused a GP fault. 12920 Assembler: could not assemble German>Nls.asm
correctly.
12967 OpenByteStreamTape: This internal Byte Stream routine dealt with the size of its buffers in paragraphs. This has now been changed to deal with the size in bytes so as to be compatible with all other byte streams.
13001 Ctos.lib: GetMsg caused a GP fault if you asked to expand a %Kn macro where K was greater than 22.
13047 SignOn: If you set the SignOnChainFile to be the PC Emulator, and the SignOnExitFile to SignOn.run, after exiting the PC Emulator, the SignOn screen would not have visible characters.
13084 Create Configuration File: A 'CR/LF' entry for newline mapping mode wrote a ' CR' value to the config file. The only way to specify 'CR/LF' was to blank the field and have the utility write it as the default.
13096 ATE: when three or more lines were cut and pasted (using CM) into an ATE session with [phone]1 specified as the Communications Channel, the workstation would crash with an erc 80.
13106 Queue Manager: Now allows Queue Manager requests sent from a Queue Manager on one node to be handled by a Queue Manager on a different node.
13114 Files: specifying a password on a print file returned erc 219, access denied.
13122 ATE: sending a file over the RS-232 port (using f7), if the CTS protocol is used, can crash the system with an erc 1431 or 1557. 13277 Create Configuration File: Responding "odd"
to the Parity prompt produced an invalid error message "Invalid parameter".
13338 Files: File names with umlauts sometimes sorted before and sometimes sorted after corresponding equivalent character sequences.
13339 Ctos.lib: NlsCollate would always return with bprioResRet equal to bColResRet. It would not use the secondary priority table. 13343 Version: When details were requested and
13442 Append: if you attempted to append Word Processor or Document Designer files, you would not receive a warning that the formatting would be lost.
13470 Exec: would not report errors (returned erc's) over 8000h correctly.
13623 ATE: would not accept the parameter {master}[phone]2.
13751 QueueMgr: Garbage was written to the system log when queue.index was absent.
1.5 CHANGES FROM STANDARD SOFTWARE 11.0
See the 11.2 Standard Software Release Notice.
1.6 CHANGES FROM STANDARD SOFTWARE 11.2
CTOSToolKit.lib: A new library has been added. The linker automatically looks for this library in [Sys]<Sys>, as it does for CTOS.lib. CTOS.lib was exceeding the limits for the librarian. In future releases, certain "non-OSish" routines will migrate from CTOS.lib into CTOSToolkit.lib. New routines will be placed in the appropriate library.
A. The following files are being re-released to close SPR's: ATE.run, Files.run, and FloppyCopy.run.
B. Assembler: A serious bug was fixed which prevented the assembler from assembling the file Nls.asm.
Note: The 'Structure Macro' mentioned in the Assembler is not supported.
D. Create Configuration File: the following parameter has been added to the parallel printer form:
[Receive timeout (number of seconds, default - wait forever)]
to support future scanner projects.
E. Ctos.lib: Minor bugs have been fixed, e.g. not allowing multiple GPS byte streams.
There are two new related routines, AtFileInit and AtFileNext which allow you to expand the contents of an 'at' file. See the CTOS/VM Reference Manual for details.
F. Nls: Additional Native Language Support tables have been added. See Nls. asm for details.
G. DisplayConfig: has been modified to recognize module id's on the XBus as different from module id's on the IBus. See DisplayConfigMsg.txt for details.
H. Exec: The Video and Screen Setup commands both have a new parameter:
[Background color]
which, on the new "EV" modules will allow the user to set the background color. Specifying "none" to the background color parameter turns off (sets to black) the background color.
Also, the parameter [Color (e.g., Green)] is now
[Foreground Color (e.g., Green)]
I. File and Tape Utilities: Support for the HSD- 320 and HDX-320 SCSI disk modules has been added to IVolume. The tape utilities can correctly reference disk files that are on a remote CT-Net node. The tape utilities also may be invoked from a Batch jcl file. IVolume can be configured via the NLS file to allocate a minimum of one contiguous track for CrashDump.sys, regardless of value specified by user.
J. Linker: has been modified to support the following additional run file modes.
1) Conditional Protected Mode.
The "conditional protected mode" options allows a program to execute in protected mode or real mode based on the internal version of CTOS/VM. This feature requires CTOS/VM 2.2 or a higher version.
Use conditional protected mode when an application depends on new CTOS features in order to execute in protected mode.
To select the "conditional protected mode" option, enter a CTOS internal version number in the [Run file mode] field following the run file mode keyword.
The correspondence between CTOS/VM internal and release version numbers is summarized in the following table.
Release Version Internal Version
2.0 11.0
2.1 11.1
2.2 11.2
2.3 11.3
For example,
[Run file mode] Protected 11.2
2) Code Sharing Servers.
The "code sharing server" option allows multiple installations of the same server on the same processor to share code. This feature requires CTOS/VM 2.2 or a higher version.
The selection of this option implies that the server is LDT-based. CTOS/VM does not support GDT-based code sharing. Consequently, code sharing servers cannot contain system common procedures.
To select the "code sharing server" option, enter
CodeSharingServer or
HighMemCodeSharingServer
in the [Run file mode] field of the Bind command form. (The HighMemCodeSharingServer keyword is explained below.)
For example,
[Run file mode] CodeSharingServer
selects the "code sharing server" option. 3) High Memory.
The "high memory" option asserts that the program can be executed on the NGen Series 386i processor in memory configurations that exceed 16Mb.
A program communicates with a "mode 3 master" either by programming the device directly or by issuing a request that causes the "mode 3 master" to transfer data into the program's data area.
On a 386i, CTOS/VM does not load programs beyond 16Mb unless the "high memory" option is asserted. By specifying this option, the programmer is asserting that the program does not communicate with a "mode 3 master", either directly or indirectly.
To select the "high memory" option, enter HighMemProtected
or
HighMemGdtProtected or
HighMemCodeSharingServer
in the [Run file mode] field of the Bind command form. These keywords select the "protected", "gdt protected", and "code sharing server" options respectively, and assert the "high memory" option as well.
For example,
[Run file mode] HighMemProtected selects the "high memory" option.
K. Partition Status: Has been updated to handle new memory management requests with CTOS/VM 2.2 or later.
L. PLog: PLog includes enhancements for the HSD- 320 and HSX-320 SCSI disk modules as well as support for the 386i processor series.
N. QueueMgr.run:
a) A serious bug was fixed in termination dealing with repeating entries.
b) Code has been added to allow Queue Managers on different nodes to send requests to each other.
c) The procedural interface to RescheduleMarkedQueueEntry has been corrected.
d) The Queue Manager no longer writes a message to the Plog if it does not find a Queue.index file, it simply installs.
e) If the Queue Manager can not forward a request to a remote Queue Manager, it now returns erc 929, 'ercForwardRqFailed'.
f) Caching now works.
O. SignOn: SignOn now issues a request to a "SignOn Server" before granting access. This server can be written to log signons, to verify access based on user name, etc. If the server is not installed, SignOn operates as before.
Further, SignOn has been modified to accept user name and password parameter for use during SysInit. As the last line of the SysInit.jcl file, you can specify a line such as:
$RUN [sys]<sys>SignOn.run,UserName,Pswd
SignOn will then run without user interaction.
When logging out on a color machine, SignOn will not reset the color to green.
P. Batch: The Background Batch system (released as a separate product from Standard Software) now operates in protected mode.
R. The following files which have previously been distributed with Standard Software are obsoleted: Request.X.sys, MRequest.2.sys, and Request.9.sys. For those users running CTOS 9.8 and below, Request.2.sys has been updated to contain the request codes that used to be in the obsoleted files.
S. tlSys.font, the standard NGen character map font, has been updated.
T. CreateBackupFloppy.sub: As before, this submit file will create floppies to do backups and restores from diskette or from tape. However, this submit file now creates three floppies instead of the two created by prior versions. The first floppy is a bootable floppy (See 8 E. below for a workaround to a temporary error.) The second floppy contains the files to do (tape) backups and (tape) restores. The third floppy contains files which allow the disk to be initialized and renamed. The following sequence would normally be followed. 1) Boot from diskette 1. 2) Backup the volume using diskette 2. 3) Verify that the backup media is OK by restoring with "List files only - yes". This is also on diskette 2. 4) Insert floppy 3.
*** Note: Now press ACTION-FINISH; Doing this will load ExecMsg.bin from floppy 3. Failure to ACTION-FINISH will result in the OS crashing with "Cannot load Exit Run File, erc 203".
2.0 CONTENTS OF DISTRIBUTION DISKETTES
The Standard Software 11.3 / 11.4 Distribution Diskettes set are your master copy, and have been shipped protected. They should not be write-enabled, nor should they be used as a working copy.
NGEN INITIALIZATION DISKETTES
CTOS 9.10 Initialization
Diskette 1 of 1, <Sys> directory
ExecMsg.bin SignOn.run
SignOn.txt Sys.cmds
tlSys.font
CTOS/VM Initialization
Diskette 1 of 1, <Sys> directory
1024x768_80Sys.font 720x348_80Sys.font
Config.sys ExecMsg.bin
InstallVDM.run SignOn.run
SignOn.txt Sys.cmds
tlSys.font VDM_BM.run
VDM_Ch.run
Initialization Continuation Diskette 1 of 3, <Sys> directory
.user 80x23CharSys.font
AllFiles.fls Config.sys
Continue.run Continue.txt
Exec.run ExecMsg.bin
Init.sub Init.user
Install.sub InstallRequest.sub
IVolume.run LptConfig.sys
PtrBConfig.sys Queue.index Real>SignOn.txt Request.sys
SignOn.run SignOn.txt
SplBConfig.sys SplCnfg.sys SplConfig.sys SubCmd.run
Submit.run Sys.cmds
Diskette 2 of 3 (2.3 CTOS/VM), <Sys> directory 1024x768_80Sys.font 720x348_80Sys.font
AllFiles.fls Exec.run
ExecMsg.bin InstallVDM.run
LCopy.run LInstall.run
Next.sub Request.2.sys
Sys.cmds tlSys.font
VDM_Ch.run
Diskette 3 of 3 (9.10 CTOS), <Sys> directory 1024x768_80Sys.font 720x348_80Sys.font
AllFiles.fls Exec.run
ExecMsg.bin InstallVDM.run
LCopy.run LInstall.run
Next.sub Request.2.sys
Sys.cmds tlSys.font
VDM_Ch.run
WORKSTATION UTILITIES DISKETTES Diskette 1 of 6, <Sys> directory
All.sub Config.Sys
Delete.fls HdInstall.sub
InstallConfig.sys Local.sub
Master.sub Rest.fls
Submit.fls
Diskette 1 of 6, <CT> directory
Cleanup.sub Command.run
Config.sys CreateBackupFloppy.sub DailyBackup.sub DisplayConfig.run
DisplayConfigMsg.bin ErcMsg.bin
ErcMsg.txt Exec.run
ExecMsg.bin ExecMsg.txt
FileUtilMsg.bin Install.sub
InstallNewRequest.sub InstallRequest.sub
LCopy.run LInstall.run
Request.Sys-Initial StdServerMsg.bin StdSoftMsg.bin SubCmd.run
Diskette 2 of 6, <Sys> directory
All.sub Delete.fls
HdInstall.sub InstallConfig.sys
Local.sub Master.sub
Submit.fls
Workstation Utilities Diskette 2 of 6 Diskette 2 of 6, <CT> directory
BatchMsg.bin BatchMst.txt
DisplayConfigMsg.txt FileUtilMsg.txt
IVolume.run MaintainFile.run
PlogMsg.bin PlogMsg.txt
SignOn.run StdServerMsg.txt
StdSoftMsg.txt Student.user
SysInit.run VolumeStatus.run
Diskette 3 of 6, <Sys> directory
All.sub Delete.fls
HdInstall.sub InstallConfig.sys
Local.sub Master.sub
Submit.fls
Workstation Utilities Diskette 3 of 6 Diskette 3 of 6, <CT> directory
ListRqSet.run MakeRqSet.run NlsServer.run PartitionStatus.run
Plog.run Restore.run
SelectiveBackup.run SetDirectoryProtection.run Diskette 4 of 6, <Sys> directory
All.sub Delete.fls
HdInstall.sub InstallConfig.sys
Local.sub Master.sub
Submit.fls
Workstation Utilities Diskette 4 of 6 Diskette 4 of 6, <CT> directory
Bootstrap.run ChgVolName.run CmdFileEditor.run FloppyCopy.run
Format.run UserFileEditor.run
UserFileTemplate.sys Version.run
Diskette 5 of 6, <Sys> directory
All.sub Delete.fIs
HdInstall.sub InstallConfig.sys
Local.sub Master.sub
Submit.fls Workstation Utilities Diskette 5 of 6 Diskette 5 of 6, <CT> directory
BackupVolume.run BadSpotReport.run
Batch.run CreateConfig.run
ExtCrashDump.run SetTime.run Submit.run
Diskette 6 of 6, <Sys> directory
All.sub Cleanup.fls
Delete.fls HdInstall.sub
InstallConfig.sys Local.sub
Master.sub RemDir.sub
Request.2.sys. Request.sys. Diskette 6 of 6, <CT> directory
Ate.run CreateMsgFile.run
Editor.run Files.run
Print.run
MASTER WORKSTATION UTILITIES DISKETTE Diskette 1 of 1, <Sys> directory
HdInstall.sub MasterUtilitiesCmds.sub Diskette 1 of 1, <CT> directory
ClusterStatus.run DelnstallQMgr.run DisableCluster.run InstallQMgr.run InstallSpl.run QueueMgr.run ResumeCluster.run SpoolerStatus.run Diskette 1 of 1, <RelNote> directory
SOFTWARE DEVELOPMENT UTILITIES DISKETTES Diskette 1 of 2, <Sys> directory
All.sub Delete.fls
HdInstall.sub InstallConfig.sys
InSys.fls Local.sub
Master.sub Rest.fls
Submit.fls
Diskette 1 of 2, <CT> directory
Ctos.lib CtosToolKit.lib
LinkCTOS.sub LinkCTOSVM.sub Linker.run LinkFileSystem.sub RequestTemplate.txt
Diskette 2 of 2, <Sys> directory
All.sub Cleanup.fls
Delete.fls HdInstall.sub
InstallConfig.sys InSys.fls
Local.sub Master.sub
Rest.fls
SoftwareDevelopmentCmds.sub Submit.fls
Software Development Diskette 2 of 2 Diskette 2 of 2, <CT> directory
Assembler.run CommNub_pre10.obj CommStatus_pre10.obj Dump.run
German>Nls.asm InitComm_pre10.obj
Librarian.run Nls.asm
Nls.mdf OsSub.mdf
PMake.run RqLabl.mdf
SamGen.mdf SamGenAll.asm
SamGenAll.obj UserRqLabel.asm UserSysCommonLabel.asm Wrap.run
SHARED RESOURCE PROCESSOR UTILITIES DISKETTES Diskette 1 of 3, <Sys> directory
All.sub Cleanup.fls
Delete.fls HdInstall.sub
Diskette 1 of 3, <CT> directory
Append.run Copy.run
CreateDirectory.run CreatePartition.run Delete.run LoadPrimaryTask.run MfAdminAgent.run RemoveDirectory.run Rename.run SetFileProtection.run Diskette 2 of 3, <Sys> directory
All.sub HdInstall.sub
SRP Utilities Diskette 2 of 3 Diskette 2 of 3, <CT> directory
CdtIO.run ChgVolNamei.run
CLI.run MakeBootTape.run
mlVolume.run mlVolumei.run RemovePartition.run VacatePartition.run Diskette 3 of 3, <Sys> directory
All.sub HdInstall.sub
SRP Utilities Diskette 3 of 3 SRPUtilitiesCmds.sub
Diskette 3 of 3, <CT> directory DeviceName.run Menu.run
mHisto.run mHistProc.run
mInstallSecondary.run mInstallServer.run mPartitionStatus.run mSpoolerMgr.run
QicTable.txt Sync.run
SyncStatus.run TapeTable.txt WsAdminAgent.run
TAPE UTILITIES DISKETTES
Diskette 1 of 3, <Sys> directory
All.sub AllFiles.fls
Cleanup.fls Delete.fls
HdInstall.sub InstallConfig.sys
Local.sub Master.sub
Submit.fls WsTapeCmds.sub
Diskette 1 of 3, <CT> directory
Diskette 2 of 3, <Sys> directory
All.sub AllFiles.fls
Cleanup.fls Delete.fls
HdInstall.sub InstallConfig.sys
Local.sub Master.sub
Submit.fls
Tape Utilities Diskette 2 of 3 Diskette 2 of 3, <CT> directory
DelnstallQicServer.run TapeCopy.run
TapeRestore.run TapeSelectiveBackup.run Diskette 3 of 3, <Sys> directory
All.sub AllFiles.fls
Cleanup.fls Delete.fls
HdInstall.sub InstallConfig.sys
Local.sub LocalSRPTapeCmds.sub
Master.sub SRPTapeCmds.sub
SRPTapeCmdsOnly.sub Submit.fls Tape Utilities Diskette 3 of 3
Diskette 3 of 3, <CT> directory
LocalSRPTapeCmds.sub mQicServer.run mTapeServer.run QicErasei.run SRPTapeCmds.sub TapeBackupi.run TapeConfig.sys TapeRestorei.run 11.4 STANDARD SOFTWARE UPDATE DISKETTE Diskette 1 of 1, <Sys> directory
All.sub Local.sub
Master.sub Delete.fls
Submit.fls HdInstall.sub
InstallConfig.sys
Diskette 1 of 1, <CT> directory
Command.Run MakeRqSet.Run
SHARED RESOURCE PROCESSOR INITIALIZATION QIC TAPE
SRPCp.sys SRPDp.sys
SRPFp.sys SRPSp.sys
SRPTp.sys SysImage.sys
Bootstrap.run ChgVolNamei.run
CLI.run Copy.run
Delete.run RemoveDirectory.run CreateDirectory.run Menu.run
MfAdminAgent.run mIvolume.run mIvolumei.run QicErasei.run Restore.run TapeBackupi.run TapeRestorei.run WsAdminAgent.run
CP00.cnf DP00.cnf
FP00.cnf IVATASI46.cnf
Ivball100.cnf IvCDC300.cnf
Ivcdc340.cnf Ivcdc675.cnf
Ivfujitsu80.cnf IvHitachi51.cnf Ivhitachi85.cnf IvMaxtorl43.cnf Ivmaxtor53.cnf IvMICR052.cnf IvMicropolis85.cnf IVSyQuest6.cnf
3.0 SYSTEM SOFTWARE COMPATIBILITY
3.1 WORKSTATION ENVIRONMENT
A. Standard Software 11.3 / 11.4 is intended for use with CTOS/VM 2.2 or later. However, Standard Software 11.3 / 11.4 is backward compatible for use on all workstations (NGEN's, IWS's, and AWS's). To work correctly in these environments, the workstation must be running the following minimum versions of CTOS:
IWS 9.1
AWS 9.11
NGEN Series 186 9.1 or later
NGEN Series 286 9.7 or VM 2.0 or later NGEN Series 286i VM 2.0 or later
NGEN Series 386 9.8 or VM 2.0 or later NGEN Series 386i VM 2.2 or later
B. If you attempt to run 11.3 / 11.4 Standard Software on a version of CTOS prior to 9.1, a status code 247 (incorrect OS version) will be returned.
4.0 HARDWARE INFORMATION
4.1 HARDWARE CONFIGURATIONS SUPPORTED
Version 11.3 / 11.4 Standard Software supports the following NGEN hardware modules:
CWS Workstations
CM-002 512 Kb CM-003 1024 Kb
NGEN Modules
CP-001/8 8 Mhz 80186 processor CP-001/9 8 Mhz 80186 processor CP-002 8 Mhz 80286 processor
CP-002/287 8 Mhz 80286 processor with 80287 numerical processor
CP-003 16 Mhz 80386 processor
CP-003/287 16 Mhz 80386 processor with 80287 numerical processor
CP-002EV/CP-003EV
CP-002 and CP003 processors with internal GC-102 alphanumeric color functionality
PHD-010 8 Mhz 80286 processor PHD-011 8 Mhz 80286 processor
PHD-140 20 or 25 Mhz 386i w/140Mb SCSI PHD-320 20 or 25 Mhz 386i w/320Mb SCSI VM-001 12" monochrome monitor
VM-002 14" monochrome monitor
VM-003 14" monochrome bitmap monitor VC-001 15" color monitor
GC-001 graphics controller GC-003 graphics controller
GC-102 alphanumeric color controller KM-001 keyboard
TM-001 voice processor (with modem) VP-002 voice processor (without modem) XC-002 RS-232 port expander
XE-001 Ethernet module
PC-001 PC compatibility module HB-001 quarter-inch tape module FD-001 dual floppy disk
FD-0A1 dual floppy disk
HD-011 32 Mb hard disk upgrade HD-020 85 MB hard disk upgrade HD-0A1 20 Mb floppy/hard disk HX-002 10 Mb hard disk expansion HX-003 20 Mb hard disk expansion HX-011 32 Mb hard disk expansion HX-020 85 Mb hard disk expansion HSD-040 40 Mb SCSI/floppy
5.0 SOFTWARE INSTALLATION
INSTALLATION PRE-REQUISITES:
If you have a system that is already running some version of CTOS, be sure that no system services are installed and that the Context Manager is not installed.
If you plan to install Standard Software 11.3 / 11.4 and a new version of CTOS (e.g. CTOS/VM), you must install Standard Software before installing the OS.
5.1 REQUIRED HARDWARE
*** IMPORTANT NOTE ***
A minimum of a 20 megabyte hard disk is recommended for installation of Standard Software.
Installation of 11.3 / 11.4 Standard Software on an SRP master requires a workstation with a hard disk and a floppy drive.
5.2 THEORY OF INSTALLATION
For the purposes of this section, three categories of system disks exist:
o A system disk that is already running some version of CTOS on which you wish to run CTOS/VM or CTOS/SRP and Standard Software 11.3 / 11.4. This applies to Series 286, Series 286i, Series 386i, and Series 386 NGen's and SRP's . CTOS/VM requires a minimum of 640 sectors for SysImage.sys. In this case, perform a Files command as follows:
Command Files Files
File list [sys]<sys>SysImage.sys [Details?] y <GO>
Look at the number of sectors. If the number is less than 640, you must re-initialize the hard disk. In the following sections, installing Standard Software on this type of disk is referred to as Re-Initializing.
If you have an SRP running some old version of CTOS (e.g. 3.2 or 3.3.1), you must Re- initialize since Standard Software 11.3 / 11.4 will not run on these versions of CTOS. o A system disk onto which you wish only to
install Standard Software 11.3 / 11.4. This could apply to any system. On Series 186 NGEN's, AWS's, IWS's, and SRP's systems, the operating system does not change. In the following sections, installing Standard Software on this type of disk is referred to as Upgrading.
Upgrade Initialize Reinitialize 1. Back Up
[Sys] Volume x 2. IVolume* x x 3. Install
Standard x x x Software
4. Restore x Old Files
The details of each of these steps are described in the following sections.
* IVolume refers to initializing the hard disk. See below for details.
Standard Software 11.3 / 11.4 consists of the following six functional packages plus an update diskette. Different packages apply to different configurations. The details of their installation are discussed in section 4.3 below.
Initialization 5 Diskettes
These diskettes are bootable. They contain enough files to allow you to initialize your system volume.
Workstation Utilities 6 diskettes These diskettes contain the base of required system software.
Master Utilities 1 diskette
This diskette contain files intended to be used on a master.
Tape Utilities 3 diskettes
These diskettes contain files needed for tape.
Standard Software Update Utilities 1 Diskette This diskette contains files that have been updated since the 11.3 Standard Software release.
SRP Utilities 3 diskettes
These diskettes contain utilities designed specifically for the SRP.
5.3 INSTALLATION PROCEDURES
This section describes the steps to take to install Standard Software 11.3 / 11.4. The installation depends upon the category into which your system disk fits. Please read this section carefully.
Installation may display error messages while creating directories, copying files, deleting files, or renaming files. You may disregard these error messages.
NOTE
Standard Software 11.3 / 11.4 requires a minimum of a 20 megabyte hard disk for the System volume.
Characters that you must type are shown in bold-face. Special keys, such as RETURN and GO, are shown in uppercase.
5.3.1 BACK UP (Re-Initialization only)
B. Back up the hard disk to floppies or tape using the Backup Volume, Tape Backup Volume or MTape Backup Volume commands. On a separate floppy, save away an additional copy of your command file(s) (Sys.cmds and/or WsAdminagent.txt), SignOn.txt, and any specially modified configuration files.
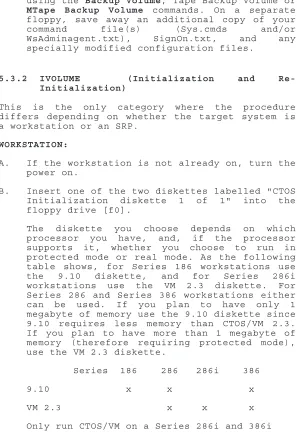
5.3.2 IVOLUME (Initialization and Re-Initialization)
This is the only category where the procedure differs depending on whether the target system is a workstation or an SRP.
WORKSTATION:
A. If the workstation is not already on, turn the power on.
B. Insert one of the two diskettes labelled "CTOS Initialization diskette 1 of 1" into the floppy drive [f0].
The diskette you choose depends on which processor you have, and, if the processor supports it, whether you choose to run in protected mode or real mode. As the following table shows, for Series 186 workstations use the 9.10 diskette, and for Series 286i workstations use the VM 2.3 diskette. For Series 286 and Series 386 workstations either can be used. If you plan to have only 1 megabyte of memory use the 9.10 diskette since 9.10 requires less memory than CTOS/VM 2.3. If you plan to have more than 1 megabyte of memory (therefore requiring protected mode), use the VM 2.3 diskette.
[image:36.396.33.330.57.494.2]C. Press the small RESET button located on the upper rear of the processor module toward the same side as the on/off switch. If your processor is a PHD-010 without a RESET button, turn it off then on again.
D. After a short time, the following SignOn form appears:
User Name (e.g. Eric) Password
Date/Time (e.g., Tue Sep 9, 1986 8:00 AM)
Fill in the SignOn form as follows: User Name: enter the name Init. Password: a password is optional.
Enter a password if you are going to password protect your hard disk during initialization.
NOTE:
If you wish to use the operating system's file system security, a volume password is required.
Date/Time: if you have just turned the workstation on, the date/time that is displayed is incorrect. An incorrect date/time is signified by a flashing dim display of the time in the upper right- hand corner of the screen.
You may correct the date/time by entering it in the format "Mon Feb 9 1987 8:00 am". You can enter any part of this field that is incorrect, and in any order.
F. Drive d0 is selected as the system volume. To use a different volume, modify the volume field of the Path command that is shown on the screen.
CAUTION:
Initializing the hard disk erases all existing files.
NOTE:
If you wish to designate hard disk drives [d1], [d2], or [d3] as the system drive, all preceding drives must be nonbootable drives. For example, if you wish [d1] to be your bootable system volume, then [d0] must be nonbootable - that is, contain no operating system in SysImage.sys.
You can make an NGEN hard disk nonbootable by overwriting its SysImage.sys with a nonexe-cutable file, such as a text file.
G. The IVolume form appears on the screen, as shown below.
Certain fields have been filled in for you. IVolume
Device name d0
[Device password] ##
Volume name Win
[Volume password]
[System Image (0)] 640
[Log file (0)] 32
[Crash file (0)] 3000
[Max. dirs]
[Max. files on vol]
[Primary file headers only?] [Max. files in Sys Dir] [Sys Directory password] [Write protect Sys Dir?] [Suppress format of medium?] [Surface tests]
[Debug=d, Password Encrypt=p] [Log file]
[Extended floppy tracks?] [NGEN hard disk type code] [Bad spots]
[Bad spots] [Bad spots]
You are not required to enter any additional information. However, consider optionally changing the following fields.
Volume Name. Enter a volume name of your choice (up to 12 characters). Volume names must be chosen to be unique within a workstation and between a workstation and the master.
[Crash file (default = 0)]. This parameter determines the size of the file CrashDump.sys. This file is used by the Context Manager (CTOS 9.x) or the Operating System (CTOS/VM) to be the default swap file. The recommended size is 3000 sectors. If this is to be your swap file and you enter less than 3000, you will later need to edit the file [Sys]<Sys>Config.sys and modify the entry :SwapFileSize: to indicate the size you pick. See the CTOS System Administrator's Guide for details.
[Sys Directory password]. You may enter a Sys directory password of your choice. This password is used only if a response is supplied to the [Volume password] prompt. [NGEN hard disk type code]. A disk type code
is a letter (for example, A, B, C) that designates a particular disk drive. It is located on the bad spot report, which is attached to the bottom of the disk module. IVolume uses the disk type code to determine drive parameters such as number of cylinders, number of heads, and number of sectors per track.
The supported disk type codes are summarized in the table below. Note that the Size field is unformatted/formatted capacity. When only one size is given that is the formatted capacity. Also, the "S" in the last column means sectors.
Code Vendor Size Cyl Heads S A Tandon 12.7/10 Mb 306 4 16 B Seagate 12.7/10 Mb 306 4 16 C reserved
D Atasi 46.5/37 Mb 645 7 16 E Quantum 42.7/32 Mb 512 8 16 F MiniScribe 26/20 Mb 612 4 16 G Seagate 26/20 Mb 612 4 16 H reserved
J reserved
K Micropolis 85/67 Mb 1024 8 16 L reserved
M reserved
Q Quantum SCSI 80 Mb 823 5 38 R Quantum SCSI 50 Mb 823 6 21 S Seagate SCSI 20 Mb 613 4 17 T Micropo SCSI 140 Mb 1016 8 34 U Micropo SCSI 326 Mb 1217 15 35 V Quantum SCSI 40 Mb 834 3 32 W Seagate SCSI 40 Mb 613 6 25 If your disk drive is not supported by a disk type code, you may enter the actual drive parameters when prompted to enter the code. Enter the parameter data as cylinders/heads/sectors.
For example, if your drive parameters are 1024 cylinders, 4 heads, and 16 sectors per track, enter the parameter data as follows:
[Bad Spots] If the hard disk has previously been initialized, IVolume obtains the bad spot information from the hard disk. If the disk has not been initialized, enter the bad spots here, or optionally enter bad spot information when prompted to do so by the IVolume utility. Separate entries with spaces. An entry must be contained entirely on a line; there are three lines available. If there are many bad spots, an at-file can be created through the Editor. See the Executive Manual for details.
On NGEN hard disks, a report showing the drive type code and bad spots is attached to the bottom of the disk module. After a disk has been initialized and Standard Software has been installed, you can give the Bad Spot Report command to obtain a listing of the bad spots on the disk.
NOTE
If your disk drive contains bad spots, you MUST enter bad spot information in order for your disk to function correctly.
Format 1
CYLINDER HEAD BFI/# SECTOR 84 1 #4
241 2 #13
For units with bad spot information as in the example above, enter a bad spot entry as: 84/l/#4
If there is no sector number, but there is a BFI (bytes from index), then enter the bad spot entry as:
Format 2
TRK HD BYTE COUNT LENGTH(BITS) --- --- 084 1 02646 04 241 2 08130 39
or Format 3
DISPLACEMENT LENGTH CYLINDER HEAD IN BYTES IN BITS 84/ 54 1 2646/ A56 4/ 4 241/ F1 2 8130/1FC2 39/27
For units with bad spot information as in the two examples above, enter a bad spot entry as:
84/1/2646/4 Format 4
CYLINDER HEAD BYTE OFFSET DEGREE 84/ 54 1 2646/ A56 81 241/ F1 2 8130/1FC2 263
For units with bad spot information as in the last example above, enter a bad spot entry as:
Volume initialization may take up to 45 minutes depending on the number of surface tests. It is strongly recommended that you run eight surface tests when initializing for the first time. If the disk is already initialized you should run at least one surface test.
Press GO to continue.
H. After Initialization Continuation Diskette 1 of 3 is complete, you will be prompted to insert the next diskette. The diskette to be inserted in the floppy drive is determined by the diskette you used to boot your system. If you used the 2.3 CTOS/VM Initialization diskette, insert Initialization Continuation Diskette 2 of 3. If you used the 9.10 CTOS Initialization diskette, insert Initialization Continuation Diskette 3 of 3.
Press GO when you have inserted the correct diskette.
I. Reboot when prompted. This makes the hard disk the system volume.
J. When you see the SignOn screen asking you to enter a user name, press GO to log on.
K. Continue with installation of the Standard Software packages (Section 5.3.3).
5.3.3 SRP - INITIALIZATION FROM QIC TAPE
The equipment required for SRP initialization is an SRP (which is defined as a system with a master processor, either a File Processor or Data Processor, and at least one Cluster Processor) and an NGEN workstation with a hard disk and at least one floppy drive.
B. Connect an RS-232 crossed cable from channel 3 of CP00 of the SRP to port B of the workstation. Connect an RS-422 cable from line 1 of CP00 to the workstation. Place a terminator on the free cluster connector of the workstation. Also, place a terminator on the other port of Line 1 of the SRP.
C. Invoke ATE from the workstation using the default parameters. The screen will clear and the ATE banner will be displayed. The third line contains a double bar running the width of the screen. The screen underneath the double bar will remain empty until step F. D. Load the "1.4 CTOS/SRP Initialization" QIC
tape in the drive.
E. Power up the SRP if it is not on already. Turn the key on the front panel of the SRP to the "stop" position, then to the "manual" position. This initiates the booting process. Wait until the number 20 is displayed on the front panel of the SRP. Now check the lights on CP00 (to do this you must walk around to the rear of the SRP and open the rear door of the enclosure which contains CP00.) The lights should appear as follows:
TOP: Off On Off On Off Off Off Blinking
If you are booting from QIC tape (your primary enclosure is called a "C" box), the device name and device password are the two characters "d1".
Although this installation is not packaged for it, if you were booting from Half-Inch tape your primary enclosure is called an "E" box, the device name and device password would be the two characters "s0".
If this is the first time you are initializing a hard disk, you should read the discussion of initializing volumes in the CTOS System Administrator's Guide. The values given below as answers to the "Maximum number of ..." prompts, are appropriate for a forty megabyte disk. You may wish to alter them if you have a larger disk. For the rest of the prompts, the recommended values are as follows:
System Image Sectors: 640 Log File Sectors: 32 Crash File Sectors: 1536
Maximum number of directories on volume: 50 Maximum number of files on volume: 4000 Maximum number of files in SYS directory: 400
Surface tests: 8 Bad Spots:
For information on bad spot formats, see the discussion of [Bad Spots] in section G of the workstation subsection earlier. After you have filled out the form, press the GO key on the workstation.
When you specify many surface tests, the initialization of the volume can take a long time. For example, a forty megabyte drive running eight surface tests can take up to 45 minutes. It is strongly recommended that you run eight surface tests when initializing for the first time. If the disk is already initialized you should run at least one surface test.
After the menu reappears, type the numeral "2" to restore files to the volume. Then answer the prompts as follows (for any prompt not specifically listed here, respond by just pressing RETURN):
Archive file: [qic]6 File list from: <*>* To File list: <Sys>* Overwrite OK?: yes Confirm each?: GO
After completion of file restoration, press the RETURN key to reload the menu program. The "6" above refers to file number 6 archived on the tape.
H. After the menu reappears, type the numeral "2", again, to restore another file to the volume. Then answer the prompts as follows (for any prompt not specifically listed here, respond by just pressing RETURN):
Archive file: [qic]7 File list from: <*>* To File list: <Cmd>* Overwrite OK?: yes
I. After completion of file restoration, unload the tape from the drive.
5.3.4 INSTALLATION OF STANDARD SOFTWARE PACKAGES (Upgrading, Initializing, and Re-initializing)
The Standard Software packages you install are dependent on the type of operating system you intend to run. There are five different types of operating systems. The types are:
ClstrLfs - used for a cluster workstation with a local file system (local disk)
Clstr - used for a diskless workstation booted from a master
Stnd - used for a stand-alone workstation (no cluster)
Mstr - used for a master workstation within a cluster
SRP - used for the Shared Resource Processor
The Standard Software packages which must be installed for each of the five types of operating systems are shown in the table below ("o" means optional):
ClstrLfs Clstr Stnd Mstr SRP
Workstation
Utilities x x x x Master
Utilities x x x SRP
Utilities x Tape
Utilities o o o o Software
The details of each of these packages are described in the following sections.
Workstation Utilities (1-6) must be installed before any of the other installation packages.
Each package is re-startable from any diskette within the package. If you need to interrupt the installation for any reason, (e.g., media failure, etc.), you can re-start from the current diskette.
Installation configurations.
When each of these packages is installed, a menu is presented. It asks you to choose from a number of different installation configurations. The configuration selects the volume to which files are copied, and the way command files are updated. Different configurations are available for the different packages, which you will see when you install. The meaning of these options is as follows:
Local - This configuration copies files to the system volume and updates Sys.cmds on the system volume.
Master, Master Workstation, Master SRP - These are configurations which copy files to the master and update the Sys.cmds on the master. You may use the applicable option from anywhere in the cluster. The term master is generic - it doesn't matter whether the master is a workstation or an SRP. Note that when you choose the Master SRP option, Sys.cmds files at both the SRP and the local workstation are updated with the MCommands.
NOTE: Updating a master:
If you are updating an NGEN master, the installation is performed at the master. Give the Disable Cluster command. Then perform the installation at the master. From the master workstation, select the Local configuration.
If you are updating an SRP master, the installation is performed over the cluster from a workstation that is booted locally. From that workstation give the Disable Cluster command. This disables all cluster lines other than the one from which you give the command. Power off all other workstations which are booted from or are accessing files at the SRP on this line. From the menu, select the Master configuration.
WORKSTATION UTILITIES (mandatory)
These diskettes contains files intended to be run on all workstations and SRP's. The files included are: Volume Status, Files, LCopy, the Executive, etc.
A. Insert diskette 1 of 6 and type the following: Command Submit
Submit
File list [fx]<Sys>HdInstall.sub [Parameters] [fx]
[Force expansion?] [Show expansion?]
or for update installations you may type the following:
Command Install Install
[Floppy (default - [f0]) [fx]
The installation of this package is done this way since it creates the Install command and copies the appropriate submit files onto the hard disk. After this package is installed, you must use the Install command to install all other Standard Software and application packages.
B. After required files are copied to the [Sys]<Sys> directory and some required commands are created, a form containing the supported software configurations appears. Use the cursor keys, the RETURN key, or the NEXT key to select the appropriate configuration.
The supported configurations are Local and Master.
Press GO to continue.
C. Insert diskettes 2 through 6 when prompted. D. On diskette 6, the installation procedure will
attempt to merge, all loadable request files into Request, sys. This is done by using List Request Set to convert all existing loadable request files, along with the version of Request.sys on disk 6 of 6, into one text file, [Scr]<$>Request.txt. Then, Make Request Set is used to convert the text file into the single loadable request file.
NOTE
If this step completes with no errors, or if only warning messages are displayed, then the merge was successful. If this is the case, press GO to continue the installation, and proceed to the next step.
If Make Request Set reported an error message stating that overlapping and differing requests were found, press ACTION-FINISH to abort the installation. To correct the problem, the conflicting definitions should be resolved in the following manner:
1. Write down the numbers of the request code(s) for which you receive error messages.
2. Edit the text file, [Scr] <$>Request. txt. Within this file, locate the multiple definitions of all offending requests. When you find the definition, look backwards in the file to a line which says something like:
;*** "Request.n.sys"
This entry tells you the original loadable request file that defined that request. A full list of current Convergent-supplied loadable request files appears in section 9 of this Release Notice.
3. If you can determine which definition is in error, delete the incorrect definition. If you cannot determine which is in error, call Technical Support.
4. Use Make Request Set to convert the text file into the single loadable request file, Request.sys.
STANDARD SOFTWARE UPDATE UTILITIES
Software release. You should install this diskette after the installation of the Workstation Utilities.
A. Insert the 11.4 Standard Software Update Utilities diskette 1 of 1 and invoke the Install command.
B. Use the cursor keys, the RETURN key, or the NEXT key to select the appropriate configuration.
The supported configurations are Local and Master.
Press GO to continue. SOFTWARE DEVELOPMENT UTILITIES
These diskettes contain run files needed for software development. You need to install these diskettes if you want to do any software development, including building a custom CTOS operating system. The files included are: the Linker, the Librarian, the Assembler, CTOS.lib, etc.
A. Insert the Software Development Utilities diskette 1 of 2 and invoke the Install command.
B. Use the cursor keys, the RETURN key, or the NEXT key to select the appropriate configuration.
The supported configurations are Local and Master.
Press GO to continue.
C. Insert diskette 2 of 2 when prompted and press GO to continue.
MASTER UTILITIES
Insert the Master Utilities diskette 1 of 1 and invoke the Install command.
This diskette should be installed regardless of whether your master is a workstation or an SRP. You can install this diskette from anywhere in the cluster.
TAPE UTILITIES
These diskettes contains files associated with Tape. The files included are: the Tape system services, Tape Backup Volume, Tape Restore, etc.
A. Insert the diskette Tape Utilities diskette 1 of 3 and invoke the Install command.
B. Use the cursor keys, the RETURN key, or the NEXT key to select the appropriate configuration.
The supported configurations are Local and Master.
Press GO to continue.
C. Insert diskette 2 of 3 when prompted and press GO to continue.
D. If your master is an SRP, insert diskette 3 of 3 when prompted.
The supported configurations are Master SRP and MCommands Only.
Press GO to continue. SRP UTILITIES
These diskettes contains files intended to be run on the SRP. The files included are: the Command Line Interpreter, the Administrative Agents, mIvolume, etc. Note that SRP operating systems and associated configuration files are not provided with this release.
B. Insert diskette 2 of 3 and 3 of 3 when prompted and press GO to continue.
5.3.5 RESTORE (Re-Initialization only)
A. After all desired packages have been installed, perform a Restore, Tape Restore or MTape Restore specifying "no" for the parameter [Overwrite OK?]. Copy back the files that you had previously saved on a separate floppy (e.g., SignOn.txt, Sys.cmds, configuration files, etc.)
B. Since the saved copy of the command file lacks the new commands supplied in Standard Software 11.3 / 11.4, you must update your command file to get the new commands and the proper updated forms for older commands. For each package you have installed, invoke the appropriate submit file to update your command file:
Workstation Utilities Diskette 6: WSUtilitiesCmds.sub*
SRP Utilities Diskette 3:
LocalSRPUtilitiesCmds.sub* SRPUtilitiesCmds.sub
Master Utilities Diskette 1: MasterUtilitiesCmds.sub
Software Development Utilities Diskette 2: SoftwareDevelopmentCmds.sub*
Tape Utilities Diskette 2: WSTapeCmds.sub* and/or LocalSRPTapeCmds.sub* SRPTapeCmds.sub
For example, if you wish to update your Workstation utilities commands, do the following:
Submit
File list WsUtilitiesCmds.sub
Parameters [Sys]<Sys> [Sys]<Sys> <GO>
C. On the SRP, the process of installation renames your old command file, <Cmd>WSAdminAgent.txt, to <Cmd>Save>WsAdminAgent.txt. The new file reflects the merged workstation and SRP utilities. For example, the MCopy command now invokes Copy.run instead of MCopy.run.
Edit <Cmd>WsAdminAgent.txt adding any custom commands which are in the saved version.
D. During installation, existing message text (*msg.txt) files are copied to save>*msg.txt. If the old files contain modified messages, you must integrate the modified messages into the new file.
5.4 OPERATING SYSTEM INSTALLATION
If you performed an initialization installation, the operating system that is copied from the initialization diskettes is for a cluster workstation with local disk. If you wish to change this to be either a master or stand-alone operating system, you must install that type of operating system. Refer to the Operating System Release Notice for instructions on how to do this. If you did not initialize your system volume and want to update your OS, do so at this time. Refer to the Operating System Release Notice for instructions on how to do this.
6.0 SUPPLEMENTARY INFORMATION
6.1 Internationalization
7.0 DOCUMENTATION UPDATES
The following update notices document changes to 11.3 / 11.4 Standard Software:
Executive Reference, Fourth Edition, Update Notice 2 (DAA-122).
CTOS System Administrator's Guide, First Edition, Update Notice 1 (DAA-116).
Status Codes Manual, Third Edition, Supplement (DAA-107).
CTOS/VM Reference Manual, Volumes 1 & 2, First Edition, Update Notice 2 (DAA-113).
LoadBackgroundPalette
LoadBackgroundPalette (pbPalette, cbPalette): ercType
DESCRIPTION
LoadBackgroundPalette sets the background color. This call returns ercNotImplemented (erc 7) if the internal OS version is less than 11.2 or if the hardware does not support background color. It returns erc 7656 if cbPalette is greater than 8.
PROCEDURAL INTERFACE
LoadBackgroundPalette (pbPalette, cbPalette): ercType
where
pbPalette describe a string of 8 bytes, cbPalette each byte being a structure of
attributes and colors as documented in Appendix F, Using Color, of the CTOS/VM Reference Manual.
REQUEST BLOCK
8.0 KNOWN ERRORS AND OMISSIONS
A. Editor: The cursor is always placed 'to the right' of the last character entered. When you use the editor to create new file, the cursor appears on the trailing End Of File marker (a dashed line). The cursor will remain there as you enter characters since it continues to be to the right of the last character entered. Be assured that characters are being entered normally and that this is a normal function.
A similar thing happens when a carriage return is the last character in the file. In this case the cursor does not wrap to the next line, but instead stays on the same line. However, the next character entered will cause line wrap and will appear on the next line.
B. Exec: The Exec can copy a file over its own message file ExecMsg.bin. However, it will always overwrite an existing file. That is, it will ignore any answers to the [Overwrite] and [Confirm each?] prompts when copying over the message file.
C. MakeRqSet: message number 157 in the message file StdSoftMsg.txt, is as follows:
:157: "none"
Unfortunately, this message is not used by MakeRqSet. For international customers the workaround is to not translate this message. The word none is never seen by the end user anyway.
E. CreateBackupFloppy.sub: Due to space problems on the first diskette, a small customized file, CBF>ExecMsg.bin must exist on [Sys]<Sys> when you start this submit file. It is created by copying messages 32907-32957 (inclusive) from ExecMsg.txt into CBF>ExecMsg.txt. Create CBF>ExecMsg.bin by executing the command "Create Message File" on this new text file.
F. Linker: (SPR 12605) The 11.3 Linker does not handle as many public symbols as the II-1.0 Linker.
G. Restore/Tape Restore: The following scenarios do not work correctly:
1) Backup a password protected (no encryption) volume. Restore to a password encrypted volume.
2) Backup a password encrypted volume. Restore to a password protected (no encryption) volume.