Guidelines to Auto Referencing and Formatting
using Microsoft Word
Aniedu A. N1, Obioma Peace C.2
1,2
Department of Electronic and Computer Engineering, Nnamdi Azikiwe University, Awka.
Abstract:Intellectual property makes for the uniqueness of every literary work. This reflects the authors ingenuity borne from
relentless research effort, novel discovery and original output. Abuse or theft of the same demeans the author’s effort. Beyond plagiarism, it is of the essence that references to such works are properly done; otherwise this might lead to an abuse or pure incognito. Microsoft a well known software company made things easier by incorporating a proper referencing ad-on to one of their packages – Microsoft word. It is the aim of this work to enlighten and also bring to the knowledge of researchers and publishers this important tool and how to neatly and efficiently organize a literary work using Microsoft word.
Keywords: Referencing, Microsoft word, References, Citation, Formatting.
I. INTRODUCTION
Referencing is one of the most important aspects of any academic research and poor or lack of referencing will not only diminish the quality of the work, but such practices may also be perceived as plagiarism and disciplinary actions may follow [1].Failure to reference or poor referencing can be classified as an Academic Misconduct. It is a standard required of scholarly communication. It is also a standard for written communication expected by professional organisations [2].
With the technological pace and advancement today, it is paramount that every tool that makes for efficiency, speed and accuracy be adopted to enable an increased proficiency in any field of endeavour. Such tools reduces time wasted in using human effort and skill to perform tasks that could be automated. With the inception of Computer Aided Design (CAD), software developers has continually channelled fruit efforts to automate every possible operation, thereby making it easier for the user to achieve hectic and tedious tasks in the quickest possible time. This reduces human error and improves accuracy [3]. These advancement spans across every field of study.
For authors and publishers alike, this incredible improvement graces them both. With the right software tool, an author can easily format his/her work to required specifications without much stress. Content organization has taken new turns, with software companies also including plagiarism checkers, grammar checkers, spelling checks, referencing, etc alongside their word processing packages. Microsoft is one company whose software (Microsoft Word) is widely used for article writing, journal writing, thesis and dissertation write-ups, etc. Most users do not exploit these additional functionalities which would make for good articles and publications. For some, a shallow understanding discourages them from using these packages. This work considers one aspect of it that affects every publisher and author, which is – Referencing. This work is divided into sections; each section captures a detailed illustration on how to use this tool.
II. REFERENCINGDEFINED
In academic work, referencing is the appropriate acknowledgement of: Ideas and work that originate from other sources that have been included in your work which is not common knowledge or widely accepted[2].It is a standardised method of formatting the information sources that has been used in any written work. Any given referencing style serves two purposes:
A. Acknowledges the source
B. Allows the reader to trace the source [4]. C. Referencing is important because it:
1) Helps show that you have been thorough and careful (or rigorous) in your academic work.
2) Indicates what material is your original work since you have provided a citation for work that is not your own. 3) Allows the reader to refer back to any external material (i.e., not your own) that you have stated or discussed.
5) Lets the reader see if you have included up-to-date work, seminal (early and influential) work, and material central to your research topic [2].
III.REFERENCINGINMICROSOFTWORD
A. Using Citation in Microsoft Word
Citation allows you to acknowledge the original author of a material used in a document.
[image:3.612.173.443.183.341.2]1) Choosing Citation Style: To be able to insert and properly format cited works, the correct style must be installed and selected. 1. To select referencing style click on style dropdown list from Referencing Menu (Figure 1).
Figure 1: Style Drop-Down window
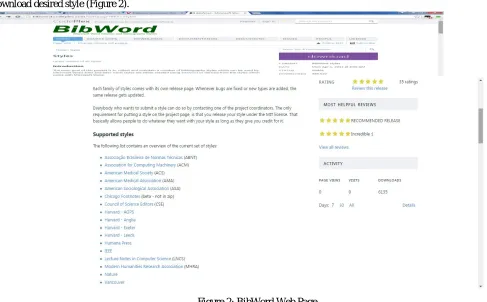
If the desired reference style is not installed visit the Bibword styles page athttp://bibword.codeplex.com/wikipage?title=Styles to download desired style (Figure 2).
Figure 2: BibWord Web Page
You can alsogo to http://bibword.codeplex.com/downloads/get/49963 to directly download IEEE/Oxford referencing style.
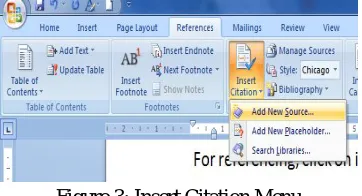
[image:3.612.49.536.379.681.2]2) Adding Citation Sources: After selecting the desired style, place your cursor at the position you wish to insert the citation in your document and click on insert citation under references, then click on add new source as shown in (Figure 3)
Figure 3: Insert Citation Menu
[image:4.612.194.422.246.346.2]On the create source dialogue box (Figure 4), select the type of source and fill in other information based on the type of source, and click ok. This adds the new citation to the position of your cursor.
Figure 4: Create Source Dialogue Box
Repeat step 2 anytime you want to add a new citation. If you want to add a citation you already typed in, simply go to Insert Citation and select from the list of displayed citations (Figure 5).
Figure 5: Inserting a Citation
If you have other citations in other documents you wish to import into current document, or you want to edit a citation in current document, click on manage sources and on the source manager dialogue box (Figure 6).
Figure 6: Source Manager Dialogue Box
[image:4.612.187.425.381.509.2] [image:4.612.120.499.540.693.2]current list window, close the dialogue box and those sources will be available for the current document. You can also delete, edit or create new sources from this dialogue box by clicking the appropriate button.
Note: All sources not cited in the current document should be deleted from the current list because all the sources on the current list will automatically be used to generate the bibliography, whether they were actually inserted into the body of the work or not.
3) Inserting Bibliography
[image:5.612.216.401.186.313.2]To generate the final bibliography or reference for the work, place your cursor at the required position, click on Bibliography and select the desired format (whether as bibliography or cited works) (Figure 7)
Figure 7: Built-In Bibliography Sub-Menu
changing the style from the style dropdown list will automatically change the referencing style for the entire document. So you can actually work on your document without the desired style and then changing it to the desired style whenever convenient.
B. Table of Content and Auto-formatting
A table of content is a table that provides a quick glance to the various headings and subheadings into which a document has been grouped.
C. Formatting Styles
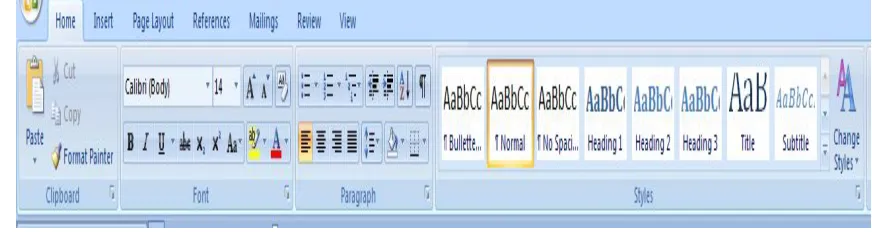
To be able to automatically generate a table of content from a document, the various headings and subheadings must be formatted with the appropriate styles. MSWord have several auto-formatting styles. The Styles gallery are located on the Home menu (Figure 8) in MSOffice 2007 and later versions.
Figure 8: The Style Gallery
Some of the most common styles include Normal (for normal body of the document), Title (for the title of the document), Heading 1, 2, 3 etc (for the different headings and subheadings), bulleted list, quotes etc. You can create more styles, modify existing ones or import styles from other documents.
To create a new style click on the expand window button at the bottom right corner of the styles tool box to show the Styles Window (Figure 9).
[image:5.612.85.521.474.590.2]Update Normal to Match Selection will modify the selected style based on the formatting of the selected text (use when you had already formatted your text, and thereafter want to use it as a template to format subsequent texts). Rename… will rename the selected style, and Remove from Quick Style Gallery will remove the selected style from the styles gallery tool.
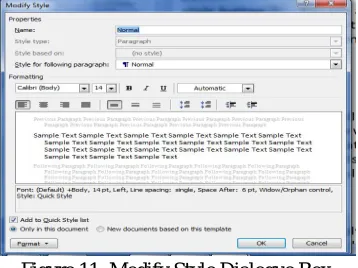
[image:6.612.114.221.78.189.2]To modify a style, right-click on the desired style and select modify, from the submenu. A modify Style dialogue box appears ( Figure 11). Here you can change the name of the style, adopt an existing style, change formatting like font type, weight, paragraphing, alignment, spacing, indenting etc.
Figure 11: Modify Style Dialogue Box
To format a text based on a style, simply place your cursor anywhere within the paragraph you wish to format and click on the desired style. It is a good practice to create/modify all the formatting styles you will be using in a particular document before commencing work on your document to make your work faster, except in cases where you are not sure what formatting style to use for a particular group of text. In that case, create/modify the style for that text at the first occurrences and use subsequently.
D. Multilevel List
Another prerequisite for creating the table of contents is a multilevel list. A multilevel list is a list prescribing the hierarchical order of the styles in a table of content. Create a multilevel list and ‘tie’ the list to formatting styles by:
Click on the Multilevel List tool from Home menu (Paragraph submenu) ( Figure 12)
[image:6.612.352.450.101.165.2]Selecting the preferred style from the displayed List Library. You can modify the selected list by selecting the Define New Multilevel list button, or create a new list style by clicking on Define New List Style button.
Figure 12: Multilevel List Sub-menu
[image:6.612.218.397.289.423.2] [image:6.612.186.430.608.715.2]Note: To be able to automatically generate a table of content from the document, you must format your document with the appropriate style especially the heading styles because the Table of Contents tool will make use of these inbuilt styles to automatically generate you table of contents.
E. Creating Table of Content
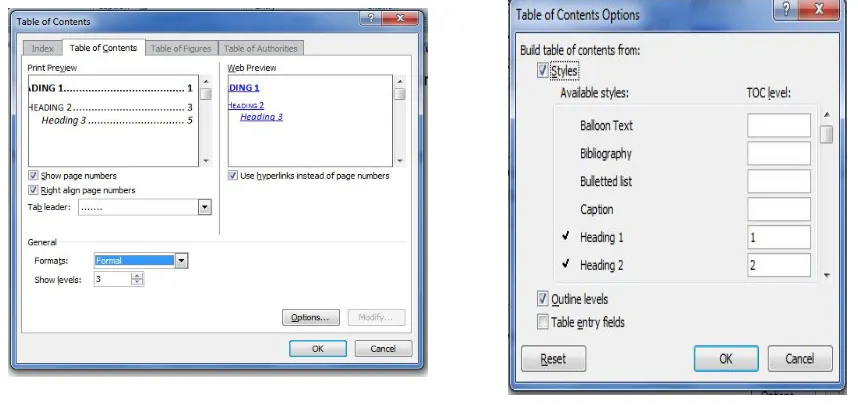
To automatically generate your table of contents, after formatting the body of the text with the appropriate formatting style; Place your cursor on the desired location in your document and click on Table of Contents tool from the References tool bar. From the Built-In dialogue box (Figure 13) select one of the Automatic Tables (you can also select the Manual Table if you want to manually add the contents of your table)
You can modify the built in table by clicking on Insert Table of Content… submenu from that dialogue box to display the Table of Contents dialogue box.
[image:7.612.193.378.224.405.2]On the Table of Contents: Dialogue box (Error! Reference source not found.), select the right Format under the General section. Select also the desired number of levels to display from the Show Levels: You can also perform more modifications by selecting the Options… button to display the Table of Contents Options dialogue box (Figure ). Here you can select the arrangement order of your table based on the formatting style i.e. which style comes at which level.
[image:7.612.282.461.483.688.2]Figure 13: Table of Content Submenu
Figure 15: Table of Contents Options Dialogue Box Figure 14: Table of Contents Options
[image:7.612.44.473.488.691.2]F. Captions and Cross References
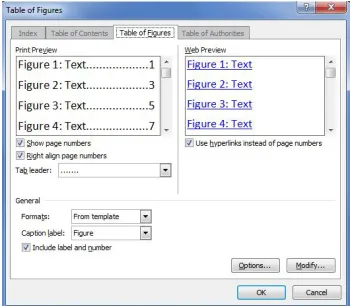
1) Inserting Captions for Figures, Tables or Equations: To caption a figure (or table or equation) and thereafter automatically generate list of figures (or list of tables);
Select the figure to caption (it is best practice to start captioning from the top of the document).
Then click on Insert Caption tool (Figure 14) on the Captions submenu under the References Menu, to display the Caption dialogue box (Figure 15).
[image:8.612.130.476.173.295.2]Type in the desired caption under the Caption: text box. From the Label: dropdown window, select the type of item you wish to caption (figure, table or equation). If you do not want the Label to appear on the caption (e.g. 1.1 instead of fig. 1.1), select the Exclude label from caption button. Type in the desired caption. You can create new label by clicking on the New Label button; delete label by clicking on the Delete Label button or change the numbering format by clicking on the Numbering button.
Figure 16: Table of Figure Dialogue Box
[image:8.612.219.394.381.534.2]Figure 14: Insert Caption Tool Figure 15: Insert Caption Dialogue Box
[image:8.612.303.449.570.688.2]G. Creating Indexes
Indexes are great tools while searching for words in a write-up. They make it easy to locate keywords, whether they occurred once or in multiple places in the work.
H. Mark key words
To insert index in a work, first mark the key words;
To mark key words, highlight them and click the Mark Entry tool on the Index submenu (References menu). It might be a good practice to be marking keywords as you prepare the write up. This will make it not only easier to capture most of the keywords, it will also save time.
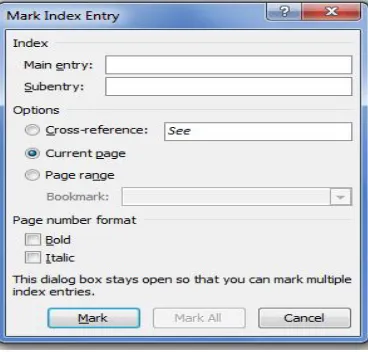
[image:9.612.215.399.235.411.2]On the Mark Index Entry dialogue box (Figure 19) that is displayed, fill in the subentry, cross-references and pages ranges if any. select the formatting for the page number and click Mark to mark selected word (or Mark All to mark all occurrences of selected word)
Figure 19: Mark Index Entry Dialogue box
I. Inserting Index
To insert index in the document;
Click on the Insert index button on the Index tool of Reference menu. This displays the Index dialogue box (
Figure
20).
On the Index dialogue box, Select the type of index, the number of columns the should be arranged on, the language, alignment and format of choice.
You can also from this dialogue box mark new keywords
Figure 20: Index dialogue box
IV.CONCLUSION
The institutionalized practice of citations and references in the sphere of learning is not a trivial matter. It is central to the academic incentive system and an underlying sense of distributive justice, that do much to energize the advancement of knowledge [5].Proper referencing and citation plays a very important role in conditioning how professionals or literary bodies regard and evaluate written works. It is therefore of the utmost importance to employ every medium possible to efficiently carryout this important task. This work has effectively described the approach adopted by Microsoft with detailed steps on each method.
REFERENCES [1] https://research-methodology.net/research-methodology/referencing/
[2] www.otago.ac.nz/hedc/otago615365.pdf
[3] www.bbc.co.uk/schools/gcsebitesize/design/systemscontrol/ictinindustryrev2.shtml [4] https://www.usq.edu.au/library/referencing/what-is-referencing