COVER
Copyright notice
This eBook is provided, and may be used, free of charge. Selling this eBook in its entirety, or extracts from it, is prohibited. Obtain permission from the author before redistribution.
In all cases this copyright notice and details of the authors and contributors (pages 1 & 2) must remain intact. Permission is granted to reproduce this eBook for personal, training and educational use, but any extract should be
clearly attributed to the author giving the name and version of this publication. Commercial copying, hiring, lending of this eBook for profit is prohibited.
At all times, ownership of the contents of this publication remains with Prof Angus Jamieson. Copyright © 2012 University of the Highlands & Islands
Revisions
The authors of this publication are fully aware the nature of the subject matter covered will develop over time as new techniques arise or current practices and technologies are updated. It is, therefore, the intension of the authors
to regularly revise this eBook to reflect these changes and keep this publication current and as complete as possible. Anyone who has expertise, techniques or updates they wish to submit to the author for assessment for inclusion in
the next revision should email the data in the first instance to:
[email protected] This version is V01.05.14
This eBook and all subsequent revisions will be hosted at:
Acknowledgements
Chapter contributors
Although Professor Angus Jamieson is the main author of this publication with overall responsibility for its content, thanks are given to the following people who contributed to certain chapters;
Andy McGregor who contributed the write up of the ‘Error model’ chapters Jonathan Stigant who contributed the first chapter on ‘Geodesy’
John Weston of Gyrodata chapter 10 – ‘Basic Gyro Theory’
Steve Grindrod who contributed to the chapter on ‘Magnetic spacing’ David McRobbie who contributed on ‘Gyro surveying’
This book was compiled by members of the Industry Steering Committee for Wellbore Survey Accuracy (ISCWSA), a Society of Petroleum Engineers (SPE) Technical Section for Wellbore Positioning.
The main author was Angus Jamieson.
Sponsors
Thanks go to the sponsors of this publication, who contributed funding to the project to bring all this knowledge together into one publication, with the aim of creating a guidebook for the industry without restriction;
University of the Highlands and Islands (UHI) Research Office who helped initiate this project in 2009 and then provided the editing, publishing and web developing expertise to shape this eBook into its published form, with the
subsequent provision of web space to make this guide freely available across the world.
This eBook has been edited, images and diagrams re-created, converted to its different formats and published to the UHI website by Stuart Knight of the UHI Research Office, Inverness. Funding for the editing was provided to UHI by
HIE and EU ERDF structural funds via the Energy Research Group.
All comments on this publication, submissions or amendments should be directed to:
Introduction to Wellbore Positioning
Summary Contents
Subjects
Page
Acknowledgements
2
List of Figures
4
Introduction
5
1.
Coordinate Systems and Geodesy
7
2.
Changing from One Map System to Another
21
3.
True North, Grid North and Convergence
23
4.
The Earth’s Magnetic Field
27
5.
Principles of MWD and Magnetic Spacing
31
6.
In-Field Referencing
35
7.
Survey Calculation Methods
39
8.
Survey Frequency
42
9.
Gyro Surveying
44
10.
Basic Gyro Theory
52
11.
When to Run Gyros
61
12.
Correcting for Sag
62
13.
Correcting for Magnetic Interference
64
14.
Multi Station Analysis
67
15.
Correcting for Pipe and Wireline Stretch
72
16.
Human Error v Measurement Uncertainty
74
17.
Understanding Error Models
76
18.
The ISCWSA Error Models: Introduction
82
19.
The ISCWSA Error Models: Explanation and Synthesis
88
20.
Anti-collision Techniques
109
21.
Planning for Minimum Risk
121
22.
Basic Data QC
123
23.
Advanced Data QC
124
24.
Tortuosity
126
25.
Some Guidelines for Best Practice
129
26.
Relief Well Drilling
135
27.
Subsea Positioning
138
Appendices
142
FULL INDEX
159
L
ist of figures
- images, tables and diagrams
All images, tables and diagrams have been created for this publication unless otherwise credited on the figure. 1. The three reference surfaces in geodesy
2. Mathematical Properties of an ellipse 3. The Relationship between Surfaces 4. Geographic Coordinate System 5. Ellipsoid Coordinate Reference Systems 6. Establishing an Astro-geodetic Datum 7. The World's Major Datum Blocks
8. Astro-geodetic datums in the Indonesian Archipelago 9a. The geoid and an outline of the geoid
9b. Ellipsoid attached to the Earth in two different places 9c.'Global’ ellipsoid attached at the Earth’s centre of mass 9d. All three datums ellipsoids attached to the Earth 10. The application of the geocentric transformation
11. Increase in offset correction with depth and offset distance 12. Lat/long locations on different geodetic datums
13. Datum transformation parameters in China 14. The hierarchy of mapping.
15. Types of projection for various plane/orientation of surfaces 16. Transverse Mercator/Lambert Conformal Conic projection 17. The plane surface to the ellipsoid
18. Mercator verses a ‘Homolosine’ projection 19. Example projection zones
20. Earths elliptical cross section
21. Map projection surface for parallel map North 22a. The ‘Convergence’ Angle
22b. The three north references 22c. Combining all three
23. Worked examples of calculating grid direction and bearings. 24. Extended direction/bearing examples
25. Basic Earth internal layers
26. Elements of the magnetic field vector 27. Tracking Magnetic North Pole 28. Main field declination Jan 2010 29. Magnetic observatories 30. Magnetic Observatory locations 31. Diurnal field variation
32. Magnetic storm as seen from space 33. Example of a non-magnetic drill collar
34. Graphical representation of two types of toolface 35. Examples of pulser equipment
36. Typical toolface display
37. Example NMDC length selection chart 38. Magnetic field survey methods 39. Examples of IFR survey results
40. Typical software display of an IFR survey 41. Calibrating a marine observation frame on land 42. Tangential method to derive a shift in coordinates 43. Balanced Tangential Method
44. Methods of dealing with curvature 45. Minimum curvature method 46. Example drilling trajectories 47. Typical slide sheet
48. Representation of a basic gyrocompass
49. Schematic representation of a two axis gyroscope 50. Illustration of gyroscopic precession
51. Dynamically tuned gyroscope 52. Calculating the Earth’s rate of rotation 53. Measuring azimuth
54. Instrument configuration with accelerometers 55. Calibration stand
56. Sag correction schematic
57. Typical sag correction software output 58. Typical sag sheet
59. Drillstring magnetisation
60. Examples of axis components of magnetometers
61. Straight plot of sensor readings
62. Adding a mathematical sine wave to the sensor readings 63. Diagram of the axial correction formula
64. ‘No go zone’ for axial correction
65. Establishing the unit vectors for each sensor axis
66. Extending the calculation for the unit vectors for each sensor axis 67. Correcting magnetic station observations
68. Forces acting on a finite element of drillpipe 69. Measuring thermal expansion of a typical drillpipe 70. Modelling deviation graphically
71. Plotting the normal distribution curves for two parameters 72. Normal distribution graph describing probabilities
73. Applying normal distribution modelling to a section of wellbore 74. Trajectory error calculations
75. Plotting the uncertainty 76. Calculating positional error 77. Plotting the ellipse uncertainty 78. Plotting a matrix of covariances
79. Measured depth error - effect on North, East and TVD. 80. Effect of azimuth error on North and East elements 81. Variance Covariance matrix
82. Calculating and plotting the collision risk 83. The ellipse of uncertainty in 3D
84: ISCWSA error model schematic. 85: Error model axes definition. 86a/b/c: Axis Errors.
87. Definition of Separation Factor
88. Calculating separation factor – Separation Vector Method 89. Calculating separation factor – Pedal Curve Method 90. Scalar (expansion) method
91. Comparing the uncertainty envelopes for two calculation methods 92. Collision probability table
93. Example of a deep, close approach report 94. Fine scan interval graphic
95. Typical scanning interval report 96. Traveling Cylinder Plot - basic
97. Traveling Cylinder Plot – with marker points
98. Traveling Cylinder Plot – marker points and uncertainty area 99. High side referenced Traveling Cylinder Plot
100. Azimuth referenced Traveling Cylinder Plot 101. TVD Crop diagrams
102. Basic ladder plot
103. Ladder plot with uncertainty added
104. Ladder plot using inter-boundary separation only 105. Minimum risk planning wheel
106. Measured depth error effect on North, East and TVD
107. Smooth curve through the observed points to show North, East and TVD
108. Spotting inconsistencies in the survey from the plot 109. Plotting the dogleg severity against measured depth 110. Example well plan graph
111. Actual inclination against measured depth graph 112. Unwanted curvature accumulation graph 113. ‘Caging’ for collision avoidance planning 114. Graphic of separation factor calculation 115. Estimating the range from a magnetic source 116. How the uncertainty forms on the ranging shot 117. Ranging on crowded platforms
118. Relief well penetration point 119. Satellite positioning
120. GPS considerations on vessels 121. Baseline Acoustic Array 122. Networked Acoustic Array
123. Reading a permanent seabed AT by vessel 124. Wellhead and Platform coordinates
Introduction
The subject of Borehole Surveying has frequently been dealt with in best practice manuals, guidelines and check sheets but this book will attempt to capture in one document the main points of interest for public access through the UHI and SPE websites. The author would like to thank the sponsors for their generous support in the compilation of this book and their willingness to release all restrictions on the intellectual property so that the industry at large can have free access and copying rights.
After matters of health and spirit, Borehole Surveying is, of course, the single most important subject of human interest. We live on a planet of limited resources supporting a growing population. At the time of writing, the efficient extraction of fossil fuels is crucial to the sustainable supply of the energy and materials we need. Whilst renewable energies are an exciting emerging market, we will still be dependent on our oil and gas reserves for many years to come.
As an industry we have not given the accuracy and management of survey data the attention it deserves. Much better data quality and survey accuracy has been available at very little additional cost but the industry has frequently regarded accuracy as an expensive luxury. Simple corrections to our surveys such as correcting for the stretch of the drill pipe or even sag correction and IFR (see later) have been seen as belonging to the ‘high tech’ end of the market and we have, unlike nearly all other survey disciplines, thrown good data away, when ‘better’ data becomes available.
The advent of the ISCWSA, The Industry Steering Committee for Wellbore Survey Accuracy, brought in a new era in survey practice. Not only was work done on improving the realism of error models, but a bi-annual forum was provided to allow industry experts to share ideas and experiences. This project has emerged out of a recognised need for better educational materials to support the understanding of borehole surveying issues. The contents of this e-book are free to use and distribute. Any additional chapters will be welcome for assessment and potential inclusion in the book so this is the first draft of a work in progress.
My thanks also go to the many participants in this effort who have contributed from their knowledge in specialist areas. In particular to Andy McGregor who contributed the write up of the error model, Jonathan Stigant who contributed the first chapter on geodesy and John Weston, Steve Grindrod and David McRobbie who contributed other chapters on gyro surveying and magnetic spacing.
Prof Angus Jamieson BSc FRICS University of the Highlands & Islands Inverness
Introduction to Wellbore Surveying
Compiled and co-written by
1. Coordinate Systems and Geodesy
1.1 The Origin – Reference Surfaces and Elevations in Mapping
Terrain: The terrain is the surface we walk on or the seabed. This surface is irregular. It is the surface we have to set up our survey measuring devices, such as a ‘total station’ or a GPS receiver. The nature of the surface will dictate the direction of gravity at a point. In mountainous terrain, the vertical will deflect in towards the main ‘centre of mass’ of the mountains.
The Geoid: The equipotential surface of the Earth's gravity field which best fits, in a least squares sense, global mean sea level (MSL). An equipotential surface is a one where gravity is an equal force everywhere, acting normal to the surface. The geoid is an irregular surface that is too complex for calculation of coordinates.
The Ellipsoid: The ellipsoid is a ‘model’ of the Earth that permits relatively simple calculations of survey observations into coordinates. The ellipsoid provides the mathematical basis of geodesy. Note that the Geoid is an ‘actual physical surface like the terrain, but the ellipsoid is a ‘theoretical’ surface that is designed to ‘match’ the geoid as closely as possible in the area of operations. Note also that the normal to the geoid (which is ‘vertical’) is not the same as the normal to the ellipsoid.
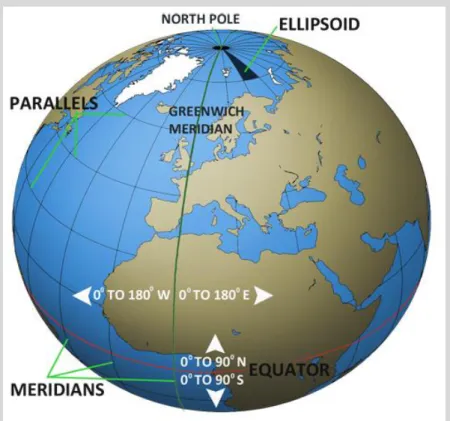
Figure 1: The three reference surfaces in geodesy. There are three basic surfaces
that are pertinent to good mapping, shown here, these are:
Terrain: The topographic surface of the ground or seabed
Geoid: An equipotential surface that is irregular and approximates to Mean Sea Level (MSL)
Ellipsoid: A regular model surface that approximates the geoid, created by rotating an ellipse about the polar axis. Used to simplify the
computational complexity of the Geoid
An ellipsoid is created when an ellipse is rotated around its polar axis. The ‘mathematical’ properties of an ellipse are shown in figure 2. ‘a’ is assigned to represent the semi-major axis or equatorial radius and ‘b’ the semi-minor or polar axis. The flattening, ‘f’, equals the ratio of the difference in ‘a’ and ‘b’ over ‘a’.
1.1.1 MSL, Elevation and Height
Mean Sea Level is established by measuring the rise and fall of the tides. This is another ‘inexact’ science. The tides are affected by the juxtaposition of ‘celestial’ objects, most notably the moon but also the planets to varying degrees. A well-established MSL reference datum is one where tidal movement has been observed for over 18 years at what is called a ‘Primary port’. The majority of countries with a coastline today have established these primary ports along that coastline and the predicted level of tides is reported by the US National Oceanographic and Atmospheric Administration (NOAA) and the UK Hydrographic Office tide tables.
In order to tie MSL to both onshore elevations and offshore depths, these observations are tied to a physical benchmark usually in a
nearby building wall or some other place unlikely to be inundated by the sea. This benchmark is quoted as a certain height above mean sea level. Sometimes MSL is used also as chart datum for the reduction of depth measurements to a common reference. Sometimes chart datum is established as the lowest level of low water, in order to provide mariners with the least possible depth at a point (i.e. the worst case). Onshore selected benchmarks represent an origin or starting point that can be used to provide the starting point for levelling across the whole country and continent.
The references for North America are the ‘Sea Level Datum of 1929’ - later renamed to the ‘National Geodetic Vertical Datum’ (NGVD 29) - and recently adjusted ‘North American Vertical Datum of 1988’ (NAVD 88).
Figure 1 shows the difference between heights (h) above the reference ellipsoid and the height above the geoid (H) also known as ‘orthometric' height. A more general picture of this relationship with the definitions is in figure 3. The caution is that the GPS system provides ‘height’ above the ellipsoid, not MSL elevation. These heights have to be adjusted to make sure they match elevations from other datasets.
1.1.2 Coordinate Systems
There are three fundamental types of coordinate systems that are used to define locations on the Earth:
‘Geocentric’ coordinates measuring X, Y, Z from the centre of an ellipsoid, ‘Geographical’ - latitude and longitude and height (figure 4) and ‘Projection’ - easting and northing and elevation. Various subsets of these can also be used as ‘2D’ consisting of only latitude and longitude or easting and northing.
Figure 2: Mathematical properties of an ellipse.
Figure 3: Shows the relationship between surfaces.
1.1.3 Geographical coordinates
These are derived from an ellipsoid and the origin of the coordinates is the centre of the ellipsoid. They are usually referenced to the ‘Greenwich’
meridian that runs through the Greenwich observatory just east of London in the UK. Meridians increase from 0° at Greenwich to 180° east and west of Greenwich. The ‘International Date Line’ runs through the Pacific and is nominally at 180° east or west of Greenwich. However, different island groups in the Pacific decide to be one side or the other of the Date Line, and the line is drawn at various longitudes to defer to national boundaries. On older maps the ‘0’° meridian is not always Greenwich. There are several other reference meridians, mainly in Europe. A list of these can be found in the EPSG parameter database.
In order to facilitate loading of data in some software applications, the convention is that North and East are ‘positive’ and South and West are negative. However the reader should beware that local applications that do not apply outside their ‘quadrant’, may not obey this convention.
Projection coordinates are usually called eastings and northings. Sometimes they are referred to as ‘x’ and ‘y’. However, this can be confusing as in about 50% of the world, easting is represented by ‘y’ and northing by ‘x’. Caution is advised!
More information about how these two types of coordinate system relate will be discussed in the following chapters.
CONTENTS
1.2 Principles of Geodesy – The forgotten Earth science!
Why “The Forgotten Earth Science”? Because there is a pervading ignorance of this science, but an illusion that it is inherently understood! (Daniel Boorstin)
1.2.1 Geodesy
Geophysics and Geology – is a study of the Earth. We use models as the other two disciplines do, and make adjustments for distortion and errors in those models.
Geodesy provides the ‘frame of reference’ for all good maps. It is the means by which we can put together all sorts of different data attributes and ensure that they are correctly juxtaposed. So while we are interested in the relative position of one piece of data to another, the means by which this is achieved is through providing an ‘absolute’ framework or set of rules that ensures that we can do this correctly. Geodesy is rightly then to be considered the underlying and immutable doctrine required to ensure that maps (the cartographers ‘art’) properly represent the real world they are designed to portray.
Geodesy is defined as the study of:
the exact size and shape of the Earth
the science of exact positioning of points on the Earth (geometrical geodesy) the impact of gravity on the measurements used in the science (physical geodesy)
Satellite geodesy, a unique combination of both geometrical and physical geodesy, which uses satellite data to determine the shape of the Earth’s geoid and the positioning of points.
Let us return to the ellipsoid that we studied in the previous section (figure 5). This time, I have ‘cut away’ a quadrant of the ellipsoid so we can see the centre. On this diagram we can see two coordinate systems. One is the Latitude, Longitude and Height of a point ‘P’ in space above the ellipsoid surface (it could just as well be below). The other is a three dimensional Cartesian coordinate system where X is in the direction of the Greenwich meridian in the equatorial plane, Y is orthogonal to the Greenwich meridian and Z is parallel to the polar axis (orthogonal to the other two axes). The Cartesian system is directly referenced to the ellipsoid centre, the geographic system is directly referenced to the ellipsoid surface and indirectly to the ellipsoid centre. However, both systems are valid and both describe in different ‘numbers’ the coordinates of the point ‘P’.
The relationship between the two systems is per the following algorithms:
X = (ν + h) * cos φ * cos λ Y = (ν + h) * cos φ * sin λ Z = [(b2 * ν/a2 ) + h] * sin φ
(where ‘ν’ is the radius of the ellipsoid at P).
1.2.2 Geodetic Datum
One of the most important lessons in geodesy is the next step. How do we tie the ellipsoid to the real world? Now that the model is set up, we have to attach it to the real world. Here is the definition of a ‘Geodetic Reference Datum’:
A Geodetic Datum is an ellipsoid of revolution attached to the Earth at some point. There are two types:
Astro-Geodetic (Regional usage)
Global (Global application)
We move from simply an ellipsoid, ‘floating’ in space to a ‘geodetic reference datum’. There are two valid ways to do this, the historic, astro-geodetic (regional), pre-navigation satellite days method and the global method using satellite orbits.
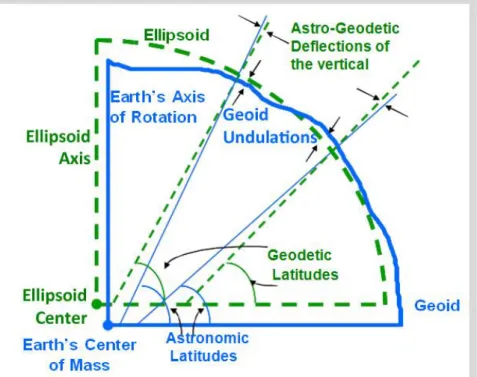
In figure 6, note three significant issues:
1. Astro-geodetic (geoid referenced) latitudes are not quite the same as geodetic (ellipsoid referenced) latitudes. This due to the slight difference in the normal to the respective surfaces. This is the model ‘distortion’ due to using an ellipsoid. If the region covered is a continent like the USA or Russia, then as the datum network is spread across the land then least squares corrections called ‘Laplace’ corrections have to be made to minimize the distortion.
2. They take much time to observe under demanding accuracy conditions which can be affected by the weather.
3. They are subject to the observation idiosyncrasies of the observer. Relative accuracy between datums established in the same place by different observers can be several hundred meters.
The drawback of the astro-geodetic method is that it is only useful over a specified region, and in general cannot be carried across large expanses of impenetrable terrain or water, since inter-visibility is required. Thus in archipelagos, like Indonesia, this can result in a large number of small regional datums none of which quite match with the others. Political boundaries can also mean a multiplicity of datums even in contiguous land masses; West Africa is a good example, where each country has its own unique astro-geodetic datum. Figure 7 shows a global view of continental regional datum ‘blocks’. Eight datums to cover the world does not seem so difficult, but in fact there are well over 100 unique astro-geodetic datums. Figure 8 shows the proliferation of datums in SE Asia.
Figure 6: Establishing an Astro-geodetic Datum. Figure 6 shows how an astro-geodetic datum
is established. Astro-geodetic means the geodetic system is set up by direct observation of the stars using very specialized survey instruments. The surface origin is the place where the survey instrument is set up.
The ellipsoid is attached at the observation point and several ‘alignments’ have to take place mathematically:
The equatorial plane of the ellipsoid has to align with the physical equatorial plane
The Polar Axis of the ellipsoid has to be parallel to the physical polar axis of the Earth
The ellipsoid surface has to be positioned so that it matches as closely as possible to the Geoid over the area of interest
A global datum is a datum that is established to model the entire global geoid as closely as possible; something an astro- geodetic datum cannot do. A global is datum is established by observing the orbit of navigation satellites, calculating the Earth’s centre of mass based on the orbits and then adjusting the ellipsoid by harmonic analysis to fit the global geoid. There have been several variants, but the two primary ones are WGS 72 and WGS 84. WGS stands for World Geodetic System. The WGS 72 datum was established for the ‘Transit Doppler’ satellite system, WGS 84 was established for the GPS system. The ‘connection’ point or origin for the global datums is the Earth’s centre of mass. Due to iterative improvement of the gravitational analysis, the centre of mass is slightly different for WGS 72 and WGS 84.
Figure 7: The World's Major Datum Blocks.
Reference Datum Transformation: Figure 10 shows a global (blue) and an astro-geodetic or regional datum (green), with the offset of the two centres. In order for a coordinate on the blue datum to be transformed to the green datum, the latitude and longitude have to be converted to x,y,z Cartesian coordinates on the blue datum. The dx, dy, dz have to be applied giving the x,y,z on the green datum. This can then be converted back to latitude and longitude on the green datum.
Figures 9a through 9d show, in cartoon form, the juxtaposition of two astro- geodetic datums with the geoid and a global datum. In figure 9a we see the geoid. There is an outline for representation in the other figures. In figure 9b red and green astro-geodetic datums are shown connected to the surface at two different points. The differences are exaggerated for effect. Figure 9c shows the geoid and the global datum. Figure 9d shows all three ellipsoids juxtaposed with the center of the ellipsoids clearly shown in three different places (again exaggerated for effect). Since latitude and longitude are referenced to the centre of the respective ellipsoid, it is clear that a latitude and longitude on one datum will not be compatible with a latitude and longitude on another datum unless some sort of transform takes place to adjust the one to match the other.
Figure 10: Showing a global datum (blue) and a regional/astro-geodetic datum (green) and the application of the geocentric transformation. The point P has not moved. It is just described by different coordinates.
Numerically these two sets of coordinates will be different but they will continue to represent the same physical point in space, as can be seen in figures 10 and 11. The corollary is that coordinates referenced to one datum that are mapped in a different datum will appear in the wrong place! The reader should note that in some of the larger regional datums, there are a variety of 3 parameter datum transformation sets depending on where in the region the operator is working (figure 12).
These are captured in the EPSG parameter database. Note also there are more sophisticated methods of calculating the datum transformation which may appear in various applications. These include parameters that not only translate but also allow for rotation and scaling differences between the two datums. The EPSG parameter database also contains many of these. Care should be taken when applying such parameters, and it is best to obtain the services of a specialist when using them or coding them into software. For most applications in the E&P domain, a three parameter shift will provide the necessary accuracy. In some countries more elaborate parameters are required by law.
Figure 11: Shows three latitude and longitude locations referenced to different geodetic datums that all represent the same point. The differences in the right-hand two columns shows the error in mapped location if the datums are confused.
Figure 12: Shows various datum transformation parameters in China as they relate to WGS 84. Datums in China are WGS 84, WGS 72 BE, Beijing 1954 and Xian 1980. Note the difference in the parameters for the Beijing datum in the Ordos and Tarim basin, both three parameter transformations and the difference between the South China Sea and the Yellow Sea seven parameter transformations.
1.2.3 Distortions in the Ellipsoidal Model
As the reader will have surmised, the ellipsoidal model is not an exact fit. The larger the area covered by a datum, the more distortion there is.
Height and Elevation – the elevation above MSL is not the same generally as the height above the ellipsoid. Corrections must be made to GPS or other satellite derived ‘heights’ to adjust them to mean sea level. Measurements made and adjusted to mean sea level by the surveyor may be assumed to lie on the ellipsoid as long as the separation between the two surfaces is relatively small.
Related to the previous one, the direction of the local vertical is not the same as the normal to the ellipsoid. This difference is known as the ‘deflection in the vertical’ and has to be minimized especially across larger regional and continental datums. This is done using Laplace corrections at regular intervals across the area of interest. Since these corrections vary in a non-regular and non-linear manner, the datum transformation between two datums may vary significantly across larger datums. The EPSG database is a means of identifying where a particular set of parameters should be used.
Radius of curvature adjustment (Figure 13) – The ellipsoid has a radius of curvature at a point (varies across the ellipsoid). When measuring distances at heights above or below the ellipsoid of more than about 5000 ft, the distances need to be adjusted to allow for the change in radius of curvature, so that they ‘map’ correctly onto the ellipsoid. Measurements made above the ellipsoid need to be reduced and measurements made below the ellipsoid need to be increased respectively, so that a map of the area (computed at the ‘true’ ellipsoid radius) map correctly onto the map in relation to other features. The calculation can be made with the following equation:
Ellipsoidal length = d[1 –( h/(R + h))] where
d = measured lengthh = mean height above mean sea level (negative if below) R = mean radius of curvature along the measured line
Section summary
The most important lessons:The most important lesson from all this is that a latitude and longitude coordinate do not uniquely define a point in space unless the datum name is included as part of the description! Please also note that knowing the name of the ellipsoid is not enough. An ellipsoid is a shape in space and the same ellipsoid can be attached to the Earth at an infinite number of places. Each time an ellipsoid is attached to another place it represents a different datum. Particular examples occur in West Africa, where many countries use the Clarke 1880 ellipsoid but set up as a different astro-geodetic datum in each case, and in Brazil where three datums use the International ellipsoid of 1924.
Ten Things to Remember about Geodesy and References:
1. Latitude and Longitude are not unique unless qualified with a Datum name.
2. Heights/Elevations are not unique unless qualified with an height/elevation reference. 3. Units are not unique unless qualified with unit reference.
4. Orientations are not unique unless qualified with a heading reference. 5. Most field data of all types are acquired in WGS 84 using GPS.
6. Every time data are sent somewhere there is a chance someone will misinterpret the references. 7. Most datasets have an incomplete set of metadata describing the references.
8. All software applications are not created equal with respect to tracking and maintaining metadata. 9. Data can be obtained by anyone from anywhere – that doesn’t make it right!
10. Most people do not understand geodesy - if you are in doubt – check with someone who knows!
1.3 Principles of Cartography – It’s a ‘Square World’! Or is it?
Why is it necessary to project geographic coordinates? We do this for three primary reasons: Ease of communication
Ease of computation Presentation and Planning
1.3.1 Projection Categories
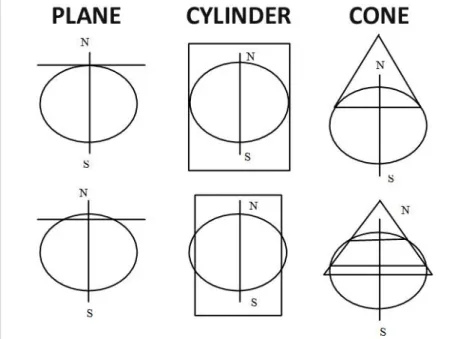
Figure 14 shows the various surfaces and orientation of the surfaces with respect to the ellipsoid axes. The three surfaces for projecting the ellipsoid are a cylinder, a cone and a plane. The main projection types used in E&P are
Transverse Mercator
andLambert Conformal Conic
.Other projection types that occur less frequently are:
Mercator, Oblique Mercator (Alaska) Oblique
Stereographic (Syria), Albers Equal Area
. The majority of the standard projections in use in E&P are listed withparameters in the EPSG database.
There are many ‘standard’ projection parameter definitions, but a project projection can be custom designed for specific purposes if needed. In general, one or two of the following criteria can be preserved when designing a projection:
Shape Area Scale Azimuth
The majority of the projections we use are conformal. This means that scale at a point is the same in all directions, angular relationships are preserved (but not necessarily north reference) and small shapes and areas are preserved.
They are also generally computational. Figure 14:
Shows the hierarchy of mapping.
The foundation is the datum. Geographic coordinates (latitude and longitude) describe points in the datum. These are then converted into Projection coordinates.
Without knowledge of the datum, projection coordinates are not unique and can easily be wrongly mapped.
Figure 15: Shows the various types of projection based on various plane surfaces and the orientation of the surface with respect to the ellipsoid.
Figure 17 shows that making the plane surface secant to the ellipsoid allows for a greater area to be covered with an equivalent scale distortion.
1.3.2 Mapping Parameters
A projection requires a set of parameters that are used to convert between latitude and longitude and easting and northing. These parameters can be found in the EPSG geodetic parameter database.
For a Transverse Mercator projection and a Lambert Conformal Conic projection these are respectively:
The geographic origin is the intersection of the central meridian with the latitude of the origin. The projection origin values at that point are the false easting and false northing. The reason for the high positive values for these parameters where applicable, is to avoid negative values. In both cases above this is for the easting but is not necessary for the northings which are both ‘0’, as the projection is not intended for use south of the origin.
There are several other types of projection, most of which are of more interest to cartographers than having any application in E&P.
1.3.3 Distortions in Mapping
We have already seen in the Geodesy section above, that by modelling the Geoid using an ellipsoid, we have already introduced some distortion in the way that the Earth is represented. Without adjustment, that distortion increases as we proceed further from the point of origin where the datum was established. However, with a well-established datum, these distortions can be minimized. When we make calculations from the Earth’s surface to a flat (projection) surface, we introduce an additional set of distortions. These are in area, shape, scale and azimuth.
Figure 17: The plane surface can be tangent or secant to the ellipsoid. Secant permits the scale distortion to be distributed more evenly and therefore a larger area to be covered per unit distortion.
These distortions:
Can be calculated and understood, but without proper care and well educated workforce, it is easy to make mistakes.
Are non-linear; that is to say, the size of the distortion varies across the projected area are very important component in mapping wellbores.
The most important and potentially destructive distortions when projecting geospatial data to a map are scale and orientation, particularly when mapping wellbore positions. Figure 18 shows a ‘macro’ level example of scale and azimuth distortion. This effect happens even at short distances but not so obviously to the eye. The orientation or azimuth change is what is called convergence. Its value can be calculated and applied to ‘real world’ measurements to adjust them to projection north referenced value. Similarly scale distortion can be applied to survey measurements to represent a scaled distance on the map.
1.3.4 Azimuth Distortion
A key point to remember is that the projection central meridian is truly a meridian - there is no azimuth distortion. As one moves away from the central meridian east or west, the other meridians plot on the projection as curved lines that curve towards the nearest pole, whereas grid north lines are parallel to the central meridian. At any given point, the difference in azimuth between the grid north lines and the meridian lines is the convergence angle. On the equator, convergence is generally zero also, and increases as one moves north.
Figure 18 shows a ‘global’ cartoon view of the concept.
Figure 19 shows a simple way to verify that the value derived is correct (i.e. that the sign of convergence has been correctly applied). It is important when dealing with convergence to do a couple of ‘sanity’ checks:
Always draw a diagram (Figure 19)
Always check that the software application is applying the correct value, correctly
Always have someone else check that the results agree with supplied results of wellbore location
If you are not sure – find a specialist
The formal algorithm is Grid azimuth = True Azimuth – Convergence but many applications do not observe the correct sign. It is better to use True Azimuth = Grid Azimuth ± Convergence α where (per figure 19), α -ve West of CM, and α +ve East of CM in Northern hemisphere and the opposite in Southern hemisphere.
In the equation above, use the sign in the diagram, not the sign you get with the software, because some applications use the opposite convention.
Figure 18: The plane surface can be tangent or secant to the ellipsoid. Secant permits the scale distortion to be distributed more evenly and therefore a larger area to be covered per unit distortion.
Figure 19: Shows two projection zones with Central Meridians, as well as non-central meridians plotted on the projection (curved lines) that converge towards the nearest pole. Two additional grid north lines are shown to the right and left of the figure. Grid north lines are parallel on the projection, creating a grid. Convergence and scale sign distortion vary in a non-linear fashion across the projection, but can be calculated for any given point.
1.3.5 Scale Distortion
Referring back to figure 18, it is clear from the example that a projection will distort the distance between two points. Clearly the true (Earth surface measured) distance between anchorage and Washington DC has not changed, but the length on the map can change depending on the projection. Most projections we use have a sub unity ‘central scale factor’. In the example above the Mississippi West state plane projection has a central scale factor of 0.99975. This means that on the central meridian a 1,000 meter line measured on the ground will be represented by a line 999.75 meters at the scale of the map. If the map has a scale of 1:10,000, then the line on the map will be represented by a line 9.9975 cms long. If you plotted the same line on the central meridian of a UTM projection with a central scale factor of 0.9996, then the line on the map would be represented by a line 9.996 cms long.
2. Changing from One Map System to Another
2.1 Ellipsoids and datums
This is covered in more detail in the Geodesy section above but here are some basic guidelines. The Earth is elliptical in cross section due to the fact that
the planet is mainly molten rock and the rotation of the Earth causes a slight ‘flattening’ as the centrifugal force throws the mass of liquid away from the centre of spin. A datum by definition is an ellipsoidal model of the Earth and a centre point. Historically we have estimated the dimensions of the ellipsoid and its centre from surface observations and the best fit datum has naturally varied from region to region around the world. For example, in the USA, an elliptical model and centre point was chosen in 1927 and is referred to as the NAD 27 datum.
It uses the Clarke 1866 Ellipsoid (named after Alexander Ross Clarke a British Geodesist 1828 - 1914 with dimensions as follows:
Semi-Major Axis: 6378206.4 metres Semi-Minor Axis: 6356583.8 metres
Whereas in 1983 the datum was updated to NAD 83 which uses a spheroid as follows:
Semi-Major Axis: 6378137 metres Semi-Minor Axis: 6356752.3 metres
Not only did the shape update but the centre point shifted by several hundred feet. In order to correctly convert from one system to another, the latitude and longitude have to be converted to an XYZ coordinate from the estimated centre of the Earth (Geo Centric Coordinates). After that a shift in the coordinates to allow for the shift between the centre estimates is applied. Then the coordinates can be converted back to a vertical angle (latitude) and horizontal angle (longitude) from the new centre on the new ellipsoid. In some cases there may be a scale change and even a small rotation around the three axes so it is not recommended that a home-made calculation is done for such a critical and sensitive conversion.
Latitude and Longitude for a point are NOT UNIQUE. They depend on the centre point and spheroid in use. Figure 20a: Earths elliptical cross section.
It is worth checking out the EPSG web site. This is the internet domain of the European Petroleum Survey Group which maintains an accurate database of geodetic parameters and provides on line software for doing such conversions.
Here, for example is the conversion of a point at 30 degrees North latitude and 70 degrees West Longitude from NAD 27 to NAD 83.
Latitude Longitude
NAD 27 datum values: 30 00 0.00000 70 00 0.00000
NAD 83 datum values: 30 00 1.15126 69 59 57.30532
NAD 83 - NAD 27 shift values: 1.15126 (secs) -2.69468(secs)
35.450 (meters) -72.222(meters)
Magnitude of total shift: 80.453(meters)
The main consideration here is that it is essential that when positioning a well, the geoscientists, the operator and the drilling contractor are all working on the same map system on the same datum as the shift in position can be enormous and frequently far bigger than the well target tolerance.
CONTENTS
3. True North, Grid North, Convergence Summary &
Exercises
3.1 Map projections
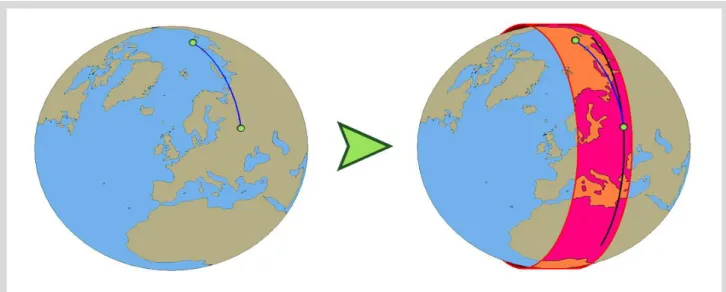
For any point on the Earth’s surface True North is towards the Geographic North Pole (The Earth’s axis of revolution). This fact is independent of any map system, datum or spheroid. However, when a map projection surface is introduced, it is impossible to maintain a parallel map North that still meets at a single point.
In this example a vertically wrapped cylinder such as those used in Transverse Mercator map projections includes the North Pole but the straight blue line on the globe will become slightly curved on the surface of the cylinder. The black line in the diagram shows the direction of Map North (Grid North) and clearly they are not the same.
When the cylinder is unwrapped, the two lines look like figure 22a.
Because all True North lines converge to a single point, the angle from True to Grid North is referred to as the ‘Convergence’ Angle.
Convergence is the True Direction of Map North.
In the case of the Universal Transverse Mercator Projection, the convergence within one map zone can vary from -3 degrees to + 3 degrees.
When correcting a true North Azimuth to Grid, this convergence angle must be subtracted from the original azimuth. It is essential that a North Arrow is drawn in order to correctly visualize the relative references.
Figure 21: Map projection surface exercise showing it is impossible to maintain a parallel map North.
When magnetic north is included (see next chapter) we have three different North References to contend with.
These can be in any order with several degrees of variation between them so a clear North Arrow is essential on all well plans and spider maps.
When correcting from one reference to the other it is common practice to set the company reference North straight upwards and plot the others around it. In figure 22a & 22b, Grid North is the preferred company reference, so all quoted azimuths would be referenced to Grid and the North arrow is centred on Grid North.
In this example the well is heading 60o Grid with magnetic North
at 6o west of True and Grid North 2o East of True - figure 22c. Depending on which reference we use, the azimuth can be expressed three different ways. It is easy to see how confusion can occur.
Worked examples follow on the next pages…..
CONTENTS
Figure 22b: The three north references.
Some simple worked examples:
Example 1 Example 2 Example 3 Example 4 Example 54 The Earth’s Magnetic Field
4.1 Basic Outline
At the heart of the planet is an enormous magnetic core that gives the Earth’s navigators a useful reference. The lines of magnetic force run from south to north and these provide a reference for our compasses.
To fully define the Earth’s Magnetic Field at any location, we need three components of a vector. The Field Strength, usually measured in nano Teslas or micro Teslas, the Declination Angle defined as the True Direction of Magnetic North and the Dip Angle defined as the vertical dip of the Earth vector below horizontal. For computing reasons, this vector is often defined as three orthogonal magnetic field components pointing towards True North, East, and vertical referred to as Bn, Be and Bv. A fundamental law of physics relating magnetic field strength to electric current is known as the Biot-Savart Law and this is our best explanation for why B is used to denote magnetic field strength. If you know better, please contact the author - details at the front of this publication.
Figure 25: Basic Earth internal layers.
4.2 Variations in the Earth’s Magnetic Field
One problem with the Earth’s Magnetic Field is that it will not stand still. Over the course of history, the magnetic core of the Earth has been turbulent with the result that the magnetic vector is constantly changing. In geological time scales this change is very rapid. It is referred to as the ‘Secular’ variation.
In order to keep track of this movement, several global magnetic models are maintained to provide prediction models. For example, an international organization called INTERMAGNET collates data from observatories scattered throughout the world to model the intensity and attitude of the Earth’s magnetic field. Every year, the data is sent to the British Geological Survey in Edinburgh where it is distilled to a computer model called the British Global Geomagnetic Model (BGGM). Historically this has been the most commonly used model for magnetic field prediction for the drilling industry but there are others. The United States National Oceanic and Atmospheric Administration (NOAA) also produce a model known as the High Definition Geomagnetic Model from their National Geophysical Data Centre in Boulder Colorado. This takes account of more localized crustal effects by using a higher order function to model the observed variations in the Earth field. In practice, when higher accuracy MWD is required, it is increasingly popular to measure the local field using IFR (see chapter 6) and to map the local anomalies as corrections to one of the global models. In this way, the global model takes care of the secular variation over time and the local effects are not dependent on a mathematical best fit over long wavelengths.
Figure 27: Tracking the magnetic North Pole.
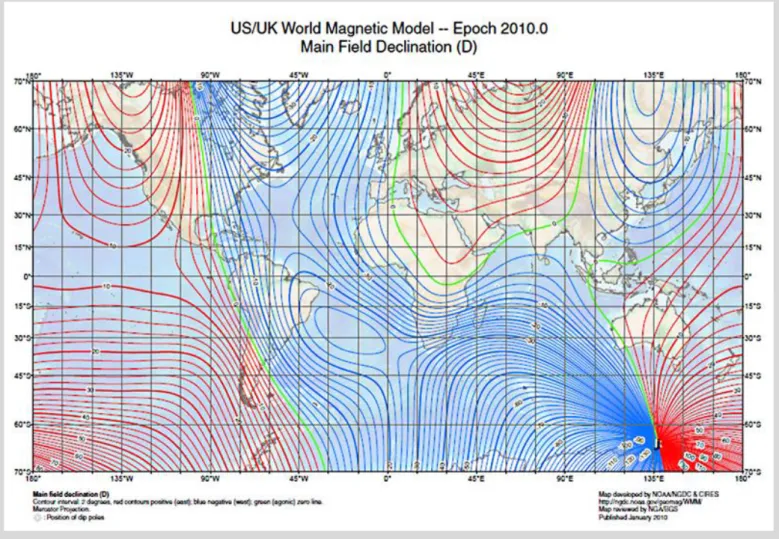
The model in figure 28 below is a combined effort between NOAA and the BGS called the World Magnetic Model which is updated every 5 years. This is a lower order model, as is the International Geomagnetic Reference Field produced by IAGA but these are freely accessible over the internet whereas the higher order models require an annual license.
The higher order world models (BGGM and HDGM) are considered to be better than 1 degree (99% confidence) at most latitudes. This may be less true at higher latitudes above 600 but at these latitudes, IFR techniques are frequently used.
Figure 28: Main field declination Jan 2010.
4.3 Magnetic Observatory Distribution
It should be noted that the global models such as BGGM and even HDGM, can only measure longer wave length effects of the Earth’s magnetic field distribution and cannot be expected to take account of very localised crustal effects caused by magnetic minerals, typically found in deep basement formations in the vicinity of drilling. See chapter 6 for a discussion of In Field Referencing (IFR), a technique for measuring the local field to a higher accuracy.
4.4 Diurnal Variation
The term Diurnal simply means ‘daily’ and for many centuries it has been noticed that the magnetic field seems to follow a rough sine wave during the course of the day. Here is a graph of field strength observations taken in Colorado over a 2 day period.
It can be seen that the field strength is following a 24 hour period sine wave.
See chapter 7 for a discussion of ‘Interpolated In Field Referencing’, a method of correcting for diurnal variation in the field.
These variations may be small but for high accuracy MWD work especially at high latitudes, they may need to be corrected for. We now know that this effect is due to the rotation of the Earth and a varying exposure to the solar wind. The sun is constantly emitting ionized plasma in huge quantities across the solar system. These winds intensify during magnetic storms and the material can be seen on a clear night at high or low latitudes, being concentrated at the magnetic poles and forming the ‘Aurora Borealis’ and the ‘Aurora Australis’.
During such storms the measurements taken from magnetometers and compasses are unlikely to be reliable but even in quiet times, the diurnal variation is always present.
CONTENTS
Figure 30: Magnetic Observatory distribution.
5. Principles of MWD and Magnetic Spacing
5.1 Measurement While Drilling (MWD)
MWD usually consists of a non-magnetic drill collar as in figure 33, containing a survey instrument in which are mounted 3 accelerometers, 3 magnetometers and some method of sending the data from these to surface.
Accelerometers measure the strength of the Earth’s gravity field component along their axis. Magnetometers measure the strength of the Earth’s magnetic field along their axis. With three accels mounted orthogonally, it is always possible to work out which way is ‘down’ and with three magnetometers it is always possible to work out which way is North (Magnetic). The following equations can be
used to convert from three orthogonal accelerations, Gx, Gy and Gz (sometimes called Ax, Ay and Az) and three orthogonal magnetic field measurements, Bx, By and Bz (sometimes called Hx,Hy and Hz), to the inclination and direction (Magnetic).
In these equations the z axis is considered to point down hole and x and y are the cross axial axes. Some tools are arranged with the x axis downhole and y and z form the cross axial components so care should be taken when reading raw data files and identifying the axes. Similarly there is no consistency in units in that some systems output accelerations in gs, others in mg and some in analogue counts. Similarly the magnetometer outputs can be in counts, nano Teslas or micro Teslas.
The magnetometers are of various types but usually consist either of a coil with alternating current used to fully magnetise a core alternating with or against the Earth field component, or a small electro magnet used to cancel the Earth’s magnetic field component.
The accelerometers are simply tiny weighing machines, measuring the weight of a small proof weight suspended between two electromagnets. Held vertically they will measure the local gravity field and held horizontally they will measure zero. In theory we could measure inclination with only one accelerometer but a z axis accelerometer is very insensitive to near vertical movement due to the cosine of small angles being so close to unity. Besides we also require the instrument to tell us the toolface (rotation angle in the hole).
If we want the toolface as an angle from magnetic north corrected to our chosen reference (grid or true) we use the x and y magnetometers and resolve tan-1(Bx/By) and if we want the angle from the high side of the hole we resolve tan-1(Gx/Gy). For practical reasons, most MWD systems switch from a magnetic toolface to a high side toolface once the inclination exceeds a preset threshold typically set between 3 and 8 degrees.
5.1 Data Recovery
Most commonly, the technique used currently is to encode the data as a series of pressure pulses in the drilling fluid using poppet valves that will restrict the fluid flow to represent a one and release to represent a zero. This is known as positive mud pulse telemetry.
There are other systems which will open a small hole to the annulus to allow the pressure to drop for a 1 and recover for a zero. This is known as negative mud pulse telemetry. A third method is to generate a sinusoidal continuous pressure cycle onto which a phase modulation can be super-imposed to create a decipherable message signal. This is known as continuous wave telemetry.
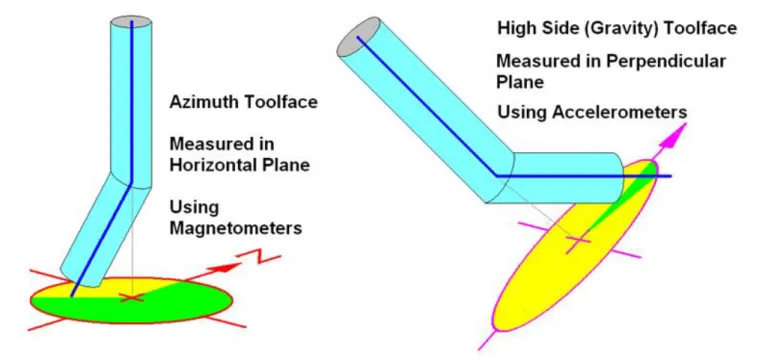
The data is interpreted at surface and displayed in a surface display unit. Direction is measured from Magnetic North initially but usually corrected to either grid or true. Inclination is measured up from vertical and toolface, as mentioned, can be measured either as an Azimuth Toolface or a High Side toolface. In the picture below, the drilling tool is currently oriented on a gravity of toolface of 136O right of high side.
Figure 34: Graphical representation of two types of toolface.
Figure 35: Pulse equipment.
5.2 MWD Magnetic Spacing
Clearly, if we are to make use of magnetic sensors in an MWD tool, we need to ensure that there is sufficient magnetic isolation to avoid significant magnetic influences from the other drilling equipment.
5.2.1 Drill String Magnetic Interference
The drillstring is a long slender metallic body, which can locally disturb the Earth’s magnetic field. Rotation of the string and its shape causes the magnetisation to be aligned along the drillstring axis.
The magnetised drillstring locally corrupts the horizontal component of the Earth’s magnetic field and hence accurate measurement of magnetic azimuth is difficult. For sensible magnetic azimuth measurement, the magnetic effect of the drillstring has to be reduced and this is done by the insertion of non-magnetic drill collars (NMDC) into the drillstring.
Non-magnetic drill collars only reduce the effect of magnetic interference from the drillstring – they do not remove it completely. An acceptable azimuth error of 0.25° was chosen based on Wolff and de Wardt (References CUR 443 and CUR 86) as this was the limit for ‘Good Magnetic’ surveys in their systematic error model. It should be noted that more recent work has suggested that magnetic interference azimuth error is likely to be of the order of 0.25 + 0.6 x sin (Inc) x sin(azimuth) so these values can be exaggerated at high angle heading east west.
By making assumptions about the magnetic poles in the steel above and below the NMDC, the expected optimum compass spacing to minimise azimuth error and the magnitude of the expected azimuth error can be calculated.
5.2.2 Pole Strength Values
Field measurements by Shell (Reference CUR 252) have been made of pole strengths for typical Bottom Hole Assemblies. These values are for North Sea area in Northern Hemisphere; these should be reversed for Southern Hemisphere. However, it should be noted that the polarity and intensity of magnetic interference is not easily predictable. In many cases the interference is mainly caused by the use of magnetic NDT techniques which of course have nothing to do with geographic location. The numbers suggested here are merely a guide and certainly not an upper limit.
Upper Pole Lower Pole
Drill collars up to + 900 μWb. Stabilisers and bit up to -90 μWb.
10m drill collar below NMDC up to -300 μWb Turbines up to -1000, μWb
5.2.3 Azimuth Error
Drillstring magnetisation affects the observed horizontal component of the local magnetic field. A magnetic compass detects the horizontal component of the Earth's magnetic field. The drillstring induced error, ΔBz acts along the drillstring axis and this affects the east/west component of the observed field in proportion to (Sine Inclination x Sine Azimuth). This means that the compass error increases with inclination and with increased easterly or westerly azimuth of the wellbore.
5.2.4 NMDC Length Selection Charts
Using the formulae from SPE 11382 by S.J. Grindrod and C.J.M. Wolff, NMDC charts can be constructed for various well inclinations and azimuths and for a maximum acceptable azimuth error. The latter is taken as 0.25 degrees as the limit for good magnetic surveying practice. By varying the DIP and B for local conditions, charts can be prepared for various areas of the world.
The following explanation is included courtesy of Dr Steve Grindrod of Copsegrove Developments Ltd.
NON-MAGNETIC DRILL COLLAR LENGTH REQUIREMENTS
This section describes the theoretical background to drillstring magnetic interference, explains the
origin of NMDC charts and makes recommendations on NMDC usage and inspection. This is based on
An example chart for a bit and stabiliser BHA is given in figure 37: The charts can be used in two ways.
1. To estimate the recommended length of NMDC for a particular situation.
2. If a different length was used, an estimate of the possible azimuth error can be obtained. To find the recommended length of NMDC for a particular BHA, the azimuth from North or South and the inclination are used to arrive at a point on the selection chart. For example a section of a well being drilled at 60° inclination and 35° azimuth requires 24 m of NMDC.
This is demonstrated on the example chart above, with the 24 m being found by visually interpolating between the 20 m and 30 m length lines.
Where inadequate lengths of NMDC are used, (or when reviewing past surveys where insufficient NMDC was used) it is possible to estimate the resulting compass error: -
Possible Azimuth Error for length of NMDC used = Acceptable Azimuth Error x (Length required)2 / (Length used)2 Example:
If only 2 NMDC's with a total length of 18.9 m (62 ft) were used instead of the recommended NMDC total length of 24 m (69 ft) we have: -
Estimated possible azimuth error = 0.25 x (24)2 / (18.9)2 = 0.4 deg
Note that it is not valid to deliberately cut back on NMDC usage and plan to theoretically correct a survey by the above formulae. This is because the formula assumes pole strengths for the BHA components and actual pole strengths are not generally measured in the field.
CONTENTS
6. In-Field Referencing
6.1 Measuring Crustal Anomalies using In-field Referencing
The biggest source of error in MWD is usually the crustal variation. The global models such as the BGGM and HDGM can only take into account the longer wave length variations in the Earth Field and cannot be expected to allow for the localised effects of magnetic rock in the basement formations. In order to correct for these effects, the magnetic field has to be measured on site. From these local measurements, a series of corrections from a global model can be mapped out for the field so that in future years, the more permanent effect of local geology can be added to the secular effects for an up to date local field model.
IFR is a technique that measures the strength (Field Strength), direction (Declination) and vertical angle (Dip Angle) in the vicinity of the drilling activity to give the MWD contractor a more accurate reference to work to.
To accurately measure the magnetic field locally we can take direct measurements from the land, the sea or the air. On land, a non-magnetic theodolite with a fluxgate magnetometer aligned on its viewing axis, is used to measure the orientation of the magnetic field against a true north, horizontal reference from which accurate maps can be made. A proton or Caesium magnetometer is used to accurately the local field strength. In the air, only the field strength variations can be measured but if a wide enough area is measured at high resolution, the field strength data can be used to derive the effects on the compass and good estimates of the declination and dip angle can then be mapped. At sea, specialist non-magnetic equipment can be towed behind a vessel or carried on board a non-magnetic survey vessel with very accurate attitude sensors and magnetometers that output their data at high frequency and the motion effects are taken out in the processing.
6.1.1 IFR Survey Maps
Once the measurements have been taken, contoured maps are produced to allow the MWD contractor to interpolate suitable magnetic field values for use on his well.
The IFR survey results are usually provided as digital data files which can be viewed with the supplied computer program. This allows the contractor to view the data and determine magnetic field values at any point within the oilfield.
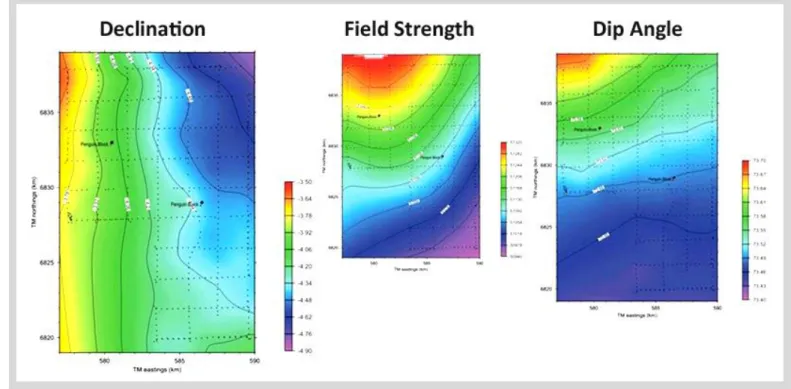
Figure 39: Examples of IFR survey results.
Two versions of the field maps are supplied. The first shows the absolute values of the total field, declination and dip angles, observed at the time of the IFR survey. The second set of maps shows how these values differed from the predictions of the BGGM model, due to the magnetic effects of Earth’s crust in the oilfield. It is these crustal corrections which are used by MWD contractors.
The crustal corrections vary only on geological timescales and therefore can be considered to be fixed over the lifetime of the field. The BGGM model does a very good job of tracking the time variation in the overall magnetic field. By combining the BGGM model and the IFR crustal corrections, the MWD contractor obtains the best estimate of the magnetic field at the rig.
First, we use the BGGM model to get an estimate of the total field, dip and declination.
Then the IFR correction values for the background magnetic field are applied by adding the BGGM values and the corrections. i.e.
Total Field Tf = TfBGGM + TfCrustal Correction Declination Dec = DecBGGM + DecCrustal Correction Dip Angle Dip = DipBGGM + DipCrustal Correction
In most cases, this just involves selecting the location of the rig and choosing a single set of crustal corrections. In some cases, when the magnetic gradients are strong, the MWD contractor may chose a different declination for each hole section along the wellbore. If the declination or dip value varied by more than 0.1 degrees, or the field strength varied by more than 50nT along the wellbore, it would be recommended to derive values for each hole section.
Note on Use of Error Models– see from chapter 17
Once IFR has been applied to an MWD survey, the contractor can change the error model applied to the survey to determine the uncertainty on its position. The Industry Steering Committee for Wellbore Survey Accuracy (ISCWSA) maintain industry standard error models for MWD that allow software to determine the positional uncertainty of the wellpath.
Normal MWD for example would have a declination error component of 0.36 degrees at 1 standard deviation but with IFR this is reduced to 0.15 degrees.
The effect of all this is to significantly reduce the uncertainty of the well position with all the benefits of the improved accuracy for collision risk, target sizing, close proximity drilling, log positional accuracy, relief well planning and so on.
6.2 Interpolated In-field Referencing
One solution to diurnal variations is to use a reference station on surface. In this way, the observed variations observed at surface can be applied to the Downhole Data which will experience similar variation. This is not always practical and requires a magnetically clean site with power supply nearby and some method of transmitting the data in real time from the temporary observatory. The other issue is establishing the baseline from which these variations are occurring in order to correct to the right background field values.
In a combined research project between Sperry Sun and the British Geological Survey, it was discovered that the diurnal and other time variant disturbances experienced by observatories, even a long way apart follow similar trends. The researchers compared observations made at a fixed observatory with derived observations interpolated from those taken at other observatories some distance away. The match was very encouraging and a new technique for diurnal correction was established called Interpolated In-Field Referencing or IIFR (not be confused with IFR discussed below). This technique is a patented method of correcting for time variant disturbances in the Earth’s magnetic field but is widely used under licence from the inventors. The readings observed at the nearby stations are effectively weighted by the proximity to the drill site and the time stamped combined corrections applied to the Downhole observations either in real time or retrospectively.
CONTENTS