TIBCO J
ASPER
R
EPORTS
S
ERVER
S
ECURITY
G
UIDE
R
ELEASE
6.1
Library, TIBCO JasperReports Server, TIBCO Jaspersoft OLAP, TIBCO Jaspersoft Studio, and TIBCO Jaspersoft ETL are trademarks and/or registered trademarks of TIBCO Software Inc. in the United States and in
jurisdictions throughout the world. All other company and product names are or may be trade names or trademarks of their respective owners.
Chapter 1 Introduction to JasperReports Server 5 Chapter 2 Overview of JasperReports Server Security 7
2.1 Authentication 7
2.2 Authorization Overview 8
Chapter 3 Application Security 11
3.1 Encrypting Passwords in Configuration Files 12 3.1.1 Encrypting Configuration Passwords on Tomcat (or Spring tcServer) 12 3.1.2 Encrypting Configuration Passwords on Enterprise Servers 13 3.1.3 Encrypting Additional Properties in default_master.properties 13 3.1.4 Password Encryption for External Authentication 15
3.1.5 Encryption Options 17
3.2 Configuring CSRF Prevention 18
3.3 Configuring Input Validation 18
3.3.1 Customizing Security Error Messages 19
3.3.2 Editing Input Validation Rules 20
3.3.3 Creating Validator Expressions 21
3.3.4 Validating New Input Parameters 22
3.3.5 Query Validation 22
3.3.6 Further Configuration 23
3.4 Restricting File Uploads 24
3.5 Hiding Stack Trace Messages 26
3.6 Defining a Cross-Domain Policy for Flash 26
3.7 Enabling SSL in Tomcat 27
3.7.1 Setting Up an SSL Certificate 27
3.7.2 Enabling SSL in the Web Server 28
3.7.3 Configuring JasperReports Server to Use Only SSL 29
3.8 Disabling Unused HTTP Verbs 29
3.9 Setting the Secure Flag on Cookies 30
3.10 Setting httpOnly for Cookies 31
3.10.1 Setting httpOnly for Tomcat 7 31
3.10.2 Setting httpOnly for Tomcat 6 32
3.11.1 Enabling the JVM Security Manager 32
3.11.2 Restoring Disallowed Permissions 33
3.11.3 Additional Customizations for Previous Versions of Tomcat 34
3.12 Encrypting Passwords in URLs 35
Chapter 4 User Security 37
4.1 Configuring the User Session Timeout 37
4.2 Configuring User Password Options 38
4.2.1 Configuring Password Memory 38
4.2.2 Enabling Password Expiration 38
4.2.3 Allowing Users to Change their Passwords 39
4.2.4 Enforcing Password Patterns 39
4.3 Encrypting User Passwords 40
4.3.1 Dropping and Recreating the Database in PostgreSQL 42 4.3.2 Dropping and Recreating the Database in MySQL 42 4.3.3 Dropping and Recreating the Database in Oracle 43 4.3.4 Dropping and Recreating in the Database in Microsoft SQL Server 43
4.4 Encrypting User Session Login 43
4.4.1 Dynamic Key Encryption 45
4.4.2 Static Key Encryption 45
Chapter 5 Securing Data in a Domain 47
5.1 Business Case 48
5.2 Process Overview 48
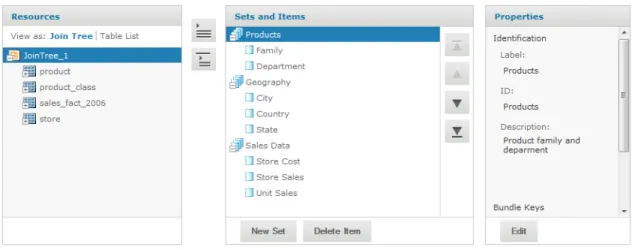
5.3 Sales Domain 49
5.4 Roles, Users, and Attributes 50
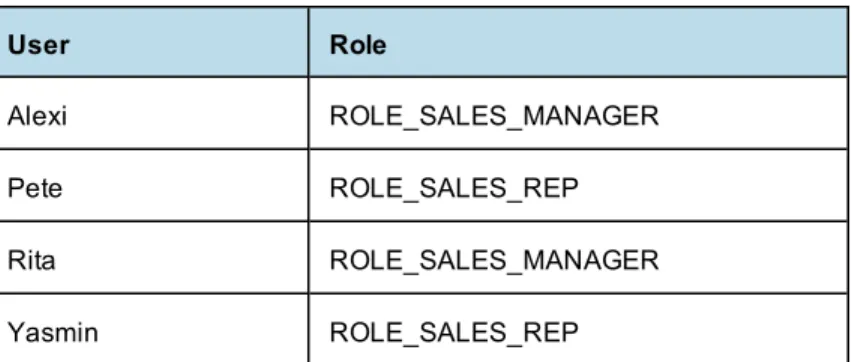
5.4.1 Roles 50
5.4.2 Users 51
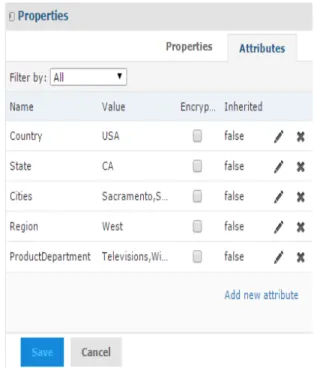
5.4.3 User Attributes 51
5.5 Setting Up Logging and Testing 52
5.5.1 Enabling Logging 52
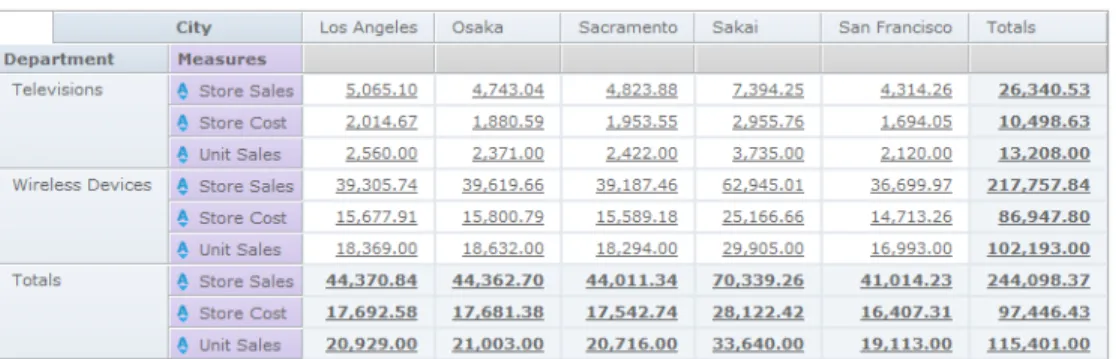
5.5.2 Creating a Test Report 53
5.6 Creating a Domain Security File 53
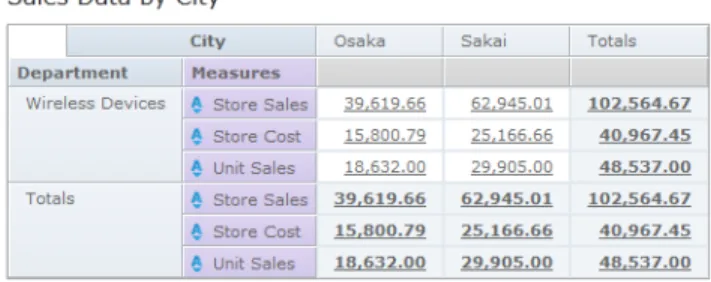
5.6.1 Row-level Security 54
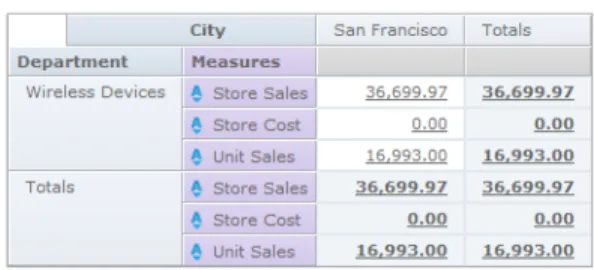
5.6.2 Column-level Security 55
5.6.3 CZS’s Item Group Access Grants for Sales Data 56
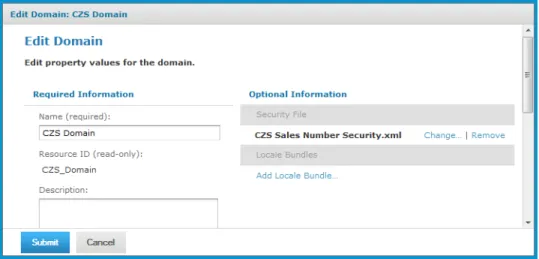
5.6.4 Uploading the Security File 57
5.7 Testing and Results 57
5.7.1 Working with Hierarchical Attributes 59
5.8 Domain and Security Recommendations 60
5.9 Domain Reference Material 62
5.9.1 Domain Design in XML Format 62
5.9.2 Domain Security File 66
Glossary 69
TIBCO™ JasperReports®Server builds on TIBCO™ JasperReports®Library as a comprehensive family of Business Intelligence (BI) products, providing robust static and interactive reporting, report server, and data analysis capabilities. These capabilities are available as either stand-alone products, or as part of an integrated end-to-end BI suite utilizing common metadata and provide shared services, such as security, a repository, and scheduling. The server exposes comprehensive public interfaces enabling seamless integration with other applications and the capability to easily add custom functionality.
The heart of the TIBCO™ Jaspersoft®BI Suite is the server, which provides the ability to:
• Easily create new reports based on views designed in an intuitive, web-based, drag and drop Ad Hoc Editor.
• Efficiently and securely manage many reports.
• Interact with reports, including sorting, changing formatting, entering parameters, and drilling on data. • Schedule reports for distribution through email and storage in the repository.
• Arrange reports and web content to create appealing, data-rich Jaspersoft Dashboards that quickly convey business trends.
For business intelligence users, Jaspersoft offers TIBCO™ Jaspersoft®OLAP, an optional component of JasperReports Server, controlled by license and described in its own user guide.
While the Ad Hoc Editor lets users create simple reports, more complex reports can be created outside of the server. You can either use TIBCO™ Jaspersoft®Studio or manually write JRXML code to create a report that can be run in the server. We recommend that you use Jaspersoft Studio unless you have a thorough
understanding of the JasperReports file structure.
You can use the following sources of information to extend your knowledge of JasperReports Server: • Our core documentation describes how to install, administer, and use JasperReports Server. Core
documentation is available as PDFs in the docs folder of your JasperReports Server installation. You can also access PDF and HTML versions of these guides online from theDocumentation sectionof the Jaspersoft Community website.
• Our Ultimate Guides document advanced features and configuration. They also include best practice recommendations and numerous examples. These guides are available online in PDF and HTML from the Documentation sectionof the Jaspersoft Community website.
• OurOnline Learning Portallets you learn at your own pace, and covers topics for developers, system administrators, business users, and data integration users. The Portal is available online from Professional Services section of ourwebsite.
• Our free samples, which are installed with JasperReports, Jaspersoft Studio, and JasperReports Server, are documented online. Thesamplesdocumentation can be found on ourcommunity website.
JasperReports Server is a component of both a community project and commercial offerings. Each integrates the standard features such as security, scheduling, a web services interface, and much more for running and sharing reports. Commercial editions provide additional features, including Ad Hoc charts, flash charts, dashboards, Domains, auditing, and a multi-organization architecture for hosting large BI deployments.
C
HAPTER
2
O
VERVIEW OF
J
ASPER
R
EPORTS
S
ERVER
S
ECURITY
JasperReports Server ensures that people can access only the data they're allowed to see. The settings that define organizations, users, roles, and repository resources work together to provide complete access control that includes:
• Authentication – Restricts access to identified users and protects that access with passwords. Defines roles for grouping users and assigning permissions.
• Authorization – Controls access to repository objects, pages, and menus based on users and roles. • Data level security (commercial version only) – Defines row and column level permissions to access your
data. Row and column level permissions can be defined and enforced in Domains.
Administrators must keep security in mind at all times when managing organizations, user, roles, and resources, because the security settings behind each of these rely on the others.
This chapter contains the following sections: • Authentication
• Authorization Overview
2.1
Authentication
The first part of security is to define user accounts and secure them with passwords to give each user an identity within JasperReports Server. The server stores user definitions, including encrypted passwords, in a private database. Administrators create, modify, and delete user accounts through the administrator pages, as described in theJasperReports Server Administrator Guide.
JasperReports Server also implements roles for creating groups or classes of users with similar permissions. A user can belong to any number of roles and have the privileges of each The server stores role definition in its private database, and administrators create, modify, and delete roles through the administrator pages, as described in theJasperReports Server Administrator Guide.
JasperReports Server relies on the open source Spring security framework; it has many configurable options for: • External authentication services such as LDAP (used by Microsoft Active Directory and Novell eDirectory) • Single sign-on using JA-SIG's Central Authentication Service (CAS)
• Java Authentication and Authorization Service (JAAS) • Container security (Tomcat, Jetty)
• SiteMinder
JasperReports Server also supports these encryption and authentication standards: • HTTPS, including requiring HTTPS
• HTTP Basic • HTTP Digest • X509
The Spring framework is readily extensible to integrate with custom and commercial authentication services and transports.
Authentication occurs by default through the web user interface, forcing login, and/or through HTTP Basic authentication for web services, such as Jaspersoft Studio and for XML/A traffic. The server can automatically synchronize with an external authentication service. External users don’t need to be created manually in the server first. Both users and roles are created automatically in the server from their definitions in an external authentication service. For an overview of the authentication system and details about external authentication, see theJasperReports Server Authentication Cookbook.
2.2
Authorization Overview
With a user’s identity and roles established, JasperReports Server controls the user’s access in these ways: Menu options and
pages
The menus appear in JasperReports Server UI depending on the user’s roles. For example, only users with the administrator role can see theManagemenu and access the administrator pages. By modifying the server’s configuration, you can modify access to menus, menu items, and individual pages. Refer to the
JasperReports Server Source Build GuideandJasperReports Server Ultimate Guidefor more information.
Organization scope Users belong to organizations and are restricted to resources within their
organizations. Organizations have their own administrators who each see only the users, roles, and resources of their own organization. When JasperReports Server is configured with multiple organizations, those organizations are effectively isolated from each other, although the system admin can share resources through the Public folder. For more information, see theJasperReports Server Administrator Guide.
Resource permissions Administrators can define access permissions on every folder and resource in the repository. You can define permissions for every role and every user, or leave them undefined to be inherited from the parent folder. For example, user may have read-write access to a folder where they create reports, but the administrator can also create shared reports in the same folder that are set to read-only. The possible permissions are: no access, execute only, read-only, read-delete, read-write-delete, and administer (see "Repository Administration" in theJasperReports Server Administrator Guide).
Permissions are enforced when accessing any resource whether directly through the repository interface, indirectly when called from a report, or programmatically through the web services. A user's access to resources is limited by the permissions defined in the user's roles.
Administrator privileges JasperReports Server distinguishes between reading or writing a resource in the repository and viewing or editing the internal definition of a resource. For security purposes, granting a user read or write permission on a resource does not allow viewing or editing the resource definition. For example, users need execute or read permission on a data source to run reports that use it, but they cannot view the data source’s definition, which includes a database password. Also, only administrators can interact with theme folders to upload, download, and activate CSS files that control the UI's appearance.
Data-level security Data-level security determines the data that can be retrieved and viewed in a report, based on the username and roles of the user running the report. For example, a management report could allow any user to see the management hierarchy, managers would see the salary information for their direct employees, and only human resource managers would see all salary values.
Data-level security in Domains is explained in theJasperReports Server User Guide. Data-level security through OLAP views is covered in theJaspersoft OLAP User Guide.
Note: This type of security is available only in the commercial edition of JasperReports Server.
Profile attributes Profile attributes are name-value pairs associated with a user, organization, or server.
User attributes provide additional information about the user and can also be used to restrict a user's access to data through Domain security files and OLAP schemas. For information on defining user attributes, see "Editing User Attributes" in the JasperReports Server Administrator Guide.
User, organization and server attributes can be used to customize the definition of a data source or as parameters of a report. See "Attributes in Data Source Definitions" and "Attribute-Based Parameters for Queries and Reports" in theJasperReports Server Administrator Guide
This chapter describes the configuration settings that protect JasperReports Server and its users from unauthorized access. The configuration properties appear in two locations:
• Some properties must be configured during the installation and deployment phase, before users access the server. These settings are configured through files used by the installation scripts. These settings are available only when performing a WAR file installation.
• Properties you can configure after installation are located in files in various folders. Configuration file paths are relative to the <js-install> directory, which is the root of your JasperReports Server installation. To change the configuration, edit these files then restart the server.
Because the locations of files described in this chapter vary with your application server, the paths specified in this chapter are relative to the deployed WAR file for the application. For example, the applicationContext.xml file is shown as residing in the WEB-INF folder. If you use the Tomcat application server bundled with the installer, the default path to this location is:
C:\Program Files\jasperreports-server-6.1\apache-tomcat\webapps\jasperserver-pro\WEB-INF
Use caution when editing the properties described in this chapter. Inadvertent changes may cause unexpected errors throughout JasperReports Server that may be difficult to troubleshoot. Before changing any files, back them up to a location outside of your JasperReports Server installation. Do not modify settings not described in the documentation. Even though some settings may appear straightforward, values other than the default may not work properly and may cause errors.
This chapter contains the following sections: • Encrypting Passwords in Configuration Files • Configuring CSRF Prevention
• Configuring Input Validation • Restricting File Uploads • Hiding Stack Trace Messages
• Defining a Cross-Domain Policy for Flash • Enabling SSL in Tomcat
• Disabling Unused HTTP Verbs • Setting the Secure Flag on Cookies • Setting httpOnly for Cookies
• Protection Domain Infrastructure in Tomcat • Encrypting Passwords in URLs
3.1
Encrypting Passwords in Configuration Files
In JasperReports Server version 5.5 or later, administrators can obfuscate passwords that appear in the configuration files. This satisfies security audit requirements and prevents the passwords from being seen by unauthorized individuals. Typically, the following are encrypted:
• The password to JasperReports Server's internal database (jasperserver). • The passwords to the sample databases (foodmartandsugarcrm). • On Tomcat and tcServer, passwords in JNDI resource definitions. You can change the configuration to also encrypt:
• The password for the mail server used by the scheduler (quartz.mail.sender.password) • The password for LDAP external authentication.
Passwords in configuration files are encrypted during JasperReports Server installation. If the installation deploys to the Tomcat application server, the database password is also automatically encrypted in the JNDI configuration (in the file context.xml).
Full password security cannot be guaranteed from within JasperReports Server. A user with sufficient privileges and knowledge of JasperReports Server can gain access to the encryption keys and the configuration passwords. While you could require a password on every server restart, this is impractical for most users. The only practical way to guarantee password security is through backup and restriction of access to the keystore property file.
3.1.1
Encrypting Configuration Passwords on Tomcat (or Spring tcServer)
To encrypt passwords in a Tomcat or tcServer installation, modify the installation procedure: 1. Depending on the database you use, copy the installation configuration file as usual:from: <js-install>/buildomatic/sample_conf/<database>_master.properties to: <js-install>/buildomatic/default_master.properties
2. Edit the default_master.properties file: • Enter values specific to your installation. • Enter your passwords in plain text.
• Turn on configuration file encryption by uncommenting theencrypt=trueproperty. You don't have to uncomment any other encryption properties because they all have the default values shown. • Unless you're using Oracle, uncommentpropsToEncryptand set it todbPassword,sysPassword. • Optionally, specify additional properties to encrypt as described in“Encrypting Additional Properties
in default_master.properties” on page 13.
• Optionally, change the settings for configuration file encryption as described in“Encryption Options” on page 17.
3. Run the buildomatic installation script (js-install) and all other installation steps according to the JasperReports Server Installation Guide. This will have the following effects:
a. The plain text passwords in default_master.properties are overwritten with their encrypted equivalents. There is no warning when you run js-install withencrypt=true.
b. The encrypted passwords are propagated to all configuration files. c. The installation proceeds and copies files to their final locations. 4. After installation, passwords are encrypted in the following locations:
• In JNDI definitions in .../META-INF/context.xml.
• In the default_master.properties files that remain after installation. If you get an error like the following when restarting the server:
javax.naming.NamingException: KeystoreManager.init was never called or there are errors instantiating an instance
you may need to add the following to your Tomcat service start properties:
-Duser.home=c:\Users\<TomcatUser>
3.1.2
Encrypting Configuration Passwords on Enterprise Servers
Most enterprise servers, like JBoss, Glassfish, WebSphere, and WebLogic, have proprietary ways to set up password encryption. You should use these encryption methods. JasperReports Server doesn't automatically set up encrypted passwords for these servers during deployment. In this case, you can encrypt the passwords in the buildomatic file after deployment:
1. Deploy JasperReports Server to your enterprise server as specified in theJasperReports Server Installation Guide. The resulting JasperReports Server instance will have unencrypted JNDI data source passwords. If you want to encrypt these passwords, refer to your application server's documentation.
2. After the server has been successfully configured, encrypt the JasperReports Server configuration files as follows:
a. In default_master.properties, turn on encryption by uncommentingencrypt=true.
b. Run the targetjs-ant refresh-config. This will remove and recreate all the configuration files without deploying them to the application server. Now the buildomatic files will have the database passwords encrypted. You should still be able to execute import/export or other scripts.
Do not runjs-installorjs-ant deploy-webapp-pro. These commands will overwrite the WAR file created in step 1 and render the server data sources inaccessible. If you need to redeploy the WAR file, reset the database password(s) to plain text in your default_master.properties and start again with step 1.
3.1.3
Encrypting Additional Properties in default_master.properties
You can encrypt additional properties in the default_master.properties file. To work correctly, these properties need to be decrypted when used. Currently decryption is supported for properties loaded into the Spring application context via thepropertyConfigurerbean in applicationContext-webapp.xml.
If a property is defined via JNDI, we recommend pointing there instead of encrypting:
<property name="password">
<jee:jndi-lookup jndi-name="java:comp/env/emailPassword" /> </property>
The following code sample shows thepropertyConfigurerbean in applicationContext-webapp.xml:
<bean id="propertyConfigurer"
class-s="com.jaspersoft.jasperserver.api.common.properties.DecryptingPropertyPlaceholderConfigurer"> <property name="locations"> <list> <value>/WEB-INF/hibernate.properties</value> <value>/WEB-INF/js.quartz.properties</value> <value>/WEB-INF/js.spring.properties</value> <value>/WEB-INF/js.scheduling.properties</value> <value>/WEB-INF/mondrian.connect.string.properties</value> <value>/WEB-INF/js.diagnostic.properties</value> <value>/WEB-INF/js.aws.datasource.properties</value> <value>/WEB-INF/js.config.properties</value> <value>/WEB-INF/js.externalAuth.properties</value> </list> </property> ... </bean> </pre>
Because we extended Spring'sPropertyPlaceholderConfigurerclass as
DecryptingPropertyPlaceholderConfigurer, all the loaded properties are scanned for the special marker ENC-<value>-. If that marker is found around the property value, that property is decrypted before it's loaded into Spring context.
To determine if your property is scanned bypropertyConfigurer, search the files inpropertyConfigurer's locations to see if it's defined in one of these files.
For example, suppose you want to encrypt thepasswordproperty of thereportSchedulerMailSenderbean in applicationContext-report-scheduling.xml:
<bean id="reportSchedulerMailSender" class="org.springframework.mail.javamail.JavaMailSenderImpl"> <property name="host" value="${report.scheduler.mail.sender.host}"/>
<property name="username" value="${report.scheduler.mail.sender.username}"/> <property name="password" value="${report.scheduler.mail.sender.password}"/> <property name="protocol" value="${report.scheduler.mail.sender.protocol}"/> <property name="port" value="${report.scheduler.mail.sender.port}"/>
<property name="javaMailProperties"> <props> <prop key="mail.smtp.auth">false</prop> </props> </property> </bean>
The use of the${...}syntax tells you thatreport.scheduler.mail.sender.passwordis most likely defined via thepropertyConfigurerbean. Search through thepropertyConfigurerlocations to verify. This property is defined in /WEB-INF/js.quartz.properties as follows:
report.scheduler.mail.sender.password=${quartz.mail.sender.password}.
Once you've verified that thequartz.mail.sender.passwordproperty can be encrypted using default-master.properties, you set up encryption before installation as follows:
1. Set the password forquartz.mail.sender.passwordin default-master.properties: quartz.mail.sender.password=cleartextpassword
4. Addquartz.mail.sender.passwordtopropsToEncrypt:
quartz.mail.sender.password=cleartextpassword ...
encrypt=true
propsToEncrypt=dbPassword,quartz.mail.sender.password
5. Configure and install your JasperReports Server WAR installation as described in theJasperReports Server Installation Guide.
6. Verify thatreport.scheduler.mail.sender.passwordwas encrypted in both default-master.properties and in /WEB-INF/js.quartz.properties.
3.1.4
Password Encryption for External Authentication
As of JasperReports Server 5.6, you can encrypt the passwords in the external authentication configuration files for LDAP and external database authentication. Here we cover only the encryption of these passwords; for details about configuring external authentication, see theJasperReports Server External Authentication Cookbook.
To enable encryption during installation, property values in the external authentication sample configuration are referenced from other configuration files. For example, if you're using LDAP to authenticate, the sample configuration file contains the following reference to the LDAP password:
<bean id="ldapContextSource"
class="com.jaspersoft.jasperserver.api.security.externalAuth.ldap.JSLdapContextSource"> <constructor-arg value="${external.ldap.url}" />
<property name="userDn" value="${external.ldap.username}" /> <property name="password" value="${external.ldap.password}"/> </bean>
The values referenced by the${...}format are defined in the js.externalAuth.properties file and imported into Spring context via thepropertyConfigurer. For example, the LDAP properties are defined in
js.externalAuth.properties as follows:
external.ldap.url=${external.ldapUrl} external.ldap.username=${external.ldapDn} external.ldap.password=${external.ldapPassword}
The${...}syntax again references other configuration properties that must be set in default_master.properties before installation or upgrade. The following example shows the syntax of the properties in the default_ master.properties file:
external.ldapUrl=ldap://hostname:389/dc=example,dc=com external.ldapDn=cn=Administrator,dc=example,dc=com external.ldapPassword=password
To encrypt the password property, set the following values in default_master.properties before installation or upgrade:
external.ldapPassword=cleartextpassword ...
encrypt=true
propsToEncrypt=dbPassword, external.ldapPassword
During the installation process, the password value in default_master.properties and its reference in js.externalAuth.properties are overwritten with the encrypted value.
If your external authentication is configured to create organizations for external users, and you're using
JasperReports Server 6.0, or later, there is another password to encrypt. When external authentication creates an organization, it uses the information inExternalTenantSetupUserof theexternalTenantSetupProcessor bean to create the organization administrator.
<bean class="com.jaspersoft.jasperserver.multipleTenancy.security.externalAuth.processors. MTAbstractExternalProcessor.ExternalTenantSetupUser">
<property name="username" value="${new.tenant.user.name.1}"/> <property name="fullName" value="${new.tenant.user.fullname.1}"/> <property name="password" value="${new.tenant.user.password.1}"/> <property name="emailAddress" value="${new.tenant.user.email.1}"/> <property name="roleSet"> <set> <value>ROLE_ADMINISTRATOR</value> <value>ROLE_USER</value> </set> </property> </bean>
The values referenced by the${...}format are defined in the js.config.properties file as follows:
## New tenant creation: user config new.tenant.user.name.1=jasperadmin new.tenant.user.fullname.1=jasperadmin ...
new.tenant.user.password.1=jasperadmin new.tenant.user.email.1=
The default values for new tenant (organization) administrators in js.config.properties applyonlyto external authentication. They do not apply to organizations created by administrators through the UI or REST interface.
To encrypt this password, modify the js.config.properties file as follows:
new.tenant.user.password.1=${tenant.user.password}
Then add the following lines to default_master.properties before installation or upgrade:
tenant.user.password=cleartextpassword ...
encrypt=true
propsToEncrypt=dbPassword, external.ldapPassword, tenant.user.password
During the installation process, the password value in default_master.properties and its reference in js.config.properties are overwritten with the encrypted value.
3.1.5
Encryption Options
In buildomatic installation scripts, the passwords are symmetrically encrypted: the same secret key is used for both encryption and decryption. The key and its containing keystore file are randomly generated on each machine during the first JasperReports Server installation. All subsequent JasperReports Server installations on the same server rely on the same keystore; they don't regenerate the key.
The keystore is an encrypted file used to securely store secret keys. JasperReports Server uses keystore properties to access the keystore. Both the keystore and keystore properties files are created by default in the user home directory. Alternatively, before running js-install, you can specify different locations for the keystore and keystore properties files via the environmental variables ks and ksp.
By default, database passwords are encrypted with the AES-128 algorithm in Cipher Block Chaining mode with PKCS5 padding. The AES algorithm is the current industry encryption standard. You can choose to modify the encryption strength by choosing either a different algorithm, a longer secret key size (for example AES-256), or a different encryption mode.
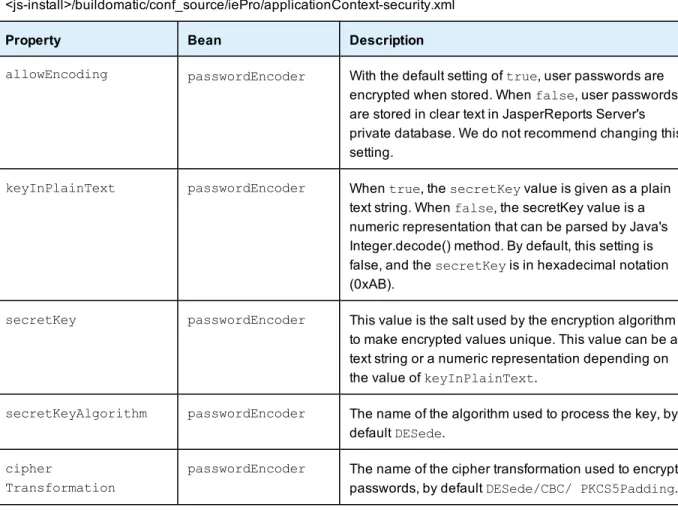
Edit the following properties in your default_master.properties and set these options. If a property is commented out, the default is used:
Property Description Default
build.key.algo Algorithm used to encrypt the properties in configuration files. AES build.key.size Size of the encryption key as in AES-128.
To increase the key size, if it has not been done before, you might have to install "Unlimited Strength Jurisdiction Policy Files" from the Oracle site for your Java version. To install the files, download US_export_ policy.jar and local_policy.jar. AFTER backing up the old files, extract the jars into %JAVA_HOME%/jre/lib/security directory.
Alternatively, you may download one of the reputable providers such as Bouncy Castle (ships with JasperReports Server). You would need to add the Bouncy Castle provider to the list in
%JAVA_HOME%/jre/lib/security/java.security file: security.provider.<seq number>=
org.bouncycastle.jce.provider.BouncyCastleProvider
128 (bits)
enc.transformation So-called encryption mode. See Java'sjavax.cryptodocumentation to understand the modes and padding better.
AES/CBC /PKCS5 Padding enc.block.size The size of the block that's encrypted. Encrypted text can contain many
blocks. Usually the block is changed together with the encryption algorithm.
16 (bytes)
3.2
Configuring CSRF Prevention
Cross-Site Request Forgery (CSRF) is an exploit where the attacker impersonates a valid user session to gain information or perform actions. In JasperReports Server, the security framework protects every page with a CSRF token in the post header, for example:
JASPER_CSRF_TOKEN: BVSY-UBBJ-K8E9-L4NZ-5866-Z4P2-ZG75-KKBW-U53Z-I833-V0OJ-BRK5-OFG5-ZL6X
In the default configuration of the server, CSRF prevention is active. We recommend leaving this setting unchanged:
CSRF Prevention Configuration File
.../WEB-INF/classes/esapi/security-config.properties
Property Value Description
security.validation.csrf.on true<default> false
Turns CSRF prevention on or off. By default, CSRF prevention is on. Any other value besides case-insensitive “false” is equivalent to true.
3.3
Configuring Input Validation
To block potential security threats like cross-site scripting and SQL injection, the security framework validates all user input and values passed to reports. Input validation prevents input with dangerous side-effects like malicious scripts and queries.
Administrators can monitor the server logs to search for evidence of attempted security breaches. However, input that was allowed in previous versions of the server may be blocked, and users may see errors when entering values. In particular:
• Parameter names and values can't have tags (<and>). If your business data contains tags, you need to update the security configuration to allow them.
• SQL queries should start with SELECT and have no comments. Multiple queries separated by semi-colons (;) are also prohibited. If your reports or Domains have such queries, you need to either change them or update the security configuration to allow them.
If users see recurring errors, administrators can examine logs to determine what input is not allowed. Preferably, users should modify their input to remove special characters that are security risks. If that's not feasible, administrators can configure the security framework to modify security rules or turn off the security restrictions, based on their perceived threat level.
Input validation rules were added to comply with security guidelines for web applications. Turning off input validation or modifying the validation rules may make the server more vulnerable to web attacks. Input validation is complex and configured in the following files:
File Contents
<js-webapp>/WEB-INF/classes/esapi/security-config.properties
Top-level configuration for enabling or disabling input validation.
<js-webapp>/WEB-INF/bundles/security.properties Text of validation error messages shown to users.
<js-webapp>/WEB-INF/classes/esapi/security.properties
Defines the input validation rules for each field of the server’s web pages and report input.
<js-webapp>/WEB-INF/classes/esapi/validation.properties
Defines the regular expressions used in security rules.
Input validation is based on UTF-8 encoded input. Make sure your application server is configured for UTF-8 URIs as described in theJasperReports Server Administrator Guide
Input validation is enabled by default when installing JasperReports Server. To turn off one or more of the protection features:
Input Validation Configuration File
.../WEB-INF/classes/esapi/security-config.properties
Property Value Description
security.validation.input.on true<default> false
Turns field input validation on or off for the server web application. Any other value besides case-insensitive “false” is equivalent to true.
security.validation.sql.on true<default> false
Turns SQL query validation on or off in the server. Any other value besides case-insensitive “false” is equivalent to true.
3.3.1
Customizing Security Error Messages
When input validation blocks input that violates a security rule, the server displays a generic error. By default, security messages are intentionally generic to avoid alerting potential attackers to security errors.
We highly recommend that external deployments customize the security error messages to be unique, yet still generic. You can change both the message and the error number. Choose any combination of numbers or letters so administrators can easily search the logs to detect security violations.
Input Validation Messages Configuration File
.../WEB-INF/bundles/security.properties
Property Value
message.validation.input An error has occurred. Please contact your system administrator. (5321)<default>
message.validation.sql An error has occurred. Please contact your system administrator. (6632)<default>
Set these properties to messages and error codes that match the rest of your application. The goal is to display a message that attackers will not recognize as a security error, yet one that administrators can uniquely identify in the logs.
If you translate your application into other languages, be sure to create a locale-specific copy of this file and translate these messages as well.
3.3.2
Editing Input Validation Rules
Input validation rules determine what input is allowed when users send information to the server. This
information generally consists of parameter-value pairs, for example the fields of an input form. For each known parameter-value pair, an input validation rule determines:
• What characters are allowed in the parameter name. • What characters are allowed for the input value.
• The maximum length allowed for the parameter name and the input value (one limit applies to both separately).
• Whether the value can be blank.
Allowed characters are determined by a regular expression called a validator. Validators are named regular expressions that can be used in any number of input validation rules. Although one validator can be used in several rules, each validation rule should be as specific as possible to the allowable input.
The predefined input validation rules in JasperReports Server are designed to allow all data and normal user input, while blocking potential attacks on the server. If your data or your user input causes security errors (false positives), you may choose to modify the input validation rules to allow your input.
1. Locate the "SECURITY FAILURE" message in your logs. For more information about logs, see
"Configuring System Logs" in theJasperReports Server Administrator Guide. The log message contains the name of the parameter and context where the parameter was used.
2. Make a backup copy of the file <js-webapp>/WEB-INF/classes/esapi/security.properties, then open it for editing.
3. Locate the parameter name and context. For example, this is the input validation rule for the entities parameter on the Manage Roles page:
entities=Alpha,AlphaNumPunctuation,5000,true,entities-Manage_Roles_context The input validation rule has the following format:
<parameter>=<nameValidator>,[!]<valueValidator>,<charLimit>,<blankAllowed>,<parameter>-<context>_context
4. Modify the rule to allow your input:
a. Usually, you need to change the value validator to one that allows your input characters. Select a value validator from the file <js-webapp>/WEB-INF/classes/esapi/validation.properties that allows your input, or create one as described in the next section.
b. If your input is atypically long, increase the character limit. c. Do not change any other part of the rule.
5. Save your changes and redeploy the JasperReports Server webapp, or restart your application server. Recommendations:
• Try to keep the character limit as close to the expected value as possible.
• Try to use a validator as close to the expected values as possible. If a parameter's value is expected to be numbers only, use the Numeric validator.
• Most validators are whitelists that specify allowed character patterns. A validator may be preceded by an exclamation point (!) to indicate that everything but those values is permitted. When used with a validator that matches characters or words, this syntax implements a blacklist. Some rules are easier to define as whitelists, others as blacklists.
• If a parameter can have radically different values or the same parameter is used in different situations, you can apply more than one rule to that parameter. To do this, simply copy a parameter rule and add
incremental integers to the parameter name. For example:
standAlone=Alpha,Alpha,50,true,standAlone-Report_PopupMenu_context Updated to:
standAlone=Alpha,AlphaNum,50,true,standAlone-Report_PopupMenu1of3_context standAlone2=Alpha,JSONObject,50000,true,standAlone-Report_PopupMenu2of3_context
standAlone3=Alpha,JSONArray,500000,true,standAlone-Report_PopupMenu3of3_context
With multiple rules for the same parameter, each rule is applied in the order listed until one passes (equivalent to a logical OR). If they all fail, the input is blocked and the user is notified with the generic error message. The rules that fail still appear as security warnings in the logs. Use
numbering in the context names, as shown above, to easily identify these false-positive messages. When using multiple rules, define the most used rule or the most permissive rule first to optimize validation and reduce false-positive log messages.
3.3.3
Creating Validator Expressions
The validators are Java-based regular expressions that specify characters allowed (whitelist) or forbidden (blacklist), depending on how they're used in a validation rule.
Do notmodify the default validator expressions provided with the server. We have thoroughly tested these expressions to provide reasonable input validation security while allowing for the general use of the application. Also, a validator can be used in several input validation rules, so modifying them may have unintended consequences. You shouldalwayscreate new validators with new names.
1. Make a backup copy of the file <js-webapp>/WEB-INF/classes/esapi/validation.properties, then open it for editing.
2. Locate the validator used in the input validation rule you want to modify, for example the Alpha validator expression allows for any letters in any language:
Validator.Alpha=^[\\p{L}\\p{M}]*$
3. Copy the entire rule on a new line and give it a new name with the following format: Validator.<validatorName>=<regularExpression>
Remember to use double backslashes (\\) in properties files for single backslashes in the expression. You should also use the\p{}syntax to match international letters and their accent marks, for example:
Validator.AlphaDotSpace=^[\\p{L}\\p{M}\\.\\s]*$
4. Use the new value validator name in your input validation rule, as described in the previous procedure. 5. Save your changes and redeploy the JasperReports Server webapp, or restart your application server.
3.3.4
Validating New Input Parameters
If you customize JasperReports Server to accept new input parameters, you must add the corresponding input validation rules to maintain server security.
1. Make a backup copy of the file *<js-webapp>/WEB-INF/classes/esapi/security.properties*, then open it for editing.
2. Create a new input validation rule in the following format:
<parameter>=<nameValidator>,<valueValidator>,<charLimit>,<blankAllowed>,<parameter>-<context>_ context
The context is the string that will appear in the log when a security validation error occurs, so make sure it contains the exact parameter name.
3. Look at existing rules in the file <js-webapp>/WEB-INF/classes/esapi/validation.properties to find validators for the parameter name and value that allow your new input. If necessary, create new validator expressions as described in the previous procedure.
4. Save your changes and redeploy the JasperReports Server web app, or restart your application server.
3.3.5
Query Validation
Query validation is a special case of input validation, where the server ensures that all queries being issued by the server meet a preset pattern for a safe query. When query validation is enabled, all queries in reports and Domains use the following validator:
Validator.ValidSQL=^\\s*((?i)select)\\s+[^;]+$
As a result:
• SQL comments are forbidden.
• Ensure that you have only one executable query statement per query. Multiple queries separated by semi-colons (;) will be rejected. The following example will cause a security error:
SELECT f1,f2 FROM tbl_1 WHERE f1=f2; SELCT f3 from tbl_2;
• Queries for reports must retrieve data only, in other words, use only the SELECT statement. The following statements are forbidden:
DROP, INSERT, UPDATE, DELETE
• If you want to use stored procedures, you must add the following validator to the file <js-webapp>/WEB-INF/classes/esapi/validation.properties:
And then modify the validation rule for the corresponding parameter or field where you want to allow stored procedure calls. If you want to allow stored procedure calls in addition to select statements, specify multiple validation rules as shown in section “Editing Input Validation Rules” on page 20.
• When SQL validation fails, the logs contain the message described in“Customizing Security Error Messages” on page 19, such as the following:
2011-11-21 13:54:28,007 ERROR ValidatorImpl,"http-bio-8090"-exec-12:48 - An error has occurred. Please contact your system administrator. (6632)
org.owasp.esapi.errors.ValidationException: SQL_Query_Executor_context: Invalid input. Please conform to regex ^\s*((?i)select)\s+[^;]+$ with a maximum length of 50000
3.3.6
Further Configuration
The configuration files contain some miscellaneous default settings for the security framework. In particular they define default action for input that has no validation rules. Changing these defaults is possible but not
recommended:
Advanced Input Validation Configuration File
.../WEB-INF/classes/esapi/security-config.properties
Property Default Value Description
log.msg.security.off SECURITY for [%s] is OFF If security is turned OFF, this message will be logged. This message in the logs can alert administrators if the security configuration has been tampered with.
msg.no.rule No rule for parameter [%s]. Using default validation on input=[%s].
If a request parameter is not previously known, this message is logged.
msg.cannot.load Security configuration [%s] cannot be loaded.
If there is an error in the security configuration files, this message is logged. This is a severe error and should be resolved by the administrator.
Configuration File
Advanced Input Validation
Property Default Value Description
DEFAULT Alpha,AlphaNumPunctuation
Brackets,200000,true,DEFAULT
If an input parameter has no defined validation rule, this rule is applied. The validator for values,
AlphaNumPunctuation-Bracketsis fairly permissive, and can be changed to something more restrictive. The DEFAULT property name is a keyword and should never be changed.
3.4
Restricting File Uploads
Several dialogs in JasperReports Server prompt the user to upload a file to the server. For performance and security reasons, you may want to restrict file uploads by name and size.
The following setting is the global file upload limit for the entire server. Any single upload that exceeds this limit will trigger an error and a stack trace message. It's intended to be an absolute maximum to prevent a worse out-of-memory error that affects the entire server.
Global File Size Upload Limit Configuration File
…/WEB-INF/js.config.properties
Property Value Description
file.upload.max.size -1
<default>
Maximum size in bytes allowed for any file upload. The default value, -1, means there is no limit to the file size, and a large enough file could cause an out-of-memory error in the JVM. Some file uploads such as importing through the UI are necessarily large and must be taken into account. Set this value larger than your largest expected import and smaller than your available memory.
The following settings apply to most file upload dialogs in the UI, such as uploading a JRXML or a JAR file to create a JasperReport in the repository. These settings in thefileResourceValidatorbean restrict the file size and the filename pattern.
File Upload Restrictions Configuration File
…/WEB-INF/flows/fileResourceBeans.xml
Property Value Description
maxFileSize -1
<default>
Maximum size in bytes allowed for a file uploaded through most UI dialogs. If an upload exceed this limit, the server displays a helpful error message. The default value, -1, means there is no limit to the file size, and an upload could reach the global limit if set, or an out-of-memory error. Usually, files required in resources are smaller, and a limit of 10 MB is reasonable.
fileNameRegexp ^.+$
<default>
A regular expression that matches allowed file names. The default expression matches all filenames of one or more characters. A more restrictive expression such as [a-zA-Z0-9] {1,200}\.[a-zA-Z0-9]{1,10} would limit uploads to alpha-numeric names with an extension.
fileName
ValidationMessageKey
<null/> <default>
The name of a Java property key whose value is a custom message to display when the uploaded filename does not matchfileNameRegexp. For example, you could add the following line to WEB-INF/js.config.properties:
my.filename.validation=The name of the uploaded filename must contain only alphanumeric
characters and have a valid extension.
The following setting restricts the extension of the uploaded file. The upload dialogs will browse only for files with the given extensions. Add or remove extensions to change the file type restrictions:
File Upload Extensions Configuration File
<jasperserver-pro-war>/scripts/resource.locate.js
Property Value
ALLOWED_FILE_ RESOURCE_EXTENSIONS
By default, the following extensions are allowed:
"css", "ttf", "jpg", "jpeg", "gif", "bmp", "png", "jar", "jrxml", "properties", "jrtx", "xml", "agxml", "docx", "doc", "ppt", "pptx", "xls", "xlsx", "ods", "odt", "odp", "pdf", "rtf", "html"
3.5
Hiding Stack Trace Messages
By default, JasperReports Server displays stack traces in certain error messages. Stack traces reveal some information about the application, and security experts recommend that an application not display them. The following setting turns off stack traces in error messages. However, more serious error messages still display Java exceptions without the stack trace.
Hiding Stack Trace Messages Configuration File
.../WEB-INF/applicationContext-security-web.xml
Property Bean Description
showStacktrace Message
webAppSecurity Filter
Set this value to false to prevent stack traces from appearing in error messages.
Restart your application server or redeploy the JasperReports Server web app for this change to take effect.
3.6
Defining a Cross-Domain Policy for Flash
JasperReports Server uses Flash for advanced Fusion-based charts such as gauges and maps. For security reasons, a Flash animation playing in a web browser is not allowed to access data that resides outside the exact web domain where the SWF originated.
As a result, even servers in subdomains cannot share data with a server in the parent domain unless they define a cross-domain policy that explicitly allows it. The file crossdomain.xml, located at the root of the server containing the data, determines which domains can access the data without prompting the user to grant access in a security dialog. Therefore, the server containing the data determines which other servers may access the data.
The following crossdomain.xml sample allows access from only the example domain or any of its subdomains. This example says the server with this file trusts only example.com to use its data.
<?xml version="1.0" ?>
<!DOCTYPE cross-domain-policy SYSTEM
"http://www.macromedia.com/xml/dtds/cross-domain-policy.dtd"> <cross-domain-policy>
<allow-access-from domain="example.com" /> <allow-access-from domain="*.example.com" /> </cross-domain-policy>
Behind a firewall servers and users often refer to other computers in the same domain without using the domain name. Flash considers this a different domain and blocks access to data unless the computer name is given in the policy:
<cross-domain-policy>
<allow-access-from domain="myserver" /> </cross-domain-policy>
When using web services, use theallow-http-request-headers-fromelement so that actions encoded in the request header are allowed. The following example allows standard requests and web service requests from any subdomain of example.com.
<cross-domain-policy>
<site-control permitted-cross-domain-policies="master-only"/> <allow-access-from domain="*.example.com"/>
<allow-http-request-headers-from domain="*.example.com" headers="*" secure="true"/>
</cross-domain-policy>
For a description of all possible properties, see thecross-domain policy file specification.
To define a cross-domain policy for Flash-based reports, create a file such as the ones above on the server containing the data being accessed. Be sure to place the crossdomain.xml file at the root of the filespace being served. For example, if you use Apache Tomcat, place your files in the following locations:
File Location
crossdomain.xml <website-B-tomcat-dir>/webapps/ROOT/crossdomain.xml XML data (*.xml) <website-B-tomcat-dir>/webapps/ROOT/<any-dir>/*.xml Flash component (*.swf) <website-A-tomcat-dir>/webapps/<appname>/<any-dir>
3.7
Enabling SSL in Tomcat
Secure Sockets Layer (SSL) is a widely-used protocol for secure network communications. It encrypts network connections at the Transport Layer and is used in conjunction with HTTPS, the secure version of the HTTP protocol. This section shows how to install SSL on Tomcat 7 and to configure JasperReports Server to use only SSL in Tomcat.
3.7.1
Setting Up an SSL Certificate
To use SSL, you need a valid certificate in the Tomcat keystore. In the Java Virtual Machine (JVM), certificates and private keys are saved in a keystore. This is the repository for your keys and certificates. By default, it's implemented as a password-protected file (public keys and certificates are stored elsewhere).
If you already have a suitable certificate, you can import it into the keystore, using the import switch on the JVM keytool utility. If you don't have a certificate, you can use the keytool utility to generate a self-signed certificate (one signed by your own certificate authority). Self-signed certificates are acceptable in most cases, although certificates issued by certificate authorities are even more secure. And they do not require your users to respond to a security warning every time they login, as self-signed certificates do.
The following command is an example of how to import a certificate. In this case a self-signed certificate imported into a PKCS12 keystore using OpenSSL:
openssl pkcs12 \-export \-in mycert.crt \-inkey mykey.key \-out mycert.p12 \-name tomcat \-CAfile myCA.crt \-caname root \-chain
Next in this example, you create key.bin, the keystore file, in the Tomcat home folder. Use one of these commands.
For Windows:
%JAVA_HOME%\bin\keytool -genkey -alias tomcat -keyalg RSA -keystore %CATALINA_HOME%\conf\key.bin
For Unix:
$JAVA_HOME/bin/keytool -genkey -alias tomcat -keyalg RSA -keystore $CATALINA_HOME/conf/key.bin
The basic install requires certain data. With the above commands, you're prompted for the data:
• Enter two passwords twice. The default for both is “changeit”. If you use the default, be sure to set better, stronger passwords later.
• Specify information about your organization, including your first and last name, your organization unit, and organization. The normal response for first and last name is the domain of your server, such as
jasperserver.mycompany.com. This identifies the organization the certificate is issuedto. For organization unit, enter your department or similar-sized unit; for organization, enter the company or corporation. These identify the organization the certificate is issuedby.
• Keytool has numerous switches. For more information about it, see theJava documentation.
3.7.2
Enabling SSL in the Web Server
Once the certificate and key are saved in the Tomcat keystore, you need to configure your secure socket in the $CATALINA_BASE/conf/server.xml file, where $CATALINA_BASE represents the base directory for the Tomcat instance. For your convenience, sample<Connector>elements for two common SSL connectors (blocking and non-blocking) are included in the default server.xml file that’s installed with Tomcat. They're similar to the code below, with the connector elements commented out, as shown.
<!-- Define a SSL HTTP/1.1 Connector on port 8443
This connector uses the JSSE configuration, when using APR, the connector should be using the OpenSSL style configuration described in the APR documentation -->
<!--<Connector port="8443" protocol="HTTP/1.1" SSLEnabled="true" maxThreads="150" scheme="https" secure="true" clientAuth="false" sslProtocol="TLS" /> -->
To implement a connector, you need to remove the comment tags around its code. Then you can customize the specified options as necessary. For detailed information about the common options, consult theTomcat 7.0 SSL Configuration HOW-TO. For detailed information about all possible options, consult theServer Configuration Reference.
The default protocol is HTTP 1.1; the default port is 8443. The port is the TCP/IP port number on which Tomcat listens for secure connections. You can change it to any port number (such as the default port for HTTPS communications, which is 443). However, note that if you run Tomcat on port numbers lower than 1024, special setup outside the scope of this document is necessary on many operating systems.
3.7.3
Configuring JasperReports Server to Use Only SSL
At this point, the JasperReports Server web application runs on either protocol (HTTP and HTTPS). You can test the protocols in your web browser:
HTTP: http://localhost:8080/jasperserver[-pro]/ HTTPS: https://localhost:<SSLport>./jasperserver[-pro]/
The next step, then, is to configure the web application to enforce SSL as theonlyprotocol allowed. Otherwise, requests coming through HTTP are still serviced.
Edit the file <js-webapp>/WEB-INF/web.xml. Near the end of the file, make the following changes inside the first<security-constraint>tag:
• Comment out the line<transport-guarantee>NONE</transport-guarantee>.
• Uncomment the line<transport-guarantee>CONFIDENTIAL</transport-guarantee>. Your final code should be like the following:
<security-constraint> <web-resource-collection> <web-resource-name>JasperServerWebApp</web-resource-name> <url-pattern>/*</url-pattern> </web-resource-collection> <user-data-constraint> <!-- SSL not enforced --> <!-- <transport-guarantee>NONE</transport-guarantee> --> <!-- SSL enforced --> <transport-guarantee>CONFIDENTIAL</transport-guarantee> </user-data-constraint> </security-constraint>
The termCONFIDENTIALforces the server to accept only SSL connections through HTTPS. And because of the URL pattern/*, all web services must also use HTTPS. If you need to turn off SSL mode, you can set the transport guarantee back toNONEor delete the entire<security-constraint>tag.
3.8
Disabling Unused HTTP Verbs
It's a good idea to disable all unused HTTP verbs so they can't be used by intruders.
In the default JasperReports Server installation, the following HTTP verbs are not used, but they are allowed. To make it easier to disable the verbs, they're listed in a single block of code in <js-webapp>/WEB-INF/web.xml. As in the code immediately above, the URL pattern/*applies the security constraint to all access to the server, including web service requests.
The list is commented out by default because it has not been exhaustively tested with all system configurations and platforms.
After uncommenting the security constraint, your final code should be like the following:
<security-constraint> <web-resource-collection> <web-resource-name>RestrictedMethods</web-resource-name> <url-pattern>/*</url-pattern> <http-method>HEAD</http-method> <http-method>CONNECT</http-method> <http-method>COPY</http-method> <http-method>LOCK</http-method> <http-method>MKCOL</http-method> <http-method>OPTIONS</http-method> <http-method>PATCH</http-method> <http-method>PROPFIND</http-method> <http-method>PROPPATCH</http-method> <http-method>SEARCH</http-method> <http-method>TRACE</http-method> <http-method>UNLOCK</http-method> </web-resource-collection> </security-constraint>
3.9
Setting the Secure Flag on Cookies
JasperReports Server uses cookies in several ways: • userTimezoneanduserLocaleto store user settings
• Repository tree information (all cookies have the prefixtree*)
• Other UI settings such aslastFolderUriandinputControlsPanelWidth
The JSESSIONID cookie is managed by the application server, so its security setting depends on your app server configuration.
Jaspersoft doesn't set the secure flag on these cookies because we don't want to force you to use secure connections. If you want all cookies to be secure, you must customize the source files that create the cookies. This requires the source code distribution and recompiling and building the server app, as described in the JasperReports Server Source Build Guide.
To customize JasperReports Server so cookies are sent only via secure connections: 1. For the time zone and locale cookies, open the following file to edit:
jasperserver-war-jar\src\main\java\com\jaspersoft\jasperserver\war\UserPreferencesFilter.java 2. Locate the following code in 2 locations, one for each cookie, and add the middle line to both:
cookie.setMaxAge(cookieAge);
cookie.setSecure(true); /* requires HTTPS */
httpOnlyResponseWrapper.addCookie(cookie);
For more information, see the JavaDoc for thesetSecuremethod on thejavax.servlet.http.Cookie class.
3. For the repository tree cookies, open the following file to edit: jasperserver-war\src\main\webapp\scripts\tree.nanotree.js 4. Locate the following line in thesetCookiefunction:
var secure = (argc > 5) ? argv[5] : false; Replace the entire line with:
5. For the UI settings cookies, open the following file to edit: jasperserver-war\src\main\webapp\scripts\utils.common.js 6. Locate the following line:
JSCookie.addVar('cookieTemplate', new Template('#{name}=#{value}; expires={expires}; path=/;'));
Modify the line as follows:
JSCookie.addVar('cookieTemplate', new Template('#{name}=#{value}; expires={expires}; path=/; secure;'));
7. Recompile, rebuild, and redeploy the JasperReports Server application.
This acts only on the cookies. Providing a secure connection is up to the client application, usually by configuring and establishing an HTTPS connection, as described in3.7, “Enabling SSL in Tomcat,” on page 27. If no secure connection is established, the cookies with the secure flag will not be sent and user settings won’t take effect.
3.10 Setting httpOnly for Cookies
The application server that hosts JasperReports Server handles the session cookie. To prevent malicious scripts on a client from accessing the user connection, you should set the application server to use httpOnly cookies. This tells the browser that only the server may access the cookie, not scripts running on the client. This setting safeguards against cross-site scripting (XSS) attacks.
The settings for Tomcat are shown below. Consult the documentation for your application server on how to set httpOnly cookies.
3.10.1
Setting httpOnly for Tomcat 7
Tomcat 7 sets httpOnly on session ID cookies by default. However, on some versions of Tomcat 7, a session error will occur while running reports, with the log error “A request has been denied as a potential CSRF attack.” This is caused by a known conflict between security settings in Direct Web Remote library (DWR) 2.x and some versions of Tomcat 7.0.x:
• Tomcat 7 sets httpOnly on session ID cookies to safeguard against cross-site scripting (XSS) attacks. • DWR 2.x uses session ID cookies to safeguard against cross-site request forgery (CSRF).
To work around this problem, you must modify these safeguards by doing one of the following: • Allowing requests from other domains in DWR
OR
• Disabling httpOnly for cookies in Tomcat
For more information on the security impact and relative risks of these two choices, see the Cross-site Scripting and Cross-site Request Forgery pages at theOpen Web Application Security Project (OWASP).
3.10.1.1 Allowing Requests from Other Domains in DWR
DWR is a server-side component used for input controls. By default, DWR uses session ID cookies to prevent cross-site request forgery. You can disable the protection in DWR by setting the
crossDomainSessionSecurityparameter for thedwrservlet in the file <tomcat>\webapps\jasperserver-pro\WEB-INF\web.xml:
<servlet> <servlet-name>dwr</servlet-name> <servlet-class>org.directwebremoting.spring.DwrSpringServlet</servlet-class> ... <init-param> <param-name>crossDomainSessionSecurity</param-name> <param-value>false</param-value> </init-param> </servlet>
3.10.1.2 Disabling httpOnly for Cookies in Tomcat 7
You can disable httpOnly in the file <tomcat>/conf/context.xml:
<Context useHttpOnly="false"> ...
</Context>
3.10.2
Setting httpOnly for Tomcat 6
In Apache Tomcat 6.0.19 or higher, you can enable httpOnly in the file <tomcat>/conf/context.xml:
<Context useHttpOnly="true"> ...
</Context>
3.11 Protection Domain Infrastructure in Tomcat
Legitimate code can be used to introduce harmful measures into the web application. For instance, calls for disk access and calls toSystem.Exitcan be hidden in classpaths. An effective measure against such intrusions is to implement a protection domain. In Tomcat you have to enable the Tomcat Security Manager then edit its parameters according to the requirements of your server environment.
TheProtectionDomainclass encloses a group of classes whose instances have the same permissions, public keys, and URI. A given class can belong to only one ProtectionDomain. For more information on
ProtectionDomain, see theJava documentation.
3.11.1
Enabling the JVM Security Manager
The Security Manager restricts permissions at the application server level. By default, no permissions are disallowed at that level, so legitimate permissions must be specifically added. You must add permissions for JasperReports Server. Doing so does not interfere with server operations because JasperReports Server security restrictions occur on other levels.
Add the enabling code for the Security Manager in the file <apache-tomcat>/conf/catalina.policy. ProtectionDomains can be enabled, as defined in <js-webapp>/WEB-INF/applicationContext.xml, reportsProtectionDomainProviderbean.
To enable the Security Manager and give JasperReports Server full permissions there, add the following code fragment at the end of catalina.policy:
// These permissions apply to the JasperReports Server application grant codeBase "file:${catalina.home}/webapps/jasperserver[-pro]/-" {
permission java.security.AllPermission; };
After enabling the manager, you should add the security parameter to your Tomcat startup command. For example:
<apache-tomcat>\bin\startup -security
If you didn't add the permissions properly, you will receive errors like the following:
Feb 9, 2010 12:34:05 PM org.apache.catalina.core.StandardContext listenerStart
SEVERE: Exception sending context initialized event to listener instance of class org.s-pringframework.web.context.ContextLoaderListener
java.security.AccessControlException: access denied (java.lang.RuntimePermission accessDeclaredMembers) at java.security.AccessControlContext.checkPermission(Unknown Source) at java.security.AccessController.checkPermission(Unknown Source) at java.lang.SecurityManager.checkPermission(Unknown Source) at java.lang.SecurityManager.checkMemberAccess(Unknown Source) at java.lang.Class.checkMemberAccess(Unknown Source) at java.lang.Class.getDeclaredMethods(Unknown Source) ...
3.11.2
Restoring Disallowed Permissions
The file <js-webapp>/WEB-INF/applicationContext.xml defines the permissions allowed for
java.security.Class. You might have to use the file to add permissions disallowed by enabling the Security Manager. On the application level, only specified permissions are granted now, so any application-level
permissions you were using have been disallowed. You must write code that restores them.
To help you restore necessary permissions, the following commented sample code is provided in the
applicationContext.xml file. For instance, to add permission for read/write access to the /temp folder, you would uncomment the code for the bean classjava.io.FilePermission:
<bean id="reportsProtectionDomainProvider" class="com.jaspersoft.jasperserver.api. engine.jasperreports.util.PermissionsListProtectionDomainProvider"> <property name="permissions">
<list>
<!-- no permissions by default -->
<!-- sample permission: read and write to temp folder --> <!--<bean class="java.io.FilePermission">
<constructor-arg value="${java.io.tmpdir}${file.separator}*"/> <constructor-arg value="read,write"/>
</bean>-->
<!-- all permissions can be granted if desired --> <!--<bean class="java.security.AllPermission"/>--> </list>
</property> </bean>