A Taste of E-commerce
Basic Computing
PREFACE...1
MODULE 1 – COMPUTER BASICS...3
PARTS OF THE COMPUTER...4
MICROSOFT OFFICE...6
COMPUTER TERMINOLOGY...6
SWITCHING ON, TURNING OFF...8
WHAT’S ALL THIS ABOUT MEGABYTES AND GIGABYTES?...8
MODULE 2 – USING WINDOWS? ...11
WHAT IS WINDOWS?...12
WHAT IS THE DIFFERENCE BETWEEN 95 / 98 / ME / NT / 2000?...12
THE WINDOWS DESKTOP...13
MOUSE TECHNIQUES...14
HOME WORK PRACTICE – COMBINING MOUSE TECHNIQUES...16
STARTING PROGRAMS...17
EXERCISE 1 –OPENING PROGRAMS...18
SWITCHING BETWEEN WINDOWS...19
WORKING WITH WINDOWS...19
OTHER WAYS TO WORK WITH WINDOWS...21
SCROLLING...22
EXERCISE 2 - PRACTICE SCROLLING...22
EXERCISE 3 – PLAYING WITH WINDOWS...23
MODULE 3 – WORKING WITH FILES AND FOLDERS...24
WHY USE WINDOWS EXPLORER? ...25
EVERYONE KNOWS HOW TO OPEN A FILING CABINET...25
IMAGINE AN OFFICE AT WORK… ...25
WHAT’S THIS ABOUT DRIVES, FOLDERS AND FILES?...26
EXERCISE 4 - CREATE A WORKING FOLDER...28
EXERCISE 5 - SAVING FILES INTO THE RIGHT PLACE...29
SAVE OR SAVE AS? ...31
UNDERSTANDING THE SAVE AS DIALOG BOX...31
EXERCISE 6 - OPENING FILES FROM EXPLORER...33
MODULE 4 – SAFETY CONSIDERATIONS...34 WORKSPACE CONSIDERATIONS...35
Preface
Application and Version Differences
Because of version and preference differences, screen shots and descriptions may differ slightly from what a trainee may experience in the training environment. Where
possible, the manual has been designed with the training environment in mind.
Cat Conatus Support
Cat Conatus offers free phone support for any material covered - and any other questions you may have. Most times a quick phone call will solve the problem and you’ll be on your way.
Contact John Guenther on Mobile: 0412 125 661 Fax: 6425 4005 Office: 6425 9016
Email: [email protected]
If we can’t answer your problem right away, we’ll return your call within 24 hours.
About this Manual
This Manual has been developed for the sole purpose of Online Access Centre courses. It may not be copied without express permission of the author / presenter.
Course Structure
This course contains examples and detailed instructions. A floppy disk is provided to take practice exercises away for future reference.
Course Objectives
This course is designed as an introductory session of people new to computing. Specifically the aim of the course is to:
!"provide foundational skills required to work with a Windows PC
!"enable a user to open programs and manipulate windows
Module 1 – Computer basics
In this module you will learn about
!"Parts of a computer
!"Software types
!"The right way to turn a computer off or on
Parts of the computer
Computers are not like toasters!
You buy a toaster and it continues to toast more or less as you expect for the next 10 years and then it dies. Computers are reasonably complex machines – the technology is changing so rapidly that what is cutting edge technology today is stock standard in 6 months. Even though the components described below are standard, you can’t just say like you would of a car: “its got a V6 engine”. But lets put a computer into layman’s language. A computer (otherwise known as a PC) is made up of the following:
!"A box !"A screen
!"Other bits that hang of the box
Let’s take them one by one.
The Box
Now we’ll get a bit more technical!
The motherboard is a circuit board with places for other components to hang off The CPU also known as CPU is a bit like the computer’s brain. It is often
described in terms of processing speed – like 600 MHz
RAM is a bit like the computer’s short term memory – and is usually referred to in terms of Megabyte capacity eg 128MB (we’ll talk about bytes later)
Hard Drive is the computer’s storage space, a bit like a giant electronic filing cabinet. Also referred to in terms of capacity – typically 12 GB (gigabytes)
CDROM ROM stands for Read Only Memory. It’s the place where you put CD’s for example loading programs onto your PC.
Soundcard is the component that enables you to hear various types of sounds.
Video Card the component that allows you to see graphics So that’s the box.
The Monitor
The monitor is a single unit that plugs into the box. It enables you to see what’s going on in your computer!
Other things that hang off the box
These are commonly called peripherals. They include:
Printers which could be a bubble-jet or a laser these days. Bubble-Jets are cheap to buy, produce great colours, but are expensive to run. Lasers are faster, cheaper to run but cost quite a bit more, especially if you want colour.
Scanners allow you to bring an image from a printed page or photo and turn it into something the PC can use. Video Cams, Digital Cameras do the same kind of thing.
Modem allows you to hook up to your phone line to connect to the Internet or send and receive faxes.
Keyboard Still a primary means of telling your computer what to do. Unfortunately you can never tell a computer where to go!
Mouse Another means of telling the computer what to do. There is one other ingredient that makes a computer useful: software.
Software
There are two types of software.
Operating System which helps pull all the bits and pieces together and allows you to see what’s going on and install other software. Your operating
system determines to a large extent what kind of other software you can run.
Application Software is everything else. It includes things like Microsoft Office, Internet browsers, games, accounting packages – you name it!
Microsoft Office
Microsoft Office is a suite of applications designed to cover the majority of needs of most businesses and home users. The latest version, Office 2000 includes 8
applications:
Word for word-processing, writing letters, reports etc Excel spreadsheet for budgets, data analysis and charts Powerpoint for public presentations using OHTs etc.
Access a relational database for keeping track of large and complex lists Outlook email and contact management program
Publisher for desktop publishing FrontPage for web design
PhotoDraw for editing images
It is important to remember that even though this suite is by far the most popular there are lots of others to choose from that do the job almost as well. For the beginner in computing, you can’t go past an all in one type of application like Microsoft Works.
Computer Terminology
Here’s a summary of technical terms often used it’s not essential that you know what they mean, but here they are anyway!
Glossary of Terms
command an instruction you give the computer. Each item on a menu bar has a list of commands that allow you to instruct your application to do certain things.
cut and paste is a way of describing moving files from one place to another default the option that comes up first when you have a choice. When
you first buy software there may be a series of default settings, some of which you may need to change – like the Language used for your spell checker
drive a drive is a storage place on your computer. Commonly these are a hard disk, a floppy disk, a network and a CD ROM.
drop-down list. Whenever you see an ‘upside down triangle there will be a list of options from which you can choose.
file: is any type of program or document stored on your computer or another drive.
hardware: is generally a part of your computer that you can see or touch – like your monitor, printer, scanner, mouse or keyboard
icon: a visual representation of a file, folder, program, drive or any other part of your computer
install: is the term used to describe the way a program or a piece of hardware is setup so you can use it on your computer
network: a system in which a number of independent computers are linked in order to share data and other hardware
peripheral: is another word for an item of hardware
restore: has two possible meanings; the restore button in the top right hand corner of a window changes to a maximise button when a window no longer takes up the whole screen. Restore also refers to removing files from the Recycle bin. When you restore a file
it goes back to where it last came from. You cannot use a file in the Recycle Bin until it is restored.
server: a computer that controls users’ access to a network.
software: is generally a program that works on a computer to perform a certain task – an example of word-processing software is Microsoft Word; an example of accounting software is MYOB
Switching on, turning off
Switching a computer on is simply a matter of finding the right button and pressing it. Once the computer starts you should not have to intervene until you get to a log-on screen which may ask you for a user name and password. If this is the case both will usually be assigned to you by a system administrator.
Shutting down is a different matter. Its important to turn the machine off properly. Once the Windows desktop is showing follow these steps:
1. Click on the button.
2. Choose the Shut Down option:
3. From the Shut Down Windows dialog box choose ‘Shut Down’ and press OK.
4. If you are advised that is OK to turn off the PC, press the OFF switch.
What’s all this about megabytes and gigabytes?
Part of a computer’s specification which you will often read about in advertising
brochures is the amount of hard disk space the machine has. The question often asked is “How much can I put on there before it fills up?”.
A byte is a unit of measure used to refer to storage space on a computer similar to that way that a gram is a unit of weight.
A byte is the equivalent of one character or one dot (pixel) on a picture
The above line has 74 bytes - that includes the spaces and paragraph mark. 1 kilobyte = 1 000 bytes =1KB∗
1 megabyte = 1 000 000 bytes = 1MB 1 gigabyte = 1 000 000 000 bytes = 1GB 1 terabyte = 1 000 000 000 000 bytes = 1TB With that out of the road
1 floppy disk = 1.44 MB 1 CD ROM = 600 MB 1 typical Hard Disk = 10 GB
How much you can put on your computer depends to a degree on what kinds of
software you load onto it. Most applications you buy will take between 50 and 200 MB of Hard Disk space. A 10GB Hard drive therefore will have room for between 50 and 200 programs. The files you create, say in a word processor, are generally quite small compared to the programs and therefore there is room for literally thousands of
documents on a Hard Disk drive. Pictures, movie files and sound files take up lots more space than documents.
To give you an idea of the differences in space used up, lets illustrate it by using a floppy disk for an example. A floppy disk holds 1.44 megabytes – that’s about 1000 pages of plain text (at about 300 words per page). It would hold about 25 pictures (6x4 size on the screen), and about 1 second of movie.
∗ Technically, its actually 1024 bytes to a KB, but it probably is easier to understand if we think of it as
Figure 1- Different ways of filling up a disk
Module 2 – Using Windows
In this module you will learn about…
!"what Windows is
!"what's the difference between Windows 95, 98, ME, NT and 2000
!"what Windows does
!"how Windows works with your computer
What is Windows?
Windows is what we call an operating system. An operating system is a program that "talks" with your computer and tells you what your computer is doing. The operating system is like the foundation stone of your computer - without it your computer would "fall over" and would become useless. You cannot add other programs to your computer unless you have an operating system - and the type of programs you add is determined
by the operating system.
What is the difference between 95 / 98 / ME / NT / 2000?
!"Windows NT / 2000 is designed specifically for use in networked environments
!"Windows 95, 98 and ME (Millennium Edition) are designed more for stand-alone
PCs, though they can be used in a network too.
There have been several progressions or versions of both Windows and Windows NT. The following time line (Figure 2) shows when these versions were introduced. With each new version, new features have been added, and support for new hardware has also been added.
Figure 2 - Windows Timeline
1992 1995 2000
Windows 3.0 Windows 95 Windows 98 Windows Me
The Windows Desktop
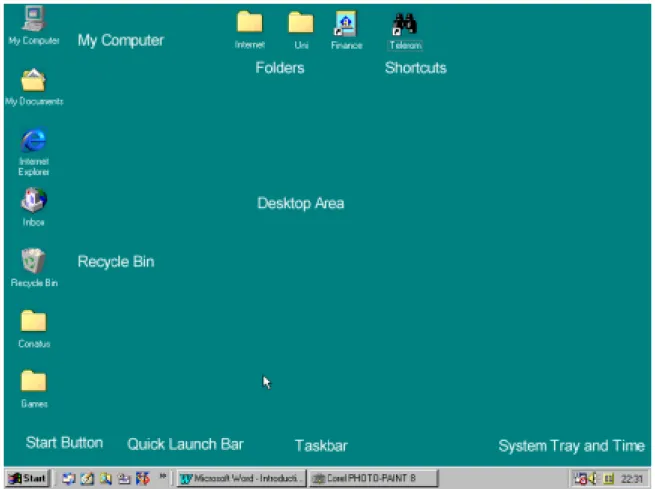
We’ll assume that you can log on to your machine. You may be required to type in a password and username. The use of these should have already been explained. Let’s start by taking a look at the Windows 98 desktop. The good news here is that even if you are using other versions of Windows, you will not notice a real lot of difference between versions. Generally speaking, what you can do in Windows 95, you can also do using the same techniques in Windows NT / 2000 or Windows 95. Your Desktop may look something like Figure 3:
Figure 3 - Typical Windows Desktop
Let’s take a look at each of these items and see what they do. Feel free to click on items you have on your desktop as we go through.
Symbol What it means
The Start button is what you click on to access programs and change your computer’s settings
The ‘Quicklaunch’ bar gives you quick access to your favourite programs. It is new to Windows 98 or Windows 95 with Internet Explorer 4 added
The ‘Taskbar’ at the bottom of the desktop shows what programs you have running.
Folders on your desktop are a convenient way of grouping and storing shortcuts to files or programs that you use regularly.
‘My Computer’ is a standard icon on your desktop used for accessing files, folders and settings which are available to you at your computer.
The ‘Recycle Bin’ is a place for placing unwanted files. Like a real recycle bin, you can retrieve files from there, or you can take your bin out to the dump-master so they are forever gone!
The ‘Desktop’ is the first screen which appears after you log on to your computer
‘Shortcuts’ are links between the desktop and a program or file on your computer. You can normally tell a shortcut from other icons by the little arrow in the bottom left corner.
The ‘System Tray’ sits at the bottom right corner of your desktop. It displays the time and may show if other programs are active.
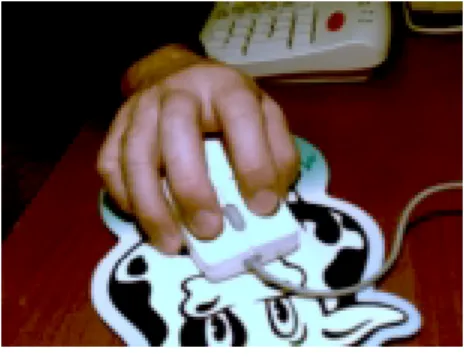
Mouse techniques
Your mouse is one of the main ways you can tell the computer what to do – it is therefore essential that you know how to use it well! When you hold the mouse, hold onto it firmly - it is a reasonably robust device (see Figure 4)
Figure 4 – Hold the mouse firmly on the mouse-pad so that your second and third are over the two mouse buttons
There are three or four types of mouse actions you need to master to get the best out of Windows software. See what happens when you try the following examples…
Action This means Try this… And try this… Single left click selecting an item –
the item is highlighted, but nothing else happens on the My Computer icon
on the Start Button
Double (left) click activating or opening an item using two quick taps
on the Recycle Bin on one of the ‘drive’ icons in My
Computer Right click bringing down a
menu to find a commonly used command for that item
on a blank area of
the desktop on the Start button
Click and Drag clicking and holding down the left mouse button to move an item around the screen
on My Computer to move it to the other side of the screen
on a folder or other icon which may be on the screen
Home work practice – combining mouse techniques
Try this exercise on your PC at home or at work.
1. Right click on a blank part of the desktop and move your mouse over ‘New’. A menu flies out.
2. Left click on ‘Folder’ near the top of the list.
3. A new folder appears on your desktop. While it is highlighted in blue, type your name so the folder is now called by your name.
4. Double click on My Computer. A ‘window’ will appear. You may need to move it out of the way a bit so that you can also see your new folder
5. Drag the new folder over the top of the drive marked ‘(C:)’ so that it is highlighted, then let it go. The folder seems to disappear.
6. Double click on the C Drive and you will find your folder in that drive.
Starting Programs
When programs are installed onto your computer, the set up program usually places a shortcut onto a list on the Start Menu. Its important to remember that these shortcuts are not the programs themselves, they are just a quick means of gaining access to your programs.
To access your programs:
1. Left-click on the button
2. Move the mouse up to Programs (a menu pops out)
3. Click on a folder on the list and then Click on the button for the program youwish to open.
Exercise 1 – Opening programs
1. Click on , move the mouse over Programs, and then up to Accessories.
2. Click on WordPad
3. Repeat the process and open Paint, Notepad and Calculator You should now have four ‘windows’ open.
Depending on how your computer is set up you may end up with something like this with one Window on top of the other:
That’s OK! You can have as many windows open as you like – it is not uncommon to have 10 programs all running at the same time.
Switching between windows
You’ve got all these open windows. How do you move from one to the other? One way is to click on the appropriate button in the Taskbar.
Try switching between the open programs on your computer now. What other ways can you switch between programs?
Working with windows
One of the good things about Windows is that there are a lot of common views and common ways of doing things. That means that when you learn a task in one
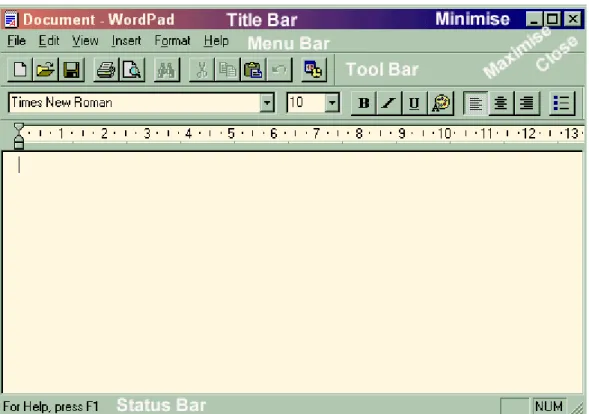
application, chances are, you’ll be able to do the same thing the same way in another application. Figure 5 shows the different parts of a typical window – in this case, the program is Wordpad.
Title Bar Tells you what application and document you have open. You can also use the Title bar to move a window around. Try it with the WordPad window.
Menu Bar Contains a series of command lists which pop out when you click on them. Most applications have a File, Edit, View, Window and Help menu with similar items on them. Take a look at the Word Pad menu and then compare them with another open window. Tool Bar Has buttons on it which if clicked, do commands that are also in
the Menu Bar.
Status Bar May provide additional information when you click on commands in the Menu Bar or when you open up dialog boxes.
Minimise Button Sends the window into the Task Bar. When you do this the program is not closed, it is just hidden. Try it, then try clicking on the program’s button in the Task Bar.
Maximise Button Makes the window fill up the screen. Try this on a window. What happens to the button?
Close Button Closes the program.
Other ways to work with windows
To move a restored window around the screen, click on the Title Bar and drag the window in any direction.
To resize a window, move the pointer to the edge of the window till it becomes a double arrow. Now pull it out or in to make the window grow or shrink.
What happens when you move the pointer to a corner of the window?
When you maximised the window you would have noticed that the buttons in the top right corner changed. What was the Maximise button has now changed to the Restore button? When you click this it returns it back to the size it was before it was
maximised.
Scrolling
You will notice that when there is more than the current window can display, that ‘scroll bar’ appears at the right hand side of the window.
There are two ways you can use this: 1. Drag the large grey section up or down
2. click on the arrow at the top or the bottom of the bar. To scroll up you click on the up pointing arrow. To scroll down click on the down pointing arrow.
Exercise 2 - Practice scrolling
Let’s give this a go using Microsoft Word to show how its done.
1. Double-click on the Word icon on the Desktop.
2. Make sure you are in ‘Print layout’ view. (Click View | Print layout on the menu bar)
3. Click and hold down the down pointing arrow 4. Scroll back up by dragging up the grey bar.
Exercise 3 – Playing with Windows
Choose a program (such as Microsoft Word) from the Start Menu and practice the following techniques:
1. Use the restore button, maximise and minimise buttons 2. Resize windows
3. Use the scroll bars
Module 3 – Working with files and folders
In this module you will learn
!"about Windows Explorer and what you use it for
!"about the difference between files, folders and drives
!"how to create an electronic filing system for your work
Why use Windows Explorer?
Windows Explorer is just a tool for looking at and organising what's inside your computer.
The kind of tasks you might want to do in Windows Explorer include:
!"creating places for your work to sit
!"moving your work from one place to another
!"finding where certain programs or files are kept
!"deleting files you no longer want on your computer
Everyone knows how to open a filing cabinet
We all know that if we don't file papers and work that we do in the right place two things can happen:
1. your desk will get terribly messy and
2. you will soon find it very hard to locate your documents
It's no different on a computer. You can shove everything in the same drawer but soon it will be chockers and you won't know where to find things.
Imagine an office at work…
there are all kinds of places to store things. There might be…
!"a bookshelf
!"a personal filing cabinet
!"someone's briefcase
These all have different purposes but they have one thing in common - they are storage spaces - and they correspond to different types of storage on a computer.
Office Storage Used for… corresponds to… Bookshelf keeping books and
important documents. Note that you don't write in a book, you just read from it. storing your own work
your CD ROM drive - CD's store lots of information, but it is Read Only Memory. CD's make ideal encyclopaedias
Personal Filing Cabinet
You can organise your filing cabinet any way you like and you can even put a lock on it
computer's Hard Drive (often labelled C: or D: in Windows Explorer) You organise it, you can put files and folders wherever you like - and because its your computer with your password, no one else can look in.
Briefcase taking work home with you, or taking the odd document to a meeting
Floppy Disk Drive. Doesn't hold much but good for transferring files around or taking something home to work on
General Office Filing Cabinet
a shared filing cabinet which everyone may have access to - for example it might contain proformas and documents used by the whole organisation. But the boss has the key!
Network Drives may be used for information accessed by the whole office or a work group. The network administrator has the key!
What’s this about drives, folders and files?
When you open Windows Explorer, you will see the drives represented by symbols on the left side of the screen, as shown above. Each of these is a separate storage area, just as filing cabinets, bookshelves, briefcases and cupboards are used in an office.
Folders
Explorer also shows you the folders (which are like drawers in a filing cabinet) where information is stored. Folders are contained in drives. You can organise your work into folders, just as you would organise a filing cabinet with drawers and folders.
Files
Files can be anything from a document, a picture, a video clip, a program, a web page or a host of other things. Files are stored inside folders. You can’t store a file inside a file. In Explorer, the type of file is shown by its icon. Files are shown on the right side of the screen in Explorer. If you choose to show ‘details’ you will get some other information about the files you have.
Exercise 4 - Create a working folder
1. Open Windows Explorer by right-clicking on ‘My Computer’ and choosing ‘Explore’.
2. Look for the folder marked “User Data” on the C: drive
3. Select this folder and choose File | New from the menu bar
4. In the right pane you will see “New Folder”. While this is still highlighted, type in your name.
If you click on the ‘+’ symbol next to User Data on the left side your new folder will appear as if it were open, and on the right hand pane the view will be empty. The folder with your name is the one we will use for the documents you create.
Exercise 5 - Saving files into the right place
Let’s suppose we create a document in Microsoft Word and we want to save it into the folder we created just now – the one with your name on it.
1. Find Microsoft Word in the Programs menu and open it. (or double-click on the icon on the desktop)
2. When you have a blank document in front of you, type “The cat sat on the mat.” 3. Click on the ‘Save’ button:
Tip: you can choose File | Save or File | Save As from the menu bar to do the same thing
The ‘Save As’ dialog box appears.
4. If the the ‘Save in’ box doesn’t show anything familiar (or you can’t see your folder below) you will have to click anywhere in the box and navigate to the appropriate folder in the correct drive. (This is something like closing a drawer in a filing cabinet and reopening another.)
5. When you have located your folder (inside the User Data folder) double-click on the folder with your name and notice that now, the ‘Save-In’ box has your named folder in it. Notice also that by default the name of the file in Word will be the first sentence of the document.
6. Click the Save button, and the document is now saved into your folder.
Notice that in the Title Bar, the document is called “The cat sat on the mat”:
Save or Save As?
The first time you save a document the Save As dialog box comes up regardless of whether you have chosen Save or Save As from the menu bar.
However if you want to save an open document into a different folder or with a different name, you must choose File | Save As from the menu bar. Its just a matter of using the Save in box the same way as shown in step 4 in the previous exercise.
Understanding the Save As Dialog Box
Part of the Dialog Box What it does
The ‘Save in’ drop down list shows where you are about to save your document to. Try clicking on the upside down triangle.
The window below the ‘Save in’ box shows folders and files that are already in the ‘Save in’ box’s folder. To choose one of these folders simply double-click on the folder
You click in the ‘File Name’ box and type an appropriate name for your document. If you want to change the type of file from the default type, click in the drop down list (that’s the upside down triangle) and choose a file type from the list.
If you ever unsure what a particular part of a dialog box means you can click on the question mark(circled). Your pointer will then change as shown in the picture and when you click on a different part of the dialog box, you will get a description of the item selected. Try it!
Exercise 6 - Opening files from Explorer
1. Try opening a file from your folder, by double-clicking it.
Exercise 7 - Opening files from within a program
In this exercise we will open a file from your floppy disk.
1. Start Microsoft Excel (either from the Programs menu or the desktop) 2. From the menu bar choose the Open button
3. Find the A Drive in the ‘Look in’ box
4. Click on the file called ‘Office Expenses’ and click the button. 5. Make some changes to the numbers and see if you can save the spreadsheet into
Module 4 – Safety considerations
In this module you will learn about
!"Setting up your equipment so that it is ergonomically correct
!"Ways to reduce the risks associated with working for long periods in front of a
Workspace considerations
Below are a number of considerations that should be taken into consideration when working at a computer for longer periods of time.
Seating
Seating should be adjusted so that your feet are placed flat on the floor. Make sure your back rest provides adequate support for your back.
Keyboard
The keyboard should be placed directly in front of you so that your wrists are relaxed when at rest.
Mouse
As with the keyboard, you should hold the mouse so that your wrists are relaxed. Refer to Module 3, page 14. You should also keep your mouse clean. This is easy to do. Special computer wipes with Iso-Propyl Alcohol are ideal for this job. Don’t use water or baby wipes.
Monitor
Most monitors have adjustable bases so that you can swivel the screen up and down. The monitor should be placed so that your eyes are directly facing the screen, at a distance you are comfortable with. If you spend lots of time in front of a monitor, it is a good idea to opt for a larger size and one of good quality. Larger, high quality monitors are considerably more expensive than others, but they are worth it in the long run.
Reducing risk
If you experience any difficulties after following these few simple rules, you should seek professional advice from someone who is qualified to advise on workplace ergonomics and Occupational Health and Safety. An Occupational Health and Safety Nurse or your GP should be able to advise you about who is the best person to speak to for advice.
Exercises
There are a number of stretching exercises you can regularly do for your hands, shoulders, back and neck to alleviate the stresses associated with sitting in front of a monitor for long periods of time.
Regular breaks
There is no substitute for regular breaks. No matter how engrossing your work may be, it is a good idea to take a short break from your work station at least every half hour. Make a coffee, stand up and stretch, look out the window for a minute or two, take a short walk - and you will feel a lot better for it!