Heurikon UNIX System V
&
V.2
Reference Guide
System V and V.2
Heurikon Corporation 3201 Latham Drive Madison, WI 53713
(608)-271-8700
Apr 1987
Rev D
1. 2. 3. 4. 5. 6. 7.
Heurikon - Reference Guide
Heurikon Corporation Madison, WI
BOOTING THE SySTEM •••••••••••••••••••••••••••••••••••••••••••••• 2 1.1
1.2 1.3
Winchester Booting •••••••••••••••••••••••••••••••••••••••
Floppy Booting ••••••••••••••••••••••••••••••••••••••••••• Initial System Configuration •••••••••••••••••••••••••••••
3
12 13
POWER-DOWN PROCEDURE •••••••••••••••••••••••••••••••••••••••••••• 14
IN CASE OF TROUBLE •••••••••••••••••••••••••••••••••••••••••••••• 15 15 15 17 18 18 20 3.1 3.2 3.3 3.4 3.5 3.6 THE 4.1 4.2 4.3 4.4 4.5 4.6 4.7 T~ 5.1 5.2 5.3 5.4 5.5 TOUR 6.1 6.2 6.3 6.4 6.5 6.6 6.7 6.8 6.9 6.10 6.11
Cannot Boot •••••••••••••••••••••••••••••••••••••••••••••• Programs that Don't Work ••••••••••••••••••••••••••••••••• Terminal or System Lockups ••••••••••••••••••••••••••••••• System Crashes ••••••••••••••••••••••••••••••••••••••••••• Other Problems ••••••••••••••••••••••••••••••••••••••••••• Reporting Bugs •••••••••••••••••••••••••••••••••••••••••••
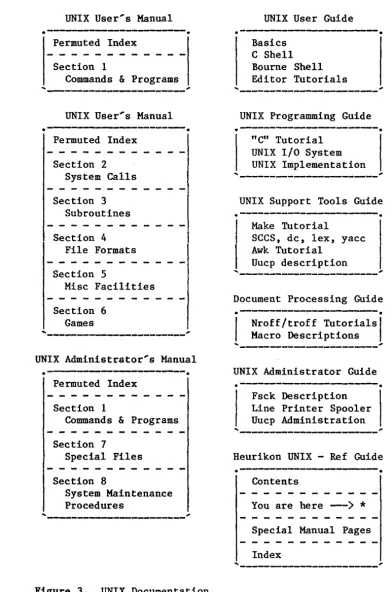
UNIX MANUALS... 21
User's Manual... 21
Adminiscrator~s
Manual... 2S
User Guide... 25Programming Guide... 25
Support Tools Guide... 26
Document Processing Guide... 26
Administrator Guide... 26
UNIX FILE SySTEM... 27
Structure, File and Directory Names... 27
Creating Directories and Files... 28
Typical Organization... 29
Owners and Permissions... 30
Repairing a Damaged File System... 30
OF IMPORTANT FILES... 31
/etc/passwd... 31
/etc/inittab... 32
/etc/gettydefs... 33
/etc/rc... 34
C-Shell Login Scripts... 35
Bourne-Shell Login Scripts... 37
/etc/termcap and terminfo... 38
The Clock Daemon... 38
News... 40
/etc/motd... 41
/dev... 41
8. 9. 10. 7.2 7.3 7.4 7.5 7.6 7.7 7.8 7.9
Csh History Feature •••••••••••••••••••••••••••••••••••••• Wild Cards and Expansions •••••••••••••••••••••••••••••••• Shell Scripts •••••••••••••••••••••••••••••••••••••••••••• Special Characters ••••••••••••••••••••••••••••••••••••••• Redirection of I/O and Pipes ••••••••••••••••••••••••••••• Background Commands •••••••••••••••••••••••••••••••••••••• Use of Shell Variables ••••••••••••••••••••••••••••••••••• Shell Layering •••••••••••••••••••••••••••••••••••••••••••
INTERESTING COMMANDS •••••••••••••••••••••• -••••••••••••• _ ••••••••• 8.1 8.2 8.3 8.4 8.5 8.6 8.7 8.8 8.9 8.10 8.11 8.12 8.13 8.14 8.15 8.16 8.17 8.18 8.19 8.20 8.21 8.22
Process Status ••••••••••••••••••••••••••••••••••••••••••• Change Directory and List •••••••••••••••••• -•••••••••••••• Change Directory and Print Working Directory ••••••••••••• Pattern Search ••••••••••••••••••••••••••••••••••••••••••• Display File Contents •••••••••••••••••••••••••••••••••••• Display Who is Logged On •••••••••••••••••••••••••••••••••
Sleep~ •••••••••••••••••••••••••••••••••••••••••••••••• •••
Display Environment and Shell Variables •••••••••••••••••• Date and Time •••••••••••••••••••••••••••••••••••••••••••• Translate Characters ••••••••••••••••••••••••••••••••••••• Copy. Move and Remove •••••••••••••••••••••••••••••••••••• Display File Types ••••••••••••••••••••••••••••••••••••••• Check Spelling •••••••••••••••••••••••••••••• 0 • • • • • • • • • • • • • Echo Arguments ••••••••••••••••••••••••••••••••••••••••••• Time a Command ••••••••••••••••••••••••••••••••••••••••••• Send Mail •••••••••••••••••••••••••••••••••••••••••••••••• Display Terminal Options ••••••••••••••••••••••••••••••••• Repeat the Previous Command •••••••••••••••••••••••••••••• Display History and Aliases •••••••••••••••••••••••••••••• Correcting Simple Errors ••••••••••••••••••••••••••••••••• Repeating a Command •••••••••••••••••••••••••••••••••••••• Head and Tail ••••••••••••••••••••••••••••••••••••••••••••
OTHER THINGS TO LEARN (TOOLS) ••••••••••••••••••••••••••••••••••• 9.1 9.2 9.3 9.4 9.5 9.6 9.7 9.8 9.9 9.10 9.11 Summary •••••••••••••••••••••••••••••••••••••••••••••••••• Move vs. Copy vs Link •••••••••••••••••••••••••••••••••••• The Visual Editor •••••••••••••••••••••••••••••••••••••••• Other UNIX Editors ••••••••••••••••••••••••••••••••••••••• Compiling a
'c'
Program •••••••••••••••••••••••••••••••••• Linking C, FORTRAN, Pascal and Assembler Programs •••••••• The Make Command ••••••••••••••••••••••••••••••••••••••••• nroff/troff •••••••••••••••••••••••••••••••••••••••••••••• awk •••••••••••••••••••••••••••••••••••••••••••••••••••••• SCCS ••••••••••••••••••••••••••••••••••••••••••••••••••••• Debuggers ••••••••••••••••••••••••••••••••••••••••••••••••ADMINISTRATIVE FUNCTIONS •••••••••••••••••••••••••••••••••••••••• 10.1 Adding New Users - Removing Old Users •••••••••••••••••••• 10.2
10.3
Managing Processes ••••••••••••••••••••••••• : ••••••••••••• Setting /etc/motd ••••••••••••••••••••••••••••••••••••••••
11. 12. 13. 14. 10.5 10.6 10.7 10.8 10.9 10.10 10.12 10.13 10.14 10.15
Garbage Collection ••••••••••••••••••••••••••••••••••••••• Examining Log Files •••••••••••••••••••••••••••••••••••••• Setting the Date and TZ •••••••••••••••••••••••••••••••••• Checking the Nodename •••••••••••••••••••••••••••••••••••• Running Vchk ••••••••••••••••••••••••••••••••••••••••••••• Init ••••••••••••••••••••••••••••••••••••••••••••••••••••• Adjusting /etc/inittab and letc/rc._ •• _ ••• _ •••• ___ ._~. __ =
Mail Aliases (System V.O) •••••••••••••••••••••••••••••••• System Security •••••••••••••••••••••••••••••••••••••••••• System Backups ••••••••••••••••••••••••••••••••••••••••••• Other Things to Watch ••••••••••••••••••••••••••••••••••••
USING FLOPPY DISKETTES AND TAPE ••••••••••••••••••••••••••••••••• 11.1 11.2 11.3 11.4 11.5 11.6
Floppy Disk •••••••••••••••••••••••••••••••••••••••••••••• Streamer Tape •••••••••••••••••••••••••••••••••••••••••••• Reel-to-Reel Tape •••••••••••••••••••••••••••••••••••••••• Media Interchange •••••••••••••••••••••••••••••••••••••••• Backups via Ethernet ••••••••••••••••••••••••••••••••••••• Method Comparison ••••••••••••••••••••••••••••••••••••••••
REBUILDING THE UNIX SySTEM •••••••••••••••••••••••••••••••••••••• 12.1 12.2 12.3 12.4 12.5 12.6 12.7 12.8 12.9 12.10 12.11
Floppy or Tape Rebuilding •••••••••••••••••••••••••••••••• Creating Boot and Rebuild Diskettes •••••••••••••••••••••• Creating Streamer Tape Dumps ••••••••••••••••••••••••••••• Writing the Standalone Boot to Winchester •••••••••••••••• Bad Block Checking ••••••••••••••••••••••••••••••••••••••• Manual Disk Format/Mkfs •••••••••••••••••••••••••••••••••• Changing the Swap Space Size ••••••••••••••••••••••••••••• File System Check, fsck •••••••••••••••••••••••••••••••••• Creative Use of the Rebuild Diskette ••••••••••••••••••••• Winchester Partitioning •••••••••••••••••••••••••••••••••• Multiple Winchester Drives •••••••••••••••••••••••••••••••
ACCESSING I/O DEVICES (DEVICE DRIVERS) •••••••••••••••••••••••••• 13.1 13.2 13.3 13.4 13.5 13.6 13.7 13.8 13.9
phys(2) System Call •••••••••••••••••••••••••••••••••••••• /dev/mem and /dev/kmem ••••••••••••••••••••••••••••••••••• Device Drivers - Reconfiguration Rights •••••••••••••••••• Installing a New Device Driver ••••••••••••••••••••••••••• Removing a Device Driver ••••••••••••••••••••••••••••••••• Hints for Writing a New Device Driver •••••••••••••••••••• Common Device Driver Problems •••••••••••••••••••••••••••• Kernel Routines and Macros ••••••••••••••••••••••••••••••• Kernel Tables ••••••••••••••••••••••••••••••••••••••••••••
I/O ERROR CODES ••••••••••••••••••••••••••••••••••••••••••••••••• 14.1 Winchester Errors •••••••••••••••••••••••••••••••••••••••• 14.2 Reel-to-Reel Tape Errors (MI0) ••••••••••••••••••••••••••• 14.3 Floppy Disk Errors ••••••••••••••••••••••••••••••••••••••• 14.4 Streamer Tape Errors •••••••••••••••••••••••••••••••••••••
15. 16. 17. 18. 19. 20. 21. 15.1 15.2 15.3 15.4 15.5 15.6 15.7 15.8 15.9 15.10 15.11 15.12 15.13 15.14 15.15 15.16 SERIAL 16.1 16.2 16.3 16.4 16.5 16.6 16.7 16.8 16.9 16.10 16.11 DEVICE 17.1 17.2 17.3 17.4
Floating Point Support ••••••••••••••••••••••••••••••••••• SUDH LEDs •••••••••••••••••••••••••••••••••••••••••••••••• User Jumpers and LEDs (MI0) •••••••••••••••••••••••••••••• Using Environment Variables •••••••••••••••••••••••••••••• /etc/update •••••••••••••••••••••••••••••••••••••••••••••• Sticky Bits and Shared Text •••••••••••••••••••••••••••••• Signals •••••••••••••••••••••••••••••••••••••••••••••••••• RAM Considerations ••••••••••••••••••••••••••••••••••••••• Memory Map ••••••••••••••••••••••••••••••••••••••••••••••• Interrupt Usage •••••••••••••••••••••••••••••••••••••••••• DMAC Channel Assignments ••••••••••••••••••••••••••••••••• Making pROMs ••••••••••••••••••••••••••••••••••••••••••••• System V.2 Porting to/from System V.O •••••••••••••••••••• Shared Memory, Semaphore and Messages •••••••••••••••••••• Accessing Kernel Variables ••••••••••••••••••••••••••••••• System V.2 Notes •••••••••••••••••••••••••••••••••••••••••
Standard Ports ••••••••••••••••••••••••••••••••••••••••••• Modem Ports •••••••••••••••••••••••••••••••••••••••••••••• Network Ports •••••••••••••••••••••••••••••••••••••••••••• RS-232-C Connections ••••••••••••••••••••••••••••••••••••• Device File Setup •••••••••••••••••••••••••••••••••••••••• Sample System Configuration •••••••••••••••••••••••••••••• Changing Serial Baud Rates ••••••••••••••••••••••••••••••• The UUCP System - Hints •••••••••••••••••••••••••••••••••• 'Cu' Usage ••••••••••••••••••••••••••••••••••••••••••••••• The LP Spooler Logic ••••••••••••••••••••••••••••••••••••• Stty Options •••••••••••••••••••••••••••••••••••••••••••••
NUMBERING AND NAMING CONVENTIONS ••••••••••••••••••••••••• Device Numbers and Types ••••••••••••••••••••••••••••••••• Major Device Numbers ••••••••••••••••••••••••••••••••••••• Minor Device Numbers ••••••••••••••••••••••••••••••••••••• Device Naming Conventions ••••••••••••••••••••••••••••••••
REFERENCE MATERIALS •••••••••••••••••••••••••••••••••••••••••••••
APPENDIX A - Changing HK68 Serial Baud Rates •••••••••••••••••••• 19.1 19.2 19.3 19.4 19.5 Background ••••••••••••••••••••••••••••••••••••••••••••••• MI0 and VI0 Baud Rates ••••••••••••••••••••••••••••••••••• Changing the Hbug Configuration Word (MI0, VI0) •••••••••• SBX-SCC Expansion Module Configuration ••••••••••••••••••• V20 and M220 Default Baud Rates ••••••••••••••••••••••••••
APPENDIX B Sed, Awk Usage Examples ••••••••••••••••••••••••••••
APPENDIX C - Other Information •••••••••••••••••••••••••••••••••• 21.1
21.2
Additional Documentation ••••••••••••••••••••••••••••••••• Unsupported Commands •••••••••••••••••••••••••••••••••••••
22.
23.
24.
READER COMMENT FORM •••••••••••••••••••••••••••••••••••••••••••••
COMMAND PAGES •••••••••••••••••••••••••••••••••••••••••••••••••••
INDEX ••••••••••••••••••••••••••••••••••••••••••••••••••••••••••• 191
193
Figure 1.
Figure 2.
Figure 3.
Figure
4.
Figure 5.
Figure 6.
Figure 7.
Figure 8.
Figure 9.
Figure 10.
Figure 11.
Figure 12.
Figure 13.
Figure 14.
Figure 15.
Figure 16.
Figure 17.
Figure 18.
Figure 19.
Figure 20.
Figure 21.
Figure 22.
Figure 23.
UNIX Startup Sequence - Flowchart... 6
Permuted Index... 21
UNIX Documentation •••• '. • • • • • • • • • • • • • • • • • • • • • • • • • • • • • • • • • • 21 Typical UNIX Directory Structure... 29
/etc/passwd file (typical)... 31
/etc/inittab file (typical)... 32
/etc/gettydefs file (typical)... 33
/etc/rc file (typical)... 34
/etc/cshrc file (typical)... 35
.cshrc file (typical)... 36
.login file (typical)... 36
fetc/profile file (typical)... 37
.profile file (typical)... 37
/etc/termcap file - portion ••••••••••••••••••••••••••••••
crontab file (typical) •••••••••••••••••••••••••••••••••••
/usr/adm/cronlog file (typical) ••••••• ~ ••••••••••••••••••
calendar file (typical) ••••••••••••••••••••••• ' •••••••••••
/bin/calendar -Day enhancement •••••••••••••••••••••••••••
/dev directory (typical) •••••••••••••••••••••••••••••••••
'whereis' script •••••••••••••••••••••••••••••••••••••••••
'vmail' script •••••••••••••••••••••••••• ~ ••••••••••••••••
Linking Languages C fragment (c.c) •••••••••••••••••••••
Linking Languages - FORTRAN fragment (fort.f) ••••••••••••
38
38
39
39
40
41
44
45
61
Figure 24.
Figure 25.
Figure 26.
Sample makefile {C programs) •••••••••••••••••••••••••••••
Sample makefile (nroff files) •••••••••••••••••••••••••••• 61
63
63
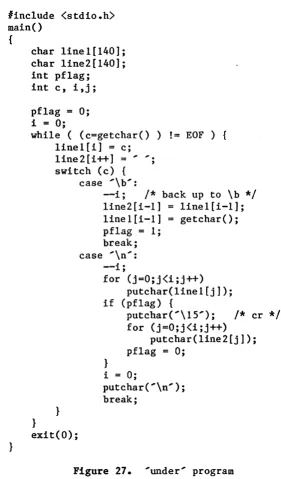
Figure 27. 'under' program... 66
Figure 28. Adduser script... 72
Figure 29. log files... 74
Figure 30. /etc/chgnod change... 76
Figure 31. Script for Incremental Backup ••••••••••••••••••••••••••• 87 Figure 32. Rebuild Media Diagram - Typical... 93
Figure 33. Winchester Partitions... 105
Figure 34. Multiple Drive Configuration - Typical... 106
Figure 35. Figure 36. 'phys()' system call ••••••••••••••••••••••••••••••••••••• 'jumper.c' program (M10. V10) •••••••••••••••••••••••••••• 107 108 Figure 37. Device Driver and Kernel Hooks (Summary)... 113
Figure 38. System V Physical Memory Map (MlO. VIO)... 132
Figure 39. System V.2 Physical Memory Map (V20)... 133
Figure 40. Semaphore and Shared Memory Example Program... 140
Figure 41. nlist(3) example... 141
Figure 42. Serial Port Minor Device Format... 155
Figure 43. Sample Network Configuration... 156
Figure 44. /usr/lib/uucp/L.sys file... 163
Figure 45. /usr/lib/uucp/L-devices file... 163
Figure 46. /usr/lib/uucp/USERFILE file... 163
Figure 47. /usr/spool/lp directory ••• ~... 168
Figure 48. Sample LP Interface Program... 169
Figure 50.
Figure 51.
Figure 52.
Nroff INDEX script part 1 ••••••••••••••••••••••••••••••
Nroff INDEX script - part 2 ••••••••••••••••••••••••••••••
184
185
Table 1. Quick Summary - Boot Procedure •••••••••••••••••••••••••••• 3
Table 2. Initial System Configuration •••••••••••••••••••••••••••••• 13
Table 3. file name-forms ••••••••••••••••••••••••••••••••••••••••••• 27
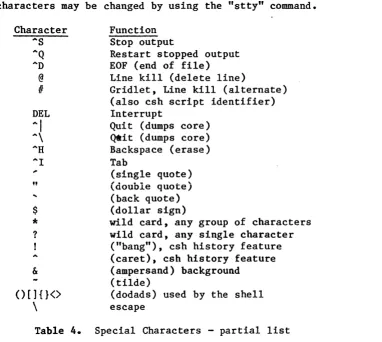
Table 4. Special Characters - partial list ••••••••••••••••••••••••• 46
Table 5. 'vi' command summary •••••••••••••••••••••••••••••••••••••• 57
Table 6. Floppy Diskette Capacities (Blocks) ••••••••••••••••••••••• 84
Table 7. Reconfiguration Rights - Contents (partial) ••••••••••••••• 111
Table B. Kernel Routines and Macros (part 1) •••••••••••••••••••••••
lIB
Table 9. Kernel Routines and Macros (part 2) ••••••••••••••••••••••• 119
Table 10. Kernel Routines and Macros (part 3) ••••••••••••••••••••••• 120
Table 11. Kernel Routines and Macros (part 4) ••••••••••••••••••••••• 121
Table 12. Kernel Routines and Macros (part 5) ••••••••••••••••••••••• 122
Table 13. SCSI I/O Errors ••••••••••••••••••••••••••••••••••••••••••• 124
Table 14. Reel-to-Reel Tape Errors, Ciprico Tapemaster (MIO
only)... 125
Table 15. Floppy Errors (SBX-FDIO only) ••••••••••••••••••••••••••••• 126
Table 16. HK68 Status LEDs •••••••••••••••••••••••••••••••••••••••••• 127
Table 17. Signals ••••••••••••••••••••••••••••••••••••••••••••••••••• 130
Table 18. DMAC Channel Assignments •••••••••••••••••••••••••••••••••• 134
Table 19. Ven-Tel 212-4 Modem Switch Settings ••••••••••••••••••••••• 146
Table 20. Hayes Smartmodem 1200 Switch Settings ••••••••••••••••••••• 147
Table 21. Hayes Smartmodem 1200 Wiring •••••••••••••••••••••••••••••• 147
Table 23. US Robotics Password Modem Wiring ••••••••••••••••••••••••• 147
Table 24. Novation Modem Switch Settings •••••••••••••••••••••••••••• 148
Table 25. Novation Modem Wiring ••••••••••••••••••••••••••••••••••••• 148
Table 26. Connection to a Data Terminal Device •••••••••••••••••••••• 150
Table 27. Connection to a Data Set (Modem) •••••••••••••••••••••••••• 150
Table 28. HK68 RS-232-C Interface •••••• -.. ••••••••••••• ••• ••••••••••• 151
Table 29. CDC Eight Channel Expansion RS-232-C Interface •••••••••••• 152 Table 30. Serial Port Connections ••••••••••••••••••••••••••••••••••• 153 Table 31. /dev/tty nodes (M10 Example) •••••••••••••••••••••••••••••• 154 Table 32. Sample Network Configuration •••••••••••••••••••••••••••••• 156 Table 33. 'stty' options •••••••••••••••••••••••••••••••••••••••••••• 170 Table 34. Major Block Device Numbers... 173
Table 35. Major Character Device Numbers (RAW)... 173
Table 36. Serial Port Device Assignments (on-card)... 174
Table 37. SBX-FDIO Minor Device As.signments {MI0) ••••••••••••••••••• 174 Table 38. OMTI 5400 - Winchester Minor Device Numbers (MIa, VI0,
M220)... 175
Table 39. OMTI 5400 - Floppy Minor Device Numbers (MI0, VIa,
M220)... 175
Table 40. OMTI 5400 Floppy Type Values (M10, VIO, M220) ••••••••••• 175 Table 41. OMTI 5400 - Streamer Minor Device Numbers (MIO, VIO, M220)... 175
Table 42. mknod Device Summary - Partial... 178
Table 43. Device Naming Conventions... 179
Table 44. Hbug Configuration Word Values... 182
Table 45. Hbug Configuration Word Detail... 182
System V and V.2
Welcome to UNIX.
If you are a first time user, there are many interesting things ahead to learn. In fact, whether you're a beginner or an expert, you will always be learning new things about UNIX. Don't let the apparent complexity scare you; one key to understanding UNIX is to realize that you don't have to learn everything. You only need to learn a few basic commands and know where to look for additional information about new or unfamiliar areas=
This Guide is written for the novice, but it is also useful for the experienced user, because it describes the specific characteristics of our implementation. Use the table of contents and the index to find particular areas of interest. If you are a beginner, be sure to read "UNIX for Beginners" in the UNIX User Guide.
This guide is only a supplement to the UNIX manuals. Our objectives are to:
Go Document Heurikon specific features and procedures. In particular, the methods used to load, backup and rebuild the UNIX system are detailed. We've included information about how to configure the serial ports for connection to a modem, a printer or another processor.
~ Document general UNIX features for the beginner. As an example, we discuss the purpose and formats of some of the system configuration files. These files allow you to alter the operation of UNIX to fit your own personal tastes. We have also included a detailed description of the UNIX manual set, so you will know how to make the most use of them.
~ Document administrative functions. There should always be one person assigned to a system who is responsible for its proper operation. That person,' the "system administrator", adds new users, modifies features that effect all users, does file backups and generally assures that the system is in good shape. That job usually requires a few minutes each day to browse through the system, looking for irregularities.
This guide covers UNIX software topics and a few hardware issues. For specifics on particular hardware characteristics, refer to the appropriate hardware manuals.
1 RK68 and Hbug are trademarks of Heurikon Corporation. 2 UNIX is a trademark of AT&T Bell Laboratories.
BOOTING THE SYSTEM
1. BOOTING THE SYSTEM
This section describes the procedure to use to boot and start the UNIX operating system. We'd really like you to skim all the manuals arid documentation before you start using the system, but we are realists. That's why this section comes first.
The standard method of booting is directly from the Winchester drive. When Heurikon ships a system, the Winchester already contains the bootstrap loader and the complete UNIX system.
In this guide, operator inputs are underscored and/or enclosed in single quotes (e .g., 'bw') and must be followed by a carriage return. For clarity, the act of entering a carriage return is not explicitly stated on most steps; but, you must do so in order for your command to be
recognized.
If you make a typing mistake while entering a UNIX command, you can use the backspace key (or the Control-H key) to backup one character. To erase the entire line, hit the "@" key or the "DEL" key. To cancel a command after it has been entered, hit the "DEL" key.
CAUTION ITEMS:
~ After unpacking your system, allow it to reach normal room temperature before applying power. Allow at least 24 hours after receipt for environmental stabilization to prevent damage due to condensation. Extremes of temperature or humidity can damage the unit.
G- Static discharges can easily damage electronic components. Do not handle the circuit boards unless absolutely necessary, and then only for as short a time as possible. Do not wear static producing clothing. Before you touch a circuit board, discharge your body by touching the system chassis first. And please, don't hand boards around from person to person •
• Avoid physical shocks, which might cause the Winchester's read/write head to hit the surface of the media. Do not move the system while power is on. When power is off, the heads are brought to a "safe" zone.
BOOTING THE SYSTEM
1.1 Winchester Booting
Condition/Prompt
Some LEDs come on Hbug prompt, ")"
Operator Response Turn Power on Push Reset PB Wait 30 sec for
drive stabilization
"Standalone boot :"
tI • • • RETURN to start at ...
UNIX prompt, "11"
" ••• date correct?" "Enter correct date:" ... date correct?"
... check file systems?" "Phase
I, 2, 3, 4, 5 ...
"login:"Password: " "TERM 925"
UNIX prompt,
"%"
or"U"
<CR) <CR) .... init 2' .... n ...
MMDDHHMM
.... y ....
.... y ....
(logname) (password) .... dumb ....
U<CR)" means enter only a carriage return
Table Ie Quick Summary - Boot Procedure
[1) Apply power and push the system reset button.
e
CAUTION. Be certain your system is not at an extreme temperature. All parts of the system, including the internal drives, must be at normal room temperatures before applying power.[2] When power is applied, or .after a hardware reset, the HK68 is executing instructions from the Hbug monitor pROM. It is generally a good idea to manually push the system reset button after applying power, even if you have the Hbug prompt, just to be certain that all I/O devices are properly initialized. The prompt from the Hbug monitor will look something like this:
Heurikon Corporation Hbug
Ver x.y )
[image:15.613.100.496.107.494.2]4
BOOTING THE SYSTEM
'uc' 'um' 'dm adrs' 'sb adrs' 'c adrs' 'bw' 'bf' 'bsf'
Print HK68 Configuration Perform RAM test
Display Memory
Substitute Byte at adrs Call Routine at adrs Boot from Winchester
Boot from floppy (MIO, SBX-FDIO) Boot from floppy (SCSI)
Refer to the Hbug manual for a complete listing of the commands and more details. If you do not receive a prompt after pushing the reset button, check these items:
$ The power switch must be all the way in the ON position, the
line cord must be firmly inserted at both ends, the fuse must not be blown and the line voltage selector (near the fuse) must be set correctly.
$ The fan must be working. Do not operate the unit if the fan is
not functioning properly.
$ If the fan is running, push and release the reset button and
observe .the status LEDs on the HK68. The
"s"
(Supervisor) LED near the corner of the HK68 or on the front panel should be on. The "S" LED means that Hbug is running. The "H" LED should go on only when the reset button is pressed.• If the "H" (Halt) LED is always on, then the HK68 is not executing instructions, which is indicative of a loose board on the bus or a hardware problem on the HK68. Remove all boards from the system, except for the HK68, and try running the system again. If that does not help (H LED still on), then remove the HK68 and check that all chips are firmly in place. CAUTION: Static discharges can damage components on the HK68.
• Check that the serial cables are properly attached to the HK68. Also check that the external cables are connected to your terminal correctly. Try your terminal on the other serial ports. Refer to section {16} and the appropriate hardware manual and drawings for details.
• Check the setting of your terminal options. Unless you made a special order, the monitor program will be transmitting the prompt at 9600 baud. If you get some characters, but they are garbage, your baud rate is probably incorrect.
$ Check that the RS-232-C control signals (RTS, CTS, DTR, DSR)
BOOTING THE SYSTEM
Pin Connection
2 Transmit data, from the terminal. 3 Receive data, to the terminal. 4 RTS, from the terminal or connect
to pin 5. Must be true. (Not required on HK68/V20) 5 CTS, to the terminal.
True if Hbug is running= 6 DSR, to the terminal.
True if Hbug is running.
7 Ground
20 DTR, from the terminal or connect to pin 6. Must be true. (Not required on HK68/V20)
See section {I6} for more information about the serial ports.
[3] At this point, allow sufficient time for the Winchesters to get up to speed. Depending on the type of drives you have, you should hear a series of clicks or whines as the drives reset themselves. Wait at least 20 to 30 seconds for the drives to stabilize.
[4] Mter you have the Hbug prompt (n>,,), enter .... bw... This will load a short bootstrap program from
a floppy. UNIX will respond:
.&..-"- _ YT..! ___ '1 _ _ _ ..L.. _ _ _
LIlt! W~IlClle~Le.[".
Standalone boot
Use ,,, L-' DL to boot from
Some versions of Hbug have an autoboot feature. If this feature is enabled, then you should not expect the boot prompt; go to step 8.
If you do not get a response, try these checks:
$ Reset the system and enter .... uc ... This will cause Hbug to print
out a summary of the current hardware configuration. This information may help you locate the problem.
$ Check that all cables are properly attached to the HK68 and the Winchester controller.
$ If you do not hear the drive resetting itself after power is
applied, and if the system will not boot, then check all of the Winchester drive and controller power and data cables. See the appropriate hardware manual for cable details.
BOOTING THE SYSTEM
• An "ID not found" error indicates that the form~t information on the drive is not readable. The system will have to be booted from floppy. Refer to sections {1.2} (floppy) and {12}
(rebuilding) for details.
[5] Enter a carriage return to continue the boot process. This will cause the (default) "/unix" file to be loaded and executed. An
input of the form ' / another .unix.... can be used to specify a system file other than the default on drive "wOb".
• If you get a message like "unix not found", the loader cannot find the default /unix file. Reset the system, repeat the above steps and, instead of just hitting the carriage return at this point, try responding '/unix.tp', .... /unix.no tp/, .... or the complete path na~e for any unix file you have on-your system. This will instruct the boot program to load a different ver~ion
of the kernel.
If the boot or kernel programs on the Winchester are corrupted, it may be possible to boot from floppy and correct the problem. If this does not work, then it may be necessary to completely rebuild the system according to section
{I2}.
• A "unix not found" error could be due to the root file system not being at the expected block on the drive, possibly because the drive has been configured with a larger swap space. Try responding with .... wd(O,16000)... (This is automatically done in release 7a an later).
• If you get a "bus error", you probably have a hardware problem, such as bad memory. The bootstrap or file system on the Winchester could also be damaged, in which case you should be
able to boot from floppy.
• Winchester error codes are described in section {14.1}.
[6] The loader will display some messages during the boot process. This information consists of the sizes of the text, data and bss areas of the kernel. This step will take about a minute.
• Then, you may be asked to "Type RETURN to start at
OxIOOO".
If you are so asked, enter another carriage return to start execution of the kernel.[7] The kernel will begin by initializing the various I/O devices. You will get a whole bunch of configuration messages, including the amount of free memory (e.g., "mem-765952M"). Allow another half minute for this step.
BOOTING THE SYSTEM
.~-~~---~~~---.
I
Hbug - HK68 MonitorI
pROM,---'
[4] .... bw .....
---.
I
UNIX Standalone bootI
on disk... - - - -,
[5,7J
I(CR>,
(CR)
- - - ' - - - .
lunix
letc/init Ibin/sh
...
....---[9] 'init 2'
letc/bcheckrc Ibin/fsck
/etc/rc
, ,
---.---.
I
/etc/inittab /etc/getty, - - - ,
[14] login
/bin/login letc/cshrc $HOME/.cshrc $HOME/.login
----.
,
- - - -
,.---
.
I
/bin/csh, ,
---Initialize serial port B
Initialize disk interface Load standalone boot
Initialize SCSI interface Load lunix kernel from disk
Initialize all devices, ints Source of all UNIX life Accept user commands (shell)
Single-user mode
Transition to multi-user
Set date
Check file system(s) Mount file system(s) Start daemons
Multi-user mode
Control file for processes Wait for user login
Process user password set TZ, print /etc/motd User dependent
Set terminal characteristics
Accept user commands (shell)
[image:19.615.88.484.99.694.2]8
BOOTING THE SYSTEM
unresponsive or "stuck" bytes (meaning it has hit the end of contiguous RAM), and initialize the I/O devices. If it cannot do this properly, it mayor may not recognize the problem and generate a specific error message. Be sure all boards are in their proper slots and that all option switches and jumpers on the peripheral boards are set correctly.
0- If your terminal is not configured properly, the system may appear to hang. Check the parity controls of your terminal; configure for eight data bits, no parity.
~ If the system appears to stop after initializing the I/O devices but before the "single user mode" message is displayed, it may be due to the /devfsyscon device node being linked to the wrong tty port. Try hitting the "DELETE" key on the console. If that doesn't help, refer to section {10.10}.
e
If there is a long delay (about five minutes or so) during the boot phase, it may be because your console te rminal does not have DTR and RTS true. Refer to section {16.4}.e
If /etc/init is missing or damaged, you will probably not get a prompt, either. Boot from floppy to check or restore the disk copy of /etc/init.[8] You should receive the standard UNIX super-user prompt
"I".
This indicates that the UNIX shell (the command interpreter) is ready for a command.At this point, you are the "super-user" and are in single user mode. The super-user has access to all files, commands and devices, regardless of the permissions or usual restrictions on them. Because of this, the system is "vulnerable". Therefore, we recommend that the console device be located in a secure area if you have sensitive information stored in your system.
You may want to stay in single-user mode if you are trying to repair damage to the file system or prevent file changes (by another user or by fetc/cron) during a dump. It is not good practice, however, to be super-user all the time, since it is easy to accidentally damage the system by deleting or altering important files •
.. The visual editor, "vi", will not work in single-user mode unless you manually set the TERM environment variable to ,your terminal type. See section {3.5} for details. You can use the other editors, however.
9
BOOTING THE SYSTEM
9
daemons (e.g. j the "cron" program) and removes old log and program
locking files. These scripts are described in more detail later in this guide.
[10] You will be asked if the date and time are correct. They probably aren .... t, so reply .... n... You will then be able to enter the correct date and time using-the following format:
.... MMDDHHMM .... or
.... MMDDHHMMYY ....
where MM is the month (01-12)
DD is the day (01-31) HH is the hour (00-23)
MM 1.S the minute (00-59)
yy is the (optional) year (85-99)
e.g., 01251330 would be
1:30 pm on Jan 25, current year
It is good practice to set the date and time before entering multi-user mode, since doing so later could burden the system. If the date or time is changed in multi-user mode (while /etc/cron is running), cron will try to "catch up" by doing, at once, all of the tasks it should have done between the old and new times.
[11] Next, you will be asked if you want to perform a file system check, "fsck". Respond .... Z ... Fsck will do a file system consistency check. We recommend that you always answer .... y... Otherwise, if the file system is corrupted, using it may damage it beyond easy repair. Fsck will offer to repair any file system problems it detects. This procedure can take from five to ten minutes. The standard output from this command will look like this (some numbers may vary):
**
Phase 1 - Check Blocks and Sizes**
Phase 2 - Check Pathnames**
Phase 3 - Check Connectivity**
Phase 4 - Check Reference Counts**
Phase 5 - Check Free List1833 files 22107 blocks 77455 free
Refer to the fsck documentation in the UNIX "Administrator Guide" for more details •
• If fsck finds a problem, it will print details concerning the trouble (e.g., inode number and file ownership) and offer to fix it for you. Generally, it is safe to respond .... 1. .... to all fsck requests. The fsck documentation contains more details.
BOOTING THE SYSTEM
system reset button and restart this entire boot procedure, including a second file system check (which should find no errors).
• Some fsck messages are only warnings. For example, a message
of the form "Possible File Size Error ••• " is probably not an
error. Do not be concerned if you see one of these. They may
be suppressed by modifying the fsck command used in the startup script.
[12] The system "nodename" will be checked against a value in
/ etc/bcheckrc. The nodename is used by the uucp logic as a host
name; if it is not correct (as would be the case after installing a new /unix file), you will be asked if you would like it fixed.
[13] If /etc/bcheckrc finds no problems, /etc/rc will be run which will
start the standard UNIX daemons (such as update and cron) and mount
any secondary file systems (such as /dev/wlb). These actions may
take up to 30 seconds. Then, you will get the standard UNIX
"login:" prompt, usually preceded by a banner of some sort, which identifies your computer system.
[ 14] To login, enter a valid user name, such as .... rootcsh.... or .... guest ...
The .... who.... command can also be executed at this point, without
logging in, simply by entering .... who .... , assuming the /etc/passwd file
has not been altered to prevent this. The console device usually
logs on as .... rootcsh ...
• The "rootcsh" super-user login will use the C-shell, "csh". The Bourne shell login, "sh"; is .... root .... e Use .... root.... if you
have trouble logging in as "rootcsh":--Refer to section {7} for information on the differences between "csh" and "sh". A super-user login should be used only for system administration
functions, not for normal usage. Also, it is best to use a
regular user login, then history files used by 'last .... and .... Sy ...
• Other login names may be used
previously in the /etc/passwd
administrator, per section
{IO.I}.
if they file
have been
by your
setup system
[15] If there is password protection for the login name which you use,
the system will request your "password:". Enter your correct
.... password.... • Be sure to hit the carriage return key, too. The
system will not echo the characters you type.
[16] You will see the "message of the day", which is contained in
/etc/motd.
BOOTING THE SYSTEM
since UNIX makes a distinction between upper and lower case
characters, even in a password. Also, while entering the
password, you cannot correct typing errors with the backspace key. You must use the If@" and retype the whole password. Or, enter a carriage return and wait for another login prompt.
(17] The operation of the system from this point on is highly dependent
upon the contents of the /etc/cshrc, -/.cshrc and -I.login files,
which are associated with the particular login name you used.. (If-n
means your home directory.)
(18] You may be asked what type of terminal you are using via a message of the form "TEIU1 (925) ". If you are using the type indicated (e.g., a Televideo 925), simply enter a carriage return. If you are
using another type, enter the terminal type code. For example,
, avp' would be an ADDS Viewpoint. This will cause the proper
initialization sequence for your terminal to be used, instead of the
default. It is important for the terminal type to be set properly
since the visual editor ('lvi If) will not work correctly otherwise.
(The line editors "ex" or "ed", however, will still work.)
• If you do not know the proper abbreviation for your terminal, enter 'dumb' and you will be minimally initialized. Later, you can scan through /etc/termcap for the correct entry, or use ned" or uex" to add a new terminal type to the termcap file. You can also modify your .login file to make the terminal selection automatically for you, once you know the· correct
abbreviation. The termcap file contains entries for over 200
terminal types.
[19] At this point, you should be "on-the-air". If you logged in as "rootcsh" or "root", you should have the super-user prompt,
"111.
If you logged in as a normal user, then you will probably have a 11%11prompt. These are the default prompts; they can easily be changed.
You can have your prompt automatically set when you log in by
including the appropriate command in your .login file. See sections
{6.5.2} and {7.2}.
(20] Look in section one of the UNIX User's Manual for descriptions of
the UNIX commands. See section
--r4':ff
of this guide for help inusing the UNIX manuals, section {8} for some simple command
examples and section {I8} for a list of suggested reference books •
• If all else fails, read the instructions!
(21] Some commands or functions are restricted, unless you are the
f1super-user". To become the super-user without logging off, enter
'su rootcsh' and, when prompted, the rootcsh password. Later, to
12
BOOTING THE SYSTEM
12
~ Do not run commands as the super-user any longer than necessary, so as to lessen the chances of accidentally deleting or damaging important files.
[22] To terminate your UNIX session, type 'exit' or 'logout'.
System power down procedures are detailed in section {2} of this guide.
Certain features have been "preset" at the factory. The initial system configuration information can be found in section {1.3}.
1.2 Floppy Booting
These procedures may be used instead of the standard method of booting from the Winchester. Typically, the only reason you would boot from a floppy would be if you are rebuilding your system or trying to recover from a "crash" which wiped out the standalone boot program or a critical file on the Winchester.
These procedures assume some familiarity with the system. Refer to the previous section on booting from the Winchester for help concerning the expected UNIX responses and troubleshooting hints if you encounter problems.
[1] Push the system reset button.
[2] Insert the floppy disk labeled "boot" and close the door. This disk should be write protected.
[3] Enter 'bf'.
[4] When you get the standalone boot prompt (" :") , remove the boot diskette and insert the "rebuild" diskette •
.. If you did not get the standalone boot prompt, remove the diskette and check that it has been properly inserted.
[5] Hit the carriage return key, which will cause the "/unix" file to be read from the floppy. This will take a few minutes to complete.
[6] When you get the UNIX prompt,
"I",
you may execute any command which is contained on the diskette. Not all commands will be available, due to limited space on the diskette.[7] If you are going to rebuild the system, refer to section {12}. Note: Rebuild the system only as a last resort.
13
BOOTING THE SYSTEM
13
rooL I1~e system so that it can be accessed. You can then refer to the Winchester files with the pathname '/floppy/name ••• ' . See section {12.9} for additional information.
If you cannot boot from the Winchester and you feel that the Winchester's file system is okay, then you may have a defective boot program (which is on the first few sectors of the Winchester) or the /unix file on the
Winchester could be bad. Either of these conditions can be corrected
without rebuilding. Section {12.4} explains how to rewrite the bootstrap. See {11.1.3} for help in recovering /unix.
1.3 Initial System Configuration
Certain system features have been configured at the factory, as shown below. Feature uucp cu Ip lpr pass-words log ins
Initial State
nodename
=
"hum"uucp daemons disabled (3)
/dev/tty2 at 1200 baud
enabled
lpsched running
printer "tosh" on /dev/ttyO
off. /dev/lp not created
no passwords required
console speed
=
9600 baud alternate port=
/dev/ttyl modem port = "off"modem speed = 1200 baud other serial ports "off"
daemons cron enabled calendar, 5:00 am atrun twice per hour
accounting off
Files/Commands /etc/bcheckrc /usr/lib/crontab /usr/lib/uucp/L-devices Ipadmin(l) /etc/rc Ipadmin(l) Ipr(l)
Ref Section
16.8 6.8
16.9
i6.iO
16.10
/etc/passwd 6.1
/etc/gettydefs 6.3
/etc/inittab 6.2
/etc/inittab
/etc/inittab, /etc/gettydefs /etc/inittab /etc/rc /usr/lib/crontab /usr/lib/crontab (numerous) 6.4 6.8 6.8 4.7
[image:25.615.79.527.268.729.2]14
POWER-DOWN PROCEDURE
2. POWER-DOWN PROCEDURE
• We do not recommend that you power the system down if you will be using ~again in only a few hours. It is much less traumatic for the equipment to be left on over a weekend than it is to turn power off and on. Also, the UNIX time of day clock and /etc/cron features should be allowed to run normally, so the automatic (preprogrammed) system maintenance functions can operate as scheduled •
• If you plan to move the system, it is advisable to power it down. The media can be damaged if physical shocks cause the Winchester read/write head to touch the disk surface.
Before you reset the system and remove power, it is important that UNIX has wri tten all of its buffers to the Winchester drive. UNIX does not necessarily do a physical disk write at the same time that a program executes a logical "write" system call. If care is not taken, you may lose portions of data which you thought were. written to the disk, but weren't. Also, UNIX maintains information in memory concerning the file system (the iisuper-blockii) which must be written to the drive before the system is stopped.
[ 1] Log off all users but one, usually the console. This step is not strictly necessary, but it insures that other users know the system is coming down. In addition to being courteous, this prevents users from making file changes just prior to stopping the system.
You can do this by entering 'exit' at each terminal or by using the "ps" and "kill" commands at the console. You could also use "wall" to notify all users to logoff and wait for them to do so. Another alternative is to enter 'init s' to force a return to single user mode. See section {IO.10} for-more information about the "init" command.
[2] Enter '~'.
[3] Enter '~' (again). This insures that all UNIX internal buffers are flushed out to the drives. Some people think the second 'sync' command is just superstition. Others explain that the second command insures the first has completed. Anyway, two or more do no harm.
[4] Remove all floppy diskettes or cassette tapes from the drives.
IN CASE OF TROUBLE
3. IN CASE OF TROUBLE
3.1 Cannot Boot
If you cannot boot the system from the Winchester t try to boot from a
floppy t as detailed in section {I. 2} , above. If the standalone boot
program or the /unix file is damaged on the winchester, you will be able to repair the problem without too much trouble. If there is a more severe problem with the file system on the Winchester, then it may be necessary to rebuild it; but, do so only as a last resort since the rebuild procedure is time consuming and will wipe out any recent changes made to your files.
Read the troubleshooting hints given with the instructions on booting the system at the beginning of this guide.
3.2 Programs that Don't Work
Sometimes a previously functional or an original distribution program will refuse to work, no matter how hard you try. Sometimes the error message will be of help, sometimes not. Here are some debugging hints:
• Do you have permission to execute the program? Are you the owner of the file, a member of the group or just !!other!!1 Is l:ne appropr~at:e
execute bit on? Use 'Is -1 pgmname' to check these bits. Change to super-user and try it again. Refer to ls(l) and chmod(l) in the UNIX User's Manual.
• Do, you have permission to search the directories in the program's path? Check the "x" bits using .... ls -1... Change to super-user and try it again.
• Do you have the permissions on your devices set correctly? For example, the ups" command is "suid check". In order for it to work, the /dev/mem and /dev/swap devices must be owned by "check". The floppy or tape devices must be mode 666, or you must be running as super-user, to do floppy disk or tape I/O.
• If the "ps" command produces no output, garbage output or complains about a bad "namelist", then you probably booted a kernel other than /unix. Use the
"-u"
option with "ps" (to specify the kernel file in use) or rename your kernel file to "/unix", if appropriate.• Do you have to be the super-user to execute the program? Change to super-user (via .... su rootcsh') and try it again.
IN CASE OF TROUBLE
• Are you using the correct command format? Check the UNIX User Manual. Try a simpler version of the command.
• Do all the files and directories that the command needs exist and do they have the proper r/w permissions? For example, "/bin/mail" needs the lusr Imail directory with 777 permissions. Check the "FILES" section of the manual page and verify that all files and directories are present.
tt Have you just "installed" the program somewhere, like in lusr Ibin? Execute 'rehash' to make it visible to your csh.
tt Is there another program of the same name earlier in the shell's search path? Use .... ls' to search for such a program or the "whereis" script, shown in figure {20}. Enter the full pathname of the program, as in ' lusr/yourname/a.out' or, if the program is in your current directory, './a.out', instead of just .... a.out'.
tit Maybe there is a csh "alias" for the bad command. Type' alias' to see the current set of aliases. You can use ~unalias cmd~ to remove an alias.
$- Is the program in your search path? Enter .... echo Spath' (csh) or
.... echo $PATH' (sh) to see the path list. You can change the path list by putting a "set" command in your .login file.
• If the program is binary, try 'strings Ibin/pgmname' and check for undocumented files, devices, directories or other programs it is trying to access. This step is not easy to explain since you must use some intuition to figure out what the program is trying to do. To get the hang of this technique, experiment by running "strings" on some familiar programs.
$- If the program generates a "core dump" and all other things have been
checked, try reading another copy of it from the appropriate distribution diskette or tape. You can check if the version you have is okay by using the 'sumdir .... command, and comparing the results with the appropriate line in letc/vchk_tree for that program.
• Does your command line have any special shell characters? You may have to escape the special characters using a pair of single quotes
( .... ) or a backslash ("\"). See section {7.5}.
17
IN CASE OF TROUBLE
3a3 Terminal or System Lockups
If your terminal stops functioning, don't panic, and don't push the reset button. The reset button is always the last resort.--Try these steps to clear the problem:
[1] Enter 'AQ' (Control-Q) in case you have stopped your output with a
ACt
D.
[2] If you are in the "vi" editor, hit ESC twice and try the .... R command. If the screen does not update, enter 'ZZ' to save your file and exit the editor. Do this in case the system is still acting on your commandsj even though you do not see
a
responsee[3] Hit your 'DEL' key to kill the program. If that doesn't work, try entering
'''''1'
(Control-I) to send a QUIT signal to the process.[4] Enter '(LF)reset(LF)' (that's "reset" surrounded by two line feeds). The linefeeds are used here in case the tty modes have been set to prevent a carriage return from terminating a line.
[5] Enter 'stty sane'.
[6] Enter'tset'. Wait 10 seconds.
[7] Hit,carriage return a few times. See if you get a prompt.
[8] Enter 'exit'. listening.
Wait 10 seconds. Maybe your shell is still
[9] Reset your terminal (power it off, then on). Repeat the above steps.
[10] Go to another terminal, login as "rootcsh", execute 'ps -e', find the programs attached to the locked port and kill them. Use 'kill -9 pid'. If you only have one terminal, reconnect it to another serial port. This is why we recommend having gettys on unused ports (see section {6.2}.)
[11] If all of the above fails, now is the time to reset the system. But before you do, enter two "sync" commands at a working terminal, if there is one, or wait 60 seconds. Then, reset the system. (If the system is still running, the /etc/update process will do an automatic "sync" every 30 seconds.)
[12] Reboot and be sure'to run 'fsck'.