BFISD 5084
Basic Four
@Level
4
Utilities
The information contained herein is proprietary to and considered a trade secret of Management Assistance Inc.
All rights reserved. No part of this publication may be reproduced,
recorded or stored in a retrieval system, or transmitted, in any form or by any means, whether electronic, mechanical, photographic, or otherwise, without prior written permission of the Basic Four Information Systems Division of Management Assistance Inc.
All Rights Reserved
SF/SD 5084
Copyright © 1981 by Management Assistance Inc. All specifications are subject to change without notice.
Basic Four and MAl are registered trademarks of Management Assistance Inc.
Printed in the United States of America
BASIC FOUR
LEVEL 4 UTILITIES
USER'S GUIDE
TABLE OF CONTENTS
Page SECTION 1 - INTRODUCTION
Overview. 0 • • • e 0 e o • • • • • • • • • • • • • • 1-1
Sea pe • 0 0 • G C • • ct • • • • 0 • • • • • • • • • • 1-1
Contents . . 0 • • • 0 • • • " • • • • • • • • • • • • 1-1 Related Publications. e 0 0 • • • • • • • • • • • • • 1-2
Conventions . 0 • • • 0 • 0 • • • • • • • • • • 0 • • 1-2
Definitions of Terms. . . 0 • • • 0 • • • • • • • • •
1-3
SECTION 2 - STANDARD UTILITY PROCEDURES
Overview. 0 • • • • 8 • • • • • • • • • • • • • • • • 2-1 Accessing the Level 4 Utilities . . • • . • • • • . . 2-1 Assigning Memory. 0 • • 0 • • • • • • • • • • • • • 2-1
The Main Menu . . . 0 0 • 0 • • • • • • • • • 2-1 Accessing a Utility Group e 0 0 • • • • • • • • • • 2-2 Selecting Parameters . . . • . . . 0 0 •
2-3
Control Key Functions . • . . . • • . • . . .
2-3
Carriage Return and Control Bar I . . . • . . • . • 2-4 Control Bar II. . . • . • . . . • . • . . . • 2-4 Control Bar III 0 0 0 • • • • • • • • • • • • • • • 2-4
Control Bar IV. . . e o . • • • • • 0 • • • • • • • 2-4 Escape Key. . . 0 0 • 0 .. • • • • • • • • • • • • • 2-4 Question Mark . • . . . . G • • • • • • • 0 • • • • 2-4 Output Devices • . . . " 0 • 0 • • • • • • • • • • • • 2-5
Parameter File. 0 • 0 .. • .. • • • • • • • • • • • • • 2-5
SECTION
3 -
DISC UTILITIESOverv iew . . . Q 0 • • • e • 0 • • • • • • • • • •
3-1
Accessing the Disc Utilities . • 0 • • • • • • • • • •3-1
Display Directory utility Q • • • • • ~ • • • • • • •
3-3
Purpose of the Utility. 0 0 • • • • • • • • • • • •
3-3
How to Use the Utility . . • · · · · . 0 • • • • • •
3-3
Effects of the Utility. • 0 • 0 • • • • • • • • • • 3-6
Display/Edit Sectors Utility . • 0 0 • • • • • • • • •
3-8
Purpose of the Utility. a 0 • • • • • • • • • • • •3-8
How to Use the Utility . . . . • . • . . • • • 0 • •
3-8
Effects of the Utility . . . • . . . • • . • . •
3-13
Copy Sectors Utility_ . . • • • • . . . • • • . • . • 3-15
Purpose of the Utility . . • . . • . • . • • • • . • 3-15
How to Use the Utility. 0 0 • • • • • • • • • • • • 3-15
Effects of the Utility . . . • . . • . . • . . .
3-17
Maintain Directory Utilitye 0 • • • • • • • • • • • •
3-18
Purpose of the Utility • . . . • . • . . • • • • . •
3-18
How to Use the Utility • . • • . 0 • • • • • • • • • 3-18
Maintain Gap File Utility . • . . . . • • . • • . • . 3-23
Purpose of the Utility . . . • . . • . . 3-23
How to Use the Utility . . . . • . . . • . . • . • • 3-23
Page SECTION 3 - DISC UTILITIES, Cont.
Change Disc ID/Label Utilityo 0 0 • • e 0 0 • • 0 • • 3-27 Purpose of the Utility. • 0 0 • • • - • • 0 • • • 0 3-27 How to Use the Utility •• 0 • • • • 0 • • • • • • • 3-27 Compact Disc Utility • • • • 0 • • • • • • • • • • • • 3-29
Purpose of the Utility •• 0 0 0 • • • • 0 • • • • • 3-29
How to Use the Utlity • • . • 0 • • • • • • • • • • 3-29 Effects of the Utility. 0 0 • • e 0 0 0 • • • • 0 • 3-31 Error Analysis/Repair Utility . . 0 • • • • • • • 0 • 3-33
Purpose of the Utility • • • • • • • • • • • • • • • 3-33
How to Use the Utility • . • 0 • 0 0 0 • • • • • • • 3-33 Effects of the Utility • • • 0 0 0 • • 0 • • • • • • 3-36 Disc Backup Utility 0 0 • 0 • 0 • • 0 • • • • • • • • 3-41
Purpose of the Utility • • • • 0 0 0 • • • • • 0 • 0 3-41 How to Use the Utility •• e o • • • • • • • • • • • 3-41
Effects of the Utility. • e o . • • 0 • • • 0 • 0 0 3-43 SECTION 4 - FILE UTILITIES
Overv i ew 0 • " 0 e o . 0 • • 0 • • 0 • • • • • 0 • 0 • 4-1 Accessing the File Utilities. • e .. G .. e o . • • • • 4-1
Rename Utility" 0 0 . . . 0 . . . . 0 . . . 4-3
Purpose of the Utility" 0 0 . . . 0 . . . 4-3 How to Use the Utility ... 0 . . . 0 0 • • • . 0 . . . 4-3
Effects of the Utility • . 0 . . . 4-3 Erase Utility e .. 0 .. 0 • & 0 .. 0 0 .. • .. 0 • • • .. .. 4-4 Purpose of the Utility. e • 0 . . . 4-4 How to Use the UtilitYe 0 .. 0 e . . . 4-4
Effects of the Utility ... 0 0 . . . 0 . . . 4-4 Move Utility . . . 0 Q • 0 . . . 0 .4-5
Purpose of the Utility. 0 . . . 4-5 How to Use the Utility ... 0 . . . 4-5 Copy Utility . . . . 0 .. 0 .. 0 . . . 4-9 Purpose of the Utility . . . 4-9
How to Use the Utility.. 0 .. .. .. • • • • • • • • • • 4-9 Compare Utility 0 . . . 0 . . . 0 • • • • • 0 • • 4-13
Purpose of the Utility. 0 • • • • • • • • • • • • • 4-13 How to Use the Utility •• 0 • 0 • • • • • • • • • • 4-13
Effects of the Utility • • • Q • 0 • • • • • • • • • 4-14 File Analysis/Repair Utilityo 0 G • " • • • • • • • • 4-17
Purpose of the Utility •• e Q • • • • • • • • • • • 4-17 How to Use the Utility • • . • 0 0 0 • • • • • • • • 4-17 Effects of the Utility • • • e • • 0 • • • • • • • • 4-18 Examine Data/Keys Utility . . • . . • • • • • • • • • 4-23
Purpose of the Utilityo . • e o • • • • • • • • • • 4-23
How to Use the Utility. 0 • 0 • 0 • • 0 • • • • • • 4-23 Effects of the Util i ty. 0 0 0 0 C • • • • • • • • • • 4-24 Sort Utility . . • • . . • 0 • 0 • • • • 0 • • • • • • 4-26 Purpose of the Utility. .. • • • • • • . • • • . • • 4-26
How to Use the Utility. 0 • 0 e o . • • • • • • • • 4-26
Page
SECTION 5 - FILES UTILITIES
Overv iew Q G .. e G • • .. .. 0 .. 0 0 • • • • • • 0 • • 0 5-1 Accessing the Files Utilities . • 0 .. .. • 0 • • • • • 5-1 Define Utility.. 0 .. .. • • .. 0 • • 0 • • 0 0 • • • • • 5-2
Purpose of the Utility . . . . 0 e 0 0 • 0 • • • 0 • • 5-2
How to Use the Utility. 0 .. e • 0 • 0 0 • • • • • • 5-2
Erase Utility e .. .. 0 .. 0 • 0 • • • • • 0 • 0 • • • • 5-5
Purpose of the Utilitye 0 • • 0 0 • • • • • • • • • 5-5
How to Use the Utility" ... 0 0 • 0 . . . 5-5
Effects of the Utility. 0 .. 0 . . . 0 • • • 5-7
Move Utility.. .. 0 .. • .. • • 0 • 0 • • • 0 • • • • 0 • 5-8 Purpose of the Utility. 0 • 0 . . . 5-8
How to Use the Utility . . . . 0 • • • • • • 0 • • 0 0 5-8
Effects of the Utility .. G . . . 0 • • 5-10
Copy Utility 0 0 .. .. • • • 0 0 • .. • • .. • • • .. .. • .. 5-12
Purpose of the Utility. G .. e e . . . 5-12
How to Use the Utility_ .... & . . . 5-12
Effects of the Utility ... 0 .. 0 .. e . . . 5-14
Compare Utility ... e 0 e . . . 5-15
Purpose of the Utility . . . 5-15 How to Use the Utility . • • 0 0 . . . 5-15
Effects of the Utility . . . 5-17 Maintain Filelist Utility 0 .. 0 . . . 5-18
Purpose of the Utility ... 0 . . . 5-18
How to Use the Utility . . . . 0 . . . 0 • • 5-18
Effects of the Utility ... 0 . . . 5-21
SECTION 6 = PROGRAM UTILITIES
Overview.. .. . .. e o . . • • 0 .. .. 0 .. • • • • • • • .. • 6-1 Accessing the Program Utilities . . . 6-1 Define Program Files Utility . . . 6-2
Purpose of the Utility . . 0 • e o . . . e 6-2
How to Use the Utility. 0 • 0 • $ • • • • • • • • 0 6-2
Cross Reference Programs Utility . . . . 0 • • • • • 0 0 6-5
Purpose of the Utility. 0 0 0 • • • 0 • • • • • 0 • 6-5
How to Use the Utility. 0 • 0 • • 0 • • • • • • • • 6-5
Effects of the Utility. 0 0 • • • • 0 • • • 0 • • • 6-7
Display First Statement Utility G • • • • • • • • • • 6-11
Purpose of the Utility. e 6 • 0 • • • • e • • • • • 6-11
How to Use the Utility . . . 0 e o • • 0 • • • • • • 6-11
Effects of the Utility. 0 . . . 6-13
String Search and Replace Utility 0 • • • • • • • 0 • 6-14
Purpose of the Utility. 0 0 . . . 6-14
How to Use the Utility ... 0 0 0 • • • • • • • • • • 6-14
Effects of the Utility. 0 0 • • • • • • • 0 • • • • 6-17
Compare Programs Utilityo 0 • 0 • • • • • • • • • • • 6-19
Purpose of the Utility . . • . e • • 0 • • • • • • • 6-19
How to Use the Utility . . . 0 0 • • • • • • • • 6-19
Page
SECTION 6 - PROGRAM UTILITIES, Cont.
Renumber Program Utility . . . 6-22 Purpose of the Utility. .. • • .. .. II • • .. .. • • • • 6-22
How to Use the Utility .... II . . . e .. 6-22
Effects of the Utility. • • • • • • • • • • • • • .. 6-24 Merge Program Files Utility • .. .. .. • • .. .. . .. • • • 6-26 Purpose of the Utility . . . 6-26 How to Use the Util it y. • • .. .. • • " • • .. • • • .. 6-26 Effects of the utility. .. • .. • .. .. .. • • • • .. • .. 6-27
SECTION 7 - SYSTEM L~ILITIES
Overview . . . 0 . . . 7-1
Accessing the System Utilities . . . " . . . . 7-1 Set Date and Time Utility e .. • " .. e .. .. • .. .. e .. • 7-2
Purpose of the Utility.. .. .. • " • .. • .. • .. • .. .. .. 1-2
How to Use the Utility. .. • • .. .. . • • • 0 • • .. • 7-2
Display Configuration Utility " • . .. • .. .. .. • .. • • 7-3 Purpose of the Utility G .. " . . . " . . . " . . . 7-3
How to Use the Utility" .. • e .. • .. a • • • " .. • • 7-3
Effects of the Utility. 0 . . . 7-3
Display Memory/Device Usage Utility • .. • • • .. . .. ..
7-5
Purpose of the Utility. 0 .. .. .. • • .. .. • " .. • • & 1-5
How to Use the Utility. .. .. 0 • .. .. • • • . e .. • • ..
7-5
Effects of the Utility. 0 .. e . . . Q e
7-5
Set Printer VFU Utility G O G .. .. • ~ " • .. • • 0 .. •
7-8
Purpose of the Utility ... 8 . . .
7-8
How to Use the Utility. 0 • " . . . s • ~ • 1-8
Effects of the Utility.. .. • • .. " " • • .. • • " .. .. 7-9
BOSS Update Utility . . . 7-10 Purpose of the Utility . . . 7-10 How to Use the Utility. .. • • .. • • • .. • • • • • • 7-10 Effects of the Utility. e o . . . 7-11
Ghost Communication Utility •• " • • • 0 . . . 1-12
Purpose of the Utility. 0 . . . 0 • G • 7-12
How to Use the Utility. .. • • .. • .. • • .. • .. .. • .. 7-12 Set Parameter Defaults Utility . . . ~ " •• 7-14 Purpose of the Utility . . . 0 . . . 0 7-14
How to Use the Utility. 0 . . . " . . . " . . . 7-14 Spooling Control Utility. 0 • 0 • • • .. • • • • " • • 7-20
Purpose of the Utility. e o . . . 7-20
How to Use the Utility.. .. • • e .. .. • • • • • • • • 7-20
SECTION 8 - INFO UTILITY
Overv iew .. .. • Q " • . . . . • . . • • • • • • • • . . . • . . e 8-1
Accessing the Info Utility. D .. • • • • • • • • e • • 8~ 1
SECTION
9 -
UTILITY TOOLSOverview. . • • • • The Utility Tools • Requirements. • • *ALOC • • • • • • *CGAP . . . . • • *DEFx • . • • • • *ERAS • • • • • • *FREE • • • • • • *GAPS • • • • • • *SPAC • • • • • • *UFREE. • • • • •
• • • • • • • • • • • • • • • • • • • • • • • • • • • • • • • • •
SECTION 10 - ERROR HANDLING
• • • • • • • • • • •
Overv iew • • . • 0 • • • • •
Error Handling Procedures • Non-Resolvable Errors • • Resolvable Errors . • • •
• • • • • • • • • • • • • • • • • • • • • • • • • • • • • • • • • • • • • • • • • • • • • • • • • • • • • • • • • • • • • • • • • • • • • • • • • • • • • • • • • • • • • • • • • • • • • • • • • • • • • • • • • • • • • • • • • • • • • • • • • • • • • • • • • • • • • • • • • • • • • • • • • • • • • • • • • • • • • • • • • • • • • • • • • • • • • • • • • • • • Page
• 9-1 • 9-1 • 9-1
· 9-2
· 9-3
· 9-4
· 9-5
• 9-6
· 9-7
· 9-8
· 9-9
.10-1 .10-1 .10-1
Figure 2-1 2-2 3-1 3-2 3-3 3=4 3-5
3-6
3-7
3-8
3-9 ~-10 oJ 3-11 3-123-13
3=14 3-153-16
3-17 3~18 3-19 3-20 3-21 3-223=23
3~24 4=1 4-2 4=3 4-4 4-5 4-6 4-7 4-8 4-9 4-10 4-11 4-12 4-13 4=14 4-154-16
4-17 4-18 4-19 4-20LIST OF FIGURES
Page
Level 4 UTILITIES Main Menu 0 0 G O O 0 • • • • 2-2
DISPLAY DIRECTORY Option Groups . . • 9 0 0 • • 2-3
Disc Roster and DISC UTILITIES Group Menu 0 0 e 3-2
DISPLAY DIRECTORY Option Screen Q 9 0 0 9 • 0 • 3-3
Listing of Selected Program Files by Mask 0 0 Q 3-5
DIRECTORY DISPLAY of Files by Location . . e 0 0
3-6
DIRECTORY DISPLAY of Free Sectors 0 0 Q G e 0 0
3-7
DISPLAY/EDIT SECTORS Utility Option Screen. 0 •
3-8
EDIT SECTORS Screen Display 0 0 0 0 0 0 • 0 0 • 3-11
DISPLAY/EDIT SECTORS Screen Display 0 ~ 0 0 0 • 3-13
COpy SECTORS Utility Option Screen. 0 0 • 0 0 0 3-15
MAINTAIN DIRECTORY Menu 0 0 0 c e o 0 0 0 • 0 0 3-18
INITIALIZE DIRECTORY/DISC Option Screen G 0 e 0 3-19
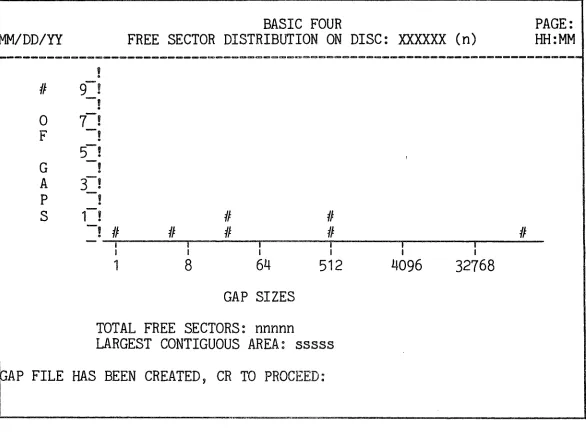
MAINTAIN GAP FILE Utility Option Screen 0 0 0 0 3-24
MAINTAIN GAP FILE Display of Free Sectors e 0 Q 3-25
Distribution Graph of Free Sectors on Disc. e e
3-26
Disc ID and Label Information 0 0 0 0 G a G 0 0 3-27
COMPACT DISC Utility Option Screen . . Q e 0 0 • 3-29
COMPACT DISC utility Printout 0 0 0 G O O 0 0 0
3-32
ERROR ANALYSIS/REPAIR Utility Option Screen 0 •
3-33
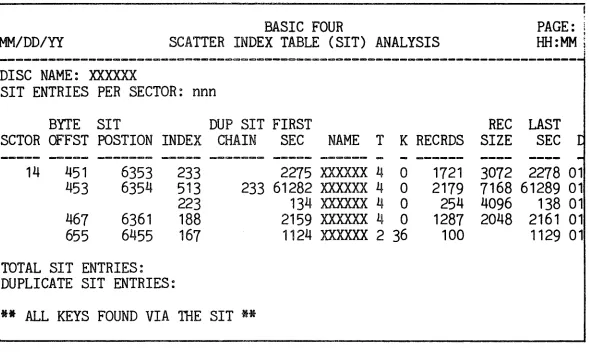
Display of EXAMINE DIRECTORY in BRIEF e 0 0 0 0 3-37
Scatter Index Table Analysis. 0 0 0 0 Q • 0 • 0
3-38
Key Area Analysis Table 0 0 0 0 0 0 0 0 0 0 • 0
3-38
Removed Keys Analysis 0 0 0 0 0 0 0 0 0 • 0 0 0
3-39
Sector Error Analysis 0 0 0 0 0 0 0 0 0 0 0 0 0 3-40
DISC BACKUP Utility Option Screen 0 0 0 0 0 0 0 3-41
File ID and FILE UTILITIES Group Menu 0 0 0 0 0 4-2
MOVE Utility Option Screen 0 0 0 0 0 0 0 0 0 0 0 4-5
File Roster for NEW SIZE Option (MOVE)o 0 0 0 0 4-7
COpy Utility Option Screeno 0 0 0 e 0 0 0 0 0 • 4-9
File Roster for NEW SIZE Option (COpy). 0 0 • 0 4-11
COMPARE Utility Option Screen 0 0 0 0 0 0 • 0 .. 4-13
COMPARE FILES Display==Program Fileso 0 0 0 • • 4-14
COMPARE FILES Display==Indexed Files. 0 • 0 0 • 4-15
COMPARE FILES Display==Direct Files . 0 • 0 0 • 4-16
FILE ANALYSIS/REPAIR utility Option Screen. 0 •
4-17
Display of FILE ANALYSIS/REPAIR in BRIEF . . 0 • 4-20
Scatter Index Table Analysis. 0 0 0 0 0 ~ G e 0 4-21
Key Area Analysis Table 0 0 0 0 G O . 0 0 • • • 4-21
Removed Keys Analysis 0 0 0 0 G O O • • • 0 0 • 4-22
EXAMINE DATA/KEYS Utility Option Screen 0 • • 0
4-23
EXAMINE DATA/KEYS Display of Data 0 • 0 0 0 • 0 4-25
EXAMINE DATA/KEYS Display of Keys. 0 • • 0 0 0 • 4-25
SORT Utility Option Screen 0 0 0 0 • 0 • 0 • 0 • 4-26
Defining a SORT Key by Record Fields. 0 0 0 0 • 4-30
Figure 5-1 5-2 5-3 5-4 5-5 5-6 5-7 5-8 5-9 6-1 6-2 6-3 6-4 6-5 6-6 6-7 6-8
6-9
6-10 6-11 6-12 6-13 6-14 6-15 6-16 7-1 7-2 7-3 7-4 7-5 7-6 7-7 7-8 7-9 7-10 7-11 7-12 7-13 7-14 7-15 7-16 7-17 7-18 7-19 8-1 8-2 PageFILES UTILITIES Group Menu. e o • • • • • • • • 5-1
DEFINE FILES utility File Roster . • . • . • 0 • 5-2
ERASE FILES Utility Option Screen • • • • . • • 5-5 MOVE FILES Utility Option Screen • • . • • • • . 5-8 COpy FILES Utility Option Screen . • 0 • • • • • 5-12
COMPARE FILES Utility Option Screen . • • • • • 5-15 MAINTAIN FILELIST Utility Option Screen . . • • 5-18 DISPLAY FILELIST . . . 0 0 • • • • • • • • • • • 5-21
FILELIST INVENTORY Display. • . . • • • . . 5-21
PROGRAM UTILITIES Group Menu • . . . • . • • 6-1 DEFINE PROGRAM FILE Roster . • 0 • • • • • • • • 6-2
CROSS REFERENCE PROGRAMS Option Screen . • . • • 6-5 Listing of Numeric Variables. 0 • • • • • • • • 6-8
Listing of String Variables • 0 • • • • • • • • 6-8
Listing of Arrays, Functions and
System Variables. . • . . • • • • 0 • • • • •
6-9
Listing of Statement Numbers. 0 • 0 • • • • • •
6-9
Listing of Directives . . • . e • 0 .. • .. • • • 6-10 DISPLAY FIRST STATEMENT Option Screen . • • . • 6-11 DISPLAY FIRST STATEMENT Display 0 0 • • • • • • 6-13
STRING SEARCH
&
REPLACE Option Screen . . • • . 6-14 STRING SEARCH&
REPLACE Report . • • • . • 0 • • 6-17COMPARE PROGRAMS Utility Option Screen • . • . 0 6-19
COMPARE PROGRAMS Display . . . 6-21 PROGRAM RENUMBER Utility Option Screen . • . • • 6-22 MERGE PROGRAM FILES Utility Option Screen . . . 6-26
SYSTEM UTILITIES Option Screen. 0 • • • • • • • 7-1
DISPLAY CONFIGURATION Utility Option Screen • . 7-3 SYSTEM CONFIGURATION Display . . 0 0 • • • • • • 7-4
MEMORY/DEVICE USAGE Display of Bank
Allocation. . . .. . 0 • • 0 C • • • 0 • • • • 7-6 MEMORY/DEVICE USAGE Display of Tasks,
Devices and Discs . • • • . • • . • • • . . • 7-7 SET VFU Utility Printer Parameters • • . • 0 • • 7-8
BOSS UPDATE Utility Option Screen . • • . • • . 7-10 BOSS UPDATE Display . . 0 0 • • • • • • 0 • • 0 7-11
GHOST COMMUNICATIONS Display . • • • • • • • . • 7-12 SET SYSTEM DEFAULTS Utility Menu . • • • • . • . 7-14 SET PARAMETER DEFAULTS Option Screen • • • • • • 7-15 SYSTEM PARAMETERS Option Screen . • • . . • • • 7-16 TASK START-UP Display G O • • G • • • G • • • • 7-18 SPOOLING Utility Menu 0 Q 0 • • • • • • • • • • 7-20
SPOOL QUEUE MAINTENANCE Menu . . • 0 • • • • • • 7-21
MAINTAIN SPOOLING DEFAULTS Screen Display • . . 7-25 ADD SPOOLING Screen Display 0 0 • • • • • • • • 7-27
DROP SPOOLING Screen Display . . . . • • . • • • 7-28 Starting Despoolers . . 0 • • • • • • • • • • • 7-30
.
. .
. . . 8-1INFO Utility Option Screen . .
OVERVIEW
SCOPE
CONTENTS
SECTION 1 = INTRODUCTION
The purpose of this manual is to describe the Business BASIC Level 4 utility programs and
procedures for operating them~ utilities are general purpose functions useful to operators at all levels9 whether they be first=time users or experienced
programmers 0 This manual provides general
information on standard utility procedures as well as detailed information on each utility programo
This manual describes all utilities that are standard features of the Level 4 and later Business BASIC
systems~ except for the Magnetic Tape Utilitieso For information on the ~gMTC utili ty ~ see the Magnetic
Tape utilities Reference Manual y BFISD 5052, and the
Magnetic Tape utilities Quick Reference Guide, BFISD
50860
.
The information in this manual is organized into the following sections~
o Section 2~ QQSTANDARD UTILITY PROCEDURES~ ~u includes general information on Level 4
utilities 9 including the main menu 7 utility
groups~ selecting parameters and control key functions 0
o Section 3 9 ~QDISC UTILITIES 9 gQ describes all
utilities associated wi~h disc operationso
o Section 4? UUFILE UTILr.cIES 9 V9 contains information
on utilities which process an individual fileo
o Section 5 ~ QUFILES UTILITIES ~ uu contains
information on utilities which process a group of files, designated by individual file names~ mask or filelist 0
o Section 6 ~ UUPROGRAM UTILITIES~ iU describes utilities allowing an operator to create and maintain program fileso
o Section 7 ~ QU SYSTEM UTILITIES ~ U9 contains information on utilities involving system variables and parameters 0
o Section 89 QUINFO UTILITY? uv gives a brief
o Section 9, "UTILITY TOOLS," contains information on three general-purpose programs used by
utilities and application programs.
o Section 10, "ERROR HANDLING," briefly discusses the standard procedures for handling error
conditions on Level 4 utilitiese
RELATED PUBLICATIONS The following Basic Four R publications contain additional information on the Level 4 Operating System:
CONVENTIONS
o Reference Manual for Business BASIC Levels
3
and
4,
BFrSD 5085o Magnetic Tape utilities Reference Manual, BFISD
5052
o Magnetic Tape Utilities Quick Reference Guide,
BFISD 5087
o 610/730 Operatorvs Guide, BFISD 5042
o Operator~s Training Guide 200/410, BFISD 5045
o Synchronous Communications Reference Manual, BFISD 5007
o Multi-level Directory Facility (MDF) Reference
Manual, BFISD 5110
This subsection describes the conventions used in this manual for representing data to be entered at the terminal. In references to information to be entered at the terminal in this guide, "Press" indicates that a function or control key is to be pressed, and "Enter" indicates that something is to be typed and frequently a Control Key (Carriage
Return, Control Bar, etcs) is to be pressedo Keys to be pressed are indicated in caps and
underlined, without any quotation marks, such as: CTL-IV (for Control Bar IV) and
RETURN or CR (for Carriage Return)
Information to be typed in is 'surrounded in single quotes, which are not themselves to be typed 7 as in:
DEFINITIONS
oP'
mRRS
The following terms appear frequently in this manual and are defined as follows:Block Print - The format used when listing program files. Each part of a compound statement is listed on a separate line. FOR/NEXT loops and IF/THEN/ELSE groups are indented five spaces, resulting in a more readable format than an ordinary listingo
Filelist ~ A file containing the names of a group of files to be processed by a program 0 Any list of file
names may be saved as a filelist and assigned a nameo Gap File - An indexed file containing information about available sectors for that disco The name of the file is vv*:XXXX" where the X's are the first four characters of the disc name. When a new file is
created, the program reads the gap file to determine the available sectors and then allocates the
appropriate space to that filee The gap file should be maintained regularly, either at load time or
through the utility program MAINTAIN GAP FILEo See Section
3
on the MAINTAIN GAP FILE utilityoHash - A 2~byte hexadecimal code used as a pointer to the Scatter Index Tableo This code is not unique to each string of characterso
Mask - Used to create a filelist by using a special cnaracter as a place-holder for any ASCII character.
On Level 4 systems, the special mask character is a CONTROL wzw (CTRL z)~ or holding the CONTROL key down while pressing
tzw
0 Utility programs consider theCONTROL vzv a match for any ASCII character,
including blankso Thus the mask
'*'
+ CTRL Z + 'BC'matches all file names beginning with an asterisk and with the letters
Be
in the third and fourth positions and containing any character? including a blank,between the asterisk and the Be The mask 'ABCD' +
CTRL Z + CTRL Z matches all file names beginning
with the letters WABCD' and ending with any two
characters, including blanks. The mask composed of five CTRL Zis matches all file n~mes containing five characters or lesso
Parameter File = The file named n*PARM" resides on
the disc along with the utility programs and is
parameters and printer information. All utilities must refer to this file at some point during program execution.
OVERVIEW
ACCESSING THE LEVEL
4
UTILITIESASSIGNING MEMORY
THE MAIN MENU
SECTION 2 ~ STANDARD UTILITY PROCEDURES
This section describes standard procedures used on Level 4 utility programs~ including how to access the utilities, the procedures for using both the main
menu and group menus~ selecting parameters for
specific utility programs~ control key functions and
the use of output deviceso
The paragraphs in this subsection describe g~neral
procedures for running the Level 4 utilities9
including assigning memory~ selecting options from the main menu and accessing utility group menuso The Level
4
utilities require~ in most cases w32
pages of memory to run from a terminale To assign
memory~ enter the command vSTART 32 vo All utility
menus can function under these conditionso Some
utilities~ however, require more memoryo The *MTC
utility~ for example9 requires 62 pages to run on Level 4 systems 0 If you attempt to run a utility which requires more than 32 pages of memory? the program displays a message such as the following~
THE TAPE UTILITIES MUST RUN IN AT LEAST A START
62 IN BANKS 1=70
ENTER uCR~ TO ABORT =
To run the wMTC utility you would first press RETURN
and then enter the command 9START 62uo
Under certain conditions~ the allocation of more space improves the performanc€o Those utilities which are affected by performance or which require a
larger START are noted in the applicable subsections of this manualo
The Level 4 utilities are divided into groups
according to their functions~ TI1e groups are: DISC~ FILE (individual)~ FILES (multiple)? PROGRAMS 9
SYSTEM, TAPE and INF00 The utilities main menu
consists of a listing of these groupso To access the main menu~ enter the command~
MM/DD/YY UTILITIES MAIN MENU BASIC FOUR HH:MM
---ACCESSING A UTILITY GROUP
GROUP OPTIONS: 1. DISC
SELECT GROUP OPTION:
2~ FILE (INDIVIDUAL)
3~ FILES (MULTIPLE)
4. PROGRAMS
5. SYSTEM
6. TAPE
7.
INFOFigure 2-1. Level 4 UTILITIES Main Menu
Each utility group can be accessed in one of two ways, either through the main menu or in console mode. From the menu, to select the group including
the desired utility, type the number corresponding to that option. There is no need to press RETURN. To copy a disc, for instance, choose the DISC group, option 1, and type '1'. To renumber a program, type
'4'
for the PROGRAMS utilities. For a complete list of Level 4 utilities, refer to the TABLE OF CONTENTS at the beginning of this manual.To access a particular group without going through the main menu, enter the command 'RUN' followed by the file name for the group menu, surrounded in double quoteso The applicable file names are:
*DISC *FILE *FILES *PGM *SYS *MTC *INFO
To access the disc utilities, for example, enter the command 'RUN n*DISC"'. The program then displays the menu for the disc utilities group. These menus and
the procedures for running individual utilities are discussed in sections
3
through 88NOTE
The available options appearing on group menus and menus for individual utilities depend on the configuration of the
SELECTING PARAMETERS When a specific utility is accessed, in most cases, parameter options associated with it are displayed in groups near the top of the screen. Each option group consists of a list of options in background mode,
with the default for each item listed first in foreground mode with an asterisk to the left, as shown in Figure 2-2 for the DISPLAY DIRECTORY utility_
1. FILE TYPE
---*
ALL TYPES DATA FILES PROGRAM FILES FREE SECTORS2. FILE RANGE
---*
ALL FILESSELECTED FILES
3.
SORT ORDER
---*
BY LOCATION BY NAME4. OUTPUT DEVICE
---*
TERMINALLINE PRINTER (LP) SELECTED PRINTER
CHANGE OPTION BY NUMBER, CR TO PROCEED:
CONTROL KEY
FUNCTIONS
Figure 2-2. DISPLAY DIRECTORY Option Groups
Thus for the FILE TYPE parameter, the default value is ALL TYPES, which is highlighted and marked with an asterisk. To change an option, press the number of the option to be changed until the desired selection is highlighted and the asterisk appears to the left. Each time the number of an option is pressed, the highlighting and asterisk move down one line. When the highlighting reaches the last line it next goes to the first parameter option. For example, from the screen display shown in Figure 2-2, to display only program files in the directory, press '1' twice. The selection PROGRAM FILES would then be highlighted with the asterisk to its left. To have the output sent to the line printer, press '4' once. If you change your mind and decide to display all types of files, press '1' twice so that ALL TYPES is
highlighted and the asterisk appears by it again.
CARRIAGE RETURN AND CONTROL BAR I
CONTROL BAR II
CONTROL BAR III
CONTROL BAR IV
ESCAPE KEY
QUESTION MARK
The Carriage Return and Control Bar I perform the same functions on Level 4 utilities. If pressed at any position other than the beginning of the field, they enter what has been typed in the field and move the cursor to the next field. If pressed at the
beginning of a field, they enter the default value if any exists, and advance the cursor to the next field.
Control Bar II is used to move the cursor backward to the immediately preceding be~inning ~osition of a
field. If the cursor 1s atny post ion other' than the beginning position of a field, Control Bar II moves the cursor back to the beginning position of the current field and clears the field. If the cursor is at the beginning position of the field, Control Bar II moves it to the beginning position of the previous field and clears ito
Control Bar III is used to move forward y entering
default values where they exist. It moves the cursor to the next field requiring operator input.
Control Bar IV is used to exit from the current process. If the cursor is at the middle of a data entry screen~ for example, pressing Control Bar IV moves the cursor to the beginning field of the screen
and clears the screen of all entries. If pressed at the beginning of a process, Control Bar IV causes the program to exit from the process and return to the previous level of processing. Thus from a utilities group menu, Control Bar IV returns the operator
either to the main menu screen or to console mode, depending on how the group menu was accessed.
In most cases the Escape key interrupts program
execution and transfers control to console mode. If a SELECT command has been entered, pressing the
Escape key will not override the command, and the task remains SELECTED to the given disc or fileset.
From menus, the question mark (?) is used to call a HELP screen for a particular utility. If HELP text is available, the utility will display up to one page at a time. In some utilities the question mark is ignoredc See SECTION 8 - INFO UTILITIES for
OUTPUT DEVICES
PARAMETER FILE
The use of output devices has also been standardized on Level 4 utilities. Most utilities allow the user to send output either to the VDT or to a line printer or to a selected printer (if more than one printer is configured). If the user elects to send output to a selected printer, the program presents this prompt to enter the name of the printer:
ENTER PRINTER ID:
When the name of the printer is entered, e.g., 'P1 v ,
normal processing continues.
The Level 4 utilities require a parameter file
(*PARM) on disc to operate. This file contains the printer parameters, system defaults and utility default parameters. The printer parameters include the paper width, paper length and the number of lines per inch to be printed.
The information maintained in the parameter file can be changed by means of the SYSTEM UTILITIES,
specifically SET PRINTER VFU and SELECT PARAMETER DEFAULTS. Basic Four R encourages users to take
advantage of the ability to change parameters to suit their particular needs. See SECTION 7 - SYSTEM
OVERVIEW
ACCESSING THE
DISC UTILITIES
SECTION
3 -
DISC UTILITIESThis section of the manual describes procedures for using the DISC UTILITIES. The DISC UTILITIES allow an operator to display a listing of files on a disc, display and edit sectors, copy sectors, maintain the directory, maintain the gap file, change the disc ID or label, compact the disc, do an error analysis or repair and back up a disc. The next subsection
explains how to access the DISC UTILITIES group menu. The following subsections describe the DISC UTILITIES in detail.
To access the DISC utility group, either type '1' from the Utilities main menu or from console mode enter the command 'RUN "*DISC", • If more than one disc is configured, the screen displays this prompt in the upper left-hand corner:
ENTER DISC:
Enter the number of a drive on which a configured disc resides, OR enter a valid disc name. If the disc number is invalid, the screen displays the message:
DISC n NOT CONFIGURED
If the name entered is not valid, the message appears:
DISC xxxxxx NOT MOUNTED
In both cases you are prompted to enter another disc number or name.
BASIC FOUR
MM/DD/YY DISC UTILITIES MENU HH :fviM
---~----~---~---DISC NAME: ALLOCATED FILES:
DISC TYPE: AVAILABLE ENTRIES:
DIRECTORY SIZE: TOTAL SECTORS:
DISC UTILITY OPTIONS: 1. DISPLAY DIRECTORY
SELECT UTILITY OPTION:
20 DISPLAY/EDIT SECTORS
3. COpy SECTORS
40 MAINTAIN DIRECTORY 5. MAINTAIN GAP FILE
6. CHANGE DISC ID/LABEL
7.
COMPACT DISC80 ERROR ANALYSIS/REPAIR
9.
DISC BACKUPFigure 3-1. Disc Roster and DISC UTILITIES Group Menu
If the correct disc is displayed on the roster~ enter the number corresponding to the option desired. If you wish to use another disc, press CTL-II to enter a different disc name or number. (Recall that pressing CTL-IV at any time returns you to the beginning stage of the process.)
DISPLAY DIRECTORY UTILITY
PURPOSE OF THE lJTILITY
HOW TO USE
THE lJTILITY
MM/DD/YY
DISC NAME: DISC TYPE:
DIRECTORY SIZE:
1 $ FILE TYPE
_ _ _ c:a _ _ _ ... _
--_..---....
-~f ALL TYPES DATA FILES PROGRAM FILES FREE SECTORS
DISPLAY DIRECTORY
This subsection describes the DISPLAY DIRECTORY utility, including the procedures for running the utility and its effects.
The DISPLAY DIRECTORY utility allows the user to list the contents of a disc directory, including files and free sectors, either to the VDT or to a printer. For files, the information listed includes the file name; file type; beginning, ending and total sectors of the file; number of records defined;
number of records used; key size; record size;
program size and program ID. For available sectors, the program lists available space by the beginning sector, ending sector and total number of sectors. This utility requires space on disc to build a work file for the listing. The amount of space required depends upon the number of files to be listedo
When option 1 is selected from the DISC UTILITIES group menu, the DISPLAY DIRECTORY utility option screen appears as shown in Figure
3-2:
BASIC FOUR
DISPLAY ,DIRECTORY UTILITY HH:MM
ALLOCATED FILES:
2. FILE RANGE _ _ ... _ _ _ em:o _ _ _
---..---*
ALL FILESSELECTED FILES
AVAILABLE ENTRIES: TOTAL SECTORS:
3.
SORT ORDER
---*
BY LOCATION BY NAME4. OUTPUT DEVICE _ _ _ _ _ _ _ _ c.... _ _ _ _
_ a = o _ _ _ _ _ _ _ _ _ _ _
*
TERMINALLINE PRINTER (LP) SELECTED PRINTER
[image:25.708.52.664.456.846.2]CHANGE OPTION BY NUMBER, CR TO PROCEED:
DISPLAY DIRECTORY
Parameters and Options
Specifying Selectedriles
As described in SECTION 2, the first item of each option group is highlighted and has an asterisk to
its left, indicating that it is the default value for that parameter. (See SECTION 2 - STANDARD UTILITY PROCEDURES for information on selecting options.)
The parameters of the DISPLAY DIRECTORY utility and their options are:
10 FILE TYPE = This parameter allows you to display or list files of ALL TYPES, DATA FILES only~
PROGRAM FILES only, or FREE SECTORS~
2. FILE RANGE ~ The available options are ALL FILES or SELECTED FILESo If the ALL FILES option is selected, all files of the type specified under FILE TYPE are listed. If the user specifies SELECTED FILES, the program presents a series of prompts for the names of the files to be listed, as described below. File names can be specified using masks~ filelists or individual file names.
30
SORT ORDER ~ Files can be listed in order BY LOCATION on the disc or BY NAMEo4Q OUTPUT DEVICE = The listing or display can be sent to the TERMINAL, the LINE PRINTER, or to a
SELECTED PRINTER (if more than one printer is configured) 0 If the SELECTED PRINTER option is
chosen, the program prompts for the name of the printer:
ENTER PRINTER ID:
Enter the name of the printer, eogo, 'P1'.
After all the options are correctly specified, press RETURN to proceedo If the listing is sorted by name or is for selected files, a work file is established on the disc to sort the directoryo
If the user chooses to list SE,LECTED FILES, the
program presents this prompt for the names of the files:
ADD SELECTED NAME 7 CR TO END (CTRL+Z=MASK):
MM/DD/YY
DISC NAME: DISC TYPE:
DIRECTORY SIZE:
DISPLAY DIRECTORY
Files can be specified either by individual file name, by mask (using CTRL+Z) or by filelisto If you enter the name of a filelist, the prompt appears to verify the selection:
IS THIS A FILELIST? (CR/N):
Pressing RETURN causes the list of files in the filelist to be displayed. Entering 'N' causes the previous prompt to be displayed.
If you enter a mask name, the program displays the message SEARCHING DISC XXXXXX (N) and then displays
the names of files selected by the mask, as shown in Figure
3-3
below, using the mask,*,
+ CTRL+ZeBASIC FOUR
DISPLAY DIRECTORY UTILITY ALLOCATED FILES: AVAILABLE ENTRIES: TOTAL SECTORS: ADD SELECTED NAME, CR TO END (CTRL+Z=MASK): 1.*(CTRL+Z)
**
*1 *2*D *E *F
*N *0 *p
*W *X *y
Figure
3-3.
*6 *9 *A *8 *C
*G *H *1 *L *M
*R *S *T *U *V
*Z
Listing of Selected Program Files by Mask
When you have finished entering file names, press RETURN in response to the prompt to add namese The program then allows you to edit the list:
ADD/DELETE/CR TO CONTINUE (A/D/CR):
If you press RETURN to begin the listing process, and if a filelist was used in specifying the files to be listed, the program allows you to save the current selection under a filelist. The prompt appears:
SAVE THIS VERSION? (Y/CR):
DISPLAY DIRECTORY
ENTER FILELIST NAME:
If the filelist name you have entered already exists, the message appears:
ALREADY EXISTS -- REPLACE? (CR/N):
If you press RETURN the utility saves the current list under the existing name. If you enter 'N', the filelist is not saved under the existing name.
When the complete list of files has been specified and you have pressed RETURN to proceed with the listing, the program displays the message SORTING LIST OF FILESo PLEASE WAITos. and the listing process beginso
EFFECTS OF Two different listings result from the DISPLAY
THE UTILITY DIRECTORY utility, one for FILES, the other for FREE SECTORS on disco
Listing of Files Whenever the user elects to list files on the disc, on Disc a display or printing similar to the one shown in
Figure 3-4 below results.
BASIC FOUR PAGE:
MM/DD/YY SELECTED FILES BY LOCo -~ DISC: XXXXXX (n) HH:MM
---~-~--~~~~~--~~----~---FILE FILE FIRST NAME TYPE SECT
SW PGM 2066
AG PGM 2110 BB PGM 2124 MS PGM 9406 AC DIR 9546 SM PGM 11923
TOTAL PROGRAMS: 6 TOTAL DATA FILES: 1 TOTAL FILES: 7
CR TO PROCEED:
UST SECT 2069 2110 2127 9405 10612 11924
TOTAL NOo OF AVAIL KEY RECRD SECT RECRDS RECRDS SIZE SIZE
4 1 1024
1 1 1024
4 1 4096
2 1 2048
156 500 495 50 256
2 1 2048
Figure 3-4. DIRECTORY DISPLAY of Files By Location
PGM PGM SIZE ID
281 "PR 806 "AR 3845 "BU 1734 tlMA
Listing of Free Sectors on Disc
DISPLAY DIRECTORY
For program files, the column PGM ID displays part of the first statement of the program. The amount of the statement listed depends on the size of the output device medium. The maximum width for each line of display is 80 characters on the VDT. It
varies for the printer depending on the size of paper used.
For a listing of PROGRAM FILES only, the columns FILE TYPE, NO. OF RECRDS, AVAIL RECRDS, and KEY SIZE do not appear. For a listing of DATA FILES only, the columns PGM SIZE and PGM ID do not appear.
When the user has chosen to list FREE SECTORS on the disc, a display similar to that shown in Figure 3-5 appears. This listing is useful for updating the gap file.
BASIC FOUR PAGE:
MM/DD/YY AVAILABLE SECTORS BY LOCATION -- DISC: XXXXXX (n) HH:MM
---FIRST LAST NO. OF FIRST LAST NO. OF FIRST LAST NO. OF SECTOR SECTOR SECTORS SECTOR SECTOR SECTORS SECTOR SECTOR SECTORS
98 101 4 1270 1273 4 2145 2146 2
119 119 1 1286 1288 3 2185 2186 2
122 123 2 1293 1293 1 2204 2207 4
138 138 1 1368 1373 6 2237 2241 5
157 158 2 1718 1728 11 2244 2249 6
175 177 3 2026 2030 5
371 371 1 2037 2037 1
392 393 2 2056 2064 9
438 441 4 2100 2101 2
545 546 2 2137 2138 2
TOTAL NUMBER OF GAPS=25 TOTAL FREE SECTORS=85
CR TO PROCEED:
DISPLAY/EDIT SECTORS
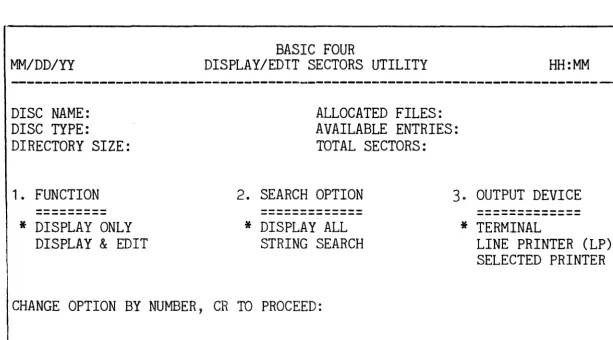
DISPLAY/EDIT SECTORS UTILITY
PURPOSE OF TIlE UTILITY
HOW TO USE THE UTILITY
MM/DD/YY
DISC NAME: DISC TYPE:
DIRECTORY SIZE:
1. FUNCTION
---....;
---*
DISPLAY ONLYDISPLAY & EDIT
This subsection describes procedures for using the DISPLAY/EDIT SECTORS utility and the displays or printouts that result from the utility.
This utility provides a display in both hexidecimal and ASCII characters of specified sectors on a disc. It also allows the user to edit the contents of a sector in either hexadecimal or ASCII characters and to write the edited sectors back to disc.
CAUTION
Extreme caution must be used when
editing sectors. Mistakes may destroy a file or data base. Basic Four R is not responsible for the results of the editing process. It is recommended that you perform a backup before editing sectors 0
When option 2 is selected from the DISC UTILITIES group menu, the program displays the option screen shown in Figure 3-6 below.
BASIC FOUR
DISPLAY/EDIT SECTORS UTILITY
ALLOCATED FILES:
HH:MM
AVAILABLE ENTRIES: TOTAL SECTORS:
2. SEARCH OPTION
---*
DISPLAY ALL STRING SEARCH3. OUTPUT DEVICE
---*
TERMINALLINE PRINTER (LP) SELECTED PRINTER
[image:30.712.52.666.542.882.2]CHANGE OPTION BY NUMBER, CR TO PROCEED:
Parameters and Options
Specifying
the Display
DISPLAY/EDIT SECTORS
As described in SECTION 2~ the first item of each option group is highlighted and has an asterisk to its left, indicating that it is the default value for that parametero (See SECTION 2 - STANDARD UTILITY
PROCEDURES for information on selecting optionso) The parameters of the DISPLAY/EDIT SECTORS utility and their options are as follows:
1& FUNCTION - This parameter allows you to choose between only DISPLAYING (or printing) the
contents of a sector~ and DISPLAYING AND EDITING the contentso The EDITING function is described in more detail below.
2. SEARCH OPTION - The user can choose between
DISPLAYING ALL characters of a sector, or executing a STRING SEARCHo The STRING SEARCH
option is available only with the DISPLAY ONLY function 0 If the user has chosen the STRING
SEARCH option, the screen presents a prompt for
the string to be searched for:
ENTER SEARCH STRING (MAX=35 CHAR):
Enter a string of 1 to 35 characters. This
causes the utility to display only those sectors which contain the string entered or those sectors which share the specified string across the
sector boundary 0
30
OUTPUT DEVICE = The standard choices ofdisplaying the sector only at the TERMINAL or printing the contents at the LINE PRINTER or at a SELECTED PRINTER (when more than one printer is configured) are availableo When the user chooses the SELECTED PRINTER option~ the program prompts for the name of the printer:
ENTER PRINTER ID:
After the parameters are set, the utility requests a starting location for the display. The prompt
appears~
DISPLAY/EDIT SECTORS
Enter a sector number or file name. For printing or searching, the screen then displays the prompt for the number of sectors to be printed or searched:
ENTER NUMBER OF SECTORS TO PRINT (CR=1, CTL-III:END OF DISC):
After this number is entered and displayed on the screen, the program prompts for the number of bytes to be displayed per line:
ENTER BYTES/LINE (CR=24, MAX=XX)
If you elect to specify a number other than 24 bytes per line, the maximum allowed depends on the size of paper usede Enter the number of bytes per line
desired, or press RETURN for the default of 24 bytes per line. The program then displays or prints the requested sectors as shown in Figure
3-7
beloweEditing the Display When the EDIT option is chosen, the selected sector is displayed as shown below in Figure
3-7,
with the available editing commands listed at the lowerMM/DD/YY
BASIC FOUR
DISPLAY/EDIT SECTORS UTILITY
DISPLAY/EDIT SECTORS
HH:MM
---~~~~~--~-~=~---···1 ··°3 ···5 ···7 .. • • • • • • • • • • • • G e e og ··11 ··13 0°15 GC • • e o IISECTOR II sssss 1 0000 0000 0000 0000 0000 0000 0000 0000 . e e • • G • • • • • oo.oo#DISC
17 0000 0000 0000 0000 0000 0000 0000 0000 •••••.••••• 0 • • • • # XXXXXX(n)
33 0000 0000 0000 0000 0000 0000 0000 0000 ••••.••••••••••• #FILE 49 0000 0000 0000 0000 0000 0000 0000 0000 ••••• 0 • • • • • • • • • • # XXXXXX 65 0000 0000 0000 0000 0000 0000 0000 0000 .••..••••••••••• #KSZ: n + n 81 0000 0000 0000 0000 0000 0000 0000 0000 . O O . O G o • • • • • o • • • #SIT: sssss
97 0000 0000 0000 0000 0000 0000 0000 0000 •• O • • • • G . o • • • • • • #KEY: sssss
113 0000 0000 0000 0000 0000 0000 0000 0000 •• D.om • • • • e • • • • • RDATA: sssss
129 0000 0000 0000 0000 0000 0000 0000 0000 . G o • • • o o . e e • • • • • #END: sssss
145 0000 0000 0000 0000 0000 0000 0000 0000 e e • • e a • • • • • • • • • • #
161 0000 0000 0000 0000 0000 0000 0000 0000 .•• e 6 o B • • • • • • o • • #
177 0000 0000 0000 0000 0000 0000 0000 0000 o • • Gooaeaoeooooe#COMMANDS
193 0000 0000 0000 0000 0000 0000 0000 0000 oeooo&eoo$oGc.e.RE=EDIT 209 0000 0000 0000 0000 0000 0000 0000 0000 e~GQeo.o.oo.eo • • #D=NEW DISC
225 0000 0000 0000 0000 0000 0000 0000 0000 eooaoeooGeeoeeeo#S=NEW SECTOR 241 0000 0000 0000 0000 0000 0000 0000 0000 e o o 8 G • • e o o o o e o • • RW=WRITE TO
/I DISC
ENTER SECTOR NUMBER: HB=BYTES/LINE
[image:33.710.51.664.107.532.2]CR=NEXT 1/4,CTL-II=PREV SECTOR7CTL=III=NEXT SECTOR,CTL-IV=EXITHP=PRINT Figure
3-70
EDIT SECTORS Screen DisplayTo display a new sector, enter the number of the
sector and press RETURN. The editing commands, which can be invoked by a single keystroke, are as follows:
E = Edit. Enter vEv to invoke the editing process. The CTL bars are now restricted to within the sector being editede The cursor is positioned at the first character of the sector on the
hexadecimal side of the screen. Enter new text
to replace existing text, or move the cursor position by typing one of the following
characters, displayed in the lower right-hand corner of the screen:
<
= Lefto Moves the cursor to the left.>
=
Right. Moves the cursor to the right.[ =
Upe Moves the cursor up_DISPLAY/EDIT SECTORS
@ = Switch. Switches the cursor from the
hexadecimal side of the display to the ASCII side, or from the ASCII side to the
hexadecimal side.
A message explaining Control Bar functions for the EDITING mode is displayed as follows at the bottom of the screen:
- CTL-II=PREV 1/4, CTL-III=NEXT 1/4, CTL-IV=RETURN TO COMMAND
To see the previous quarter of the sector being displayed, press CTL-II. Pressing CTL-III causes
the next quarter of the sector to be displayed. Pressing CTL-IV returns control to command mode.
S = Specify a new location to edit. Enter'S' to position the cursor at the first character of the next sectoro
D
=
New disc. Enter 'D' to change discs, at which time a new sector is read from the new disc.W = Write to disco Enter 'W' to write the current sector to the disco Before the sector is written to the disc, the screen asks for a verification:
OK TO WRITE SECTOR sssss TO DISC XXXXXX (n)? (Y/CR) :
where: iVsssss"
=
sector number, "XXXXXX"=
disc name, Un" = disc drive number.Enter 'Y' and the utility attempts to DISABLE the disc and to WRITE the edited sector to the disc. If the attempt to disable the disc is
unsuccessful 9 the message appears:
UNABLE TO RESERVE DISC n TO WRITE SECTOR CR TO RETRY, CTL-II TO SKIP, CTL-IV TO EXIT:
DISPLAY/EDIT SECTORS
B = Bytes/Lineo If a printer has been specified as the OUTPUT DEVICE, enter 'B' to change the number of bytes per line printed on the printer. When you enter
'B',
the program displays the prompt:ENTER BYTES/LINE (CR=16, MIN=2, MAX=XX):
(where XX depends on the size of paper used). Enter the number of bytes per line to be printed or press RETURN for 16 bytes per line.
EFFECTS OF
THE UTILITY The following paragraphs describe the printed and displayed results of the DISPLAY/EDIT SECTORS utilityo Displays to the terminal are 1/4 sector or 256 bytes at a time. Printed displays may be up to a sector to a page, depending on the number of bytes printed per line. The display resulting at the screen is as shown in Figure
3-8.
MM/DD/YY DISPLAY/EDIT SECTORS UTILITY BASIC FOUR HH:MM
---=---~---~---~---1
17
33
49 65 8197
113
129 145 161177
193
209 225 241·"1 ···3 ···5 ···7 030g 0°11 ··13 ··15
• • • • e • • • e • • G GI.~ 0 0 0 0 ( ) O
0000 0000 0000 0000 0000 0000 0000 0000 0000 0000 0000 0000 0000 0000 0000 0000 0000 0000 0000 0000 0000 0000 0000 0000 0000 0000 0000 0000 0000 0000 0000 0000 0000 0000 0000 0000 0000 0000 0000 0000 0000 0000 0000 0000 0000 0000 0000 0000 0000 0000 0000 0000 0000 0000 0000 0000 0000 0000 0000 0000 0000 0000 0000 0000 0000 0000 0000 0000 0000 0000 0000 0000 0000 0000 0000 0000 0000 0000 0000 0000 0000 0000 0000 0000 0000 0000 0000 0000 0000 0000 0000 0000 0000 0000 0000 0000 0000 0000 0000 0000 0000 0000 0000 0000 0000 0000 0000 0000 0000 0000 0000 0000 0000 0000 0000 0000 0000 0000 0000 0000 0000 0000 0000 0000 0000 0000 0000 0000
ENTER SECTOR NUMBER:
~ 0 Q • $ & & • . 0 . 8 • • II e
• G G e o . 0 • 0 0 0 e 0 e $ • G • e & 0 • G • • • • • • 0 • ~ 6 • 0 • • • e o . • • 0 • • • • C 0 e & • • • • • • • • • 0 • e
o • 0 • • • • • • • • • • • 0 e
• • e o . • • • 0 • • • • e 0 e
o • 0 0 • G • 0 • e G O • • 0 e
• • • 0 • • • • 0 0 • • • . 0 .
o • 0 & • e o . • • • • . 0 0 •
o e e • e • • • • • • • • • ~ •
o • 0 • & ~ U • 8 • • • • • e 0
Q • • • • 0 0 0 • • • • • a • 0
• ~ e e Q 0 • 0 ~ • e • S • G 0
e G • e o . e _ ~ e • & • • 0 • ~ 0 0 0 • • • • e e G • . 0 0 •
SECTOR sssss DISC XXXXXX(n) FILE XXXXXX KSZ: n + n
SIT: sssss KEY: sssss DATA: sssss END: sssss
COMMANDS E=EDIT D=NEW DISC S=NEW SECTOR W=WRITE TO
DISC
[image:35.712.48.663.415.858.2]CR=NEXT 1/4, CTL-II=PREV SECTOR, CTL-III=NEXT SECTOR, CTL-IV=EXIT
DISPLAY/EDIT SECTORS
The column to the left gives the number of the first byte in the row, beginning with 1. The columns at the top of the screen are the numbers of the bytes across from 0 to 15. The display underneath these columns is the content of the sector in hexademical characters 0 To the right appears the same content in
ASCII characterso To the right of the ASCII display may appear the following information: the number of the sector being displayed, the name and number of the disc, the name of the file, keysize, beginning sector of the Scatter Index Table, starting sector of the key area, starting sector of the data area and last sector of the file. For program files, only the DATA and END sectors are displayed. Commands for editing the display are shown in the lower right-hand corner of the screen.
Control Bar fUnctions are displayed at the bottom of the screeno Press RETURN or CTL-I to proceed to the next 1/4 sector; press CTL-II to back up to the
COpy SECTORS UTILITY
PURPOSE OF THE UTILITY
HOW TO USE THE UTILITY
MM/DD/YY
COPY SECTORS
This subsection describes the COpy SECTORS utility, including procedures for running the utility and the results of the utility.
This utility is used to copy sectors on a disc to another location on the same disc, or to a different disc. The utility also provides an option to verify that sectors are correctly copied. In order to
execute, the utility must DISABLE the destination disc. otherwise the COPY procedure is aborted.
CAUTION
Extreme caution must be used when
copying sectors. Mistakes may destroy a file or data base. Basic Four R is not responsible for the results of the copying process.
When option
3
is selected from the DISC UTILITIES menu, the following screen display results:BASIC FOUR
COPY SECTORS UTILITY HH:MM
---~---DISC NAME: DISC TYPE:
DIRECTORY SIZE:
1. SECTOR RANGE
---*
WHOLE DISC SELECTED RANGEALLOCATED FILES: AVAILABLE ENTRIES: TOTAL SECTORS:
2. VERIFY OPTION
-
---*
NON-VERIFIED VERIFIEDCHANGE OPTION BY NUMBER, CR TO PROCEED:
COPY SECTORS
Parameters and Options
Copying Sectors
As described in SECTION 2, the first item of each option group is highlighted and has an asterisk to
its left, indicating that it is the default value for that parameter. (See SECTION 2 - STANDARD UTILITY PROCEDURES for information on selecting options.) The parameters of the COpy SECTORS utility and their options are as follows:
1. SECTOR RANGE - The available options here are to copy the WHOLE DISC (sectors 1 through the
highest sector available) or only a SELECTED RANGE of sectors on the disc.
2. VERIFY OPTION - This option allows the user to execute the copy and to verify that the sectors were copied correctly. The amount of time needed for the copy depends on available memory. To
verify the copy, approximately twice the amount of data area memory is required and twice as much
time is required since only half as many sectors transfer at a time, and an extra read is required for the verification.
If the user has chosen the SELECTED RANGE option, the screen displays the prompts:
ENTER START COpy SECTOR (CR=1): ENTER ENDING SECTOR (CR=HSA):
where "HSA" is the highest sector available on the disc. Enter the number of the sector where the copy is to begin, then enter the number of the last sector to be copied. Defaults are the first and last
sectors on the disc.
If more than one disc is configured, the screen displays:
COPY TO DISC (CR:name and number of source disc): Enter the drive number or main directory name of any configured disc 1 or press RETURN to have the sectors
EFFECTS OF THE UTILITY
COpy SECTORS
If SELECTED RANGE has been chosen, the screen next displays the prompt:
ENTER COpy TO SECTOR (CR=nnnnnn):
where VWnnnnnn" is the same sector number as the START COpy sector on the source disc~ Enter the number of the sector on the destination disc where copying is to begin.,
If the utility cannot DISABLE the destination and source discs, the following message is displayed:
UNABLE TO RESERVE DISC n FOR SECTOR COpy
CR TO RETRY, CTL-IV TO EXIT:
If you press CTL-IV to abort the copy, the utility returns the
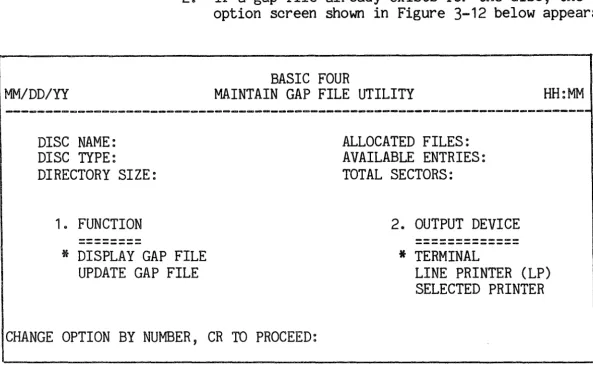
MKINTAIN
DIRECTORY menuo Or you may make sure that all files are closed and the disc is not RESERVEd or DISABLEd, and press RETURN to attempt the copy againoWhen the disc is successfully DISABLED, the screen displays the message:
MAXIMUM TRANSFER SIZE: X SECTORS
ORIGINAL DESTINATION SECTORS WILL BE LOST 0 OK TO
PROCEED? (CR/N):
The maximum transfer size varies depending on the size of the system and the amount of memory assigned to the tasko The maximum every used is 18 sectors on a removable~disc system with the task assigned 128 pages of memoryQ
Enter iN' to return to the first prompt after
parameter selection or press RETURN to proceed with the copying processm
Once the parameters are selected and all the required information has been entered in response to the
prompts, the copying process begins. The screen displays a progress indicator showing the first sector of the current group being transferred, and
any errors encountered. The message COPY COMPLETE. CR TO PROCEED: is displayed when the sectors have been copiede When the copying process is finished, the destination disc is ENABLED and the DISC
MAINTAIN DIRECTORY
MAINTAIN DIRECTORY UTILITY
PURPOSE OF
THE UTILITY
HOW TO USE
THE UTILITY
MM/DD/YY
DISC NAME: DISC TYPE:
DIRECTORY SIZE:
This subsection describes the MAINTAIN DIRECTORY
utility, including procedures for running the utility and its resultsa
This utility provides a means of initializing the directory or disc and changing the directory
capacity 0 (For systems with the Multi-level
Directory Facility, options are also provided to create and erase FILESETs). The disc is DISABLED before any of these processes begins.
When option 4 is selected from the DISC UTILITIES menu, a secondary menu shown in Figure 3=10 is displayed:
BASIC FOUR
DIRECTORY MAINTENANCE
ALLOCATED FILES: AVAILABLE ENTRIES: TOT