MOB Study
The Make or Break (MOB) and the other new studies are very efficient when used correctly. Every effort has been made to explain them in this technical section. We encourage you to visit www.esignalcentral.com to learn more about the eSignal Studies such as MOB. Additionally, we offer live seminars and can train you in person on several strategies utilizing eSignal Studies.
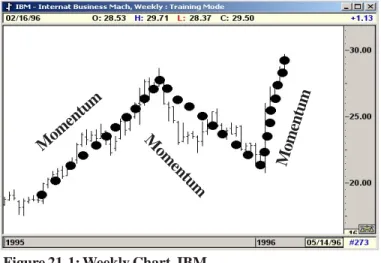
The MOB (Make or Break) Study takes the momentum, acceleration and other ratio models to define a price projection zone. The IBM Weekly chart is shown in Figure 21-1. The various swings are assigned separate momentum values, such as Momentum 1,2,3.
Using the ratio of these various momentums, eSignal calculates a price projection zone.
•
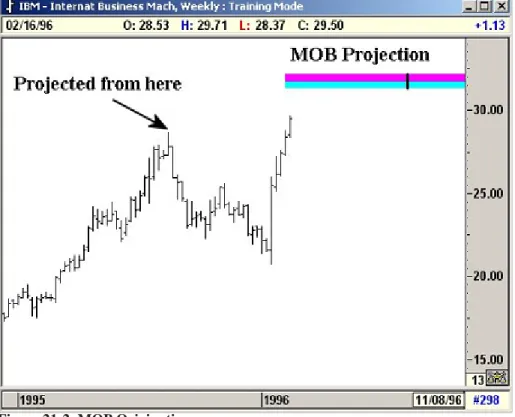
This price projection should provide major resistance for the current rally.•
The prices should rally to the MOB projection.•
Approximately 70% of the time, prices will trade to the MOB projection level and reverse.•
The rest of the time the prices will reach the MOB price projection and continue to trade through with stronger momentum. Hence the name Make or Break.Figure 21-1: Weekly Chart, IBM
C H A P T E R
Make or Break
21
Momentum Momentum
Where to Draw (Originate) the MOB Calculations
The simplest way to originate the MOB calculations is to draw them from a previous pivot (Primary or Major). In Figure 21-2, the MOB levels were initiated from a Major (J) pivot. The Pivots can be calculated and displayed by selecting the Pivot Study on the software.
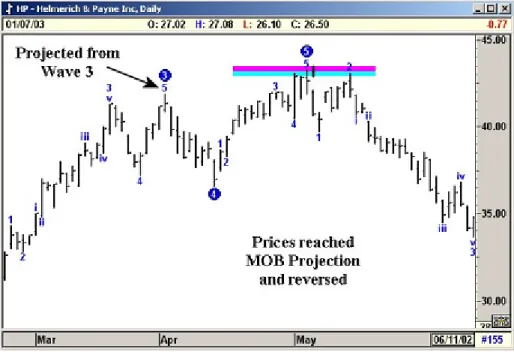
The MOB can be initiated from several levels. For example, when a Fifth Wave is being completed, one can initiate the MOB study from the previous Wave Three Pivot. Basically, any time you have a Major or Primary Pivot, MOB price levels can be initiated. At times, even smaller Pivots such as Intermediate or Minor can be used for the projection.
Make or Break Examples
With Elliot Waves
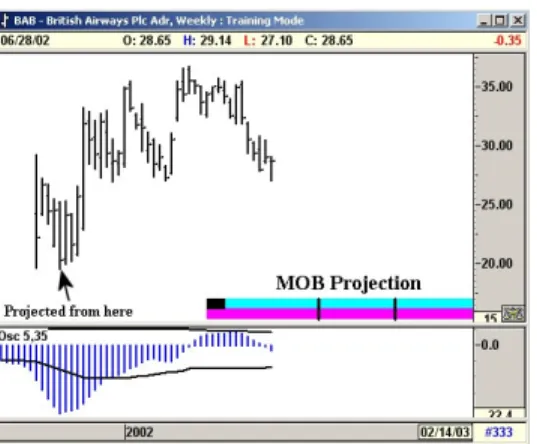
The MOB is initiated from the Previous Pivot Low. Using the ratio of these various momentums, eSignal calculates a price projection zone. This price projection should provide major support for the current decline.
MOB Projection zones usually provide the termination point for a Five Wave Elliott sequence: In this case the previous pivot low was the Wave Three low. The MOB projection from this Pivot Low provided the support (MOB projection zone) for the final Wave Five.
Also note how early the projections were given.
Figure 21-3: In this case, the MOB Projection was given at a very early stage before the low was taken out.
Figure 21-5: Daily Chart, Helmerich & Payne
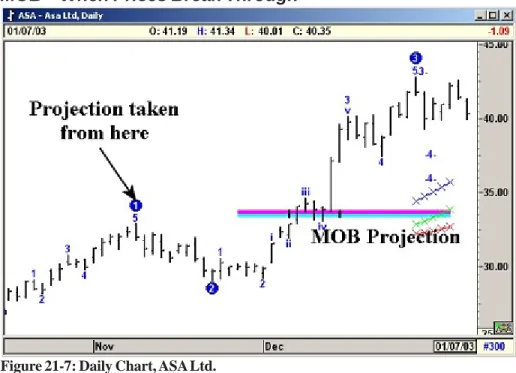
MOB—When Prices Break Through
In Figure 21-7, the MOB projection was generated from the Previous Pivot High. In this case, the previous Pivot High was a Wave One. When prices reached the MOB projection zone, it hung around for a while and then broke through with increasing momentum.
Once again, this is why it is called the Make or Break Study. It either runs into the MOB zone and changes trend or it will make through the MOB zone with increasing momentum.
In most cases where the market makes or goes through the MOB zone, tools such as the Elliott Oscillator will help to identify such breakouts prior to it happening. When the market is trading in a Wave Three, the MOB price zone simply becomes a level where the market breaks through with increasing momentum. One could also use the XTL to identify such situations.
If you ever get a black square in the left-hand corner of your MOB, this means there isn't enough data for the MOB to be 100% certain that this is the level. Keep erasing and redrawing the MOB as each bar comes in until the black square is gone.
New Time Marks Added to the MOB Study
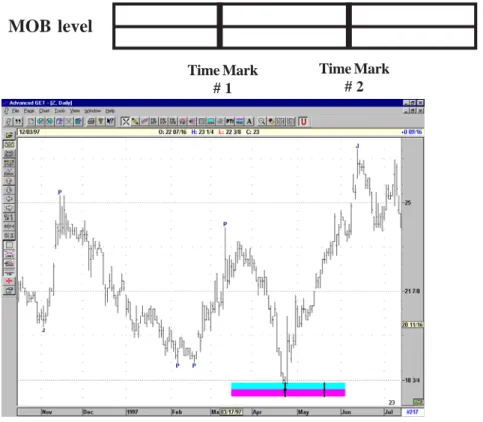
We released this new addition to the MOB study at the Cleveland Seminar (Nov 10, 1997). In the past, the MOB provided price levels at which the market had tendencies to reverse. However, it did not provide any sense of time as to when the prices can arrive at the MOB level. From our ongoing research, we have developed a method to forecast the time as shown in Figure 21-8, below (Z-Woolworth Daily Stock):
Here the MOB is drawn from the previous Primary Pivot (P). As you can see, the prices traded to the projected MOB level and reversed quickly. If you examine it carefully, the MOB also has two Time Marks drawn vertically. These are two projected time periods where the software has calculated a high tendency for the prices to approach the MOB level.
In Figure 21-8, below, the prices traded to MOB level on the day marked as Time Mark #1 and quickly reversed from the projected MOB level.
MOB level
Time Mark # 1
Time Mark # 2
Figure 21-8: Daily Chart, Z - Woolworth
Time Marks
The software calculated two Time Marks. These are two days or bars (on a 5-Minute chart, etc.) which has the highest tendency for the prices to approach the MOB projections. In testing, we have observed the following:
The prices approach the MOB levels in two groups.
Group A has a tendency to approach the MOB level near the Time Mark #1. In this case, the prices tend to hit the MOB level and reverse at or near the Time Mark #1.
The example on the previous page on Woolworth shows the prices approaching the MOB level at Time Mark #1.
Group B had a tendency to approach the MOB level between Time Mark #1 and Time Mark #2 with a slight bias towards Time Mark #2. See Figure 21-9, below.
MOB level
Time Mark # 1 Time Mark # 2Distribution of Groups
The distribution is split almost 65 to 35. Prices approach the MOB levels near Time Mark #1 (Group A) roughly 65% of the time. Prices approach the MOB levels between Time Mark #1 and #2 (Group B) roughly 35% of the time.
Observation:
In Group A, the prices approach at or near the Time Mark #1—almost on top of it.
Observation:
In Group B, the prices approach between Time Mark #1 and Time Mark #2— with a slight bias towards Time Mark #2.
MOB level Time Mark # 1 Time Mark # 2 Group A 65% of the time
MOB level
Time Mark # 1 Time Mark # 2Group B
35% of the time
The Time Mark study is not the Holy Grail for identifying the exact day or time when the market should reverse. Instead, it provides a framework of when to expect such reversals. If the prices have not approached the MOB level by Time Mark #1, then you are simply not in Group A. You would then continue to look for a Group B type behavior.
In Figure 21-11, below, the MOB level is shown with an Elliott Wave study. When Five Waves are complete, the market changes direction. The MOB levels help to identify price levels where this change can occur. The Time Marks provide a framework of when to expect the change.
In this example, the action is classified as Group B. Even though the price penetrated the MOB earlier, the rally labeled Wave 2 (which was the final high before reversal) happened right in the middle of Time Mark #1 and Time Mark #2.
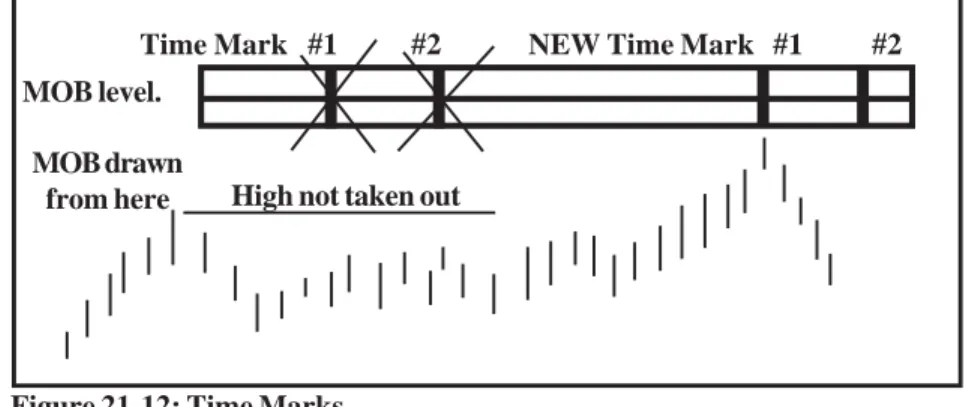
Recalculation of Time Marks
When the MOB is first drawn, the software calculates Time Mark #1 and Time Mark #2. As time passes by, if the prices have not taken out the pivot high (where the MOB was drawn from), the software will cancel the current Time Marks and recalculate new ones.
Figure 21-12: Time Marks
Figure 21-11: 60-Minute Chart, Soybeans
MOB level.
Time Mark #1 #2
MOB drawn
from here High not taken out