DU-05337-001_v01 | November 17, 2010
Quadro 4000/5000/6000 SDI DU-05337-001_v01 |3
1 About NVIDIA Graphics to SDI ... 1
About This Document... 1
Other Documents... 1
System Requirements... 2
2 NVIDIA Graphics-to-SDI... 3
Feature Overview ... 3
Graphics and BNC Connections ... 3
Supported SDI Signal Formats... 3
Supported SDI Color Formats... 4
Supported Output Modes ... 4
Desktop Region Adjustment Capability... 4
Genlock and Frame Lock Capability ... 4
Installing and Preparing the NVIDIA Quadro SDI ... 5
About Your NVIDIA Quadro SDI ... 5
Installing the NVIDIA Quadro SDI ... 6
Operating NVIDIA SDI ... 9
Understanding the Connections ... 9
About the Software... 11
Recommended Operating Practices ... 12
3 Windows–Using the Graphics to SDI Control Panel...14
How to Set Up the Graphics-to-SDI Output ... 15
Basic SDI Setup ... 15
Synchronizing the SDI Output to an External Source ... 18
Understanding the Status Indicators... 19
Advanced Adjustments ... 20
Adjusting the Desktop Area ... 20
Applying Gamma Correction ... 21
Setting Up the Color Space Conversion... 22
About Dualview Mode ... 23
Enabling Multiple SDI Cards... 24
Allowing Application Control of the SDI Output ... 25
Viewing the SDI Connection Status Using the Topology Viewer ... 27
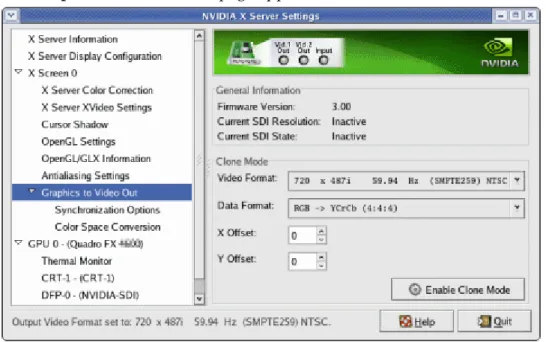
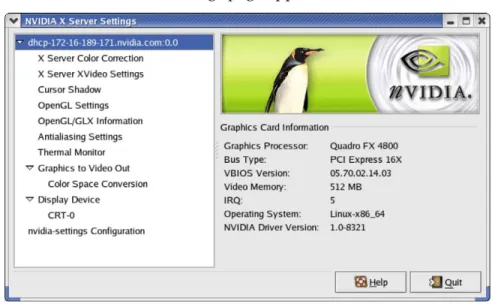
4 Linux—Using the Graphics to Video Out Control Panel ...28
How to Set Up the SDI Output ... 28
Basic SDI Setup Under Clone Mode ... 29
Basic SDI Setup with X-window or under Dualview Mode... 32
Advanced Setups ... 36
Understanding the Status Indicators... 37
Adjusting the Desktop Area ... 38
Customizing the Color Space Conversion ... 38
Synchronizing the SDI Output to an External Source ... 39
5 API Control ...42
SDI Application Programming Overview ... 43
Windows XP NvGvo API Description ... 44
NvGvo Function Description ... 44
NvGvo Structures, Enumerations, and Defines... 53
Linux CONTROL X Extension API ... 72
NV-Control X Functions... 72
NVIDIA CONFIDENTIAL
Quadro 4000/5000/6000 SDI DU-05337-001_v01 |1
DU-05337-001_v01
Version Date Authors Descriptiopn of Change
1.0 11/17/2010 cc Initial Release. Based on Quadro FX 5800 SDI User Guide
Serial
Digital
Interface
(SDI)
is
a
digital,
uncompressed
high
quality
video
format
used
for
film
and
video
post
production
and
broadcast
applications.
The
NVIDIA Quadro
®4000
SDI,
NVIDIA Quadro
®5000
SDI
and
NVIDIA Quadro
®6000
SDI
1convert
composited
video
and
graphics
to
uncompressed
8
‐
bit,
10
‐
bit,
or
12
‐
bit
SDI
output.
About This Document
This
manual
explains
the
graphics
‐
to
‐
SDI
functionality
of
the
NVIDIA
Quadro
SDI
graphics
card
and
software,
described
in
the
following
sections:
“NVIDIA
Graphics
‐
to
‐
SDI”
on
page 3
lists
the
supported
SDI
features
and
explains
the
basic
operation
in
a
broadcast
environment.
“Windows–Using
the
Graphics
to
SDI
Control
Panel”
on
page 14
describes
how
to
use
the
Display
Properties
control
panel
to
set
up
and
start
the
SDI
output
under
Windows.
“Linux—Using
the
Graphics
to
Video
Out
Control
Panel”
on
page 28
describes
how
to
use
the
Display
Properties
control
panel
to
set
up
and
start
the
SDI
output
under
Linux.
“API
Control”
on
page 42
gives
an
overview
of
API
control
of
the
SDI
functions.
For
instructions
on
installing
the
graphics
card
and
drivers,
refer
to
the
documentation
that
accompanies
your
NVIDIA
Quadro
SDI
graphics
card.
Other Documents
For
details
on
using
the
NVIDIA
Control
Panel,
see
the
NVIDIA Control Panel Quick Start
Guide.
1. In the rest of this document, “NVIDIA Quadro SDI” refers to the Quadro 4000 SDI, Quadro 5000 SDI, and Quadro 6000 SDI products.
Quadro 4000/5000/6000 SDI DU-05337-001_v01 |2
System Requirements
The
following
operating
systems
are
supported:
•
Windows
®XP.
•
Linux
NVIDIA
Quadro
4000
SDI,
NVIDIA
Quadro
5000
SDI,
or
NVIDIA
Quadro
6000
SDI
Graphics
Card
PCI
‐
Express
Motherboard
This
chapter
provides
an
overview
of
the
NVIDIA
graphics
‐
to
‐
SDI
functionality,
described
in
the
following
sections:
“Feature
Overview”
on
page 3
lists
the
hardware
connections,
supported
SDI
formats,
and
additional
SDI
support
features
of
the
NVIDIA
Quadro
SDI
graphics
card.
“Installing
and
Preparing
the
NVIDIA
Quadro
SDI”
on
page 5
describes
how
to
install
the
NVIDIA
Quadro
SDI
card
and
prepare
it
for
use.
“Operating
NVIDIA
SDI”
on
page 9
provides
an
overview
of
SDI
operation.
Feature Overview
Graphics and BNC Connections
Two
BNC
connections
that
can
be
configured
as
a
single
fill
+
key
dual
‐
link
SDI
output,
or
up
to
two
fill
single
‐
link
SDI
outputs
One
video
monitoring
output
BNC
connection
for
external
sync
signals
Supported SDI Signal Formats
Standard
Definition
(SD)
Modes
•
487i
@
59.95
Hz
(SMPTE259)
NTSC
•
576i
@
50.00
Hz
(SMPTE259)
PAL
High
Definition
(HD)
Modes
•
720p
@
23.97
Hz,
24.00
Hz,
25.00
Hz,
29.97
Hz,
30.00
Hz,
and
50.00
Hz
•
720p
@
59.94Hz,
60.00
Hz
(SMPTE296)
•
1035i
@
59.94
Hz,
60.00
Hz
(SMPTE260)
Quadro 4000/5000/6000 SDI DU-05337-001_v01 |4
•
1080PsF
@
24.00
Hz,
23.976
Hz
•
1080PsF
@
25.00
Hz,
29.97
Hz,
30
Hz
(SMPTE274)
•
1080p
@
23.976
Hz,
24.00
Hz,
25.00
Hz,
29.97
Hz,
30.00
Hz
(SMPTE274)
•
2048x1080p
@
23.976
Hz,
24.00
Hz,
25.00
Hz,
29.97
Hz,
30.00
Hz,
47.96Hz,
48Hz,
60Hz
(SMPTE272)
Supported SDI Color Formats
RGB
4:4:4
YCrCb
4:2:2
or
4:4:4
RGBA
4:4:4:4
YCrCbA
4:2:2:4
Supported Output Modes
Clone
Mode
Dualview
Mode
Application
‐
controlled
Mode
using
NVIDIA
SDI
APIs
Desktop Region Adjustment Capability
When
in
Clone
mode,
lets
you
define
a
portion
of
the
desktop
to
convert
to
SDI
output.
Genlock and Frame Lock Capability
Lets
you
synchronize
the
SDI
output
to
an
external
digital
or
analog
sync
source.
Note: The NVIDIA Quadro SDI card does not support SLI mode at this time.
Installing and Preparing the NVIDIA Quadro SDI
About Your NVIDIA Quadro SDI
The
following
describes
the
components
included
in
your
NVIDIA
Quadro
SDI
product
package:
Cards
The
NVIDIA
Quadro
SDI
consists
of
the
following
two
cards:
NVIDIA
Quadro
4000,
Quadro
5000,
or
Quadro
6000
graphics
card
NVIDIA
SDI
Output
Card
Cables
In
addition,
you
need
the
following
cables,
which
should
be
provided
with
your
NVIDIA
Quadro
SDI
package:
(Qty
1
ea.)
14
‐
Pin
Ribbon
Cable
This
cable
connects
the
NVIDIA
Quadro
4000/5000/6000
card
to
the
SDI
Output
card
for
genlock
and
frame
‐
lock
functionality.
(Qty
1
ea.)
DVI
‐
to
‐
DVI
Cable
Quadro 4000/5000/6000 SDI DU-05337-001_v01 |6
Installing the NVIDIA Quadro SDI
Step 1: Install the NVIDIA Quadro SDI
1
Power
down
the
system
and
open
the
chassis
cover.
2
Install
the
NVIDIA
Quadro
card
a
Insert
the
graphics
card
into
the
x16
PCI
‐
express
slot
and
use
a
screw
to
secure
the
card’s
bracket
to
the
system
chassis.
b
Connect
the
power
cable
to
the
auxiliary
power
connector(s).
The
NVIDIA
Quadro
6000
requires
power
to
two
auxiliary
power
connections.
3
Install
the
NVIDIA
SDI
Output
card.
a
Insert
the
NVIDIA
SDI
Output
card
into
any
available
type
of
expansion
slot
within
six
inches
of
the
NVIDIA
Quadro
G
‐
Sync
connector,
and
use
a
screw
to
secure
the
card’s
bracket
to
the
system
chassis.
b
Connect
the
power
cable
to
the
auxiliary
power
connector.
4
Connect
one
end
of
the
14
‐
pin
ribbon
cable
to
the
G
‐
Sync
connector
on
the
NVIDIA
Quadro
card,
and
the
other
end
to
the
NVIDIA
SDI
Output
card.
5
Close
the
chassis
cover.
Step 2: Connect the Auxiliary Cabling and Monitor
1
Connect
the
DVI
Connectors.
Connect
one
end
of
the
DVI
cable
to
the
DVI
connector
on
the
SDI
Output
card,
and
the
other
end
to
the
DVI
connector
on
the
NVIDIA
Quadro
SDI
card
as
shown
in
Figure
2.1
and
Figure
2.2
.
The
NVIDIA
Quadro
SDI
will
not
work
properly
if
the
cable
is
connected
to
the
other
digital
connectors.
.
Figure 2.1 DVI Connection: SDI Output card to Quadro 4000
Figure 2.2 DVI Connection: SDI Output card to Quadro 5000/6000
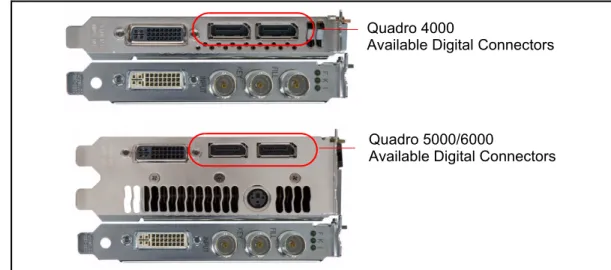
2
Connect
your
display
to
one
of
the
available
digital
connectors
on
the
graphics
card
as
shown
in
Figure
2.3
.
You
may
need
a
VGA
‐
DP
or
DVI
‐
DP
display
dongle.
Figure 2.3 Digital Connectors Available for Displays
SDI-Output Card DVI ConnectorQuadro 4000 DVI connector
Quadro 5000/6000
SDI-Output Card DVI Connector
DVI Connector
Quadro 5000/6000
Available Digital Connectors Quadro 4000
Quadro 4000/5000/6000 SDI DU-05337-001_v01 |8
Step 3: Install the NVIDIA Graphics Drivers
If
you
will
be
installing
new
graphics
drivers
for
the
NVIDIA
Quadro
SDI
card,
it
is
highly
recommended
that
you
uninstall
any
previous
version
of
the
NVIDIA
graphics
driver
software
before
installing
updated
graphics
drivers.
1
Follow
the
instructions
on
the
NVIDIA.com
Web
site
driver
download
page
to
locate
the
appropriate
driver
to
download,
based
on
your
hardware
and
operating
system.
2
Click
the
driver
download
link.
The
license
agreement
dialog
box
appears.
3
Click
Accept
if
you
accept
the
terms
of
the
agreement,
then
either
open
the
file
or
save
the
file
to
your
PC
and
open
it
later.
Opening
the
EXE
file
launches
the
NVIDIA
InstallShield
Wizard.
4
Follow
the
instructions
in
the
NVIDIA
InstallShield
Wizard
to
complete
the
installation.
Operating NVIDIA SDI
The
following
sections
provide
an
overview
of
SDI
operation:
“Understanding
the
Connections”
on
page 9
“About
the
Software”
on
page 11
“Recommended
Operating
Practices”
on
page 12
Understanding the Connections
Figure
2.4
shows
the
available
SDI
and
external
sync
connectors
on
the
NVIDIA
Quadro
SDI.
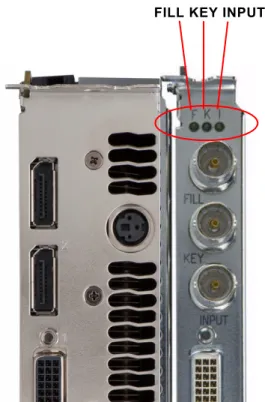
Figure 2.4 NVIDIA Quadro SDI Connectors
Key portion of a dual-link SDI output Fill portion of a dual-link SDI output - or - SDI/Composite Sync Signal“FILL”
“KEY”
“INPUT”
Fill portion of a single-link SDI output Fill portion of a single-link SDI outputQuadro 4000/5000/6000 SDI DU-05337-001_v01 |10
Connecting the SDI Video Output
Refer
to
Figure
2.4
.
4:4:4/4:2:2:4/4:4:4:4
dual
‐
link
signals
are
sent
to
the
FILL
and
KEY
connectors.
4:2:2
single
‐
link
signals
are
sent
to
the
FILL
connector
only.
In
application
control
mode,
using
the
APIs,
an
additional
4:2:2
signal
can
be
sent
to
the
KEY
connector.
Connecting to an External Sync Source
You
can
genlock
the
output
to
an
external
digital
or
analog
sync
source.
Several
systems
can
also
be
frame
‐
locked.
NVIDIA
Genlock
supports
the
following
two
external
synchronization
signal
types:
•
SDI
•
Composite,
which
can
be
one
of
the
following:
Composite
Bi
‐
level
(NTSC
or
PAL
sources
use
bi
‐
level
composite
signals.)
Composite
Tri
‐
level
(HDTV
sources
commonly
use
tri
‐
level
composite
signals.)
To
use
an
external
sync
source,
connect
the
sync
signal
to
the
INPUT
BNC
connector
as
indicated
in
Figure
2.4
,
then
select
the
corresponding
signal
type
(SDI
or
composite)
using
the
NVIDIA
Control
Panel.
About the Software
The
NVIDIA
SDI
software
lets
you
specify
the
SDI
signal
format
Color
formats
Synchronization
method
Gamma
correction
Color
‐
space
conversion
Graphics
‐
to
‐
SDI
functionality
can
be
set
up
and
controlled
in
two
basic
ways—using
the
NVIDIA
Control
Panel
for
8
‐
bit
SDI
output
from
the
desktop,
or
using
the
NVIDIA
SDI
API
for
8
‐
,
10
‐
,
or
12
‐
bit
SDI
output
from
an
application.
Using the SDI APIs
The
SDI
application
programming
interface
allows
OpenGL
applications
to
have
full
and
exclusive
control
of
the
SDI
output.
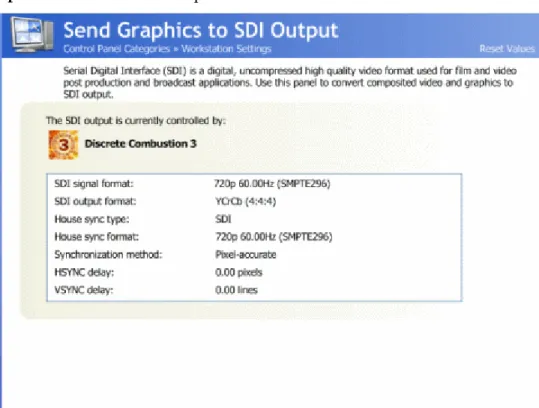
When
the
SDI
output
is
under
application
control,
you
can
view
the
SDI
hardware
status
using
the
NVIDIA
Control
Panel
Send
graphics
to
SDI
ouput
page.
See
the
chapter
“API
Control”
on
page 42
for
a
description
of
the
graphics
‐
to
‐
video
‐
out
API
calls.
Also,
refer
to
the
document
Programming NVIDIA Quadro SDI
for
instructions
on
using
the
APIs.
Using the Control Panel
When
the
SDI
output
is
not
being
controlled
by
an
application,
the
SDI
software
works
on
top
of
existing
applications,
and
the
active
workstation
desktop
or
full
screen
application
display
is
automatically
forwarded
to
the
SDI
video
outputs.
This
is
accomplished
under
either
Clone
or
Dualview
mode.
In
this
mode,
you
can
use
the
NVIDIA
Graphics
to
SDI
property
page
to
Configure
the
external
synchronization
signal
if
needed.
Specify
the
SDI
signal
format,
output
format,
and
then
enable
the
SDI
output.
For
detailed
instructions
under
Windows,
see
the
chapter
“Windows–Using
the
Graphics
to
SDI
Control
Panel”
on
page 14
.
For
detailed
instructions
under
Linux,
see
the
chapter
“Linux—Using
the
Graphics
to
Video
Out
Control
Panel”
on
page 28
.
Quadro 4000/5000/6000 SDI DU-05337-001_v01 |12
Recommended Operating Practices
This
section
provides
some
basic
operating
practices
to
follow
in
order
to
obtain
the
best
SDI
performance
for
your
application.
Initial On-Air Broadcast
When
starting
a
live
broadcast
of
SDI
video,
follow
the
sequence
below
to
ensure
proper
allocation
of
system
resources
and
to
prevent
visual
disturbances
in
the
on
air
broadcast.
1
Set
up
the
SDI
format
settings
and
start
the
SDI
output
2
Start
the
application
to
be
broadcast
3
Verify
the
video
quality
4
Close
the
Graphics
to
SDI
control
panel
5
Go
on
air
To
avoid
visual
disturbances
while
broadcasting
live,
DO
NOT
•
Start
or
stop
the
graphics
or
video
application
•
Turn
on
or
off
the
SDI
output
•
Make
changes
to
the
SDI
signal
format
Changing Applications
To
avoid
visual
disturbances
while
switching
applications,
observe
the
following
sequence:
1
Stop
the
live
broadcast
(go
off
air)
2
Stop
the
application
3
Start
the
new
application
4
Verify
video
quality
5
Resume
the
live
broadcast
Changing Video Formats
When
changing
any
of
the
SDI
settings,
visual
disturbances
might
occur
as
the
video
resets
to
the
new
settings.
To
prevent
such
disturbances
from
being
visible
to
the
public
or
from
being
recorded,
observe
the
following
sequence
when
making
changes
to
any
SDI
setting:
1
Stop
the
live
broadcast
(go
off
air)
2
Change
video
format
or
SDI
settings
3
Verify
video
quality
4
Resume
the
live
broadcast
When Using the Control Panel
NVIDIA
recommends
the
following
Set
the
desktop
to
the
same
or
higher
resolution
than
the
SDI
output
for
better
image
quality.
Close
all
background
applications—such
as
virus
scan,
backup,
and
archiving
applications—before
starting
the
SDI
output
and
going
on
air.
Close
the
Display
Properties
panel
before
going
on
air.
When
running
multiple
OpenGL
applications,
tearing
may
occur
if
the
applications
are
not
synchronized.
In
general,
NVIDIA
does
not
recommend
running
multiple
OpenGL
applications
when
starting
the
SDI
output
or
when
going
live.
Running Multiple OpenGL Applications
To
maximize
the
system
resources
and
bandwidth
available
for
converting
graphics
to
SDI
output,
NVIDIA
recommends
broadcasting
only
one
OpenGL
application
at
a
time.
Quadro 4000/5000/6000 SDI DU-05337-001_v01 |14
SDI CONTROL PANEL
This
chapter
explains
how
to
set
up
the
NVIDIA
Quadro
SDI
graphics
card
for
Windows
under
Clone
or
Dualview
mode
using
the
NVIDIA
Control
Panel
Send
Graphics
to
SDI
output
page.
It
contains
the
following
sections:
“How
to
Set
Up
the
Graphics
‐
to
‐
SDI
Output”
on
page 15
provides
step
‐
by
‐
step
instructions
for
using
the
control
panel
to
set
up
the
SDI
output.
“Advanced
Adjustments”
on
page 20
explains
additional
adjustments
you
can
make
to
the
SDI
output.
“About
Dualview
Mode”
on
page 23
“Enabling
Multiple
SDI
Cards”
on
page 24
How to Set Up the Graphics-to-SDI Output
This
section
explains
how
to
set
up
the
graphics
‐
to
‐
SDI
output.
“Basic
SDI
Setup”
on
page 15
“Synchronizing
the
SDI
Output
to
an
External
Source”
on
page 18
“Understanding
the
Status
Indicators”
on
page 19
Basic SDI Setup
1
From
the
NVIDIA
Control
Panel
navigation
tree
pane,
under
Workstation,
click
Send
graphics
to
SDI
output
.
To ensure proper operation, NVIDIA recommends the following -
Set
the
desktop
resolution
to
be
the
same
or
larger
than
the
SDI
output
for
better
image
quality
Stop
background
applications—such
as
virus
scan,
backup
and
archiving
applications—prior
to
starting
SDI
output
and
going
on
air.
Quadro 4000/5000/6000 SDI DU-05337-001_v01 |16
2
If
you
are
using
more
than
one
NVIDIA
Quadro
SDI
card,
under
Select
a
display
to
configure
SDI
output
click
the
display
icon
corresponding
to
the
display
you
want
to
configure,
then
follow
the
remaining
instructions
for
that
display.
•
This
option
does
not
appear
if
your
system
contains
only
one
NVIDIA
Quadro
SDI
card.
•
If
this
option
does
not
appear
and
your
system
does
contain
more
than
one
NVIDIA
Quadro
SDI
card,
see
“Enabling
Multiple
SDI
Cards”
on
page 24
for
instructions
on
enabling
the
cards.
3
Under
Send
SDI
output
using
,
select
the
SDI
output
mode
that
you
want
to
use.
•
Clone
mode
:
In
Clone
mode,
the
SDI
output
is
a
clone
of
the
display
output.
•
Dualview
mode
:
In
Dualview
mode,
you
can
define
one
large
desktop
that
extends
from
the
display
to
the
SDI
output.
This
lets
you
move
windows
between
the
SDI
output
and
the
graphics
(DVI)
display
part
of
the
extended
desktop.
•
Do
not
send
SDI
output
:
With
this
option,
no
signal
is
sent
to
the
SDI
output.
The
remaining
controls
on
the
page
are
disabled.
Choose
this
option
if
you
want
an
application
to
control
the
SDI
output.
Once
the
application
is
running,
this
page
does
not
let
you
change
the
settings,
but
only
shows
the
settings
established
by
the
application.
4
Click
the
SDI
Settings
bar
to
open
the
SDI
Signal
Settings
dialog
box.
5
Choose
a
method
for
determining
the
format
of
the
SDI
output
‐
either
using
internal
timing
or
synchronized
to
an
external
signal
source.
To
use
internal
timing,
select
Free
running
(internal
timing)
,
then
click
the
list
arrow
and
choose
from
the
list
of
available
SDI
signal
formats.
To
synchronize
to
an
external
signal
source,
make
sure
the
house
sync
is
connected
to
the
INPUT
BNC
connector
on
the
graphics
card,
then
select
the
Synchronized
to
a
house
sync
signal
radio
buttion
and
set
up
the
synchronization
and
signal
formats
as
follows:
•
Select
the
House
sync
type
radio
button
(SDI
or
Composite)
that
corresponds
to
the
sync
signal
type
you
are
using.
•
To
synchronize
the
pixel
scanning
of
the
SDI
output
to
the
external
signal
using
genlock,
select
Pixel
‐
accurate
synchronization
.
•
To
synchronize
the
frame
rate
of
the
SDI
output
to
the
external
signal
using
frame
lock,
select
Frame
‐
accurate
synchronization
using
this
format
,
then
click
the
list
arrow
and
choose
from
the
list
of
available
SDI
signal
formats.
•
To
introduce
a
delay
in
the
SDI
output,
enter
the
pixel
or
line
delay
values
in
the
appropriate
HSYNC
or
VSYNC
delay
boxes.
Quadro 4000/5000/6000 SDI DU-05337-001_v01 |18
See
“Synchronizing
the
SDI
Output
to
an
External
Source”
on
page 18
for
additional
information.
6
Check
the
Terminate
the
analog
signal
at
this
connector
check
box
if
•
the
system
is
a
standalone
system
synchronized
to
a
house
sync
signal,
or
•
the
system
is
the
last
in
a
chain
of
systems
connected
to
the
same
house
sync
signal.
7
Choose
the
SDI
output
data
format
by
clicking
the
SDI
output
format
list
arrow
and
then
selecting
from
the
list
of
available
color
formats.
8
Click
OK
when
done
to
close
the
dialog
box.
9
Click
Apply
.
Synchronizing the SDI Output to an External Source
You
can
synchronize
the
SDI
output
with
other
equipment
in
a
broadcast
or
post
production
environment.
Supported Synchronization Methods
The
Graphics
to
SDI
page
provides
two
methods
for
synchronizing
the
SDI
output
to
a
common
sync
source—pixel
‐
accurate
or
frame
‐
accurate
synchronization.
Pixel
‐
accurate
synchronization
synchronizes
the
pixel
scanning
of
the
SDI
output
to
the
house
sync
signal.
When
using
pixel
‐
accurate
synchronization,
the
SDI
refresh
rate
is
determined
by
the
sync
signal.
Frame
‐
accurate
synchronization
synchronizes
the
frame
rate
of
the
SDI
output
to
the
house
sync
signal.
The
sync
signal
determines
the
available
SDI
signal
formats.
Supported Synchronization Signals
The
NVIDIA
driver
supports
the
following
external
synchronization
signal
types:
SDI
Composite
Bi
‐
level
(NTSC
or
PAL
sources
use
bi
‐
level
composite
signals.)
Composite
Tri
‐
level
(HDTV
sources
commonly
use
tri
‐
level
composite
signals.)
Connecting to an External Synchronization Source
To
use
an
external
sync
source:
1
Connect
the
sync
signal
to
the
INPUT
BNC
connector.
You
can
connect
multiple
systems
to
the
same
house
sync
by
daisy
‐
chaining
the
house
sync
cable
to
each
card
using
BNC
T
‐
connectors.
2
Follow
the
instructions
in
Basic
SDI
Setup
for
setting
up
your
SDI
system
to
use
the
external
sync
signal.
The
driver
will
not
detect
a
valid
sync
signal
until
the
correct
signal
type
is
configured
in
the
NVIDIA
Control
Panel.
Understanding the Status Indicators
The
LEDs
on
the
NVIDIA
SDI
Output
Card
connector
bracket
indicate
the
status
of
the
SDI
outputs
and
the
synchronization
input
signals.
Figure 3.1 SDI Connection LED Indicators
The
activity
of
the
LEDs
indicates
the
signal
status
as
follows:
FILL
or
KEY
Out
Input
Status Meaning
Off (gray) SDI output is not in use Steady Green SDI output has power. Blinking Green SDI output is active.
Status Meaning
Off (gray) SDI input synchronization is disabled. Blinking Green Valid SDI synchronization signal is detected.
SDI Output Card LEDs FILL KEY INPUT