The science behind the report:
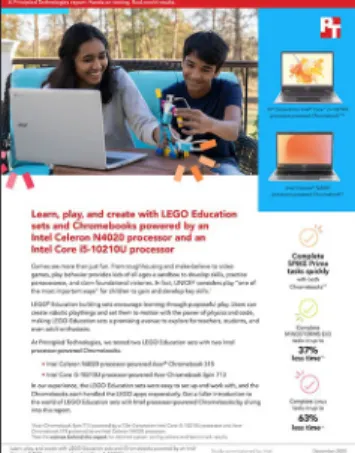
Learn, play, and create with LEGO
Education sets and Chromebooks
powered by an Intel Celeron
N4020 processor and an Intel
Core i5‑10210U processor
This document describes what we tested, how we tested, and what we found. To learn how these facts translate
into real-world benefits, read the report
Learn, play, and create with LEGO Education sets and Chromebooks
powered by an Intel Celeron N4020 processor and an Intel Core i5-10210U processor.
We concluded our hands-on testing on October 27, 2020. During testing, we determined the appropriate
hardware and software configurations and applied updates as they became available. The results in this report
reflect configurations that we finalized on October 20, 2020 or earlier. Unavoidably, these configurations may not
represent the latest versions available when this report appears.
Our results
Table 1: Time in seconds to complete tasks in various apps.
Task
Acer® Chromebook
Spin 713 with an Intel® Core™ i5-10210U processor
Acer Chromebook 315 with an Intel Celeron® N4020
processor
Intel Core i5-10210U processor powered Chromebook advantage SPIKE™ Prime tasks
Launching the LEGO® Education SPIKE app 12.2 13.2
Up to 7.5% less time
Creating a new Python project 0.8 0.9
Connecting the hub via Bluetooth 2.4 2.5 Opening the obstacle course project 2.6 2.7 Downloading and running a complex program 4.2 4.3
Total time 22.2 23.6
Task
Acer® Chromebook
Spin 713 with an Intel® Core™ i5-10210U processor
Acer Chromebook 315 with an Intel Celeron® N4020
processor
Intel Core i5-10210U processor powered Chromebook advantage Linux®-related tasks
Launching Visual Studio Code 2.8 7.6
Up to 63% less time
Installing the MicroPython extension 6.8 7.9
Creating a new MINDSTORMS EV3 MicroPython project 2.1 3.9
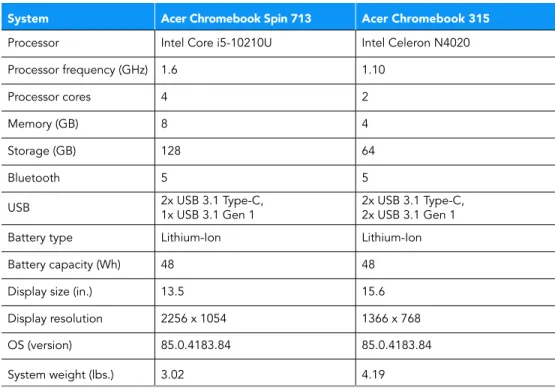
System configuration information
Table 2: The table below presents detailed information on the systems we tested.
System Acer Chromebook Spin 713 Acer Chromebook 315
Processor Intel Core i5-10210U Intel Celeron N4020 Processor frequency (GHz) 1.6 1.10
Processor cores 4 2
Memory (GB) 8 4
Storage (GB) 128 64
Bluetooth 5 5
USB 2x USB 3.1 Type-C, 1x USB 3.1 Gen 1 2x USB 3.1 Type-C, 2x USB 3.1 Gen 1 Battery type Lithium-Ion Lithium-Ion Battery capacity (Wh) 48 48 Display size (in.) 13.5 15.6 Display resolution 2256 x 1054 1366 x 768 OS (version) 85.0.4183.84 85.0.4183.84 System weight (lbs.) 3.02 4.19
How we tested
This document details the methodologies we will follow in testing the system.
Application testing
For each scenario, we downloaded, installed, and pinned the requisite apps to the Chrome shelf. For applications that required accounts
or Google Authenticator, we created test profiles and logged in the users on each device. After one run of a given task, we reset the
Chromebook and performed two additional runs.
SPIKE LEGO Education
Launching LEGO Education SPIKE
1. Install the LEGO Education SPIKE app from the Google Play Store. 2. Pin the app to the shelf.
3. Simultaneously start the timer, and click to launch the app. 4. Stop the timer when the app has fully loaded.
Creating a new Word Blocks project
1. Launch the app from the shelf.
2. From the home screen, click New Project.
3. Leave the default Word Blocks project type selected. 4. Simultaneously start the timer and click Create. 5. Stop the timer when the project editor has fully loaded.
Creating a new Python project
1. Launch the app from the shelf.
2. From the home screen, click New Project.
3. Click to select the Python project type. Simultaneously start the timer and click Create. 4. Stop the timer when the project editor has fully loaded.
Connecting the SPIKE hub via Bluetooth
1. Launch the app from the shelf. 2. Select and open the test project. 3. Power on the SPIKE hub.
4. After the startup chime completes, press and hold the Bluetooth button until it begins blinking. 5. Simultaneously start the timer and click the Connect button.
6. Stop the timer when the connection chime completes, and the device appears as connected in the project editor window.
Opening the Advanced Driving Base Assembly instructions
1. Launch the app from the shelf.
2. Click the Build tab from the navigation menu.
3. Simultaneously start the timer and click the Advanced Driving Base Assembly instructions. 4. Stop the timer when the first page of the instructions fully loads.
Opening the Obstacle Course project
1. Launch the app from the shelf.
2. Click the Units tab from the navigation menu. 3. Click the Training Trackers projects unit.
4. Scroll down to the bottom of the Lessons list to find The Obstacle Course lesson.
5. Simultaneously start the timer and click Start.
Downloading and running the Obstacle Course
1. Launch the app from the shelf.
2. Click the Units tab from the navigation menu. 3. Click the Training Trackers projects unit.
4. Scroll down to the bottom of the Lessons list to find The Obstacle Course lesson, and click Start.
5. Follow the lesson plans in steps 1 through 6, clicking the forward arrow to advance the instructions. 6. With the project code complete, simultaneously start the timer and click the Play icon.
7. Stop the timer when the motors connecting to the SPIKE hub begin spinning.
Downloading and running a complex program
1. Launch the app from the shelf.
2. From the home screen, click New Project.
3. Leave the default Word Blocks project type selected, and click Create.
4. Create the program and save the project. (For this task, we created a program with multiple repeating nested loops to create a large
file size.)
5. Simultaneously start the timer and click the Play icon.
6. Stop the timer when the sound sequence begins playing from the SPIKE hub.
LEGO Education MINDSTORMS EV3
Launching the LEGO Education MINDSTORMS EV3 app
1. Install the LEGO Mindstorms Education EV3 app from the Google Chrome Web Store. 2. Pin the app to the shelf.
3. Simultaneously start the timer and click to launch the app. 4. Stop the timer when the app has fully loaded.
Connecting the MINDSTORMS EV3 hub via USB
1. Launch the app from the shelf.
2. From the home screen, click New Program. 3. Power on the EV3 hub.
4. Simultaneously start the timer and connect the EV3 hub via USB. 5. Stop the timer when the hub appears connect in the app.
Creating a new program
1. Launch the app from the shelf.
2. Simultaneously start the timer and click New Program. 3. Stop the timer when the program editor fully loads.
Downloading and running a simple project
1. Launch the app from the shelf.
2. From the home screen, click New Program.
3. Assemble the block code elements to play a sound when the program runs. 4. Simultaneously start the timer and click the download and run icon. 5. Stop the timer when sound playback begins on the EV3 hub.
Downloading and running a project with 10 sounds
Downloading and running the Large Motor program
1. Launch the app from the shelf.
2. From the home screen, click the Use a Large Motor lesson.
3. Follow the instructions to arrange the block code elements to start the motor when the program runs. 4. Simultaneously start the timer and click the download and run icon.
5. Stop the timer when the motor connected to the EV3 hub begins spinning.
Downloading and running a complex program
1. Launch the app from the shelf.
2. From the home screen, click New Program.
3. Create the program and save the project. (For this task we created a program with multiple repeating nested loops to create a large
file size.)
4. Simultaneously start the timer and click the Play icon.
5. Stop the timer when the sound sequence begins playing from the EV3 hub.
Launching Teacher Support
1. Launch the app from the shelf.
2. Simultaneously start the timer and click Teacher Support. 3. Stop the timer when the Teacher Support page fully loads.
Opening the User Guide PDF file
1. Launch the app from the shelf.
2. From the home screen, click Teacher Support.
3. From the Teacher Support page, simultaneously start the timer and click User Guide (pdf). 4. Stop the timer when the PDF file fully loads.
Opening the curriculum for engineering projects
1. Launch the app from the shelf.
2. From the home screen, click Teacher Support.
3. From the Teacher Support page, simultaneously start the timer and click Next Steps (pdf). 4. Stop the timer when the pdf file fully loads.
PyBricks – MINDSTORMS EV3 – Linux Beta for ChromeOS
Installing Linux Beta for ChromeOS
1. Open the Chromebook Settings window.
2. From the search bar, search for Linux, and click to select the search result. 3. Under the Linux (Beta) settings category, click Turn On.
4. Click Next.
5. Leave the default username and Disk size. Simultaneously start the timer and click Install. 6. Stop the timer when the Linux installation completes.
Launching Visual Studio Code
1. Launch the Linux terminal application.
2. Install the community build of Visual Studio Code from the following link: https://code.headmelted.com/
3. Pin the Linux app to the shelf.
4. Simultaneously start the timer and launch Visual Studio Code. 5. Stop the timer when the app has fully loaded.
Installing the MINDSTORMS EV3 MicroPython Extension
1. Launch the Visual Studio Code Linux app from the shelf. 2. Click the Extensions menu.
This project was commissioned by Intel.
Read the report at
http://facts.pt/FybptkR
Intel contributes to the development of benchmarks by participating in, sponsoring, and/or contributing technical support to various benchmarking groups, including the BenchmarkXPRT Development Community administered by Principled Technologies.
Software and workloads used in performance tests may have been optimized for performance only on Intel microprocessors.
Performance tests, such as SYSmark and MobileMark, are measured using specific computer systems, components, software, operations and
functions. Any change to any of those factors may cause the results to vary. You should consult other information and performance tests to assist you in fully evaluating your contemplated purchases, including the performance of that product when combined with other products. For more complete information visit www.intel.com/benchmarks.
Intel’s compilers may or may not optimize to the same degree for non-Intel microprocessors for optimizations that are not unique to Intel microprocessors. These optimizations include SSE2, SSE3, and SSSE3 instruction sets and other optimizations. Intel does not guarantee the availability, functionality, or effectiveness of any optimization on microprocessors not manufactured by Intel. Microprocessor-dependent
optimizations in this product are intended for use with Intel microprocessors. Certain optimizations not specific to Intel microarchitecture are
reserved for Intel microprocessors. Please refer to the applicable product User and Reference Guides for more information regarding the
specific instruction sets covered by this notice.
Performance results are based on testing as of dates shown in configurations and may not reflect all publicly available updates. See backup for configuration details. No product or component can be absolutely secure.
Your costs and results may vary.
Intel technologies may require enabled hardware, software or service activation.
© Intel Corporation. Intel, the Intel logo, and other Intel marks are trademarks of Intel Corporation or its subsidiaries. Other names and brands may be claimed as the property of others.
Creating a new MINDSTORMS EV3 MicroPython Project
1. Launch the Visual Studio Code Linux app from the shelf.
2. With the MINDSTORMS MicroPython project type selected, simultaneously start the timer and click New Project. 3. Stop the timer when the project editor fully loads.