Using VMware Horizon Client for Linux
March 2016
Horizon Client
This document supports the version of each product listed and
supports all subsequent versions until the document is
replaced by a new edition. To check for more recent editions
of this document, see
http://www.vmware.com/support/pubs
.
You can find the most up-to-date technical documentation on the VMware Web site at: http://www.vmware.com/support/
The VMware Web site also provides the latest product updates.
If you have comments about this documentation, submit your feedback to: [email protected]
Copyright © 2012–2016 VMware, Inc. All rights reserved. Copyright and trademark information.
VMware, Inc.
3401 Hillview Ave. Palo Alto, CA 94304 www.vmware.com
Using VMware Horizon Client for Linux 5
1
System Requirements and Installation 7
System Requirements for Linux Client Systems 8 System Requirements for Real-Time Audio-Video 11 Requirements for Using Flash URL Redirection 12 Smart Card Authentication Requirements 13 Supported Desktop Operating Systems 14
Preparing Connection Server for Horizon Client 14
Install or Upgrade Horizon Client for Linux from VMware Product Downloads 14 Install Horizon Client for Linux from the Ubuntu Software Center 20
Configure VMware Blast Options 21
Horizon Client Data Collected by VMware 22
2
Configuring Horizon Client for End Users 25
Using URIs to Configure Horizon Client 26
Using the Horizon Client Command-Line Interface and Configuration Files 29 Configuring Certificate Checking for End Users 38
Configuring Advanced TLS/SSL Options 38
Configuring Specific Keys and Key Combinations to Send to the Local System 39 Using FreeRDP for RDP Connections 41
Enabling FIPS Mode on Horizon Client 3.2 and Earlier 43 Enabling FIPS Mode on Horizon Client 4.0 44
Configuring the PCoIP Client-Side Image Cache 44
3
Managing Remote Desktop and Application Connections 47
Connect to a Remote Desktop or Application 47 Share Access to Local Folders and Drives 49 Certificate Checking Modes for Horizon Client 52 Switch Desktops or Applications 53
Log Off or Disconnect 53
4
Using a Microsoft Windows Desktop or Application on a Linux System 55
Feature Support Matrix for Linux 55 Internationalization 58
Keyboards and Monitors 59
Using the Real-Time Audio-Video Feature for Webcams and Microphones 61 Saving Documents in a Remote Application 65
Set Printing Preferences for the Virtual Printer Feature on a Remote Desktop 65 Copying and Pasting Text 66
5
Troubleshooting Horizon Client 69
Problems with Keyboard Input 69 Reset a Remote Desktop or Application 69 Uninstall Horizon Client for Linux 70
6
Configuring USB Redirection on the Client 71
Setting USB Configuration Properties 72 USB Device Families 75
This guide, Using VMware Horizon Client for Linux, provides information about installing and using VMware Horizon™ Client™ software on a Linux client system to connect to a View desktop in the datacenter.
The information in this document includes system requirements and instructions for installing and using Horizon Client for Linux.
This information is intended for administrators who need to set up a View deployment that includes Linux client systems. The information is written for experienced system administrators who are familiar with virtual machine technology and datacenter operations.
NOTE This document pertains mostly to the Horizon Client for Linux that VMware makes available. In addition, several VMware partners offer thin and zero client devices for View deployments. The features that are available for each thin or zero client device, and the operating systems supported, are determined by the vendor, the model, and the configuration that an enterprise chooses to use. For information about the vendors and models for these client devices, see the VMware Compatibility Guide, available on the VMware Web site.
System Requirements and
Installation
1
Client systems must meet certain hardware and software requirements. The process of installing Horizon Client is like installing most other applications.
n System Requirements for Linux Client Systems on page 8
The Linux PC or laptop on which you install Horizon Client, and the peripherals it uses, must meet certain system requirements.
n System Requirements for Real-Time Audio-Video on page 11
Real-Time Audio-Video works with standard webcam, USB audio, and analog audio devices, and with standard conferencing applications like Skype, WebEx, and Google Hangouts. To support Real-Time Audio-Video, your View deployment must meet certain software and hardware requirements.
n Requirements for Using Flash URL Redirection on page 12
Streaming Flash content directly from Adobe Media Server to client endpoints lowers the load on the datacenter ESXi host, removes the extra routing through the datacenter, and reduces the bandwidth required to simultaneously stream live video events to multiple client endpoints.
n Smart Card Authentication Requirements on page 13
Client systems that use a smart card for user authentication must meet certain requirements.
n Supported Desktop Operating Systems on page 14
Administrators create virtual machines with a guest operating system and install agent software in the guest operating system. End users can log in to these virtual machines from a client device.
n Preparing Connection Server for Horizon Client on page 14
Administrators must perform specific tasks to enable end users to connect to remote desktops and applications.
n Install or Upgrade Horizon Client for Linux from VMware Product Downloads on page 14
With Horizon Client 3.2 and later, you can download and run a Horizon Client installer bundle from the VMware Downloads page. This installer contains modules for features such as USB redirection, virtual printing, Real-Time Audio-Video, smart card, and client drive redirection.
n Install Horizon Client for Linux from the Ubuntu Software Center on page 20
If you have a Ubuntu system, you can install the client from the Ubuntu Software Center as an alternative to installing the version provided on the VMware Downloads Web site. If you use the Ubuntu Software Center, you install the client by using the Synaptic Package Manager.
n Configure VMware Blast Options on page 21
In Horizon Client 4.0 and later, you can configure decoding and network protocol options for remote desktop and application sessions that use the VMware Blast display protocol.
n Horizon Client Data Collected by VMware on page 22
If your company participates in the customer experience improvement program, VMware collects data from certain Horizon Client fields. Fields containing sensitive information are made anonymous.
System Requirements for Linux Client Systems
The Linux PC or laptop on which you install Horizon Client, and the peripherals it uses, must meet certain system requirements.
NOTE These system requirements pertain to the Horizon Client for Linux that VMware makes available. In addition, several VMware partners offer thin and zero client devices for View deployments. The features that are available for each thin or zero client device, and the operating systems supported, are determined by the vendor and model and the configuration that an enterprise chooses to use. For information about the vendors and models for these client devices, see the VMware Compatibility Guide, available on the VMware Web site.
NOTE
n Starting with version 7.0, View Agent is renamed Horizon Agent.
n VMware Blast, the display protocol that is available starting with Horizon Client 4.0 and Horizon Agent
7.0, is also known as VMware Blast Extreme.
Architecture Intel-based, ARM
Memory At least 2GB of RAM
Operating systems n Horizon Client 4.0 supports the following operating systems.
Operating System Version
Ubuntu 12.04, 14.04
Ubuntu x64 12.04, 14.04
Red Hat Enterprise Linux (RHEL) 6.7, 7.2 SUSE Linux Enterprise Desktop (SLED) 11 SP4
CentOS 6.7
n Horizon Client 3.5 supports the following operating systems.
Operating System Version
Ubuntu 12.04, 14.04
Ubuntu x64 12.04
Red Hat Enterprise Linux (RHEL) 6.6, 6.7 SUSE Linux Enterprise Desktop (SLED) 11 SP3
CentOS 6.6
IMPORTANT Ubuntu 12.04 is the only 64-bit Linux distribution that is supported.
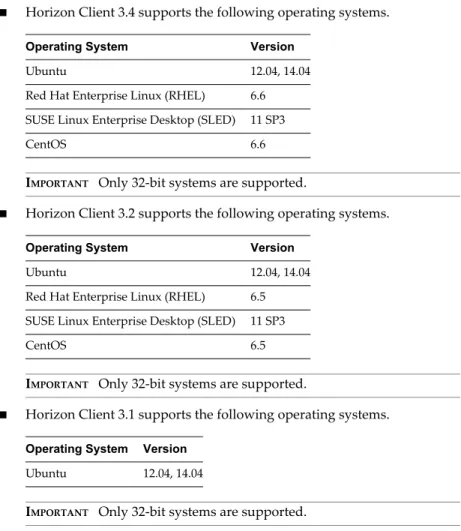
n Horizon Client 3.4 supports the following operating systems.
Operating System Version
Ubuntu 12.04, 14.04
Red Hat Enterprise Linux (RHEL) 6.6 SUSE Linux Enterprise Desktop (SLED) 11 SP3
CentOS 6.6
IMPORTANT Only 32-bit systems are supported.
n Horizon Client 3.2 supports the following operating systems.
Operating System Version
Ubuntu 12.04, 14.04
Red Hat Enterprise Linux (RHEL) 6.5 SUSE Linux Enterprise Desktop (SLED) 11 SP3
CentOS 6.5
IMPORTANT Only 32-bit systems are supported.
n Horizon Client 3.1 supports the following operating systems.
Operating System Version
Ubuntu 12.04, 14.04
IMPORTANT Only 32-bit systems are supported.
OpenSSL requirement Horizon Client requires a specific version of OpenSSL. If you have
Horizon Client 3.4 or later, the correct version is automatically downloaded and installed. If you have Horizon Client 3.2 or earlier, if you do not install the correct version of OpenSSL, the client might not start, might exit unexpectedly, or might not be able to connect to the server. The client might also be vulnerable to security bugs that exist in the older versions of libraries that are in use.
Table 1‑1. Open SSL Requirements for Specific Versions of Horizon Client
Client
Version Requirement
Horizon
Client 4.0 OpenSSL 1.0.2f or later. For your convenience, it you do not havethe correct version of OpenSSL, the Horizon Client installer will download and install the required version of OpenSSL
Horizon Client 3.4 and 3.5
OpenSSL 1.0.1m or later. For your convenience, it you do not have the correct version of OpenSSL, the Horizon Client installer will download and install the required version of OpenSSL
Table 1‑1. Open SSL Requirements for Specific Versions of Horizon Client (Continued)
Client
Version Requirement
Horizon
Client 3.2 OpenSSL 1.0.1i or later.IMPORTANT If you download the source code for OpenSSL 1.0.1i
from the OpenSSL Web site or some other site, compile, and install it, you might get libraries with the extension 1.0.0 or 1.0.1i, but Horizon Client looks for libraries with the extension 1.0.1. Specifically, the client looks for files named libssl.so.1.0.1 and
libcrypto.so.1.0.1 in system's library path. To work around this issue, you can create a symbolic link by linking libssl.so.1.0.1
to libssl.so.1.0.1i or libssl.so.1.0.0, as appropriate, and linking libcrypto.so.1.0.1 to libcrypto.so.1.0.1i or
libcrypto.so.1.0.0. Horizon
Client 3.1 OpenSSL 1.0.1h
View Connection Server, Security Server, and View Agent
Latest maintenance release of View 5.3.x and later releases
If client systems connect from outside the corporate firewall, VMware recommends that you use a security server. With a security server, client systems will not require a VPN connection.
Remote (hosted) applications are available only on Horizon 6.0 (or later) View servers.
Display protocol n VMware Blast (requires Horizon Client 4.0 or later and Horizon Agent
7.0 or later)
n PCoIP n RDP
Screen resolution on client system
Minimum: 1024 X 768 pixels
Hardware Requirements for VMware Blast and PCoIP
n x86- or x64-based processor with SSE2 extensions, with a 800MHz or
higher processor speed.
n Available RAM above system requirements to support various monitor
setups. Use the following formula as a general guide:
20MB + (24 * (# monitors) * (monitor width) * (monitor height))
As a rough guide, you can use the following calculations:
1 monitor: 1600 x 1200: 64MB 2 monitors: 1600 x 1200: 128MB 3 monitors: 1600 x 1200: 256MB
Hardware Requirements
for RDP n x86- or x64-based processor with SSE2 extensions, with a 800MHz orhigher processor speed.
n 128MB RAM.
Software Requirements
Software Requirements for FreeRDP
If you plan to use an RDP connection to View desktops and you would prefer to use a FreeRDP client for the connection, you must install the correct version of FreeRDP and any applicable patches. See “Install and Configure FreeRDP,” on page 42.
Other Software Requirements
Horizon Client also has certain other software requirements, depending on the Linux distribution you use. Be sure to allow the Horizon Client installation wizard to scan your system for library compatibilities and dependencies. The following list of requirements pertains only to Ubuntu distributions.
n To support idle session timeouts: libXsso.so.1.
n To support Flash URL redirection: libexpat.so.1. (The libexpat.so.0
file is no longer required.)
n To support USB redirection and Real-Time Audio-Video: libudev0.
NOTE By default, libudev0 is not installed in Ubuntu 14.04.
n To improve performance when using multiple monitors, enable
Xinerama.
System Requirements for Real-Time Audio-Video
Real-Time Audio-Video works with standard webcam, USB audio, and analog audio devices, and with standard conferencing applications like Skype, WebEx, and Google Hangouts. To support Real-Time Audio-Video, your View deployment must meet certain software and hardware requirements.
This feature is supported on the following versions of Horizon Client for Linux:
n Horizon Client 3.2 or a later release that is available from VMware.
n Horizon Client 2.2 or a later release that is available from third-party vendors.
View remote desktop The desktops must have View Agent 5.3 or later, or Horizon Agent 7.0 or
later, installed. For View Agent 5.3 desktops, the desktops must also have the corresponding Remote Experience Agent installed. For example, if View Agent 5.3 is installed, you must also install the Remote Experience Agent from View 5.3 Feature Pack 1. See the View Feature Pack Installation and
Administration document for View. If you have View Agent 6.0 or later, or
Horizon Agent 7.0 or later, no feature pack is required. Real-Time Audio-Video is not supported in remote applications.
Horizon Client computer
or client access device n In Horizon Client 3.4 and earlier, Real-Time Audio-Video is supportedon x86 devices only. In Horizon Client 3.5 and later, it is supported on
x86 and x64 devices. This feature is not supported on ARM processors. The client system processor must have at least two cores.
n Horizon Client requires the following libraries: n Video4Linux2
n libv4l
The plug-in file (/usr/lib/pcoip/vchan_plugins/libmmredir_plugin.so
in Horizon Client 3.5 and
earlier, /usr/lib/pcoip/vchan_plugins/libviewMMDevRedir.so in
Horizon Client 4.0) has the following dependencies.:
libuuid.so.1 libv4l2.so.0 libspeex.so.1 libudev0
libtheoradec.so.1 libtheoraenc.so.1 libv4lconvert.so.0 libjpeg.so.8
All of these files must be present on the client system or the Real-Time Audio-Video feature will not work. Note that these dependencies are in addition to the dependencies required for Horizon Client itself.
n The webcam and audio device drivers must be installed, and the
webcam and audio device must be operable, on the client computer. To support Real-Time Audio-Video, you do not have to install the device drivers on the desktop operating system where the agent is installed.
Display protocol for
View n PCoIP
n VMware Blast (requires Horizon Client 4.0 or later and Horizon Agent
7.0 or later)
Real-Time Audio-Video is not supported in RDP desktop sessions.
Requirements for Using Flash URL Redirection
Streaming Flash content directly from Adobe Media Server to client endpoints lowers the load on the datacenter ESXi host, removes the extra routing through the datacenter, and reduces the bandwidth required to simultaneously stream live video events to multiple client endpoints.
The Flash URL redirection feature uses a JavaScript that is embedded inside a Web page by the Web page administrator. Whenever a virtual desktop user clicks on the designated URL link from within a Web page, the JavaScript intercepts and redirects the ShockWave File (SWF) from the virtual desktop session to the client endpoint. The endpoint then opens a local VMware Flash Projector outside of the virtual desktop session and plays the media stream locally. Both multicast and unicast are supported.
This feature is available when used in conjunction with the correct version of the agent software. For View 5.3, this feature is included in the Remote Experience Agent, which is part of the View Feature Pack. For View 6.0 and later releases, this feature is included in View Agent or Horizon Agent.
To use this feature, you must set up your Web page and your client devices. Client systems must meet certain software requirements:
n This feature is supported on the version of Horizon Client provided by partners or provided on the
VMware download page, on x86 devices in Horizon Client 3.4 and earlier, on x86 and x64 devices in Horizon Client 3.5 and later, and for PCoIP only. This feature is not supported on ARM processors.
n Client systems must have IP connectivity to the Adobe Web server that hosts the ShockWave File (SWF)
that initiates the multicast or unicast streaming. If needed, configure your firewall to open the appropriate ports to allow client devices to access this server.
n Client systems must have the appropriate Flash plug-in installed.
a Install the libexpat.so.1 file, or verify that this file is already installed.
Ensure that the file is installed in the /usr/lib or /usr/local/lib directory.
b Install the libflashplayer.so file, or verify that this file is already installed.
Ensure that the file is installed in the appropriate Flash plug-in directory for your Linux operating system.
c Install the wget program, or verify that the program file is already installed.
For a list of the remote desktop requirements for Flash URL redirection, and for instructions about how to configure a Web page to provide a multicast or unicast stream, see the View documentation.
Smart Card Authentication Requirements
Client systems that use a smart card for user authentication must meet certain requirements.
Each client system that uses a smart card for user authentication must have the following software and hardware:
n Horizon Client
n A compatible smart card reader n Product-specific application drivers
You must also install product-specific application drivers on the remote desktops or Microsoft RDS host. Users that authenticate with smart cards must have a smart card, and each smart card must contain a user certificate.
In addition to meeting these requirements for Horizon Client systems, other View components must meet certain configuration requirements to support smart cards:
n For information about configuring Connection Server to support smart card use, see the topic
"Configure Smart Card Authentication," in the View Administration document.
All applicable CA (certificate authority) certificates for all trusted user certificates must be added to a server truststore file on the Connection Server host or security server host. These certificates include root certificates and must include intermediate certificates if the user's smart card certificate was issued by an intermediate certificate authority.
n For information about tasks you might need to perform in Active Directory to implement smart card
authentication, see the topics about preparing Active Directory for smart card authentication, in the
View Installation document.
Configure Horizon Client for Smart Card
In Horizon Client 3.5, to set up smart card authentication you must perform some configuration steps.
Prerequisites
Horizon Client is installed.
Procedure
1 Create the folder /usr/lib/vmware/view/pkcs11.
2 Create a symbol link to the pkcs11 library which is used for smart card authentication. For example, run the following command:
sudo ln -s /usr/lib/pkcs11/libgtop11dotnet.so /usr/lib/vmware/view/pkcs11
Supported Desktop Operating Systems
Administrators create virtual machines with a guest operating system and install agent software in the guest operating system. End users can log in to these virtual machines from a client device.
For a list of the supported Windows guest operating systems, see the "Supported Operating Systems for View Agent" topic in the View 5.x or 6.x installation documentation. See the "Supported Operating Systems for Horizon Agent" topic in the Horizon 7 installation documentation.
Some Linux guest operating systems are also supported if you have View Agent 6.1.1 or later, or Horizon Agent 7.0 or later, and Horizon Client 3.4 or later. For information about system requirements, configuring Linux virtual machines for use in Horizon 6 or Horizon 7, and a list of supported features, see
Setting Up Horizon 6 for Linux Desktops, which is part of the Horizon 6, version 6.1 documentation, or see Setting Up Horizon 7 for Linux Desktops.
Preparing Connection Server for Horizon Client
Administrators must perform specific tasks to enable end users to connect to remote desktops and applications.
Before end users can connect to Connection Server or a security server and access a remote desktop or application, you must configure certain pool settings and security settings:
n If you plan to use Access Point, which is available with Horizon 6 version 6.2 or later, configure
Connection Server to work with Access Point. See Deploying and Configuring Access Point. Access Point appliances fulfill the same role that was previously played by only security servers.
n If you are using a security server, verify that you are using the latest maintenance releases of
Connection Server 5.3.x and Security Server 5.3.x or later releases. See the View Installation document.
n If you plan to use a secure tunnel connection for client devices and if the secure connection is
configured with a DNS host name for Connection Server or a security server, verify that the client device can resolve this DNS name.
To enable or disable the secure tunnel, in View Administrator, go to the Edit View Connection Server Settings dialog box and use the check box called Use secure tunnel connection to desktop.
n Verify that a desktop or application pool has been created and that the user account that you plan to use
is entitled to access the pool. For Connection Server 5.3.x, see the topics about creating desktop pools in the View Administration document. For Connection Server 6.0 and later, see the topics about creating desktop and application pools in the Setting Up Desktop and Application Pools in View document.
n To use two-factor authentication with Horizon Client, such as RSA SecurID or RADIUS authentication,
you must enable this feature on Connection Server. For more information, see the topics about two-factor authentication in the View Administration document.
Install or Upgrade Horizon Client for Linux from VMware Product
Downloads
With Horizon Client 3.2 and later, you can download and run a Horizon Client installer bundle from the VMware Downloads page. This installer contains modules for features such as USB redirection, virtual printing, Real-Time Audio-Video, smart card, and client drive redirection.
NOTE On most Linux distributions, the Horizon Client installer bundle launches a GUI wizard. On SUSE Linux distributions, the bundle installer launches a command-line wizard. You can also run the installer with the --console option to launch the command-line wizard.
During the installation process, you are prompted to confirm whether to install various components. The default is to install all components except for Horizon Client 3.5, which does not, by default, install client drive redirection, a Tech Preview feature. The following table provides a brief summary of each optional component.
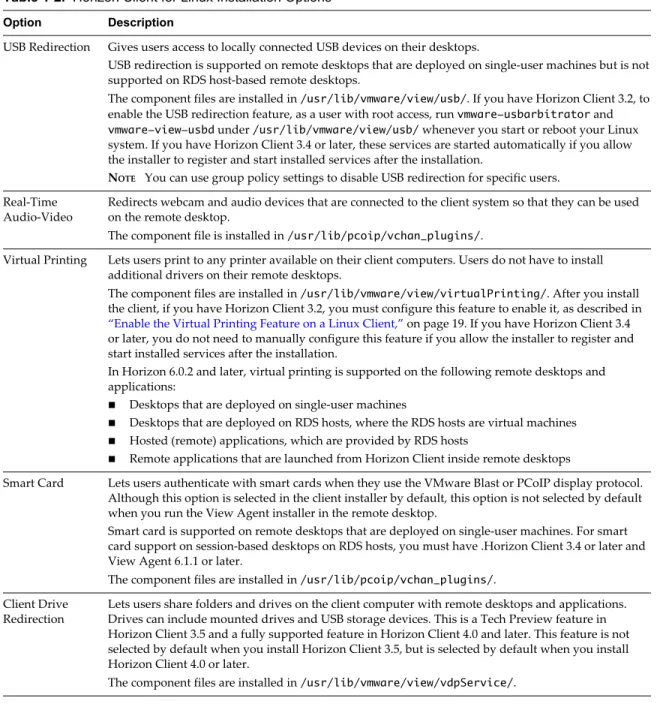
Table 1‑2. Horizon Client for Linux Installation Options
Option Description
USB Redirection Gives users access to locally connected USB devices on their desktops.
USB redirection is supported on remote desktops that are deployed on single-user machines but is not supported on RDS host-based remote desktops.
The component files are installed in /usr/lib/vmware/view/usb/. If you have Horizon Client 3.2, to enable the USB redirection feature, as a user with root access, run vmware-usbarbitrator and
vmware-view-usbd under /usr/lib/vmware/view/usb/ whenever you start or reboot your Linux system. If you have Horizon Client 3.4 or later, these services are started automatically if you allow the installer to register and start installed services after the installation.
NOTE You can use group policy settings to disable USB redirection for specific users.
Real-Time
Audio-Video Redirects webcam and audio devices that are connected to the client system so that they can be usedon the remote desktop. The component file is installed in /usr/lib/pcoip/vchan_plugins/.
Virtual Printing Lets users print to any printer available on their client computers. Users do not have to install additional drivers on their remote desktops.
The component files are installed in /usr/lib/vmware/view/virtualPrinting/. After you install the client, if you have Horizon Client 3.2, you must configure this feature to enable it, as described in “Enable the Virtual Printing Feature on a Linux Client,” on page 19. If you have Horizon Client 3.4 or later, you do not need to manually configure this feature if you allow the installer to register and start installed services after the installation.
In Horizon 6.0.2 and later, virtual printing is supported on the following remote desktops and applications:
n Desktops that are deployed on single-user machines
n Desktops that are deployed on RDS hosts, where the RDS hosts are virtual machines n Hosted (remote) applications, which are provided by RDS hosts
n Remote applications that are launched from Horizon Client inside remote desktops
Smart Card Lets users authenticate with smart cards when they use the VMware Blast or PCoIP display protocol. Although this option is selected in the client installer by default, this option is not selected by default when you run the View Agent installer in the remote desktop.
Smart card is supported on remote desktops that are deployed on single-user machines. For smart card support on session-based desktops on RDS hosts, you must have .Horizon Client 3.4 or later and View Agent 6.1.1 or later.
The component files are installed in /usr/lib/pcoip/vchan_plugins/. Client Drive
Redirection Lets users share folders and drives on the client computer with remote desktops and applications.Drives can include mounted drives and USB storage devices. This is a Tech Preview feature in Horizon Client 3.5 and a fully supported feature in Horizon Client 4.0 and later. This feature is not selected by default when you install Horizon Client 3.5, but is selected by default when you install Horizon Client 4.0 or later.
The component files are installed in /usr/lib/vmware/view/vdpService/.
Prerequisites
n Verify that the client system runs a supported operating system. See “System Requirements for Linux
Client Systems,” on page 8.
n For Horizon Client 3.2 and earlier, verify that OpenSSL 1.0.1i or later is installed on the client system.
For Horizon Client 3.4 and later, if the correct OpenSSL library is not installed, the installer downloads and installs it for you. See the release notes for the OpenSSL library version.
n Verify that you have root access on the host system.
n If you plan to use the RDP display protocol to connect to a View desktop, verify that you have the
appropriate RDP client installed. See “System Requirements for Linux Client Systems,” on page 8.
n If you have an earlier version of the Horizon Client software installed on the Linux client system,
uninstall that application before installing Horizon Client 3.2 or later. See “Uninstall Horizon Client for Linux,” on page 70.
n If you plan to use the command-line installer, familiarize yourself with the Linux command-line
installation options. See “Command-Line Installation Options for the Linux Client,” on page 17. As part of the installation process, the installer runs a scan of the system libraries to determine whether the system is compatible with Horizon Client, although you can select to skip the scan.
Procedure
1 On the Linux client system, download the Horizon Client installer file from the Horizon Client Product Downloads page at http://www.vmware.com/go/viewclients.
The name of the file is VMware-Horizon-Client-x.x.x-yyyyyyy.arch.bundle, where x.x.x is the version
number, yyyyyyy is the build number, and arch is either x86 or x64. x64 is available in Horizon Client 3.5
and later.
2 Open a Terminal window, change directories to the directory that contains the installer file, and run the installer, using the appropriate command.
Option Command
For the GUI wizard, if you have set executable permissions
sudo ./VMware-Horizon-Client-x.x.x-yyyyyyy.arch.bundle For the GUI wizard, if you have not
set executable permissions
sudo sh ./VMware-Horizon-Client-x.x.x-yyyyyyy.arch.bundle For the command-line installer sudo ./VMware-Horizon-Client-x.x.x-yyyyyyy.arch.bundle
--console
The installer wizard appears, prompting you to accept the end user license agreement. 3 Follow the prompts to finish the installation.
IMPORTANT If you are installing Horizon Client 3.4 or later, you are prompted to allow the installer to register and start installed services after the installation. Allowing the installer to complete these tasks means that you will not need to manually start USB redirection services every time you reboot, and you will not need to manually enable the virtual printing feature.
4 After installation is complete, specify whether to perform the compatibility scan for libraries that various feature components are dependent on.
The system scan displays a result value for each library compatibility.
Result Value Description
Success All needed libraries were found. Failed The specified library was not found.
IMPORTANT With Horizon Client 3.4, the scan reports failure if the
OpenSSL library is not installed (libssl.so.1.0.1 and libcrypto.so. 1.0.1 files), but you can safely ignore this failure because the installer will automatically download and install the correct library. This scan failure does not occur with Horizon Client 3.5 or later.
What to do next
If you have Horizon Client 3.2, to use the USB redirection feature, run vmware-usbarbitrator and vmware-view-usbd under /usr/lib/vmware/view/usb/. If you have Horizon Client 3.4 or later, performing this
procedure is not necessary if you specify that the installer should register and start installed services after the installation.
If you have Horizon Client 3.2, to use the virtual printing feature, perform the procedure described in
“Enable the Virtual Printing Feature on a Linux Client,” on page 19. If you have Horizon Client 3.4 or later, performing this procedure is not necessary if you specify that the installer should register and start installed services after the installation. When the user launches the client, a configuration file is automatically created and placed in the user's home directory.
Start Horizon Client and verify that you can log in to the correct virtual desktop. See “Connect to a Remote Desktop or Application,” on page 47.
Command-Line Installation Options for the Linux Client
You can use command-line installation options to install Horizon Client on a Linux system.
Install Horizon Client silently by using the --console option along with other command-line options and
environment variable settings. With silent installation, you can efficiently deploy View components in a large enterprise.
The following table lists the options you can use when you run the
VMware-Horizon-Client-x.x.x-yyyyyyy.arch.bundle installer file.
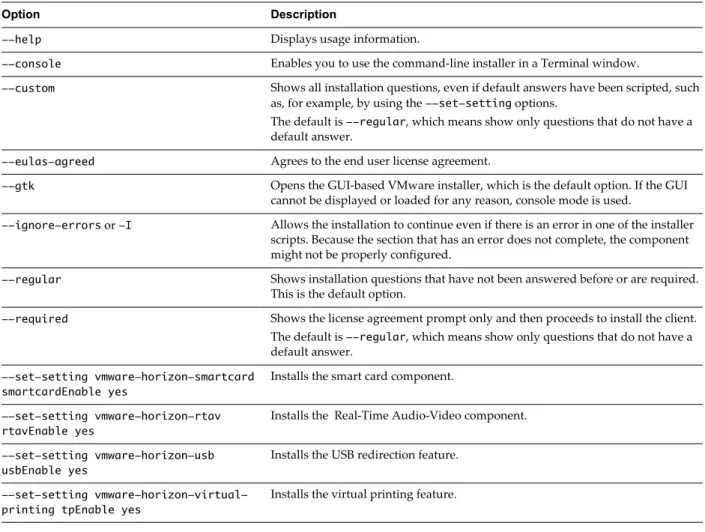
Table 1‑3. Linux Command-Line Installation Options
Option Description
--help Displays usage information.
--console Enables you to use the command-line installer in a Terminal window.
--custom Shows all installation questions, even if default answers have been scripted, such as, for example, by using the --set-setting options.
The default is --regular, which means show only questions that do not have a default answer.
--eulas-agreed Agrees to the end user license agreement.
--gtk Opens the GUI-based VMware installer, which is the default option. If the GUI cannot be displayed or loaded for any reason, console mode is used.
--ignore-errors or -I Allows the installation to continue even if there is an error in one of the installer scripts. Because the section that has an error does not complete, the component might not be properly configured.
--regular Shows installation questions that have not been answered before or are required.
This is the default option.
--required Shows the license agreement prompt only and then proceeds to install the client. The default is --regular, which means show only questions that do not have a default answer.
--set-setting vmware-horizon-smartcard smartcardEnable yes
Installs the smart card component.
--set-setting vmware-horizon-rtav rtavEnable yes
Installs the Real-Time Audio-Video component.
--set-setting vmware-horizon-usb usbEnable yes
Installs the USB redirection feature.
--set-setting vmware-horizon-virtual-printing tpEnable yes
Table 1‑3. Linux Command-Line Installation Options (Continued)
Option Description
--set-setting vmware-horizon-tsdr tsdrEnable yes
Installs the client drive redirection feature.
--stop-services (For Horizon Client 3.4 and later) Do not register and start installed services. In addition to the options listed in the table, you can set the following environment variables.
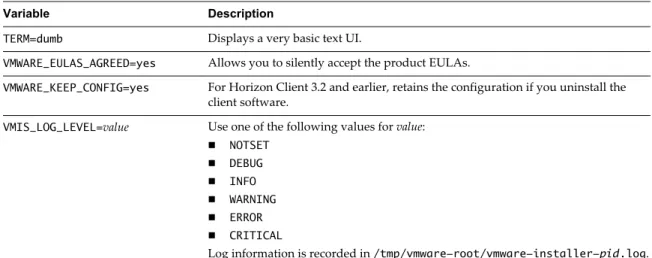
Table 1‑4. Linux Environment Variable Installation Settings
Variable Description
TERM=dumb Displays a very basic text UI.
VMWARE_EULAS_AGREED=yes Allows you to silently accept the product EULAs.
VMWARE_KEEP_CONFIG=yes For Horizon Client 3.2 and earlier, retains the configuration if you uninstall the client software.
VMIS_LOG_LEVEL=value Use one of the following values for value:
n NOTSET
n DEBUG
n INFO
n WARNING
n ERROR
n CRITICAL
Log information is recorded in /tmp/vmware-root/vmware-installer-pid.log.
Example: Silent Installation Commands
Following is an example of how to install Horizon Client silently, and, for each component, the example specifies whether to install that component.
sudo env TERM=dumb VMWARE_EULAS_AGREED=yes \
./VMware-Horizon-Client-x.x.x-yyyyyyy.arch.bundle --console \ --set-setting vmware-horizon-usb usbEnable no \
--set-setting vmware-horizon-virtual-printing tpEnable yes \ --set-setting vmware-horizon-smartcard smartcardEnable no\
--set-setting vmware-horizon-rtav rtavEnable yes \ --set-setting vmware-horizon-tsdr tsdrEnable yes
This next example shows how to perform a silent installation of Horizon Client using the default settings.
sudo env TERM=dumb VMWARE_EULAS_AGREED=yes \
Enable the Virtual Printing Feature on a Linux Client
The installer bundle for Horizon Client 3.2 and later includes a virtual printing component. If you have Horizon Client 3.2, you must create a configuration file and set some environment variables to enable the feature..
The virtual printing feature lets end users use local or network printers from a remote desktop without requiring that additional print drivers be installed in the remote desktop.
IMPORTANT Performing this procedure is usually not necessary if you have Horizon Client 3.4 or later because you can specify during client installation that the installer should register and start installed services after installation. When the user launches the client, a configuration file is automatically created and placed in the user's home directory
Prerequisites
You must use the installer bundle provided by VMware to install Horizon Client 3.2 or later. The virtual printing component is then installed by default.
Procedure
1 Open a Terminal window and enter a command to create a folder named .thnuclnt in the home
directory.
$ mkdir ~/.thnuclnt/
NOTE Because this file is created in a specific user's home directory, the file needs to be created for each user who will be using the Linux client system.
2 Use a text editor to create a configuration file called thnuclnt.conf in the ~/.thnuclnt folder, and add
the following text to the file:
autoupdate = 15 automap = true autoid = 0 updatecount = 1 editcount = 0
connector svc { protocol = listen
interface = /home/user/.thnuclnt/svc setdefault = true
}
In this text, substitute the user name for user. 3 Save and close the file.
4 Enter a command to start the thnuclnt process. $ thnuclnt -fg
5 Enter the commands to set the environment variables for the virtual printing components.
$ export TPCLIENTADDR=/home/user/.thnuclnt/svc $ export THNURDPIMG=/usr/bin/thnurdp
6 To launch Horizon Client, start the vmware-view process.
The printers that normally appear in the client are now also redirected so that they appear in the Print dialog boxes in your remote desktop.
7 (Optional) If you ever want to disable the virtual printing feature, use the following steps: a Enter a command to stop the thnuclnt process.
$ killall thnuclnt
b Disconnect from the remote desktop and reconnect to the desktop. The printers will no longer be redirected.
Install Horizon Client for Linux from the Ubuntu Software Center
If you have a Ubuntu system, you can install the client from the Ubuntu Software Center as an alternative to installing the version provided on the VMware Downloads Web site. If you use the Ubuntu Software Center, you install the client by using the Synaptic Package Manager.
This topic provides instructions for obtaining the client software from the Ubuntu software Center. With Horizon Client 3.2 and later, you can also obtain the Horizon Client software from the VMware Product Downloads Web site, as described in “Install or Upgrade Horizon Client for Linux from VMware Product Downloads,” on page 14.
IMPORTANT Customers using Linux-based thin clients must contact their thin client vendor for
Horizon Client updates. Customers who have successfully built their own Linux-based endpoints and need an updated client must contact their VMware sales representative.
Prerequisites
n Verify that the client system uses a supported operating system. See “System Requirements for Linux
Client Systems,” on page 8.
n Verify that you have the correct version of OpenSSL installed. See “System Requirements for Linux
Client Systems,” on page 8.
n Verify that you can log in as an administrator on the client system.
n If you plan to use the RDP display protocol to connect to a View desktop, verify that you have the
appropriate RDP client installed. See “System Requirements for Linux Client Systems,” on page 8.
n If you have a View Client 1.x or 2.x installed on the Linux client system, uninstall that application
before installing Horizon Client 3.1 or later. See “Uninstall Horizon Client for Linux,” on page 70.
Procedure
1 On your Linux laptop or PC, enable Canonical Partners.
a From the Ubuntu menu bar, select System > Administration > Update Manager. b Click the Settings button and supply the password for performing administrative tasks.
c In the Software Sources dialog box, click the Other Software tab and select the Canonical Partners check box to select the archive for software that Canonical packages for their partners.
d Click Close and follow the instructions to update the package list.
2 If you have Ubuntu 12.04 or 14.04, download and install the package from the Ubuntu software Center, as follows.
a Open a Terminal window and enter the command to get new packages:
sudo apt-get update
New packages are downloaded, and you see a list of the packages in the Terminal window. b Open the Update Manager, check for updates, and install updates.
c Open the Ubuntu Software Center app, and search on vmware-view-client.
d Install the vmware-view-client app.
If your operating system is Ubuntu 12.04 or 14.04, the latest version of Horizon Client is installed. An application icon for VMware Horizon Client appears in the Application Launcher.
3 If you have Ubuntu 10.04, download and install the package from the Ubuntu Software Center, as follows.
a From the Ubuntu menu bar, select System > Administration > Synaptic Package Manager b Click Search and search for vmware.
c In the list of packages returned, select the check box next to vmware-view-client and select Mark
for Installation.
d Click Apply in the toolbar.
If your operating system is Ubuntu 10.04, View Client for Linux 1.7 is installed.
e To determine that installation succeeded, verify that the VMware Horizon View application icon appears in the Applications > Internet menu.
What to do next
Start Horizon Client and verify that you can log in to the correct virtual desktop. See “Connect to a Remote Desktop or Application,” on page 47.
Configure VMware Blast Options
In Horizon Client 4.0 and later, you can configure decoding and network protocol options for remote desktop and application sessions that use the VMware Blast display protocol.
H.264 decoding has the following restrictions:
n Multiple monitors are not supported.
n The maximum resolution that is supported depends on the capability of the graphical processing unit
(GPU) on the client. A GPU that can support 4K resolution for JPEG/PNG might not be able to support 4K resolution for H.264. If a resolution for H.264 is not supported, Horizon Client uses JPEG/PNG instead.
H.264 decoding is supported on AMD and Nvidia GPUs only. Also, H.264 decoding requires that the graphics library OpenGL 3.2 or later is installed.
Prerequisites
Verify that you have Horizon Client 4.0 or later. VMware Blast is not supported in earlier Horizon Client versions. This feature also requires Horizon Agent 7.0 or later.
Procedure
1 In the desktop and application selector window, select Connection > Settings or click the Settings icon in the upper-right portion of the window, and select VMware Blast in the left pane of the Settings window.
2 Configure the decoding and network protocol options.
Option Description
H.264 Select this option to allow H.264 decoding in Horizon Client. When this option is selected (the default setting), Horizon Client uses H.264 decoding if the agent supports H.264 software encoding. If the agent does not support H.264 software encoding, Horizon Client uses JPG/PNG decoding. Deselect this option to always use JPG/PNG decoding.
UDP Select this option to allow UDP networking in Horizon Client. When this
option is selected (the default setting), Horizon Client uses UDP
networking if UDP connectivity is available. If UDP networking is blocked, Horizon Client uses TCP networking.
Deselect this option to always use TCP networking.
NOTE UDP is disabled by default on a Horizon remote desktop. For UDP
to work, it must be enabled on the desktop, the client, and the Blast Secure Gateway (BSG).
Your changes take effect the next time a user connects to a remote desktop or application and selects the VMware Blast display protocol. Your changes do not affect existing VMware Blast sessions.
Horizon Client Data Collected by VMware
If your company participates in the customer experience improvement program, VMware collects data from certain Horizon Client fields. Fields containing sensitive information are made anonymous.
VMware collects data on the clients to prioritize hardware and software compatibility. If your company's administrator has opted to participate in the customer experience improvement program, VMware collects anonymous data about your deployment in order to improve VMware's response to customer requirements. No data that identifies your organization is collected. Horizon Client information is sent first to Connection Server and then on to VMware, along with data from Connection Server instances, desktop pools, and remote desktops.
Although the information is encrypted while in transit to Connection Server, the information on the client system is logged unencrypted in a user-specific directory. The logs do not contain any personally
identifiable information.
The administrator who installs Connection Server can select whether to participate in the VMware customer experience improvement program while running the Connection Server installation wizard, or an
administrator can set an option in View Administrator after the installation.
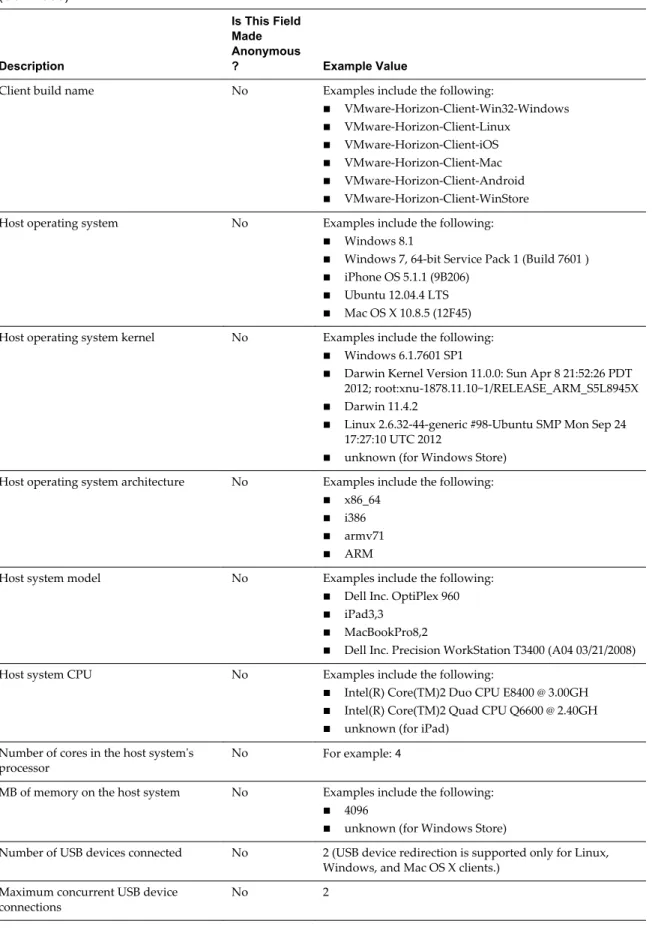
Table 1‑5. Data Collected from Horizon Clients for the Customer Experience Improvement Program
Description
Is This Field Made Anonymous
? Example Value
Company that produced the
Horizon Client application No VMware
Product name No VMware Horizon Client
Client product version No (The format is x.x.x-yyyyyy, where x.x.x is the client version number and yyyyyy is the build number.)
Client binary architecture No Examples include the following:
n i386 n x86_64 n arm
Table 1‑5. Data Collected from Horizon Clients for the Customer Experience Improvement Program (Continued)
Description
Is This Field Made Anonymous
? Example Value
Client build name No Examples include the following:
n VMware-Horizon-Client-Win32-Windows n VMware-Horizon-Client-Linux
n VMware-Horizon-Client-iOS n VMware-Horizon-Client-Mac n VMware-Horizon-Client-Android n VMware-Horizon-Client-WinStore
Host operating system No Examples include the following:
n Windows 8.1
n Windows 7, 64-bit Service Pack 1 (Build 7601 ) n iPhone OS 5.1.1 (9B206)
n Ubuntu 12.04.4 LTS n Mac OS X 10.8.5 (12F45)
Host operating system kernel No Examples include the following:
n Windows 6.1.7601 SP1
n Darwin Kernel Version 11.0.0: Sun Apr 8 21:52:26 PDT
2012; root:xnu-1878.11.10~1/RELEASE_ARM_S5L8945X
n Darwin 11.4.2
n Linux 2.6.32-44-generic #98-Ubuntu SMP Mon Sep 24
17:27:10 UTC 2012
n unknown (for Windows Store)
Host operating system architecture No Examples include the following:
n x86_64 n i386 n armv71 n ARM
Host system model No Examples include the following:
n Dell Inc. OptiPlex 960 n iPad3,3
n MacBookPro8,2
n Dell Inc. Precision WorkStation T3400 (A04 03/21/2008)
Host system CPU No Examples include the following:
n Intel(R) Core(TM)2 Duo CPU E8400 @ 3.00GH n Intel(R) Core(TM)2 Quad CPU Q6600 @ 2.40GH n unknown (for iPad)
Number of cores in the host system's
processor No For example: 4
MB of memory on the host system No Examples include the following:
n 4096
n unknown (for Windows Store)
Number of USB devices connected No 2 (USB device redirection is supported only for Linux, Windows, and Mac OS X clients.)
Maximum concurrent USB device
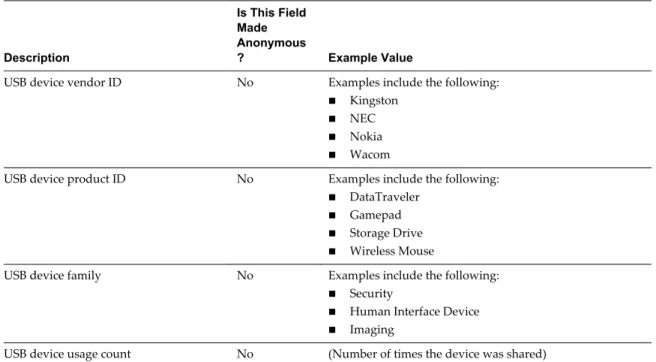
Table 1‑5. Data Collected from Horizon Clients for the Customer Experience Improvement Program (Continued)
Description
Is This Field Made Anonymous
? Example Value
USB device vendor ID No Examples include the following:
n Kingston n NEC n Nokia n Wacom
USB device product ID No Examples include the following:
n DataTraveler n Gamepad n Storage Drive n Wireless Mouse
USB device family No Examples include the following:
n Security
n Human Interface Device n Imaging
Configuring Horizon Client for End
Users
2
Horizon Client provides several configuration mechanisms to simplify the login and desktop selection experience for end users, and also to enforce security policies.
The following table shows only some of the configuration settings that you can set in one or more ways.
Table 2‑1. Common Configuration Settings
Setting Mechanisms for Configuring
View Connection Server address URI, Configuration File Property, Command Line Active Directory user name URI, Configuration File Property, Command Line Domain name URI, Configuration File Property, Command Line Desktop display name URI, Configuration File Property, Command Line Window size URI, Configuration File Property, Command Line Display protocol URI, Configuration File Property, Command Line Configuring certificate checking Configuration File Property
Configuring SSL protocols and
cryptographic algorithms Configuration File Property, Command Line This chapter includes the following topics:
n “Using URIs to Configure Horizon Client,” on page 26
n “Using the Horizon Client Command-Line Interface and Configuration Files,” on page 29 n “Configuring Certificate Checking for End Users,” on page 38
n “Configuring Advanced TLS/SSL Options,” on page 38
n “Configuring Specific Keys and Key Combinations to Send to the Local System,” on page 39 n “Using FreeRDP for RDP Connections,” on page 41
n “Enabling FIPS Mode on Horizon Client 3.2 and Earlier,” on page 43 n “Enabling FIPS Mode on Horizon Client 4.0,” on page 44
Using URIs to Configure Horizon Client
Using uniform resource identifiers (URIs), you can create a Web page or an email with links that end users click to launch Horizon Client, connect to Connection Server, and launch a specific desktop or application with specific configuration options.
You can simplify the process of connecting to a remote desktop or application by creating Web or email links for end users. You create these links by constructing URIs that provide some or all of the following information, so that your end users do not need to supply it:
n Connection Server address n Port number for Connection Server n Active Directory user name n Domain name
n Desktop or application display name n Window size
n Actions including reset, log off, and start session n Display protocol
To construct a URI, you use the vmware-view URI scheme with Horizon Client specific path and query parts.
NOTE You can use URIs to launch Horizon Client only if the client software is already installed on end users' client computers.
Syntax for Creating vmware-view URIs
Syntax includes the vmware-view URI scheme, a path part to specify the desktop or application, and,
optionally, a query to specify desktop or application actions or configuration options.
URI Specification
When you create a URI, you are essentially calling vmware-view with the full View URI string as an
argument.
Use the following syntax to create URIs for launching Horizon Client:
vmware-view://[authority-part][/path-part][?query-part]
The only required element is the URI scheme, vmware-view. For some versions of some client operating
systems, the scheme name is case-sensitive. Therefore, use vmware-view.
IMPORTANT In all parts, non-ASCII characters must first be encoded according to UTF-8 [STD63], and then each octet of the corresponding UTF-8 sequence must be percent-encoded to be represented as URI characters.
For information about encoding for ASCII characters, see the URL encoding reference at
http://www.utf8-chartable.de/.
authority-part Specifies the server address and, optionally, a user name, a non-default port
number, or both. Note that underscores (_) are not supported in server names. Server names must conform to DNS syntax.
Note that you cannot specify a UPN address, which includes the domain. To specify the domain, you can use the domainName query part in the URI. To specify a port number, use the following syntax:
server-address:port-number
path-part Specifies the desktop or application. Use the desktop display name or
application display name. This name is the one specified in View Administrator when the desktop or application pool was created. If the display name has a space in it, use the %20 encoding mechanism to represent
the space.
query-part Specifies the configuration options to use or the desktop or application
actions to perform. Queries are not case-sensitive. To use multiple queries, use an ampersand (&) between the queries. If queries conflict with each other, the last query in the list is used. Use the following syntax:
query1=value1[&query2=value2...]
Supported Queries
This topic lists the queries that are supported for this type of Horizon Client. If you are creating URIs for multiple types of clients, such as desktop clients and mobile clients, see the Using VMware Horizon Client guide for each type of client system.
action Table 2‑2. Values That Can Be Used with the action Query
Value Description
browse Displays a list of available desktops and applications hosted on the specified server. You are not required to specify a desktop or application when using this action.
start-session Launches the specified desktop or application. If no action query is provided and the desktop or application name is provided,
start-session is the default action.
reset Shuts down and restarts the specified desktop or remote
application. Unsaved data is lost. Resetting a remote desktop is the equivalent of pressing the Reset button on a physical PC. In Horizon Client 3.0, if you specify an application, the action will be ignored.
In Horizon Client 3.1, if you specify an application, the end user is prompted to confirm quitting all remote applications.
logoff Logs the user out of the guest operating system in the remote
desktop. If you specify an application, the action will be ignored or the end user will see the warning message "Invalid URI action."
appProtocol For remote applications, valid values are PCOIP and BLAST. For example, to
specify PCoIP, use the syntax appProtocol=PCOIP. This query is supported
only in Horizon Client 4.0 and later releases. In earlier Horizon Client releases, remote applications always use PCoIP.
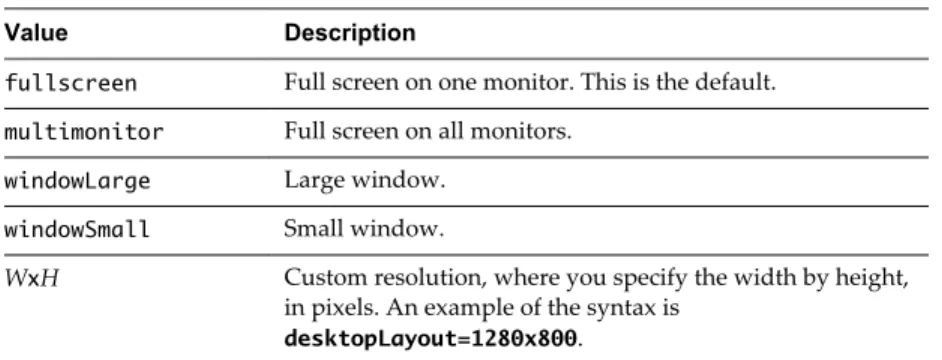
desktopLayout Sets the size of the window that displays a remote desktop. To use this
query, you must set the action query to start-session or else not have an
Table 2‑3. Valid Values for the desktopLayout Query
Value Description
fullscreen Full screen on one monitor. This is the default.
multimonitor Full screen on all monitors.
windowLarge Large window. windowSmall Small window.
WxH Custom resolution, where you specify the width by height, in pixels. An example of the syntax is
desktopLayout=1280x800.
desktopProtocol For remote desktops, valid values are RDP, PCOIP, and BLAST. For example, to
specify PCoIP, use the syntax desktopProtocol=PCOIP. BLAST is supported
only in Horizon Client 4.0 and later releases.
domainName The NETBIOS domain name associated with the user who is connecting to
the remote desktop or application. For example, you would use mycompany
rather than mycompany.com.
Examples of vmware-view URIs
You can create hypertext links or buttons with the vmware-view URI scheme and include these links in email
or on a Web page. Your end users can click these links to, for example, launch a particular remote desktop with the startup options you specify.
URI Syntax Examples
Each URI example is followed by a description of what the end user sees after clicking the URI link. 1 vmware-view://view.mycompany.com/Primary%20Desktop?action=start-session
Horizon Client is launched and connects to the view.mycompany.com server. The login box prompts the
user for a user name, domain name, and password. After a successful login, the client connects to the desktop whose display name is displayed as Primary Desktop, and the user is logged in to the guest operating system.
NOTE The default display protocol and window size are used. The default display protocol is PCoIP. The default window size is full screen.
You can change the defaults. See “Using the Horizon Client Command-Line Interface and Configuration Files,” on page 29.
2 vmware-view://view.mycompany.com:7555/Primary%20Desktop
This URI has the same effect as the previous example, except that it uses the nondefault port of 7555 for Connection Server. (The default port is 443.) Because a desktop identifier is provided, the desktop is launched even though the start-session action is not included in the URI.
3 vmware-view://[email protected]/Finance%20Desktop?desktopProtocol=PCOIP
Horizon Client is launched and connects to the view.mycompany.com server. In the login box, the User
name text box is populated with the name fred. The user must supply the domain name and password.
After a successful login, the client connects to the desktop whose display name is displayed as Finance
Desktop, and the user is logged in to the guest operating system. The connection uses the PCoIP
display protocol.
Horizon Client is launched and connects to the view.mycompany.com server. In the login box, the user
must supply the user name, domain name, and password. After a successful login, the client connects to the application whose display name is displayed as Calculator. The connection uses the VMware Blast display protocol.
5 vmware-view://[email protected]/Finance%20Desktop?domainName=mycompany
Horizon Client is launched and connects to the view.mycompany.com server. In the login box, the User
name text box is populated with the name fred, and the Domain text box is populated with
mycompany. The user must supply only a password. After a successful login, the client connects to the
desktop whose display name is displayed as Finance Desktop, and the user is logged in to the guest operating system.
6 vmware-view://view.mycompany.com/
Horizon Client is launched, and the user is taken to the login prompt for connecting to the
view.mycompany.com server.
7 vmware-view://view.mycompany.com/Primary%20Desktop?action=reset
Horizon Client is launched and connects to the view.mycompany.com server. The login box prompts the
user for a user name, domain name, and password. After a successful login, Horizon Client displays a dialog box that prompts the user to confirm the reset operation for Primary Desktop. After the reset occurs, depending on the type of client, the user might see a message indicating whether the reset was successful.
NOTE This action is available only if the View administrator has enabled this feature for end users. 8 vmware-view://
Horizon Client is launched, and the user is taken to the page for entering the address of a Connection Server instance.
HTML Code Examples
You can use URIs to make hypertext links and buttons to include in emails or on Web pages. The following examples show how to use the URI from the first URI example to code a hypertext link that says, Test Link, and a button that says, TestButton.
<html> <body>
<a href="vmware-view://view.mycompany.com/Primary%20Desktop?action=start-session">Test Link</a><br>
<form><input type="button" value="TestButton" onClick="window.location.href=
'vmware-view://view.mycompany.com/Primary%20Desktop?action=start-session'"></form> <br> </body>
</html>
Using the Horizon Client Command-Line Interface and Configuration
Files
You can configure Horizon Client using command-line options or equivalent properties in a configuration file.
You can use the vmware-view command-line interface or set properties in configuration files to define default
values your users see in Horizon Client or to suppress some dialog boxes from prompting users for information. You can also specify settings that you do not want users to change.
Processing Order for Configuration Settings
When Horizon Client starts up, configuration settings are processed from various locations in the following order:
1 /etc/vmware/view-default-config
2 ~/.vmware/view-preferences
3 Command-line arguments
4 /etc/vmware/view-mandatory-config
If a setting is defined in multiple locations, the value that is used is the value from the last file or command-line option read. For example, to specify settings that override users' preferences, set properties in
the /etc/vmware/view-mandatory-config file.
To set default values that users can change, use the /etc/vmware/view-default-config file. After users
change a setting, when they exit Horizon Client, any changed settings are saved in the ~/.vmware/view-preferences file.
Properties That Prevent Users from Changing Defaults
For many properties, you can set a corresponding view.allow property that controls whether users are allowed to change the setting. For example, if you set the view.allowDefaultBroker property to "FALSE" in the /etc/vmware/view-mandatory-config file, users will not be able to change the name of the server when
they connect using Horizon Client.
Syntax for Using the Command-Line Interface
Use the following form of the vmware-view command from a terminal window. vmware-view [command-line-option [argument]] ...
By default, the vmware-view command is located in the /usr/bin directory.
You can use either the short form or the long form of the option name, although not all options have a short form. For example, to specify the domain you can use either -d (short form) or --domainName= (long form). You might choose to use the long form to make a script more human-readable.
You can use the --help option to get a list of command-line options and usage information.
IMPORTANT If you need to use a proxy, use the following syntax:
http_proxy=proxy_server_URL:port https_proxy=proxy_server_URL:port vmware-view options
This workaround is required because you must clear the environment variables that were previously set for the proxy. If you do not perform this action, the proxy exception setting does not take effect in
Horizon Client Configuration Settings and Command-Line Options
For your convenience, almost all configuration settings have both a key=value property and a corresponding command-line option name. For a few settings, there is a command-line option but no corresponding property you can set in a configuration file. For a few other settings, you must set a property because no command-line option is available.
IMPORTANT Some command-line options and configuration keys are available only with the version of Horizon Client provided by third-party vendors. For more information about VMware thin-client and zero-client partners, see the VMware Compatibility Guide at
http://www.vmware.com/resources/compatibility/search.php?deviceCategory=vdm.
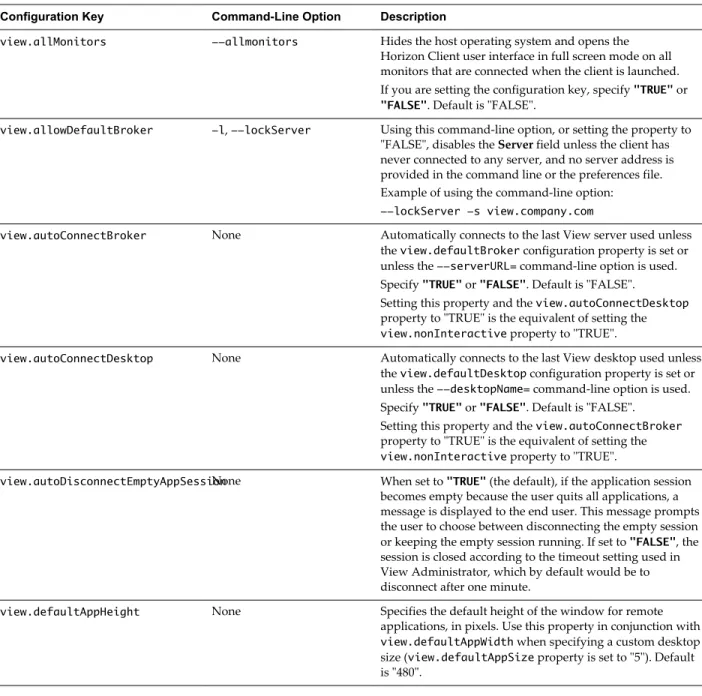
Table 2‑4. Horizon Client Command-Line Options and Configuration File Keys
Configuration Key Command-Line Option Description
view.allMonitors --allmonitors Hides the host operating system and opens the Horizon Client user interface in full screen mode on all monitors that are connected when the client is launched. If you are setting the configuration key, specify "TRUE" or
"FALSE". Default is "FALSE".
view.allowDefaultBroker -l, --lockServer Using this command-line option, or setting the property to "FALSE", disables the Server field unless the client has never connected to any server, and no server address is provided in the command line or the preferences file. Example of using the command-line option:
--lockServer -s view.company.com
view.autoConnectBroker None Automatically connects to the last View server used unless the view.defaultBroker configuration property is set or unless the --serverURL= command-line option is used. Specify "TRUE" or "FALSE". Default is "FALSE".
Setting this property and the view.autoConnectDesktop
property to "TRUE" is the equivalent of setting the
view.nonInteractive property to "TRUE".
view.autoConnectDesktop None Automatically connects to the last View desktop used unless the view.defaultDesktop configuration property is set or unless the --desktopName= command-line option is used. Specify "TRUE" or "FALSE". Default is "FALSE".
Setting this property and the view.autoConnectBroker
property to "TRUE" is the equivalent of setting the
view.nonInteractive property to "TRUE".
view.autoDisconnectEmptyAppSessionNone When set to "TRUE" (the default), if the application session becomes empty because the user quits all applications, a message is displayed to the end user. This message prompts the user to choose between disconnecting the empty session or keeping the empty session running. If set to "FALSE", the session is closed according to the timeout setting used in View Administrator, which by default would be to disconnect after one minute.
view.defaultAppHeight None Specifies the default height of the window for remote applications, in pixels. Use this property in conjunction with
view.defaultAppWidth when specifying a custom desktop size (view.defaultAppSize property is set to "5"). Default is "480".
Table 2‑4. Horizon Client Command-Line Options and Configuration File Keys (Continued)
Configuration Key Command-Line Option Description
view.defaultAppSize --appSize= Sets the default size of the window for remote applications:
n To use all monitors, specify "1".
n To use full screen mode on one monitor, specify "2".
n To use a large window, specify "3".
n To use a small window, specify "4".
n To set a custom size, specify "5"and then also set the
view.defaultAppWidth and view.defaultAppHeight
properties. Default is "1".
view.defaultAppWidth None Specifies the default width of the window for remote applications, in pixels. Use this property in conjunction with
view.defaultAppHeight when specifying a custom desktop size (view.defaultAppSize property is set to "5"). Default is "640".
view.defaultBroker -s, --serverURL= Adds the name that you specify to the Server field in Horizon Client. Specify a fully qualified domain name. You can also specify a port number if you do not use the default 443.
Default is the most recently used value. Examples of using the command-line option:
--serverURL=https://view.company.com -s view.company.com
--serverURL=view.company.com:1443
view.defaultDesktop -n, --desktopName= Specifies which desktop to use when autoConnectDesktop
is set to "TRUE" and the user has access to multiple desktops.
This is the name you would see in the Select Desktop dialog box. The name is usually the pool name.
view.defaultDesktopHeight None Specifies the default height of the window for the View desktop, in pixels. Use this property in conjunction with
view.defaultDesktopWidth when specifying a custom desktop size (view.defaultDesktopSize property is set to "5").
view.defaultDesktopSize --desktopSize= Sets the default size of the window for the View desktop:
n To use all monitors, set the property to "1" or use the command-line argument "all".
n To use full screen mode on one monitor, set the
property to "2" or use the command-line argument
"full".
n To use a large window, set the property to "3" or use the command-line argument "large".
n To use a small window, set the property to "4" or use the command-line argument "small".
n To set a custom size, set the property to "5"and then also set the view.defaultDesktopWidth and
view.defaultDesktopHeight properties.
Alternatively, specify the width by height, in pixels, at the command-line as "widthxheight".
Examples of using the command-line option:
--desktopSize="1280x800" --desktopSize="all"