25Live Configuration Utility
Before your school begins using 25Live, your R25/25Live functional administrator needs to use the 25Live Configuration Utility to set up key aspects of your 25Live environment to best meet the needs of your 25Live users and your institution’s event scheduling, publishing, e-commerce, and accounting requirements.
This document describes the 25Live Configuration Utility associated with 25Live release 21 and how to use it.
If you’re using an earlier release of 25Live and want to access the Configuration Utility document for that release do the following: 1 Access the 25Live Documentation page of Customer Resources: http://knowledge25.collegenet.com/display/CustomerResources/25Live+Documentation
2 Scroll to the bottom of the page and click the link for the 25Live release you’re using to access the document archive for that release. 3 Click the “25Live Configuration Utility” link.
Contents
If your school is using 25Live release 15 or earlier and you have previously edited inst.css, defaults.xml, and master list XML files to configure your 25Live environment, you must re-configure your environment using the 25Live Configuration Utility. Those earlier configuration settings will not be retained in versions of 25Live after release 15.
Topic Page
Configuration Utility overview 2
Accessing the Configuration Utility 4
Using the Configuration Utility 4
Application configuration 5
Event Wizard configuration 8
Events configuration 20
Locations configuration 21
Configuration Utility overview 25Live Configuration Utility
Configuration Utility overview
Description The 25Live Configuration Utility is deployed as part of the 25Live web server in its own folder. It provides the following configuration tabs you use to customize your 25Live environment:
Tasks configuration 22
Integration configuration 23
Topic Page
This configuration tab... Lets you specify...
Application • 25Live system defaults
• 25Live user defaults for the home tab, events, locations, resources, and tasks
• Calendar spud code for an alternate 25Live landing page Event Wizard • Event Wizard configurations
• Default schedulers
• Options for each security group: creation and editing Event Wizard configurations, creation date buffer, default scheduler, event creation success message, and event types and states available for selection • Email options
Events The event master list items— categories, types, custom attributes, and contact roles—you want to appear in 25Live.
Locations The location master list items— categories, features, layouts, and custom attributes—you want to
Configuration Utility overview 25Live Configuration Utility
The Configuration Utility also has a Home tab that provides WebServices and 25Live instance information.
Note Functional- and object-level security (FLS and OLS) settings further define what 25Live users are able to see and do in 25Live. To learn more, see the 25Live Viewer Seat and User Security Setup Supplement and the 25Live Administration Utility documents available here:
http://knowledge25.collegenet.com/display/CustomerResources/25Live+Documentation Intended
Configuration Utility user
The 25Live Configuration Utility is intended to be used by your R25/25Live functional administrator who must be a member of your administration security group (-1).
If you have multiple instances of 25Live
If your school has multiple instances of 25Live, you have a separate Configuration Utility instance for each. You must configure each 25Live instance using its associated Configuration Utility instance.
For example, if ABC University has two instances of 25Live, one for the School of Medicine (som) and another for all other Schools, they would:
• Use this instance of the Configuration Utility:
http://25live.abc.edu/abcsom/config.html
to configure this instance of 25Live: http://25live.abc.edu/abcsom
• Use this instance of the Configuration Utility:
http://25live.abc.edu/abc/config.html
to configure this instance of 25Live: http://25live.abc.edu/abc
The name of the 25Live instance you’re configuring is shown on the Configuration Utility Home tab.
This configuration tab... Lets you specify...
Resources The resource master list items— categories and custom attributes— you want to appear in 25Live. Tasks Any XSLT stylesheet files you’ve
created for BPE rules related to tasks. Integration 25Live event publishing,
e-commerce, and accounting settings.
Accessing the Configuration Utility 25Live Configuration Utility
Accessing the Configuration Utility
1 Enter the 25Live URL for the instance you’re configuring followed by “/config.html” in your browser and click <Enter>.
2 On the Configuration Utility sign in page, enter your 25Live/R25 username and password.
3 Click Sign In.
Using the Configuration Utility
The Configuration Utility is very easy to use.
1 At the top of the page, click the tab for the configuration area you want—Application, Event Wizard, Events, Locations, Resources, Tasks, or Integration.
2 Click through the configuration section tabs on the left, setting configuration options for each and, where applicable, taking appropriate associated actions. Each option is described, and required and optional settings are clearly marked.
3 Click Save All <configuration section> Changes. (You can also click Save Changes before going from one configuration section tab to the next, if you prefer.)
Note If you’ve made changes, but haven’t yet saved them, the associated configuration area tab label or section tab label is italicized to remind you to save. Unsaved section tabs are also marked with an orange bar.
Application configuration 25Live Configuration Utility
Application > User Defaults: Home example
Application configuration
The Application tab lets you specify: • 25Live system defaults
• 25Live defaults for users
• Calendar spud code for an alternate 25Live landing page
System Defaults Use the System Defaults section tab to set these configuration options:
Use this option... To specify...
Public Search Username
The username of the 25Live “default user” whose shared, “public” R25 searches are made available to all 25Live users. Feedback Email
Address
The email address 25Live users use to submit feedback. The address you enter is accessed from the “Feedback” link in the 25Live page footer.
Configuration Area Tabs
Application configuration 25Live Configuration Utility
Use this option... To specify...
Home Message (aka “Message of the Day”)
A message you want displayed below the tab bar on the Home Dashboard and Calendar. Valid XHTML is permitted. Sign In Message The message you want displayed in the
25Live user sign-in window. Valid XHTML is permitted.
Header Logo Link The URL link accessed from your site header. If you enter your school’s URL here (for example, http://www.yourschool.edu), 25Live users clicking on your site header will open your school’s website in a new window. If you don’t enter a URL here, your site header image file (specified in inst.css in your WebServices web server installation for 25Live) is unlinked and clicking on it does nothing.
Event Display Field Whether event names or event titles are used for primary event identification in 25Live.
Note: If you choose event title and an event has no title, the event name will be displayed in 25Live.
Email password reminder
Whether or not the password reminder link appears in 25Live.
Application configuration 25Live Configuration Utility
User Defaults Use the User Defaults section tabs to set these configuration options for 25Live users.
Use this User Defaults section tab...
And this option... To specify...
Home Default Home Mode The default view for the Home tab: Dashboard or Calendar. 25Live users can change the default setting from within the 25Live application if they want to. Default Home Calendar
Duration
The default date span for the Home Calendar view.
Available Home Searches
The searches to make available on the Home tab Calendar for 25Live Viewers and Users.
Default Home Search The default search for the Home tab Calendar. 25Live automatically runs the specified search and displays the results when the Home tab Calendar opens. Events Event Search Options The available options for event searches.
Event Search Default View
The default view for event search results: List or Calendar.
Event Default View The default view for an individual event: Details or Calendar.
Locations Location Search Options
The available options for location searches.
Location Search Default View
The default view for location search results: List, Availability, or Calendar.
Location Default View The default view for an individual location: Details, List, Availability, or Calendar. Resources Resource Search
Options
The available options for resource searches.
Resource Search Default View
The default view for resource search results: List, Availability, or Calendar.
Resource Default View The default view for an individual resource: Details, List, Availability, or Calendar.
Event Wizard configuration 25Live Configuration Utility
Alternate Landing
Page Calendar Use the alternate landing page for users consisting of a calendar of events set up Alternate Landing Page Calendar section tab to provide an and formatted in 25Live Publisher and a button link to the 25Live application. Copy and paste the spud code from the calendar's Publishing Control Panel into this field to embed the calendar in your landing page.
The web address for the Default Publisher Calendar is your school's base 25Live URL, followed by /calendar.html:
25Live.collegenet.com/<your school.edu>/calendar.html For example, if Awesome University’s 25Live instance is 25Live.collegenet.com/awesome, their calendar would be 25Live.collegenet.com/awesome/calendar.html
For information on calendar spud code, see 25Live Guide to Publishing Calendars available here:
http://knowledge25.collegenet.com/display/CustomerResources/25Live+Documentation
Event Wizard configuration
The Event Wizard tab lets you:
• Select a pre-defined 25Live Event Wizard layout for event creation and editing.
or
Configure custom Event Wizard layouts for event creation and editing.
or
Enter the name of your custom event GET file if you’ve created your own Business Process Extension (BPE) rules for event creation and editing. The default filename is event_get.xsl.
• Set up the list of your potential default schedulers
Use this User Defaults section tab...
And this option... To specify...
Tasks Tasks Default View The default view for tasks: Overview or Agenda.
Event Wizard configuration 25Live Configuration Utility
• Specify Event Wizard configurations, an event creation buffer, a default scheduler, an event creation success message, and/or the event types and states available for selection for each of your security groups.
• If you’re implementing BPE rules for custom handling of event PUT (input or output) creation/editing requests, specify those XSLT stylesheet files.
• Set up automated email messaging for a saved event.
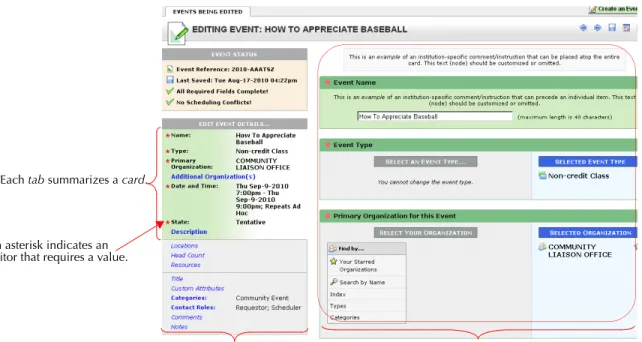
Event Wizard example
The 25Live Event Wizard is used to create and edit events. The
illustration below shows the structure of the Event Wizard and describes the terminology used for its various parts.
Each tab summarizes a card.
An asterisk indicates an editor that requires a value.
The currently selected tab on the left opens the corresponding
card and its associated editor(s)on the right. This area shows the tabs/
Event Wizard configuration 25Live Configuration Utility
Event Wizard editors Based on the actions you take on the Event Wizard tab in the
Configuration Utility, your Event Wizard in 25Live could have as many as 21 possible editors on up to a maximum of 21 cards. Any of the editors can be designated as requiring the user to enter a value, with the exception of Event Type which is always required to save an event in a state other than Draft.
This is a list of all potential editors:
Event Name (required) Event Description Event Custom Attributes Event Type Event Description
(HTML-Enabled)
Event Categories Primary Organization Event Locations Contact Roles Additional Organizations Event Head Count Event Comments Event Date and Time (required) Event Resources Internal Notes Event State Event Title Publish to Calendar Affirmation Expected Head Count Registered Head Count
Event Wizard configuration 25Live Configuration Utility
Implementing the Event Description (HTML-Enabled) and Publish to Calendar editors
Event Description (HTML-Enabled)
If you choose to implement the Event Description (HTML-Enabled) editor, Event Wizard users will be able to enter HTML in the event description editor using a WYSIWYG (What You See Is What You Get) HTML editor, and 25Live will automatically convert all content entered to valid XHTML.
Note 25Live users can also enter HTML in the non-HTML-enabled Event Description editor, but must do so via a plain text entry box rather than an HTML editor user interface. In this case, 25Live tests the validity of the HTML entered and prevents the event from being saved if the content is not XHTML-compliant.
Publish to Calendar
The Publish to Calendar editor facilitates approval of events for publishing to your event calendars.
If you choose to implement the Publish to Calendar editor, all
Administrative Event Requirements you’ve set up in R25 will appear in this editor. You may want to deactivate administrative requirements unrelated to 25Live Publisher calendars and, if not already included in your requirements list, add administrative requirements related to Publisher calendars, such as “Add to Master Calendar” or “Publish to Student Events Calendar.” Within the R25 Event Requirement form you can then set up specific contacts charged with maintaining and updating Publisher calendars to receive notification of these requirements. Once set up, when an event is saved as either Tentative or Confirmed in 25Live, the specified notification recipient(s) will be automatically notified via their 25Live task list, and can then review the event content and determine if the event should be published.
For more information, see Customizing the 25Live Event Wizard
available here:
http://knowledge25.collegenet.com/display/CustomerResources/ 25Live+Documentation
Event Wizard configuration 25Live Configuration Utility
Configuration Files Use the Configuration Files section tab to set these configuration options:
Use this option... To specify...
Event Wizard Configurations
The 25Live Event Wizard configuration(s) you want for event creation and editing. You can choose from these options: • One of two pre-defined Event Wizard
configurations:
More Editors Per Card, Fewer Wizard Cards
or
More Wizard Cards, Fewer Editors Per Card
If you choose one of these pre-defined Event Wizard configurations, all your 25Live users will use this Event Wizard configuration to create and edit events.
Note: Click the “[details]” link to see the card/editor configuration of each option.
• Custom Configurations
If you choose this option, you create custom Event Wizard configurations to allow you to tailor the event creation and/or editing experience for different groups of users.
• Custom BPE
If you’ve created a custom version of the event GET file to add additional BPE rules for an event GET and customize the order of cards and/or editors in the Event Wizard, choose this option and enter the name of your custom XSLT file (by default, event_get.xsl).
Event PUT (input) The name of the XSLT file you created to handle the input transform for events submitted from the Event Wizard that have not yet been saved to the database
(optional).
Event PUT (output) The name of the XSLT file you created to handle the output transform for events
Event Wizard configuration 25Live Configuration Utility
Note For further information to assist you in determining whether or not you need a custom version of the event GET file, see
Customizing the25Live Event Wizard.
For basic information on how you might implement custom BPEs at your school, see Using Business Process Extensions to Customize 25Live.
Both of these documents are available from the 25Live page on the Series25 Customer Resources site:
http://knowledge25.collegenet.com/display/CustomerResources/25Live+Documentation For information and examples of BPE rule development, see the
BPE Development Guide, available on the 25Live area of the FAQiki and Series25 Customer Resources.
For additional information on the potential of custom BPEs, contact Implementation Services: [email protected]. Custom
Configurations
Use the Custom Configurations section tab to create one or more custom configurations of the Event Wizard.
For each custom Event Wizard configuration you can: • Enter custom message text for cards and editors • Put editors in the order you want them
• Label editors as you want
• Define which editors appear on each card • Indicate which editors require a value • Put tabs/cards in the order you want them • Define the number of tabs/cards you want
If you selected an option other than “Custom Configurations” on the Configuration Files section tab, you can still create custom
configurations here, but they won’t take effect until you go back to the Configuration Files section tab and select “Custom Configurations.”
Event Wizard configuration 25Live Configuration Utility
To create a custom Event Wizard configuration
You must copy one of the pre-defined configurations (see page 12) or another previously created custom configuration to begin creating a new Event Wizard configuration.
1 On Custom Configurations > Manage Your Configurations, select the configuration you want to copy.
2 Click Copy Configuration.
3 Enter a name for your new configuration.
4 Determine how you want to modify the configuration you’ve copied—the number of cards you need, their order, which editors you want on each card and their order, which editors require a value, and any custom text you want on cards and/or editors—for this new configuration, then set it up appropriately.
To... Do this...
Enter custom message text for a card
1 Click “EDIT” to the right of “Custom Message.”
2 Enter the text of your custom message.
Event Wizard configuration 25Live Configuration Utility
To... Do this...
Change the order of a tab/card Click the up or down arrow of the card.
Add a new tab/card 1 Click Add New Card near the bottom of the page.
2 Add custom message text for the card if you want (see
below).
3 Add or move editors to the card as described below. Edit an editor’s name labels,
indicate whether users must provide a value in the editor, and/or enter any custom message text for an editor
1 Click “EDIT” to the right of the editor name.
2 Modify the editor Name label and/or Short Name label as needed (the latter is the name that appears on the tab).
3 Check the “Required” box if 25Live users must provide a value in this editor to save an event.
4 Enter the text of a custom message for this editor as needed.
5 Click “CLOSE.” Change the position of an
editor on a card
Click the up or down arrow of the editor.
Move an editor to another tab/card
Click the move arrow of the editor
and select the card from the drop-down list.
Event Wizard configuration 25Live Configuration Utility
5 When you’ve set up this Event Wizard configuration as you want it, click Save Changes at the bottom of the page.
Editing a configuration
You can edit an existing configuration by clicking Edit Configuration on Custom Configurations > Manage Your Configurations, then modifying the configuration as needed by following steps 4 - 5 starting on page 14. Setting a new default configuration
The More Editors Per Card, Fewer Wizard Cards is the initial default Event Wizard configuration for all 25Live users (all security groups), but you can change your configuration default on Custom
Configurations > Manage Your Configurations by selecting the configuration you want as the default and clicking Set as Default Configuration.
To... Do this...
Add an editor to a tab/card 1 At the bottom of the card, click Add New Editor.
2 Select the editor from the drop-down list. Only editors not already in use in this Event Wizard
configuration are listed. Remove an editor from a
tab/card
Click the remove button of the editor. The Event Name and Event Date and Time editors are required, so you can’t remove them (their remove button is grayed out).
By default, all 25Live security groups are initially assigned the default Event Wizard configuration. Any new 25Live security groups you set up later are also automatically assigned the default configuration. If you change the default from one configuration to another, security groups assigned the previous default configuration retain that assignment. They are not automatically assigned the new default configuration.
Event Wizard configuration 25Live Configuration Utility
Deleting a configuration
You can delete any configuration except the default by clicking Delete Configuration on Custom Configurations > Manage Your
Configurations.
Default Schedulers Use the Default Schedulers selection tab to choose the active 25Live users who could potentially be assigned as default schedulers for particular security groups. This allows you to specify a subset of your active users as potential default schedulers. You assign default
schedulers from this list to individual security groups using the Security Group Options section tab (see below).
To select an active user as a potential default scheduler, click the blue arrow to the right of their name to add them to the Default Scheduler list on the right. To de-select a default scheduler, click the X to the right of their name in the Default Scheduler list. Make sure to click Save Changes after you’re done selecting and/or de-selecting default schedulers.
Security Group Options
Use the Security Group Options section tab to specify for each security group:
• The Event Wizard configuration members of the security group will use when creating events.
• A “Creation Date Buffer” that specifies the number of days in advance of an event’s start date required to permit members of the security group to create an event. For example, if you set the “Creation Date Buffer” for a security group to “5 days,” members of the security group can only create an event that begins at least six days in the future (allowing five days of “buffer” time).
• A “Default Scheduler” for the 25Live security group. Events created by members of the security group are automatically routed to the scheduler designated here.
• A “Creation Success Message” that specifies the message a user in the security group receives when he/she successfully creates an event using the Event Wizard.
• The event types members of the security group can choose from when creating an event using the Event Wizard.
• The event states members of the security group can choose from when creating an event using the Event Wizard.
Event Wizard configuration 25Live Configuration Utility
• The Event Wizard configuration members of the security group will use when editing events. You may want to choose a different configuration for editing than you did for creation to, for example, limit the event data that can be edited by members of the security group once an event has been created.
Note You can specify any or all of the above options for any security group.
To specify options for a security group
1 Highlight the security group you want to specify options for, then click either Configure Group to load just that group or Configure All Groups to load all security groups.
2 If you clicked Configure All Groups in step 1, click the “Edit” link of a security group you want to specify options for.
3 Choose the Event Wizard configuration you want for event creation for this security group.
4 Choose a creation date buffer for the security group. 5 Choose a default scheduler for the security group.
6 Enter or edit the event creation success message as needed. 7 To limit the list of event types members of this security group can
choose from in the Event Wizard, click the “Restrict to Selected Event Types” radio button and select the types.
8 To limit the list of event states members of this security group can choose from in the Event Wizard, click the “Restrict to Selected Event States” radio button and select the states.
9 Choose the Event Wizard configuration you want for event editing If you selected an option other than “Custom Configurations” on the Configuration Files section tab, you can still specify security group options here, but they won’t take effect until you go back to the Configuration Files section tab and select “Custom Configurations.”
Event Wizard configuration 25Live Configuration Utility
10 If you clicked Configure All Groups in step 1, click the “Edit” link of each additional security group you want to specify options for and specify options as needed for each group.
11 Click Save Changes.
Email Options Use the Email Options section tab to set up emails to be automatically sent to an event’s Requestor and/or Scheduler whenever they create or edit an event and save it. You can select whether the Requestor and/or Scheduler should receive an email and customize the message body introduction which precedes the basic event details and event URL link which are automatically generated by 25Live. Valid XHTML can be used in your customized introduction. If an event’s Requestor and Scheduler are the same person, only the Scheduler email is sent. Note If you selected “Custom BPE” on the Configuration Files
section tab and you’ve created a BPE rule in your event GET stylesheet to automatically email event Requestors and/or Schedulers when they create and/or edit an event, you may not want to “turn on” automated email messaging here. Doing so could cause some individuals to receive multiple, redundant emails related to their events.
Events configuration 25Live Configuration Utility
Events configuration
The Events tab lets you enter the event category name you want to use for hot events (a system-defined event category) and select the R25 event categories, types, custom attributes, and contact roles you want to appear in 25Live.
Use this section tab and option...
To specify...
Categories > Event Categories
• The category name you want to use for “Hot Events” in 25Live
• The event categories you want to appear in the 25Live Event Wizard, when they’re specified for the event type, in 25Live event details, and in searches Types > Event Types The event types you want to appear in
25Live. Custom Attributes >
Event Custom Attributes
The event custom attributes you want to appear in the 25Live Event Wizard when they’re specified for the event type and in 25Live event details.
Contact Roles > Event Contact Roles
The event contact roles you want to appear in the 25Live Event Wizard, when they’re specified for the event type, in 25Live event details, and in searches.
Locations configuration 25Live Configuration Utility
Locations configuration
The Locations tab lets you select the R25 space (“location” in 25Live) categories, features, layouts, and custom attributes you want to appear in 25Live.
Resources configuration
The Resources tab lets you select the R25 resource categories and custom attributes you want to appear in 25Live.
Use this section tab and option...
To specify...
Categories > Location Categories
The location categories you want to appear in 25Live.
Features > Location Features
The space features you want to appear in 25Live.
Layouts > Location Layouts
The space layouts you want to appear in 25Live.
Custom Attributes > Location Custom Attributes
The space custom attributes you want to appear in 25Live.
Use this section tab and option...
To specify...
Categories > Resource Categories
The resource categories you want to appear in 25Live.
Custom Attributes > Resource Custom Attributes
The resource custom attributes you want to appear in 25Live.
Tasks configuration 25Live Configuration Utility
Tasks configuration
Business Process Extensions (BPEs)
If you’re implementing one or more BPE rules for custom handling of tasks in 25Live, you use the Business Process Extensions (BPEs) section tab to specify the XSLT stylesheet file to use for each transformation type.
If a 25Live security group’s functional security permission for event, location, and resource master definitions is set to “Can view, edit, and deactivate” or “Can view, edit, deactivate, create and delete,” members of that security group will see all master list items in 25Live, regardless of what Event, Location, and Resource master list items you’ve selected in the Configuration Utility. If set to “Can View,” the members will see only the master list items you’ve selected. See the 25Live
Administration Utility document for information on setting functional security permissions.
Use this option... To specify...
Tasks PUT (input) The name of the XSLT file you created to handle the input transform when event task changes are submitted from 25Live but not yet saved to the database.
Tasks PUT (output) The name of the XSLT file you created to handle the output transform when event task changes submitted from 25Live have been saved to the database.
Integration configuration 25Live Configuration Utility
Integration configuration
The Integration tab lets you set event publishing, e-commerce, and accounting options.
Publisher The Publisher section tab lets you specify 25Live Publisher settings.
Use this option... To specify...
Publisher Display Options
The feed options to display in the Send Events to 25Live Publisher window to let the
Publisher/user specify:
• Whether the event name (the default) or the event title is displayed in published calendars
• Whether the location short name (the default) or the location formal name is displayed
• Whether or not reservation comments are included in the feed
• Whether or not event occurrences are published if they don’t have a location assignment
• Whether or not setup and takedown times are displayed for events Event Publishing Date
Range
The date range when publishing event feeds.
Note: The larger the date window, the slower the Publisher updates.
Events-By-Location Publishing Date Range
The date range when publishing event feeds based on location.
Note: The larger the date window, the slower the Publisher updates.
Integration configuration 25Live Configuration Utility
E-Commerce The E-Commerce section tab lets you specify default 25Live E-Commerce settings.
The remaining settings—Registration URL and Services URL—should not be changed unless you are instructed to do so by CollegeNET Support.
25Live Accounting The 25Live Accounting section tab lets you set up one or more
instances of 25Live Accounting. This only applies to you if your school has signed a 25Live Accounting addendum to your CollegeNET contract.
Enter the following for each instance:
• Instance Name—a short name that identifies this instance to 25Live Accounting users. The name is simply an identifier and can be anything that makes sense in your event accounting environment. • Instance Login URL—the instance login URL provided to you by
Use this option... To specify...
Banner Image The URL of the image file you want to appear at the top of your event registration e-commerce forms for institution branding purposes. This should be an HTTPS-protected URL to avoid browser warnings. Merchant Description The text that appears on the customer’s
credit card bill identifying their event e-commerce transactions with your institution.
Institution ID Your institution’s unique identifier provided to you by CollegeNET. Contact your CollegeNET Account Manager if you don’t yet have an ID.
If you’re (1) a 25Live SaaS customer or (2) an existing 25Live E-Commerce customer who has previously entered your Institution ID in your 25live_common.asn file, you can leave this setting blank.
Important! Once you enter the ID, don’t change it.
Integration configuration 25Live Configuration Utility
• Instance Service URL—the instance service URL provided to you by your CollegeNET Account Manager.
• Instance Token—the instance token provided to you by your CollegeNET Account Manager.