PayDollar
Copyright Information
AsiaPay (HK) Limited
Room 1702, 17/F K. Wah Centre 191 Java Road
Hong Kong.
Telephone :(852) 3173 1929 / 2538 8278 Fax: (852) 2545 3898
Web site: http://www.asiapay.com
This document and the software described by this document are copyright 2009 by AsiaPay (HK) Limited. All rights reserved. Use of the software described herein may only be done in accordance with the License Agreement provided with the software. This document may not be reproduced in full or partial form except for the purpose of using the software described herein in accordance with the License Agreement provided with the software. Information in this document is subject to change without notice. Companies, names and data used in the examples herein are fictitious unless otherwise noted.
All trademarks are the property of their respective owners. This document is developed and produced in Hong Kong, SAR.
Confidentiality and Usage
The information contained in this document (and any attachments) is confidential information provided by AsiaPay (HK) Limited. This document is intended only for use by merchants, customers, partners and other parties approved by AsiaPay (HK) Limited. Any copying, distribution or dissemination of this document by any other parties is prohibited.
Revision History
Revision Date Revision Description
1.0 Mar 10, 2003 First issue
2.0 Dec 12, 2004 New functions & order status and documentation list update
2.1 Sep 20, 2005 Revised password policies
2.2 Aug 31, 2007 Add AliPay payment method
TABLE OF CONTENTS
OVERVIEW
... 6INTRODUCTION... 6
GETTING STARTED
... 7STEP 1–APPLY FOR A MERCHANT ACCOUNT... 7
STEP 2–INTEGRATE PAYDOLLAR PAYMENT SERVICES... 7
STEP 3–APPLICATION TEST... 7
STEP 4–OFFICIAL LAUNCH... 7
HOW DOES PAYDOLLAR PAYMENT SERVICES WORK?... 7
ADMINISTRATION TOOLS
... 9PAYDOLLAR MERCHANT ADMINISTRATION TOOLS... ….9
Merchant MTD Transaction Summary ...10
Merchant’s Bulletin Board...10
Hot Tips ...11 Online Help...11
MERCHANT’S PROFILE
... 12 GENERAL INFORMATION... 13 BANKING INFORMATION... 14 PAYMENT INFORMATION... 15 PAYMENT OPTIONS... 17OPERATIONS & REPORTS
... 18TRANSACTION DETAIL... 19
Void, Refund, Reverse and Capture Transaction ...25
Screening Function ...30
ESTATEMENT... 32
Settlement History ...32
Settlement Schedule ...35
SALES REPORT... 36
REFUND REPORT... 36
CHARGEBACK REPORT... 38
TRANSACTION SUMMARY REPORT... 39
BANK SETTLEMENT REPORT... 40
PAYALERT REPORT... 42
SERVICES CENTRE
... 44CHANGE PASSWORD... 45
USER ACCESS CONTROL... 46
User Group Maintenance ...47
Add User Group ...48
User Maintenance ...50
Update User ...51
Add User ...52
CREATE DIRECT PAYMENT LINK... 53
SCREENING MANAGEMENT... 54
Overview
Introduction
PayDollar is a powerful web-based online payment services platform, which provides secure, multi-channel, multi-lingual and multi-currency payment services. It is used by many renowned companies and organizations in the region.
This document will help you get the most from the PayDollar payment services. With this document, PayDollar merchants will be able to understand the various features of PayDollar services. It is suggested that you read this document prior to using PayDollar services. It contains valuable information that helps you to learn faster and enhance your experience.
Getting Started
There are several steps that must be completed prior to accept payments through PayDollar payment services.
Step 1
–Apply for a Merchant Account
Before any integration is being carried out, it is presumed that the merchant has already applied a merchant account with AsiaPay (HK) Limited. If you do not have a merchant account, please contact us for application.
Step 2
–Integrate PayDollar payment services
This step should be completed after reading our Integration Guide. PayDollar payment service supports different types of channels’ integration. Make sure that you have the right version of Integration Guide for your application.
Step 3 – Application Test
When steps 1 and 2 are completed, you may apply a testing account with us to test your application before the official launch of your online business. In the testing environment, only testing credit cards and account numbers work. During testing process, please enter some transactions and check to see that those transactions are authorized. Check the details of each transaction, such as Merchant name, currency, amount and etc. are correct. To check the details, you have to login your merchant admin tools which at PayDollar testing environment provides detail information for transaction of your account. If your testing does not give you the expected result, please contact us for assistance.
Step 4 – Official Launch
At the moment after satisfactory testing result, it is ready for your web application launch. Make sure necessary modifications are made for production environment. If everything is ready, you can start enjoying the benefits of real-time payment process with PayDollar.
How does PayDollar Payment Services work?
Merchants using PayDollar Payment Services can automatically authorize and settle credit card payments either on their web site or on standard payment interface on Paydollar.com with 128-bits SSL encryption. Transactions history is recorded in our database and merchants can access the information by logging into merchant administration tools at www.paydollar.com.
Usually, a transaction starts when a consumer makes a purchase at a merchant’s website. The required purchase information is sent securely to PayDollar Payment Services platform. Upon the transaction reaches PayDollar, our database records the information and requests the acquiring bank to authorize the transaction. The result is returned through our payment platform to client browser within seconds.
With PayDollar Administration Tools, the merchant can query the transactions’ status via their web browser. They can also perform actions like void, request refund, download report and etc. In the following sections, there contains detailed information on the features of PayDollar Administration Tools.
Administration Tools
Paydollar Merchant Administration Login
Merchant can access the Administration Tools, the user must set the correct URL or use the shortcut
link at www.paydollar.com homepage by selecting “Merchant Login”
(https://www.paydollar.com/b2c2/eng/merchant) and then enters Merchant ID, Login name and
Password in the form as shown below. Click the “Submit” button to submit the form. All fields are case sensitive. i.e. ‘ABC’ is not the same as ‘abc’.
Figure 1: Merchant Admin Login Screen
In the production environment, the data transmitted via browser will be encrypted. Please make sure there is lock-liked icon shown at the lower-right corner of your browser. This means the browser is protected and server connected is authenticated. To authenticate the identity of the server ID certificate, double click the icon to read the details. Contact PayDollar or the certificate issuer if there is any doubt.
The user will be temporarily locked when the system records more than 6 consecutive login failures due to incorrect password. Users are required to change password periodically. When a user’s password is expired, the system will prompt the user to change the password automatically.
After a successful login, the first page presented is the Merchant Admin Homepage as shown below.
Figure 2: Merchant admin home page
At the top of this home page, it contains account information, including:
- Merchant ID
- Merchant Name
- Last Logon, it shows the date and time last time you logon for security purpose.
Merchant MTD Transaction Summary
The Merchant MTD (Month to date) Transaction Summary shows transactions of the account in the current month by payment method.
Merchant’s Bulletin Board
Just below the Merchant MTD Transaction Summary, there is a Bulletin Board which covers the update news and benefits for merchants. You are recommended to view the contents regularly.
Hot Tips
“Your business is our business”. PayDollar always aims at providing comprehensive information to help our business partners and merchants like you to develop a profitable and healthy e-commerce business. This Hot Tips area contains useful information and business tips for e-business such as reference on fraud prevention and chargeback prevention.
Online Help
Simply click the ‘Help’ button on the right upper corner, you can get more information or explanation of items on the merchant admin tools usage.
In order to protect the user account, the login session will be expired automatically when the browser is idle for too long. You are highly recommended to logout the account when you are using a public terminal computer or leaving your seat.
At the left-hand-side of the screen are tags to other section: 1) Profile; 2) Operations; 3) Services; and 4) Support and these will be discussed in more detail.
Merchant’s Profile
When the Profile tag is selected, the menu of Merchant’s Profile section is shown as below.
Figure 3: Menu of Merchant’s Profile
This Merchant’s Profile section is divided into 2 parts:
i) Profile’s Information – records the Merchant Information: -
General information
Banking information
Payment information
ii) Profile Setting – shows a list of payment options: -
CVV2/CVC2 Checking
Datafeed failure alert email to contact email (depends on Datafeed setting) High risk country rejection
Cardholder name checking Decline transaction from same IP
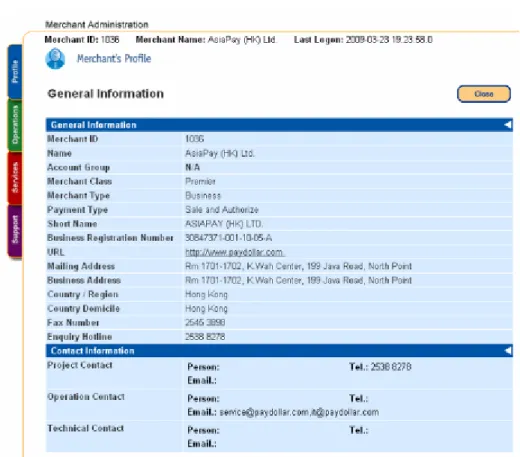
General Information
Figure 4: General Information Screen
Merchants have the responsibility to ensure the company information is up-to-date and accurate. The descriptions of the form as follow:
General Information
Field name Description
Merchant ID Unique ID number of the merchant account
Company Name Merchant’s registered company name
Merchant Class The plan applied for the merchant
Merchant Type Business type of merchant
Payment Type Type of payment to be accepted with this merchant account. Sale means the amount is debit from the credit card account, while Authorize only holds the request amount from the account without debit at instant.
Short Name Company name in short
Business Registration No. The certificate number of the company
URL Registered URL for online business
Business Address Registered address of the merchant’s company
Country / Region Country / Region of business registration
Country Domicile Country domicile of the registered company
Fax Number Corresponding fax number
Enquiry Hotline Telephone number for general enquiry about the merchant’s business. (e.g. Customer Service Hotline)
Enquiry Email Address Email address for general enquiry about the merchant’s business
Contact Person Contact person is the responsible person for the merchant account
Contact Number Contact person’s telephone number
Contact Email Address Contact person’s email address
Contact Information (Name, Telephone No. & Email)
Field name Description
Project Contact Person who is in charge of the PayDollar merchant account set-up
Operations Contact Person who is in charge of the daily operations of the online transactions
Technical Contact Person who is in charge of the technical issue related to this account
Paydollar will send email to your operation contact email address(es) for the followings: 1) real-time email notification of successful/unsuccessful transactions
2) chargeback and retrieval request notification 3) accounts related e.g. refund, payment invoice
To update the company profile information (e.g. business and mailing address, contact number, website URL), please submit the ‘Merchant Account Maintenance Form’. You can download this form at the Support session.
Banking Information
Figure 5: Banking Information Screen
Banking Information
Field name Description
Bank Name of settlement bank
Bank Account Title Registered name for the account
Bank Account Number Registered account number
Bank Account Currency Currency of settlement for the account
For HKD merchant accounts, you may register with our auto settlement service. For details, please contact our Accounts department at 852 3173 1968.
Payment Information
Figure 6: Payment Information Screen
Payment Information
Field name Description
Currency Currency setting for the merchant account
Return Value Link (Data Feed)
This is the location where merchant’s application accepts the return value of the payment transaction
Transaction Limit Maximum limit for each single transaction
Daily Limit Maximum total transaction amount per day
Monthly Limit Maximum total transaction amount per month
To request for a payment limit upgrade, please submit the ‘Merchant Account Maintenance Form’. You can download this form at the Support session. You have to provide supporting documents such as the new pricing plan, sales receipts and invoice for the bank’s approval. The application process will take around 7-10 working days.
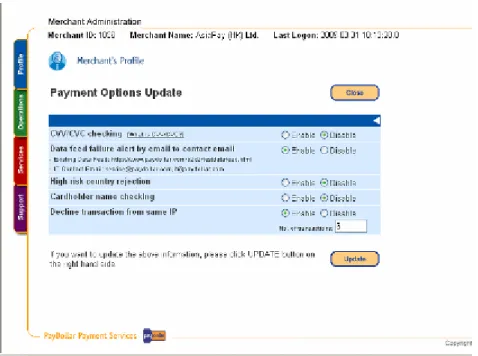
Payment Options
Figure 7: Payment Options Screen
For each payment option, you can enable or disable at anytime by simply selecting the options and click the button UPDATE to confirm the changes.
Option Description
CVV2/CVC2 Checking Card Verification Number is a 3-digit code imprinted on the back of the card. By
enabling this function, your customer will be required to enter the credit card number, expiry date and together with the Card Verification Number printed on the card before starting the online payment process. It is an add-on security function to avoid business loss due to the fraudulent use of card. For more details, please refer to the brief description about “What is CVC/CVV?” next to this function.
Datafeed failure alert email to contact email
When there is problem in returning you with the registered datafeed, we will send an email notification to your technical contact email
High Risk Country Rejection By enabling this function, all transactions originated from high risk countries will be blocked. To view the high risk country list, please visit the merchant admin homepage or ‘Online Help’.
Cardholder name checking This checking is subject to the card issuing bank
Decline transaction from the same IP
If you set the no. of transactions originated from the same IP to be N. Transaction N+1 onwards will be blocked by the system.
Operations & Reports
When the Operations tag is selected, the menu of Operations & Reports section is shown as below.
Figure 8: Menu of Operations & Reports
What administrator can do in this section is mainly checking the transaction details and generating reports. The menu is divided into 2 parts: i) Operations; and ii) Reports.
Sub-menu Contents
Operations -Transaction Details
-eStatement (for standard merchants)
Reports -Sales Report
-Refund Report (for standard merchants) -ChargeBack Report (for standard merchants) -Transaction Summary Report
-Bank Settlement Report (for premier merchants) -PayAlert Report
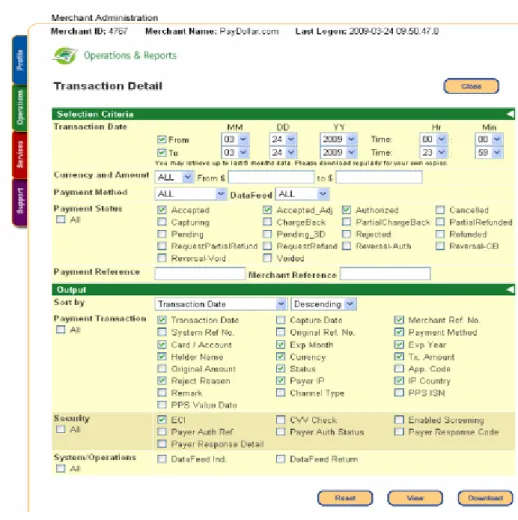
Transaction Detail
Figure 9: Transaction Detail screen
This function provides PayDollar merchants a powerful and flexible transaction searching and reporting based on the specified selection and sorting criteria. And, the selected details can also be downloaded to CSV format for recording and other processing reference. The first page of the Transactions Detail is to define selection criteria and output. Steps for transactions retrieval:
Steps Description
Step 1 – Define Searching Criteria
There are a number of selection criteria for searching. The logic of search is ‘AND’, i.e. Combination of all the fields. Leaving the field blank and selection to ALL will return all records. By default, only today’s transaction will be shown.
Step 2 – Output Sorting and fields to display
Output can be sorted by any of the criteria, ascending order or descending order. By default, the returned records are sorted by the field selected, such as Transaction Date, in descending order.
Step 3 – Submit Search Click View button to start searching and view online. Click Download button to download the extracted data.
Please note that the searching date range is set at 3 days and you may retrieve up to previous 6 months data. You are recommended to download the reports monthly for your own reference.
In order to provide a detail picture to Transaction Detail, there are descriptions of each selection criterion and output field in the following tables.
Selection Criteria of Transaction Detail
Field name Parameter / Type Description
Transaction Date From Date and To Date
(MM: Month; DD: Day; YY: Year; Hr: Hour; Min: Minutes)
Default value is today. Check From only to define the start date of search and Check To only to define the end date of search. Uncheck both From and To returns all transactions.
Currency and Amount Currency (Selection) and range of amount (Float)
Currency of transaction and amount or range of amount
Payment Method List of payment method Payment Method (e.g. Visa and MasterCard)
Order Status Check box:
-Accepted -Accepted_Adj -Authorized -Cancelled -Capturing -Chargeback -PartialChargeback -PartialRefunded -Pending -Pending_3D -Rejected -Refunded -RequestPartialRefunded -RequestRefund -Reversal-Auth -Reversal-CB -Voided -Reversal-Void
Accepted: Successful sale transaction
Accepted_Adj: Transaction is accepted but there is
a partial chargeback or partial refund involved
Authorized: Hold request transaction limit only;
awaiting for capture
Cancelled: Payment cancelled by customer Capturing: Transaction waiting for the completion
of a capture process
Chargeback: Cardholder raises a dispute to the
card issuer (full amount)
PartialChargeack: Cardholder raises a dispute to
the card issuer (partial amount)
PartialRefunded: Requisition of partial amount
refund is processed by PayDollar
Pending: Incomplete transaction
Pending_3D: Transaction waiting for completion of
3D authentication process
Rejected: Unsuccessful sale transaction Refunded: Requisition of full amount refund is
processed by PayDollar
RequestPartialRefunded: Requisition of partial
RequestlRefunded: Requisition of full amount
refund by merchant is submitted
Reversal-Auth: Cancellation of successful
authorized transaction by merchant
Reversal-CB: Chargeback transaction is
successfully appealed by merchant
Voided: Cancellation of successful transaction
before daily bank settlement by merchant
Reversal-Void: Withdraw the cancel request by
merchant
Payment Reference No. Number Payment Reference No. is a unique number generated by PayDollar platform. Separate by “,” (comma) for more than one entry.
Merchant Reference No. Text Reference No. submitted by merchant
Searching Output of Transaction Detail – Payment Transaction
Field name Description
Transaction Date Date of transaction
Capture Date Date of Capture process (for authorized transaction only)
Merchant Ref. No. Reference No. submitted by merchant
System Ref. No. PayDollar generated unique number for each payment transaction
Original Ref. No. A System Ref. No. of the original parent transaction of a transaction
Payment Method Method of payment, e.g. VISA or MasterCard
Card/Account Credit Card account number
Exp Month Expiry month of the card
Exp Year Expiry year of the card
Holder Name Credit Card’s Holder name
Currency Currency of transaction
Tx. Amount Amount of transaction
Original Amount Original amount of transaction when there is a modification during capture process
Status Payment status (e.g. Accepted and Rejected)
App. Code The return value code sent by bank or card company for successful payment
Reject Reason Reason for unsuccessful transaction
Payer IP IP address of transaction
IP Country Country origination of the transaction (Country code will be shown)
Remark Remark submitted by merchant
Searching Output of Transaction Detail - Security
Field name Description
ECI Electronic Commerce Indicator (ECI) is a value that is returned from the Directory Server (Visa, MasterCard, and JCB) to indicate the authentication results of your customer's credit card payment on 3D Secure. Refer to ‘Online Help’ for details.
CVV Check CVV2/CVC2 checking is an indicator to explain if the cardholder enters the verification number at the time of payment.
Y - CVV2/CVC2 is entered by cardholder during payment N - CVV2/CVC2 is NOT entered by cardholder during payment
(Applicable for merchants who have enabled CVV2/CVC2 checking function only)
Enabled Screening Merchant can selectively block a particular IP address or card number
Payer Auth. Ref 3D Payer Authentication Reference Data
Payer Auth Status 3D Payer Authentication Status
Y – Card is 3D-secure enrolled and authentication succeeds N – Card is 3D-secure enrolled but authentication fails P – 3D secure check is pending
A – Card is not 3D-secure enrolled yet U – 3D-sercure check is not processed
Payer Response Code Response code of authentication process
Payer Response Detail Response code ‘s description
Searching Output of Transaction Detail – System/Operations
Field name Description
DataFeed Result of Datafeed process:
T – Successfully get response from merchant’s defined datafeed page F – Fail to get response from merchant’s defined datafeed page or error occurs
DataFeed Return Acknowledged print out received from the merchant’s defined datafeed page
Paydollar provides a special function called the ‘unique merchant reference number checking’. You may enable/disable this function according to your business needs. For more details, please contact us at 852 3173 1929.
When the searching is finished, the result will be generated as the screen below.
Figure 10: Transaction Detail searching result
There is an Action column at the leftmost of the page which MAY contain any of these 4 buttons: i) Void, ii) Refund, iii) Capture, and; iv) Reverse. The Void and Refund actions are cancellation of success sales payment while Reverse action is cancellation of successfully authorized payment. And Capture action is confirmation of the payment and the amount will be debit from the credit card account once the Capture action is taken.
Hints: To achieve quicker results. For authorized transactions, if you wish to cancel the order at real time, you are suggested to first capture the transaction and void it, instead of doing reversal.
Action Type Description
Success Payment WITH DEBIT (Accepted)
Void Void is available before daily bank settlement.
Refund Refund is available within 14 days from the transaction (for full amount refund only)
Successfully Authorized Payment WITHOUT DEBIT (Authorized)
Capture Capture is available within 14 from the transaction. (exceptions subjected to payment bank) Reverse Reverse is available within 14 from the transaction. (exceptions subjected to payment bank)
CAPTURE of Authorized Transactions
PayDollar recommends our Merchants to perform the CAPTURE action as soon as the transaction is confirmed as valid. Once captured, the customer’s credit card will be debited and merchants can receive the payment as per the scheduled pay date. If the merchant does not capture/reverse the authorized transaction over 14 days, the credit limit will be released to the cardholder after a time period which is subjected to card issuing bank.
Full Amount Refund (for standard plan merchants)
Full Refund is available both online and offline. If the transaction has occurred within the 14 days after-sale period, merchants can perform online refund, by visiting the Transaction Detail Report, and clicking the REFUND Action button. If the transaction has occurred for more than 14 days, merchants can download a Merchant Refund Request form, from the Account Service in the Support Centre.
Partial Amount Refund (for standard plan merchants)
Partial refund is only available through offline application. Merchant can download the same form as mentioned above. Simply fill in the necessary details and send it back to AsiaPay for manual processing.
After receiving a refund request, AsiaPay will gather all the necessary information and send them to the bank for processing. The refund request will then be processed by the bank, and will take up to 4 to 6 weeks to credit into the customer’s credit card account.
Please note that different payment method has its own refund processing period. You have to send us the refund request latest as follows:
Payment Method Max. refund period
Visa / MasterCard / JCB / PPS 180 Days AliPay 90 Days
China UnionPay 30 Days
The merchant should directly settle the refund request with the customer after the above said period.
For Premier merchants and AE merchants, you have to contact the bank or card company directly to process refund.
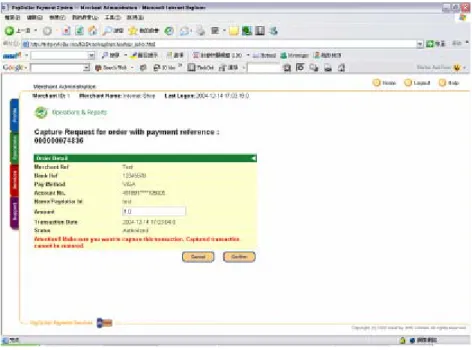
Void, Refund, Reverse and Capture Transaction
Figure 11: Void/Refund/Reverse Transaction
The above screen is opened when the Void, Refund or Reverse button is clicked. In this page, the detail transaction information is shown. To confirm the action, click the Confirm button to continue. If decided not to proceed, click the Cancel button.
To capture a transaction, the below screen is opened when the Capture button is clicked. You may choose to capture the original authorized amount or a smaller amount.
To learn more about the action log of a particular payment status for the transactions, simply click on the Status for that transaction; an Action History window will pop up, to show you more information. Action History lists all the actions performed for a particular transaction.
Figure 13: Payment Status
The Action History provides information on when a specific action is performed. The Action Date shows the date and time that lead to the present payment status. You can also find out the operator that is in charge of such action from the Operator column.
Additional Information on rejected and pending transactions
A. Rejected Transactions
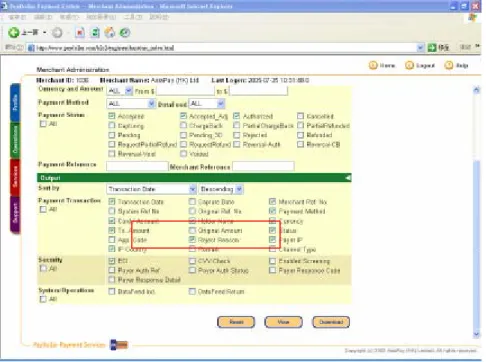
To learn more about why a transaction is being rejected, before viewing the Transaction Detail Report, please select the Reject Reason in the Output section, this will enable the Reject Reason to be displayed on the report as Reject Message.
Figure 15: Transaction Detail Report Options
The most common rejected reasons are:
1) Do not honour / Bank Decline: When the card under some account conditions that card issuers disapprove the transactions. Reasons behind includes marginally credit record, abnormal purchase amount or frequency, credit card not allowed for online payment, etc. Please invite your customers to contact the card issuing bank for the account status.
2) Payer Authentication Fail: Transaction authentication is very important in online payment process; authentication process can ensure the identity of the customers, and again to a large extent can lower the chance of chargeback cases. The 3D-secure check is enforced and the customer fails to confirm his/her identity. If the cardholder fails to pay with their VISA/MasterCard, please kindly invite the cardholder to contact the card issuing bank and register the Verified by VISA (VBV) / MasterCard SecureCode (MSC). If he has already registered the password, there may be input error during the payment, please check with the bank and try to process the transaction once again.
3) High Risk Country: A list of countries with a high reported incident of suspected fraud. By default, transactions originated from these countries will be blocked by system (Please go to Profile > Payment Options to change the checking status if necessary). Once you have disabled the checking, you are suggested to perform order confirmation with the customers whenever there is suspicion.
4) Expired Card: The cardholder inputs the expiry date wrongly, the transaction will be rejected with the reason of 'Expired Card'. Please invite your customers to contact the card issuing bank for the account status.
5) Invalid card number: The transaction may be rejected due to the customer entered the wrong card number. Please kindly invite your customers to perform the payment again and ensure that they are entering the correct card numbers.
6) Lost card: The card is reported as a lost card (by the cardholder) at the bank.
7) Stolen card, pickup card: The card is reported as a stolen card / being picked up by a third party.
8) Not sufficient funds: The credit limit of the card is not enough to process a transaction. Please invite your customers to contact the card issuing bank for the account status.
9) Blacklisted IP and card by merchant/system: After the merchant has applied a screening management, to block the IP address or credit card number of a particular transaction. That transaction will be rejected due to this blacklisted record.
10) Others: Please contact us for further details.
B. Pending Transactions
This may due to either the transaction is under processing or the Banking System does not respond to the transaction request. Please contact us at 852 3173 1929 for details.
Screening Function
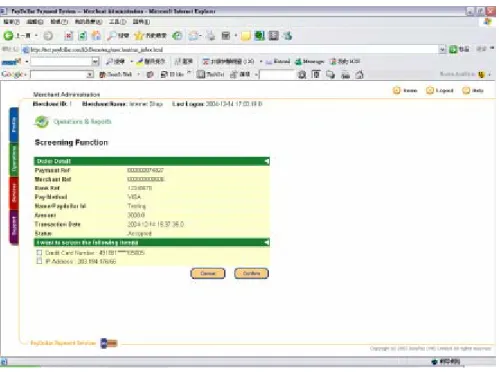
If the “Screening Function” box is checked as one of the Searching Output field in the report, a Screening column is added to the 2nd leftmost column of the page and a Screen button will be shown as below.
Figure 17: Transaction Detail Report with Screening Function
Once the Screen button is clicked, the above page is opened to facilitate the screening function. It allows the following screening effects:
Item Description
Screen the Credit Card Number Further transaction with that credit card number will be blocked
Screen the IP Address Further transaction from that IP address will be blocked
Both of the above items Further transaction either with that credit card number or from that IP address will be blocked
To confirm the action, click the Confirm button to continue. If decided not to proceed, click the Cancel button.
A Screening Management function is available under the Services tag to review or delete the current screening rules. Details of this function will be described in the later Services Centre section.
eStatement (for standard plan merchants)
(For premier merchants, please contact your acquiring bank for the settlement issue.)
This is an online statement which shows the settlement detail in either by group of payment method or one-by-one transaction listing. In addition, merchant can view their coming settlement schedule and current transaction fee settings.
Three functions are available in the eStatement’s menu:
Figure 19: eStatement Menu Screen
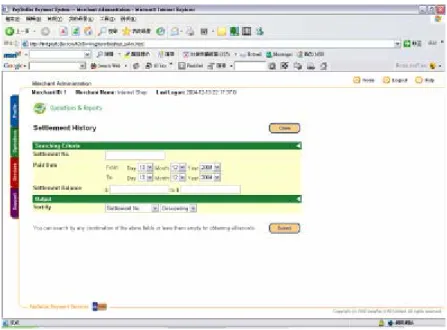
1) Settlement History
In this function, merchants are allowed to search the past settlement records by settlement number, paid date or settlement balance.
After clicking the SUBMIT button, available records will be shown as below:
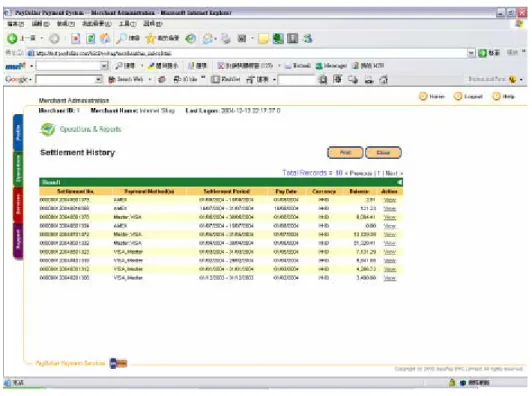
Figure 21: Searching Result Screen
In the above screen, there is an action column with a “View” hyperlink provided for every record. Once it is pressed, the settlement detail will be shown in statement format. Below is one of the statement samples.
For every statement, it is divided into 5 sections:
Section Description
Statement Information Includes merchant information and the statement no. and period
Sale & New Capture Transaction
Net balance of Sale transaction and New Capture transaction
* Net balance = Total Sale/New Capture transaction amount - transaction fee
Refund Transaction Net balance of Refund Transaction
* Net balance = Total Refund amount + Return charge
(Return charge means the transaction fee charged in the past/current statement)
Chargeback Transaction Net balance of Chargeback transaction
* Net balance = Total Chargeback amount + Return charge – Handling fee (Return charge means the transaction fee charged in the past/current statement)
Adjustment Adjustment details
Merchant can use the DETAIL button to view all the transactions that are included in the corresponding statement. Below is the sample layout:
2) Settlement Schedule
Merchant can view their coming settlement schedule by selecting their desired period. Any change on the settlement schedule will also be reflected in this function.
Figure 24: Settlement Schedule Screen
3) Setting Summary
It shows the current transaction fee setting for each payment method.
Sales Report
This online report provides a powerful reporting of Sales transactions based on the specified selection criteria including day range and currency. PayDollar merchant can choose to view, print or download (in CSV format) the report.
By default, the total sales within past 2 days will be shown.
Figure 26: Sales Report
Refund Report (for standard plan merchants)
Refund report, is similar to Sales report, which provides reporting of Refund transactions based on the specified selection criteria including day range and currency. PayDollar merchant can choose to view, print or download (in CSV format) the report.
By default, the total refund within past 2 days will be shown.
Figure 27: Refund Report
Chargeback Report (for standard plan merchants)
Chargeback report is an online report that provides a reporting of Chargeback transactions based on the specified selection criteria including day range and currency. PayDollar merchant can choose to view, print or download (in CSV format) the report.
By default, the total chargeback transaction within past 2 days will be shown.
Figure 28: Chargeback Report
Transaction Summary Report
Figure 29: Transaction Summary Report main screen
Transaction summary report is a concise report that provides a summary of total amount and number of transactions within the specified date range. Total amounts of all transactions breakdown by payment method are available. The following is a sample result page of the summary report.
Bank Settlement Report (for premier merchants)
After daily settlement, premier merchants can work on accounts reconciliation based on the bank settlement report and payment advice received from bank.
You can view the settlement by payment bank and settlement date.
Figure 31: Bank Settlement Report – Payment Bank and Settlement Date searching
Figure 32: Bank Settlement Result
You can choose to view or download the settlement report (in csv or txt format) for your own record.
PayAlert Report
PayAlert is a power fraud management tool designed by PayDollar to assist merchants closely monitoring the transactions. It displays a PayAlert alert symbol to indicate the merchants if there is suspicious transaction. The 3 different levels of PayAlert are High, Medium and Low, and each is represented with a different alert symbol:
- High PayAlert Level,
- Medium PayAlert Level, and
- Low PayAlert Level.
PayAlert Level
The table below shows the description and suggested actions to be taken for each PayAlert level. PayDollar recommends merchants when identifying suspicious transactions, to: 1). VOID or 2). REFUND the transactions, and even apply the screening management rule whenever necessary.
PayAlert Level Description Suggested Actions
High High PayAlert Level signifies a high level of doubt
and uncertainty about the transaction being checked. They are potentially caused by:
- Using stolen credit cards - Shoppers from high risk countries
- Unusual shopping patterns, such as repeated
orders, or transaction attempts using invalid information
- Credit card with a series of chargeback records
PayDollar highly recommends you to take active actions to ensure the buyer and the transaction are legitimate, to prevent fraudulent transactions. For example:
- Send email or call up to ensure the
shopper is valid and knows about the transaction
- Check shopper’s shipping address, billing
address, IP address and card issuer to see if it is suspicious
- Look through transactions carried out by
this particular shopper to study his/her spending history
Medium Medium PayAlert Level signifies inconsistencies in
the transaction being processed. It is less risky compared to High PayAlert Level, and potentially caused by:
- Unusual shopping patterns, such as repeated
orders, or transaction attempts using invalid information
- Credit card with chargeback records
You may wish to carry out further checks before fulfilling the order. Refer to the above actions listed for High PayAlert.
Low Low PayAlert Level indicates there is a slight
chance of fraud in the transaction. Potentially caused by:
- Repeated purchase within a short period of time
- Credit cards with a chargeback record
You may closely monitor the customer to early detect any undesirable or fraudulent behaviour.
Services Centre
When the Service tag is selected, the menu of Service Centre section is shown as below.
Figure 35: Services Centre main screen
This section provides a collection of functions for account configuration, user control and value-added services. Choose from the submenu, Account Configuration or Services, the merchant can select one of the following options:
Function Description
Account Configuration
Change Password To change admin login password of super admin
User Access Control To control / amend user and group access rights
Services
Create Direct Payment Link To generate static payment link
Change Password
Figure 36: Change Password screen
To change password, simply enter the old password, then the new password twice to confirm. Press the Submit button to change the password of your given login ID.
It is recommended to use a highly secure password with 7-15 characters. A good password should contain alphanumeric, and should be meaningless to most of the people and CANNOT be found dictionary. The new password chosen could not be the same as the previous 4 password being used before.
User Access Control
Figure 37: User Account Maintenance main screen
PayDollar Merchant Administration Tools allows different users to access the system. Super Admin may grant different access rights to different users or groups. This is useful, for instance that you may want a user or a group of users to have limited range of control over some aspects, while granting others on some other aspects.
Sub-menu Functions
User Group Maintenance -Define new group
-Group’s access right control -Edit access right
User Maintenance -Add new user -User search -Group assignment -User’s status control -Change password
User Group Maintenance
Figure 38: User Group Maintenance screen
In PayDollar system, a user must be assigned to a group in order to gain access rights. In the diagram at the right-hand-side, it illustrates the procedure of creating groups and assigning users. Since the ‘rights’ are assigned to a group level, instead of user level, a user must be grouped into a right group to gain the rights.
The screen above is the User Group Maintenance section in which list of groups will be shown. To view / update a group, click on the group name to open the group detail screen. To add a new group, click to open the Add User Group form as shown below.
Operations Group System Admin Ops Account System Service Group Step 1 -Define new group and grant rights to the group
Step 2 -Create user and assign the user to a group
Assignment Assignment
Add User Group
Figure 39: Add User Group screen
Create a new user group by completing the information, then selecting the access rights. Access right are divided in 3 levels:
- None means no access right
- Read only restricts user to edit / update any information
- Full means user is allowed to read and update information
Types and Functions are corresponding to the tag-menu (at the left-hand-side) and submenu of each section. When the access right of a function to a user is set as None, that menu item will not be seen by that user.
The following is the group detail screen of a sample user group. Update the group information and access right, then Confirm to complete and submit updated information.
User Maintenance
Figure 41: User Maintenance screen
User Maintenance is the second function of User Account Maintenance, in which administrator can add new user by clicking button. To search for a user, enter search criteria, such as Login ID, Name, Group and/or Status. Click Submit button to start searching. By default, i.e. click the Submit button without entering any criteria, all active user will be listed as the result screen shown below.
Update User
Figure 43: User Update screen
To update an existing user, click the Update link of that user under Action column of User Searching screen. It will present an Update User screen as above. When finish, click Submit button to complete the update process.
Add User
Figure 44: Add User screen
To add a user, click the button to open the add user form as shown above. Complete the information and then press Submit button when finish.
Create Direct Payment Link
Create Direct Payment Link is a function that helps merchants to create hyperlink with necessary payment parameters.
For example, after you have received an order by e-mail, you can input the necessary information on the page below, then send the hyperlink to the customer for payment.
Screening Management
Screening Management covers TWO main areas: - Credit Card Screening
IP Address Screening
This function shows all the currently filtered card number and IP addresses and allows deletion on specific record.
Support Centre
When the Support tag is selected, the menu of Support Centre section is shown as below.
Figure 48: Support Centre
In Support Centre, merchant can find useful information, such as vendor’s contact information, maintenance and refund request form, guidelines to risk and fraud management, etc.