INFORMATICS
LABORATORY WORK #2
SIMPLE C# PROGRAMS
Associate Professor A.S. Eremenko,
Simple C# programs
Objective: writing and compiling simple C# programs1.
For creation a source code2 files use: MS NotePad;
MS Visual C# 2010 Express;
MS Visual Studio 2010;
SharpDevelop.
Theory part
WHAT IS VISUAL STUDIO 2010?WHAT ABOUT VISUAL C#?
The first “Visual” language from Microsoft was Visual Basic. The first popular C-based language from Microsoft was Visual C++. Like Visual Basic, it had Visual in its name because it had a built-in graphical user interface (GUI — pronounced “GOO-ee”). This GUI included everything you needed to develop C++ programs.
Eventually, Microsoft rolled all its languages into a single environment —
Visual Studio. As Visual Studio 6.0 started getting a little long in the tooth, developers anxiously awaited version 7. Shortly before its release, however, Microsoft decided to rename it Visual Studio .NET to highlight this new environment’s relationship to .NET.
Visual Studio .NET differed quite a bit from its predecessors — enough to warrant a new name. Visual Studio 2010 is the third-generation successor to the original Visual Studio .NET.
1A computer program (or just a program) is a sequence of instructions written to
perform a specified task with a computer. A computer requires programs to function, typically executing the program's instructions in a central processor. The program has an executable form that the computer can use directly to execute the instructions. The same program in its human-readable source code form, from which executable programs are derived (e.g., compiled), enables a programmer to study and develop its algorithms.
2 In computer science, source code is any collection of computer instructions
Microsoft calls its implementation of the language Visual C#. In reality, Visual C# is nothing more than the C# component of Visual Studio. C# is C#, with or without Visual Studio.
CREATING YOUR FIRST CONSOLE APPLICATION
Visual Studio 2010 includes an Application Wizard that builds template programs and saves you a lot of the dirty work you’d have to do if you did everything from scratch.
Typically, starter programs don’t really do anything — at least, not anything useful. However, they do get you beyond that initial hurdle of getting started. Some starter programs are reasonably sophisticated. In fact, you’ll be amazed at how much capability the App Wizard can build on its own, especially for graphical programs.
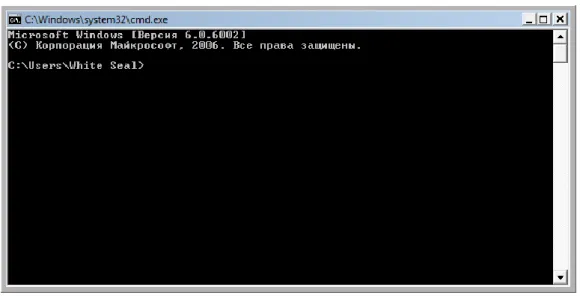
This starter program isn’t even a graphical program, though. A console
application3 is one that runs in the “console” within Windows, usually referred to as the DOS prompt or command window. If you press Ctrl+R and then type cmd, you see a command window. It’s the console where the application will run (see Fig.1).
Figure 1 Command window
3A console application is a computer program designed to be used via a text-only
The following instructions are for Visual Studio. If you use anything other than Visual Studio, you have to refer to the documentation that came with your environment. Alternatively, you can just type the source code directly into your C# environment.
CREATING THE SOURCE PROGRAM
To start Visual Studio, choose Start ➪ All Programs ➪ Microsoft Visual Studio 2010 ➪ Microsoft Visual Studio 2010.
Complete these steps to create your C# console app:
1. Open Visual Studio 2010 and click the New Project icon, shown in Figure 2. Visual Studio presents you with lots of icons representing the different types of applications you can create, as shown in Figure 3.
2. In this New Project window, click the Console Application icon. Make sure that you select Visual C# — and under it, Windows — in the Project Types pane; otherwise Visual Studio may create something like a Visual Basic or Visual C++ application. Then click the Console Application icon in the Templates pane.
Visual Studio requires you to create a project before you can start entering your C# program.
A projectis a folder in which you throw all the files that go into making your program. It has a set of configuration files that help the compiler do its work. When you tell your compiler to build (compile) the program, it sorts through the project to find the files it needs in order to re-create the executable program.
Figure 2
The default place to store this file is somewhere deep in your Documents
directory. Put your programs where you want them to go, not necessarily where Visual Studio wants them. To simplify working, you can change the default program location. Follow these steps to make that happen:
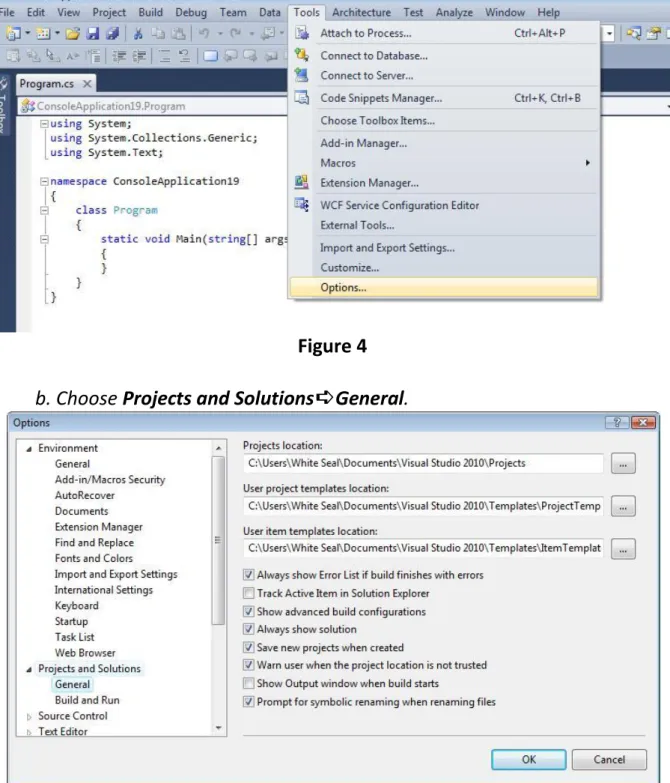
a. Choose Tools➪Options.
The Options dialog box opens.
Figure 4
b. Choose Projects and Solutions➪General.
Figure 5
(I recommend C:\temp for lab work in class.)
You can create the new directory in the Projects Location dialog box at the same time. Click the folder icon with a small sunburst at the top of the dialog box.
CLICK THE OK BUTTON
After these Visual Studio generates a file named Program.cs. (If you look in the window labeled Solution Explorer, you see some other files; ignore them for now. If Solution Explorer isn’t visible, choose View➪Solution Explorer.)
C# source files carry the extension4 .cs. The name Program is the default name assigned for the program file.
The contents of your first console app appear this way:
using ...
namespace Program1 {
class Program {
static void Main(string[] args) {
} }
}
Along the left edge of the code window, you see several small plus (+) and minus (–) signs in boxes. Click the + sign next to using .... This expands a code
region, a handy Visual Studio feature that minimizes clutter. Here are the
directives that appear when you expand the region in the default console app:
using System;
using System.Collections.Generic; using System.Linq;
using System.Text;
To execute the program, choose Debug5➪Start. The program brings up a
black console window and terminates immediately. (If you have a fast computer, the appearance of this window is just a flash on the screen.)
4A filename extension is a suffix (separated from the base filename by a dot) to
An alternative command, Debug➪Start Without Debugging.
WHAT IS THE SHARPDEVELOP?
SharpDevelop (also styled as #develop) is a free and open source integrated development environment (IDE) for the Microsoft .NET, Mono, Gtk# and Glade# platforms, and supports development in C#, Visual Basic .NET, Boo, F#, IronPython and IronRuby programming languages.
It was designed as a free and lightweight alternative to Microsoft Visual Studio, and contains an equivalent feature for almost every essential Visual Studio Express feature, including features for project management, code editing, application compiling6 and debugging. To allow for easy project migration, SharpDevelop works natively with Visual Studio project and code files. It is able to compile applications for .NET Framework version 2.0, 3.0, 3.5, 4.0 and the .NET Compact Framework 2.0 and 3.5.
Although not as widespread as the Visual Studio line of products, SharpDevelop is fairly popular and has been downloaded at least 6 million times worldwide.
SharpDevelop is written entirely in C# and consists of about 20 components that integrate to form the application. The source code editor component is known as AvalonEdit and can be utilized by others applications. Early in its development the project was split for Mono and Gtk# development into the MonoDevelop project.
Features
SharpDevelop includes features very similar to those found in Visual Studio, or Delphi/Kylix, including a GUI Designer, Code/Design views, Syntax highlighting, Auto completion menus (similar to IntelliSense) the ability to compile and debug form/console .NET Framework applications, the New Project wizard, Toolbars,
Menus, Panels, and a Panel docking system.
5Debugging is a methodical process of finding and reducing the number of bugs,
or defects, in a computer program or a piece of electronic hardware, thus making it behave as expected.
6A compiler is a computer program (or set of programs) that transforms source
SharpDevelop integrates Graphic User Interface Designers for the C#, VB.NET, Boo, and the IronPython and IronRuby languages, using the following GUI technologies:
Windows Forms;
Windows Presentation Foundation (WPF); Entity Framework.
Practice part
1. First program create using MS NotePad and save in C:\temp directory with new name (change default name to another with .cs extension):
using System;
using System.Collections.Generic;
using System.Text;
namespace SimpleCSharpApp {
class Program
{
static void Main() {
//Display a simple message to the user.
Console.WriteLine("***** My First C# App *****"); Console.WriteLine("Hello World!");
Console.WriteLine();
//Wait for Enter key to be pressed before shutting down.
Console.ReadLine(); }
} }
Step by step:
1. Source code creation (Visual Studio or NotePad).
2. Compile your code with C# compiler csc.exe (check Environment Variable
path, if you need specify path). 3. Run program.
After source code creation open command window (cmd) in directory you work in (C:\temp).
Path to compiler:
C:\Windows\Microsoft.NET\Framework\v2.0.50727\csc.exe
Figure 6
If you don’t have any errors in C:\temp directory will be created .exe file – your application that can be executed.
Execute your program in command window (type the name of your console application without extension and press Enter key):
Figure 7
Figure 8
2. Second Program: display message (using Visual Studio or SharpDevelop)
Copy the SharpDevelop folder to C:\temp directory. Find in
C:\temp\SharpDevelop\4.2\bin\ executable file SharpDevelop.exe and run it. Usage of SharpDevelop tool:
3. In New Project window choose the creation of Console Application, appropriate Location (C:\temp) and Name for your project.
4. In Program.cs file write the following code:
using System;
using System.Windows.Forms;
using System.Collections.Generic;
using System.Text;
namespace MessageDisplayApp {
public class Program
{
public static void Main() {
DisplayMessage(); }
static void DisplayMessage() {
// Using string.Format() to format a string literal.
string userMessage = string.Format("Fatal error :-)");
// You would need to reference System.Windows.Forms.dll
//in order to compile this line code!
System.Windows.Forms.MessageBox.Show(userMessage); }
6. Debug and Run your code.
3. Arguments (using Visual Studio or SharpDevelop in analogy to previous tasks):
using System;
using System.Collections.Generic;
using System.Text;
namespace ProcessingCLArgs {
class Program
{
{
//Process any incoming args.
for(int i=0; i<args.Length; i++)
Console.WriteLine("Arg: {0}", args[i]); Console.ReadLine();
return -1; }