Document Review History
Review Date
Reviewed By
Signature
2018
Document Change History
Change to Document
Reason for Change
GUIDELINE ON THE CARE
OF CHILDREN WITH CHEST DRAINS
Version Number
3
Date of Issue
27
thJuly 2015
Reference Number
CCCD-07-2015-ETMLTGRS-V3
Review Interval
3 yearly
Approved By
Name: Fionnuala O’ Neill
Title: Nursing Practice Development Coordinator
Signature:
June 2015
Authorised By
Name:Rachel Kenna
Title: Director of Nursing
Signature:
June 2015
Author/s
1st Edition & 2nd editionMary Gorman, Eileen Tiernan, Clinical Nurse Facilitator, PICUs. Tracey Wall (Breen), Marie Lavelle, Clinical Nurse Facilitator, St. Theresa’s Ward.
Tara Galligan & Mags Lynch, Clinical Nurse Facilitators, St Brigid’s Ward. Ann Costigan, Clinical Nurse Facilitator
3rd Edition
Eileen Tiernan, Clinical Coordinator, Graduate Diploma Critical Care Nursing (Children)
Marie Lavelle, CNF, Children’s Cardiac Centre Tara Galligan, CNM 2,Children’s Heart Centre Rosemary Sheehan, CNF, Our Lady’s Ward
1
stEdition:
2002
2
ndEdition:
August 2010
3
rdEdition:
July 2015
Review Date:
July 2018
Contents
Page No
1. Assisting with the Insertion of a Chest Drain(s)
2
2. Care of an Infant / Child with a Chest Drain(s)
6
(a) Changing a Chest Drain
12
(b) Sampling from a Chest Drain
14
3. Care of a Chest Drain Valve
15
(a) Heimlich Valve
15
(b)
Pneumostat ™ Valve
16
4. Removal of Chest Drain(s): Nursing Responsibilities
18
5. Assisting with Intrapleural Urokinase Treatment:
24
Nursing Responsibilities
6. Appendices
27
7. References
29
Introduction
One of the earliest reports of chest tube management in the literature is by Hewitt in 1876 when
he described a continuous plan of chest aspirations to drain empyema (Kam 1993). Major
advances in the development of pleural drainage systems have occurred with time and nursing
researchers continue to explore chest tube management. Effective nursing care of the child
with a chest drain must be informed by evidence based nursing practice guidelines (Magner
2009).
Definition
A chest tube is a “simple conduit used to remove air, blood, pus or fluid from the pleural cavity
there by preventing compression of the lung and allowing it to re-expand” (Westaby 1992:2).
Types
Pleural drain(s), which are placed in the thoracic cavity following a thoracotomy and
have two functions:
to allow fluid drainage,
to allow air from a pneumothorax to escape from the pleural space and
re-establish the negative pressure necessary for lung expansion and respiration.
Chest tubes can also be placed to treat a pneumothorax un-related to surgery.
Mediastinal drain(s) are placed in the mediastinum after open heart surgery, to drain
blood and to prevent cardiac tamponade and promote healing (Laker, 2010).
Indication for Insertion
1. Pneumothorax
2. Tension Pneumothorax
3. Haemothorax
4. Haemopneumothorax
5. Pleural Effusion
6. Chylothorax
7. Empyema (pus) and complicated parapneumonic pleural effusion
8. Post Thoracic Surgery (Hazinski 2013, Woodrow 2013)
Contraindications
Need for immediate thoracotomy
Risk of bleeding due to anticoagulation therapy/ patient has predisposition to bleeding or
abnormal clotting profile (relative)
Dermatologic Disorder (relative)
(Dev et al 2007, Royal Children’s Hospital 2009).
Hands must be washed thoroughly before and after all contact with the patient, the chest
drain or chest drain equipment (OLCHC 2010). Antiseptic non-touch technique (ANTT) to
be used at the appropriate level for all procedures detailed in this document, as per
hospital guideline (OLCHC 2007).
Equipment
Dressing Trolley
Scalpel Size 11
Chest Drain Insertion Pack
Sterile drapes
Small Suturing pack
(Available from CSSD / Theatre) Sterile Water for Irrigation (1000mls)
Chest Drain Clamps- 1 per drain
Steristrips
Chest Drain, Thoraseal1 or 3 (As per doctors instructions, prepare as per manufacturer’s instructions)
Analgesia and sedation
(As per guidelines)
Local Anaesthetic as prescribed i.e. (Xylocaine®) Lidocaine 2%
(20mg/ml)/Adrenaline 1:200,000
(5microgram/ml)
Orange needle
1, 2 and 5 ml syringes
Sterile Gauze Swabs
Suturing material i.e. anchor suture – 2/0 Sofsilk ™ (silk) and purse string suture 3/0 Monosof ™ (nylon).
Sterile gloves
Cleaning agent as per local policy
Sterile Surgical Gown
Drain Connection(s)
Cooke Seldinger Chest Drain Set (selection per infant/ child’s age)
Guide Only o Neonate 8-12 fg o Infant 12-16 fg o Child 16-24 fg o Adolescent 20-32 fg (Royal Children’s Hospital Melbourne, 2013a)
Disposable “Inco” Pad
Chest drains are usually inserted as a planned procedure in the Operating Theatre or
Paediatric Intensive Care Unit (PICU) in OLCHC. Needle aspiration is performed in an
emergency.
ACTION RATIONALE, EVIDENCE & REFERENCE
Preparation
Explain procedure to patient/parents as appropriate
Consult chest x-ray
Check patient’s platelets and coagulation status in high risk groups i.e. post cardiac patients as medically directed.
Record base line vital signs i.e. temperature, heart rate, respirations, blood pressure and oxygen
To inform patient / parents and gain co-operation To ensure consent for procedure
Promotes patients/ parent’s understanding and trust (Ball Binder and Cowen 2011).
To verify the indication for insertion of the tube.
To ensure any coagulopathy has been treated prior to insertion of chest drain (Balfour-Lynn
et al 2005, Dev et al 2007).
To monitor effects of analgesia / sedation, and also enable accurate assessment of the patient during and
saturation.
Ensure emergency equipment available i.e. oxygen, suction and ambu bag / rebreathing circuit and mask available at bedside or nearby.
NB: Ward patients may require a general anaesthetic for the insertion of a chest drain, and should be prepared for theatre as per hospital guidelines.
Administer analgesia and sedation as prescribed by doctor prior to procedure
Patients in PICUs
Please refer to the ‘Procedural Analgesia and Sedation
in PICU/HDU’ on the PICU i-drive.
Patients on General Wards
Please refer to ‘Sedation Guidelines –Oral 2014’ on the OLCHC intranet (Hyperlink)
Immediately before the procedure the patient should be reassessed and the site / side for the insertion of the chest drain confirmed by reviewing clinical signs and the chest x-ray.
Provide privacy for the patient during the procedure Position and Insertion Site
Position child (supine or semi recumbent position), maximally abduct the child’s arm or place behind their head or as indicated by doctor.
The Doctor will prepare the skin around the proposed site with cleansing agent as per local policy.
A local anaesthetic i.e. (Xyloidine®) Lidocaine 2% (20mg/ml) /Adrenaline 1:200,000 (5microgram/ml) is recommended and administered by the doctor.
Wash hands using aseptic non-touch technique (ANNT) (level 3).
Procedure
Assemble chest drain ensuring the Water for Irrigation
post procedure.
To ensure a safe environment for procedure
To promote comfort and adequate pain relief for the patient.
To uphold the protocol for Good Practice. To ensure correct medication is administered.
(An Bord Altranais 2007, OLCHC 2007/2008, OLCHC 2008a, OLCHC 2010b).
To ensure that risks of error / risks of inserting a chest drain is minimised. (Laws et al 2003, National Patient Safety Agency 2008, OLCHC, 2008b). To ensure correct site surgery policy is followed (OLCHC 2008b). To maintain the patients’ privacy and dignity (Ball Binder and Cowen 2011, Hockenberry and Wilson 2012). To allow easy accessibility to insert tube (Lehwaldt and Timmons 2005, Dev et al 2007, Royal Children’s
Hospital Melbourne 2013b).
Reduces transfer of micro-organisms (Department of Health and Children 2007, OLCHC 2008c).
Intercoastal drain placement is a very painful procedure because pleural intercoastal, subcutaneous pain receptors are stimulated (Allegaert et al 2004). Local
anaesthetics prevent pain transmission by
anaesthetising sensory nerves and blocking nerve conduction of a small area. Onset of action is within 2 minutes and lasts between 1-3 hours following subcutaneous infiltrate. When adrenaline is added to lignocaine it acts as a vasoconstrictor that limits perfusion and keeps anaesthetic localised and minimises any bleeding. It also increases lignocaines duration of action by up to 50%. (Pasero and Wong 1997).
is filled to level as marked on the underwater seal chamber, as per manufactures instructions. Do not overfill the water seal chamber beyond 2 cms.
The doctor will usually make a small incision and dissect into the pleural space. The drain will be inserted and clamped close to the chest wall until attached to the underwater seal drain.
Assist the doctor with the insertion of the drain into the proposed site.
The doctor will attach the intercostal tube, to the chest drain once inserted into the pleural cavity and unclamp the tube.
Ensure chest drain is positioned minimum 30 cms below the level of the patient.
The tube is then sutured in place with a ‘stay’ suture and also a purse string suture applied.
The drainage tube may be secured in place with extra tape or elastoplast.
Wash hands using aseptic non-touch technique (ANNT) (level 3).
Observe chest drain for:
Bubbling (pneumothorax).
Pleural drainage (pleural effusion). Assist in obtaining a chest x-ray.
Record and document respiratory status and vital signs following insertion of chest drain.
Palpate skin around site for subcutaneous emphysema.
Check air entry.
Document procedure in patient’s nursing notes.
(OLHSC 2005, 2007, OLCHC 2010b, 2011).
It is more difficult for the patient to get air out of pleural space (when level of water in underwater seal is greater than 2 cms) due to increased pressure and resistance (Carroll 2000).
To ensure adequate drainage of air or fluid (Carroll 1993, Royal Children’s Hospital Melbourne 2013b). To secure chest drain and ensure that the tube does not become displaced.
A chest drain open to air at the time of insertion will result in a pneumothorax (Nettina 2010).
To ensure that the drain does not become displaced during patient movement or lung expansion. (Nettina 2010).
This position encourages drainage and prevents siphoning of fluid, debris or air back into the pleural space (Tang et al 2002, Dixon 2006).
To ensure drain is in a satisfactory position and prevent displacement. The purse string suture is used during removal to seal the skin opening (Tomlinson and Treasure, 1997; Briggs 2010, Nettina, 2010).
To prevent cross infection, universal precautions (OLHSC 2005, 2007, OLCHC 2010b, 2011).
Evaluates effectiveness of chest drain (Balfour-Lynn et al 2005).
To ensure a pneumothorax has not developed and ensure correct tube positioning (Balfour-Lynn et al
2005).
To monitor patients condition, early detection and timely intervention of any complications (Balfour-Lynn et al
2005).
To monitor for air leak.
Early detection of worsening or improving respiratory status (Advanced Life Support Group 2011).
To maintain an accurate record of nursing care and to facilitate communication. To ensure safe practice and maintain accountability (An Bord Altranais 2002).
Complications of Chest Drain Insertion
Pain
Bleeding
Haemothorax (intercoastal artery perforation)
Perforation of visceral organs (heart, lung, diaphragm or intra-abdominal organs)
Perforation of aorta / subclavian vessels
Pneumothorax / Subcutaneous emphysema
Reexpansion pulmonary oedema (uncommon, dramatic and unpredictable)
Infection (site / pleural cavity i.e. empyema)
Pneumonia
Technical problems (intermittent blocking of tube i.e. pus, clotted blood or debris)
Incorrect positioning of drain (ineffective drainage)
Intercoastal neuralgia (trauma of neurovascular bundles)
Chylothoracic (damage to thoracic duct)
Cosmetic (scar)
(Dev
et al
2007, Royal Children’s Hospital 2009).
2.
Care of a Child with a Chest Drain
ACTION RATIONALE, EVIDENCE & REFERENCE
CARE OF THE CHILD Monitoring
Report and document any abnormalities / concerns to the medical team as clinical condition indicates.
Assess rate, depth, rhythm and effectiveness of respirations. Minimum 4 hourly or as condition indicates.
Monitor colour and oxygen saturations to establish parameters of same. Minimum of 4 hourly or as condition indicates.
Observe for equal chest expansion / symmetry, increased respiratory effort and signs of respiratory distress.
To ensure timely and appropriate intervention of any complicatons.
To establish baseline and detect changes in a timely fashion (Ball and Binder 2008, Royal Children’s Hospital Melbourne 2013b, Woodrow 2013).
Breathlessness may be a sign of pneumothorax (Peek
et al 2000).
Deterioration in colour or drop in saturations may be a sign of hypoxia or worsening pneumothorax or air leak (Royal Children’s Hospital Melbourne 2013b, Woodrow 2013).
Early and timely detection of respiratory deterioration i.e. pneumothorax (Woodrow 2013).
Report any abnormalities to medical team.
Document and record as clinical condition dictates. Observe air entry by listening to both sides of the chest with a stethoscope (PICU / HDU).
Record and report any abnormalities.
Monitor heart rate and blood pressure, minimum 4 hourly or as condition dictates
Monitor acid-base balance (as per medical team) PICU / HDU only
Observe patient’s conscious level utilising the AVPU (Alert, Voice, pain, Unresponsive) scale.
Pain Relief / Position
Nurse the patient in a comfortable semi-upright sitting position, well supported by pillows or in a chair.
Ensure regular position changes.
Monitor the child’s pain score using a validated and age appropriate tool, minimum 4 hourly or as clinically indicated.
The child will usually require an opiate analgesic of choice i.e. either by infusion, NCA / PCA or orally e.g. Oramorph ® to ensure comfort and effective pain relief. Liaise with CNS Acute Pain.
Administer analgesia or encourage PCA bolus as indicated prior to any intervention.
Administer regular multimodal analgesia around the clock.
Use non-pharmacological methods of pain control i.e. play / distraction, as clinically indicated. Liaise with play specialist.
Unequal air entry may indicate worsening respiratory compromise i.e. pneumothorax.
Bradycardia may be a sign of hypoxia.
Tachycardia or haemodynamic instability may be a sign of tension pneumothorax (Dougherty and Lister 2011, Royal Children’s Hospital Melbourne 2013b).
(Dougherty and Lister 2011).
(Agitation and restlessness may be a sign of hypoxia (Courtney and McKane 1998, Woodrow 2013). Drowsiness may be a sign of hypercapnia (high pCO2), indicating inadequate ventilation.
To promote lung expansion and aid chest drainage. Also to prevent stiffening of shoulder joints (Allibone 2003, GOSH 2014).
An upright position, well supported by pillows or sitting in a chair has been reported as the most comfortable position for patients (Owen and Gould 1997).
To assess child’s pain objectively without personal bias (Royal Children’s Hospital Melbourne 2013b).
Patients have reported having a chest drain as a very painful intervention (Owen and Gould 1997).
Considerable discomfort has been experienced whilst a chest drain is in situ, especially when lying on the chest tubes. Pain can also inhibit chest expansion and movement, resulting in delayed recovery. In addition sleep has been reported as being interrupted (Owen and Gould 1997, Fox et al 1999; Laker 2010).
Pain has been reported as most marked when patient trying to mobilise, get out of bed or during physiotherapy (Fox et al 1999).
To ensure child is pain free and comfortable (Grey 2000).
These alternative strategies of pain management are known to complement pharmacological ones (APA 2009, Laker 2010).
Encourage deep breathing, coughing and the use of incentive spirometry. Blow bubbles may be useful in the young child. Liaise with Physiotherapist.
Encourage child to mobilise as able within room for pneumothorax and within unit / playroom with physiotherapist as clinically indicated.
Liase with physiotherapist if chest x-ray changes present.
Psychological support should also be provided for both the child and their parents / guardians.
These strategies will aid full lung expansion and prevent respiratory complications i.e. pneumonia
To encourage air / fluid drainage.
Chest physiotherapy may be indicated.
To reduce / allay anxiety
ACTION RATIONALE, EVIDENCE & REFERENCE
CARE OF THE INSERTION SITE Observe for oozing.
The nurse may apply a keyhole Mepore dressing as clinically indicated.
Any dressing should be left in place if clean and dry. Surgeons will often use extra steristrips to secure chest drain at the time of incision. This additional taping may be reapplied if it becomes loose, as clinically indicated.
Check insertion site daily. Observing for signs of infection i.e. inflammation, oedema, discharge, pyrexia. Ensure clean, dry and free from odour. Report any abnormalities to the medical team.
Ensure sutures remain secure and intact.
Palpate the skin around site for surgical emphysema (feels like Rice Krispies / crackly).
Notify Cardiothoracic (medical / surgical team) if present and extends beyond site or travels to patient’s face or neck. Document same.
Surgeons/ nurse may occasionally use an
‘omentum’ made from tape strapping to secure drain to chest skin as clinically indicated.
To prevent infection by keeping insertion site clean and dry (GOSH 2014).
Early detection of inflammation / infection (Allibone 2003, Royal Children’s Hospital Melbourne 2013b). Chest drains can act as a retrograde conduit and skin contaminants can pass to deeper layers of the insertion site (Bale and Leaper 2000).
Sutures may erode over time especially in the child with long term chest drain (Royal Children’s Hospital Melbourne 2013b).
Surgical emphysema is an early sign that air leak is present or worsening. It may also be a sign associated with impeding tension pneumothorax (Fox et al 1999, Allibone 2003, GOSH 2014).
To prevent kinking, tension or pulling on the chest drain at the insertion site when moving the patient (Royal Children’s Hospital Melbourne 2013b).
Figure 1: Securing chest drain using ‘omentum’ strapping technique
NB: Do not secure chest drain tubing inside a nappy.
This may restrict tension on the chest drain tube and cause iatrogenic loss of chest drain on movement resulting in a tension pneumothorax.
ACTION RATIONALE, EVIDENCE & REFERENCE
CARE OF THE CHEST DRAIN / EQUIPMENT The Tubing
Check tubing from chest tube to drainage system for leaks, kinks or obstructions
Avoid dependent and ascending loops (hanging down below the top of the chest drain or lying on the floor).
Figure 2: AVOID dependent and ascending loops.
Secure excessive tubing by coiling flat on the cot/ bed and periodically straighten to promote drainage Remaining tubing should be in a straight line to the
To ensure:
Connections are secure
Drainage flows freely (Hazinski 2013)
Dependent and ascending loops can alter intrapleural pressure thereby increasing resistance which impedes effective drainage. A column of fluid accumulating in the loop may seal and obstruct the drain and prevent effective drainage.
NB: Predisposes the patient to a Tension
Pneumothorax (Gordon et al 1997, Schmelz et al
1999).
Coiled and straightened tube positions are optimal for draining fluid from the pleural space
chest drain
Figure 3: Coiled chest drain
(Audiovisual Dept. OLHSC, 2010)
When the child is sitting in a low chair and dependent loops can’t be avoided resulting in tubing coiled on floor. The tubing must be lifted every 15 minutes.
Do NOT manipulate the tubing by routine milking.
NB: In exceptional circumstances (PICU 2 only) it may be necessary to milk frequently and ONLY if drain likely to block due to clots i.e. fresh bleeding / haemorrhage post cardiac surgery.
Clamping Chest Drains
POTENTIALLY UNSAFE AND HIGHLY
DANGEROUS
Chest drains should not be routinely clamped when moving or transferring a patient.
Pressures + 38 have been reported with dependent loops (Gordon et al 1997).
To prevent increased resistance, back pressure, obstructed flow and decreased drainage (Gordon et al
1997, Hazinski 2013).
This will aid and ensure adequate drainage is maintained (Gordon et al 1997, Schmelz et al 1999). There is no evidence in the literature to support the need to routinely manipulate chest drains (Wallen et al
2002, Day et al 2008).
Milking can cause excessive suction which is centre of controversy. It is not performed by nurses in OLCHC.
Chest drain pressures of -400cms H2O have been demonstrated. The longer the section milked the higher the suction created (Duncan and Erickson 1982*; Dixon 2006).
High pressures during milking can also suck lung tissue into drainage holes and cause trauma to mediastinum or pleural space (Teplitz 1991, Dixon 2006).
New chest drains contain a non-thrombogenic coating thus decreasing the potential for clotting (Nettina 2010). Active bleeding may increase risk of clot formation and development of cardiac tamponade post cardiac surgery (Erickson 1989b).
Clamping the drain can cause a build up of pressure in the pleural space if air is draining. Predisposes to subcutaneous emphysema and Real Danger of Life Threatening Tension Pneumothorax.
Tension pneumothorax occurs when air can enter alveoli but can not leave the pleural space. This increases pressures to a dangerous level, resulting in
NB: A bubbling chest drain should NEVER be clamped
Chest drains should only be clamped when changing bottles or after accidental disconnection
THORASEAL III
Collection Chamber (1st Compartment)
The collection chamber acts as a reservoir for fluid draining from the chest drain.
Monitor the collection chamber for drainage including the presence of blood
Amount
Colour (blood, haemoserous, serous, chyle)
Consistency
Flow
Check the volume of fluid drainage for the first 2 hours a minimum of every 30 minutes post insertion and hourly thereafter or as patients condition dictates. Document same.
Report and document any sudden changes in volume loss to the cardiothoracic surgical team immediately.
Significant postoperative bleeding is:
> 3ml/kg/hour for three hours
5ml/kg/hour in any one hour.
This should be immediately reported to the Cardiothoracic surgical team for review
NB: Do not clamp the chest drains
Post operative cardiac patients should be closely monitored a minimum of half hourly until the patient has re-warmed and is stable
Under Water Seal Chamber (2nd Compartment)
medinastinal shift. The heart, great vessels, lungs and trachea are pushed to the other side. This shift causes lung expansion to be severely decreased, venous return impeded, decreased cardiac output and results in sudden circulatory collapse (Lazzara 2002, Tang et al
2002, Allibone 2003, Royal Children’s Hospital Melbourne 2013b, Woodrow 2013).
(Appendix I)
NB: Gravity of this complication out weighs the risk
of disconnection. (Kirkwood 2002).
This indicates an air leak is present and is hazardous with the potential of converting a simple pneumothorax into life threatening tension pneumothorax (Henry et al
2003, Laws et al 2003, Balfour-Lynn et al 2005, Roskelly and Smith 2011, Royal Children’s Hospital Melbourne 2013b).
Chamber is graduated so volume of drainage can be easily measured (Carroll 2000).
Some bloody drainage can be expected immediately following insertion of the drain or following chest surgery.
The amount of drainage will vary depending on the initial indication for the chest drain.
A medinastinal drain inserted following heart surgery is expected to yield more than a pleural drain inserted to treat pneumothorax.
Close monitoring of losses aids early detection of bleeding.
Sudden increase may indicate haemorrhage
(Hazinski 2013)
Sudden reduction may indicate kinked tubing or formation of clots (post open heart surgery), predisposing to cardiac tamponade.
Ensure that there is sufficient Water for Irrigation in the chamber, as per markings on the chamber
i.e. 2 cmsand the chest drain is submerged.
Water seal chamber should not be overfilled beyond 2 cms.
Observe for bubbling in the water seal chamber, on expiration and coughing
Observe for continuous bubbling in the underwater seal and absent bubbling in the suction chamber. Observe water level closely in the water seal chamber in response to respiration, i.e. swinging / oscillating.
NB: This may be minimal/ difficult to observe in the infant
The water seal chamber should be placed 30cms below the child’s chest.
Suction Chamber (3rd Chamber)
Fill suction chamber to 10 -15 cms of water, using Water for Irrigation i.e. 10cm in infants and 15cms
The underwater seal chamber is only effective when there is sufficient water in chamber and chest drain is submerged. It then creates a one-way valve, allowing air to drain but preventing air re-entering the pleural space (Lazzara 2002, Tang et al 2002).
Excessive submersion increases hydrostatic pressure which means that intrapleural air must exceeds this and makes it more difficult for the patient to get air out of pleural space (Carroll 2000, Briggs 2010).
Intermittent bubbling in the underwater seal chamber confirms an air leak. A minor leak causes bubbling on coughing when peak airway pressures are reached. Continuous bubbling indicates a massive air leak (Tang
et al 2002).
This indicates that there is an air leak in the chest drain system (Woodrow 2013).
This indicates that the chest tube is patent. If not present the lungs may have reexpanded or the tube needs to be checked for obstruction i.e. loops / kinks (Dixon 2006, Sullivan 2008, Briggs 2010).
Increased water level implies an increase in negative pressure within the pleural space. Decreased water level implies less negative pressure.
In a self ventilating child when system is open to atmospheric air, swinging will occur on inspiration as intrapleural pressure is below atmospheric pressure and decreases with expiration (Gallon 1998).
NB: This is reversed when the child is on mechanical ventilation i.e. water level decreases during inspiration and increases during expiration (Briggs 2010, Dixon 2010).
NB: Swinging does not occur if the child’s chest
drain is on continuous low pressure suction (Gallon
1998).
This positioning encourages drainage and prevents siphoning of fluid, debris or air back into the pleural space (Dixon 2010, Laker 2010).
Amount of water in the suction chamber controls the low pressure suction, minus length of water seal tube below water level Negative pressure can not go
in child. This may be increased to 15-20 cms of water in the adolescent / adult.
Refill water in suction chamber periodically as required to maintain negative pressure.
To activate suction, adjust low pressure suction devise at wall, until slow gentle continuous bubbling is observed. The bubbling should only be seen in the suction chamber.
Chest drain suction is routinely applied to chest drains following open heart surgery.
It is not usually applied to pleural drains initially but may be added by the medical team later, for collection of fluid, persistent air leak or failure of a pneumothorax to expand.
NB: Once suction is discontinued the suction connection tubing to the drain should be discontinued.
2 a) CHANGING OF CHEST DRAIN UNIT
The system should only be changed, as per manufacturer’s guidelines.
Explain procedure if appropriate to child / parents. Wash hands using an aseptic non-touch technique (ANNT) (level 3) and put on sterile gloves
Assemble new chest drain, ensuring water seal filled with sterile water to within 2 cm of marked line and also suction chamber to desired level. Be careful not to touch the sterile tip of the chest drain tubing.
NB: Water seal chamber must be checked by 2 nurses, one of whom is a senior Registered Nurse
above set level {safety feature}. (Henry et al 2003, British Thoracic Society 2010, Schlosser 2013).
High negative pressures can cause damage to lungs i.e. parenchyma injury (Bar-El et al 2001).
Water may evaporate (Frazer 2012).
Bubbles vent excess vacuum pressure (Carroll 2000). Turbulent bubbling caused by high airflow has been reported as generating excessive negative pressures under certain conditions i.e. up to 37 cms H2O. This should be considered a warning sign of potential high negative pressures in the chest (Bar-El et al 2001). Also excessive bubbling will cause increased evaporation and noise for the infant / child or parents/ guardians. Evaporation also decreases low pressure suction (Carroll 2000).
Suction enhances the removal of excessive blood from the medinastinum preventing cardiac tamponade. Also excessive air / fluid drainage from the pleural space, restores negative pressure and enhances lung expansion (Allibone 2003, Tang et al 2002. Henry et al
2003).
A closed system can potentially generate positive pressure if an air leak is present and may precipitate a tension pneumothorax (Tang et al 2002).
Once the system is two thirds full or if in situ for more than 1 week (Hornick et al 1992, Durai Hoque and Davies 2010). More frequent changing may precipitate cross infection (Godden and Hiley 1998). It may also need to be replaced if tubing disconnects and becomes contaminated.
To allay anxiety.
To prevent cross infection and potential body fluid contamination (Macey and Landstrom 1993, OLHSC 2005, 2007, 2010b).
Failure to fill water seal chamber may result in tension pneumothorax in the child.
Remove suction from chest drain.
Wrap gauze around chest drain and double clamp chest tubing close to chest wall.
NB: Only clamp tubing for minimal time necessary to quickly disconnect and reconnect the chest tube. Reconnect new chest drain tubing ensuring the connection is secure.
Remove clamps.
Reattach suction until gentle bubbling in the suction control chamber.
Disposal of Equipment
To discard chest drain, secure drain tip in a disposable glove and fasten with sleek tape
The chest drain is then placed in a large leak proof yellow sharps container in the sluice
Remove gloves and aprons and dispose of them in clinical waste bin. Wash hands.
Documentation
Document in nursing notes:
Fluid level in drainage chamber of discarded chest drain
Reason for change of chest drain
Evaluation of patient.
To protect chest drain tubing from damage.
To prevent air entering the pleural space through the tubing (Erickson 1989a).
Clamping can cause air to accumulate the pleural cavity and predisposes to tension pneumothorax (Macey and Landstrom 1993).
To prevent spillage and contamination of chest drainage from the chest drain unit.
To adhere to hospital waste policy To reduce transmission of organisms.
Standard precautions (OLCHC 2008a, 2011). Standard precautions (OLCHC 2008a, 2011). Continuity of nursing care (An Bord Altranais 2002).
ACTION RATIONALE, EVIDENCE & REFERENCE
2 b) TAKING A SAMPLE OF CHEST DRAINAGE
A self sealing mechanism on the chest drain tubing of the Thoraceal I and III enables a sample of chest drain fluid to be obtained without opening the drainage system.
DO NOT OPEN CHEST DRAINAGE SYSTEM TO OBTAIN SAMPLE
Equipment
10 ml syringe
Sterile orange needle
Specimen jar and form
(Tyco Healthcare 2001).
(Royal Children’s Hospital Melbourne 2013b, GOSH 2014).
Sanicloth wipe
Non sterile gloves
Eye protection
Dressing pack
Explain procedure to child / parent if appropriate
Allow chest drain tubing to hang in loop and drainage fluid to collect.
Clean insertion site with Sanicloth wipe and allow to dry.
Using a 10 ml syringe and orange needle aspirate a minimum of 2-5 mls from the chest drain tubing loop, using an aseptic non-touch technique (ANTT) (level 3)
Label specimen jar and request form.
Send to the laboratory.
Documentation
Document the intervention in the child’s nursing notes:
Time and date of sample
Colour, volume and consistency of drainage fluid.
To gain child’s trust and help alleviate child / parents anxiety (Hockenberry and Wilson 2012).
To ensure sufficient fluid for chest drain fluid sample (Royal Children’s Hospital Melbourne 2013b. To prevent contamination of the sample.
To maintain a closed system and prevent cross infection (OLHSC 2005, 2007).
To ensure analysis is carried out correctly (GOSH 2014).
To obtain microbiological / biochemical analysis of the sample as directed by medical team.
To maintain continuity of care and accountability through accurate recording of the nursing care (An Bord Altranais 2002).
3.
Care of a Chest Drain Valve
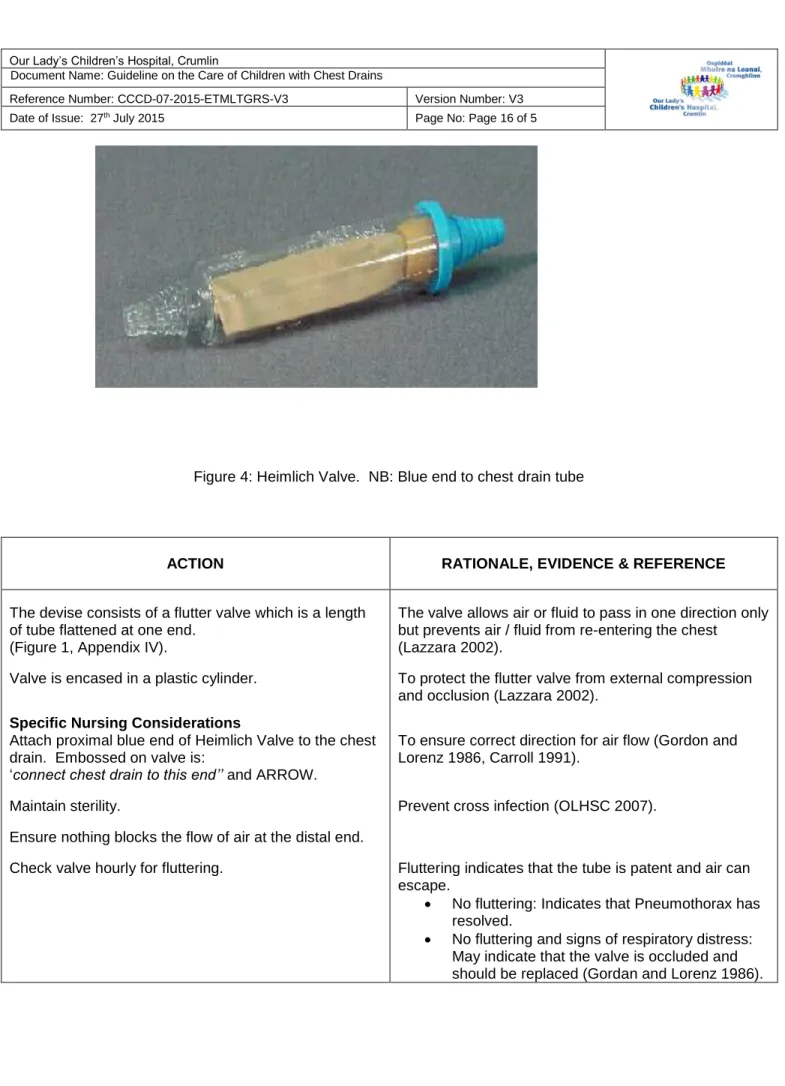
3 a) HEIMLICH VALVEA Heimlich Valve may be used for transportation instead of a chest drain for a small uncomplicated pneumothorax. Its main advantage is portability. It has a one-way flutter valve (Nettina 2010), which is essentially ‘a water-seal chamber’ (Lazzara 2002:38). This is connected to the chest drain tube and evacuates air from the pleural space by removing air as the patient exhales. The valve opens when the pleural pressure is greater than atmospheric pressure and closes when the reverse occurs (Nattina 2010).
Figure 4: Heimlich Valve. NB: Blue end to chest drain tube
ACTION RATIONALE, EVIDENCE & REFERENCE
The devise consists of a flutter valve which is a length of tube flattened at one end.
(Figure 1, Appendix IV).
Valve is encased in a plastic cylinder. Specific Nursing Considerations
Attach proximal blue end of Heimlich Valve to the chest drain. Embossed on valve is:
‘connect chest drain to this end’’ and ARROW.
Maintain sterility.
Ensure nothing blocks the flow of air at the distal end. Check valve hourly for fluttering.
The valve allows air or fluid to pass in one direction only but prevents air / fluid from re-entering the chest
(Lazzara 2002).
To protect the flutter valve from external compression and occlusion (Lazzara 2002).
To ensure correct direction for air flow (Gordon and Lorenz 1986, Carroll 1991).
Prevent cross infection (OLHSC 2007).
Fluttering indicates that the tube is patent and air can escape.
No fluttering: Indicates that Pneumothorax has resolved.
No fluttering and signs of respiratory distress: May indicate that the valve is occluded and should be replaced (Gordan and Lorenz 1986).
3 b) ATRIUM PNEUMOSTAT ™ CHEST DRAIN VALVE.
The Atrium Pneumostat ™ is a disposable single patient use chest drain valve with a 30 ml collection chamber. A needleless fluid sample port provides fluid removal by syringe (Atrium 2008).
Figure 5: Pneumostat ™Chest Drain Value Figure 6: Main Parts of Pneumostat Chest Valve
ACTION RATIONALE, EVIDENCE & REFERENCE
Indications
To evacuate air from chest cavity i.e. simple pneumothorax.
Transition from traditional chest drain to a smaller and more mobile device.
Warnings
Pneumostat must not be used for fluid collection
Keep air leak well free of obstruction
Do not clamp chest drain during use.
Do not use or puncture device with a needle.
Do not leave syringe attached to needleless fluid sample port.
Do not connect any open luer-lock connector to needleless luer port on bottom of device
Precautions
Replace Pneumostat chest drain valve if:
It is damaged
Volume exceeds 30mls
There is evidence of occlusion having occurred Ensure Pneumostat is securely fastened to the chest drain
Two drains must not be connected to the Pneumostat
(Atrium 2008, 2010)
with a Y connection device. Set Up
Chest drain is inserted firmly into the stepped connector of Pneumostat.
Air Leak Detection
Water 1ml is inserted into the air leak well. Bubbling in the water will confirm an air leak.
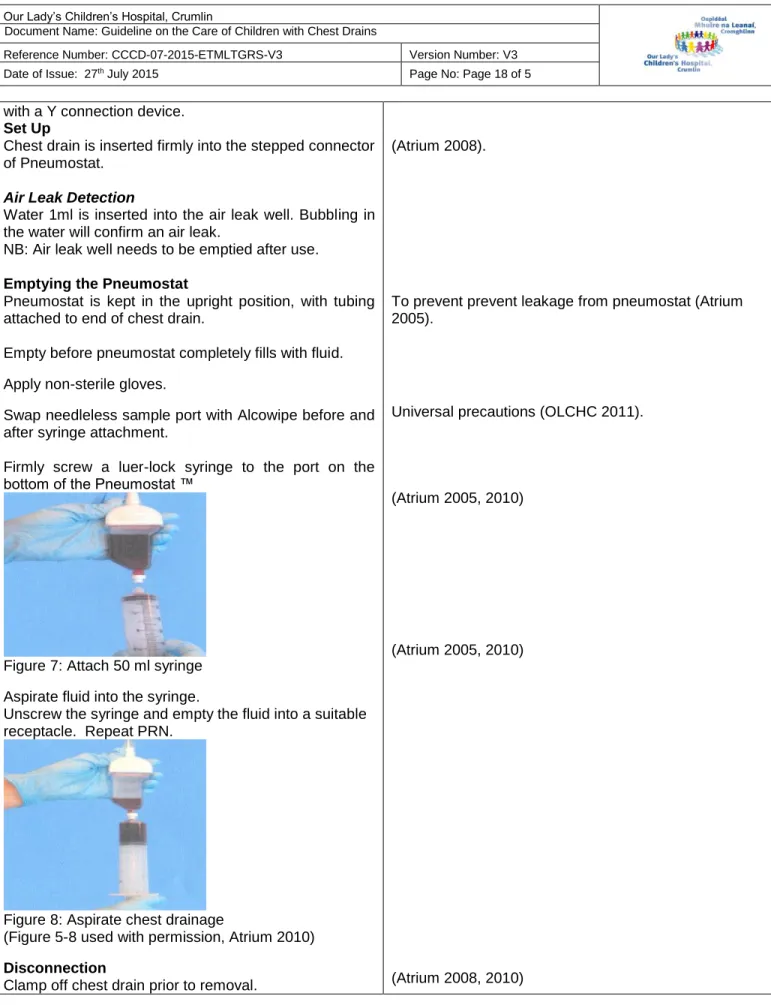
NB: Air leak well needs to be emptied after use. Emptying the Pneumostat
Pneumostat is kept in the upright position, with tubing attached to end of chest drain.
Empty before pneumostat completely fills with fluid. Apply non-sterile gloves.
Swap needleless sample port with Alcowipe before and after syringe attachment.
Firmly screw a luer-lock syringe to the port on the bottom of the Pneumostat ™
Figure 7: Attach 50 ml syringe Aspirate fluid into the syringe.
Unscrew the syringe and empty the fluid into a suitable receptacle. Repeat PRN.
Figure 8: Aspirate chest drainage
(Figure 5-8 used with permission, Atrium 2010) Disconnection
Clamp off chest drain prior to removal.
(Atrium 2008).
To prevent prevent leakage from pneumostat (Atrium 2005).
Universal precautions (OLCHC 2011).
(Atrium 2005, 2010)
(Atrium 2005, 2010)
4.
Removal of Chest Drains: Nursing Responsibilities
Introduction
A chest drain should be removed once there is clinical resolution of reason for initial chest drain insertion (Balfour-Lynn et al 2005). Long term drainage may be required for chronic air leak in patients with pulmonary disease and in some patients with pleural effusions, chylothorax and empyema.
ACTION RATIONALE, EVIDENCE & REFERENCE
Verify doctor’s order for chest tube removal.
Indications for Chest Drain Removal
When drainage is minimal
Residual air leak / fluid is no longer evident.
When chest x-ray, pulse oximetry and arterial
blood gases are within normal
limits for the individual patient.
Coagulation blood results are within normal limits.
The cardiothoracic surgeon has ordered chest tube to be removed.
Pre Procedure
Fasting
Fast patient prior to procedure as clinically indicated. Consult medical team / anaesthetist as appropriate.
IV Access
Ensure patient has a patent intravenous cannula in situ prior to the procedure.
Monitoring
Record the child’s observations, recorded prior to removal i.e. temperature, pulse, respirations, SaO2 and blood pressure
Patients who are in the ward areas should have continuous monitoring of heart rate and oxygen saturations during the procedure.
Safety
The nurse will ensure emergency equipment is working and available at the bedside
Amubag / rebreathing circuit (PICU/ HDU) and appropriate mask
Oxygen and mask
Suction equipment and suction catheters
The decision to remove the chest drain(s) is guided by the cardio-thoracic surgical team
(Thompson et al 1997).
To prevent aspiration.
Patients especially in PICU / HDU will usually be given anaesthetic / sedative medication.
To provide a route for analgesia, sedative or emergency medication as necessary.
To establish baseline observations for comparison post procedure.
Early and timely detection of changes in the patients’ condition (Ball Binder and Cowen 2011, Hockenberry and Wilson 2012).
To create a safe environment and maintain patient safety
Psychological Preparation
The child and parents / carer will receive adequate explanation of the procedure at an appropriate level and emotional support as appropriate.
Encourage questions and answers
A play therapist may be utilised for preparation and / or distraction if appropriate
Pain Relief
Administer multimodal analgesia and sedation prescribed by the medical team
Ensure medication is appropriately timed to have peak effect.
Sedation will always be given in conjunction with analgesia.
Patients in PICU
Please refer to the ‘Procedural Analgesia and Sedation
in PICU/HDU’ on the PICU i-drive.
Patients on General Wards
Please refer to ‘Sedation Guidelines –Oral 2014’ on the OLCHC Intranet.
NB: An anaesthetist will always be present in the PICU if an anaesthetist agent is used.
Apply topical Tetracaine Gel (Ametop®) 1.5g (tube x 1) around each chest drain site avoiding incision site as per protocol 30-45 minutes prior to the procedure. NB: Children < 5 years should only have contents of a single tube applied per procedure
Positioning
The child will be positioned comfortably either supine or alternatively at 30o angle as clinically indicated for the procedure
Procedure
Responsibility for Removal of Chest Drains
Appropriately trained medical/nursing staff may carry out removal of the drain(s).
Equipment Required
Dressing Pack
Sterile Gloves.
Goggles and plastic apron.
Cleaning solution asper local policy
Stitch cutter.
Occlusive dressing i.e. Op-Site ™ Post Op (6.5cms x 5cms), one for each chest drain site.
Chest drain clamps x 2 for each drain
To relieve fear, anxiety and foster trust, understanding and cooperation for the procedure.
Information may need to be reinforced if the child is stressed (Hockenberry and Wilson 2012, GOSH 2014). To fully prepare the child for the procedure following national guidelines (APAGBI 2012).
To inform child and parents / guardians.
To aid patient comfort, minimise anxiety and pain. Chest drain removal has been reported to cause moderate / severe pain intensity and to be a frightening procedure. Children have also reported more pain than adults (Corbo-Richert, 1994, Owen and Gould 1997, Mimnaugh et al 1999, Puntillo and Ley 2004 Bruce et al
2006a, APAGBI 2012, GOSH 2014).
To ensure effective and satisfactory multimodal pain relief. (Bruce et al 2006b).
Subcutaneous nociceptors may play a significant role in pain during chest drain removal.
Topical and transdermal analgesics have been demonstrated to blunt the pain of chest drain removal. Local anaesthesia will remain effective, in most patients for between 4-6 hours. (Valenzuela and Rosen 1999, OLHSC 2000, Rosen et al 2000).
To ensure correct positioning for chest drain(s) removal (GOSH 2014).
Incontinent ‘Inco’ pad.
Sterile prep towel
Sleek adhesive tape.
Sterile Scissors.
Verify doctors order for chest tube removal
Put on personal protective equipment i.e. plastic aprons and face shield / goggles.
Prepare trolley for procedure.
Assist / set up the sterile dressing pack.
Place protective pad i.e. incontinent ‘inco’ pad underneath the drains.
Wash hands using aseptic non-touch aseptic technique (ANNT) (level 2).
Place sterile dressing prep towel over incontinent pad. Remove steristrips and / or dressing from around drain site(s).
Identify sutures present:
Anchor suture
Purse-string suture, expose the end sutures. Both nurses repeat hand washing and apply sterile gloves, using an aseptic non-touch technique (ANTT) (level 2) for the procedure.
Clean drain site with cleansing agent as per local policy as clinically indicated.
Thoraceal 1 Drain
Drain must be clamped prior to removal if not on continuous low pressure suction.
Thoraceal III Drain
Remove drain with continuous low pressure suction (CLPS) on and clamp remaining drain(s).
Repeat procedure for each remaining drain(s) as above, also ensuring any drain(s) already removed are also clamped.
To reduce the risk of contamination. Face shield / goggles should be worn to protect face / eyes and plastic apron to protect clothing as splashes can occur on removal of drains.
(Thompson et al 1997, Hunter 2008).
To aid the procedure (Dougherty and Lister 2011). To minimize the risk of infection and to have the equipment ready.
To absorb any ooze from the drain. To reduce risk of contamination of the patient and bed clothing (Hunter 2008, OLHSC 2008a).
To prevent cross infection, universal precautions (OLHSC 2007, 2011).
To create a sterile field and soiling of bed linen following removal of drain(s) (Hunter 2008).
To inspect the drain insertion site and prepare for drain removal (Hunter 2008).
To prepare for drain removal and check what type of suture is present so that the suture can be used to form an airtight seal when the drain is removed (Sullivan 2008, GOSH 2014).
To prevent contamination and reduce the risk of infection. (OLHSC 2007, Walker 2007).
To reduce the risk of infection.
To prevent air entering the pleural space.
Continuous low pressure suction will remove any air whilst removing the drain.
Clamping of other drains stops air re-entering the pleural space. (Foss 1989, GOSH 2014).
Anchor suture is cut, at the site, of the drain that is being removed.
NB: Remember to cut the anchor suture below the knot and flush with skin.
The nurse ensures the drain is mobile and ready to be removed.
In an older cooperative child (wards) the nurse may ask the child to do deep breathing exercises as clinically indicated.
Nurses agree their roles for removal of drains.
1st nurse prepares purse string suture ready to
be tied.
2nd nurse removes the drain swiftly on count of
3 at the beginning of the child’s third expiratory breath
NB: Drain removal and purse string suture tie are performed simultaneously.
Purse string suture is ONLY tied to close the skin. 3 knots performed and cut to about 1 cm of site.
NB: Avoid over tying.
If strong resistance encountered, nurse stops the procedure and inform cardiothoracic surgical team. Examine each drain to verify that all of the drain has been removed.
Cover drain site with an air occlusive dressing i.e. Opsite ™ dressing for minimum 24-48 hours.
Procedure repeated for each individual drain, removing drains one at a time.
No Purse String Suture
Cover the drain site with an air occlusive dressing i.e. Opsite ™ dressing, whilst drain is been removed following the above procedure.
Post Procedure
Patient
Assess the patient following the procedure. Record vital signs / respiratory status.
Observe for signs of increasing respiratory distress, anxiety or agitation, minimum hourly as clinically indicated.
This frees the drain from the skin (GOSH 2014).
To ensure no suture material above the skin is pulled under the skin and thus prevent cross infection (Hunter 2008).
To reduce anxiety and nurses may be able to coordinate removal of drain with the child’s own breathing pattern.
To aid and prepare for drain removal. (Dougherty and Lister 2011).
To minimise risk of air influx through chest drain site and development of pneumothorax (Bell et al 2001).
To prevent air entering the pleural space through the tract causing a pneumothorax. (Thompson et al 1997, GOSH 2014).
To avoid puckering of the skin and poor cosmetic wound healing. Also to prevent skin necrosis (GOSH 2014).
To observe for any retention of the chest drain. (Thompson et al 1997).
To prevent contamination and to promote healing (Dougherty and Lister 2011).
To compare with initial patient assessment and ensure early detection and timely treatment of any potential complication.
Pneumothorax can occur following chest drain removal and result in increasing respiratory distress (Thompson
et al, 1997).
Assist in obtaining a chest x-ray 1 hour post chest drain removal if clinical indicated as per cardio-thoracic team protocol i.e.:
Signs of respiratory compromise
Previous x-ray > 24 hours previously.
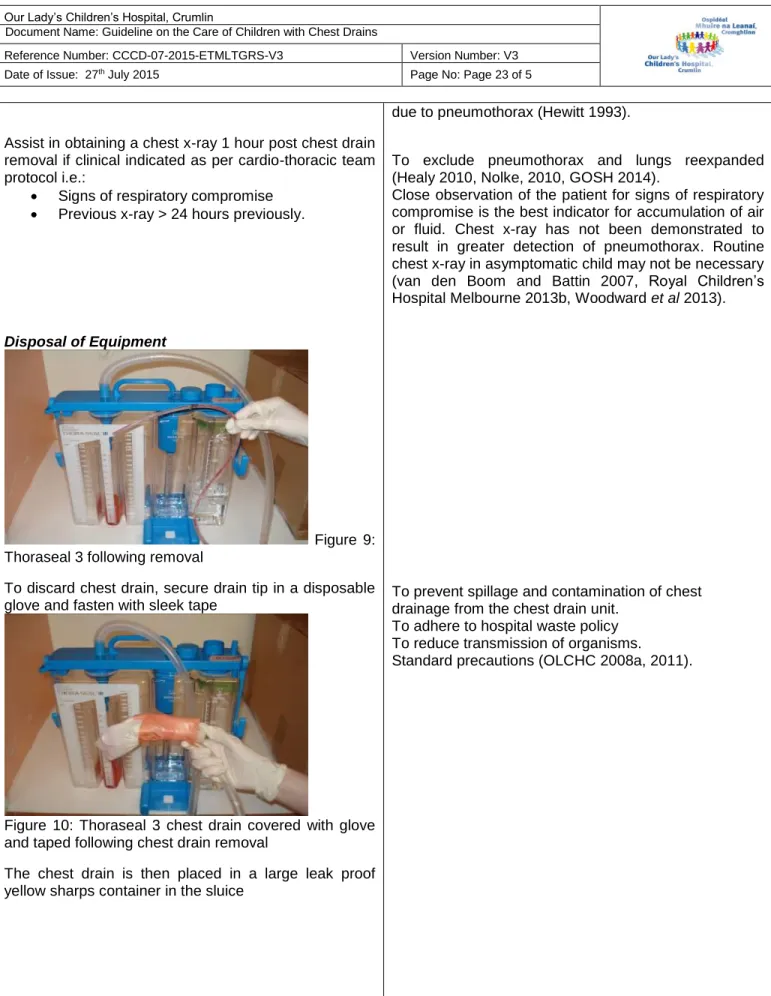
Disposal of Equipment
Figure 9: Thoraseal 3 following removal
To discard chest drain, secure drain tip in a disposable glove and fasten with sleek tape
Figure 10: Thoraseal 3 chest drain covered with glove and taped following chest drain removal
The chest drain is then placed in a large leak proof yellow sharps container in the sluice
due to pneumothorax (Hewitt 1993).
To exclude pneumothorax and lungs reexpanded (Healy 2010, Nolke, 2010, GOSH 2014).
Close observation of the patient for signs of respiratory compromise is the best indicator for accumulation of air or fluid. Chest x-ray has not been demonstrated to result in greater detection of pneumothorax. Routine chest x-ray in asymptomatic child may not be necessary (van den Boom and Battin 2007, Royal Children’s Hospital Melbourne 2013b, Woodward et al 2013).
To prevent spillage and contamination of chest drainage from the chest drain unit.
To adhere to hospital waste policy To reduce transmission of organisms.
Figure 11: Disposal unit for Thoraseal 3 chest drain. Remove gloves and aprons and dispose of them in clinical waste bin. Wash hands.
Wound Site
Remove purse string suture from each chest drain site approximately 5-7 days post removal as per cardio-thoracic surgical team.
If the drain site appears inflamed or purulent a swab should be obtained and sent to lab for culture and sensitivity. Inform cardiothoracic medical / surgical team.
Documentation
Record drainage on fluid chart and in nursing notes Document the procedure in nursing notes including patients’ clinical response, removal of suture(s) and all changes.
Surgeons Request
Some cardiothoracic surgeons may request that the child’s chest drain is clamped for 4 hours, prior to chest drain removal.
Verify instructions with the patients’ consultant and ensure documented by doctor in the child’s medical notes.
Observe and monitor child vigilantly for signs of increasing respiratory distress whilst the chest drain is clamped.
Remove the chest drain clamp immediately and
inform medical / surgical cardiothoracic team if
there are any concerns about the patients’
condition.
Standard precautions (OLCHC 2008a, 2011).
To detect infection (Walker 2007).
To maintain an accurate record of the procedure and nursing care. Documentation provides continuity of care when information is shared and facilitates communication. It also ensure safe practice and maintain accountability (An Bord Altranais 2002).
This is a potentially unsafe practice and may
predispose child to tension pneumothorax.
Although this practise is questioned it continues (Henry
et al 2003, Laws et al 2003).
5
Assisting with Intrapleural Urokinase Treatment: Nursing Responsibilities
Introduction
Intrapleural Urokinase treatment may be medically indicated in a child with a complicated parapneumonic effusion or empyema. It is known to shorten the child’s hospital stay. Urokinase is recommended as it is the only fibrinolytic agent that has been studied in a randomised controlled trial in children (Thompson et al 2002, Balfour-Lynn et al 2005).
Definitions
Parapneumonic Effusion: Collection of pleural fluid associated with underlying
pneumonia. Effusion is usually unilateral and the fluid is thick with loculations.
Empyema: The presence of overt pus in the pleural space. It is often the result of
progression of a parapneumonic effusion caused by a community acquired pneumonia. There is increased production and decreased reabsorption of pleural fluid. Normal function of fibrinolytic pathways is also decreased and an increased production of fibrin at reabsorption sites occurs. Empyema has a significant morbidity in children and can be therapeutically challenging. Bilateral empyema is unusual.
Urokinase: Fibrolytic agent which in empyema may lyse fibrinous strands and thereby
clear the lymphatic pores. This results in effective filtration and reabsorption of the pleural fluid. (Thompson et al 2002, Barnes and Benjamin 2004, Balfour-Lynn et al
2005).
Complications Associated with Parapneumonic Effusion or Empyema Usually uncommon but can include:
Bronchopleural fistula
Lung abscess
Perforation through the chest wall (Empyema necessitates). (Balfour-Lynn et al 2005). Indications
The management of parapneumonic effusion or empyema includes the insertion of a chest drain. In some instances however, a chest drain will not adequately drain the empyema. In this situation, the intrapleural instillation of Urinokinase may be required in combination with chest drainage to allow effective drainage of the pleural cavity. (Balfour-Lynn et al 2005).
In Our Lady’s Children’s Hospital, Crumlin the instillation of intrapleural Urokinase must be performed by a doctor
Equipment
Dressing Trolley
Sterile dressing pack
Sterile drape
Non-powdered sterile gloves
Sterile scissors Non-toothed clamp x 2 Alcohol Wipes x 6 Cutisoft swab x 1 10ml syringe x 1 23g needle
50ml bladder tip syringe
100ml bag 0.9% Sodium chloride (> 1year) or 1 x 10ml Sodium Chloride 0.9% miniplasco (< 1 year)
Urokinase
o <1 year:1 x 10,000 unit vial (Syner-KINASE®)
o >1 year: 2 x 25,000 unit vials (Syner-KINASE®) (to prepare final dose of 40,000 units)
Antiseptic cleansing agent as per local policy
Lidocaine 2%
ACTION RATIONALE, EVIDENCE & REFERENCE
Pre Procedure
Coagulation status is checked as clinically indicted. Explain procedure to child / parents as clinically indicated. Involve play specialist if appropriate.
Doctor prescribes Intrapleural Urinokinase on Medication Chart as per medication policy.
Urokinase: Recommended Dose
Twice daily dose x 3 days (total 6 doses).
< 1 year: 10,000 units in 10mls Sodium Chloride 0.9%
> 1 year: 40,000 units in 40 mls Sodium Chloride 0.9% .
NB: In preparing the 40,000 unit dose, the contents of
each 25,000 unit vial should be reconstituted with 2ml of Sodium Chloride 0.9% (25,000units/2ml) and a total volume of 3.2ml (40,000units) withdrawn. This should then be made up to a final volume of 40ml with Sodium Chloride 0.9% prior to installation.
Procedure
Explain the procedure to child and parents/carers as clinically indicated.
Assess child’s pain using an appropriate tool and ensure adequate analgesia is administered.
Wash hands using Aseptic non-touch technique (ANNT) (level 3) before commencing procedure. Prepare trolley for the procedure with soap and water, and allow to dry; wipe the surface with an alcohol wipe, from the centre outwards in a circular motion. Allow to dry thoroughly.
Wash hands using aseptic non-touch technique (ANNT) (Level 2).
Assist / set up the sterile dressing pack.
Open sterile equipment onto sterile working area. Doctor will apply sterile gloves.
To allay anxiety.
To ensure the correct prescription and solution is prepared for the correct child and minimise risk of error, in adherence with Medication Policy (An Bord Altranais 2000, OLCHC 2010a)
(Balfour-Lynn et al 2005, OLHSC, 2010a).
To gain child’s trust and reduce his / her anxiety and obtain consent from the parents (Hockenberry and Wilson 2012).
To promote comfort and reduce anxiety during procedure (OLHSC 2004)
To prevent cross infection (OLCHC 2005, 2007, 2010b).
To aid the procedure (Dougherty and Lister 2011). To create a clean working area and to prevent cross infection (OLHSC 2005, 2007, OLCHC 2010b, Dougherty and Lister 2011).
To minimize the risk of infection and to have the equipment ready.
Doctor draws up local anaesthetic lidocaine 2% and administers around the chest drain site allowing time to take effect.
Urokinase solution is drawn up by the doctor. Sterile ‘prep’ sheet is placed under chest drain.
The chest drain is clamped and disconnected from the Thoraseal 3 drain.
The proximal end of the chest tube is cleansed with Bethidine solution.
Chest drain now unclamped and Doctor administers the urokinase solution slowly.
When medication administration complete, tube is reconnected to Thoraseal 3 and reclamped.
Following administration chest drain is clamped for 4 hours or according to cardiothoracic team instructions. Check doctors instructions regarding positioning of patient i.e. on affected side or back.
Unclamp chest drain after 4 hours and reconnect the Thoraseal 3 drain to continuous low pressure suction. Record and document chest drainage losses and all care given in nursing notes.
Discard waste and used supplies in Healthcare Risk Waste (i.e. Clinical Waste) if contaminated with blood or body fluids. Otherwise discard into the Healthcare Non Risk Waste (Household waste). Sharps into sharps bin.
There may be an increase in chest drain losses following urokinase treatment.
To prevent cross infection
(Department of Health and Children 2002, OLCHC 2008c)
To maintain an accurate record of nursing care and to facilitate communication. To ensure safe practice and maintain accountability (An Bord Altranais 2002).
6.
Appendices
APPENDIX I
Key Points to be considered before a Clamping Drain
The only indications now accepted for clamping underwater seal drains are:
1. Post-operatively following pneumonectomy, to maintain the central mediastinal position. 2. When changing chest drain(s) collection unit.
3. Following intrapleural urokinase treatment chest drains are clamped for 4 hours. 4. In pleuradesis treatment following drug instillation by doctor.
5. In some instances when removing a chest drain (see section on same).
6. Following insertion of chest drain and initial rapid drainage of pleural / chyle fluid. 7. On accidental disconnection of the chest drain,:
a) Clamp drain and reconnect new system
b) Submerge the disconnected chest drain under water
Quickly reconnecting the drainage tubes or reassembling a new system, if the previous one has been contaminated.
NB: Either of the above actions will be dependent on the child’s condition and the length of time the tube could be clamped for.
APPENDIX II
Complications of Chest Drain Removal
Complications
Signs and Symptoms
Prevention
Treatment / Intervention
Pneumothorax
Decreased oxygen saturationIncreased work of breathing Diminished breath sounds on affected side
Increased restlessness/ complains of chest discomfort (older child)
Assess for air leakage in water seal chamber before removal Clamp chest drain before removal (Thoraseal 1 only) Remove drain on expiration
If there is no purse string suture, seal the wound with an air occlusive dressing at the time of removal
Contact medical / surgical cardiothoracic team
Order chest x-ray
Possibly, reinsert chest drain, by medical team
Bleeding
(rare) Persistent bleeding from the chest drain insertion site that repeated saturates the occlusive dressingMay be unavoidable if the chest tube was against the vein or artery of chest wall before removal
Apply pressure. Place a tight occlusive dressing over the site. If bleeding persists, contact medical / surgical cardiothoracic team
Skin Necrosis
(purse string suture)Chest drain insertion site dark or inflamed, with necrotic areas visible
Avoid pulling purse string suture too tightly closed when chest drain is removed
Contact medical / surgical cardiothoracic team
Retained Chest Drain
Extreme resistance felt with chest drain removal Chest drain obviously not intact on removalStop removal efforts if extreme resistance is experienced with removal attempt Inspect all chest drain tips following removal for intactness
Immediately contact medical / surgical cardiothoracic team Surgeon may consider possible resternotomy
Infection
Inflammation, tenderness or purulent discharge at sitePyrexia
Apply sterile occlusive dressing i.e. mepore if purse string suture not in situ.
An aseptic non-touch technique (ANTT) is used with all clinical procedures. Strict handwashing.
Contact medical / surgical cardiothoracic team
Obtain wound swab if clinically indicated