How to Compile, Link, and Execute C or C++ Codes
Using Microsoft Visual C++
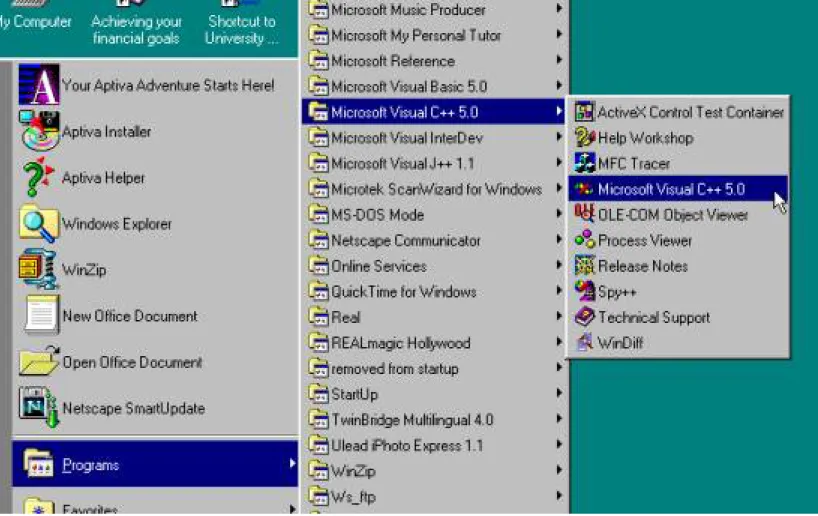
1. First, you need to click Start button, Programs, and then Microsoft Visual C++ 5.0 or 6.0 to launch MS Visual C++, shown in Figure 1.
Figure 1 Start Visual C++ program.
2. Close “Tip of the Day” message window shown in Figure 2, by clicking Close button.
Now you are in Visual C++ program, shown in Figure 3.
How to Compile, Link, and Execute C Programs Using Microsoft Visual C++
Figure 3 Visual C++ with blank project workspace.
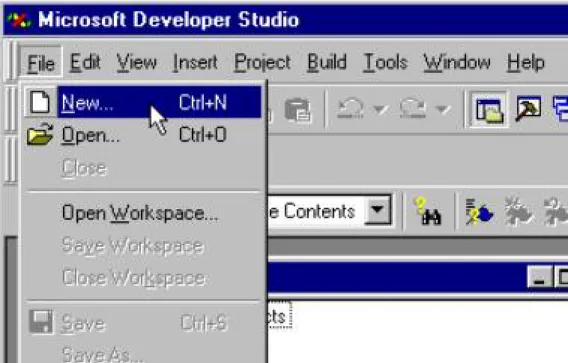
3. Click pull-down menu File, shown in Figure 4, and then New to create a new project, if
you never create before, or you want to create another project. A new window with tab menus shows up. There are five tab menus including Files, File Wizards, Projects, Workplaces, and
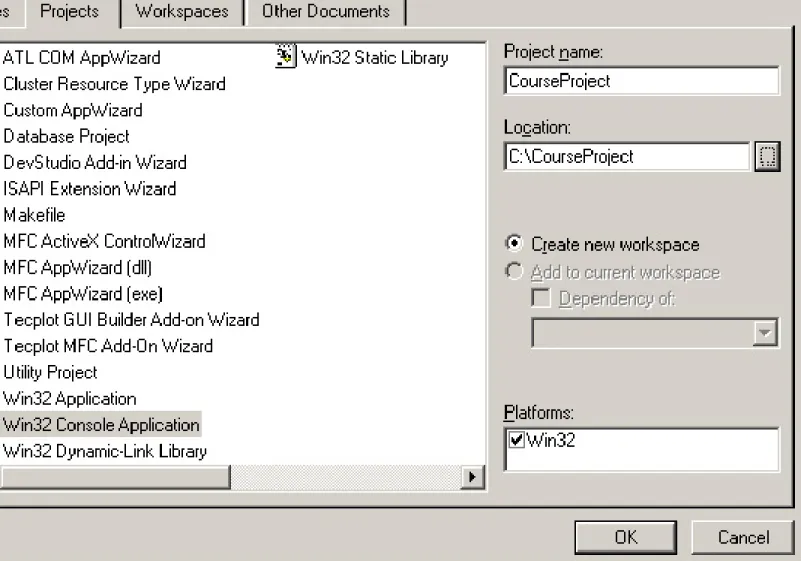
Other Documents. Make sure you go to Projects menu (Figure 5) by click tab of Projects.
Figure 4 Create new project.
How to Compile, Link, and Execute C Programs Using Microsoft Visual C++
Figure 5 Project tab menu.
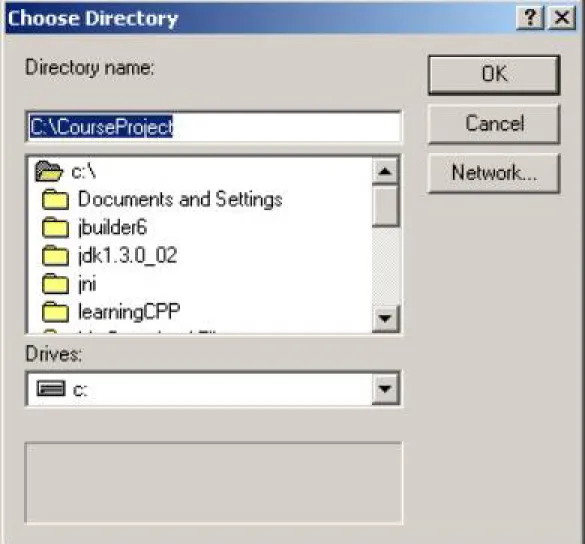
4. In Projects Menu, select Win32 Console Application; locate your disk place in which
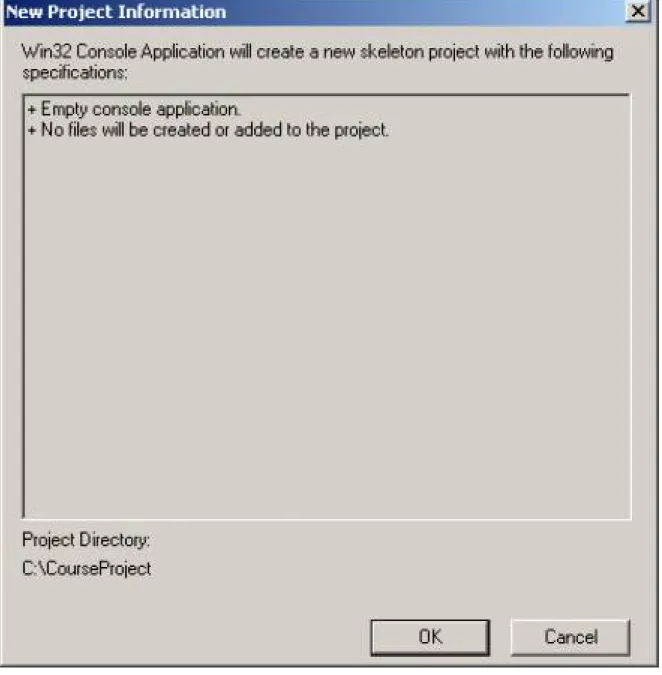
you can save your project, shown in Figure 6. Make sure input project name. For example you can type the project name as CourseProject, as displayed. Now Visual C++ automatically creates a directory or folder which has project named CourseProject. After you click OK button and click Finish button to close the Win32 Console Application Wizard window, shown in Figure 7 and OK button of New Project Information window, shown Figure 8. The project name share with the folder name, in which project file is saved. Then Visual C++
Figure 6 Locate the folder in which your new project can be saved.
How to Compile, Link, and Execute C Programs Using Microsoft Visual C++
Figure 8 New Project Information window.
How to Compile, Link, and Execute C Programs Using Microsoft Visual C++
Figure 9 Workspace with new project.
5. If you haven’t had a C/C++ code, you can use Visual C++’s text editor to type one. IF you
have a c/c++ file already save somewhere in your computer or disks, you do not need to create C/C++ file.
Now let assume you do not have the C/C++ file or you want to create a new C/C++ program. You can type your C or C++ code, you can click New Text File under the File Menu (Figure 10) to open a new editor window for you to type or edit your source code. Let’s type the following simple C or C++ code.
C code C++ code
#include<stdio.h> int main() {
printf("I am learning C now!\n"); return 0; }
#include <iostream.h> int main()
{
cout << "I am learning C++ now!\n"; return 0; }
Figure 10 Click to open text editor
How to Compile, Link, and Execute C Programs Using Microsoft Visual C++
6. After you accomplish your code type, click File, Save as to save your C or C++ source
code (Figure 11). Visual C++ will open a window for you to save. Type the name of your C or C++ source code. For example, code01.c for C code and code01.cpp for C++ code. Note: step 5 and 6 can be avoided if you already typed your source code using Notepad, Word, or other word processing editors. In other words, you can create C++ source code using any editing software. For example, you can download codes from internet or copy example codes from CD or disk associated with textbooks.
Figure 11 Save your code in your computer somewhere.
Figure 12 Save As window to save your code.
7. Even though you typed the code. It does not mean you have load the code in the project
How to Compile, Link, and Execute C Programs Using Microsoft Visual C++
you have opened. You can save your code inside the project folder. That doesn’t mean you load the code in your project. This is very important note. Now you need to add your source codes (say code01.cpp) to the project.
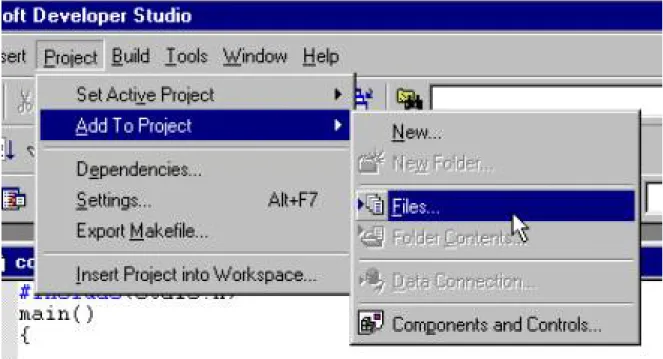
Go to pull-down menu Project, Click Adds to Project, then Files. Visual C++ will open a window called Inset Files into Project (Figure 13). Find out whether C or C++ source code has been add to your project or not. Then click OK button to insert it to the current project called code01.cpp, shown in Figure 14. You can go to Workspace window and click
FileView, then click “+” in front of CouresProject files and “+” in front of Source files, you
will find your source code, code01.c or code01.cpp. Double click code01.c or code01.cpp will open the editor window for you to modify the source code, if it has bugs.
Figure 14 Select code to be added to the project.
How to Compile, Link, and Execute C Programs Using Microsoft Visual C++
Figure 15 Open added code for editing.
8. Now it is time for you to compile, link it by clicking pull-down menu, Build, then Build Code01.exe. Or press F7 key.
Figure 15 Compiling status window.
9. If no error message reported, you can execute it, by clicking pull-down menu, Build, then Execute code01.exe (or press Ctrl+F5).
How to Compile, Link, and Execute C Programs Using Microsoft Visual C++
Figure 16 Execute code.
10. Visual C++ brings you a DOS console window in which your computational outputs are
displayed. Press any key to exit the window. You have done the job. See Figure 17.
Figure 17 Result in Win 32 console window.
12. After you accomplish your current project, make sure save the whole project by clicking File then Save ALL. Then go to File, then Close Workspace.
13. If you want to open your existing project, you go to File, then Open Workspace….Visual C++ brings you a Open Workspace window. Go to CoureProject folder and double click CourseProject.dsw.
Note: The procedure is exactly the same for C and C++ programming.